GILBARCO VEEDER-ROOT Passport PX60 User manual

MDE-5183C Passport® PX60 Express Ordering Kiosk Installation Guide · May 2018 Page 1
Introduction
Purpose This manual provides instructions for installing the Passport®PX60 Express Ordering Kiosk.
Table of Contents
Topic Page
Introduction 1
Pre/Post Installation Checklist for Express Ordering Kiosk 4
Installing Express Ordering Kiosk 6
Express Ordering Kiosk Internal Components 64
Troubleshooting 66
Required Tools
The following tools are required to install the Passport PX60 Express Ordering Kiosk:
• Flat-blade Screwdriver
• Phillips®Screwdriver
• USB QWERTY Keyboard
•USBMouse
• USB Thumb Drive - provided by Gilbarco®Veeder-Root®
Parts List The following table lists the spare parts required to install the Passport PX60 Express Ordering
Kiosk:
Item Description Part Number Quantity
1Double Data Rate (DDR) 3 Dynamic Random Access Memory (DRAM),
4 GB, 1066/1333 MHz M09219B002 1
2PX60 Motherboard with Q67 Chipset M09219B003 1
3Cable Assembly, Serial RJ-45 to DB9 15” M09747B010 3
4Hard Drive, 2.5”, Serial Advance Technology Attachment (SATA),
V32.8.06 REBUILT KS702A0022D 1
MDE-5183C
Passport®PX60 Express Ordering Kiosk
Installation Guide
May 2018

Page 2 MDE-5183C Passport® PX60 Express Ordering Kiosk Installation Guide · May 2018
Introduction
Technical Support
If you need to contact Gilbarco Technical Assistance Center (TAC), call 1-800-743-7501. To
contact Gilbarco Support Center, call 1-877-503-4971.
If you need assistance installing or configuring the kiosk software, contact Xpedient®for
technical assistance at 1-888-501-8836, or e-mail support@xpedientsoftware.com.
If you need assistance configuring and troubleshooting the Kitchen Monitor system, contact
MicroPlus Inc. at 1-919-816-9222.
Related Documents
Document
Number Title GOLDSM Library
MDE-3620 Point of Sale (POS) Systems Site Preparation Manual Site Prep
MDE-4866 Passport Firewall Router Start-up and Service Manual Passport
MDE-4954 Passport Start-up and Service Manual for the Cisco®Firewall Router (Q13708-08) Passport
MDE-4956 Honeywell®Xenon™1900 Scanner Setup/Service Instructions POS Peripheral
MDE-5083 Passport Hardware Start-up and Service Manual for PX60 Platform Passport
MDE-5187 Express Ordering Kiosk Quick Reference Poster Passport
PT-1877 Retail Automation Products Illustrated Parts Manual Parts Manual
Abbreviations and Acronyms
Term Description
AIO All-in-One
BIOS Basic Input/Output System
CAT5 Category 5
COM Communications
DDR Double Data Rate
DHCP Dynamic Host Configuration Protocol
DIP Dual Inline Package
DMZ Demilitarized Zone
DRAM Dynamic Random Access Memory
EPAD Electrically Programmable Analog Device
GOLD Gilbarco Online Documentation
HDD Hard Disk Drive
LAN Local Area Network
LED Light Emitting Diode
MWS Manager Workstation
NIC Network Interface Card
OPOS OLE for Retail POS
PLU Price Look Up
POS Point of Sale
QR Quick Response
SATA Serial Advance Technology Attachment

MDE-5183C Passport® PX60 Express Ordering Kiosk Installation Guide · May 2018 Page 3
Introduction
TAC Technical Assistance Center
TCP/IP Transmission Control Protocol/Internet Protocol
TEA Training Effectiveness Analysis
UPS Uninterruptible Power Supply
USB Universal Serial Bus
VESA Video Electronics Standards Association
VGA Video Graphics Adapter
Term Description

Page 4 MDE-5183C Passport® PX60 Express Ordering Kiosk Installation Guide · May 2018
Pre/Post Installation Checklist for Express Ordering Kiosk
Ensure that the pre-installation checklist is completed before installation
begins, preferably days before installation.
IMPORTANT INFORMATION
PRE-INSTALLATION CHECKLIST
Check
if OK Procedure Description
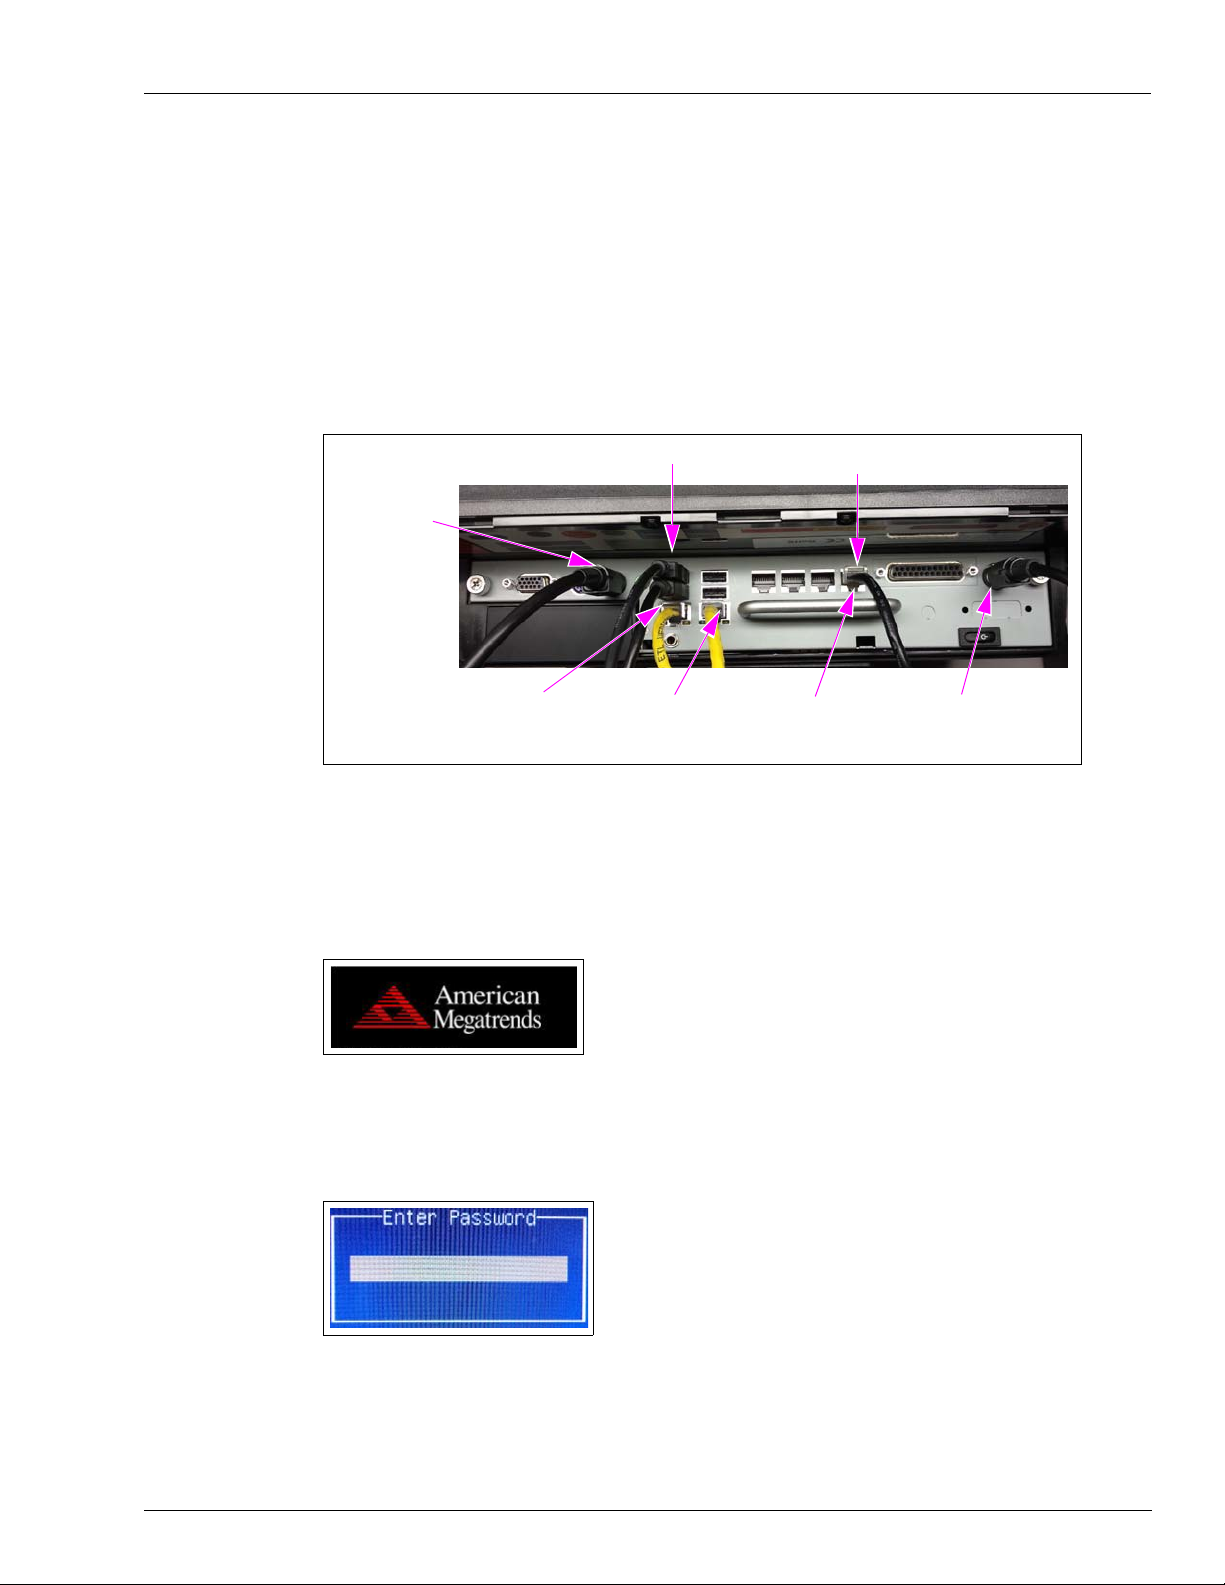
Verify the two LAN Drops/Ethernet®runs are
completed to the main kiosk location and one to each
of the others.
Main kiosk will have a dedicated Ethernet cable back to the site router
(Internet access LAN1) and to the Passport Router via the Demilitarized
Zone (DMZ) port (LAN2). All other kiosks will have one connection to the
site router (LAN1). Kitchen Monitor will require a LAN drop as well.
Obtain TCP/IP properties from site IT personnel for
proper configuration to allow access to the Internet to
LAN1.
IP Address _____._____._____._____
Subnet Mask _____._____._____._____
Default Gateway _____._____._____._____
Preferred DNS Server _____._____._____._____
Alternate DNS Server _____._____._____._____
Verify the site router has been configured to allow
remote connection from Xpedient. Site IT personnel is responsible for setting up the site router.
Verify the kiosk circuit (isolated/dedicated ground)
location is correct. Ensure space is available for
Uninterruptible Power Supply (UPS) near the
mounting location (electrical outlets).
Kiosk and kitchen hardware will be on a dedicated isolated grounding circuit
(not to be shared with any other equipment).
Refer to MDE-3620 Point of Sale (POS) Systems Site Preparation Manual.
Verify the site has broadband Internet access. Broadband is required for remote support.
Ensure space is available for the keyboard and
mouse. Keyboard and mouse are not required to stay connected to the kiosk. If they
cannot be secured out of reach of site customers, remove them and have
the site personnel keep available for future use.
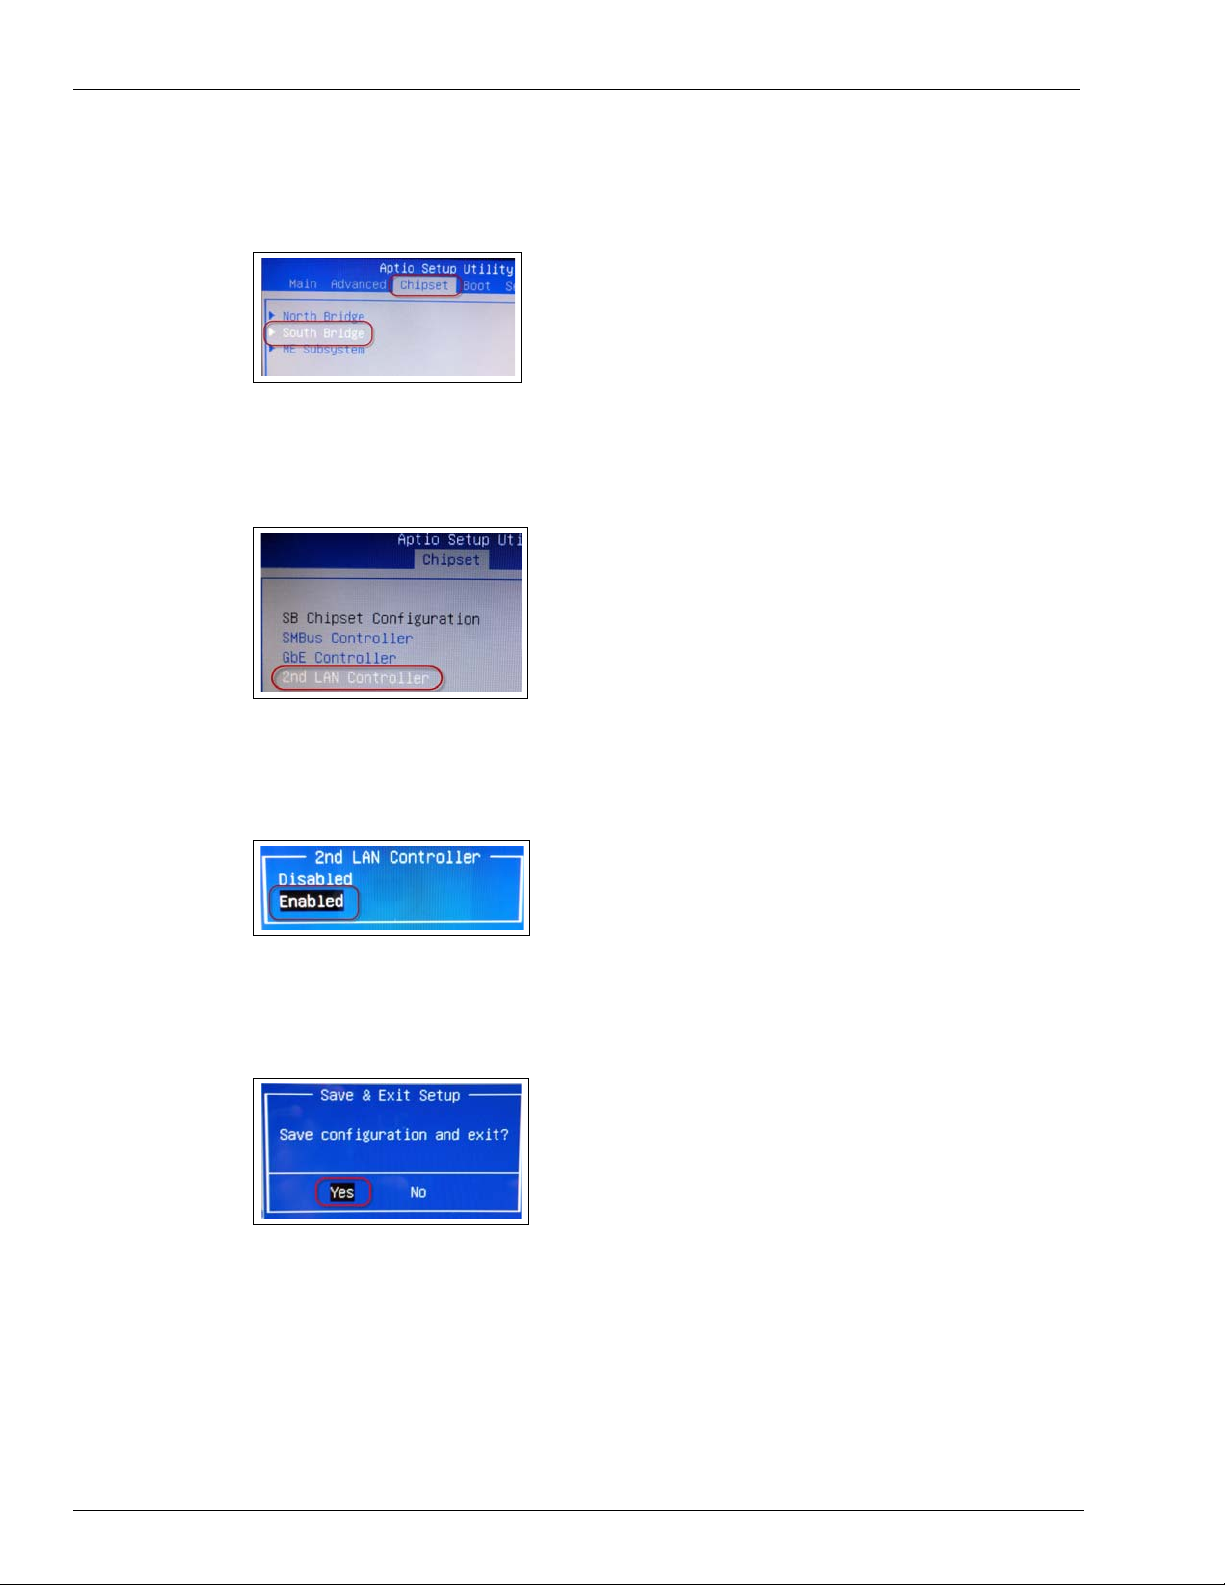
Ensure Passport is on minimum version. Passport minimum required versions:
8.02V, 8.03L, 8.05K, 8.06G, 9.0D, V10.00
V10.00L patch and later for third-party data interface functionality.
Ensure the Honeywell Xenon 1900 Scanner
(Q12651-26) has been installed. The Honeywell Xenon 1900 scanner is the only 2D scanner that has been
tested and approved by Gilbarco.
Refer to MDE-4956 Honeywell Xenon 1900 Scanner Setup/Service
Instructions.
Verify if Kitchen Monitor was ordered. If yes, ensure
proper cables are provided. Site IT personnel to provide IP address for Kitchen Monitor setup.
Refer to MDE-5187 Express Ordering Kiosk Quick Reference Installation
Poster.
Ensure the site has back office computer or other
means to provide a Price Book (Xpedient architect). This information should have been determined during the site survey.
Confirm the software suite from Xpedient is available
to install via USB drive provided by Gilbarco
Veeder-Root or remote download from Xpedient.
If Passport is on V10L (minimum), then back office is not required for
Pricebook. This is required only if kiosk was not previously set up at
Xpedient or customer lab. Kiosk should be imaged with a PC60 Passport
Client image from the factory.
Ensure that you have the latest version of Adobe®
Flash®Installer from the USB drive provided by
Gilbarco Veeder-Root.
This program is required to load Xpedient software but may have to be
downloaded to the kiosk at the time of installation. Ensure all windows are
closed prior to installing.
Obtain all equipment serial numbers and e-mail them
obtain an activation license.
This is required to be performed prior to installation of the system to ensure
that the license is available during the day of installation.

MDE-5183C Passport® PX60 Express Ordering Kiosk Installation Guide · May 2018 Page 5
Pre/Post Installation Checklist for Express Ordering Kiosk
INSTALLATION CHECKLIST
Check if OK Procedure Description
Expand the DMZ IP Range in the Passport Router
10.5.60.30-40.For proper programming, refer to MDE-4954 Passport
Start-up and Service Manual for the Cisco Firewall Router
(Q13708-08) and MDE-4866 Passport Firewall Router
Start-up and Service Manual.
Enable second Network Interface Card (NIC) card. (This only
applies to main kiosk.) Kiosk has two NIC cards, one card needs to be manually
enabled in Basic Input/Output System (BIOS). One Ethernet
connection is used for Internet access and the other one is
used for the Passport DMZ.
Connect LAN cables to LAN1 and LAN2. The LAN1 connection is required for Internet access and to
allow Xpedient to update software and provide remote
support. LAN2 connects to the Passport Router DMZ Port
(main kiosk only).
Login as Passport technician and elevate the Passport user to
admin. If this process is not completed, you will not be able to install
the software properly.
Ensure receipt number range is set up properly for each kiosk (if
necessary). Xpedient will try and make this process automated. Kiosk 1 is typically set to 1-200.
Kiosk 2 is typically set to 201-400, etc.
All kiosks are defaulted to 1-200.
Ensure all kiosk printers are named LOCAL (all capitalized
letters). The Xpedient software is hard-coded to look for printer
named LOCAL when sending receipt information.
Ensure printer Dual Inline Package (DIP) switch settings are
completed. TM-T88V settings (9600, 8, none, 1, DTR/DSR).
All switches are off except DSW1 #7=on.
To check settings, hold Feed button while powering on,
receipt will print with DIP switch settings.
POST INSTALLATION CHECKLIST
Check if OK Procedure Description
Create order from each kiosk and verify scan code. This should be performed on each Passport console to
ensure proper functionality.
Verify kiosk configuration with the store manager. Follow Xpedient’s directions (call Xpedient for any
questions at 1-888-501-8836).
Scan Quick Response (QR) Code and test Passport
functionality. Ensure Passport is processing QR codes properly and
check that items on the Passport receipt match items on the
kiosk receipt.
Complete the Training Effectiveness Analysis (TEA)
interview. A Gilbarco associate will ask a series of questions on the
installation, training, and documentation provided. Provide
an honest feedback.
Show the site personnel how to enter receipt information
manually if the scanner or QR codes are not working. Customer will need to manually enter items in Passport
(process may be customer specific).
Verify the virtual keyboard is functional. -
Verify remote connectivity with Gilbarco and Xpedient. Call Gilbarco TAC at 1-800-743-7501 or Gilbarco Help Desk
at 1-877-503-4971, and Xpedient at 1-888-501-8836 to
confirm remote access is functioning.
Ping test all kiosks with each other and with back
office/corporate computer. -

Page 6 MDE-5183C Passport® PX60 Express Ordering Kiosk Installation Guide · May 2018
Installing Express Ordering Kiosk
To install the Express Ordering Kiosk, proceed as follows:
1Ensure that the pre-installation checklist has been completed.
Note: This must be done to complete many of the following steps.
2Unpack the system components.
3Set the DIP switch settings on all printers (default setting may not work).
The following table shows the DIP switch settings for Epson®printers:
DIP Switch Description Settings
TM T881V DSW 1 and 2 All Off
OLE for Retail POS
(OPOS) Settings 19200, 8N1 with Flow Control
TM T88V DSW 1 All Off Except #7
DSW 2 All Off
OPOS Settings 9600, 8N1 DTR/DSR
Note: Epson printers for Passport are shipped with different DIP switch settings than
described in the table. Ensure that you configure the DIP switches to match the settings
in the table.
Connecting the Kiosk
To connect the kiosk, proceed as follows:
1Connect the 9-pin barrel connector of the AC power cable from the power brick located under
the kiosk pedestal.
2Connect the printer power cables.
3Connect the two LAN cables via dual NIC card.
a Connect LAN 1 cable labeled “Router” to access the store/corporate network for Internet
access and Xpedient remote support.
b Connect LAN 2 cable labeled “N/A” configured for DMZ on Passport Router on the main
kiosk only.

MDE-5183C Passport® PX60 Express Ordering Kiosk Installation Guide · May 2018 Page 7
Installing Express Ordering Kiosk
4Connect the printer communication cable.
To connect the printer communication cable from the kiosk to the printer without the dongle:
• Red: M11247B050 connected to printer.
• Connect the CAT5 cable to COM port 5 on the kiosk.
After the setup is complete, USB keyboard and mouse (temporarily installed) can be removed
and retained for reuse.
Figure 1: Connections
Printer Power
LAN2 DMZ Connection to
Passport Secure Router
(Main Kiosk ONLY)
LAN1
Store/Corporate
Connection
Keyboard and Mouse
Printer Kiosk Power
Connection
Printer Data
5Apply power to the unit and enter BIOS setup. (Turn on secondary NIC for KIOSK001.)
a When the logo shown in Figure 2 is displayed, press Delete on keyboard to enter BIOS.
Figure 2: Logo Display
b Once prompted, enter the BIOS password PASSASC.
Figure 3: Entering BIOS Password

Page 8 MDE-5183C Passport® PX60 Express Ordering Kiosk Installation Guide · May 2018
Installing Express Ordering Kiosk
c Select Chipset > South Bridge.
Figure 4: Navigating to South Bridge
d Select 2nd LAN Controller.
Figure 5: Navigating to 2nd LAN Controller
e Select Enabled, then press Enter.
Figure 6: Enabling 2nd LAN Controller
f Press F4 on the keyboard. The dialog box shown in Figure 7 opens.
Figure 7: Saving Configuration
g Select Yes and press Enter.

MDE-5183C Passport® PX60 Express Ordering Kiosk Installation Guide · May 2018 Page 9
Installing Express Ordering Kiosk
6Once the unit loads and the dialog box shown in Figure 8 opens, rename the computer from the
Standard Client Image convention.
a Name kiosks based on the standard naming convention (KIOSK001, KIOSK002,
KIOSK003), and then click OK.
Note: You cannot name the kiosks the same system name or you will have issues with Kitchen
Monitor printing.
Figure 8: Naming Kiosks
b When the dialog box shown in Figure 9 opens, select Yes. The unit will reboot.
Figure 9: Confirming Kiosk Name
Note: Prior to selecting Yes, record the requirement in step 7a.
7Once the system has booted, log in as Passport technician and elevate the Passport user to
Admin.
a When the Windows®logo displays, hold the left Shift key until the login screen opens.
b On the Login screen, enter the following credentials:
• Username: passporttech
• Password: 911Tech

Page 10 MDE-5183C Passport® PX60 Express Ordering Kiosk Installation Guide · May 2018
Installing Express Ordering Kiosk
c Select Start > Control Panel > User Accounts.
Figure 10: Selecting User Accounts
d Select Manage another account.
Figure 11: Selecting Manage Another Account
e Select Passport.
Figure 12: Selecting Passport Account

MDE-5183C Passport® PX60 Express Ordering Kiosk Installation Guide · May 2018 Page 11
Installing Express Ordering Kiosk
f Select Change the account type.
Figure 13: Changing Account Type
g Select Administrator > Change Account Type and exit.
Figure 14: Selecting Administrator Login
h Close the User Accounts window, and reboot the system to start as Passport.

Page 12 MDE-5183C Passport® PX60 Express Ordering Kiosk Installation Guide · May 2018
Installing Express Ordering Kiosk
8Configure LAN1 network adapter settings.
To configure LAN1 adapter, proceed as follows:
a Select Start > Control Panel > Network and Sharing Center.
Figure 15: Selecting Network and Sharing Center
b Select Change Adapter Settings.
Figure 16: Changing Adapter Settings
c Right-click Local Area Connection on the upper-left and select Properties.
Figure 17: LAN1 Adapter Properties

MDE-5183C Passport® PX60 Express Ordering Kiosk Installation Guide · May 2018 Page 13
Installing Express Ordering Kiosk
d Select Internet Protocol Version 4 > Properties.
Figure 18: Configuring LAN1 Adapter
e Enter the supplied IP address information and select OK. (This should have been obtained
from the site IT personnel and recorded on the pre-installation checklist.)
Figure 19: Entering IP Address for LAN1

Page 14 MDE-5183C Passport® PX60 Express Ordering Kiosk Installation Guide · May 2018
Installing Express Ordering Kiosk
9Configure LAN2 network adapter settings.
To configure LAN2 adapter, proceed as follows:
a Right-click the LocalArea Connection 4 on the upper-right and select Properties.
Figure 20: LAN2 Adapter Properties
b Select Internet Protocol Version 4 [TCP/IPv4] > Properties.
Figure 21: Configuring LAN2 Adapter

MDE-5183C Passport® PX60 Express Ordering Kiosk Installation Guide · May 2018 Page 15
Installing Express Ordering Kiosk
c Enter the appropriate IP address information from the following table for the kiosk being
installed and select OK.
Figure 22: Entering IP Address for LAN2
d Close all open windows.
10 Copy files from USB.
a Insert a USB storage device (provided in the installation kit) into an available USB port on
kiosk to access the required Xpedient software.
b Select the Windows Explorer icon from the task bar.
Figure 23: Starting Windows Explorer
Kiosk Unit IP Address Subnet Mask Default Gateway
Kiosk001 10.5.60.31
255.255.255.0 10.5.60.14
Kiosk002 10.5.60.32
Kiosk003 10.5.60.33
Kiosk004 10.5.60.34
Kiosk005 10.5.60.35

Page 16 MDE-5183C Passport® PX60 Express Ordering Kiosk Installation Guide · May 2018
Installing Express Ordering Kiosk
c Select C:\ > File > New > Folder.
Figure 24: Creating New Folder
d Name this folder Xpedient.
Figure 25: Naming Folder to Xpedient
e From the left plane, select Removable Disk (D:).
Figure 26: Selecting Removable Disk Drive
f From the toolbar, select Edit > Select all.
Figure 27: Edit Shortcut Menu

MDE-5183C Passport® PX60 Express Ordering Kiosk Installation Guide · May 2018 Page 17
Installing Express Ordering Kiosk
g Select all items on the USB drive as shown in Figure 28.
Figure 28: Selecting USB Drive Files
h From the toolbar, select Edit > Copy to folder.
Figure 29: Selecting Copy to Folder in Menu
i Select the C:\ Xpendient folder and click Copy.
Figure 30: Copying to Xpedient Folder

Page 18 MDE-5183C Passport® PX60 Express Ordering Kiosk Installation Guide · May 2018
Installing Express Ordering Kiosk
Figure 31 opens indicating the files are being copied.
Figure 31: Copying Files
Once all the files are copied, remove the USB storage device from the system.
11 Install Adobe Flash.
To installAdobe Flash, proceed as follows:
a Select Start > Windows Explorer > C: > Xpedient > Flash Player 14.
b Double-click flashplayer14_0r0_176_winax.msi.
Figure 32: Executing Adobe Flash Player
c Click Install.
Figure 33: Installing Adobe Flash Player

MDE-5183C Passport® PX60 Express Ordering Kiosk Installation Guide · May 2018 Page 19
Installing Express Ordering Kiosk
d Click Finish.
Figure 34: Completing Installation of Adobe Flash Player
12 Install TeamViewer (remote support software for Gilbarco Support).
To install TeamViewer, proceed as follows:
a Select Start > Windows Explorer > C: > Xpedient > TeamViewer Host.
b Double-click Teamviewer_Host_Setup.exe.
Figure 35: Executing TeamViewer
c Click Next.
Figure 36: TeamViewer Installation Welcome Screen

Page 20 MDE-5183C Passport® PX60 Express Ordering Kiosk Installation Guide · May 2018
Installing Express Ordering Kiosk
d Select Both of the above, and then click Next.
Figure 37: Selecting TeamViewer Environment
e Agree to the terms and click Next.
Figure 38: Accepting License Agreement Terms
f Click Next.
Figure 39: TeamViewer Setup Wizard Screen
Table of contents