Girard Products GMW09AB User manual

0.9 CU.FT. BUILT-IN MICROWAVE OVEN
GMW09AB/2022071764
USER MANUAL
* Product picture for reference only

CCD-0006006 Rev: 09-22-22 - 1 -
Thank you for purchasing this Girard product. Before operating your new product, please read
these instructions carefully. This user manual contains information for safe use, installation and
maintenance of the product.
Please keep this user manual in a safe place for future reference. This will ensure safe use and
reduce the risk of injury. Be sure to pass on this manual to new owners of this product.
The manufacturer does not accept responsibility for any damages due to not observing these
instructions.
CONTENTS
IMPORTANT SAFETY INSTRUCTIONS ...........................................................................................2
General Safety Instructions.......................................................................................................2
Grounding Instructions..............................................................................................................4
Electrical Requirements............................................................................................................4
Radio or TV Interference ...........................................................................................................4
California Residents Only..........................................................................................................4
PRODUCT OVERVIEW....................................................................................................................5
Product Features ......................................................................................................................5
Control Panel............................................................................................................................6
INSTALLATION ..............................................................................................................................7
What’s in the Box .....................................................................................................................7
Before Installation ....................................................................................................................7
Microwave Oven Installation.....................................................................................................7
Electrical Connection................................................................................................................9
QUICK COOK PROGRAMS .............................................................................................................9
OPERATION.................................................................................................................................10
COOKING TECHNIQUES...............................................................................................................13
UTENSILS GUIDE.........................................................................................................................13
CLEANING AND CARE.................................................................................................................14
TROUBLESHOOTING....................................................................................................................15
SPECIFICATION...........................................................................................................................16

CCD-0006006 Rev: 09-22-22
- 2 -
IMPORTANT SAFETY INSTRUCTIONS
PRECAUTIONS TO AVOID POSSIBLE EXPOSURE
TO EXCESSIVE MICROWAVE ENERGY
1. Do not attempt to operate this oven with the door open since open door operation can result in
harmful exposure to microwave energy. It is important not to defeat or tamper with the safety
interlocks.
2. Do not place any object between the oven front face and the door or allow soil or cleaner
residue to accumulate on sealing surfaces.
3. Do not operate the oven if it is damaged. It is particularly important that the oven door closes
properly and that there is no damage to the:
a. DOOR (bent)
b. HINGES AND LATCHES (broken or loosened)
c. DOOR SEALS AND SEALING SURFACES
4. The oven should not be adjusted or repaired by anyone except properly qualified service
person.
General Safety Instructions
WARNING - When using electrical appliances basic safety precautions should be followed,
including the following. To reduce the risk of burns, electric shock, fire, injury to persons or
exposure to excessive microwave energy.
1. Read all instructions before using the appliance.
2. Read and follow the specific: “PRECAUTIONS TO AVOID POSSIBLE EXPOSURE TO EXCESSIVE
MICROWAVE ENERGY”.
3. This appliance must be grounded. Connect only to properly grounded outlet. See
“GROUNDING INSTRUCTIONS” section.
4. Install or locate this appliance only in accordance with the provided installation instructions.
5. HOT CONTENTS CAN CAUSE SEVERE BURNS. DO NOT ALLOW CHILDREN TO USE THE
MICROWAVE. Use caution when removing hot items.
6. When cleaning surfaces of door and oven that comes together on closing the door, use only
mild, nonabrasive soaps, or detergent applied with a sponge or soft cloth.
7. Keep cord away from heated surface.
8. Liquids, such as water, coffee, or tea are able to overheat beyond the boiling point without
appearing to be boiling. Visible bubbling or boiling when the container is removed from the
microwave oven is not always present. THIS COULD RESULT IN VERY HOT LIQUID SUDDENLY
BOILING OVER WHEN THE CONTAINER IS DISTURBED OR A UTENSIL IS INSERTED INTO THE
LIQUID. To reduce the risk of injury to persons:
a. Do not overheat the liquid.
b. Stir the liquid both before and halfway through heating it.
c. Do not use straight-sided containers with narrow necks.
d. After heating, allow the container to stand in the microwave oven for a short time before
removing the container.

CCD-0006006 Rev: 09-22-22 - 3 -
e. Use extreme care when inserting a spoon or other utensil into the container.
9. This appliance should be serviced only by qualified service personnel. Contact nearest
authorized service facility for examination, repair, or adjustment.
10. To reduce the risk of fire in the oven cavity:
a. Do not overcook food. Carefully attend appliance when paper, plastic, or other
combustible materials are placed inside the oven to facilitate cooking.
b. Remove wire twist-ties from paper or plastic bag before placing bag in oven.
c. If material inside of the oven ignite, keep oven door closed, turn oven off, and disconnect
the power cord, or shut off power at the fuse or circuit breaker panel.
d. Do not use the cavity for storage purposes. Do not leave paper products, cooking utensils,
or food in the cavity when not in use.
11. Some products such as whole eggs and sealed containers, for example, closed glass jars are
able to explode and should not be heated in this oven.
12. Do not cover or block any openings on the appliance.
13. Do not store this appliance outdoors. Do not use this product near water - for example, near a
kitchen sink, in a wet basement, near a swimming pool, or similar location.
14. Use this appliance only for its intended use as described in the manual. Do not use corrosive
chemicals or vapors in this appliance. This type of oven is specially designed to heat, cook or
dry food. It is not designed for industrial or laboratory use.
15. Do not operate this appliance if it has a damaged cord or plug, if it is not working properly, or
if it has been damaged or dropped.
16. Do not immerse cord or plug in water or any other liquid.
17. Do not let cord hang over edge of table or counter.
18. Do not operate any heating or cooking appliance beneath the appliance.
(Exception: A microwave oven investigated for use above another heating appliance.)
19. Do not mount unit over or near any portion of heating or cooking appliance.
(Exception: A microwave oven investigated for use above another heating appliance.)
20. Do not mount over sink.
21. Do not store anything directly on top of the appliance surface when the appliance is in
operation.
SAVE THESE INSTRUCTIONS
HOUSEHOLD USE ONLY (NOT FOR COMMERCIAL
USE)

CCD-0006006 Rev: 09-22-22
- 4 -
CAUTION
●NOTICE: PACEMAKERS - Most pacemakers are shielded from interference from electronic
products, including microwaves. However, patients with pacemakers may wish to consult
their physicians if they have concerns.
●Changes or modifications not expressly approved by the party responsible for compliance
could void the user's authority to operate the product.
Grounding Instructions
This appliance must be grounded. In the event of an electrical short circuit, grounding reduces risk
of electric shock by providing an escape wire for the electric current.
WARNING - Improper use of the grounding plug can result in a risk of electric shock.
Consult a qualified electrician or serviceman if the grounding instructions are not completely
understood, or if doubt exists as to whether the appliance is properly grounded, and either:
If it is necessary to use an extension cord, use only a 3-wire extension cord that has a 3-blade
grounding plug and a 3-slot receptacle that will accept the plug on the appliance. The marked
rating of the extension cord shall be equal to or greater than the electrical rating of the appliance.
Electrical Requirements
The electrical requirements are a 120 volt, 60 Hz, AC only, 15 amp or 20 amp dedicated circuit. It
is recommended that a separate circuit serving only the oven be provided. The oven is equipped
with a 3-prong grounding plug. It must be plugged into a wall receptacle that is properly installed
and grounded.
Radio or TV Interference
Should there be any interference caused by the microwave oven to your radio or TV, check that
the microwave oven is on a different circuit, relocate the radio or TV as far away from the oven as
feasible or check position and signal of receiving antenna.
California Residents Only
WARNING
This product can expose you to chemicals such as Di (2-ethylhexyl) phthalate (DEHP), which is
known to the State of California to cause cancer and birth defects or other reproductive harm.
For more information go to www.P65Warnings.ca.gov
This device complies with part 18 of the
FCC Rules.
SAVE THESE INSTRUCTIONS

CCD-0006006 Rev: 09-22-22 - 5 -
PRODUCT OVERVIEW
Product Features
2
1
3 4
7
5
6
8
Item Description
1Door Safety Lock System
2Oven Window
3Roller Ring
4Shaft
5Glass Tray
6Door Release Button
7Control Panel
8Wave Guide (Do not remove the mica plate covering the wave guide)

CCD-0006006 Rev: 09-22-22
- 6 -
Control Panel
DISPLAY
Cooking time, power, indicators and present
time are displayed.
TIME COOK
Cook with the setting you programmed.
TIME DEFROST
Defrost by the time you input.
WEIGHT DEFROST
Defrost by the weight you input.
POWER
Set the cooking power or check power level
during cooking.
CLOCK
Set the time of day.
KICTHEN TIMER
Set a timer to cook.
QUICK COOK BUTTONS
Instant settings to cook popular foods
EXPRESS COOK (1-6)
Press numbers 1 through 6 to quickly select
a time cooked setting from 1 to 6 minutes.
NUMBER BUTTONS (0-9)
Set the time, power or weight
STOP/CANCEL
Stop/cancel a setting.
0/MEMORY
Set and memory a program.
START/+30 SEC
Press to start cooking. During the cooking
process, press to increase the cooking time.

CCD-0006006 Rev: 09-22-22 - 7 -
INSTALLATION
What’s in the Box
Make sure all the following items are included
in the packaging. If any item is damaged or
missing, contact your dealer.
●Microwave oven body x 1
●Glass tray x 1
●Glass tray roller ring x 1
●User manual x 1
●Warranty manual x 1
Before Installation
1. Make sure that all the packing materials
are removed from the oven cavity.
2. Check the oven for any damage, such as
misaligned or bent door, damaged door
seals and sealing surface, broken or loose
door hinges and latches and dents inside
the cavity or on the door. If there is any
damage, do not operate the oven and
contact qualified service personnel.
3. This microwave oven must be placed on a
flat, stable surface to hold its weight and
the heaviest food likely to be cooked in
the oven.
4. Do not place the oven where heat,
moisture, or high humidity are generated,
or near combustible materials.
5. The oven must have sufficient airflow. Do
not cover or block any openings on the
oven. Do not remove feet on which oven
stands.
6. Do not operate the oven without glass
tray, roller support, and shaft in their
proper positions.
7. Make sure that the power supply cord is
good in condition and does not run under
the oven or over any hot or sharp surface.
8. The electrical plug or the circuit breaker
must be accessible so that it can be easily
unplugged in an emergency.
Microwave Oven Installation
WARNING
For built-in installations, you have to use
the upper and bottom ducts provided with
trim kit FMSN09A-BL-TK/FMSN09A-SS-TK.
Failure to comply would lead to overheating
of the device.
Cabinet Preparation
1. Select a suitable place that is not
susceptible to moisture.
2. Mark and cutout an opening in the cabinet
according to the dimensions outlined in
the table.
A
B
C
A 133/8" (340mm) Min.
B 20" (510mm) Min.
C 141/8" (359mm) Min.

CCD-0006006 Rev: 09-22-22
- 8 -
Bottom Duct Installation (sold
together with FMSN09A-BL-TK or
FMSN09-SS-TK trimkit))
1. Mark out the cabinet center line as shown
in the figure below.
Cabinet center line
2. Locate the bottom duct into the cabinet
opening. Ensure the duct bottom is center
aligned to the cabinet center line. Fix the
bottom duct with four M4 x 3/8" self-
tapping screws.
Bottom duct and cabinet
are aligned as shown.
Trim Kit Installation
(FMSN09A-BL-TK/FMSN09A-SS-TK,
not included)
1. Remove the trim kit from the packaging.
Check to make sure it is not damaged.
2. Fit the trim kit over the oven front panel
and fix with four M4 x 5/8" self-tapping
screws on side.
Upper Duct Installation (sold together
with FMSN09A-BL-TK or FMSN09-
SS-TK trimkit))
Install the upper duct on the top of the oven
and fix it with four M4 x 5/8" self-tapping
screws.

CCD-0006006 Rev: 09-22-22 - 9 -
Oven Installation
Slide the microwave oven into the cabinet
opening and fix it to the cabinet with four M4 x
3/8" self-tapping screws.
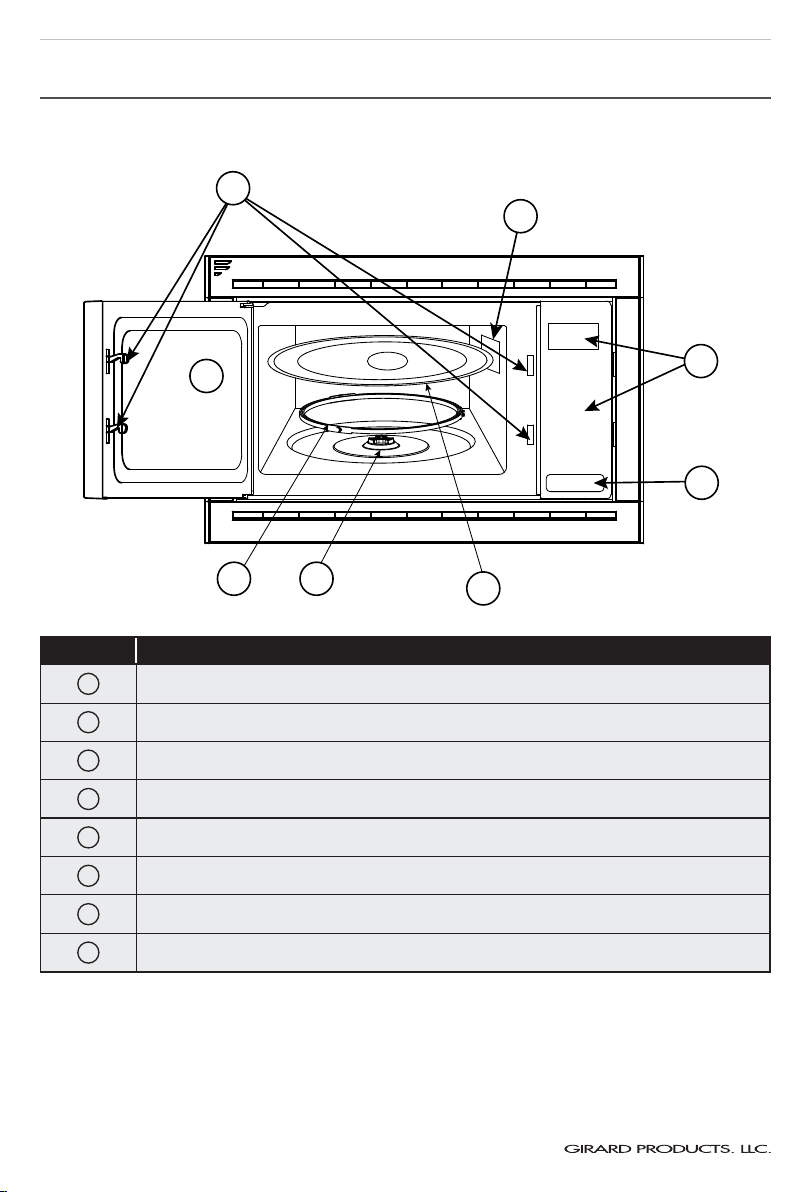
Turntable Installation
Glass Tray
Hub (underside)
Turntable ring assy.
Turntable shaft
●Never place the glass tray upside down.
The glass tray should never be restricted.
●Both the glass tray and turntable ring
assembly must always be used during
cooking.
●All food and containers of food are always
be placed on the glass tray for cooking.
●If glass tray or turntable ring assembly
cracks or breaks, contact your nearest
authorized service center.
Electrical Connection
Connect the microwave oven to a 120 volt,
60 Hz, AC only, 15 amp or 20 amp dedicated
circuit. It is recommended that an individual
circuit serving only the microwave oven be
provided.
QUICK COOK PROGRAMS
The Quick Cook programs allow you to cook
or reheat food automatically without selecting
power level and time.
POPCORN
1. Press “POPCORN” repeatedly, the number
“1.75”, “3.0”, “3.5” will be displayed in
order.
2. Once the number you desired is displayed,
press “START/+30 SEC” to start cooking,
the buzzer will sound once.
3. When the cooking is finished, the buzzer
will sound five times then return to
standby mode.
NOTE: The number indicates the weight of
food.
POTATO
1. Press “POTATO” repeatedly, the number
“1”, “2”, “3” will be displayed in order.
2. Once the number you desired is displayed,
press “START/+30 SEC” to start cooking,
the buzzer will sound once.
3. When the cooking is finished, the buzzer
will sound five times then return to
standby mode.
NOTE: The number displayed indicates the
number of potatoes. Approximate weight of a
single potato is 8 oz.
PIZZA
1. Press “PIZZA” repeatedly, the number
“4.0”, “8.0”, “14.0” will be displayed in
order.
2. Once the number you desired is displayed,
press “START/+30 SEC” to start cooking,

CCD-0006006 Rev: 09-22-22
- 10 -
the buzzer will sound once.
3. When the cooking is finished, the buzzer
will sound five times then return to
standby mode.
NOTE: The number indicates the weight of
food in oz.
FROZEN VEGETABLE
1. Press “FROZEN VEGETABLE” repeatedly,
the number “4.0”, “8.0”, “16.0” will be
displayed in order.
2. Once the number you desired is displayed,
press “START/+30 SEC” to start cooking,
the buzzer will sound once.
3. When the cooking is finished, the buzzer
will sound five times then return to
standby mode.
NOTE: The number indicates the weight of
food in oz.
BEVERAGE
1. Press “BEVERAGE” repeatedly, the number
“1”, “2”, “3” will be displayed in order.
2. Once the number you desired is displayed,
press “START/+30 SEC” to start cooking,
the buzzer will sound once.
3. When the cooking is finished, the buzzer
will sound five times then return to
standby mode.
NOTE: The number indicates the cup of
beverage, one cup is about 120ml.
DINNER PLATE
1. Press “DINNER PLATE” repeatedly, the
number “9.0”, “12.0”, “18.0” will be
displayed in order.
2. Once the number you desired is displayed,
press “START/+30 SEC” to start cooking,
the buzzer will sound once.
3. When the cooking is finished, the buzzer
will sound five times then return to
standby mode.
NOTE: The number indicates the weight of
food in oz.
OPERATION
POWER LEVEL
There are 11 power levels available to select:
Number
button
Power
Level
Cooking
Power
Screen
Display
1,0 10 100% PL10
9 9 90% PL9
8 8 80% PL8
7 7 70% PL7
6 6 60% PL6
5 5 50% PL5
4 4 40% PL4
3 3 30% PL3
2 2 20% PL2
1 1 10% PL1
0 0 0% PL0
CLOCK SETTING
1. Press “CLOCK “once, the “00:00” will be
displayed.
2. Use the number buttons to enter the
current time. For example, the time is
12:10 now, press “1, 2, 1, 0” buttons
accordingly.
NOTE: It is a 12-hour clock system, the
clock range allowed to be set is 1:00--
12:59.
3. Press “CLOCK” to finish the clock setting.
4. Repeat steps 1 to 3 to reset the clock if
you want to reset it.
NOTE: In the process of clock setting, if the
“STOP/CANCEL” button is pressed or if there
is no operation within 1 minute, the oven will
return to the previous setting automatically.

CCD-0006006 Rev: 09-22-22 - 11 -
KITCHEN TIMER
1. Press “KITCHEN TIMER” once, the “00:00”
will be displayed.
2. Use the number buttons to set the timer.
The maximum timer allowed to set is 99
minutes and 99 seconds.
3. Press “START/+30SEC.” to confirm the
setting.
4. When the timing is finished, the buzzer
will sound five times, then return to the
clock displaying.
NOTE: You are not allowed to change the
program setting during the timing process.
TIME COOK
1. Press “TIME COOK” once, the screen will
display “00:00”.
2. Use the number buttons to input the
cooking time. The maximum cooking time
is 99 minutes and 99 seconds.
3. Press “POWER” once, the screen will
display “PL10”. Press the number button
to adjust the power level.
NOTE: The default power is 100% power.
4. Press “START/+30SEC.” to start cooking.
The remaining cooking time is displayed
and start counting down.
For example, if you want to cook the food with
50% microwave power for 15 minutes.
1. Press “TIME COOK” once.
2. Press “1”, “5”, “0”, “0” in order.
3. Press “POWER” once, then press “5” to
select 50% cooking power.
4. Press “START/+30SEC.” to start cooking.
NOTES:
●In the process of setting, if the “STOP/
CANCEL” button is pressed or if there
is no operation within 1 minute, the
oven will return to the previous setting
automatically.
●If the “PL0” power level is selected, the
oven will work with fan mode only.
NOTE: You can use the “PL0” level to
remove the odor of the oven.
●During the cooking process, you are
allowed to change the cooking power by
pressing the “POWER” button. Once the
“POWER” button is pressed, the current
power will flash for 3 seconds, then you
can press the number button to change
the power.
EXPRESS COOKING
●In standby mode, press the number
buttons 1 to 6 to select 1 to 6 minutes of
cooking at instantly 100% power level.
Press “START/+30SEC.” to increase the
cooking time during the cooking process,
each press will increase cooking time by
30 seconds. The maximum cooking time
is 99 minutes and 99 seconds.
●In standby mode, press “START/+30SEC”
to start 30 seconds of cooking at instantly
100% power level. During microwave
cooking and time defrost ,time can be
added by pressing “START/+30EC”button
The maximum cooking time is 99 minutes
and 99 seconds.
WEIGHT DEFROST
1. Press “WEIGHT DEFROST” once, the
screen will display “dEF1”.
2. Use the number buttons to input the food
weight to be defrosted. The valid weight
range is 4~100 Oz.
3. Press “START/+30SEC.” to start
defrosting. The defrosting time will be
displayed and start counting down.
TIME DEFROST
1. Press “TIME DEFROST” once, the screen
will display “dEF2”.
2. Use the number buttons to input the
defrosting time. The valid time range is
0:01~99:99.
3. Press “START/+30SEC.” to start
defrosting. The defrosting time will be
displayed and start counting down.
NOTE: The default defrosting power is level 3.

CCD-0006006 Rev: 09-22-22
- 12 -
If you want to change the power level, press
“POWER” once, then press the number button
to choose a desired defrosting power level.
MEMORY FUNCTION
If a program has been memorized in the
system.
1. Press “0/MEMORY” repeatedly, the
number “1”, “2”, “3” will be displayed in
order.
2. Once the number where the program to
be saved is displayed, press “START/+30
SEC” to start cooking by using the saved
program.
For example, to set a new program of “To
cook the food with 80% microwave power for
3 minutes and 20 seconds.” as the second
memory, the steps are as follows:
1. In standby mode, press “0/MEMORY”
twice, the number “2” will be displayed.
2. Press “TIME COOK” once, then press “3”,
“2”, “0” in order.
3. Press “POWER” once, the screen will
display “PL10”. Press “8” to change the
power level to “PL8”.
NOTE: The default power is 100% power.
4. Press “START/ +30 SEC” once to save the
program. The buzzer will sound once and
the screen displays “2”.
NOTE: The memory will not be cleared unless
the power is cut off. Or you need to reset the
program.
MULTI-STAGE COOKING
At most 2 multi-stage programs can be set for
cooking.
For example, if you want to cook with 80%
microwave power for 5 minutes and 60%
microwave power for 10 minutes. The cooking
program can be set as follows:
1. Press “TIME COOK” once, then press “5”,
“0”, “0” to set the cooking time.
2. Press “POWER” once, then press “8” to
select 80% microwave power.
3. Press “TIME COOK” once, then press “1”,
“0”, “0”, “0” to set the cooking time.
4. Press “POWER” once, then press “6” to
select 60% microwave power.
5. Press “START/ +30 SEC” to start cooking.
NOTE: If the defrosting stage is included in
multi-stage cooking, the defrosting will be
set as the first stage automatically. The auto
cooking function is unusable during multi-
stage cooking.
CHILD LOCK
The child lock function prevents unsupervised
operation by children.
To lock: In standby mode, press and hold
“STOP/CANCEL” for 3 seconds, a long “beep”
will be heard indicating the oven has entered
into the lock mode, the screen displays “
”.
To unlock: Press and hold “STOP/CANCEL” for
3 seconds, a long “beep” indicating the oven is
unlocked, the “ ” disappeared from the
screen.
INQUIRING FUNCTION
●In cooking mode, press “CLOCK”, the
clock will be displayed for 3 seconds and
then disappeared.
●In cooking mode, press “POWER” the
current power level will be displayed for 3
seconds and then disappeared.
COOKING END REMINDING
When the cooking is finished, the buzzer will
beep 5 times to alert the user the cooking is
finished.

CCD-0006006 Rev: 09-22-22 - 13 -
COOKING TECHNIQUES
Your microwave makes cooking easier than
conventional cooking, provided you keep these
considerations in mind:
STIRRING
Stir foods such as casseroles and vegetables
while cooking to distribute heat evenly. Food
at the outside of the dish absorbs more energy
and heats more quickly, so stir from the
outside to the center. The oven will turn off
when you open the door to stir your food.
ARRANGEMENT
Arrange unevenly shaped foods, such as
chicken pieces or chops, with the thicker,
meatier parts toward the outside of the
turntable where they receive more microwave
energy. To prevent overcooking, place delicate
areas, such as asparagus tips, toward the
center of the turntable.
SHIELDING
Shield food with narrow strips of aluminum
foil to prevent overcooking. Areas that need
shielding include poultry wing tips, the ends
of poultry legs, and corners of square baking
dishes. Use only small amounts of aluminum
foil. Larger amounts can damage your oven.
TURNING
Turn foods over midway through cooking to
expose all parts to microwave energy. This is
especially important with large foods such as
roasts.
STANDING
Foods cooked in the microwave build up
internal heat and continue to cook for a few
minutes after heating stops. Let foods stand
to complete cooking, especially foods such as
cakes and whole vegetables. Roasts need this
time to complete cooking in the center without
overcooking the outer areas. All liquids, such
as soup or hot chocolate, should be shaken or
stirred when cooking is complete. Let liquids
stand a moment before serving. When heating
baby food, stir well at removal and test the
temperature before serving.
ADDING MOISTURE
Microwave energy is attracted to water
molecules. Food that is uneven in moisture
content should be covered or allowed to stand
so that the heat disperses evenly. Add a small
amount of water to dry food to help it cook.
UTENSILS GUIDE
This section lists which utensils can be used
in the microwave, which ones have limited use
for short periods, and which ones should not
be used in the microwave.
RECOMMENDED
Microwave browning dish - Use to brown the
exterior of small items such as steaks, chops,
or pancakes. Follow the directions provided
with your browning dish.
Microwaveable plastic wrap - Use to
retain steam. Leave a small opening for some
steam to escape and avoid placing it directly
on the food.
Paper towels and napkins - Use for short-
term heating and covering; these absorb
excess moisture and prevent spattering. Do not
use recycled paper towels, which may contain
metal and could ignite.
Glass and glass-ceramic bowls and dishes
-Use for heating or cooking.
Paper plates and cups - Use for short-term
heating at low temperatures. Do not use
recycled paper, which may contain metal and
could ignite.

CCD-0006006 Rev: 09-22-22
- 14 -
Wax paper - Use as a cover to prevent
spattering.
Thermometers - Use only those labeled
“Microwave Safe” and follow all directions.
Check the food in several places. Conventional
thermometers may be used on microwave
food once the food has been removed from the
oven.
LIMITED USE
Aluminum foil - Use narrow strips of foil to
prevent overcooking of exposed areas. Using
too much foil can damage your oven, so be
careful. You should keep distance of 1 inch
(25.4mm) between aluminum foil and cavity.
Ceramic, porcelain, and stoneware - Use
these if they are labeled “Microwave Safe”. If
they are not labeled, test them to make sure
they can be used safely.
Plastic - Use only if labeled “Microwave Safe”.
Other plastics can melt.
NOT RECOMMENDED
Glass jars and bottles - Regular glass is too
thin to be used in a microwave. It can shatter
and cause damage and injury.
Paper bags - These are a fire hazard, except
for popcorn bags that are designed for
microwave use.
Styrofoam plates and cups - These can melt
and leave an unhealthy residue on food.
Plastic storage and food containers -
Containers such as margarine tubs can melt in
the microwave.
Metal utensils - These can damage your
oven. Remove all metal before cooking.
NOTE: Should you wish to check if a dish is
safe for microwaving, place the empty dish
in the oven and microwave on HIGH for 30
seconds. A dish which becomes very hot
should not be used.
CLEANING AND CARE
1. Turn off the oven and remove the power
plug from the wall socket before cleaning.
2. Keep the inside of the oven clean. When
food splatters or spilled liquids adhere
to oven walls, wipe with a damp cloth.
Mild detergent may be used if the oven
gets very dirty. Avoid the use of spray and
other harsh cleaners as they may stain,
streak or dull the door surface.
3. The outside surfaces should be cleaned
with a damp cloth. To prevent damage to
the operating parts inside the oven, water
should not be allowed to seep into the
ventilation openings.
4. Wipe the window on both sides with
a damp cloth to remove any spills or
spatters.
5. Do not allow the control panel to become
wet. Clean with a soft, damp cloth.
When cleaning the control panel, leave
oven door open to prevent oven from
accidentally turning on.
6. If steam accumulates inside or around
the outside of the oven door, wipe with
a soft cloth. This may occur when the
microwave oven is operated under high
humidity conditions. In such case, it is
normal.
7. It is occasionally necessary to remove the
glass tray for cleaning. Wash the tray in
warm sudsy water or in a dishwasher.
8. The roller ring and oven floor should be
cleaned regularly to avoid excessive noise.
Simply wipe the bottom surface of the
oven with mild detergent. The roller ring
may be washed in mild sudsy water or
dishwasher. When removing the roller ring
from cavity floor for cleaning, be sure to
replace in the proper position.
9. Remove odors from your oven by
combining a cup of water with the
juice and skin of one lemon in a deep

CCD-0006006 Rev: 09-22-22 - 15 -
microwaveable bowl, microwave for 5
minutes. Wipe thoroughly and dry with a
soft cloth.
10. When it becomes necessary to replace the
oven light, please consult a dealer to have
it replaced.
11. The oven should be cleaned regularly
and any food deposits removed. Failure
to maintain the oven in a clean condition
could lead to deterioration of the surface
that could adversely affect the life of
the appliance and possibly result in a
hazardous situation.
12. Please do not dispose this appliance into
the domestic rubbish bin; it should be
disposed to the particular disposal center
provided by the municipalities.
TROUBLESHOOTING
Check your problem by using the chart below and try the solutions for each problem. If the
microwave oven still does not work properly, contact the nearest authorized service center.
TROUBLE POSSIBLE CAUSE POSSIBLE REMEDY
Oven will not start –Electrical cord for oven is not plugged in.
–Door is open.
–Wrong operation is set.
–Plug into the outlet.
–Close the door and try again.
–Check instructions.
–Check circuit breaker
Arcing or sparking –Materials to be avoided in microwave oven
were used.
–The oven is operated when empty.
–Spilled food remains in the cavity.
–Use microwave-safe cookware only.
–Do not operate with oven empty.
–Clean cavity with wet towel.
Unevenly cooked
foods
–Materials to be avoided in microwave oven
were used.
–Food is not defrosted completely.
–Cooking time, power level is not suitable.
–Food is not turned or stirred.
–Use microwave-safe cookware only.
–Completely defrost food.
–Use correct cooking time, power level.
–Turn or stir food.
Overcooked foods –Cooking time, power level is not suitable. –Use correct cooking time, power level.
Undercooked
foods
–Materials to be avoided in microwave oven
were used.
–Food is not defrosted completely.
–Oven ventilation ports are restricted.
–Cooking time, power level is not suitable.
–Use microwave-safe cookware only.
–Completely defrost food.
–Check to see that oven ventilation ports are
not restricted.
–Use correct cooking time, power level.
Improper
defrosting
–Materials to be avoided in microwave oven
were used.
–Cooking time, power level is not suitable.
–Food is not turned or stirred.
–Use microwave-safe cookware only.
–Use correct cooking time, power level.
–Turn or stir food.

SPECIFICATION
Technical Specification
Rated Input Power 120V/60Hz, 1350W (MICROWAVE)
Rated Output Power (Microwave) 900 W
Product Dimensions (W×D×H ) 191/8" x14¾" x 133/8" (485 x 375 x 340mm)
Oven Capacity 0.9 cu. ft.
Turntable Diameter Ø10.6" / Glass
Net Weight Approx. 27.6 lbs.
CCD-0006006 Rev: 09-22-22

CCD-0006006 Rev: 09-22-22

CCD-0006006 Rev: 09-22-22

IM-FHA00126 V3.0
The contents of this manual are proprietary and copyright protected by
Lippert. Lippert prohibits the copying or dissemination of portions of this
manual unless prior written consent for an authorized Lippert representation
has been provided. Any unauthorized use shall void any applicable warranty.
The information contained in this manual is subject to change without notice
and at the sole discretion of Lippert. Revised editions are available for free
download from lippert.com.
Please recycle all obsolete materials.
For all concerns or questions, please contact Lippert
PhL 432-LIPPERT (432-547-7378) | Web: lippert.com | E-mail:
CCD-0006006 Rev: 09-22-22
This manual suits for next models
1
Table of contents