Glen Dimplex Sterling 1100E User manual


Our Warranty
Should you need it . . . .
Inside the paperwork which has come with this appliance, there is a leaflet
and card explaining the terms of our extended warranty and guarantee.
In order to apply for our five year guarantee, simply fill in the details on
the card and post it off, this will register your appliance.
Should you wish to take out extended warranty, please fill in the details on the leaflet and
post this off to:
len Dimplex Australia,
Unit 2, 205 Abbotts Road
Dandenong South
Victoria 3175
Australia
If your appliance is covered by the warranty and guarantee, you will not be billed for
work undertaken should your appliance be faulty, terms and conditions do apply, so
please read through the literature carefully.
Please ensure that you have available your appliances model number and serial number,
there is a space at the back of this book for recording that information.
IMPORTANT NOTICE
Please note the cooling fan fitted to this appliance is an integral part of its safety
and functionality
When the appliance is installed care must be taken that the cooling fans perform-
ance is not impeded by any objects coming into contact with it (Installation pipes,
leads etc)
Care must also be taken that there is sufficient air flow at the rear of the appliance
for the cooling fan to run at its optimum efficiency (Particularly Built In appliances)
See clearance dimensions in the installation section of the booklet
During use the Appliance must never be disconnected from the Mains supply as
this will seriously affect the safety and performance of the appliance, particularly
in relation to surface temperatures becoming hot and gas operated parts not work-
ing efficiently
The cooling fan is designed to run on after the control knob has been switched off
to keep the front of the appliance and the controls cool until the appliance has nat-
urally cooled itself

Contents
User’s Section . . . . . . . . . . . . . . . . . . . . . . . . . . . . . . . . . . . . . . . . . . . . . . . . . . . . . 1
Beforeusingyourcooker..............................................1
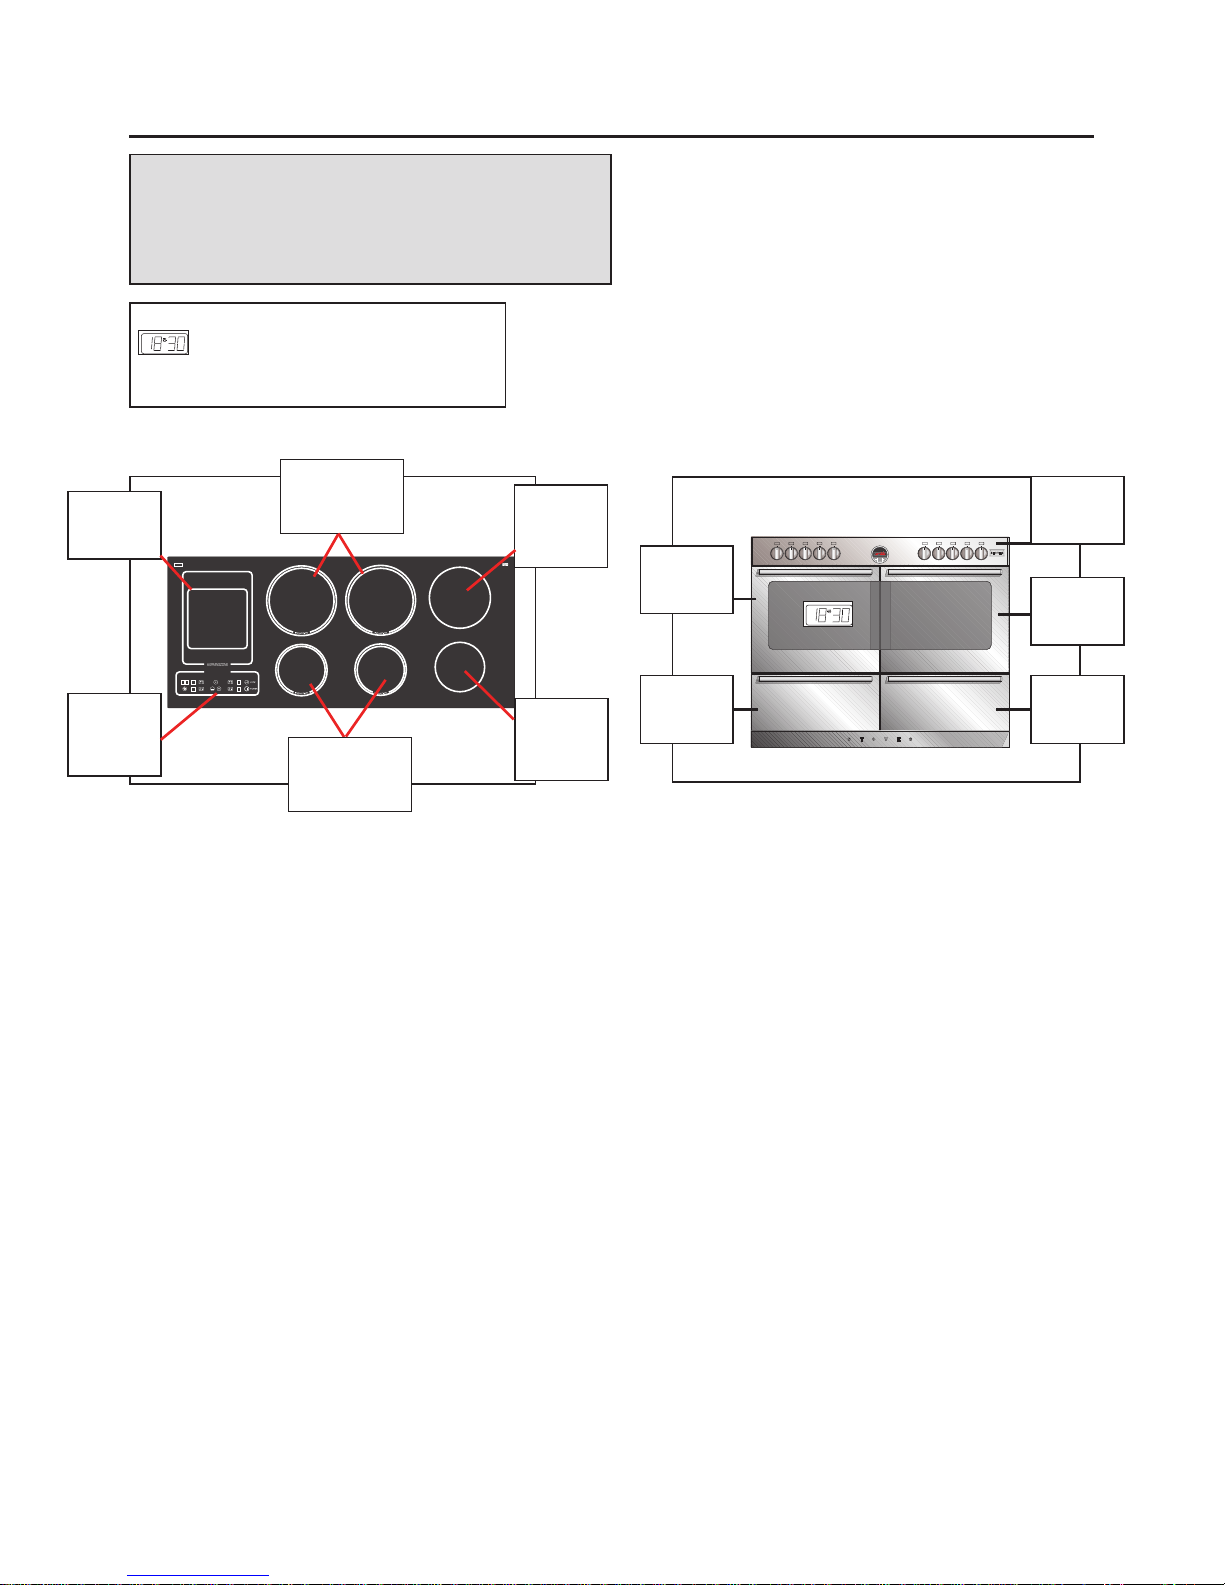
Aboutyourcooker...................................................2
Cookersafety.....................................................3-4
Usingtheprogrammer/clock ..........................................5-7
.................................................................
Your Hob - Introduction . . . . . . . . . . . . . . . . . . . . . . . . . . . . . . . . . . . . . . . . . . . . . .
Switchingon.......................................................8
NoteforCeramic/Halogenhobs .........................................9
Safety...........................................................10
Howyourinductionhobworks .........................................11
Choiceofpans.....................................................12
switchingon ......................................................12
Features (timer/Power boost/ warming zone) . . . . . . . . . . . . . . . . . . . . . . . . . . . . . . . 13
HintsandTips.....................................................14
Cookingguide...................................................15-16
Using Your Ovens . . . . . . . . . . . . . . . . . . . . . . . . . . . . . . . . . . . . . . . . . . . . . . . . . . .
UsingyourMultifunctionoven..........................................17
Usingyoufanoven .................................................18
Ovenandgrillfunctions..............................................19
Usingyourgrill ....................................................20
Usingyourmultifunctionoven..........................................21
Fannedovenguide .................................................22
Cookingguide.....................................................23
Roastingguide..................................................24-25
Bakingguide......................................................26
Defrostingguide ...................................................27
YourSlowCookOven-Introduction....................................
Usingyourslowcookoven............................................28
Keeping food warm/how to use your slow cook oven . . . . . . . . . . . . . . . . . . . . . . . . . 29
CleaningYourAppliance..............................................
Cleaningyourhob..................................................30
Cleaningyourovens ..............................................31-32
Beforeyoucall.....................................................33
Changinglightbulbs.................................................34
InstallationInstructions..............................................
RequirementsandRegulations .........................................35
Beforeyoustart....................................................36
Clearances........................................................37
Fittingaccesories...................................................38
Electricalconection .................................................39
TechnicalData.................................................40-44

Before Using Your Cooker
Before using this appliance please make sure that
you have removed all packaging and wrapping.
Some of the furniture inside this
appliance may have additional wrapping.
It is also advised that you turn the ovens and/or
grill on for a short while, this will burn off any
residues left from manufacturing. There may be a
smell which accompanies this process - but this is
nothing to worry about and is harmless.
We also recommend that you wash the oven
shelves, the baking tray, the grill pan, and the grill
pan trivet before their first use in hot soapy water,
this will remove the protective oil coating.
Although every care has been taken to ensure this
appliance has no burrs, or sharp edges, we
recommend that you wear protective gloves when
installing and moving this appliance.
This will prevent any injury.
Our policy is one of constant development and
improvement. Strict accuracy of illustrations and
specifications cannot be guaranteed. Modification
to design and material may be necessary
subsequent to publication.
Please bear in mind that not all the sections inside
this handbook are relevant to your appliance, but
you should read carefully the sections which are
relevant before installation and use. This will save
you time.
Always use a registered installer for this appliance.
Environmental protection:
Stoves are committed to protecting the environ-
ment.
All packaging with this appliance is recyclable and
environmentally friendly.
Please recycle whenever possible - contact your
local authority for your nearest recycling centre.
!!!
i
i
!!!
i
i
!!!
This appliance is for
use in a domestic
kitchen only, it is not
designed, or intended,
for commercial use.
!!!
1

About Your Cooker
A
FUNCTION
The illustrations below show the different
cavity and hob layouts available within
dual fuel ranges.
Fanned
oven
Multifunction
oven & grill
Slow cook
oven
Fascia
panel
Storage
drawer
INDUCTIONCONTROLS
Small
Ceramic
element
Warming
zone
Touch
control
panel
Large
Ceramic
element
Large Induction
elements
= Programmable oven
(see timer section)
Small Induction
elements
2

Hob & Cooker Safety
Always ensure that pan bases are dry, and flat before
using them on the hob.
Always position pans over the centre of the element,
and turn the handles to a safe position so they cannot
be knocked or grabbed.
Always use pans which are no smaller than 100mm
(4”), or larger than 250mm (10”).
Always take care when removing food from the oven
as the area around the cavity may be hot.
Always use oven gloves when handling any utensils
which have been in the oven as they will be hot.
Always make sure that the oven shelves are resting in
the correct position in between two runners. Do not
place the oven shelves on top of the highest runner,
this will lead to spillage and injury if the baking tray, or
dish falls.
Never use double pans, rimbased pans, old or
misshapen pans, or any pan which is not stable on a
flat surface.
Never leave cooking fat, or oil, unattended.
Never use commercial simmering aids, or heat
diffusers, as they create excessive heat and can
damage the surface of the hob.
Never use the hob for any other purpose than cooking
food.
Plastic cooking utensils can melt if they come into
contact with a warm hob. Never leave them close to,
or on top of the hob.
Never leave the element alight without a pan covering
it. This causes a fire hazard.
Do not place items of the door while it is open.
Do not wrap foil around the oven shelves, or allow it to
block the flue.
Do not drape tea towels near the oven while it is on,
this will cause a fire hazard.
Do not pull heavy items, such as turkeys, or large
joints of meat, out from the oven on the shelf, as they
may overbalance and fall.
Do not use this appliance to heat anything other than
food items, and do not use it for heating the room.
Call for a service
engineers visit if:
You find over a period of
time that the gas oven
becomes hotter at a
particular temperature - the
thermostat may need
replacing.
The cooling fan fails to
i
Always use the Minute Minder
(if fitted) if you are leaving the
oven unattended, this reduces
the risk of food burning.
Warning (ceramic
glass): Never use the
hob if the ceramic
surface is cracked,
broken or shattered.
This creates a high risk
of injury. Switch off
the electric supply and
call for a service
engineer to come out.
Warning (ceramic
glass): Do not stare at
the halogen elements
(if fitted). This may
impair your vision!
Aluminium foil:
Do not leave foil on the hob
top, it reflects heat back into
the element which leads to
damage.
Slow cooking time?
Check the base of your pan.
Shiny pans can often reflect
heat back into the element
causing it to cycle on and off
more.
!!!
!!!
WARNING: Parts of
the appliance may
become hot while in
use, always make sure
that children are
supervised when they
are near to the
appliance.
!!!
3

Chip Pan Fires
What causes a chip pan fire?
Chip pan fires start when oil of fat overheats and catches fire,
or when oil or fat spills on to the cooker because the pan has
been filled too high.
They can also start when wet chips are put into hot oil,
making it bubble up and over flow.
Preventing a chip pan fire
Never fill the pan more than a third full with oil of fat.
Never leave the pan alone with the heat on - even for a few
seconds.
Dry chips before putting them in the pan.
Never put chips in the pan if the oil has started smoking.
Turn off the heat and leave the oil to cool down, or else it
could catch fire.
In the event of a chip pan fire
If your chip pan does catch fire - don’t panic, and don’t move
the pan. Serious burns are often caused by picking up the
pan and running outside with it.
If it is safe to do so, and you don’t have to reach across the
pan, turn off the heat.
Never throw water, or use a fire extinguisher.
If you can, drape a damp cloth or towel over the pan to
smother the flames.
Leave the pan to cool down for at least half an hour.
If you can’t control the fire yourself, close the door, get out
and tell everybody else to get out.
Call the fire brigade. Don’t go back inside whatever the
reason.
4

Through your programmer you will be able to set the time
of day, set the minute minder, and use the semi and fully
automatic cooking functions. The programmer is vital to
the working of your appliance, and reading this section will
make sure that you get the most out of your ovens.
The programmer buttons
There are three buttons on this type of timer. The table
below shows you what their symbols look like, depending on
the model type, and what they do.
Setting the time of day
Press the Plus and Minus buttons together for a few
seconds, and release.
The ‘’ in between the numbers on the LED Display will
begin to flash.
While the ‘’ is flashing it is possible to adjust the time
using the Plus and Minus buttons.
Once the time has been set, allow approximately 30
seconds before using any of the other timer functions.
This ensures that the time will remain correct.
Setting an alarm tone
There are three tones to choose from.
Press and release the minus button.
Once the minus button is released, the tone is selected.
Symbol Symbol What is it?
-
Down / Minus
Used to decrease cook / end time, remove
minutes from the minute minder and adjust
the time of day.
Also for listening to and setting the alarm
tone.
+
Up / Plus
Used to increase cook / end time, add minutes
to the minute minder and adjust the time of
day.
Function button
Used to select the functions available on this
timer.
Press once for: Minute Minder.
Press twice for: Cook time
Press three times for: End time.
How to use these functions is explained later
on in this section.
Using The Programmer/Clock
Automatic
symbol Cook Pot
Minute Minder
symbol
This is a 24 hour clock.
Before you do anything
with your appliance -
you must set the cor-
rect time of day.
i
What your timer symbols
mean.
5

Setting the minute minder
To set the Minute Minder, press the Function button
once. The bell symbol will appear and start flashing.
The flashing only lasts for 5 seconds so the time must be
set within this time frame.
Use the Plus and Minus button to set the length of time
required. Once this has been done, the Minute Minder
is set.
When the desired length of time has counted down the
alarm will sound. To cancel the tone, press any of the
buttons.
To cancel the Minute Minder at any time, press the Plus
and Minus buttons together.
Semi - Automatic Cooking
The Duration method
Switch off after a set time period
Press the Function button twice, which will skip past the
Minute Minder.
The display will flash the word ‘dur’, and the ‘A’ will flash
on the left hand side of the display.
Use the Plus and Minus buttons to set the length of time
you want to cook for. This must be done within 5
seconds or the time of day will show again.
Once this is done the oven will automatically switch off
once the time has elapsed, and the alarm will sound. To
switch off the alarm, press any button.
To view any remaining time press the function button
twice.
The End Time method
Switch off at a set end time
Press the Function button three times, which will skip
past the Minute Minder and the Duration programmer.
The display will flash the word ‘End’ and the ‘A’ will flash
on the left hand side of the display.
Use the Plus and Minus buttons to select the time the
oven is required to turn off.
Once this is done the oven will turn itself off at the time
you have selected. To switch off the alarm, press any
button.
Using The Programmer/Clock
6

Setting the Programmer
Fully Automatic Cooking
Switch on and off automatically
This requires both the duration and the end time to be
entered. The timer will work out the start time and begin
cooking.
Press the Function button twice, which will skip past the
Minute Minder.
The display will flash the word ‘dur’, and the ‘A’ will flash
on the left hand side of the display.
Use the Plus and Minus buttons to set the length of time
you want to cook for. This must be done within 5 sec-
onds or the time of day will show again.
Press the Function button three times, which will skip
past the Minute Minder and the Duration programmer.
The display will flash the word ‘End’ and the ‘A’ will flash
on the left hand side of the display.
Use the Plus and Minus buttons to select the time the
oven is required to turn off.
Once this is done the oven will turn itself off at the time
you have selected. To switch off the alarm, press any
button.
Set the temperature of the oven and place the
food inside.
The timer will calculate the appropriate start time.
When using the Programmer:
Do:
Familiarise yourself with the use of the programmer.
Select foods which are as fresh and as cold as possible
preferably straight from the refrigerator.
Choose foods which are suitable for cooking from a cold
start, as some dishes will be affected by being left
uncooked, at room temperature.
Make sure that meat, poultry and uncooked food are
thoroughly thawed before placing them in the oven.
Cover dishes with lids or foil.
Try to keep the end time as close to your return as
possible.
Do not:
Place warm food in the oven for delayed cooking foods
must be thoroughly cooled before placing in the oven,
the oven must also be cool before you start.
Cook dishes containing left over cooked meat or poultry,
or pastry dishes with wet fillings, they are not suitable!
Over-fill dishes containing liquids.
The automatic cooking
symbol will appear to
show that the oven is
no longer in manual
mode but in automatic
mode.
i
Important: Once the
oven has switched itself
off please make sure
you turn to oven con-
trols to the ‘off’ position
and set the oven to
manual by pressing the
Cook Time and Ready
Time buttons together.
i
Important: Remove
food as soon as it is
cooked.
i
7

Using Your Ceramic Hob
Introduction
Your hob may have halogen element (s) as well as the
standard ceramic elements. In terms of care and use the
procedure remains the same as with the other elements.
The hot hob light
The hot hob light will come on when one of the hotplates
is switched on. It will remain on for a short time after the
last element has been switched off to serve as a reminder
that the hob top may still be warm to the touch.
Switching on - touch control
Select the element you wish to use, place the pan on
and touch the relevant control pad to the heat you
wish to use.
The temperature settings on the hob do not indicate
any set temperature and cannot be used to judge one
element against another.
During cooking, the elements will cycle on and off, this
is to prevent the hob for overheating.
In addition for your safety, there may be a ‘hot hob’
light, this will indicate that the hob has been recently
used and may still be hot to touch.
To switch off, touch the selected control pad.
Energy Saving
Position pans centrally over the elements.
Only heat the amount of liquid you need.
Once liquids have been brought to the boil, reduce the
heat setting to a simmer.
Consider using a pressure cooker if possible.
Vegetables in small pieces will cook quicker.
Use a pan which is a close match to your element size.
Smaller elements are ideal for simmering and stewing
in smaller pans, while the larger elements are ideal for
frying and boiling.
Always make sure that
children are super-
vised when they are
near to the appliance
when it is in use.
!!!
Before use:
Apply a thin coat of
ceramic hob cleaner
to the hob to help
maintain and protect it.
Supplies can be
purchased from our
Customer Parts Centre.
The part number and
contact number are
towards the back of this
guide.
i
Try to avoid spillages of
salty substances or
sugary substances onto
your hotplate spillage
well, as this may cause
staining and damage your
hob.
Clean the hob top as
regularly as possible, this
will prevent any build up
of grease which may be a
fire hazard.
!!!
Use flat based pans
which are the correct
size for your burners
and suitable for your
hob type.
We recommend the
following sizes:
100mm or 4” min.
250mm or 10” max.
Smaller or larger pan
sizes may lead to slower
cooking times.
i
8

Using Your Ceramic Hob
Notes for Ceramic / Halogen hobs:
Warning: Do not stare at the halogen hob element
while it is in use - doing so may temporarily impair
your vision.
Do not use the ceramic glass surface of the hob as a
work surface or chopping board, this will cause damage
to the glass.
Do not use commercial simmering aids as they cause
excess heat which can damage your hob top and cause
a hazard.
Plastic utensils may melt onto the hob top if they come
into contact with it while it is warm.
Please be aware that the surface of this hob is smooth.
If pans are knocked they will move on the hob top.
Make sure pans are not overhanging the edge of the
hob to prevent this wherever possible.
Use pans which are large enough for the foods inside
to avoid over flowing - this may cause damage to your
hob.
Pans with dull or dark coloured bases give the quickest
results. All pans used on ceramic/halogen hobs should
have thick, flat, smooth bases to ensure maximum
contact with the element.
Aluminium pans will give goods results, but please take
care when using them. If they are skid across the hob
top they tend to leave visible marks which can be
difficult to remove.
Foods in salted water, or with a high sugar or syrup
content may cause damage if they are spilled onto the
hob during cooking.
Aluminium foil must not be placed onto the hob, it will
reflect any heat back into the element - which can
damage it.
Pans with highly polished bases may also reflect heat
back into the element causing the hotplate to cycle on
and off rapidly, which slows down cooking.
Do not leave the element on without it being covered
by a pan as this can cause over heating.
9

Using Your Induction Hob
If you are fitted with a pacemaker or an active
implant
The functions of the hob comply with the applicable
standards on electromagnetic interference
Your induction cooking hob thus complies fully with the
statutory requirements (Directive 89/336/EEC). It is
designed to not interfere with the functioning of other
electrical equipment as long as these also comply with
the same regulations.
Your induction hob generates magnetic fields in its imme-
diate vicinity.
So that there is no interference between your cooking
hob and a pacemaker, the pacemaker must be
designed in compliance with the appropriate regu-
lations.
In this respect we can only guarantee the compliance of
our own product. You can ask the manufacturer or your
doctor about the compliance or any incompatibilities of
10

Using Your Induction Hob
How your Induction hob works
Induction currents instantly heat the pan, which then
passes it’s heat on to the food it contains.
With an induction hob, the heat necessary for cooking
food is produced directly inside the pan; the ceramic glass
hardly heats up at all, as it only receives heat from the
pan placed on it - see diagram.
When compared with conventional cooking hobs, your
induction hob is;
More economical - when a pan is lifted off, the zone
stops heating immediately.
Quicker - 3000W of power is immediately available at
the heating zone.
More precise - the hob reacts immediately to your
instructions.
Safer - the temperature of the glass top remains
relatively low.
Choice of pans
Note: A pan with a base not absolutely flat may still be
suitable, as long as it is not too distorted.
Choose a pan bearing the logo on its base or
packaging to be sure that it is perfectly suitable for use
on your hob under normal conditions of use.
You can also find a range of pans suitable for induction
cooking by looking in quality kitchen shops. Look for the
wording and symbol “suitable for induction”.
You probably already have some suitable pans:
•Pans in enamelled steel, with or without non-stick
coating
For example; cooking pot, chip pan, frying pan, meat grill
pan, etc.
•Cast iron pans
To avoid the risk of scratching the glass top of your hob,
use pans with an enamelled base, or avoid sliding the
pan across the glass surface.
•Stainless steel pans suitable for induction
Most stainless steel pans are suitable for induction cooking
Some stainless steel pans have copper bases which are
usually not suitable.
•Aluminium pans with a special base
Choose pans with a thick base, as this ensures more
even cooking (the heat is more evenly distributed).
Always make sure that
children are super-
vised when they are
near to the appliance
when it is in use.
!!!
Before use:
Apply a thin coat of
ceramic hob cleaner
to the hob to help
maintain and protect it.
Supplies can be
purchased from our
Customer Parts Centre.
The part number and
contact number are
towards the back of this
guide.
i
Try to avoid spillages of
salty substances or
sugary substances onto
your hotplate spillage
well, as this may cause
staining and damage your
hob.
Clean the hob top as
regularly as possible, this
will prevent any build up
of grease which may be a
fire hazard.
!!!
Use flat based pans
which are the correct
size for your burners
and suitable for your
hob type.
We recommend the
following sizes:
100mm or 4” min.
280mm or 11” max.
Smaller or larger pan
sizes may lead to slower
cooking times.
i
11

Using Your Induction Hob
Incompatible pans
lass, ceramic or earthenware pans, aluminium pans
(unless they have a special base), copper pans, some non-
magnetic steel pans.
The pan test
Because of its leading-edge technology, your induction hob is
able to “recognise” most pans.
Place your pan on a heating zone on power setting 4;
• If the indicator stays fixed, your pan is compatible.
• If the indicator flashes, the pan cannot be used for
induction cooking.
Switching on
Look for the controls which correspond to the zone where
you have put your pan.
• Press the key.
The power indicator shows 0, next to all of the heating
zone selectors and the hob is switched on.
• Use the heating zone selectors to choose which zone you
wish to use. Ensure that your pans are in place first.
• Adjust the heating power you want using the +and -
key.
After you have pressed the on/off control key, if you
do not touch any sensor within 10 seconds, the
instruction will be automatically cancelled.
• Adjust the power during cooking.
You can adjust the heating power from 1to 9at any
time during cooking using the +and -keys.
Turning a heating zone off
There are two ways to switch off the Induction hob:
• Touch the ‘-’ sensor until the display shows ‘0’
• Touch the ‘+’ and ‘-’ sensors together.
Audio Warning
An audio signal sounds when your appliance detects a
problem on the control panel, such as:
An object (pan, cover, etc) placed on the control panel
for more than ten seconds.
A spill on the control panel
Prolonged pressure on the control panel.
The hob will also switch itself off.
To reset, simply touch the power on sensor.
Note:
Next to the power
indicator is a ‘.’ this will
flash when a zone has
not been selected.
When the ‘.’ is static a
zone has been selected
and the power levels
can be adjusted.
You must make sure
you have selected a
zone before you start,
otherwise you cannot
make any adjustments.
i
Note:
The hob is equipped
with 2 or 4 residual
heat indicators.
The display shows ‘H’ if
the temperature of that
heating zone exceeds
60˚C.
This prevents the risk of
burning.
i
A small object - such as
a fork, a spoon or even
a ring - placed on a hob
cooking zone on its own
is not detected as a
pan.
The display flashes and
no heating power is
supplied. The security
system acts in the same
way when it detects a
pan which is not suit-
able for use on an
induction hob.
i
12

Using Your Induction Hob
The Zone Indicator (Timer)
On the timer there are four lights at the corners, these
correspond to you heating zones.
As with the power indicators, these will flash when not
selected and remain static when selected.
Programming a cooking duration
Select the timer key to access the programming function.
The corresponding indicator lights flashes.
Press the ‘+’ key to display the required cooking duration
(max 99 mins)
Press the timer key to confirm the programming
operation.
Multiple programming
It is possible to programme more than one heating zone
at a time.
Simply repeat the above steps on whichever zones you
wish to use.
Note: The indicator light will remain lit once the duration
has been confirmed.
To see how long a zone has, select the zone you wish to
look at and touch the sensor. The indicator light will
remain lit and the time remaining will show.
An audio signal will sound once the various times have
counted down and the zone will switch itself off.
The Power Booster
To use the power booster for rapid heating, touch the
Booster sensor ‘P’, the power indicator will display a P.
The booster function stops after 4 minutes automatical-
ly. While the booster is on the heating zones at the front
of the hob will only reach 600W, this is to prevent over
heating.
The warming zone (if applicable)
To operate the warming zone touch the warming zone
symbol.
The display above will show ‘1’ to indicate that the zone
is active.
Place your pan on top.
To switch off the warming zone, simply touch the
warming zone symbol again.
The display will show ‘H’ - alerting you that it may be hot
to touch with any residual heat.
Alternatively, the zone can be turned off when the power
symbol is touched to turn off the hob.
Note:
The timer starts count-
ing down immediately.
An audio signal sounds
at the end of cooking
time, and the heating
zone switches off.
Press the off key to
switch off the appliance.
i
Note:
Once a further zone is
programmed and
confirmed, that will
remain lit and the
indicator light for the
zone programmed first
will begin to flash.
This is not an error,
continue with cooking,
or programming.
i
The warming zone:
Ideal for keeping food
warm on an extremely
low heat to prevent
burning.
i
13

Using Your Induction Hob
Cooking with your induction hob
Do not leave an empty pan on a heating zone.
Pans should be placed in the centre of the heating zone.
Never heat up a sealed tin of food, as it may explode.
After use, please ensure that you switch the
appliance off. Do not rely on the pan detector.
When you use a pan with a non-stick coating (eg;
Teflon) with little or no fat, heat the pan first for a
moment on setting 6or 7.
We recommend that you do not put metal cooking
utensils, cutlery, knives or other metal objects on the
hob, as they could become hot if they are near a
cooking area which is in use.
It is perfectly possible to use a pan with a smaller
diameter than that of the ring marked on the
vitro-ceramic glass (note that we recommend a minimum
5” pan base diameter); there will be no loss of energy as
is the case with conventional cookers (electricity and
gas).
Nothing should ever be left lying on the hob.
Do notuse the hotplate surface for storage.
Lift pans onto and off the hob, rather than sliding them
across the surface, to avoid marks and scratches.
As soon as the water boils, turn the cooking zones down
to a lower setting; this will help prevent pans boiling
over.
Do not use the vitro-ceramic glass surface as a work
surface or chopping board, as it will damage it, and if
any plastic utensils come into contact with a warm hob,
they may melt onto it.
As pans are on a smooth surface, they will move easily
if knocked accidentally; turning pan handles so they are
not overhanging the edge of the hob, will help prevent
this happening and keep them out of the reach of
children.
Be careful when cooking foods in salted water, or
foods containing large amounts of sugar or syrup,
if they are spilt onto hot areas of the hob they may dam-
age the glass.
Wipe any spillage as soon as possible.
Use pans which are large enough to avoid overflows
onto the ceramic glass hob surface.
14

Using Your Induction Hob
Cooking guide
For best cooking results, follow the examples in the guide
below, bearing in mind that settings 8and 9are maximum
positions and should only be used for deep frying and
bringing up to the boil quickly.
Preparation
Very fast frying Fast Medium Slow Simmering,
re-heating Keeping
warm
9 8 7 6 5 4 3 2 1
Soup
Thin soup
Thick soup
Fish
Court-Bouillon
Deep fried
Sauces
Thick, flour based
Buttery, containing eggs
Vegetables
Spinach
Pulses
Boiled potatoes
Carrots
Saute potatoes
Frozen vegetables
Meat
Thin cuts of meat
Fried steak
Other types of cooking
Deep frying: frozen chips
Deep frying: fresh chips
Pressure cooking
Stewed fruit
Pancakes
Custard
To melt chocolate
Jam
Milk
Fried eggs
Pasta
Re-heating baby food
Rice pudding
Keeping food warm
Stews
15

Using Your Induction Hob
Cooking tips
reen vegetables (spinach, broccoli, sorrel, etc) or
vegetables rich in sulphur compounds (cabbage, onions,
etc) should be cooked without a lid in plenty of boiling
water; they will cook more quickly, and will keep their
green colour (some vegetables only), vitamin and
minerals content.
Pasta, rice, cereals, etc absorb water during cooking and
increase in volume; cook them in plenty of boiling salted
water in order to dilute the starch they contain.
Make sure you use a sufficiently large pan to avoid
boiling over; the temperature setting may need to be
reduced to maintain a simmer.
Mushrooms should be poached in a small quantity of
boiling water, with salt, butter and lemon juice.
When liquids boil, reduce the control setting to maintain
a simmer.
Vegetables will cook quicker if chopped in smaller pieces.
Aluminium foil
When cooking, never use kitchen foil and never put
items wrapped in kitchen foil straight onto the hob.
The aluminium kitchen foil may melt and do irreparable
damage to your appliance.
Safety
Regularly check that there is nothing (cloth, paper, etc)
which might block the air inlet underneath your hob (see
section “Installation Instructions”).
Hob ock
For your safety this hob has fitted with a hob lock.
To activate touch the lock sensor.
To unlock, simply press the senor again.
16

The multifunction oven may be controlled by the program-
mer (see The Programmer/Clock for details).
The programmer, if fitted must be set to manual before it
can be used, or programmed.
Switching on the multifunction oven
Use the function control knob to select the function you
wish to use - see the functions table for details.
Note: You can change function during cooking if you
wish, as long as the oven is in manual mode.
Turn the temperature control knob to the temperature
you wish to use.
The thermostat indicator will come on to show that the
oven is heating, and once the temperature is achieved,
it will go out.
To switch off the oven, simply turn the control knob
back to the ‘‘ position.
The cooling fan may come on during use, and may
continue to run for some time afterwards.
Using Your Multifunction Oven
Important: Never
place food, or dishes on
the base of the main
oven, the element is
here and it will cause
over heating.
i
17
Table of contents