GM Chevrolet Monte Carlo 1976 User manual

1976 Chevrolet · Important operating,safety
and
maintenance in?tructions
www.PlandeGraissage.org

A WORD
TO
CHEVELLE AND MONTE CARLO OWNERS
...
This
manual
has
been
prepared
to
acquaint
you
with
the
operation
and
maintenance
of
your
1976
Chevelle
or
Monte
Carlo
and
to
provide
important
safety
information.
It
is
supplemented
by
two
convenient
folders
which
provide
additional
information
on
vehicle
maintenance
and
warranties.
We
urge
you
to
read
these
publications
carefully
and
follow
the
recommendations
to
help
assure
the
most
enjoyable
and
troublefree
operation
of
your
vehicle.
When
it
comes
to
service.
remember
that
your
Chevrolet
dealer
knows
your
vehicle
best
and
is
interested
in
your
complete
satisfaction.
Return
to
him
for
Guardian
Maintenance
Service
and any
other
assistance
you
may
require.
To
assist
dealers
in
handling
your
needs,
Chevrolet
maintains
a
number
of
Zone
Offices
throughout
the
country.
Should
you
have
a
problem
that
cannot
be'~andled
through
normal
channels,
follow
the
procedure
presented
in
Section
6
of
this
manual
under
the
heading,
"Owner
Assistance".
We
would
like
to
take
this
opportlJrtjty,.to
thank
you
for
choosing
a
Che~rolel
product-and
assure
you
of
our
continuing
interest
in
your
motoring
pleasure
a.ndsatisfaction.
FOR
CONTINUING
SATISFACTION,
KEEP
YOUR
GM
CAR
ALL
GM.
GENERAL
MOTORS
PARTS
ARE
IDENTIFIED
BY
ONE
OF
THESE
TRADEMARKS:
NOTE TO CANADIAN OWNERS:
If preferred, a French Owner's Manual can
be
obtained
from
either your Dealer
or
by
writing
to
General Motors of
Canada
Limited,
Owner
Rela-
tions Department, Oshawa, Ontario L1J 5Z6.
Chevrolet
Motor
Division
Aux
i
canadiens
On peut se procurer
un
exemplaire de ce Guide en
fran9ais au
pres
du cancessionnaire au
du
service
des relations avec la clientele, General Motors of
Canada
Limited, Oshawa, Ontario L1J 526.
www.PlandeGraissage.org

1976
CHEVELLE
AND
MONTE
CARLO
OWNER'S
MANUAL
This
manual
should
be
consid-
.
ered
a
permanent
part
of
the
vehicle.
and
must
remain
with
the
vehicle
at
time
of
resale.
CHEVROLET
MOTOR
DIVISION
GENERAL
MOTORS
CORPORATION
DETROIT. MICHIGAN 48202
All
inlormiltion. illustrations
and
specifications
con·
Is/ned in this
milnuilI8re
based
on
the IBtest product
information 8vailable
lit
the time
of
publication.
The
right
Is
reserved
to
make
changes
ilt
'ny
time
without
.
notice.
For
vehicles sold in
Canada.
substitut6 th" name
General
Molors
of
Canada Limited. wh8rever the
nlm.
Chevrolet Motor
Car
Division appears in this manual.
ST
305-76
C
Generol
Motors
Corporotion
1975
Table
of
Contents
Section
Page
1 Before Driving Your
Car
......•.•.......................
:
.•..
1-1
2 Starting and Operating
.........................................
2-1
Steering Column Controls
.....
.
.......
.
......................
2-2
Floor Controls
......................
.
............
..
..
.........
2-11
Instrument
Panel
.
..
.
.......
.....
........................
...
. 2-13
Other Controls and
Features
..
.........
...........
............
. 2-30
3
In
Case
of Emergency
..............................
~
...
.
......
3-1
4 Appearance
Care
...
.. .
...
...
;
..
..
...........
...
..
:
..............
4-1
5 Service .
and
Maintenance
........
.
..................
.
..........
5-1
6 Specifications, Owner Assistance, Service Manuals,
.,
.. Index,
Gas
Station Information
...
,
.....•.....
,
......
.
.....
6-1
A.pplicable
to
CALIFORNIA
Sales
Only
This .vehicle
as
delivered by GM Chevrolet Division is equipped with a bumper energy
absorption system meeting California S.B.42 (1971)
as
set forth in
Sec.
34715 Vehicle Code.
Applicable
to
FLORIDA
Sale8
Only
This vehicle
as
delivered by
Gf.v1
Chevrolet Division is equipped
with
a bumper 'energy
absorption system meeting section 501.125, Florida Statutes,
as
amended June 10, 1974.
i
www.PlandeGraissage.org

YOUR CAR'S FIRST
FEW HUNDRED MILES
OF
DRIVING
You can operate your new car from
its very first
mile
without adhering
to a formal "break-in" schedule.
However, during the first
few
hun-
dred miles of driving you can, by
observing a
few
simple precautions,
add to the future performance and
economy of your car.
It
is recommended that your
speed during the first 500 miles
be
confined:
to a maximum of 55
M.P.H
.,
but
do
not drive for
ex-
tended periods at
anyone
constant
speed, either fast or slow. Dur-
ing this period, avoid full throttle
starts and, if possible, avoid hard
stops especially during the first 200
-:':
'i
")\,'
.
--",
<"",,,:.~.
miles
of
operation since brake
mis-
use during this period
will
destroy
much future brake efficiency.
Always drive at moderate speed
until the engine has completely
warmed up.
If
you
plan to
use
your new car
for trailer hauling
see
additional
information on page 1-15.
SEE
PAGE 5-21
FOR
ADDITIQNA.L<JNFORMATION
ON
HOW
TO IMPROVE
VOURGAS
MILEAGE.
Ii
www.PlandeGraissage.org

BEFORE
DRIVING YOUR
CAR
DRIVER CHECKLIST
Before Entering
Car
I.See
that windows. mirrors and
lights are clean.
2. Visually note inflation condition
of tires.
3.
Check that area to rear
is
clear
if about to back up.
Before Driving Off
1.
Lock all doors.
2. Position seat, and adjust head
restraints, if
so
equipped.
3. Adjustinsideandoutsidemirrors.
4. Fasten belt restraints.
5. Check that warning bulbs light
when key
is
turned to start
position.
6. Release parking brake
(and
see
that brake warning light turns
off) .
7. Be sure you understand your car
and how
to
operate it safely.
Keys
Two separate keys are provided
for your car. Each key has a differ-
ent cross section so that it can be
inserted only in certain locks.
•
Key
with
square
head
(stamped "e") -for ignition
switch only.
•
Key
with
ovill head (stamped
("0") -for all other locks.
The
code number of each key
is
stamped on the "knock out" plug
IGNITION
ALL
OTHER
LOCKS
1-1
in the key head. Your Chevrolet
dealer
removed
these
plugs
and
placed them with the spare set of
keys in the special key envelope
that was given to you at time of
delivery.
For
your protection:
• Record the numbers on the key
envelope and discard the key
plugs.
• Keep the key envelope in a safe
place such as your wallet.
NOT
IN
THE
CAR.
In
the event the original keys are
lost, duplicates can be made by
your dealer or a locksmith using the
key code information.
Be sure to lock the
[dove
box or
console compartment and remove
the key from the car whenever it
is
necessary to leave the ignition key
with an attendant,
www.PlandeGraissage.org

Door Locks
Front and rear side doors can
be
locked from the inside by de-
pressing the passenger guard door
lock buttons located on the upper
door panel. All doors can be locked
from the outside by
fir
st depressing
the door lock button and closing
the door.
The front doors can also
be
l
oc
ked by using the key.
All models have
as
a standard
safety feature overridingdoorlocks.
When the doors are locked, the
door latch mechanism
is
inopera-
tive, preventing inadvertent open-
ing of the door by movement of the
inside handle.
REMINDER: Avoid hanging ob-
jects .on the right hand coat hook
in
such a way that you block the
driver's vision to the right . rear
quarter.
SEAT CONTROLS
Adjustment of Seat Position
Manually Operated
Front Seats
The front seats may be adjusted
forward or rearward by moving the
control lever at the side of the seat
forward and exerting slight body
pressure in the direction desired.
The seat is locked
In
position when
the lever is released.
1-2
Bucket Seats
The front seats may be adjusted
forward or rearward by moving the
control lever at the front of the seat.
Move control lever to the right to
release the locking mechanism;
then exert slight body pressure to
move seat to desired position. Re-
lease control lever to lock seat in
desired position.
www.PlandeGraissage.org

Swivel Bucket Seat
The·
swivel
bu
cket seat can
be
turned towards the door opening
to· provide front seating conven-
ience and easy entrance into the
rear seat area. To turn s
wivel
seat,
depress control lever at outboard
side of seat base, then turn seat.
Position seat
in
forward locked
position,
prior
to
operating car.
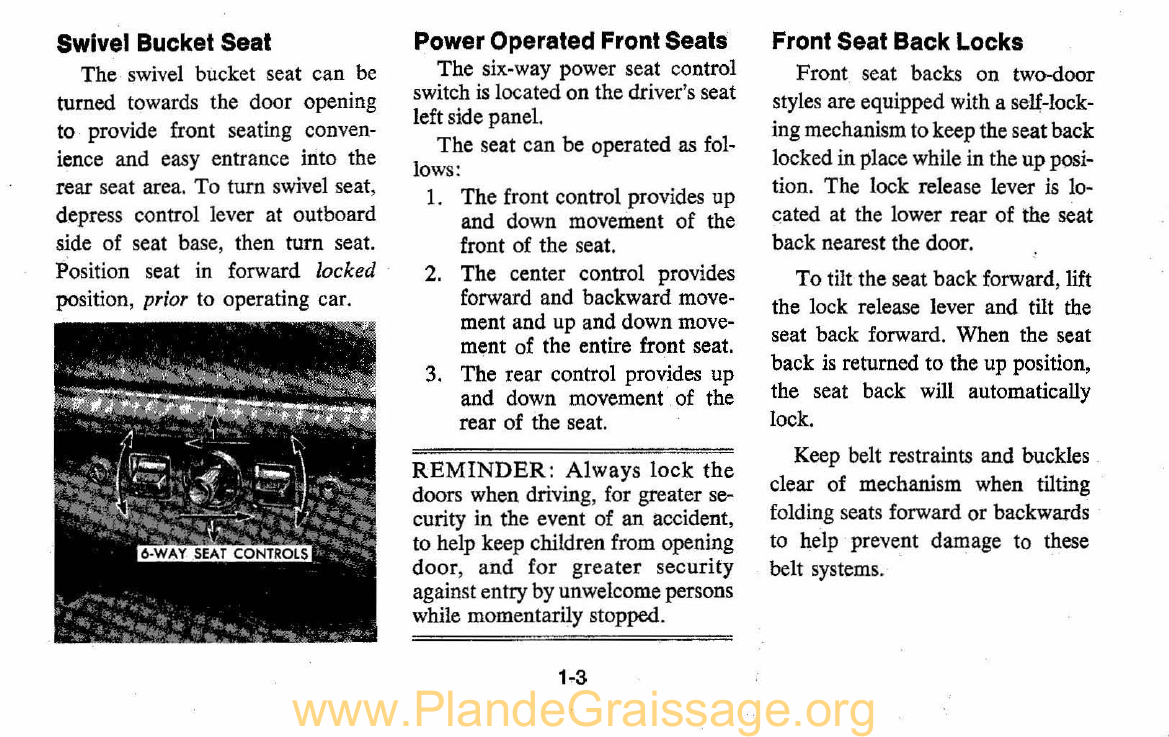
Power Operated Front Seats
The six-way power seat control
switch
is
located on the driver's seat
left side panel.
The seat can be operated
as
fol-
lo
ws
:
I. The front control provides
up
and down movement of the
front of the seat.
2.
The center control provides
forward and backward
move-
ment and
up
and down
move-
ment of the entire front seat.
3.
The rear control provides up
and down movement of the
rear of the seat.
REMINDER
: Always
lock
the
doors when driving, for greater se-
curity in the event of an accident,
to help keep children from opening
door, and for greater security
against entry
by
unwelcome persons
while momentarily stopped.
1-3
Front Seat Back Locks
Front. seat ba
cks
on two-door
styles are equipped with a self-lock-
ing mechanism to keep the seatback
locked in (llace while in the up posi-
tion. The lock release lever
is
lo
-
cated at the lower rear of the seat
back nearest the door.
To tilt the seat back forward, lift
the lock release lever and tilt
the
seat back forward. When the seat
back
is
returned to the up position,
the seat back will automatically
lock.
Keep
belt restraints and buckles
clear of mechanism
when
tilting
folding seats forward or backwards
to
help prevent damage
to
these
belt systems.
www.PlandeGraissage.org

Reclining Passenger Seat
Back
The pa
sse
nger seat back can be
reclined approximately
20
degrees
rearward of normal position.
To
adjust seat back, lift the control
lever at the outboard side of the
passenger seat cushion and exert
rearward pressure on the
se
at back
to recline rearward or with no pres-
sure on the seat back allow seat
back
to
return forward.
Power Windows
Power windows have an ignition
interlock
so
the windows cannot be
operated unless the ignition switch
is
in
the
"on
" position.
A master control for
all
win-
dows is provided at the driver's
position. Individual switches are
provided under each window for
passenger use.
REMINDER: Remoye the ignition
key
whim
the vehicle
is
not at-
tended
by
a responsible person.
1-4
Inside Rearview Mirrors
To
raise
or
lower
mirror
to
achieve desired
field
of view, grasp
mirror and exert sufficient pressure
by
pushing or pulling up, down or
sideways.
Switch mirror to night position
to
reduce glare from following
headlights.
www.PlandeGraissage.org

Occupant Restraint Belts
CHEVELLE AND
MONTE CARLO ONLY
For
EI
Camino-$ee
page 1-9
Lap
and shoulder belts provide
added security and comfort for you
and your passengers. Proper use
and
care
of
these .belts will assure
contin~ance
of
this security.
Front Seat Lap-Shoulder Belt
Combination
• Adjust front seat
to
satiSfaction
·
of.
driver and sit erect and well
back in seat.
•:
In
a single motion, pull the lap-
. shoulder belt webbing across lap
far enough
to
permit inserting
metal latch plate end of belt into
the buckle, until a snap
is
heard.
If
webbing
is
not pulled out far
enough
to
reach buckle, let lap
belt rewind into
it
s retractor to
release lock mechanism, so belt
can be pulled
out
to the proper
length.
• Position "lap" portion of belt
across lap as
LOW
ON
HIPS as
possible.
To
reduce the risk of
sliding under belt during
an
ac-
cident, adjust to a SNUG
FIT
by pulling belt firmly across lap
in direction
of
lap belt retractor
~o
it can take up slack. The belt
1-5
CLIP
I
-""':F-W"
BELT
I"
retractors are designed to auto-
matically take
up
exce
sS
webbing.
• The front seat shoulder belts in
this vehicle are equipped with
a "vehicle sensitive. retractor"
which is designed to
lock
only
during a sudden stop
or
impact.
At
other times it
is
designed to
movefreelywith the occupant.
www.PlandeGraissage.org

• For best restraint the slight ten-
sion on the shoulder caused by
the shoulder belt retractor
is
de-
sirable.
• A comfort clip
is
provided for
those who find the shoulder belt
tension a source of discomfort.
If
theshoulder belt tension becomes
uncomfortable, pull down on the
shoulder belt to provide the least
amount of slack necessary to re-
lieve tension (not
more
than one
inch), then push the comfort clip
snugly against the guide loop.
• To unfasten belts, depress push
button in center of buckle.
1-6
• When no longer in use, front
seat lap-shoulder belts can be
stowed by allowing them
to
re-
wind
into their retractors. The
comfort clip can be adjusted
when removing belts,
so
shoulder
belt slack
will
be fully taken
up
by retractor.
NOTE: Take. care not
to
let the
"lap" portion of the belt twist while
it
is
being rewound into the retrac-
tor. The bulk of the twisted belt
may cause the retractor
to
jam
so
it
will not rewind further while at the
same time the retractor's locking
mechanism may prevent the belt
from being withdrawn.
www.PlandeGraissage.org

To
release a jammed belt, open
the cover on the rear of the retrac-
tor and rotate the key slot while
pulling the beltupward. This should
allow the belt to be untwisted.
If
your retractor does not have such a
key slot or for some reason
the
lap
.belt portion remains jammed,
or
other parts of the restraint system
do not operate properly,
take
the
vehicle to your dealer for service.
Belt Restraint Light/Buzzer
Reminder
• When the ignition key.is turned
to On
or
Start, a reminder light
is
designed to come on for four
to eight seconds, to remind oc-
cupants to fasten their belts re-
straints.
•
If
the driverhas not buckled his
belt restraint prior to turning the
key to.
On
or
Start, a buzzer is
designed to sound for four to
eight seconds to remind, him to
do
so.
lf
the belt restraint system
oue-
minder system does not work as de-
scribed, see your dealer for infor-
mation and assistance.
Lap Belts (For Rear Seat
and Center Front Seat
Passengers)
• Seating positions next to side
windows (except station wagon
1-7
third seats) have retractors which
are designed to automatically
take up excess webbing. These
belts should be positioned, se-
cured and released
as
described
above under "Lap-Shoulder Belt
Combination." (Retractors are
available
as
an option onstation
wagon third seats.)
-
--
www.PlandeGraissage.org

• Lap belts at center seating posi-
tions (and third seats) also should
be positioned, secured and re-
leased as described above, and
adjusted to a SNUG
FIT
by
pull-
ing on the end of the belt extend-
ing from the adjustable latch
plate.
•
To
lengthen lap belt at center
seating positions (and station
wagon third seats) place adjust-
able latch plate at right angles
to the belt webbing and pull on
latch plate; belt shouldthen slide
easily through the adjustment
feature.
Optional Shoulder Belts
Rear Seat, Outboard
• When properly worn with a lap
belt, a shoulder belt can provide
additional protection
by
prevent-
. ing
or
minimizing impactwith the
car interior, by restraining for-
ward motion of the upper.torso
in a collision. This
is
particularly
true in the case of a frontalforce
impact.
•
To
fasten the detachable shoulder
belt, unstow it and place the knob
on the shoulder belt end into the
keyhole on the lap belt latch
plate. The latch
is
designed so
that this attachment can only be
completed before fastening the
lap belt. Tilt the knob
as
neces-
sary, to pass it through the slot.
Pull the knob firmly upward to
scat it at the narrow end of the
keyhole, then fasten the lap belt.
Reverse this procedure when re-
moving and restowing the shoul-
der belt.
• The detachable shoulder belts
are lengthened and shortened in
the same manner
as
center seat
lap belts.
• The detachable shoulder belt
should have sufficient slack to in-
1-8
se
rt a fist's width between your
chest and the belt. This can be
checked
by
inserting a clenched
fist
between the belt and your
chest with thumb against chest
and back ofhand facing upward.
www.PlandeGraissage.org

EL
CAMINO-
Belt Restraint
System
~ap
Beltl-EI
Camino
• Adjust seat to
satisf~lion
of
. driver and sit erect .and well
back in seat. .
.0 In a single motion, pultwebbing
across lap far enough :to permit
inserting metal latch plate end
of lap belt into the buckle, until
a snap
is
heard.
If
webbing
is
not pulled out far enough to
reach the buckle, let belt rewind
into the retractor to release lock
mecqanism,
So
belt can be pulled
out
to
the proper length.
ADJUSTABLE
LATCH
PLATE
CENTER
SEAT
BELT.
TURN
AT
RIGHT
ANGLE
TO
LENGTHEN.
www.PlandeGraissage.org

• Position belt across lap
as
LOW
ON
HIPS
as
possible. To reduce
the risk of
s,liding
under belt
during an accident, adjust to a
SNUG
FIT
by pulling belt firmly
across lap in direction of retrac-
tor
so
it can take up slack.
• Seating positions next to side
windows have retractors which
are designed to automatically
take up excess webbing.
• Lap belt at center seating posi-
tion should be positioned and
secured
as
above, and adjusted
to a SNUG
FIT
by pulling on
the end of the belt extending
from the adjustable latch plate.
• To lengthen lap belt at center
seating position place adjustable
latch plate at right angles to the
belt webbing and pull on latch
plate;belt should then slide easily
through the adjustment feature.
•
To
unfasten lap belts, depress
push button in center of buckle.
Shoulder
Belts-EI
Camino
• When properly worn with a lap
belt, a shoulder belt can provide
additional protection by prevent-
ing or minimizing impact with
the car interior by restraining
forward motion of the upper
torso in a collision. This
is
particularly true in the case of
a frontal impact.
•
To
fasten the shoulder belt, un-
stow it and place the knob on
the shoulder belt end in the key-
hole on the lap belt latch plate.
(The latch
is
designed so that
this attachment can only be com-
1-10
pleted before fastening the lap
belt.) Tilt the knob
as
necessary,
to pass it through the slot. Pull
the knob firmly upward to seat
it at the narrow end of the key-
hole, then fasten the lap belt.
Reverse this procedure when re-
moving and restowing the shoul-
der belt.
www.PlandeGraissage.org

• Shoulder belts are lengthened
and shortened
in
the same man-
ner
as
center seat lap belts.
• Shoulder belt should have
suffi-
cient slack to insert a
fi
st's width
between your chest and the belt.
This can be checked by inserting
a clenched
fist
between the belt
and your chest with thumb
against chest and back of hand
facing upward.
• The shoulder belts in this vehicle
are equipped with "inertial type"
retractors which are webbingsen-
sitive, designed to lock
only
when
the webbing is extended rapidly.
•
For
best restraint the slight ten-
sion on the shoulder caused by
the shoulder belt retractor is de-
sirable.
• A comfort clip is provided for
those who find the shoulder belt
tension a source of discomfort.
If
the shoulder belt tension be-
comes uncomfortable, pull down
on
the shoulder belt to provide
the
lea
st amount of slack neces-
sary to relieve tension
(not
more
than one inch), then push the
cQmfort clip snugly against the
trim panel.
• To unfasten .belts, depress push
button in center of buckle.
• When no longer in use, shoulder
belts can be stowed by allowing
them to rewind into their retrac-
tors. The comfort clip can be ad-
1-11
justed when removing belts,
so
shoulder belt slack can be taken
up
by
retractor.
Belt Restraint Buzzer/Light
Reminder-EI Camino
• When the ignition key is turned
to On or Start, a reminder light
is designed to come on'for four
to eight seconds, to remi:ld oc-
cupants to f
as
ten their belt re-
straints.
•
If
the driver has not buckled his
belt restraint prior to turning the
key to On
or
Start, a buzzer is
designed to sound for four to
eight seconds to remind him to
do
so.
If
belt restraint system or re-
minder system does not work
as
de-
scribed, s
ee
your Chevrolet dealer
for information and assistance. .
www.PlandeGraissage.org

Belt Restraint
Inspection-
Chevelle, Monte Carlo and
EI
Camino
o Periodically inspect belts, buck-
les, adjustable latch plates, re-
tractors, reminder
sy
stems, guide
loops, clips, and anchors for
proper operation, and also for
damage that could lessen the
effectiveness of the restraint
sys-
tem.
o Keep sharp edges and damaging
objects away from belts, and
other parts of restraint system.
o Replace belts if cut, weakened,
frayed, or subjected
to
collision
loads.
o Check that anchor mounting
bolts are tight.
o
Have
questionable
parts
re-
placed.
o Keep belts clean and dry.
• Clean only with mild soap solu-
tion and lukewarm water.
• Do not bleach or dye belts since
this may severely weaken belts.
Head Restraints
o Head restraints are designed to
help reduce injuries due to
"whiplash."
• Select one of three positions up,
intermediate or down -which
places
the
top of the head
re-
1-12
straint clos
es
t
to
the top of your
ears.
o Do not use head restraint above
the up detent position.
o Head restraint can be raised by
pulling up until you
feel
it click
into the "detent" position.
o To lower, release latch at base
of supporting rod and '
pu
sh
down on restraint.
o Do not operate vehicle with head
restraints removed, since occu-
pants lose the protection they
provide.
Child
Restraint-
Chevelle and Monte Carlo
Children in automobiles should
be
restrained to lessen the risk of
injury in accident
s,
or sudden stops.
General Motors dealers offer re-
straint systems designed specifically
www.PlandeGraissage.org

for use with infants and with small
children. The GM "Infant Love
Seat"
is
designed for babies up to
20 pounds. The GM "Child Love
Seat" (not available in Canada)
is
designed for children weighing 20
to
40
pounds, up to 3 feet 4 inches
in height, who are able to sit up
alone.
If
a child
is
traveling in a vehicle
not equipped with a General Mo-
tors infant or child restraint
or
other appropriate infant
or
child
restraint system, the following pre-
cautions should be taken:
l.
Infants unable to.sit up by them-
selves should be restrained by
placing them in a covered,
padded bassinet which
is
placed
crossways in the vehicle (width-
wise) on the
re:;tr
seat. The bas-
sinet should be securely re-
strained with the regul:;tr vehicle
belt restraints.
An
alternate
method
is
to position the bassi-
net so that it rests against the
back of the front seat, again
crossways in the vehicle.
2. Children able to sit up by them-
selves should be placed on a seat
and restrained with belt restraint.
When children ride in the front
seat, both lap and shoulder belt
should be worn.
If
the shoulder
belt causes neck or face irrita-
tion due
t()
the child's size, this
may be reduced in some cases by
positioning the child further in-
board.
If
serious discomfort con-
tinues, the child should be lap
belted in the rear seat. Never al-
low child to stand
or
kneel on
any seat.
3.
GeneralMotors recommends that
www.PlandeGraissage.org

children be restrained properly
when riding. However, if unusual
conditions prohibit use of re-
straints and require that a child
must stand, he should stand on
the floor directly behind the
front seat. This will help mini-
mize the possibility of injury
from frontal impacts
i.fl
the event
of such an accident.
Child Restralnt-EICamino
Children in vehicles should be
restrained to lessen the risk of in-
jury in accidents, or sudden stops.
General Motors dealers offer re-
straint systems designed specifically
for use with infants. The
GM
"In-
fant Love Seat"
is
designed for
babies up to
20
pound
s.
If
a child
is
traveling in a vehicle
not equipped with a General Mo-
tors infant
or
child restraint or
other appropriate infant
or
child
restraint system, the following pre-
cautions should be taken:
1. Infants unable to sit up by them-
selves should be restrained by
placing them in a covered,
padded bassinet which should be
placed crossways in the vehicle
(widthwise) on the seat. The
bassinet should be securely re-
strained with the regular vehicle
belt
re~traints.
(An
alt~rnate
method
is
to position the bassi-
net so that it rests against the
back of the front seat, again
crossways in the vehicle.)
2. Children able to sit up by them-
selves should be placed on a seat
and restrained with a belt re-
straint: Both lap and shoulder
belt should be worn when both
are available.
If
the shoulder belt
1-14
causes neck or face irritation due
to the child's size, this may be
reduced in some cases by posi-
tioning the child further inboard.
Never allow a child to stand
or
kneel on the seat.
All
Models
In
using any infant or child re-
straint
sYstem,
read and comply
with all installation and usage in-
structions.
CAMPER USAGE
ON
EL
CAMINO
www.PlandeGraissage.org

Trailer Hauling
,Sincepassenger cars are designed
and intended to be used"primarily
as
passenger
conveyance~,
towing
a trailer will effect handlipg, dura-
bility and economy. M.aximum
,safety and satisfaction ' depends
upon proper use of corte¢t equip-
,ment and avoiding overloads and
, other abusive operation, " '
The maximum loaded trailer
,weight which you can pull with
your car depends on what"special
equipment has been installed on
your car, Chevrolet does not rec-
ommend towing any trailer over
1,000 pounds gross trailer weight
unless the car has the proper equip-
ment, Information on trailer haul-
ing capabilities, special equipment
required, and optional equipment
offer~d
by Chevrolet is available
from your Chevrolet Dealer or by
writing Chevrolet Motor Division,
Detroit, Michigan' 48202
(or
in
Canada by writing to General
Motors of Canada Limited, Owner
Relations Department, Oshawa,
Ontario
LlJ
5Z6).
To
assist in attaining good han-
dling of the car-trailer combination,
it
is
important that the trailer
1'-15
tongue load be maintained at ap-
proximately
10%
of the loaded
trailer weight. Tongue loads can
be adjusted by proper distribution
of the load in the trailer, and can
be checked
by
weighing separately
the loaded trailer and then the
tongue,
Whentowing trailers,tires should
be inflated to the highest inflation
pressures shown on 'the ' placard
affixed to the left front door. The
allowable passenger and cargo
load, also
shown
on the same pla-
card,
is
reduced
by
an amount
equal to the trailer tongue load on
the trailer hitch;
www.PlandeGraissage.org

Maintenance
More frequent vehicle mainte-
nance
is
required when using your
car to pull a trailer. Change the:
• Automatic transmission fluid
and filter each
15
,000 miles,
(see Trailering brochure for addi_
tional information).
• Rear axle fluid each 15,000
miles,
• Engine oil each
90days
or 3,000
miles, whichever occurs first,
• Positive crankcase ventilation
valve each
12
months or 15,000
miles, whichever occurs first.
• See index for important informa-
tion
on
belts, cooling system care
and automatic brake adjustment.
Break-in Schedule
In addition to the new car break-in
in
structions
in
this manual,
it
is
recommended that your
new
car
be
operated for 500 miles before
trailer towing.
If
it
is
necessary to
tow during this period, avoid speeds
over 50 MPH and full throttle
starts. The same precautions should
be
observed whenever a new en-
gine, transmission or axle
is
in-
stalled in.your car.
1-16
www.PlandeGraissage.org
Table of contents
Other GM Automobile manuals