Good Sam RVND 5525 LM User manual

Quick Start Guide
RVND™5525 LM


1
Important Information About Your GPS
Wi-Fi®:Some features of this device require wireless connectivity, which requires a supporting feature and data
plan from your wireless service provider. As the user, you are responsible for all data charges. Please contact your
wireless service provider to make sure you do not exceed the limits of your data plan.
Rand McNally Dock: Keep your device up to date by downloading the Rand McNally Dock for your home
computer at www.randmcnally.com/dock and connecting your device with the USB cable provided.
Learn More: Access Tutorial & Tips under Preferences > General on your device for more information,
or visit www.randmcnally.com/support to download the user manual.
Power Button: Press and hold the orange power button to turn the device on or off. The power button can also
be used for quick access to certain features while the device is running. See Preferences > General >
Quick Power Press for options. A red light indicates the battery is charging; a green light indicates the
battery is fully charged.
Reset: Use the reset button on the back of the device to restart. This will cancel the current route, but
preferences, address book, and other personal data will be saved.

2

3
Install the Mount
Note: Follow all local regulations governing the placement of the mount.
1. Select an area with a line of sight to the sky and GPS satellites to ensure reliable GPS information.
2. Clean and dry the mounting area.
3. Remove the suction cup protective film.
4. Adjust the angle of the mount using the thumbscrew.
5. Pull the suction cup lever up to release suction.
6. Plug the power cord into the device and the vehicle’s 12-volt power source.
7. Slide the device onto the mount.
8. Place and hold the mount suction cup against the mounting surface.
9. Press the suction cup lever down until it snaps into place.
10. Adjust the device so that it can be easily seen and does not block the driver’s line of sight.

4
1Enter RV information and access RV-specific tools.
2Show location on the map and view navigation
instructions.
3Choose a destination.
4Select general, route, and map preferences.
5Mute/unmute the speaker.
6Adjust speaker volume.
7Battery status indicator.
Note: From other screens, tap the Main Menu icon in
the bottom right corner to return to the Main Menu.
Help and tutorials are available in Preferences. Some
screens may appear different, based on model number.
Main Menu
1 2 3
4 5 6
7

5
1. Tap RV Tools > RV Info or Warnings.
2. Tap and to view options.
3. Tap the option button to be changed.
4. Enter new settings.
5. Tap to save changes.
1. Tap Preferences.
2. Tap the General, Route or Map tab.
3. Tap and to view options.
4. Tap the option button to be changed.
5. Enter new settings.
6. Tap to save changes.
On the left,
tap on an
option
On the right,
enter settings
for the option
Enter RV Information and Set Warnings
Set Routing and Device Options
On the left,
tap on an
option
On the right,
enter settings
for the option

6
Destination
1Return to a new location. (See page 7.)
2Return to a previously entered address.
3Access the Address Book.
4Plan a multi-stop trip.
5Route to a point of interest. (See page 8.)
6Run an Internet search for local businesses.
(Note: This feature requires a Wi-Fi connection.)
7View trip content from Rand McNally.
Run a local search near:
8Your RV
9A particular city
10 Your destination
11 Search for local restaurants.
12 Access recent searches.
1 2 3
456
8 9 10
11 12
7

7
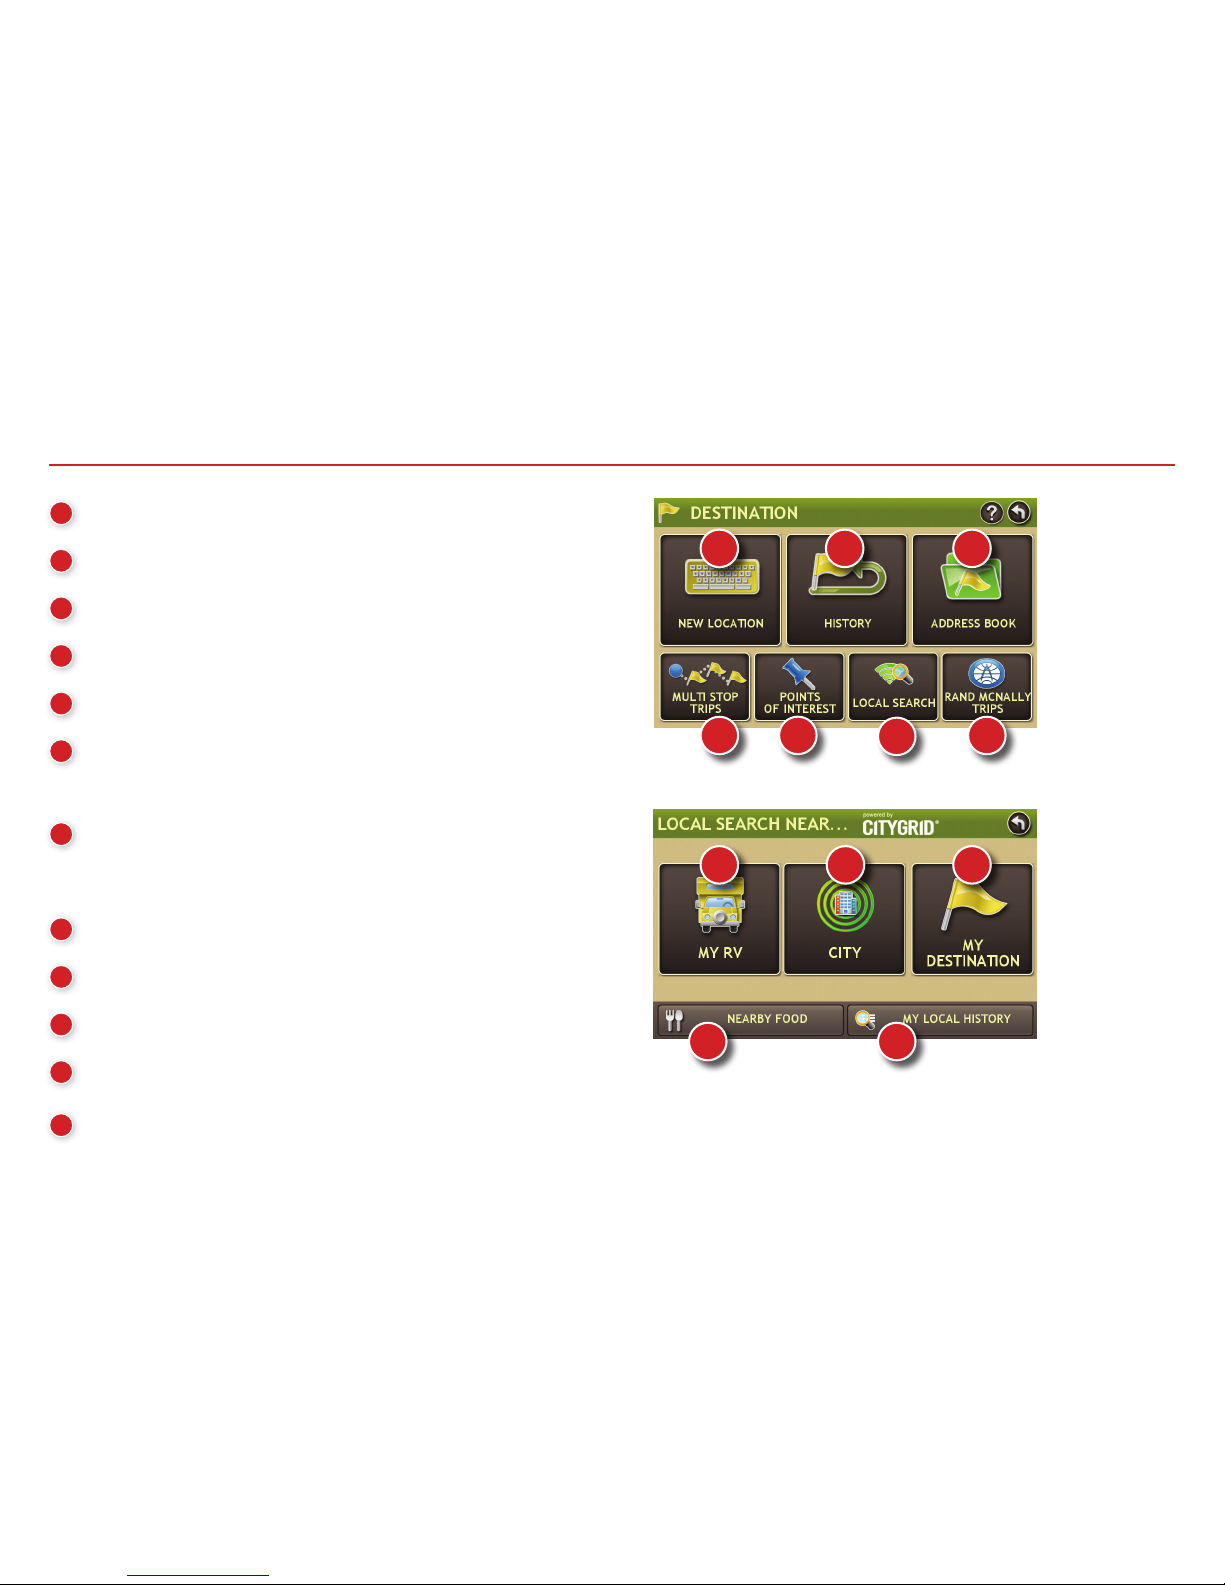
Route to a New Location
1. Tap Choose Destination > New Location.
2. Tap Address.
3. Enter the name of the city. (Note: As you type, the keyboard
displays only the next possible letter.)
4. Prompts appear in the top bar. Tap the city to select. Or, tap
List to view cities beginning with the letter(s) you entered.
5. Enter the street name. (Note: If the letters you need do not
appear, tap Expand Search.)
6. Enter the house number. (Note: To enter the house number before
the street, tap the house number button in the previous step.)
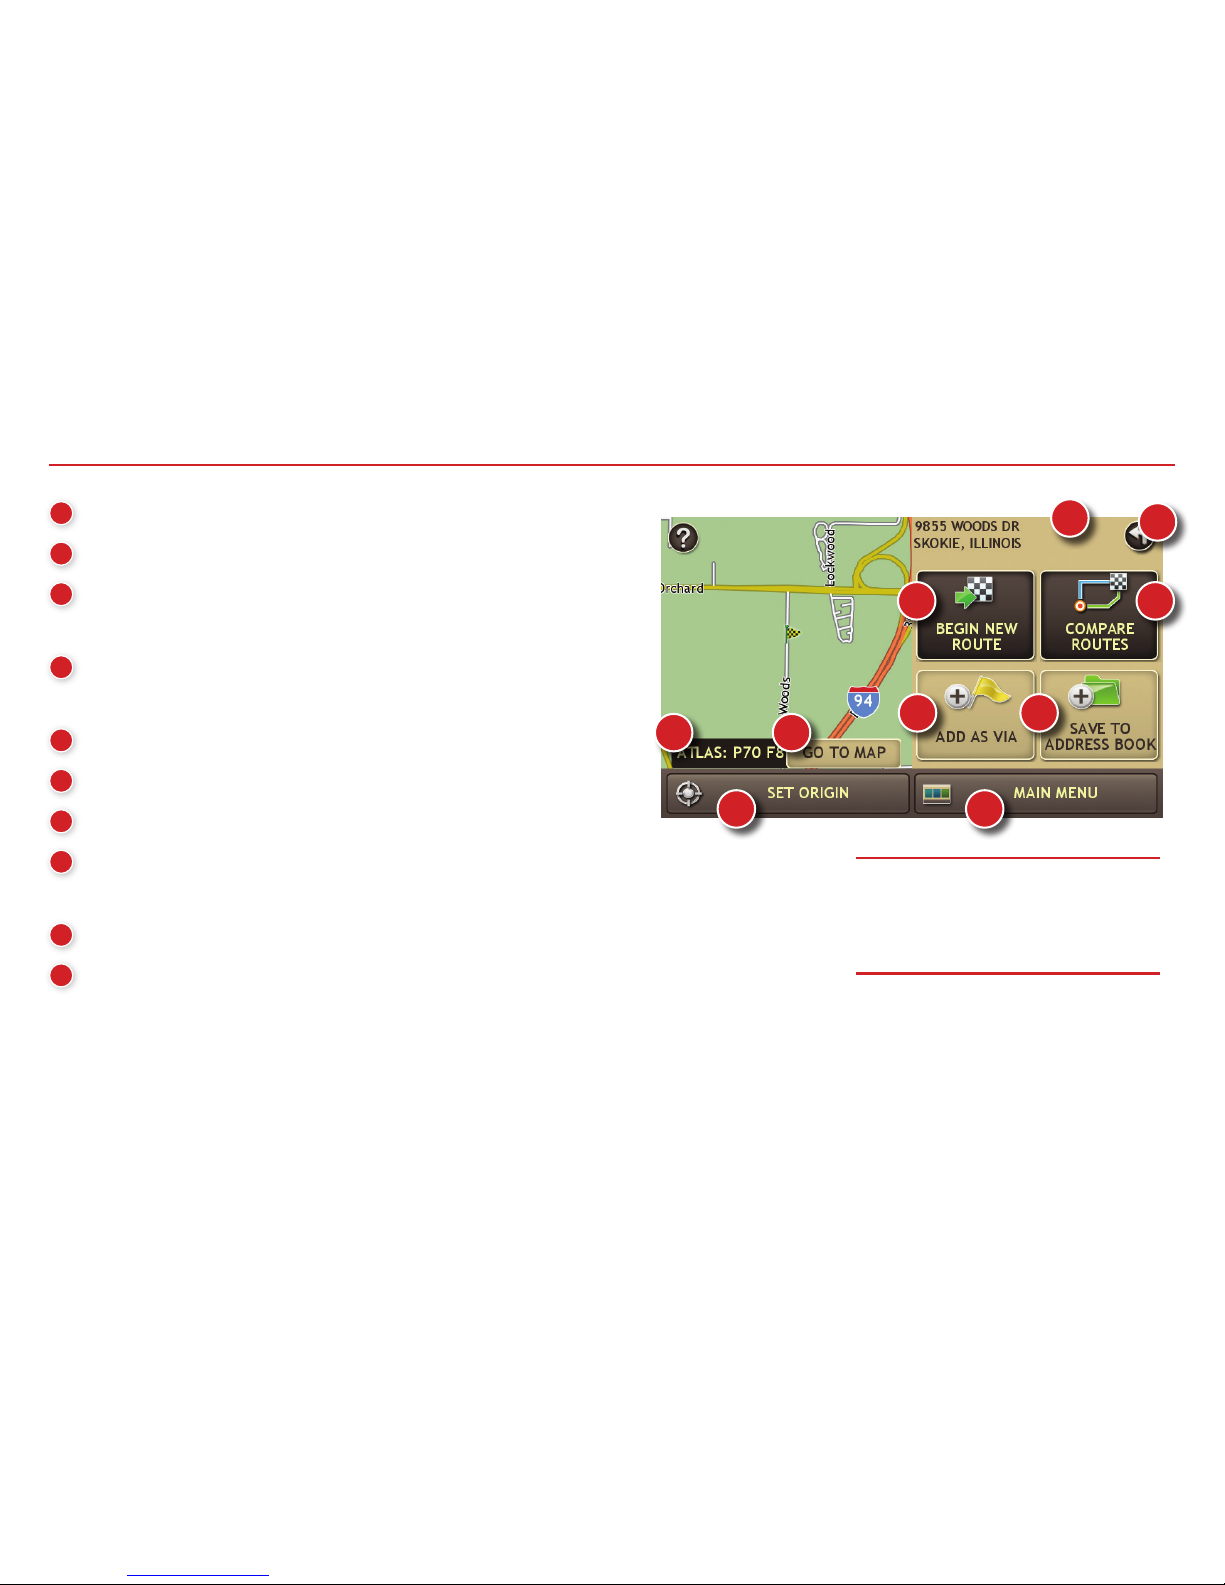
See Confirm Destination Window (page 8).
Tips
• You can also route to a new location by City Center,
Intersection, or Latitude/Longitude, or choose
Address > Zip Code Search.
• View recent destinations by tapping Choose Destination > History.
View recent cities by tapping Choose Destination > New Location > Address > History.
• View saved locations by tapping Choose Destination > Address Book.

8
Confirm Destination Window
1Destination address.
2Begin route to destination.
3Compare a primary and alternate route and
choose one.
4Add the location as a via point on the way to
a previously entered destination.*
5Save the location to the Address Book.
6Cross reference to printed Rand McNally Road Atlas.
7View the map.
8Change the starting location for a route to the
location displayed here.
9Return to Main Menu.
10 Return to previous window.
*To manage via points, Tap Choose Destination > Multi-Stop Trips. You can add up to
50 destinations in a multi-stop trip, and optimize routing for trips of up to 10 stops.
NOTE: This window may include
additional buttons based on the
type of destination selected.
1
45
6 7
9
8
10
2 3

9
1Repeat spoken next-maneuver instructions.
2Name of street you will turn onto next.
3Show arrival time, remaining time, or other options.
4Slide out to show upcoming exit information.
5Directions list slideout. Tap Route Display Options
to select turn-by-turn, highway, or map view.
6Zoom in/zoom out.
7Access Wi-Fi connected services.
8Return to Main Menu.
9Select a map display option (Heading Up, North Up,
or 3D View). Also displays Wi-Fi status.
10 View current road name, upcoming cross road name, or city, county and state.
11 View and save current location, detour, or cancel a route.
12 Tap on the current speed to display the Virtual Dashboard.
(Note: Turns red for speed warnings; set in RV Tools > Warnings.)
13 Current speed limit. Tap to open a “Tell Rand” about speed limits.
14 View the Traffic Window (enabled with traffic receiver accessory).
15 Mute the speaker.
Route Map Window
13
4
5
6
8
7
9
2
10
11
12 15
14
13

10
7
6
8
1
3
45
2
Find a Point of Interest (POI)
Tap Choose Destination > Points of Interest.
1Find popular RV-friendly POIs near your current
location.
Search for a POI:
2Near your RV
3In a particular city
4Along your route
5Near your destination
POI Categories:
6Select a category.
7Find restaurants, hotels, and other subcategories.
8View custom POIs that have been uploaded
through the Rand McNally Dock.

11
When on a route, Junction View displays when you have an upcoming maneuver.
Once past the maneuver, Junction View closes and the previous window displays.
1Signs to follow for the next maneuver.
2Number and direction of lanes for the next maneuver.
3Distance to the upcoming maneuver. Distance decreases as you
approach the ramp.
4Lane assist arrow.
5Mute the speaker.
6Return to previous window.
1
3
2
4
56
9Tap location to select.
10 View and edit ratings and comments.
11 Tap to search by available services.
12 Apply or remove services filter for search results.
910
11 12
Find a Point of Interest (POI) -
continued
Junction View

12
1Sunrise and sunset times based on vehicle
location (latitude/longitude) and day.
2Current speed.
3Elevation at current location.
4Percentage of current trip completed, distance to
next maneuver, and the number of miles and time
spent on the trip to this point.
5Average uphill and downhill speeds.
6Gather trip information for up to three trips.
Includes odometer settings, hours, and speeds.
7Reset trip information for the selected trip (Tab 1,
Tab 2 or Tab 3).
8Select to automatically reset the information in
each tab after the vehicle has remained stationary
for the specified number of hours.
9View fuel logs and add fuel purchase information.
10 Return to the Route Map Window.
Virtual Dashboard
1
3
4
5
6
8
7
9
2
10

13
Tap RV Tools > Checklists, Maintenance, Trails, Fuel.
Then tap on each tab to view.
1Use Checklists to create and complete task lists to
prepare for a trip.
2Add notes in the Maintenance tab to record dates of
service for your RV.
3Use Trails to record a “bread-crumb” path of GPS coordinates
where your RV has traveled. Tap any record to view the trail,
edit the name, or set the color.
4Use the Fuel tab to view a list of fuel purchases. Tap Add Fuel
to record the date, location and cost of fuel purchase. Tap Save.
Tap any record to make changes.
Checklists, Maintenance, Trails, and Fuel
1 2 3 4

14
For information on setting up a Wi-Fi hotspot through your cellular phone
or laptop computer, please visit www.randmcnally.com/wifihelp for
basic instructions or contact your wireless carrier.
Note: Wi-Fi connectivity requires a supporting feature and data plan
from your wireless service provider.
As the user, you are responsible for all data charges. Please contact
your wireless service provider to make sure you do not exceed the
limits of your data plan.
Once you have established a Wi-Fi hotspot:
1. From the Main Menu, tap Preferences.
2. Tap WiFi in the bottom right corner.
3. Tap Enable WiFi to search for available hotspots.
4. Tap the hotspot you want to connect to.
5. Enter the network password.
6. Tap Disable WiFi to turn Wi-Fi connectivity off.
(Note: Disable to save battery power.)
Wi-Fi®

15
Weather
Note: This feature requires a Wi-Fi connection.
To view current weather information and the three-day
forecast for your location, tap the Wi-Fi connected services
icon on the map screen.
1Tap to view details for current weather alerts.
2View weather information at your destination.
Note: You can view weather information at any other
location by tapping the map and then the Weather icon.
3Display weather on the map as you drive.
4Select from a variety of weather types.
5Slide to adjust the transparency of the overlay on the map.
Note: Use the slider to readjust for visibility when
switching between day and night modes. The speed of
the weather display will depend on the speed of your
Internet connection.
4
5
1
32

16
Note: This feature requires a Wi-Fi connection.
Tap the Wi-Fi connected services icon ( ) on the map screen.
Then tap the Fuel tab.
1Check to show fuel prices on the map screen.
2Sort results by distance or price.
3Set filters for type and brand of fuel.
4Choose to search near your vehicle or along your route.
Fuel Prices
Traffic Everywhere
Live traffic information is available as a premium service on the
Rand McNally Dock. (See page 17.) Get traffic conditions and
alerts right on your RV GPS. Traffic information is available with
a Wi-Fi connection wherever you receive a data signal on your
smartphone, even in rural areas.
134
2

17
The Rand McNally Dock enables you to receive software upgrades and access map updates, construction
updates, and additional features. Simply download the Dock software for your PC or Mac at
www.randmcnally.com/dock and connect your device using the USB cable provided.
With the Rand McNally Dock, you can also:
• Access the Good Sam Trip Planner
• Purchase Traffic Everywhere
• Upload custom POIs, such as red light cameras and railroad crossings, to your device
• Download the User Manual
• Access the Rand McNally support site and online store
• Read product news and announcements
• Send feedback and suggestions to Rand McNally through “Tell Rand”
For a detailed description of the features of your device, please see the User Manual, which can be downloaded
from the Rand McNally Dock, and is also available at www.randmcnally.com/support.
More Information
Rand McNally Dock™

18
Warnings, End-User License Agreement, and Warranty
Pay attention to road conditions and street signs, and obey all traffic and safety laws. Traffic laws and current traffic conditions must always be observed and take precedence over the instructions issued by the
Rand McNally
®
navigation system. The User should be aware of situations where current traffic conditions and the instructions from the navigation system may be in conflict. Some states prohibit the use of windshield mounts
and may otherwise restrict the usage of navigation and other electronic devices in the vehicle. It is the User’s responsibility to ensure compliance with all laws and regulations. The use of the navigation system does not relieve
the User of his/her responsibilities. The User is ultimately responsible for the vehicle under his/her control and should be aware of the surroundings at all times.
If after reading these statements the User decides not to accept these terms, the User should not use this navigation system.
RM Acquisition, LLC d/b/a Rand McNally (“Rand McNally”) hereby grants you (“User”) a single-user non-exclusive, non-transferable license to use the Rand McNally navigation system (hereinafter referred to as the
“Product” (including software and associated data)) for User’s own internal business or personal use and not for resale, sublicense or commercial use.
This Product and the software incorporated in it and related documentation are furnished under license and may be used or copied only in accordance with this license. Except as permitted by such license, the contents of
this Product and software may not be disclosed to third parties, copied or duplicated in any form, in whole or in part, without the prior written permission of Rand McNally. This Product and software contain proprietary and
confidential information of Rand McNally and its licensors. Rand McNally grants User a limited license for use of this Product and the software incorporated in the Product for its normal operation. By using the Product, User
acknowledges that the content of this document and the Product are the property of Rand McNally and its licensors and are protected by U.S. copyright, trademark and patent laws and international treaties.
THE USER MAY NOT:
• Use the Product on a network or file server, time-sharing or to process data for other persons.
• Use the Product to create any routing tables, files, databases or other compendiums.
• Copy, loan or otherwise transfer or sublicense the Product, its software or content.
• Modify, or adapt the Product in any way, or decompile, disassemble, reverse engineer or reduce to human readable form the Product and software incorporated therein.
• Alter, remove or obscure any copyright notice, trademark notice, or proprietary legend from the Product, its software or content.
This license will terminate automatically if User fails to comply with any of the terms of this license and User agrees to stop using the Product. Rand McNally may revise or update the Product and is not obligated
to furnish any revisions or updates to User.
Rand McNally warrants that the Product, and the component parts thereof, will be free of defects in workmanship and materials for a period of one (1) year from the date of first use as determined by contact with GPS
satellites. This warranty may be enforced by the first consumer purchaser (“Customer”), provided that the Product is utilized within the U.S.A. or Canada.
Rand McNally will, without charge, repair or replace (with a new or newly reconditioned unit), at its option, defective Products or component parts. For repair or replacement of defective Products, Customer must contact
Rand McNally at 1-800-333-0136 for return authorization and instructions. Customer will be required to have the product registered via the Rand McNally Dock or, if Customer is unable to register the Product electronically,
Customer will be required to provide proof of the date of first Customer purchase, such as a duplicate copy of a sales receipt for warranty to be valid. When the Product is connected to the Rand McNally Dock, the Dock will
record the date of first use of the Product based on contact with GPS satellites. The Customer must pay any initial shipping charges required to ship the product for warranty service, but the return charges will be at
Rand McNally’s expense, if the Product is repaired or replaced under warranty.
Repairs of replacements have a 90-day warranty. If the Product sent in is still under its original warranty, then the new warranty is 90 days or to the end of the original one (1) year warranty, depending on
which is longer.
This warranty gives the Customer specific rights. Other rights may be available to Customer which vary from state to state.
Other manuals for RVND 5525 LM
1
Table of contents
Other Good Sam GPS manuals