GreatGadgets MP3 Piggy Bank User manual

MP3 Piggy Bank
Instruction manual
Features
Piggy bank with 8 MB storage capacity for music files
Plays tune after inserting a coin
Recognises MP3 and WAV files
Recording capacity of approximately 90 seconds
Up to 20 tunes, 5.5 seconds each
Adjustable volume
Coin door can be locked
How to get started
Open the battery case using
a small screw driver and insert
three AA-batteries (mignon).
Please ensure the " + " & " - "
polarities are correct.
1.
Close the battery case.
2.
Attach the USB cable to the
MP3 Piggy Bank and the USB
port to your PC or laptop.
3.
Includes USB cable and software (auto start once connected to PC / laptop)
Requires three AA-batteries (mignon) which are not included
Compatible with Windows XP / Vista / 7 and higher
Not appropriate for children under the age of eight
1
English
Your PC or laptop automatically
recognises the software "DIY
Writer" and opens the following
window:
4.
Back Open the folder Refresh
DIY Writer
Download
Delete
Delete All
Volume bar
Drag
Slot USB Port Screw
Coin door Battery cover

MP3 Sparschwein
Bedienungsanleitung
Additional operating advice
The MP3 Piggy Bank only operates with disposable batteries. Smooth operation of the
device cannot be guaranteed with rechargeable batteries.
Old and new batteries should not be used together at the same time.
If your PC / laptop does not automatically recognise the "DIY Writer" software then
browse your computer for the software. Double click to run the program.
If the MP3 Piggy Bank does not play a tune the first time that you insert a coin, then
remove the batteries and re-insert them. The MP3 Piggy Bank should now be ready to
operate.
Removing music files from the MP3 Piggy Bank
To delete tunes from the device, select the songs from the bottom half of the software
screen and click DELETE or DELETE ALL. The file names and information (type and size)
will disappear.
1.
Then, click the DOWNLOAD button to physically remove the music files from the device.
2.
Removing coins from the MP3 Piggy Bank
The coin compartment is located at the bottom of the MP3 Piggy Bank. To open, twist the
cover and remove.
1.
Remove the coins and close the compartment.
2.
2
English
Loading music files onto the MP3 Piggy Bank
View all folders and files on your computer in the upper half of the software screen.
Browse your folders to locate the MP3 or WAV files you wish to load onto the device.
Select the files from the upper half and drag them into the bottom half.
1.
Please bear in mind that the MP3 Piggy Bank has a maximum storage capacity of 8 MB.
The figures in the bottom half of the "DIY Writer" window (‘Total Files:’ and ‘Device free
space:’) indicate how much storage capacity has been used and is still available.
2.
Click the red DOWNLOAD button to download the tunes onto the MP3 Piggy Bank.
3.
Move the VOLUME bar on the software screen to adjust the volume.
4.
Remove the USB cable, position the MP3 Piggy Bank on a flat surface and insert a coin.
The piggy bank will start playing the first tune loaded onto the device.
5.
In case you loaded several music files onto the device, the MP3 Piggy Bank will play the
tunes in sequence upon inserting a coin.
6.

MP3 Piggy Bank
Instruction manual
Safety instructions
This instruction manual provides information for safe use of the MP3 Piggy Bank.
Please retain this manual for future reference.
Do not use the MP3 Piggy Bank if the device and / or the USB cable are damaged.
For safety reasons, repairs and/or alterations to the product are not permitted.
Humidity, heat or dropping the product can damage the device and make it unusable.
Use a dry and soft cloth to clean the product.
Technical specifications
Warning! Product warranty will be forfeited if damages result from disregarding the above
safety instructions. We are not liable for damages to person and property as a result of
improper handling of the product and/or disregarding the above safety instructions.
Measurements: 150 x 132 x 135 mm
File formats: MP3, WAV
Internal SPI 8 MB flash storage (maximum storage capacity for music files could be
lower)
Recording time: up to 90 seconds
Subject to technical modifications and possible errors
3
!
www.Great-Gadgets.com
Recycling and disposal
This electronic appliance should not be disposed of with regular household waste. Once
this device becomes obsolete, please take it to an authorized recycling facility.
You can contact your local waste management authority for information about collecting
points in your area and about possible costs associated with the recycling process.
English
TNAILPMOC SHoR

MP3 Sparschwein
Bedienungsanleitung
Eigenschaften
Sparschwein mit 8 MB Speicher für Sound-Dateien
Spielt bei Münzeinwurf Musik/Geräusche
Dateiformate: MP3, WAV
Aufnahmekapazität ca. 90 Sekunden
Für bis zu 20 Sounds mit einer Länge von je 5,5 Sekunden
Lautstärke ist regulierbar
Mit wiederverschließbarem Münzfach
Inbetriebnahme
Öffnen Sie das Batteriefach mithilfe eines
kleinen Kreuzschlitzschraubendrehers und
legen Sie drei Batterien vom Typ AA
(Mignon) ein. Bitte beachten Sie dabei
die Hinweise zur Polarität (+/-).
1.
Verschließen Sie das Batteriefach
wieder.
2.
Schließen Sie das mitgelieferte
USB-Kabel an das MP3 Sparschwein
und an einen freien USB-Steckplatz
Ihres Computers an.
3.
Inklusive USB-Kabel und Software (Autostart nach Anschluss an den PC)
Drei AA-Batterien (Mignon) erforderlich (im Lieferumfang nicht enthalten)
Kompatibel mit Windows XP / Vista / 7 und höher
Nicht geeignet für Kinder unter 8 Jahren
4
Der Computer erkennt die Software
"DIY Writer" automatisch und öffnet
folgendes Fenster:
4.
Münzeinwurf USB Anschluss Schraube
Münzfach öffnen Batteriefach
Deutsch
Im Verzeichnis eine
Ebene nach oben
Ordner öffnen Ansicht aktualisieren
DIY Writer
ALLE LÖSCHEN
Alle Dateien
löschen Lautstärkeregler
Drag
LÖSCHEN
Dateien einzeln
löschen
DOWNLOAD
Dateien herunter
laden / wieder
entfernen

MP3 Sparschwein
Bedienungsanleitung
Hinweise zum Betrieb
Nutzen Sie für das MP3 Sparschwein ausschließlich Einwegbatterien. Mit wiederaufladbaren
Akkus ist ein einwandfreier Betrieb nicht gewährleistet.
Benutzen Sie niemals gleichzeitig alte und neue Batterien.
Wird die automatische Erkennung/Installation von Ihrem System nicht unterstützt, finden Sie den
Wechseldatenträger "DIY Writer" in Ihrem Dateimanager/Windows-Explorer unter "Arbeitsplatz"
bzw. "Computer".
Es kann vorkommen, dass das MP3 Sparschwein beim ersten Münzeinwurf nach dem Aufladen
von Sound-Dateien nicht reagiert. In diesem Fall machen Sie es einfach noch einmal stromlos,
indem Sie das Batteriefach öffnen. Dadurch werden die Kontakte von den Batterien getrennt.
Nach dem erneuten Verschließen ist das MP3 Sparschwein funktionstüchtig.
Musik / Geräusche wieder vom Sparschwein entfernen
Markieren Sie im unteren Feld die Dateien, die Sie entfernen möchten und drücken Sie wahlweise
das LÖSCHEN- oder das ALLE LÖSCHEN-Symbol. Danach werden die Dateiinformationen
(Name, Typ, Größe) nicht mehr angezeigt.
1.
Drücken Sie anschließend den DOWNLOAD-Pfeil, um die Dateien physikalisch vom
MP3 Sparschwein zu entfernen.
Das Löschen aufgespielter Dateien erfolgt in zwei Schritten:
2.
Erspartes entnehmen
Der Zugang zum Münzfach befindet sich an der Unterseite des MP3 Sparschweins. Zum Öffnen
drehen Sie den Deckel in Richtung "OPEN" (Öffnen) und nehmen ihn anschließend heraus.
1.
Entnehmen Sie den Inhalt und setzen Sie den Deckel wieder ein.
2.
Durch Drehen in Richtung "CLOSE" (Schließen) verriegeln Sie das Münzfach wieder.
3.
5
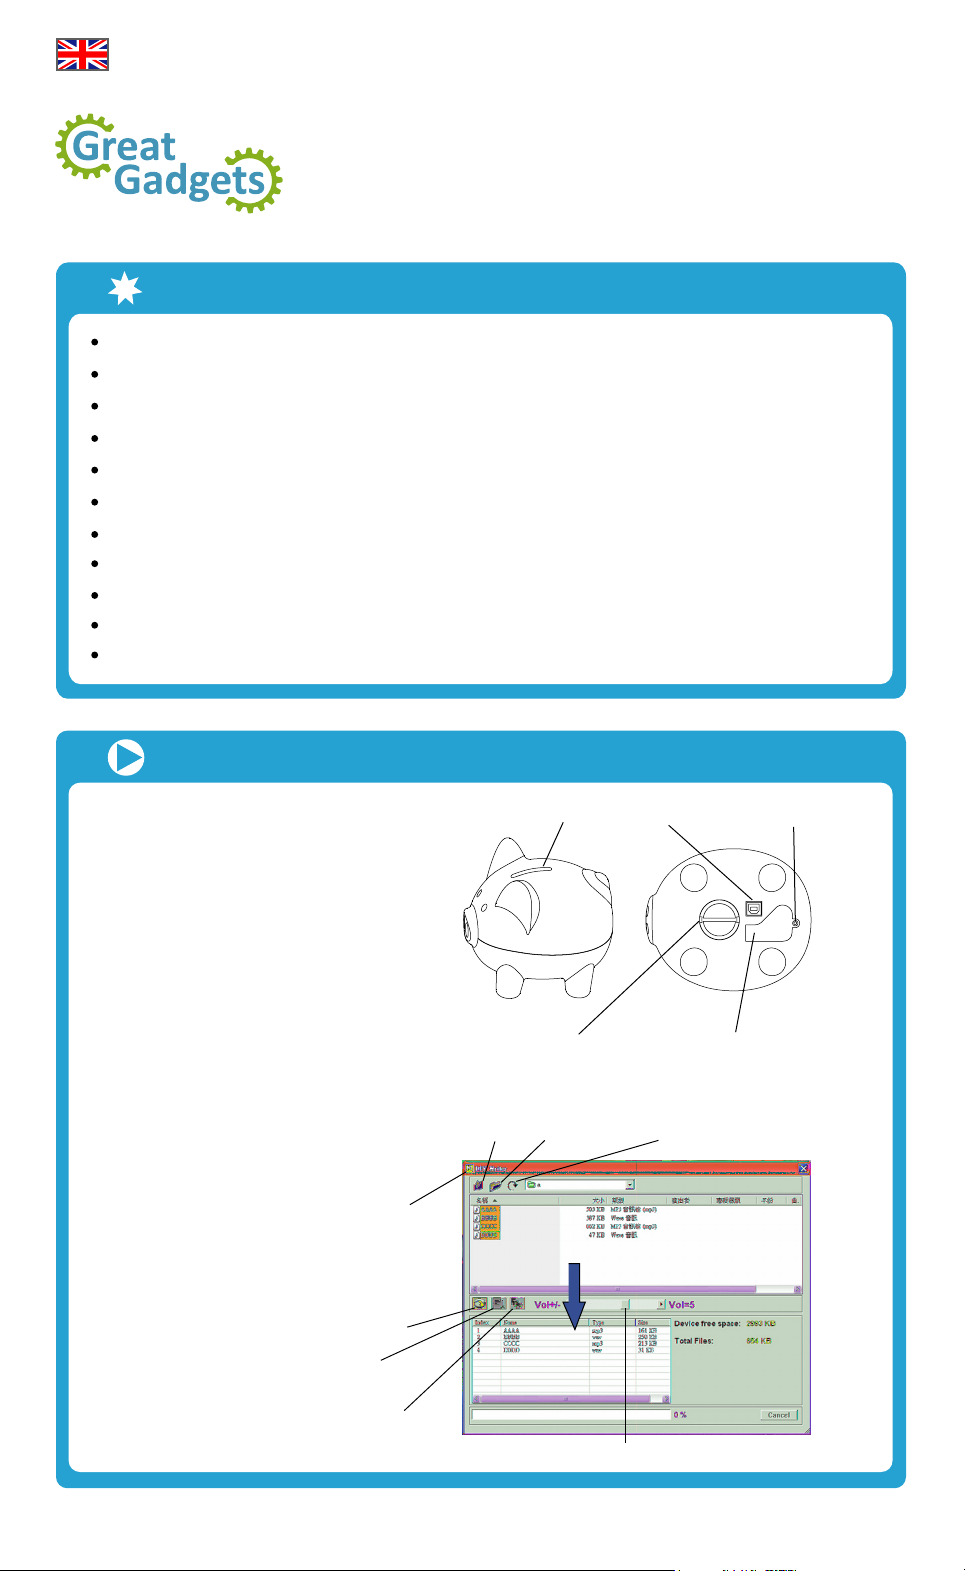
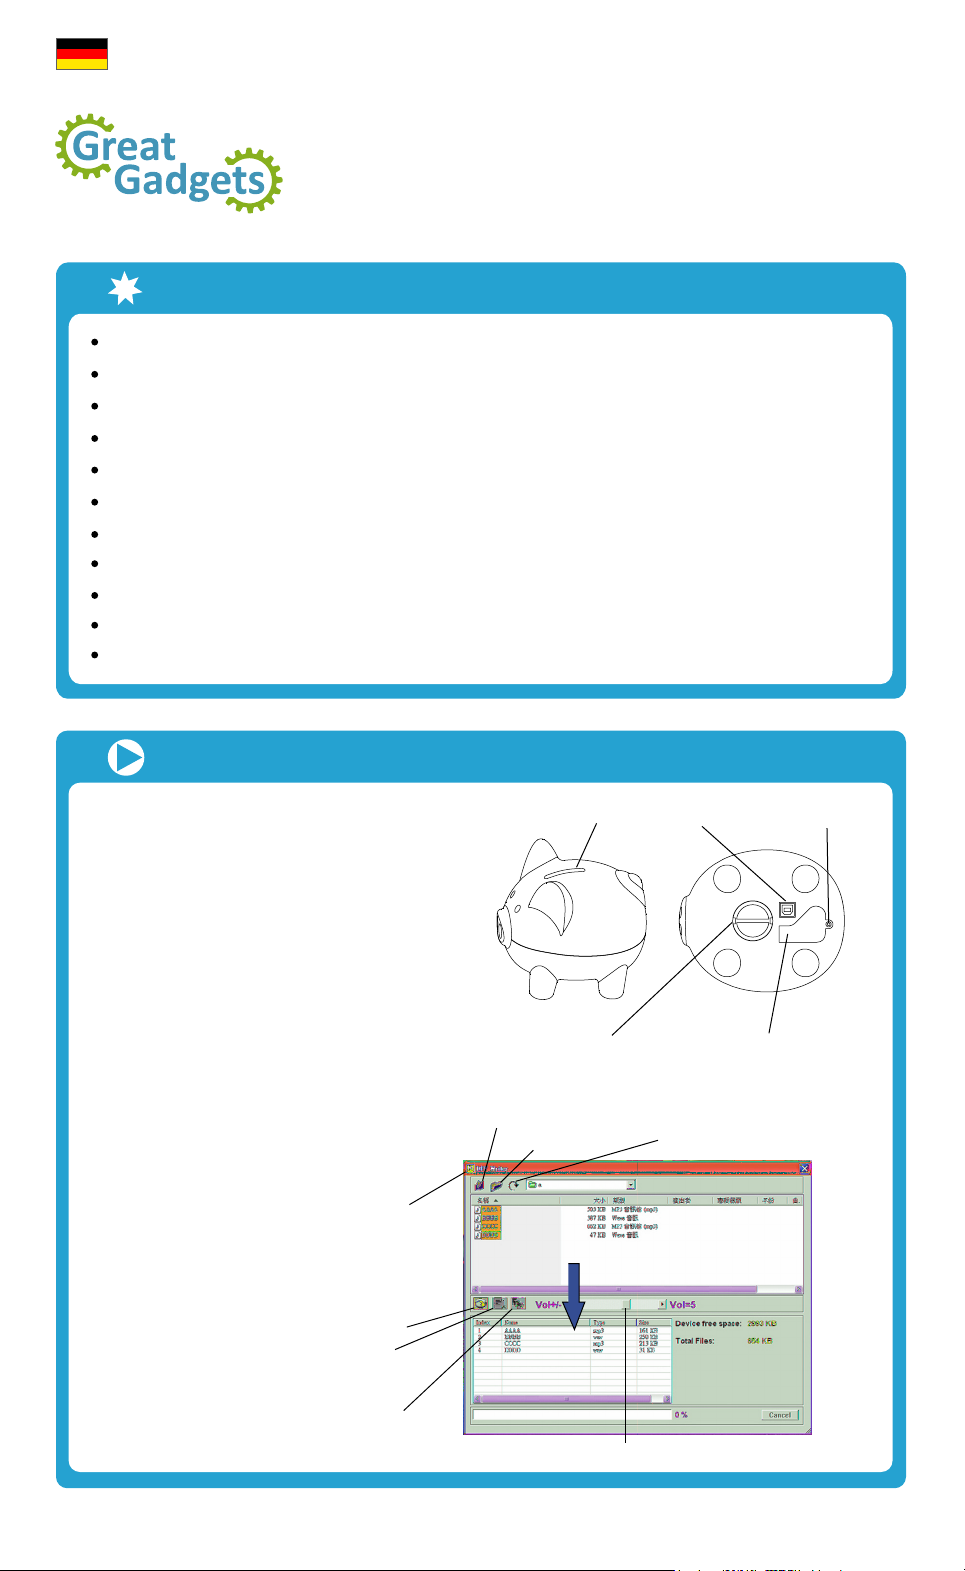
Musik / Geräusche auf das Sparschwein übertragen
In der oberen Hälfte des Fensters sehen Sie die Ordner bzw. Dateien, die sich auf Ihrem
Computer befinden. Hier wählen Sie die gewünschten Dateien im MP3- oder WAV-Format aus
und kopieren diese in das untere Feld, indem Sie sie markieren und mit gedrückter Maustaste
nach unten ziehen.
1.
Bitte beachten Sie, dass das MP3 Sparschwein maximal 8 MB Speicherplatz für Ihre Musik-/
Geräuschdateien hat. Wie viel Speicherplatz belegt bzw. noch frei ist, entnehmen Sie den roten
Zahlen rechts im unteren Feld: "Total Files" (belegter Speicherplatz) und "Device free space"
(freier Speicherplatz).
2.
Um Ihre Dateiauswahl schließlich auf das MP3 Sparschwein zu übertragen, drücken Sie den
roten DOWNLOAD-Pfeil.
3.
Mit dem Lautstärkeregler können Sie die Lautstärke der MP3-Dateien nach Belieben verändern.
4.
Entfernen Sie das USB-Kabel, stellen Sie das MP3 Sparschwein auf eine eben Fläche und
werfen Sie eine Münze ein. Die erste der aufgespielten Dateien ertönt.
5.
Wenn Sie mehrere Musik-/Geräuschdateien auf das MP3 Sparschwein kopiert haben, werden
diese bei jedem Münzeinwurf nacheinander abgespielt.
6.
Deutsch

MP3 Sparschwein
Bedienungsanleitung
Sicherheitshinweise
Diese Anleitung soll Ihnen dabei helfen, sich mit dem MP3 Sparschwein vertraut zu
machen und einen sicheren Umgang mit dem Produkt ermöglichen. Bewahren Sie sie
bitte zum späteren Gebrauch sorgfältig auf.
Falls Sie Beschädigungen am Gerät oder Kabel feststellen, nehmen Sie das MP3 Spar-
schwein bitte nicht in Betrieb.
Aus Sicherheitsgründen ist das eigenmächtige Reparieren und/oder Verändern des
Produkts nicht gestattet.
Feuchtigkeit, extreme Hitze, Stöße, Schläge oder Fall schon aus geringer Höhe können
das Produkt beschädigen und unbrauchbar machen.
Zum Reinigen bitte nur mit einem trockenen, weichen Tuch abwischen.
Technische Spezifikationen
Achtung! Bei Schäden, die sich aus der Nichtbeachtung dieser Bedienungsanleitung
ergeben, erlischt der Garantieanspruch. Für Folge-, Sach- und Personenschäden, die
durch unsachgemäße Handhabung oder Nichtbeachten der Sicherheitshinweise verursacht
werden, übernehmen wir keine Haftung.
Maße: 150 x 132 x 135 mm
Dateiformate: MP3, WAV
Eingebauter SPI 8 MB Flash-Speicher (der maximale Speicherplatz für Musik/Geräusche
kann geringer sein)
Insgesamt etwa 90 Sekunden Aufnahmezeit
Kompatibel mit den Betriebssystemen Windows XP / Vista / 7 und höher
Technische Änderungen und Irrtümer vorbehalten
3
!
www.Great-Gadgets.com
Hinweise zur Entsorgung
Dieses Elektrogerät gehört nicht in den Hausmüll. Für die fachgerechte Entsorgung
wenden Sie sich bitte an die öffentlichen Sammelstellen in Ihrer Gemeinde.
Einzelheiten zum Standort der Sammelstellen sowie zu eventuell anfallenden Kosten bei
Abholung erfragen Sie bitte direkt bei Ihrer Gemeindeverwaltung.
TNAILPMOC SHoR
Deutsch
Table of contents
Languages: