Onkyo DP-S1 User manual

29
Ja
ライセンスと商標について
Bluetooth®のワードマークおよびロゴは、BluetoothSIG,Inc. が所有する登
録商標です。
Windows®および Windows®ロゴは、米国 MicrosoftCorporation の米国お
よびその他の国における登録商標または商標です。
TheWi-FiCERTIFIEDLogoisacertificationmarkofWi-FiAlliance®.
iTunes は、米国および他の国々で登録された AppleInc. の商標です。
DSD および DirectStreamDigital ロゴは、ソニー株式会社の登録商標です。
その他記載された会社名、製品名などは該当する各社の商標または登録商標
です。
音のエチケット
楽しい映画や音楽も、時間と場所によっては気になる
ものです。
隣り近所への配慮を十分にしましょう。特に静かな夜
間には窓を閉めたり、ヘッドホンをご使用になるのも
一つの方法です。
お互いに心を配り、快い生活環境を守りましょう。
> はじめに > 各部の名前 > 初期設定 > 再生する
応用的な設定 |追補情報 |その他

2
Before Start
Table of Contents
Before Start ............................................................ 2
What's in the box ..................................................... 3
Part Names ............................................................ 4
Part Names .............................................................4
Initial Setup ............................................................ 6
Turning the power on and initial settings .................6
Playback ................................................................8
Copying music with "X-DAP Link" ...........................8
Dragging and dropping to copy music .................. 11
Listening to music from the "Library" ....................12
Creating a play list ................................................ 14
Using network services .........................................15
Connecting BLUETOOTH® ...................................16
Line Out ................................................................ 17
Advanced Setup .................................................. 18
Various settings .................................................. 18
Audio Adjust ...................................................... 21
Software Update ................................................... 23
Supplementary Information ...............................25
Supplementary Information ...................................25
Others .................................................................. 26
Entering text .......................................................... 26
General Specifications .......................................... 27
Cautions for use .................................................... 28
> Before Start > Part Names > Initial Setup > Playback
Advanced Setup | Supplementary Information | Others
SN29403051_DP-S1_En_1704XX.book 2 ページ 2017年4月11日 火曜日 午後5時37分

3
En
What's in the box
1. Main unit (1)
2. micro USB cable (1)
3. Protective film (1)
This protects the main unit. Peel off the temporary film on
the display first, then attach this film.
0Quick Start Guide (1)
* This document is an online instruction manual. It is not
included as an accessory.
> Before Start > Part Names > Initial Setup > Playback
Advanced Setup | Supplementary Information | Others
1
23
SN29403051_DP-S1_En_1704XX.book 3 ページ 2017年4月11日 火曜日 午後5時37分

4
Part Names
> Before Start > Part Names > Initial Setup > Playback
Advanced Setup | Supplementary Information | Others
Part Names
Line
Library
Online
Balanced
Out
Best Mix_01
1. Status bar
2. Library: Tap to display the tracks copied from your
computer (P12).
3. Turn on or off the BLUETOOTH feature. " " is
displayed on the status bar when this is on. Pairing is
necessary to connect BLUETOOTH wireless technology
enabled devices. Refer to "Connecting BLUETOOTH®"
(P16) for connection settings.
4. Turn on or off the Wi-Fi feature. " " is displayed on the
status bar when this is on. Connection settings are
necessary to use Wi-Fi features. Refer to "2. Wi-Fi" (P7)
for connection settings.
5. Line Out: You can switch the headphone output to the
line output mode to connect external equipment. "Line
Out" is displayed on the status bar when this is on.
6. Tap when using balanced headphones and switch
between the "Balanced" and "ACG" modes.
Balanced: Compared to the normal single-ended
operation, this mode enables you to get a larger output
and as the high voltage is not grounded together with the
small signal, you can anticipate superior music quality.
Because you get a larger output, you can drive
headphones with a higher impedance.
ACG: The basic operating method is the same as
Balanced (mode), but uses technology to even more
forcefully fix grounding standards, so you can enjoy a
sound quality with improved clarity and stability than
Balanced (mode). Output volume is the same as the
regular single-ended operation, however.
7. Shows the name of the track being played. Tap to display
the play screen.
8. Volume dial: Turn the dial to adjust the volume.
9. Online: Tap to switch to a screen showing a list of
network services, such as TuneIn Radio, etc. (P15).
10.
You can make various settings for the unit, such as Wi-Fi
and BLUETOOTH settings (P18).
11.
You can set to your preferred sound quality (P21).
12.
Artwork: Displays the album art of the track being played.
Tap to display the play screen.
13.
Skip ( ) button: Skip to the next track.
SN29403051_DP-S1_En_1704XX.book 4 ページ 2017年4月11日 火曜日 午後5時37分

5
> Before Start > Part Names > Initial Setup > Playback
Advanced Setup | Supplementary Information | Others
En
14.
Play/pause ( ) button
15.
Skip ( ) button: Skip to the beginning of the track or
to the previous track.
16.
micro SD card slot 1
17.
micro SD card slot 2
0When inserting the micro SD card into the card slot,
insert with the contacts facing up and push in
completely so the card clicks into place.
0To remove the micro SD card, first unmount it (P28).
After unmounting, push the micro SD card in until you
hear a click and then pull straight out. The micro SD
card may spring out so take care not to lose it.
18.
Headphone jack ( ): Connect headphones
compatible with balanced output. (2.5 mm/4-conductor)
19.
Headphone jack ( ): Connect regular headphones.
(3.5mm/3-conductor)
0This unit does not support simultaneous use of the
balanced headphone jack and the headphone jack.
Using both jacks at the same time may result in
damage.
20.
Charging lamp: This lights white when charging starts. It
turns off when recharging finishes. If the unit is in a state
that prevents charging, it flashes white. Try charging
again after waiting a while.
21.
Power button (Í): Press and hold the power button to
turn the power on. To turn the power off, press and hold
the power button so the "Power Off?" screen is
displayed. You can turn the power off by tapping "Yes".
To turn the display on or off, just press the button.
0If operation becomes unstable, you can shutdown the
unit by pressing and holding the power button for 10 or
more seconds. Refer to "If operation becomes
unstable" (P28) for details.
22.
micro USB port: To charge the unit (P6) or transfer music
files (P8, P11), connect the supplied micro USB cable.
23.
HOLD switch: You can lock operations on this unit by
sliding the switch up. When the "Operations while
Holding" (P19) setting is "Enable", the volume dial and
side buttons for play, etc., can still be used.
SN29403051_DP-S1_En_1704XX.book 5 ページ 2017年4月11日 火曜日 午後5時37分

6
Initial Setup
Turning the power on and initial settings
Initial Setup starts automatically
1. The battery is not charged at the time of purchase.
Charge the unit with the supplied micro USB cable
before use. Connect so the wider side of the plug is down
when inserting into this unit's micro USB port. The
recharging mark is displayed at the top right of the
screen when recharging.
0You can also recharge while the unit is on. The time
for recharging may increase in this case.
2. The power comes on automatically when recharging
starts, and the initial settings start.
3. Select the language you want to use first. Flick the list of
languages up or down, then tap the language you want
to use. When you select the language, a confirmation for
the initial settings is displayed. Tap "Yes". If you tap "No",
you will ext the initial settings and the home screen is
displayed.
0"Passcode (P19)" and "Wi-Fi (P18)" settings can be
completed later.
> Before Start > Part Names > Initial Setup >Playback
Advanced Setup | Supplementary Information | Others
1
2 3
Would you like to start initial
setup?
1st Step : Passcode
2nd Step : Wi-Fi
No Yes
SN29403051_DP-S1_En_1704XX.book 6 ページ 2017年4月11日 火曜日 午後5時37分

7
> Before Start > Part Names >InitialSetup >Playback
Advanced Setup | Supplementary Information | Others
En
∫1. Passcode
Set the pass code used to protect this unit. When you set a
pass code, the pass code screen is displayed when the
power is turned on or when restoring from display off. You
should create a pass code to protect your account if you are
going to use a network service.
1. Enter any four digit number. If you made a mistake with
an entry, tap " ".
2. Enter the pass code again to confirm.
0If you enter the wrong pass code three times, a message
appears asking if you want to initialize the unit's settings.
Note that even if the settings are initialized, the copied
music files are not deleted.
∫2. Wi-Fi
Set to use network services such as TuneIn Radio on this
unit.
Wi-Fi can be connected in the following two ways.
Selecting SSID:
1. Tap the SSID of the access point you want to connect
from the SSID displayed.
0If the SSID of the access point is not displayed, tap
"Other..." in the SSID list and follow the on screen
instructions to configure.
2. After tapping the field for entering the password, enter
the password of the access point, then tap "Connect".
For details on how to enter text, refer to "Entering text"
(P26).
3. " " is displayed on the status bar on the screen when
the connections are complete.
Using the push button:
0The access point needs to have an automatic setting
button.
1. Tap "Push Button" on the screen and press the automatic
setting button on the access point.
0The operation of the automatic setting button depends
on your device. Refer to the instruction manual of your
device for instructions.
2. " " is displayed on the status bar on the screen when
the connections are complete.
1st Step : Passcode
Do you wish to use passcode
lock?
No Yes
2nd Step : Wi-Fi
Do you wish to setup Wi-Fi?
No Yes
Wi-Fi
Choose a network...
SSID 1
SSID 2
Other...
Push Button
SN29403051_DP-S1_En_1704XX.book 7 ページ 2017年4月11日 火曜日 午後5時37分

8
Playback
Copying music with "X-DAP Link"
You can copy music files stored on your computer to the
built-in storage on this unit or to a micro SD card in this unit,
then listen to the music through the "Library" (P12). You can
copy either using the data copying software "X-DAP Link"
or by dragging and dropping (P11).
0X-DAP Link is compatible with Windows® 10 (32bit/64
bit), Windows® 8/ 8.1 (32 bit/64 bit), and Windows® 7 (32
bit/64 bit).
0To copy to a micro SD card, insert a micro SD card into
the card slot (P5).
0When removing the micro SD card, unmount the micro
SD card before removing it (P28).
0NTFS format micro SD cards are not supported on this
unit.
Install [X-DAP Link] on your computer
This unit supports X-DAP Link versions 1.2.0 and later.
When using version 1.2.0 or earlier, install the latest version
before continuing.
Perform the following procedure when the unit is on.
1. Start your computer and download the installer for X-
DAP Link from the following site.
http://www.jp.onkyo.com/audiovisual/portable/dap/
license.htm
Double-click "setup.exe" to install. Follow the on-screen
instructions to install. A shortcut is created on the
desktop after installation.
2. Connect this unit to a computer with the supplied micro
USB cable. Connect so the wider side of the plug is down
when inserting into this unit's micro USB port. You may
damage the plug or jack if you try to insert it the wrong
way.
Do not tap "Unmount", displayed on this unit's screen,
until copying is complete. If you do tap it, unplug the
micro USB cable, then connect it again.
> Before Start > Part Names > Initial Setup >Playback
Advanced Setup | Supplementary Information | Others
2
1
3
SN29403051_DP-S1_En_1704XX.book 8 ページ 2017年4月11日 火曜日 午後5時37分

> Before Start > Part Names > Initial Setup >Playback
Advanced Setup | Supplementary Information | Others
9
En
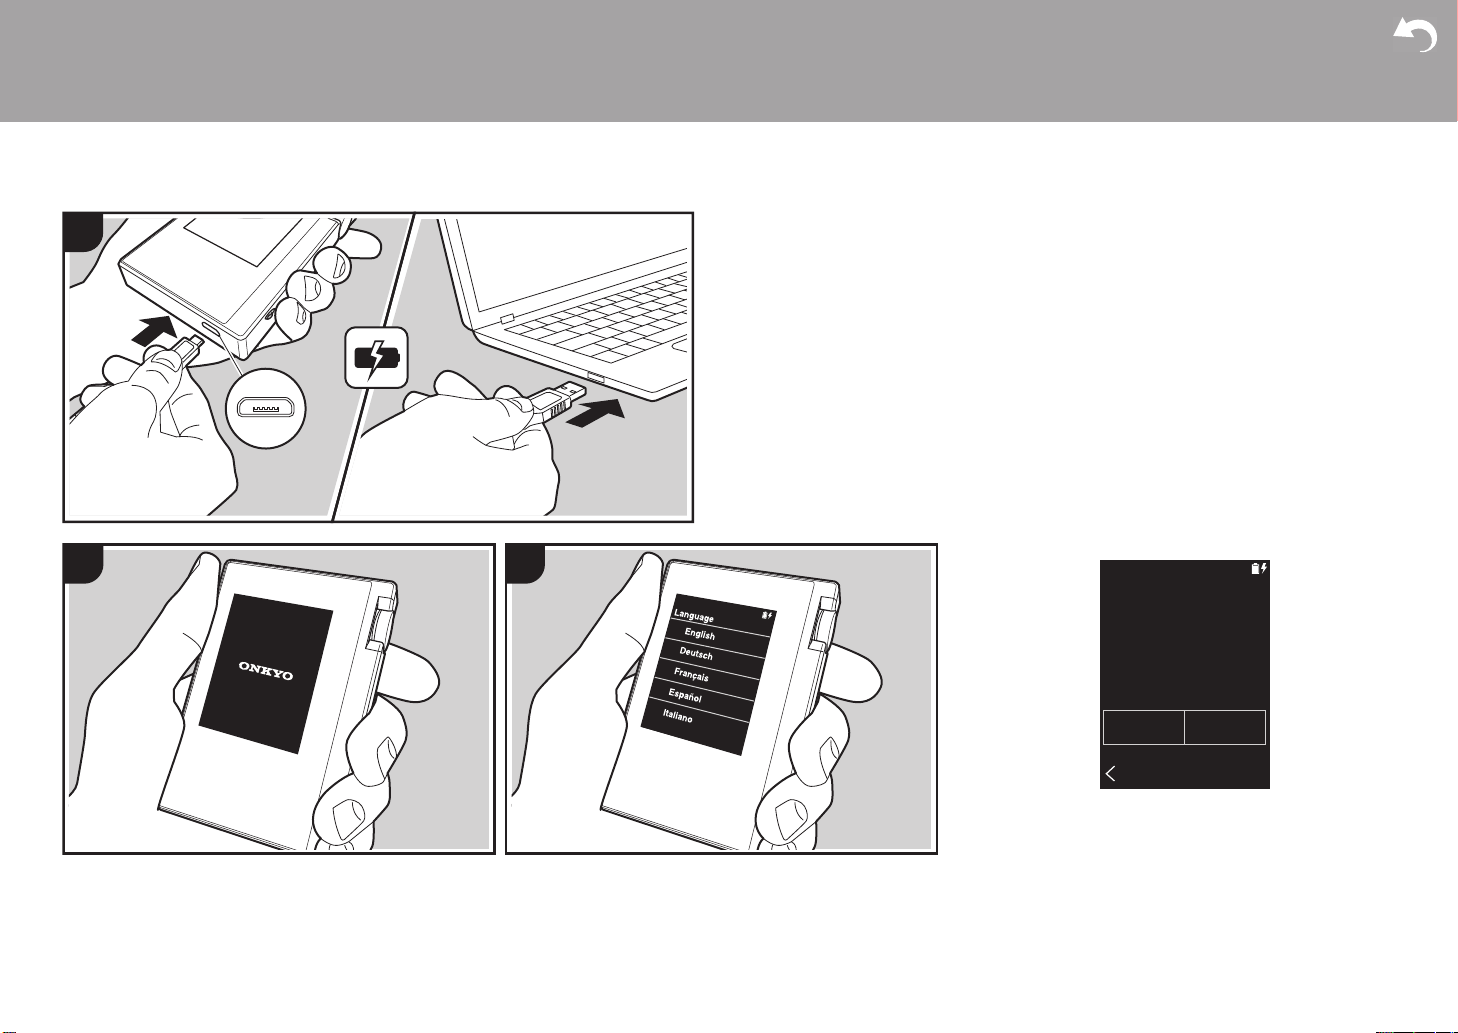
3. Start X-DAP Link. The following types of screens are
displayed when you start it.
Copying music from a computer
1. Click 1 and select the folder that contains the music files
you want to copy. If the folder you want to copy is already
displayed, start selecting from 2.
onkyo music
If there are music files you have downloaded from onkyo
music (a site that distributes music files), select this
folder.
iTunes Media
If you are using iTunes®, a play list and content are
displayed. If iTunes cannot be selected, open
"Preferences" - "Advanced" in iTunes, then put a check
mark next to "Share iTunes Library XML with other
applications".
0There may be some differences in the operations
screens and how operations are performed depending
on the iTunes version. For details, see the operating
instructions for iTunes.
2. A list of music files is displayed in the center of the
screen when you select it.
3. Click 3 in the bottom left of the screen and select the
copy destination. When copying to the Internal Storage
of this unit, select "Internal", when copying to a micro SD
card, select the "Removable Storage" for the card to be
copied to, then click "OK". You can also click 4 5 to
specify different copy destinations to 3.
4. Select the music files you want to copy according to the
copy destination specified in step 3. If the copy
destination was selected by clicking 3, put check marks
in the column 6 to the left of the music files to be added.
By clicking the check button 7 at the very top of the list,
you can either select or deselect all tracks.
0If there are already copied music files in the copy
destination, the check button is automatically selected.
If there are music files that you want to delete from this
unit, deselect them.
music
e
-onkyo
Folder
onkyo music
iTunes Media
Used:
Free:
Title
Title Artist
Album
X-DAP Link
Genre
Format
Artist Album
Genre
Length
Format Size
Best Mix_01 Best Mix Jazz
00:03:31
MP3
4.04 MB
Artist B
Best Mix_02 Best Mix Jazz
00:03:40
MP3
4.20 MB
Artist B
Best Mix_03 Best Mix Jazz
00:02:44
MP3
3.14 MB
Artist B
Best Mix_04 Best Mix Jazz
00:07:12
MP3
8.25 MB
Artist B
Best Mix_05 Best Mix Jazz
00:04:42
MP3
5.40 MB
Artist B
Best Mix_06 Best Mix Jazz
00:03:54
MP3
4.49 MB
Artist B
Best Mix_07 Best Mix Jazz
00:04:38
MP3
5.32 MB
Artist B
Select
Used:
Free:
Select
Used:
Free:
Select
Folder
onkyo music
iTunes Media
Best Mix
Folder
onkyo music
iTunes Media
Title
Title Artist
X-DAP
Artist
Best Mix_01
Artist B
Best Mix_02
Artist B
Best Mix_03
Artist B
Best Mix_04
Artist B
Best Mix_05
Artist B
Best Mix_06
Artist B
Best Mix_07
Artist B
Best Mix
Used:
Free:
Select
M
ix_05 Best Mix Jazz
00:04:42
MP3
5.40 MB
Artist B
M
ix_06 Best Mix Jazz
00:03:54
MP3
4.49 MB
Artist B
M
ix_07 Best Mix Jazz
00:04:38
MP3
5.32 MB
Artist B
Used:
Free:
Select
Used:
Free:
Select
Title
Title
A
Best Mi
x
Best Mi
x
Best Mi
x
Best Mi
x
SN29403051_DP-S1_En_1704XX.book 9 ページ 2017年4月11日 火曜日 午後5時37分

10
> Before Start > Part Names > Initial Setup >Playback
Advanced Setup | Supplementary Information | Others
If the copy destination was selected by clicking 4, click
8 in the central column, and if 5 was clicked to select
the copy destination, click the check button 9 in the
column on the right.
5. If the copy destination was selected by clicking 3 in step
3, click :.
If the copy destination was selected by clicking 4, click
;, and if 5 was selected click <.
6. When "OK" is selected in the confirmation screen, the
selected music files are copied to this unit.
0When copying a music file and an error message is
displayed, restart this unit and perform the operation
again. If the error message is displayed again, use
your computer to delete the "xdaplink" folder from the
built-in storage of this unit.
7. Tap "Unmount" on this unit's screen and unplug the
micro USB cable. Refer to "Listening to music from the
"Library""(P12) for play operations.
Title
Title
A
Best Mi
x
Best Mi
x
Best Mi
x
Best Mi
x
Used:
Free:
Select
Mix_05 Best Mix Jazz
00:04:42
MP3
5.40 MB
Artist B
Mix_06 Best Mix Jazz
00:03:54
MP3
4.49 MB
Artist B
Mix_07 Best Mix Jazz
00:04:38
MP3
5.32 MB
Artist B
Used:
Free:
Select
Used:
Free:
Select
SN29403051_DP-S1_En_1704XX.book 10 ページ 2017年4月11日 火曜日 午後5時37分

11
En
Dragging and dropping to copy music
You can copy music files stored on your computer to the
built-in storage on this unit or dragging and dropping to a
micro SD card in this unit, then listen to the music through
the "Library" (P12).
0To copy to a micro SD card, insert a micro SD card into
the card slot (P5).
0When removing the micro SD card, unmount the micro
SD card before removing it (P28).
0NTFS format micro SD cards are not supported on this
unit.
Copying music from a computer
1. Connect this unit to a computer with the supplied micro
USB cable. Connect so the wider side of the plug is down
when inserting into this unit's micro USB port. You may
damage the plug or jack if you try to insert it the wrong
way.
Do not tap "Unmount", displayed on this unit's screen,
until copying is complete. If you do tap it, unplug the
micro USB cable, then connect it again.
0If "AutoPlay" or similar is displayed on your computer,
select "Open folder to view files" and then proceed to
step 3.
2. Open "PC", "My Computer", etc., on your computer.
3. Select the save destination from the list. To copy to the
built-in storage in this unit, open "Internal". To copy to a
micro SD card, open the "Removable Storage" card you
want to copy to.
0The screen displayed depends on the OS and
language of your computer.
4. Drag and drop the folder on your computer that contains
the music files that you want to copy to the copy
destination.
5. Tap "Unmount" on this unit's screen and unplug the
micro USB cable. Refer to "Listening to music from the
"Library""(P12) for play operations.
> Before Start > Part Names > Initial Setup >Playback
Advanced Setup | Supplementary Information | Others
2
1
SN29403051_DP-S1_En_1704XX.book 11 ページ 2017年4月11日 火曜日 午後5時37分

12
Listening to music from the "Library"
You can listen to music files copied from
your computer or to music on an inserted
micro SD card. Note that the operations to
play are the same for both.
0Refer to (P5) for how to insert the micro
SD card.
0When removing the micro SD card,
unmount the micro SD card before
removing it (P28).
0NTFS format micro SD cards are not
supported on this unit.
∫Playing Music with the "Library"
1. A categorized list of tracks you copied
from your computer is displayed when
you tap "Library" in the home screen.
0It may take some time for
synchronized tracks to be displayed.
2. Flick the list screen up and down then
tap on the display category you want.
Folders
All tracks saved in the same folder level
are displayed.
Playlists
Displays a list of play lists you have
created (P14).
Track Artists
Displays by artists as recorded in the
music files as participating artists.
Album Artists
Displays by artists as recorded in the
music files as artists participating in the
album.
Albums
Displays by album.
Songs
Displays all tracks.
Genres
Displays by genre.
3. When you tap the track you want to play
in the list of tracks, the screen changes
to the play screen and play starts. To
return to the list of tracks, tap " " at the
bottom left of the screen.
0Do not connect headphones that have
an impedance outside the rated range
as this may result in damage. Refer to
"General Specifications"(P27) for the
headphone specifications.
0At the time of purchase, the Auto sync
feature is on, so when music files are
copied to this unit or a micro SD card
with music files on it is inserted (P5),
the data is automatically
synchronized. When "Auto sync"
(P19) has not been set, tracks may
not be displayed.
Adjusting the volume
Turn the volume dial to adjust the volume.
0The volume bar is displayed on the
screen when you turn the volume dial.
> Before Start > Part Names > Initial Setup >Playback
Advanced Setup | Supplementary Information | Others
Line
Library
Online
Balanced
Out
Folders
Playlists
Track Artists
Album Artists
Albums
Library
Artist B - Best Mix
00:03 03:23
Best Mix_01
Best Mix
Best Mix_01
Artist B
10Songs / 46:27
3:23 MP3
5:02 MP3
2
3
1
4
4:43 MP3
5:13 MP3
Best Mix_02
Best Mix_03
Best Mix_04
1 2 3
Best Mix_01
35
SN29403051_DP-S1_En_1704XX.book 12 ページ 2017年4月11日 火曜日 午後5時37分

> Before Start > Part Names > Initial Setup >Playback
Advanced Setup | Supplementary Information | Others
13
En
∫The play screen
Screen A
1. Play/pause ( )
2. Skipping ( )
Skip to the beginning of the track or to
the previous track.
3. Return to the list of tracks.
4. Switches to the home screen.
5. Skipping ( )
Skip to the next track.
6. Switches to screen B.
7. Seek bar
Progresses along with the track's
progress. By swiping left or right from the
current play position, you can move the
play position to the position where you
lift your finger.
8. Tap to display the album art.
Screen B
9. Audio Adjust
You can set to your preferred sound
quality (P21).
10.
Switch output between "Headphone",
"Line Out", or "Bluetooth".
0When "Line Out" is selected, output
through the headphone jack is at
maximum volume, so do not use
headphones. Adjust the volume on
the connected device.
0"Bluetooth" is displayed when
BLUETOOTH is on and a
BLUETOOTH wireless technology
enabled device is connected.
11.
Shuffle mode
You can switch shuffle play on or off by
tapping this. " " is displayed on the
status bar on the screen when this is on.
12.
The track being played is added to the
play list (P14).
13.
Repeat mode
Tap to change the mode: 1 track repeat‚
# all track repeat ‚# no repeat. " "
is displayed on the status bar on the
screen when 1-track repeat is set, and
" " is displayed for all-track repeat.
01-track repeat cannot be set when the
shuffle mode is on.
14.
Switches to screen A. When you have
switched to screen B from the album art
screen, this switches to the album art
screen.
2
1
3
5
6
8
7
4
10
9
11
12
13
14
SN29403051_DP-S1_En_1704XX.book 13 ページ 2017年4月11日 火曜日 午後5時37分

14
Creating a play list
You can select the tracks you like to create
your own play list.
1. Tap "Playlists" in the categorized list in
the "Library".
2. Tap "New Playlist" and enter the title. For
details on how to enter text, refer to
"Entering text" (P26). Tap " " at the
bottom left of the screen to switch to the
track list when you have finished
entering text.
3. In the list, tap the "+" to the right of the
track you want to add to the play list.
4. Tap a play list you have created to
register the track in the play list.
5. Repeat steps 3 and 4 to keep adding
tracks to the play list.
0 Play lists created outside the
"Library", such as in iTunes, are not
displayed in the list of play lists on this
unit.
∫Editing a play list
Tap "Playlists" in the list of categories in the
"Library" to display the list of play lists.
To delete a play list:
Tap " " at the top right of the play list you
want to delete, then tap " ".
To change the name of a play list:
Tap " " at the top right of the play list
whose name you want to change, then tap
"".
∫Editing tracks in a play list
Tap "Playlists" in the list of categories in the
"Library" to display the list of play lists. Tap
the play list you want to edit next.
To delete a track from a play list:
Tap " " at the top right of the track you
want to delete, then tap " ".
0Tracks are not deleted from the unit
even if you delete them from a play
list.
To change the order of tracks in a play
list:
Tap " " at the top right of the track you
want to reorder, then tap " ".
> Before Start > Part Names > Initial Setup >Playback
Advanced Setup | Supplementary Information | Others
Folders
Playlists
Track Artists
Album Artists
Albums
Library
New Playlist
Playlists
Best Mix
Best Mix_01
Artist B
10Songs / 46:27
3:23 MP3
5:02 MP3
2
3
1
4
4:43 MP3
5:13 MP3
Best Mix_02
Best Mix_03
Best Mix_04
New Playlist
Playlist_1
Add to Playlist
1 2 3 4
SN29403051_DP-S1_En_1704XX.book 14 ページ 2017年4月11日 火曜日 午後5時37分

15
En
Using network services
You can use network services such as
TuneIn Radio and TIDAL by connecting
this unit to a network that has an internet
connection.
0There needs to be a Wi-Fi connection in
order to play network services.
0Depending on the network service, the
user may need to register from their
computer first. Refer to the websites for
each of the services for details about
them.
0Functionality may be introduced by
software updates and service providers
may cease services, meaning that some
network services and content may
become unavailable in the future.
Playing Back
Perform the following procedure when the
unit is on.
1. Tap "Online" in the home screen of this
unit.
2. Tap the network service you want to use.
3. Follow the on screen instructions and
tap the radio station or program to start
play.
0To return to the preceding screen, tap
" " at the bottom left of the screen.
Network service menus
You can register certain stations as your
favorites or delete stations you have
registered from your favorites. The menu
displayed depends on the service currently
selected.
A menu is displayed by tapping " " at the
bottom right of the screen while playing a
station and then tapping " " in the middle
of the screen.
Regarding the TuneIn Radio
Account
Creating an account on the TuneIn Radio
website (tunein.com) and logging in from
the unit allows you to automatically add
your favorite radio stations and programs
to your "My Presets" on the unit as you
follow them on the website. "My Presets"
are displayed in the level under TuneIn
Radio.
To display a radio station registered in "My
Presets", you must log into TuneIn Radio
from the unit. To log in, select "Login" - "I
have a TuneIn account" in the "tunein" top
list on the unit, and then enter your user
name and password.
0If you associate the device on My Page
within the TuneIn Radio website using
the registration code obtained by
selecting "Login" on the unit, you can log
in from "Login" - "Login with a
registration code" without entering the
user name and password.
> Before Start > Part Names > Initial Setup >Playback
Advanced Setup | Supplementary Information | Others
Line
Library
Online
Balanced
Out
Online
1 2
SN29403051_DP-S1_En_1704XX.book 15 ページ 2017年4月11日 火曜日 午後5時37分

16
Connecting BLUETOOTH®
You can listen to music wirelessly by using
BLUETOOTH wireless technology enabled
devices such as headphones or speakers.
Reception is possible over a distance of 10
m with a clear line of sight. The
communication distance will be reduced in
some conditions.
Pairing for play
Pairing is necessary when connecting the
BLUETOOTH wireless technology enabled
devices for the first time. Make sure the
BLUETOOTH wireless technology enabled
device you want to connect is ready to be
detected.
1. Tap " " in the home screen.
2. Tap "Bluetooth".
3. Turn on the BLUETOOTH feature and
select the device to connect from the
"Available Devices" list.
4. Pairing will end after a short time.
5. Tap "Library" or "Online" in the home
screen.
0This unit can store the data of up to eight
paired devices.
When connecting after the first time
1. Tap " " in the home screen.
2. Tap "Bluetooth" and tap the device you
want to connect in "Paired Devices".
Canceling a connection
1. Tap " " in the home screen.
2. Tap "Bluetooth".
3. Tap " " at the top right of the device
you want to disconnect, then tap
"Disconnect".
0Pairing information is not deleted even if
you cancel the connection. Tap "Forget
this device" to delete the pairing
information.
> Before Start > Part Names > Initial Setup >Playback
Advanced Setup | Supplementary Information | Others
Line
Library
Online
Balanced
Out
Wi-Fi
Bluetooth
Brightness
Balanced Output Select
Line Out Mode
Settings
Bluetooth
Bluetooth
Paired Devices :
Available Devices :
Not Paired
Device 1
1 2 3
SN29403051_DP-S1_En_1704XX.book 16 ページ 2017年4月11日 火曜日 午後5時37分

17
En
Line Out
You can connect a headphone amplifier or
D/A converter, for example, that has line
input. You will need a headphone plug
(commercially available) to connect to this
unit. Make sure you have the correct type
of headphone plug for the jack of the
device you are connecting.
Connecting a device
1. Connect the device to this unit through
the headphone jack.
2. Turn on the power of this unit, and select
"Line Out" in the home screen to turn
Line Out on. "Line Out" is displayed on
the status bar on the screen when this is
on.
0When "Line Out" is on, output through
the headphone jack is at maximum
volume, so do not use headphones.
Adjust the volume on the connected
device.
> Before Start > Part Names > Initial Setup >Playback
Advanced Setup | Supplementary Information | Others
1
Line
Library
Online
Balanced
Out
2
SN29403051_DP-S1_En_1704XX.book 17 ページ 2017年4月11日 火曜日 午後5時37分

18
Advanced Setup Various settings
Tap to make settings for Wi-Fi and BLUETOOTH, settings for audio output, pass code
settings, software updates, and a variety of other settings.
1. Tap " " in the home screen.
2. Tap the item you want to set.
∫Wi-Fi
"On": Connection to a network via Wi-Fi is enabled. This also enables you to make various
settings related to Wi-Fi, such as selecting the SSID of the access point to be connected.
"Off (default value)": Connection by Wi-Fi is not enabled
∫Bluetooth
"On": Enables connection with a BLUETOOTH wireless technology enabled device. This
also enables you to make various settings related to BLUETOOTH, such as pairing.
"Off (default value)": When BLUETOOTH is not to be used
∫Brightness
You can adjust the brightness of the screen. The brightness can be set with the slide bar in
10 steps between " (1)" and " (10)". The screen becomes brighter when you slide it to
the right (default value is "9").
∫Balanced Output Select
Use when balanced headphones are to be connected.
"Balanced (default value)": Compared to the normal single-ended operation, you can get a
larger output and the high voltage is not grounded together with the small signal, so you can
anticipate a superior effect in the quality of the music. Because you get a larger output, you
can drive headphones with a higher impedance.
"ACG": The basic operating method is the same as Balanced (mode), but uses technology
to even more forcefully fix grounding standards, so you can enjoy a sound quality with
improved clarity and stability than Balanced (mode). Output volume is the same as the
regular single-ended operation, however.
0This unit does not support simultaneous use of the balanced headphone jack and the
headphone jack. Using both jacks at the same time may result in damage.
∫Line Out Mode
"On": Switch the headphone output to the line output mode to connect external equipment.
When "Line Out Mode" is on, output through the headphone jack is at maximum volume, so
do not use headphones. Adjust the volume on the connected device.
0When turned on for European models, you can then select either "Fixed (default value)"
> Before Start > Part Names > Initial Setup > Playback
Advanced Setup | Supplementary Information | Others
Line
Library
Online
Balanced
Out
Wi-Fi
Bluetooth
Brightness
Balanced Output Select
Line Out Mode
Settings
1 2
SN29403051_DP-S1_En_1704XX.book 18 ページ 2017年4月11日 火曜日 午後5時37分

> Before Start > Part Names > Initial Setup > Playback
Advanced Setup | Supplementary Information | Others
19
En
or "Variable". When "Variable" is selected, volume can be adjusted on this unit. If you
select "Fixed", adjust the volume on the connected external device.
"Off (default value)": Line output is not enabled
∫Audio
Gain: You can select the headphone output level to suit your headphones.
Select "High (default value)", "Normal", or "Low".
0Lower the volume first if you intend to select "High".
0When connecting a pair of headphones for the first time, set to "Low" and change the
volume level gradually.
Volume Limiter: You can set an upper limit for the maximum volume so that the volume
does not increase too much. Select between "0" and "60 (default value)".
∫Music Library Sync
Auto sync: When this is on, music files you have copied to this unit from a computer or
music files on a micro SD card are automatically synchronized with the library.
"On (default value)": When this function is to be used
"Off": When this function is not to be used
Sync Now
If "Auto sync" is off, tap this to manually synchronize the music files with the library. You can
select "Sync All" or "Sync Added Songs" after tapping this.
Sync All: Select to synchronize all transferred tracks.
Sync Added Songs: Select to synchronize only tracks that have been added.
∫Unmount SD Card
You can unmount a micro SD card. The card can be damaged or may stop working properly
if you fail to unmount the card first.
∫Physical Buttons
Volume Rotation: You can set the direction to turn the dial when adjusting the volume.
Normal (default value): Turn clockwise to increase the volume.
Reverse: Turn anticlockwise to increase the volume.
Operations while Holding
When set to "Enable", even when you slide the hold switch (P5) up to lock operations on this
unit, the Volume dial and side buttons for play (P5), etc., can still be used. Tap this to change
the settings for "Volume" and "Side Buttons".
Volume: "Disable (default value)"/"Enable"
Side Buttons: "Disable (default value)"/"Enable"
∫Power Management
Auto Display Off: The unit's LCD automatically switches off when the specified time
elapses with no operations.
Select "Off", "15 seconds", "30 seconds (default value)", "1 minute", "2 minutes", or "5
minutes".
Auto Power Off: The unit's power automatically switches to "Off" when the specified time
elapses with no operations.
Select "Off (default value)", "10 minutes", "30 minutes", or "60 minutes".
∫Passcode
Passcode Lock: Set a four-digit pass code to protect this unit. (This is not set by default)
Change Passcode: Change the number for the set pass code. This can not be selected if a
pass code has not been set.
0If you enter the wrong pass code three times, a message appears asking if you want to
initialize the unit's settings. Even if the settings are initialized copied music files are not
deleted.
0You should create a pass code to protect your account if you are going to use a network
service.
∫Language
Select the language you want to use. Flick the list of languages up or down, then tap the
language you want to use.
English, German, French, Spanish, Italian, Swedish, Russian, Traditional Chinese,
Simplified Chinese, Japanese
∫Software Update
Update Notice: Availability of a software update will be notified via network when "Enable"
is set.
"Disable": Do not notify
"Enable (default value)": Notify
Update Now: Software can be updated via a network or via a micro SD card.
Select "via Network" or "via SD Card". You can not select if there is no software update.
SN29403051_DP-S1_En_1704XX.book 19 ページ 2017年4月11日 火曜日 午後5時37分
Other manuals for DP-S1
1
Table of contents
Languages:
Other Onkyo MP3 Player manuals