Grex TRITIUM Series User manual

OWNER’S MANUAL
TRITIUM
Series
. . . . . . . . . . . . . . . . . . . . . 2
. . . . . . . . . . . . . . . . . . . 3
. . . . . . . . . . . . . . . . . . . . . . . 4
. . . . . . . . . . . . . . . . . 4
. . . . . . . . . . . . . . . . . . . . . . . 4
. . . . . . . . . . . . . . . . . . . . 4
. . . . . . . . . . . . . . . . . . . . . . . . 5
. . . . . . . . . . . . . . . . . . . . . . . . 5
. . . . . . . . . . . . . . . . . . . . . 5
. . . . . . . . . . . . . . . . . . . . 5
. . . . . . . . . . . . . . . . . . 6
. . . . . . . . . . . . . . . . . 7
. . . . . . . . . . . . . . . . . 7
. . . . . . . . . . . . . . . . . . 8
. . . . . . . . . . . . . . . . . . . . . . . . . . . . 9
. . . . . . . . . . . . . . . . . . . 9
. . . . . . . . . . . . . . 10
. . . . . . . . . . . . . . . . . . . . . . . . 10
. . . . . . . . . . . . . . . . . . . 11
. . . . . . . . . . . . . . . . . . . . . . . 12
. . . . . . . . . . . . . . . . . 12
. . . . . . . . . . . . . . . . . . 12
. . . . . . . . . . . . . . . . . . 13
. . . . . . . . . . . . . . . . . . . . . 13
. . . . . . . . . . . . . . . . . . . . . 14
. . . . . . . . . . . . . . . . . . . . . . . . 15
. . . . . . . . . . . . . . . . . . . . . . . . . . . . 16
. . . . . . . . . . . . . . . . . . 18
. . . . . . . . . . . . . . . . . . . . . 19
. . . . . . . . . . . . . . . . . . . . . . . 20
. . . . . . . . . . . . . . . . . . . . . . 22
01. Technical Specifications
02. Anatomy of Your Airbrush
03. General Information
3.1 Compressors & Air Pressures
3.2 Paint Preparation
3.3 Airbrush System Setup
04. General Operation
4.1 Before Each Use
4.2 Holding YourAirbrush
4.3 Quick-FitTM Needle Caps
4.4 Installing Paint Reservoirs
4.5 Airbrush Trigger Operation
4.6 Spray Paern Adjustments
4.7 Pre-set Knob Adjustments
05. Maintenance
5.1 Cleaning your Airbrush
5.2 Cleaning Between Color Changes
5.3 After Each Use
5.4 Airbrush Back Flushing
5.5 Needle Pumping
5.6 Airbrush Straight Flushing
5.7 Cleaning Paint Reservoirs
5.8 Cleaning the Fluid Nozzle
5.9 Airbrush Lubrication
06. Nozzle Conversion Kits
07. Replacement Parts
08. Accessories
09. Private StockTM Color System
10. Troubleshooting Guide
11. Exploded Diagrams
12. Warranty Information
TABLE OF CONTENTS
®


Introduction Grex Tritium Series Owner’s Manual
1
®
Congratulations on your purchase of a Grex airbrush. Grex
Tritium airbrushes represent our premium line of double action
pistol style trigger airbrushes. Its intuitive easy-to-use design
appeals to beginners, but its fine detail control and comfortable
operation makes it appealing to professionals as well. Tritium
airbrushes are a comprehensive, feature-rich line that can
accommodate to your airbrushing preferences and you'll find the
same reliable, high performance you'd expect from any Grex
product. Thank you for choosing Grex and for joining us on this
journey for ...
the Evolution of Perfection ®
* Recommended Operating Pressures: 4 ~ 80psi (0.28 ~ 5.52bar)
* Operating pressures may vary depending on paint used.
* All optional accessories are sold separately.
* See Section 8 for a full list of available genuine Grex accessories.

Technical Specifications Grex Tritium Series Owner’s Manual
2
®
1. TECHNICAL SPECIFICATIONS
. . . . . . . . . . . Double Action Pistol Style Trigger
. . . . . . . . . . . . . . . . . . . . . . . . . . Top Gravity
. . . . . . . . . . . . . . . . . . . . . . . . . . 180g (6.4 oz.)
. . . . . . . . . . . . . . . . . . . . . . . . . . 159mm (6.25”)
. . . . . . 2mL (1/20 fl. oz.) Top Cup w/ Lid
. . . . . . . . . . . . . . . . . . . . . 7mL (1/4 fl. oz.) Top Cup w/ Lid
. . . . . . . . . . . . . . . . . . . . 15mL (1/2 fl. oz.) Top Cup w/ Lid
. . . . . . . . . . . . . . . . . . . Quick-FitTM Needle Cap
. . . . . . . . . . . . . . . . . . . . . . . . . Quick-FitTM Crown Cap
. . . . . . . . . . . . . . . . . . . . . . . . . . . . . . Nozzle Wrench
. . . . . . . . 50mL (1.7 fl. oz.) Top Cup w/ Lid
. . . . . . . . . . . . . . . . . . . .125mL (4.2 fl. oz.) Top Cup w/ Lid
. . . . . . . . . . . . . . . . . . . . . . G-MAC Quick Connect Valve
. . . . . . . . . . . . . . . . . . . . . . . TK - Nozzle Conversion Kits
. . . . . . . . . . . . . . . . . . . . . . . . . . . TF - Fan Spray Caps
Airbrush Type
Feed Type
Weight
Length
Included Fluid Reservoirs
Kit includes
Optional Accessories
Tritium.TG
. . . . . . . . . . . Double Action Pistol Style Trigger
. . . . . . . . . . . . . . . . . . . . . . . . . Side Gravity
. . . . . . . . . . . . . . . . . . . . . . . . . . 180g (6.4 oz.)
. . . . . . . . . . . . . . . . . . . . . . . . . . 159mm (6.25”)
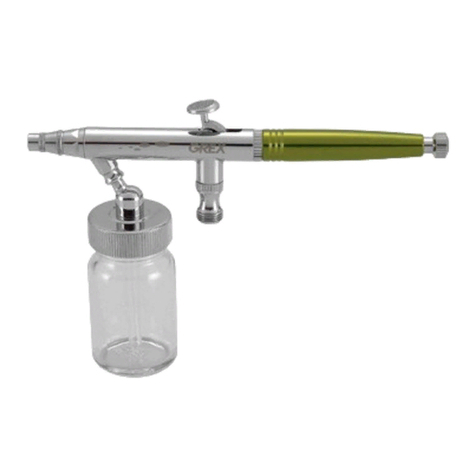
. . . . . . 7mL (1/4 fl. oz.) Side Cup w/ Lid
. . . . . . . . . . . . . . . . . . . . 15mL (1/2 fl. oz.) Side Cup w/ Lid
. . . . . . . . . . . AD32 Side Feed Adaptor w/ 30mL (1 fl. oz.) Bole
. . . . . . . . . . . . . . . . . . . Quick-FitTM Needle Cap
. . . . . . . . . . . . . . . . . . . . . . . . . Quick-FitTM Crown Cap
. . . . . . . . . . . . . . . . . . . . . . . . . . . . . . . . . Side Plug
. . . . . . . . . . . . . . . . . . . . . . . . . . . . . . Nozzle Wrench
. . . . . . . . 50mL (1.7 fl. oz.) Side Cup w/ Lid
. . . . . . . . . . . . . . . . . . . 125mL (4.2 fl. oz.) Side Cup w/ Lid
. . . . . . . . . . . . . . . . . . . . . . G-MAC Quick Connect Valve
. . . . . . . . . . . AD31 - Adaptor, Grex to Iwata or Aztek Side Feed
. . . . . . . . . . . . . . . . . . . . . . . TK - Nozzle Conversion Kits
. . . . . . . . . . . . . . . . . . . . . . . . . . . TF - Fan Spray Caps
Airbrush Type
Feed Type
Weight
Length
Included Fluid Reservoirs
Kit includes
Optional Accessories
Tritium.TS
Model No.
Fluid Nozzle
Min. Spray Paern
Max. Spray Paern
TG2
0.2mm
Hairline
20mm (3/4")
TG3
0.3mm
Hairline
25mm (1")
TG5
0.5mm
Hairline
50mm (2")
Model No.
Fluid Nozzle
Min. Spray Paern
Max. Spray Paern
TS2
0.2mm
Hairline
20mm (3/4")
TS3
0.3mm
Hairline
25mm (1")
TS5
0.5mm
Hairline
50mm (2")

Anatomy of Your Airbrush Grex Tritium Series Owner’s Manual
3
®
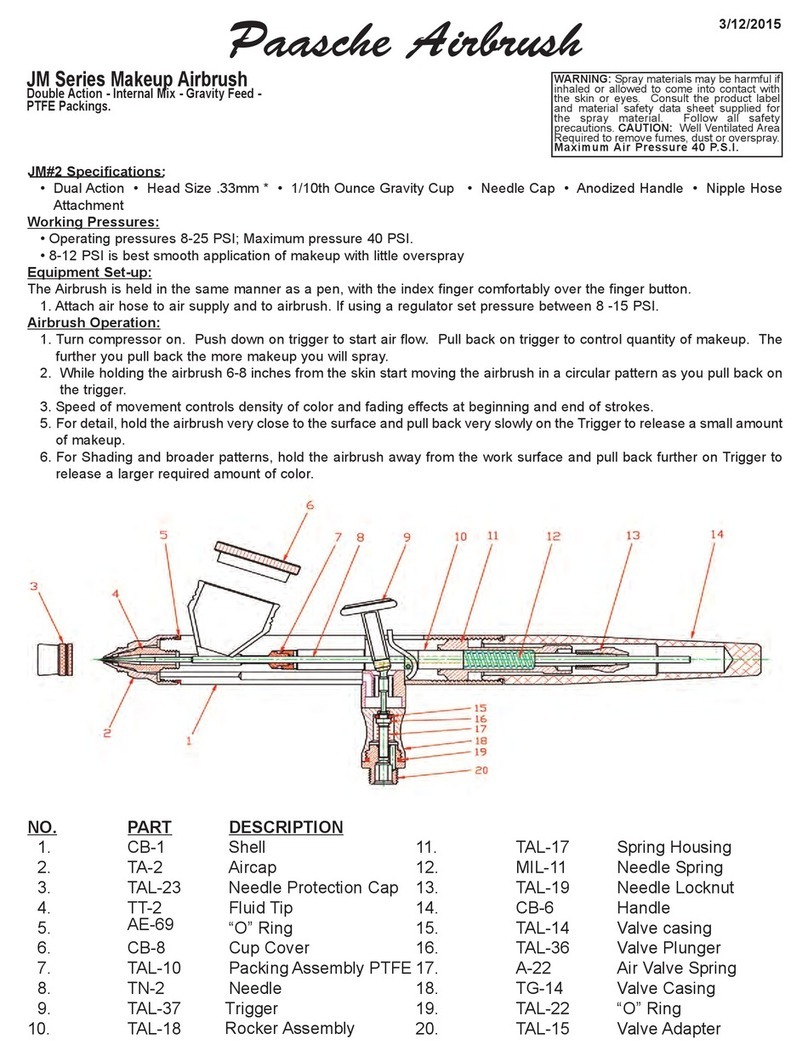
2. ANATOMY OF YOUR AIRBRUSH
Paint cup
Rear handle cap
Pre-set knob
Quick-FitTM
needle cap
Nozzle cap
Trigger
Air inlet
Pistol grip handle
Airbrush body
Cup lid Quick-FitTM
cap storage
Quick-FitTM
crown cap
Side plug
Paint cup
Rear handle cap
Pre-set knob
Quick-FitTM
needle cap
Nozzle cap
Air inlet
Pistol grip handle
Cup lid
Quick-FitTM
cap storage
Quick-FitTM
crown cap
Trigger
Airbrush body
Integrated cup
Tritium.TG
Tritium.TS

General Information Grex Tritium Series Owner’s Manual
4
®
3. GENERAL INFORMATION
3.1 Compressors and Air Pressures
Choosing an appropriate air compressor that supplies sufficient
air flow ensures the ability to take full advantage of the versatile
spray characteristics of your Grex airbrush. Working pressures can
vary from 4 to 80 psi depending on the type of work and what
textures are desired. Paint viscosity and fluid nozzle opening size
can affect optimal working pressures. In general, thicker and higher
viscosity paints require higher pressures. Thick paints may require
45 psi or higher, while thinner paints may only need 18 to 25 psi.
It is strongly recommended that you use air filters, moisture
traps, and pressure regulators as part of your airbrush system.
Having clean, dry air enables optimal performance, provides
hassle-free maintenance, and prolongs the life of your airbrush.
Note: Use of the siphon aachment requires relatively higher
operating pressures than gravity feed cups.
3.2 Paint Preparation
Your Grex airbrush comes standard with Teflon packings which
allows most paints to be used with the airbrush. This includes, but
is not limited to, food dyes, acrylics, textile paints, makeup,
lacquers, and urethanes.
Proper paint preparation is needed for best performance. Paint
must be reduced using the proper solvent (manufacturer
recommended) and mixed thoroughly. Always filter the paint
through a fine nylon mesh to remove clumps and chunks that can
disrupt consistent spray and block the minute passageways in the
airbrush.
Warning: Always wear proper protective gear and clothing (such
as goggles, respirator, dust mask and gloves). Work in a well
ventilated area, especially when using urethane and enamel based
paints. Follow all instructions that come with your paint, and use
the reducers recommended by the paint manufacturer.
3.3 Airbrush System Setup
Aach any desired accessories, such as moisture traps, filters,
regulators, etc., to your compressor and/or airbrush depending on
your setup. Connect an air hose between the compressor and
airbrush while using the appropriate adapters where necessary.
Refer to Section 8 “Accessories” to learn more about adapters that
may be needed for your system setup. Adjust air pressures
according to paint type and desired spray characteristics. Check for
any air leaks from the compressor and air hose. Then fill the paint
reservoirs or boles with paint when ready to use.
General Operation Grex Tritium Series Owner’s Manual
5
®
4. GENERAL OPERATION
4.1 Before Each Use
Spray water or appropriate paint solvent through your airbrush to
make sure the airbrush is working properly and to clear out any
pigment residue present. Refer to Section 4.5 “Airbrush Trigger
Operation” for specific instructions on airbrush operation.
4.2 Holding Your Airbrush
There are several options to holding your airbrush for operation. In
the following few figures, we illustrate some of the recommended
methods. Choose the one that allows you to work most naturally
and comfortably.
4.3 Quick-FitTM Needle Caps
All Grex Tritium airbrushes feature our patented Quick-FitTM
needle caps. These caps can be easily removed and installed by
simply aaching them to the magnetic nozzle cap. Each airbrush
includes one Quick-FitTM Standard Needle Cap and one Quick-FitTM
Crown Needle Cap. Both caps are meant to protect the needle tip
from damage, but the crown needle cap is cut away on two opposite
sides to allow spraying of fine lines with the airbrush positioned
close to the work surface.
Note: The rear end of the Pre-set Adjustment Knob also serves as a
convenient magnetic storage for either Quick-FitTM needle caps.
®
Figure 4A. Figure 4B.
Magnetic nozzle cap
Quick-FitTM Crown Needle Cap
Quick-FitTM Standard Needle Cap
Fluid needle
Figure 4C.

General Operation Grex Tritium Series Owner’s Manual
6
®
4.4 Installing Paint Reservoirs
Tritium.TG
Your Tritium.TG airbrush comes with three top gravity cups of
varying fluid capacity. Depending on your application, you can
chose to install either one of these cups. Simply securely screw the
threaded base of the cup onto the airbrush. For very minute
amounts of paint, you can forgo the paint cups and just use the
integrated cup.
Tritium.TS
Your Tritium.TS airbrush comes with three reservoirs of varying
fluid capacity - two side gravity cups and one side siphon
aachment with bole. Depending on your application, you can
choose to install either one of these reservoirs and they can be
installed on either the left or right hand side of the airbrush. Side
reservoirs can also be adjusted to be used at any angle.
Figure 4D.
15mL top
cup w/ lid
7mL top
cup w/ lid
2mL top
cup w/ lid
Integrated cup
1. Screw in Side Plug on the opposite side you'd like to install reservoir
2. On other side of airbrush, screw in reservoir as much as possible
3. Turn the reservoir to the desired position
4. Tighten the lock nut to secure the reservoir position
Installing the Side Paint Reservoir
Lock Nut
4
Side Plug
1
32 +
Figure 4E.
7mL side cup w/ lid
15mL side cup w/ lid
AD32 adapter w/
30mL Plug-in siphon
bole assembly

Pull trigger back less:
less paint, narrower paern
Pull trigger back more:
more paint, wider paern
General Operation Grex Tritium Series Owner’s Manual
7
®
4.5 Airbrush Trigger Operation
In a double action pistol style trigger airbrush, the trigger controls
both the air flow through the airbrush and the paint volume
sprayed. Pulling the trigger back to the halfway point opens the air
valve at the boom of the airbrush and allows air to flow through.
Further pulling back on the trigger pulls the fluid needle back away
from the fluid nozzle allowing paint to be sprayed. As the trigger
continues to be pulled back, the nozzle opening becomes larger
which allows more paint to be sprayed to create a wider spray
paern.
4.6 Spray Paern Adjustments
Paint sprayed from an airbrush exits from the nozzle in the form of
a cone. As the needle of the airbrush is pulled back away from the
nozzle, the nozzle opening is increased allowing more paint to be
sprayed resulting in a wider cone. Depending on where the work
surface intersects this cone, a different spray width is achieved. So,
line widths produced by the airbrush are controlled by a combina-
tion of adjusting the distance the airbrush is held from the work
surface and adjusting the amount of paint allowed to spray.
®
12
Pull trigger halfway to
turn on air flow
1
Continue pulling trigger
to control paint volume
2
Less paint,
narrower paern
More paint,
wider paern
Further work surface
for wider paerns
Closer work surface
for narrower paerns
Less paint,
narrower paern
More paint,
wider paern
Figure 4H.Figure 4G.
Figure 4F.

General Operation Grex Tritium Series Owner’s Manual
8
®
4.6 Spray Paern Adjustments <continued>
Fine Line Spraying
To spray a fine line, position your airbrush close to your work
surface and control your airbrush such that a minimal amount of
paint is sprayed. The closer the airbrush is to the work surface, the
finer the line that is created. An extremely fine line can be obtained
by using the Crown Needle Cap and positioning your airbrush even
closer to the surface. See page 7, Figure 4H for reference.
Wide Line and Background Spraying
To create wider lines and background spraying, position your
airbrush further from the work surface and control the airbrush to
release more paint. Increasing the air pressure, the distance of the
airbrush from the surface, and the amount of paint sprayed will
further increase spray widths. See page 7, Figure 4G for reference.
Stippling
Stippling is the technique of using small dots to simulate varying
degrees of solidity or shading. There are many methods for creating
stippling effects with an airbrush, but one way this can be achieved
is by lowering the air pressure to between 5 and 15 psi and pumping
the trigger. Lower air pressures will usually produce courser
stipples whereas higher air pressures will provide finer stipples.
Note that paint viscosity will also affect the stippling texture.
4.7 Pre-set Knob Adjustments
To help produce constant line widths, your Grex airbrush comes
standard with a Pre-Set Knob on the end of the rear handle cap. A
set amount of paint is sprayed by limiting how far the trigger can be
pulled back. Turning the knob clockwise reduces how far the trigger
can move to help produce consistent fine lines. Turning the knob
counter clockwise allows the trigger to move further back to help
produce consistent wider lines. Fully turning the knob clockwise
will prohibit trigger movement and prevent any spraying. Fully
turning the knob counter clockwise will allow the full range of
trigger action and deactivate the Pre-set knob
capabilties.

Maintenance Grex Tritium Series Owner’s Manual
9
®
5. MAINTENANCE
Your Grex airbrush is a durable precision instrument. As with any
precision instrument, it is susceptible to damage if handled improperly.
Take care to prevent damaging the components of this highly sensitive
tool to assure peak performance throughout its lifetime. Proper mainte-
nance of your Grex airbrush demands appropriate cleaning and
requires correctly replacing and adjusting its parts. Daily and thorough
maintenance of your airbrush will result in spraying that is smooth,
consistent, and hassle-free.
5.1 Cleaning your Airbrush
Your airbrush needs to be cleaned between color changes, if it is not
being used for an extended period of time, at the end of the work
day, or if your airbrush is not performing properly. It is only
necessary to clean areas of the airbrush which come in contact with
paint; namely, the paint reservoir, paint passageway, nozzle, needle
cap and around the tip of the needle. These areas must be kept clean
for optimum performance of the airbrush.
Always empty paint out of your airbrush if not used for relatively
long periods of time and spray appropriate solvent until the
airbrush is flushed free of color. Blockages caused by dried paint are
the biggest problem when using an airbrush. Any time the airbrush
becomes clogged, first try increasing the air pressure and spray
appropriate solvent through the airbrush for a short period of time.
If this does not clear the clog, a thorough cleaning of the airbrush
may be needed.
Caution: Never soak or submerge your entire airbrush in any
solvent and/or cleaning solution to avoid damaging the o-rings and
airbrush packing. More importantly, it will ensure that solvent
and/or cleaning solution does not enter the air valve and damage its
seals and o-rings.
Warning: Never use ammonia or ammonia based products on or in
the airbrush. Ammonia will corrode the brass and chrome used to
make your airbrush. Do not use abrasives (cleansers, sand paper,
etc.) or metal objects to clean. They can scrape the metal finish,
causing nicks, scratches, and/or destroy airbrush parts that will
degrade the quality and performance of your airbrush.
Note: Always wear proper protective gear and clothing (such as
goggles, respirator, dusk mask and gloves) and work in a well
ventilated area, especially when using urethane and enamel based
paints. Make sure to dispose of materials properly.

Maintenance Grex Tritium Series Owner’s Manual
10
®
5.1 Cleaning the Airbrush <continued>
Note: We recommend using the mildest solvent to clean the types of
paint used. If water-based paints were used, then water is usually
sufficient to clean out your airbrush. Be sure to follow all instruc-
tions that come with the solvents.
Tip: Perform all your cleaning in a contained area (ie. cookie sheet,
plate, bowl) to prevent parts from geing lost or damaged. It also
helps keep any mess in a contained area.
5.2 Cleaning Between Color Changes
Empty out remaining paint in the paint reservoir and wipe off as
much residual paint as possible with a paper towel. Spray out
any excess paint.
Partially fill the paint reservoir with the appropriate solvent and
use a brush to breakdown paint in the reservoir. Pour out this
dirty solution.
Partially fill the paint reservoir again with solvent and spray the
solvent at a heavy spray seing into a paper towel, waste
container or similar material.
Repeat spraying solvent until airbrush is flushed free of color.
5.3 After Each Use
Follow Section 5.2 “Cleaning Between Color Changes.”
Back flush your airbrush to clean the paint passageway.
Refer to Section 5.4 “Airbrush Back Flushing.”
Pump the needle of your airbrush to clean the internal packing.
Refer to Section 5.5 “Needle Pumping.”
Straight flush your airbrush to clean the paint passageway.
Refer to Section 5.6 “Airbrush Straight Flushing.”
Carefully remove fluid needle from your airbrush and set aside.
Thoroughly clean paint reservoirs and external passageways.
Refer to Section 5.7 “Cleaning Paint Reservoirs.”
Thoroughly clean threads on airbrush and reservoirs.
Carefully remove and clean needle and nozzle caps.
Clean the fluid needle and carefully re-insert into your airbrush.
Refer to Section 5.8 “Cleaning the Fluid Needle.”
1.
2.
3.
4.
1.
2.
3.
4.
5.
6.
7.
8.
9.

®
Maintenance Grex Tritium Series Owner’s Manual
11
®
5.3 After Each Use <continued>
Clean the rest of the airbrush body and dry thoroughly.
Make sure the entire airbrush is re-assembled properly.
Spray some water or alcohol through your airbrush to make
sure it has been thoroughly cleaned and is functioning properly
before storing.
Note: After your airbrush parts have been removed and cleaned,
they must then be carefully replaced and adjusted in their designat-
ed positions. Failure to align each part correctly will prevent your
airbrush from functioning properly. In many instances, when an
airbrush fails to perform correctly, these problems result from
improper cleaning and/or alignment of parts.
5.4 Airbrush Back Flushing
Remove the rear handle cap, loosen the needle lock and retract
the needle slightly back into the fluid nozzle. Retighten the
needle lock.
Partially fill the paint reservoir with water or cleaner.
Using your finger or a towel, carefully block the front of the
airbrush opening (needle cap). Refer to Figure 5A below.
Pull trigger to push air upstream into the paint reservoir to back
flush (bubbles will appear in paint reservoir).
Hold 15 to 20 seconds. Then pour out the dirty solution.
Repeat back flushing until the water or cleaner in the paint
reservoir remains clean.
10.
11.
12.
1.
2.
3.
4.
5.
6.
Figure 5C.
Figure 5A.
Figure 5B.
®

Maintenance Grex Tritium Series Owner’s Manual
12
®
5.5 Needle Pumping
With rear handle cap removed, loosen the needle lock.
Partially fill the paint reservoir with water or cleaner.
Hold the needle and move it slightly in and out of your airbrush
repeatedly (pumping) to clean the internal packing. Refer to
Figure 5B on page 11.
Pour out the dirty solution.
Add water or cleaner to the paint reservoir and continue
pumping until the solution in the paint reservoir remains clean.
Carefully slide needle forward into fluid nozzle. Make sure it
sets firmly into the fluid nozzle. Re-tighten needle lock and
replace rear handle cap.
5.6 Airbrush Straight Flushing
Partially fill the paint reservoir with water or cleaner and spray at a
heavy spray seing into a paper towel, waste container or similar
material. Repeat straight flushing your airbrush until the solution
sprays out clean. The internal paint passageway should now be
clean.
5.7 Cleaning Paint Reservoirs
Tritium.TG - Thoroughly clean the paint passageway at the boom
of the paint reservoir. Refer to Figure 5C on page 11.
Tritium.TS side cups - Remove the paint cups and thoroughly clean
the paint passageway through the cup. Remove and clean the lock
nut and also the threads of the cup. Thoroughly clean the opening
on the side of the airbrush. Refer to Figure 5D below.
Tritium.TS AD32 side siphon adaptor - Remove the adaptor and bole
cap. Thoroughly clean the adaptor, paint passageway of the
adaptor, bole, and bole cap, including the plastic tubing. Refer to
Figure 5E below. Also thoroughly clean the side openings of the
airbrush.
1.
2.
3.
4.
5.
6.
Figure 5E.
Lock Nut
Figure 5D.
Lock Nut

Maintenance Grex Tritium Series Owner’s Manual
13
®
5.8 Cleaning the Fluid Needle
Wipe needle clean (start from the back end and wipe towards the
needle tip). Carefully slide needle back into the airbrush, while
adding a lile twist to make sure it sets firmly into the fluid nozzle.
Re-tighten needle lock and re-aach rear handle cap.
Before replacing the needle, you may apply a light coat of lubricant
to the needle to facilitate smooth trigger motion.
5.9 Airbrush Lubrication
Caution: Do not use light machine oil, WD40 or any petroleum and
silicon based products for lubrication. Doing so will cause the
needle to stick as it moves through the needle packing and may
contaminate the paint.
To ensure smooth operation, lubricate the needle regularly. Periodi-
cally remove the fluid needle and coat with high quality airbrush
lubricant. Then wipe the needle with a soft clean cloth, leaving a
light coat of lubricant.
Caution: Do not over lubricate the needle. Doing so may transfer
excess lubricant into the nozzle and paint reservoir causing severe
paint flow problems and paint contamination.
After a full tear down and cleaning, it is recommended to inspect the
slider (#8) and shift pin (#18) to ensure they are sufficiently lubricat-
ed (refer to schematic on page 20). Use a high quality multipurpose
synthetic grease (such as Super Lube). This should be applied to the
o-rings and top of shift pin, as well as the under side of the slider
before re-assembly. Refer to Figure 5F below.
Figure 5F.
#8 #18
A video demonstrating the full assembly and
dis-assembly of Grex airbrushes can be found by
visiting: www.grexairbrush.com/ABM

Maintenance Grex Tritium Series Owner’s Manual
14
®
6. NOZZLE CONVERSION KITS
Nozzle Conversion Kits are great as replacement parts or an excellent
way to change your spray output. Compatible with the Tritium.TS, TG,
and Genesis.XGi and XSi.
Caution: Please read, understand and follow the instructions in Section
7, “Replacement Parts,” before replacing or changing any part of your
airbrush with the Nozzle Conversion Kits.
Fluid Needle Identification
Fluid Nozzle, Nozzle Cap and Fan Spray Cap Identification
0.2mm = 2 Stripes
0.3mm = 3 Stripes
0.5mm = 5 Stripes
0.7mm = 7 Stripes
1 Stripe
No Stripes
2 Stripes
3 Stripes
No Stripes
1 Stripe
(Front)
2 Stripes
(Front)
3 Stripes
(Front)
TF - Fan Spray Cap
Nozzle Cap
Fluid Nozzle Fluid Needle
TK - Nozzle Conversion Kit
TFK - Fan Cap w/ Nozzle Kit
0.2mm
TK-2
0.3mm
TK-3
0.5mm
TK-5
0.7mm
TK-7TF-3 TF-5 TF-7TFK-3 TFK-5 TFK-7
Size
Item No.
Fan Cap
Nozzle Cap
Fluid Needle
Fluid Nozzle
0.2mm
0.3mm
0.5mm
0.7mm
0.3mm
0.5mm
0.7mm
2 Stripes
3 Stripes

Replacement Parts Grex Tritium Series Owner’s Manual
15
®
7. REPLACEMENT PARTS
Caution: If it is necessary to disassemble your airbrush: (1) DO NOT use
pliers. In most cases, no tools are required to disassemble your airbrush
except those provided in the kit. (2) DO NOT over tighten the fluid
nozzle when assembling. Only a slight force is needed with the
included nozzle wrench.
Even though Grex airbrushes are manufactured with precision machin-
ing and high quality materials, several delicate parts require replace-
ment due to normal wear and tear. These include the fluid nozzle, fluid
needle, o-rings, and needle packing.
Fluid Nozzle – Before replacing the fluid nozzle, be sure that the needle
is slightly pulled back away from the fluid nozzle. To do this, remove
the rear handle cap, loosen the needle lock and carefully pull the needle
back. Remove the needle cap and nozzle cap then carefully unscrew the
fluid nozzle using the wrench supplied with your kit. Replace with a
new fluid nozzle and re-assemble the airbrush. Make sure the needle is
set firmly into the fluid nozzle.
Caution: DO NOT over tighten the fluid nozzle when assembling. Only
a slight force is needed with the nozzle wrench.
Note: It is recommended to change the fluid needle at the same time to
ensure even wear.
Fluid Needle – Grex needles are made of precision ground and hardened
stainless steel and will withstand prolonged use. However, because of
their fine tip and long taper, they are easily subject to physical damage.
This is a highly delicate part and any small deformations to the needle
tip will compromise the performance of your airbrush. If the tip is
severely bent, it must be straightened before being removed to prevent
damage to the fluid nozzle.
To purchase replacement parts, contact your local Grex dealer. Find
your local Grex dealer by visiting www.grexairbrush.com, emailing
[email protected], or calling 888-4-GREXCO (447-3926).

Grex Airbrush Grip Set
The Grex airbrush grip is an innovative accessory for any ordinary
airbrush that provides beer handling, control, and comfort.
GGS1 - Compatible with the Genesis.XD, XG, XN, XS, XGi and XSi.
Also compatible with other brands
Grex Micro Air Control Quick Connect Valve
An inline micro air control valve with a quick connect
coupler for convenient air flow control at your fingertips.
Perfect for precise control of stippling effects.
GMAC.B G-MAC w/ quick connect plug set
GMAC.B For Grex airbrush & hose
GMAC.B G-MAC w/ quick connect plug set
GMAC.B For Badger airbrush & hose
GMAC.P G-MAC w/ quick connect plug set
GMAC.B For Paasche airbrush & hose
Airbrush Holder - HD1
Adjustable to aach on table and bench tops.
Holds up to 4 airbrushes with two rotatable
boom holders and two top holders that can
pivot 180 deg./rotate 360 deg.
Quick Connect Air Couplers and Plugs
Quick connect couplers and plugs allow quick
connect & disconnects between air hose and
airbrush for easy setup and system changes.
AD02 Coupler (F) & Plug (M) Set for Grex airbrush & hose
AD03 Coupler (M) & Plug (F) Set for Grex airbrush & hose
AD09 Plug for Grex Airbrush
AD19 Plug for Badger Airbrush
AD29 Plug for Paasche Airbrush
Side Siphon with 30mL Bole
CP30-01 - 30mL (1 fl. oz.)
For Grex XS, XSi, XT, TS
Accessories Grex Tritium Series Owner’s Manual
16
®
8. ACCESSORIES
A
B
C
D
A
B
C
D
E
E
* Suggested use

Accessories Grex Tritium Series Owner’s Manual
17
®
Air Fiing Adapters
Connect hose, airbrush, and air fiings with different sizes.
AD05 1/8"M to 1/8"M
AD06 1/8"F to 1/4"M
AD10 1/4"M to 3/8"F
AD11 1/8"F to 1/4"M
AD12 1/8"M to 1/4"F
AD20 1/8"F to 1/4"F
AD21 1/8"M to 1/4"M
Set of six 30mL (1 fl. oz.) Boles
CP30-6K
For Grex XB, XBi, XT, TS, XSi or CP30-01, CV1-2TB
Top Gravity Cups
For Grex XA, XGi, TG
CP02-01 2mL (1/20 fl. oz.)
CP07-01 7mL (1/4 fl. oz.)
CP15-02 15mL (1/2 fl. oz.)
CP50-01 50mL (1.7 fl. oz.)
CP125-G 125mL (4.23 fl. oz.)
Braided Nylon Air Hoses
GBH-06 06’ with 1/8"F x 1/8"F
GBH-10 10’ with 1/8"F x 1/8"F
GBH-20 20’ with 1/8"F x 1/8"F
Side Gravity Cups
For Grex XS, XSi, XT, TS
CP07-02 7mL (1/4 fl. oz.)
CP15-01 15mL (1/2 fl. oz.)
CP50-02 50mL (1.7 fl. oz.)
CP125-S 125mL (4.23 fl. oz.)
Boom Siphon Assembly
CV1-2TB (cap only)
CP30-2 (cap plus 30mL glass bole)
For Grex Genesis.XB, XBi and AD32
L
F
H
J
K
F
H
J
K
M
AD24 1/4"F to 1/4"F
AD25 1/4"M to 1/4"M
AD14 Grex airbrush to Badger hose
AD16 Badger airbrush to Grex hose
AD28 Grex airbrush to Paasche hose
AD30 Paasche airbrush to Grex hose
Boom Siphon w/ 60 mL Plastic Bole
CP60-01
For Grex Genesis.XB, XBi and AD32
G
Side Feed Adapters
For Grex XS, XSi, XT, TS
AD31 to Iwata/Aztek side reservoirs
AD32 to Fast BlastTM Boles
I
I
G
Note: 1/8” PS - Parallel Pipe Threads are standard fiing sizes used in
these airbrush brands: Grex® , Harder Steenbeck® , Iwata® , Olympos®
* Registered marks owned by their respective companies.
GBH-30 30’ with 1/8"F x 1/4"F
GBH-50 50’ with 1/8"F x 1/4"F

Private StockTM Color System Grex Tritium Series Owner’s Manual
18
®
9. PRIVATE STOCKTM COLOR SYSTEM
Private StockTM is a revolutionary and evolutionary paint system – made
from a blend of acrylics designed and formulated for performance to
give you full control on every surface imaginable.
Private StockTM is used on all materials, ranging from illustration boards
textiles, wood, leather, glass, metals and plastics that include HDPE,
PVC, PET, LEXAN and Polycarbonate. Artist of every kind, Crafters, RC
builders and modelers can use this single system to suit all their needs.
Private StockTM is water-based, non-toxic and conforms to ASTM D4236
compliance standards. But unlike other water-based paints, it uses
proprietary nano-technology that results in minimal dry tip issues and
sprays as smooth as solvent based urethanes to ensure maximum
performance and superior control, even with fine nozzle airbrushes. Its
been built from the ground up specifically for airbrush use, but can also
be applied with a paint brush.
Private StockTM is only made with premium ingredients and with no
fillers added whatsoever. Only pigments of the finest quality with
regards to purity, strength and performance are used. All colors are
extremely light fast representing the highest ratings without requiring
health or precautionary labeling, which makes them more fade resistant
- ideal for many outdoor applications like custom painting, textiles etc.
Private StockTM is precision manufactured for accurate and repeatable
mixing of an infinite color spectrum. This top quality color system also
includes a comprehensive range of modifiers that allow you to change
the properties of the paints and create a variety of special effects. Finally,
a highly adjustable, yet streamlined color system that puts you in the
driver seat.
• Transparent Colors (25 colors)
Core of the Private StockTM System
• Opaque Colors (6 colors)
Useful to layout art designs
• Fluorescent Colors (7 colors)
Highest lightfast flourescents
• High Solid Special FX Bases (6 bases)
Metallics, basecoats, pearls and flakes
• Base Modifiers (2 bases)
Control your paint properties
GXPS-200
Opaque
Carbon Black
P
rivate
tock
S
FROM
®
This manual suits for next models
8
Table of contents
Other Grex Airbrush manuals