Congratulations on your purchase of Grex Genesis airbrush; a multi-purpose, reliable and high
performance airbrush designed for the demanding professional. Precision machining and carefully
selected materials are employed in the manufacturing process of each Grex airbrush to insure
consistent high performance and adherence to Grex’s high quality standards. To maintain your
Genesis at its peak performance, proper care and attention must be observed.
Compressors and Air Pressures
Choosing an appropriate air compressor that can supply sufficient pressure for your Genesis
airbrush insures optimal operation and performance. Working pressures vary from 30 to 60 psi,
depending on the type of work being done and what textures are desired. In general, 45 psi or above
is needed to take full advantage of the versatile spray characteristics of the airbrush. Viscosity of the
paint also effects which pressures are ideal. In general, larger volumes and/or thicker paints require
higher pressures.
Assembling Airbrush for Use
Attach an air hose to the compressor and airbrush. Adjust the air pressure according to type of paint
used and desired spray characteristics. Check for any air leaks from the compressor and air hose.
XB, XD, XG, XN, XS - Fill the bottle or color cup with some airbrush cleaner. Pointing the airbrush
away from you, press down on the trigger to allow air flow through the airbrush. Pull back on the
trigger to open the nozzle of the airbrush allowing cleaner to spray out.
XA - Fill the color cup with some airbrush cleaner. Turn the paint flow adjustment knob on the rear of
the airbrush counter-clockwise to open the nozzle. Pointing the airbrush away from you, press down
on the trigger to allow cleaner to spray out.
XT - Fill the color cup with some airbrush cleaner. Pointing the airbrush away from you, pull back on
the trigger to allow cleaner to spray out.
Caution: The fluid nozzle and needle are very delicate parts. Even the slightest physical damage can
adversely affect the spray pattern.
Paint Preparation
Proper preparation and filtering of paint through a nylon mesh is recommended for best performance.
Paint should always be thinned with its proper solvent. It is best to prepare the paint relatively thin
and make repeated passes across the work to achieve the desired shade. This will also improve the
quality of your work and decrease the cleaning time of your airbrush.
Line Width Adjustments
XB, XD, XG, XN, XS, XT - Line widths produced by the airbrush are controlled by adjusting the
distance the airbrush is held from the work surface and adjusting the amount of paint flow by
positioning of the trigger. As the trigger is pulled further back, the nozzle opens more, releasing more
paint and allowing larger spray widths. To help produce constant line widths, your Genesis airbrush
is designed with a Width Adjustment Knob on the rear of the handle, which controls how far the
trigger can be pulled back. Turning the knob clockwise helps produce finer lines, while turning the
knob counter clockwise helps produce wider lines.
XA – The trigger in this model only controls air flow. So aside from adjusting the distance between
the airbrush and work surface, line widths are controlled by adjusting the Width Adjustment Knob on
the rear of the airbrush.
Fine Line Spraying
XB, XD, XG, XN, XS, XT - To spray a fine line, depress and pull the trigger back slightly while
positioning the airbrush close to the work surface.
XA – Fully turn the Width Adjustment Know clockwise to close off paint flow. Then turn the knob
clockwise slightly to provide a small opening for fine line widths and depress the trigger.
An extremely fine line can be obtained by carefully removing the needle cap and positioning the
airbrush closer to the surface.
Wide Line & Background Spraying
XB, XD, XG, XN, XS, XT - For wider lines and background spraying, depress and pull the trigger
further back to release more paint.
XA – Fully turn the Width Adjustment Know counter-clockwise to release maximum paint flow and
depress the trigger.
Increasing the air pressure and the distance of the airbrush from the surface further increases spray
widths.
Stippling
Stippling is achieved by removing the needle and nozzle cap assembly and adjusting the air pressure
between 5 and 50 psi. Lower air pressure will produce courser stipples whereas higher air pressures
will provide finer stipple effects. Note that paint viscosity will also affect the stippling texture.
GENERAL OPERATION
Cleaning the Airbrush
It is only necessary to clean areas of the airbrush which come in contact with paint namely, the paint
reservoir, around the tip of the needle and the head cap assembly. These areas must be kept clean
for optimum performance of the airbrush.
Before each use
At the beginning of every session, spray water or appropriate paint solvent through the airbrush to
make sure the airbrush is working properly.
Cleaning airbrush between color changes
For the bottle-fed airbrush (XB), changing colors can be accomplished quickly by replacing the color
bottle with a bottle containing the appropriate cleaning solution. Spray the cleaner at a heavy spray
setting into a paper towel or similar material until the airbrush is flushed free of color. Replace the
color bottle and spray with the next color. Repeat the cleaning procedure when finished.
For airbrushes with color cups (XB, XD, XG, XN, XS, XT), empty out remaining paint in the color cup
and spray out any excess paint. Wipe off as much residual paint as possible with a paper towel.
Partially fill the paint reservoir with appropriate cleaning solution and use a bristle paintbrush to
breakdown paint in the reservoir. Spray the cleaner at a heavy spray setting into a paper towel or
similar material. Repeat rinse and spray until airbrush is flushed free of color.
Periodic Cleaning
The cleaning procedures described above are recommended before intermittent breaks during your
work session to prevent paint from drying inside the airbrush’s internal parts. Always empty paint out
if the airbrush is not used for relatively long periods of time and spray appropriate cleaning solution
until the airbrush is flushed free of color. Blockages caused by dried paint are the biggest problem
when using an airbrush. Any time the airbrush becomes clogged, increase the air pressure and spray
appropriate cleaning solution through the airbrush for a short period of time.
After each use
At the end of every session, follow the same cleaning procedures as those described for cleaning
between color changes. Then remove and clean only those parts which come into contact with paint.
Carefully wipe clean the needle, nozzle and needle cap assembly with the appropriate cleaning
solution. It is not necessary to dismantle the entire airbrush. Before replacing the needle, apply a light
coat of lubrication to the needle to facilitate smooth triggering. After the airbrush parts have been
removed and cleaned, they must then be carefully replaced and adjusted in their designated
positions. Failure to align each part correctly will prevent the airbrush from functioning properly. In
many instances, when an airbrush fails to perform correctly, these problems result from improper
cleaning and/or alignment of parts.
Caution: Never soak entire airbrush in any solvent and/or cleaning solution to avoid damaging of o-
rings and airbrush packaging.
Lubrication of Airbrush
Caution: Do not use light machine oil or W-40 for lubrication. Doing so will cause the needle to stick
as it moves through the needle packing.
To insure smooth operation, lubricate the needle and trigger mechanism regularly. Periodically
remove the fluid needle and coat with high quality lubricant. Then wipe the needle with a soft clean
cloth, leaving a light coat of lubricant. Several drops of lube should also be placed in to the trigger
slot of the airbrush body to lube the trigger mechanism and air valve.
Caution: Do not over-lube the needle or the main lever mechanism. Doing so may transfer excess
lube into the nozzle causing severe paint flow problems.
Replacement Parts
Caution: If it is necessary to disassemble the airbrush DO NOT use pliers. In most cases, no tools
are required to disassemble the airbrush except those provided in the kit.
Even though Grex airbrushes are manufactured with precision machining and high quality materials,
several delicate parts require replacement due to normal wear and tear. These include the fluid
nozzle, fluid needle and o-rings.
Fluid Nozzle –Before replacing the fluid nozzle, be sure that the needle is slightly pulled back in the
airbrush. To do this, remove the handle, loosen the needle lock nut and carefully pull the needle back.
In the case of the Genesis.XA, simply turn the width adjust knob counter-clockwise. Remove the
needle cap and nozzle cap then carefully unscrew the nozzle using the wrench supplied with your kit.
Replace with a new nozzle and reassemble the airbrush. Do not over tighten any parts of the
airbrush.
Note: It is recommended to change the fluid needle at the same time to insure even wear.
Fluid Needle – Grex needles are made of precision ground and hardened stainless steel and will
withstand prolonged use. However, because of their fine tip and long taper, they are easily subject to
physical damage. This is a highly delicate part and any small deformations to the needle tip will
compromise the performance of the airbrush. If the tip is severely bent, it must be straightened before
being removed to prevent damage to the fluid nozzle.
Your Genesis airbrush is a durable precision instrument and as with any precision instrument it is
susceptible to damage if handled improperly. It is essential to take care to prevent damaging the
components of this highly sensitive tool in order to assure its peak performance during its lifetime.
Proper maintenance of the Genesis airbrush demands appropriate cleaning and requires correctly
replacing and adjusting the parts. Daily and thorough maintenance of your airbrush will result in
spraying that is smooth, consistent and hassle-free.
MAINTENANCE
TROUBLESHOOTING
Symptom - Skipping
Dirty Airbrush
Paint too thick
Air pressure to high
Improper nozzle and housing connection
Crack or damaged nozzle
Dried paint on tip of needle
Possible Causes
Symptom - Double Line
Dirty Airbrush
Bent needle
Debris on tip of nozzle or in nozzle cap
Dried paint on tip of needle
Possible Causes
Symptom - Bubbling in Paint Resevoir
Improper nozzle and body seal
Cracked or damaged nozzle
Possible Causes
Symptom - Spattering
Dirty airbrush
Paint buildup in needle cap
Paint too thick
Air pressure too low
Dried paint on tip of needle
Possible Causes
Symptom - No or Restricted Spray
Clogged nozzle
Loose needle lock nut
Improper air pressure
Paint too tick
Cracked or damaged nozzle
Vent hole in bottle lid is plugged
Possible Causes
Symptom - Restricted Trigger Movement
Lubricate area around air valve piston
or trigger chamber
Possible Causes
Technical Specifications
Operating Instructions
Maintenance Information
Troubleshooting Guide
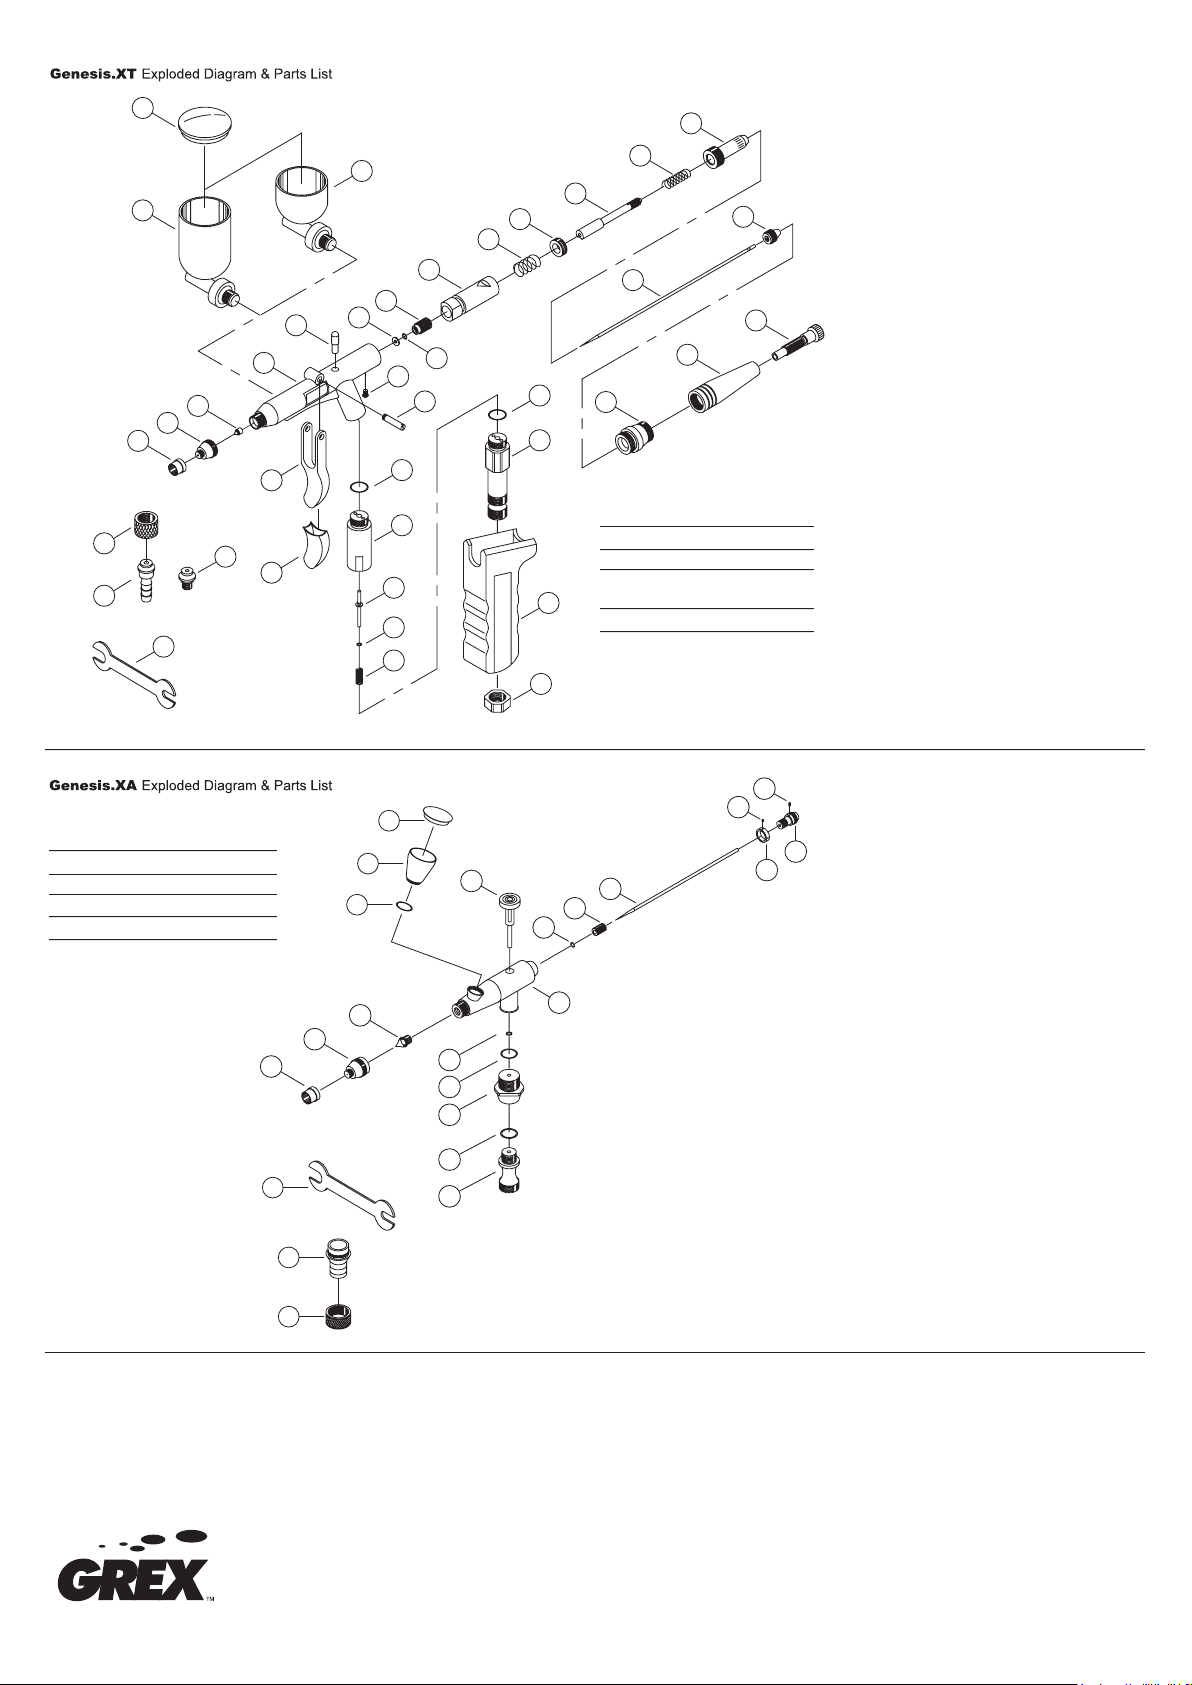
Parts Diagrams
Series
The new Genesis series of airbrushes
from Grex. Premium equipment for
creative professionals & hobbyist.
© 2005 Grex Power Tools. All Rights Reserved.