Grimani Systems Alpha User manual

61 Galli Drive, Suite B |Novato, CA 94949, USA |+1.415.883.1476 |info@grimanisystems.com |www.grimanisystems.com
Alpha Speaker
Installation and Operation Manual
V2
April 26, 2017

Alpha Speaker
Installation Manual
1. Unpack the speaker
a. Place shipping box upright, with UP arrow pointing up.
b. Cut packing tape and slide the top half of the shipping carton up over the speaker.
c. Carefully lay the bottom carton and speaker on the floor, and remove the speaker from the bottom
carton.
d. Look for mounting bracket and cable bag in the bottom carton.
e. Keep the box and packing material in case you need to ship it back for returns, maintenance or
upgrades.
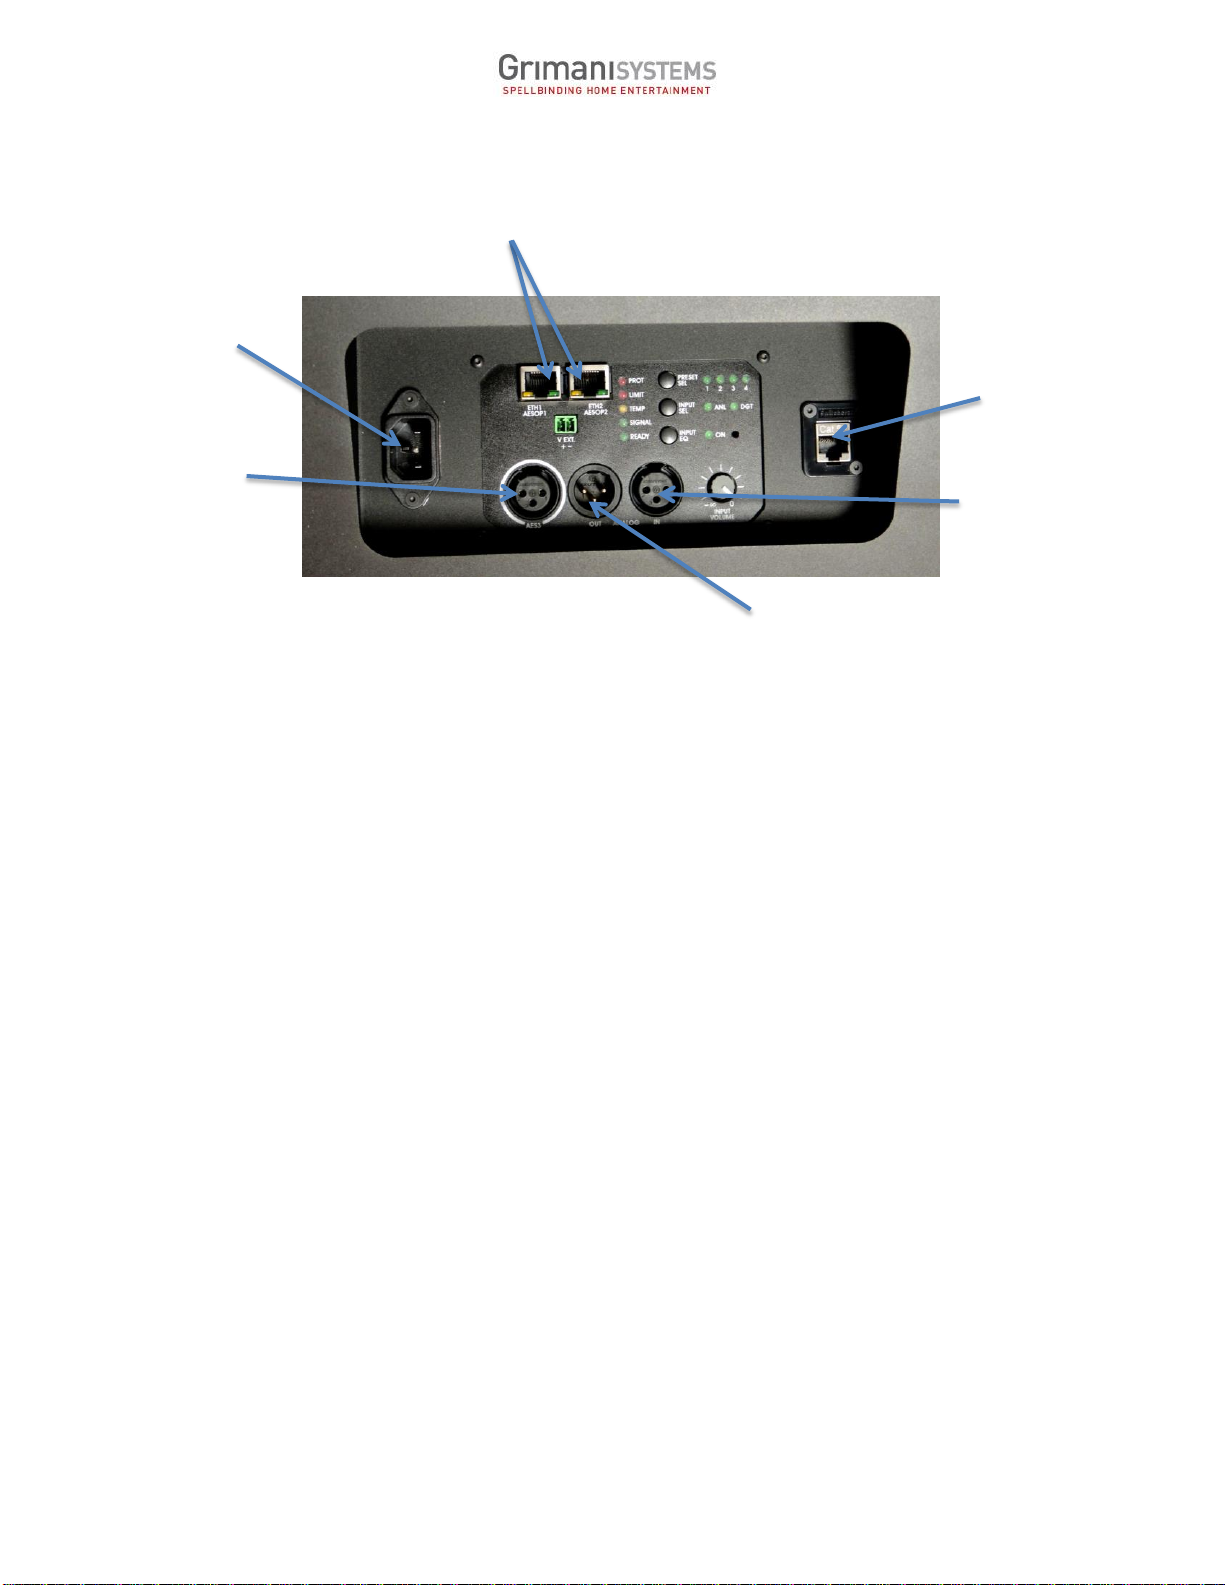
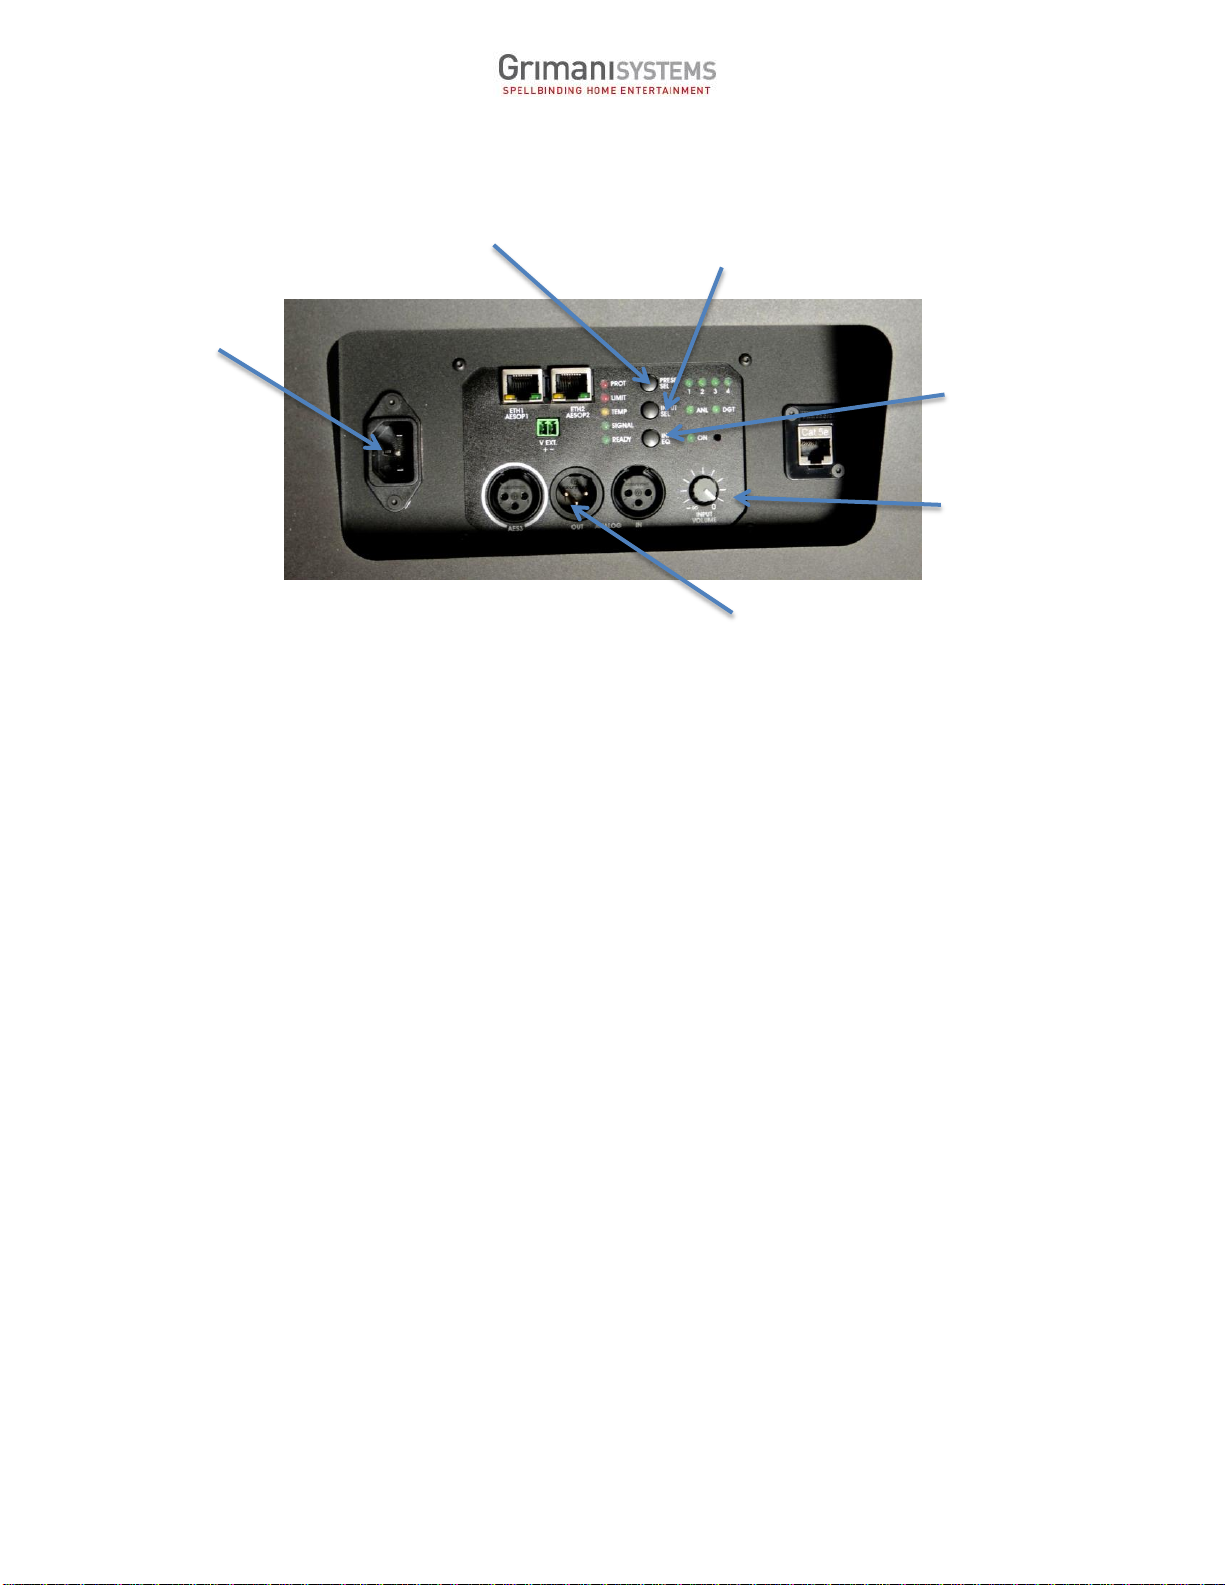
2. Prewire. Power, signal, and Network should be prewired to each Alpha speaker
a. Power: The Alpha is an active speaker with built-in signal processing and amplification. It requires
about 1500 Watts of available AC power in the range from 100V to 250V. We recommend prewiring
one 120V-20A circuit, or a 220 / 240V –15A for each group of three Alpha speakers, with either a
quad box near the three speakers, or a duplex near each speaker.
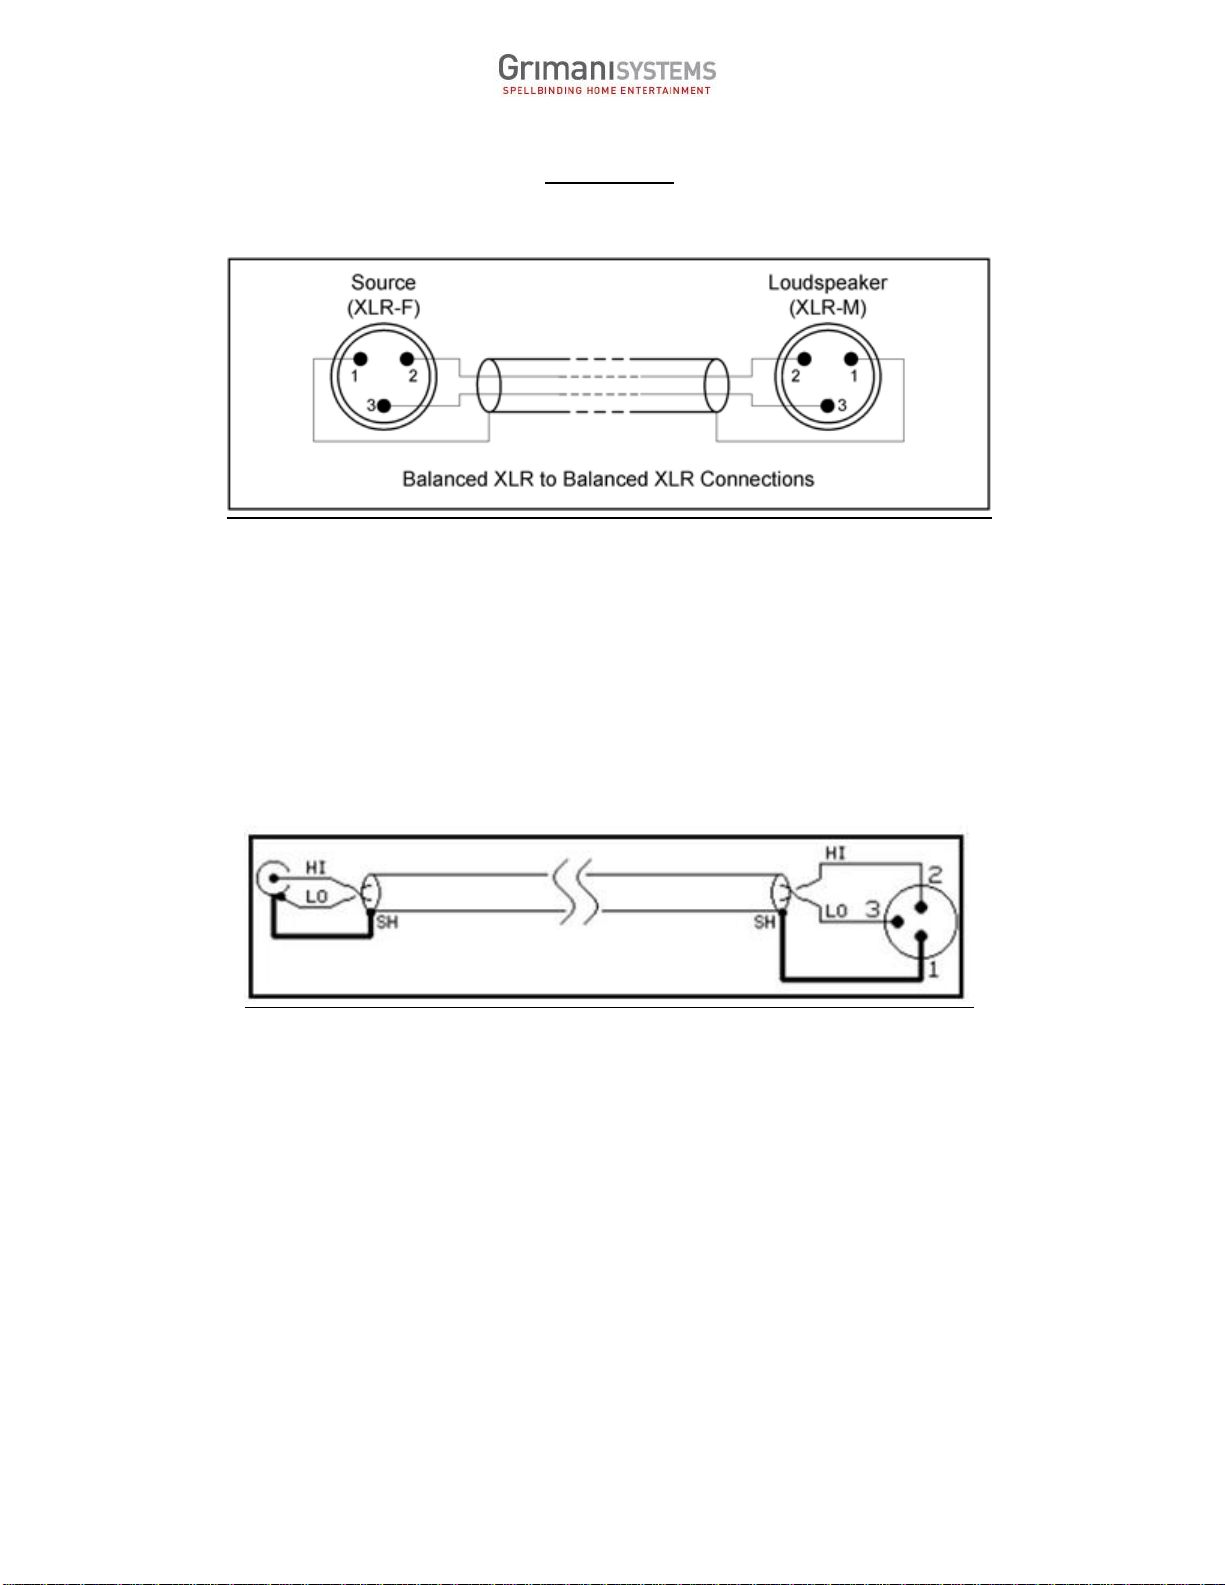
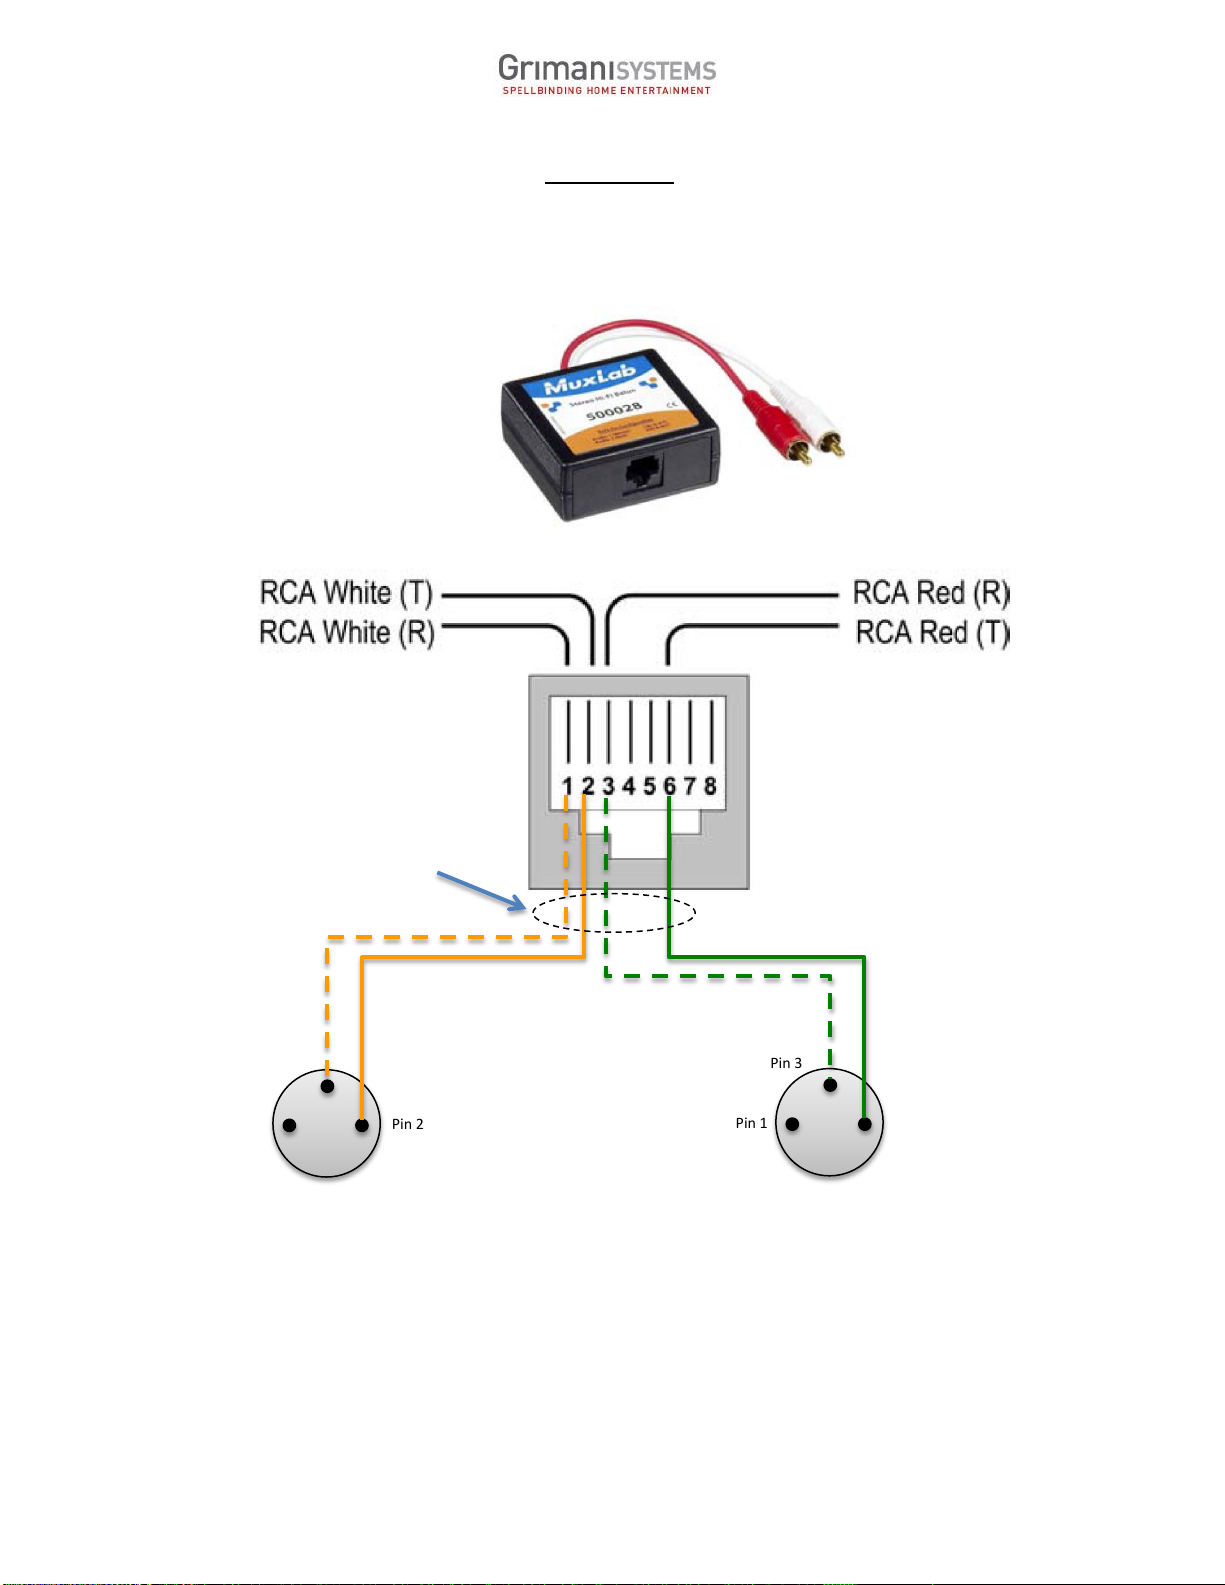
b. Audio Signal: The Alpha can take three types of audio signals. AES/IP over Cat5 cable; AES over 110
Ohm twisted pair with shield XLR cable; Analog Balanced over twisted pair with shield XLR cable.
Choose which type of signal interface you plan to use, and prewire for it. If in doubt, wire a Cat5 or
Cat 6 cable to punchdown “Keystone”connectors, and an audio twisted pair with braided shield
both to locations near the speaker. Note that even for unbalanced analog audio sources it is best to
use a twisted pair with shield cable. See the connection section below for termination
recommendations.
c. Network signal: The Alpha is controlled and monitored through IP networking. You can prewire
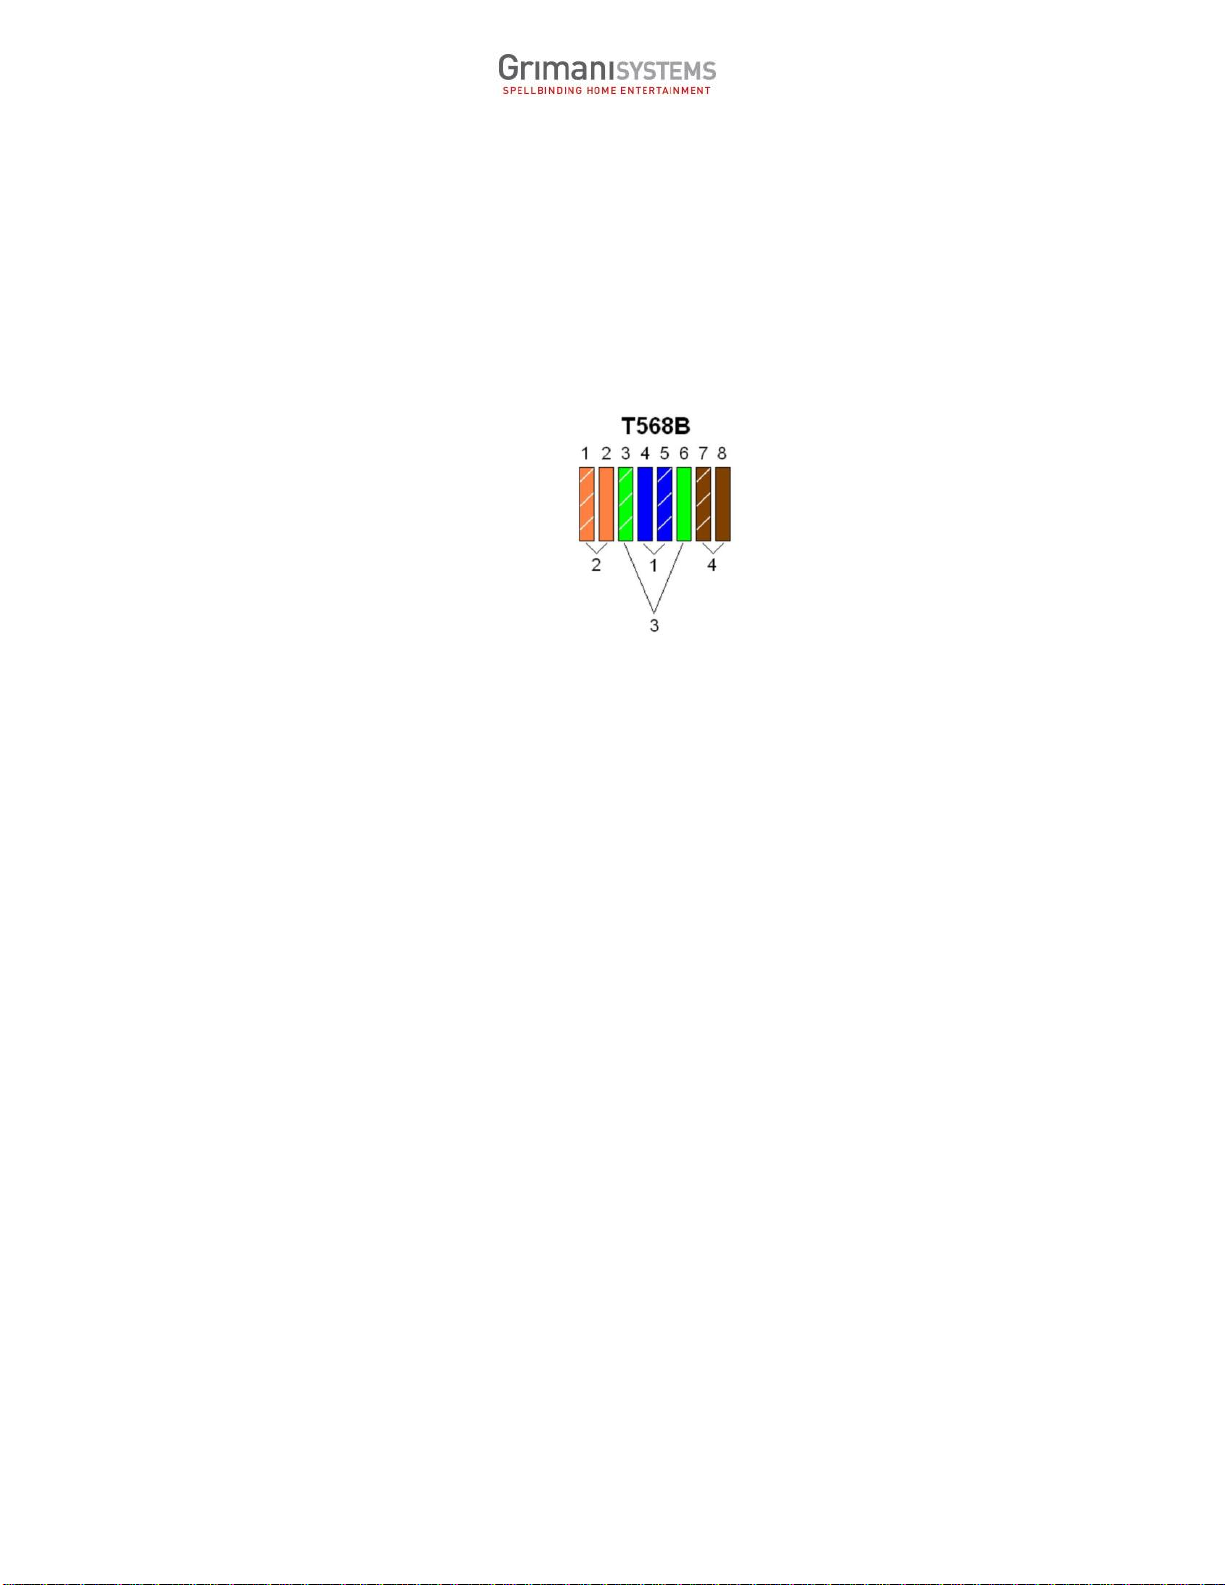
with either Cat5, Cat5e, Cat6, Cat6a standards. In all cases prewire using “Keystone”punchdown
connectors at wall plates or rackmount locations near the source and the speaker, using EIA T568B
standard. Test the connection using a certification meter to assure quality of connection and
bandwidth. The last interface should be accomplished with factory terminated and certified patch
cables, such as the ones supplied with the speakers. Note that if you are choosing to feed the
speakers with AES/IP over Cat5, through the Grimani Systems DAI1 interface unit, you will use only
one connection for digital audio and network.
3. Mounting Bracket. The Alpha is designed to be installed on a wall, using the supplied hanging bracket.
a. Place the speakers correctly in the room. Set the speaker position on the wall
based on several factors: Position spread relative to the listener; position
relative the screen edge or center; boundary reflection conditions. Set the
height such that the middle of the waveguide is 6 inches above seated ear
height, or at the middle of the screen. Grimani Systems Technical Support
can assist with determining the best position upon request.
b. The top of the bracket plate will be 20 5/8” inches (524mm) below the
top of the waveguide.
Stud

c. Mark four hole locations for the mounting bracket, based on a. and b. above. Use the bracket as a
template, and make sure that it is straight and plumb by using a bubble level.
d. Choose appropriate fasteners. The Alpha weighs 65 lbs (32kg), and each fastener will need to be
rated for 30 pounds (15kg) each, to account for vibration. For sheetrock walls, we suggest using
EZAnchors and their associated screws. For Concrete walls, we suggest using good quality wall
anchors and screws. For plywood surfaces, wood screws in a size 10 (6mm) and above will work
well.
e. Holding the speaker from the top bar and the top lip of the woofer tunnel, pick it up and carefully
place the two bars into the slots of the hanging bracket. Make sure that the speaker is centered and
that the fingers of the hanging brackets are straight.
f. Speaker aiming: The speaker can be aimed up or down by selecting the right length of stud
between the hanging bars and the speaker back panel (see picture above). Alphas are typically
shipped with a smallest stud at the bottom, and the next size up at the top, for a down angle of 5
degrees, which matches most installation requirements. You can custom-order the speaker angle
setting, or you can change the studs to adapt to the installation conditions. Contact Grimani
Systems to order the studs.

4. Connections
a. Power: The Alpha ships with a 9 foot (2.7m) long locking detachable IEC power cable. The
receptacle is on the connector plate at the bottom of the speaker. Plug the cable there, then to the
mains outlet. To remove the ICE cable from the speaker, pull back the red locking pin before easing
out the plug. After powering up the speaker, it will go through a few seconds of start-up sequence.
There is no standby switch.
b. Audio signal. Plug in the audio feed:
- For AES-IP over Cat5 cable into either of the two network ports, labeled “ETH – AESOP”.
- For AES over twisted pair cable with shield, terminate the cable to a male XLR plug, using Pin 2 for
+, Pin3 for -, and Pin 1 for ground/shield (See Appendix 1). Connect the XLR plug into the AES
input, labeled (LABEL). It is the female one with a white ring around it. Note that Cat5 cables can
be used to transmit AES digital audio signals with good success. Be sure to use one same-colored
pair per speaker feed.
- For Analog balanced over twisted pair cable with shield, terminate the cable to a male XLR plug,
using Pin 2 for +, Pin3 for -, and Pin 1 for ground/shield (See Appendix 1). Connect the XLR plug
into the Analog input, labeled (LABEL). It is the female one without a ring around it.
- For Analog unbalanced sources, it is best to pre-wire with twisted pair with shield. On the source
side, connect the + signal to the + wire (usually Red) of the pair, and connect the source ground
to the –wire (usually Black) of the pair. On the speaker side, terminate the cable with a male XLR
plug, with Pin 2 for the + wire, Pin3 for - wire, and Pin 1 for the shield of the wire (See Appendix
1). If you used regular coaxial wire, from the source, terminate the wire to a Male XLR plug with
Pin 2 for the + wire, Pin3 and Pin 1 for the shield of the wire. If there is a hum loop, try
disconnecting Pin 1 on the XLR plug. If the coaxial wire is already terminated with and RCA
connector, you can use a female-to-male XLR converter plug.
You can also use Cat5 cable with a balancing converter unit such as the MuxLabs 500028, as
shown in Appendix 2, or the Audio Control BLD-10.
Power In
AES Digital
Audio In
AES/IP Network
In/Out
Analog
Audio In
Analog Audio
through Out
Analog Audio
Processed Out

c. Network signal:
- If you use the audio AES/IP over Cat5, through the Grimani Systems DAI1 interface unit, you will
use only one connection for digital audio and network. No need for a further network connection.
Assuming that you prewired to a wall-mounted or rack-mounted keystone punch-down RJ45
receptacle, connect a premade factory-terminated and certified patch cable, such as the one
supplied with the speaker, into either of the two network ports, labeled “ETH – AESOP”. If you
didn’t prewire to a punch down receptacle, carefully terminate the network cable with a male
RJ45, using EIA T568B standard, and ensure proper connection and strain relief. Test the
connection with a certification tester to ensure proper connectivity.
d. If you use either the digital audio AES over twisted pair audio signal, or the analog audio signal, you
will connect the network feed into either of the two network ports, labeled “ETH – AESOP”.
e. The other network port can be used as network switch output to another networked product.
f. The Alpha has an analog audio output over Cat5 that is fed out of the #4 signal processing chain of
the DSP unit. It can be full-bandwidth to feed another speaker, low-pass-filtered to feed a
subwoofer, or whatever other processing is required and programmed into the DSP unit.
Connection patch cables are available through Grimani Systems Technical Support. If you wish to
terminate these yourself, the connection is as follows:
- Terminate a Cat5, Cat5e, or Cat6 cable to an RJ45 male plug, carefully ensuring that the insulation
and wires are properly punched through.
- Terminate the other side of the CatX cable, using Brown for +, and Brown with White stripe for -. If
terminating to XLR, use + for Pin 2, and –for Pin 3. There is no shield drain.

5. Settings
a. AC Voltage is automatically set for a range from 100V AC to 250V AC. There is nothing to set.
b. Audio Input Mode Select. The Alpha is shipped in the following default mode: XLR/IP over Cat5 with
Analog backup. There is no need to change the input setting if you are going to use either of these
two inputs. If you want to use the AES over twisted pair into the XLR input, you can switch the input
mode by pressing the input button on the connector plate at the bottom of the speaker. Monitor
the status by looking at the XXX LEDs.
c. EQ preset. The Alpha ships with a response curve that is voiced for the most typically neutral
voicing in-room. This is mostly flat anechoic response for both the axial and sound power frequency
response. This is stored into Preset 1. Preset 2 is the same as Preset 1 with 3dB more High
frequency energy. Preset 3 is the same as Preset 1 with 3dB less High frequency energy. You can
switch between the presets by pressing the preset button on the connector plate at the bottom of
the speaker.
d. Input Volume. Set the volume knob to maximum gain.
e. Input EQ. Set to ON.
f. DSP programming. The Alpha speaker includes a DSP engine with more than 60 bands of response
tailoring, plus several other signal processing functions. These are programmed through a
computer application, and requires advanced control by a factor trained professional. Contact
Grimani Systems for DSP programming and system calibration services.
Power In:
Auto
Voltage
Sensing
EQ Preset Select
Input
Volume
Analog Audio
through Out
Audio Input
Mode Select
Input EQ

6. Remote Monitoring
The alpha speaker can be programmed for automated self-diagnostics and remote warnings. Typical
auto-test and reporting functions include Power Status, Signal voltage limits, Temperature, Mounting
angle, and many more. Any failure, or performance that falls outside of specified limits, will result in
emails sent to several programmed addresses, indicating the nature of the failure. The speaker can also
be tested and verified from a remote location. For both of these functions you will need to dedicate a
small Windows computer to be left enabled on the same network as the speaker. It will need to run the
Grimani Systems Armonia control application as well as a remote desktop application. Both of these
can be set up by a Grimani Systems factory technician.
7. Limited Warranty
The Alpha is warrantied to be free of manufacturing defects for a period of two years from the date of
purchase. This limited warranty does not apply to failures due to misuse, excessive sound pressure,
damage from handling and carriage, or any other defects that are outside the control of Grimani
Systems, LLC. Any warranty claim will need to be made directly with Grimani Systems, or through one
of its authorized dealers. An RMA number will need to be issued before any return is authorized.

Appendix 1
Balanced XLR Wire connection
Unbalanced to Balanced Analog Wire connection

Appendix 2
MuxLab 500028 Wiring Diagram
For use in driving unbalanced signals to XLR inputs of speakers
One Balun can be used to drive two speakers
From White
RCA Input
XLR Male to
speaker 1 input
Pin 3
Pin 1
Pin 2
Pin 3
Pin 1
Pin 2
XLR Male to
speaker 2 input
Cat5
Cable
From Red
RCA Input
Other Grimani Systems Speakers manuals
Popular Speakers manuals by other brands

Proficient
Proficient AW830 owner's manual

Tannoy
Tannoy Ellipse 10 Passive owner's manual

Alto Professional
Alto Professional Transport 12 user guide

Toa
Toa PC-2668 instruction manual

Origin Acoustics
Origin Acoustics E60 installation manual

musikelectronic geithain
musikelectronic geithain ML 811K1 Instructions for installation and use