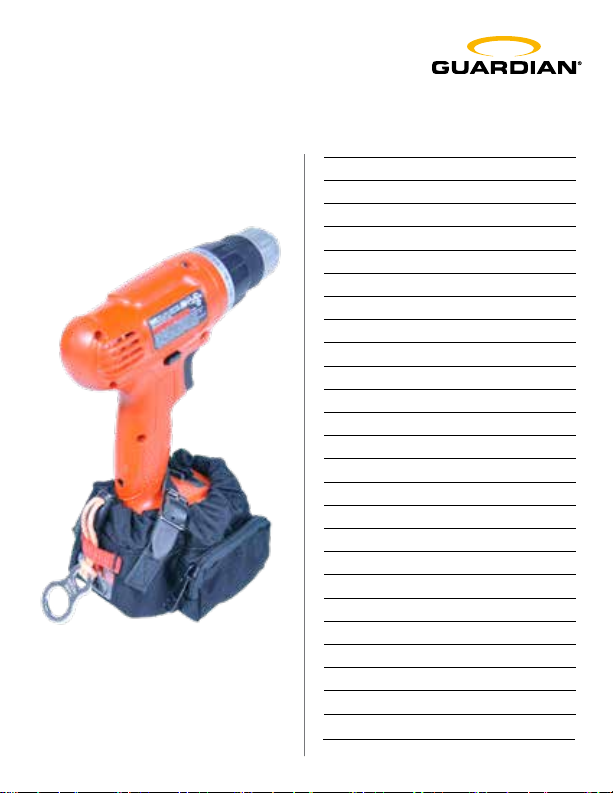
Guardian DRILL BOOT 42114 User manual

Do not throw instructions away.
Read and understand instructions before
using this equipment.
Instruction
Manual
A
DRILL BOOT ™
WITH TETHER LOOP
Part #
7 Manual de instrucciones Español
9 Gebrauchsanleitung Deutsch
11 Manuel d’instructions Français
13 Manuale di istruzioni Italiano
15 Ръководство за употреба Български
17 Korisnički priručnik Hrvatski
19 Návod k použití Čeština
21 Brugsanvisning Dansk
23 Gebruiksaanwijzing Nederlands
25 Kasutusjuhend Eesti keel
27 Käyttöohje Suomi
29 Εγχειρίδιο οδηγιών Ελληνικά
31 Használati utasítás Magyar
33 Lietošanas instrukcija Latviešu
35 Instrukcijų vadovas Lietuviškai
37 Bruksanvisning Norsk
39 Instrukcja obsługi Polski
41 Manual de instruções Português
43 Manual cu instruciuni Română
45 Navodila za uporabo Slovenščina
47 Návod na používanie Slovensky
49 Bruksanvisning Svenska
51 Kullanım Kılavuzu Türkçe
ﺔﯾﺑرﻌﻟا
55 取扱説明書 日本語
US Patent No. D731,175 & 9,254,032
53使用说明书 中文版
57 تﺎﻤﯿﻠﻌﺘﻟا ﻞﯿﻟد

2
Important Notes
Drill Boot™attachments are suitable
only for cordless power tools weighing
less than 3.18 kg (7 lbs) and tool tethers
with a length of 152cm (5 ft) or less.
This product is intended for use
by personnel who are trained
and knowledgeable regarding
working with hand tools at height
and/or near machinery.
Inspect before each use for
damage and proper function:
1. Check all hardware for abrasion,
deformity, cuts and sharp edges.
2. Check for tears, cuts, fraying, abrasion,
discoloration, burns, holes, mold,
unsplicing, pulled or broken stitches,
or other signs of wear or damage.
3. Verify cord knot integrity.
4. Do not use and always quarantine if
any of the above apply or if damaged
or not functioning correctly.
Ensure the attachment location
and tool are a suitable size and
shape to support the tool in its
entirety in the event of a drop.
Applicable Safety Standards
Meets or exceeds:
ANSI / ISEA 121-2018
Safety Information
WARNING!Do not use near
moving parts, mechanisms, running
machinery or rotating equipment.
May contain electrically
conductive materials.
Do not alter product in any way
from its original state.
English

3
English
Alternative Configuration
Other battery configurations may be able
to utilize the drill boot as long as geometry
can be captured with the cinching strap (.
Always attach the drill boot in such a
way that the tether loop is oriented away
from the business end of the tool (2).
Installation
Step 1
Insert the drill into the drill boot
and then tighten the cinching
strap using the cord lock (A).
Step 2
Wrap the belt strap around the
front of the drill handle.
Step 3
Tighten the belt strap (B) and ensure
the pin is threaded through a hole
and excess belt is tucked.
Step 4
Insert the tether loop under the orange
tensioning strap (C) as shown and tighten.
B
C
A

4
English
Specifications
Drill Boot™with Tether Loop
Part # Max. Tool Weight Max. Tool Weight Use with Clearance
Anchored to Structure Anchored to Cordless tools Distance*
Personnel with battery size
42114 3.18 kg (7 lbs) 2.72 kg (6 lbs) ≤12.7 cm (≤5") 20 cm (8")
*To determine how far a tool could fall before stopping add clearance distance of all products used.
Materials
Ballistic nylon, leather, stainless steel.
Maintenance, Cleaning,
and Storage
Clean with a damp cloth and mild soap,
wipe o excess and thoroughly dry.
Store this product away from tools and
other objects that could cause damage.

5
English
DRILL BOOT ™
WITH TETHER LOOP
Part #
Important Notes
Drill Boot™attachments are suitable
only for cordless power tools weighing
less than 3.18 kg (7 lbs) and tool tethers
with a length of 152cm (5 ft) or less.
This product is intended for use
by personnel who are trained
and knowledgeable regarding
working with hand tools at height
and/or near machinery.
Inspect before each use for
damage and proper function:
1. Check all hardware for abrasion,
deformity, cuts and sharp edges.
2. Check for tears, cuts, fraying, abrasion,
discoloration, burns, holes, mold,
unsplicing, pulled or broken stitches,
or other signs of wear or damage.
3. Verify cord knot integrity.
4. Do not use and always quarantine if
any of the above apply or if damaged
or not functioning correctly.
Ensure the attachment location
and tool are a suitable size and
shape to support the tool in its
entirety in the event of a drop.
Do not throw instructions away.
Read and understand instructions
before using this equipment.
Instruction
Manual
Applicable Safety Standards
Meets or exceeds:
ANSI / ISEA 121-2018
Safety Information
WARNING!Do not use near
moving parts, mechanisms, running
machinery or rotating equipment.
May contain electrically
conductive materials.
Do not alter product in any way
from its original state.
Installation
See images on page 3
Step 1
Insert the drill into the drill boot
and then tighten the cinching
strap using the cord lock (A).
Step 2
Wrap the belt strap around the
front of the drill handle.
Step 3
Tighten the belt strap (B) and ensure
the pin is threaded through a hole
and excess belt is tucked.

6
English
Alternative Configuration
See image on page 3
Other battery configurations may be able
to utilize the Drill Boot as long as geometry
can be captured with the cinching strap (.
Always attach the drill boot in such a
way that the tether loop is oriented away
from the business end of the tool (2).
Materials
Ballistic nylon, leather, stainless steel.
Maintenance, Cleaning,
and Storage
Clean with a damp cloth and mild soap,
wipe o excess and thoroughly dry.
Store this product away from tools and
other objects that could cause damage.
Step 4
Insert the tether loop under the orange
tensioning strap (C) as shown and tighten.
Specifications
Drill Boot™with Tether Loop
Part # Max. Tool Weight Max. Tool Weight Use with Clearance
Anchored to Structure Anchored to Cordless tools Distance*
Personnel with battery size
42114 3.18 kg (7 lbs) 2.72 kg (6 lbs) ≤12.7 cm (≤5") 20 cm (8")
*To determine how far a tool could fall before stopping add clearance distance of all products used.

7
Español
FUNDA DRILL BOOT™
CON BUCLE PARA
CORREA
N.º de componente
Observaciones importantes
Las sujeciones Drill Boot™son aptas
únicamente para herramientas sin
cablede un peso hasta 3,18 kg (7 lbs)
con correas para herramientas
de hasta 152cm (5 pies).
Este producto está pensado para su uso
por parte de personal con formación y con
experiencia en el trabajo con herramientas
de mano en altura o cerca de maquinaria.
Antes de cada uso, compruebe que
el producto funciona correctamente
y no presenta daños:
1. Compruebe que la tornillería no
presenta abrasiones, deformidades,
cortes o bordes afilados.
2. Compruebe que no haya desgarros,
cortes, partes deshilachadas,
abrasiones, cambios de color,
quemaduras, agujeros, moho,
roturas, costuras sueltas o rotas,
uotros signos de desgaste o daño.
3. Compruebe el nudo del cordón.
4. Si el producto presenta alguno de
los desperfectos anteriores, o si está
dañado o no funciona correctamente,
no lo utilice: póngalo en cuarentena.
Asegúrese de que la ubicación del
anclaje tenga el tamaño y la forma
adecuadas para aguantar toda la
herramienta en caso de caída.
No tire las instrucciones.
Asegúrese de leer y entender las
instrucciones antes de usar el equipo.
Manual de
instrucciones
Estándares de seguridad aplicables
Cumple o supera:
ANSI / ISEA 121-2018
Información de seguridad
ADVERTENCIA:No utilice este producto
cerca de componentes omecanismos
en movimiento, maquinaria en
funcionamiento o equipos giratorios.
Puede contener materiales
conductores de electricidad.
No altere en modo alguno el
estado original del producto.
Instalación
Consulte las imágenes de la página 3
Paso 1
Inserte el taladro en la funda para la
base y, a continuación, apriete la correa
de fijación con el cierre de cordón (A).
Paso 2
Enrolle la correa del cinturón alrededor de
la parte delantera del mango del taladro.
Paso 3
Apriete la correa del cinturón (B) y
asegúrese de pasar el pasador por un
orificio y de recoger el exceso de correa.

8
Español
Configuración alternativa
Consulte la imagen de la página 3
La funda para la base del taladro puede
utilizarse con otras configuraciones de
batería, siempre que pueda abarcarse su
geometría con la correa de fijación (.
Fije siempre la funda para la base del taladro
de manera que el bucle de la correa quede
orientado mirando al lado contrario del
extremo operativo de la herramienta (2).
Materiales
Nailon balístico, piel, acero inoxidable.
Mantenimiento, limpieza
y almacenamiento
Limpie el producto con un paño húmedo y un
detergente suave, retire el exceso de agua
ydetergente con un trapo y deje secar a fondo.
Guarde este producto lejos de herramientas
u otros objetos que pudieran dañarlo.
Paso 4
Inserte el bucle para la correa por debajo
de la correa tensora de color naranja (C),
como muestra la imagen, y apriete.
Características
Funda Drill Boot™con bucle para correa
N.º de Peso máx. de las Peso máx. de las Para usar con Distancia de
componente herramientas herramientas herramientas sin separación*
ancladas a la cable con baterías
ancladas a la de un tamaño de
estructura
42114 3,18 kg (7 lbs) 2,72 kg (6 lbs) ≤12,7 cm (≤5") 20 cm (8")
*Para determinar a qué distancia podría caer una herramienta antes de detenerse, sume la distancia de separación de todos
los productos empleados.

9
Deutsch
DRILLBOOT ™SICHE
RUNGSTASCHE MIT
ZUGSCHLAUFE FÜR
ELEKTROWERKZEUGE
ARTIKELnummer #
Wichtige Hinweise
Drill Boot™Befestigungen sind nur
für kabellose Elektrowerkzeuge mit
einem Gewicht von maximal 3,18kg
und für Sicherungsbänder mit einer
Länge von maximal 152cm geeignet.
Dieses Produkt ist ausschließlich
für Fachkräfte bestimmt, die im
Umgang mit Handwerkzeugen
bei Höhenarbeiten und/oder nahe
maschinellen Anlagen ausgebildet sind.
Vor jedem Gebrauch auf Schäden
und Funktionstüchtigkeit prüfen:
1. Die gesamte Ausrüstung auf
Abrieb, Verformung, Einschnitte
und scharfe Kanten prüfen.
2. Auf Risse, Einschnitte, Ausfransungen,
Abrieb, Verfärbungen, Brandflecken,
Löcher, Schimmel, Aufspleißen,
lose oder aufgerissene Nähte und
andere Anzeichen von Verschleiß
oder Beschädigungen prüfen.
3. Den Kordelknoten auf Mängel prüfen.
4. Bei einem der oben genannten
Anzeichen, bei einer Beschädigung
oder bei mangelhafter Funktion:
Die Sicherheitsausrüstung
keinesfalls verwenden, sondern
in ein Sperrlager einlagern.
Sicherstellen, dass Befestigungspunkt
und Werkzeug angemessen
dimensioniert und geformt sind,
damit das Werkzeug vollständig
gesichert ist, falls es herunterfällt.
Bewahren Sie diese
Gebrauchsanleitung sorgfältig auf.
Lesen Sie die Gebrauchsanleitung vor
der Verwendung dieser Ausrüstung
sorgfältig und stellen Sie sicher, dass
Sie alle Punkte verstanden haben.
Gebrauchsanleitung
Anwendbare Sicherheitsnormen
Erfüllt oder übertrit:
ANSI/ISEA121-2018
Sicherheitshinweise
WARNUNG!Nicht in der Nähe von
beweglichen Teilen, Mechanismen,
laufenden Maschinen oder rotierenden
Maschinenteilen verwenden.
Kann elektrisch leitendes
Material enthalten.
Der Originalzustand des Produkts darf
in keinster Weise verändert werden.
Anbringung
Siehe Abbildungen auf Seite3
Schritt1
Das Elektrowerkzeug in die
Sicherungstasche stecken.
Anschließend das Zugband mittels
Kordelstopper (A) festzurren.
Schritt2
Das Gurtband um die Vorderseite
des Werkzeuggriffs wickeln.
Schritt3
Das Gurtband (B) straffen und
festschnallen. Sicherstellen, dass der
Dorn durch eines der Löcher geführt ist,
und überschüssiges Gurtband sichern.

10
Technische Daten
DrillBoot™Sicherungstasche für Elektrowerkzeuge mit Zugschlaufe
Art.-Nr. Max. Max. Verwenden Auffangstrecke*
Werkzeuggewicht Werkzeuggewicht für kabellose
an Struktur im an Person befestigt Werkzeuge mit
Umfeld befestigt Akkugröße
42114 3,18kg 2,72kg ≤12,7cm 20cm
*Um zu bestimmen, wie tief ein Werkzeug fallen könnte, bei jedem verwendeten Produkt die Auffangstrecke hinzurechnen.
Deutsch
Alternative Anordnung
Siehe Abbildung auf Seite3
Vorausgesetzt, dass das Werkzeug
mittels Zugband angemessen
gesichert werden kann, können auch
Elektrowerkzeuge mit anderen Akkupositionen
im Drill Boot gesichert werden.
Die DrillBoot Sicherungstasche
stets so befestigen, dass die
Zugschlaufe vom Funktionsende des
Werkzeugs (2) abgewendet ist.
Materialien
Ballistisches Nylon, Leder, rostfreier Stahl.
Wartung, Reinigung und Lagerung
Mit einem feuchten Tuch und milder
Seife reinigen, danach sorgfältig
abwischen und gründlich trocknen.
Dieses Produkt abseits von Werkzeugen
und anderen Gegenständen lagern, die
Beschädigungen verursachen könnten.
Schritt4
Die Zugschlaufe unter dem
orangefarbenen Spannriemen (C)
entlangführen und festziehen.

11
Français
DRILL BOOT™
PROTECTION DE
BATTERIE AVEC
BOUCLE D’ATTACHE
Réf.
Remarques importantes
Les accessoires Drill Boot™(protection
de batterie) ne sont compatibles
qu’avec les outils électriques sans
fil pesant jusqu’à 3,18kg (7lb) et les
attaches d’outil mesurant jusqu’à
152cm (5pi) de longueur.
Ce produit est destiné à une utilisation
par un personnel dûment formé
et informé concernant le travail
en hauteur et/ou à proximité de
machines avec des outils manuels.
Avant chaque utilisation, vérifier
l’absence de dommages et le bon
fonctionnement du produit:
1. Contrôler l’absence d’abrasions,
de déformations, de coupures et de
bords tranchants sur le matériel.
2. Vérifier l’absence de déchirures, de
coupures, d’eilochage, d’abrasions,
de décolorations, de marques de
brûlure, de trous, de moisissures,
de désépissage ou encore de
points cassés et de toute autre
marque d’usure ou de dommage.
3. Vérifier l’état du nœud du cordon.
4. Le cas échéant ou en cas de dommage
ou encore de dysfonctionnement,
ne pas utiliser et toujours
isoler dans un endroit sûr.
S’assurer que l’emplacement de
l’accessoire et l’outil ont une taille et
une forme compatibles, aptes à retenir
l’ensemble de l’outil en cas de chute.
Conserver ces instructions.
Lire et comprendre les instructions
avant d’utiliser cet équipement.
Manuel d’instructions
Normes de sécurité applicables
Est conforme ou dépasse:
ANSI / ISEA 121-2018
Consignes de sécurité
AVERTISSEMENT!Ne pas utiliser
à proximité de pièces mobiles, de
mécanismes, de machines en service
ou d’équipements rotatifs.
Peut contenir des matériaux
conducteurs électriques.
Ne modifier d’aucune manière le produit
par rapport à son état d’origine.
Installation
Voir les images à la page 3
Étape 1
Introduire la batterie dans la protection
de batterie, puis resserrer la sangle
serrante au moyen du système
de blocage du cordon (A).
Étape 2
Enrouler la sangle de ceinture autour de la
partie avant de la poignée de la protection
de la batterie.
Étape 3
Serrer la sangle de ceinture (B) et vérifier
que l’axe est enfilé dans un trou et que la
longueur de ceinture en plus est rentrée.

12
Spécifications
Drill boot™(protection de batterie) avec boucle d’attache
Réf Poids max. outil Poids max. outil Utiliser avec des Distance de
Ancré à la Ancré au outils sans fil sécurité*
structure personnel avec des tailles
de batterie
compatibles
42114 3,18kg (7lb) 2,72kg (6lb) ≤12,7cm (≤5") 20cm (8")
*Pour déterminer jusqu’où un outil pourrait tomber avant de s’arrêter, ajouter la distance de sécurité de tous les produits utilisés.
Français
Autre configuration possible
Voir image à la page 3
D’autres configurations de batterie peuvent
être utilisées avec la protection de batterie
à condition que leur géométrie puisse
être retenue par la sangle serrante (.
Toujours attacher la protection de batterie de
sorte que la boucle d’attache soit orientée loin
de l’extrémité de fonctionnement de l’outil (2).
Matériaux
Nylon balistique, cuir, acier inoxydable.
Entretien, nettoyage et stockage
Nettoyer avec un chion humide et du savon
doux, enlever le surplus et bien sécher.
Ranger ce produit loin d’outils et d’autres
objets susceptibles de l’endommager.
Étape 4
Introduire la boucle d’attache sous la sangle
de tension orange (C) tel qu’illustré et serrer.

13
Italiano
DRILL BOOT ™CON
CINTURINO
AD ANELLO
CODICE PARTE 42114
Note importanti
I fissaggi di Drill Boot™sono adatti
solo per utensili elettrici senza fili di
peso pari o inferiore a 3,18 kg (7 lbs)
ea cinturini portautensili di lunghezza
pari o inferiore a 152 cm (5 ft).
Questo prodotto è destinato a essere
utilizzato da personale qualificato
einformato circa l'utilizzo di utensili
manuali in quota e/o vicino a macchinari.
Prima di ogni impiego,
controllare l'assenza di danni
eil corretto funzionamento:
1. Controllare che tutta la meccanica
sia priva di abrasioni, deformità,
tagli e bordi taglienti.
2. Controllare la presenza di strappi,
tagli, sfilacciamenti, abrasioni,
scolorimenti, bruciature, fori, mua,
separazione delle giunzioni, punti
tirati o interrotti, o di altri segni
di usura o di danneggiamento.
3. Verificare l'integrità del nodo
presente sulla corda.
4. Non utilizzare e, in ogni caso,
accantonare se si verifica una
qualsiasi delle condizioni di cui sopra
oppure in caso di danneggiamento
o di errato funzionamento.
Assicurarsi che la posizione e il mezzo
di fissaggio siano di dimensioni
e forma adeguate a supportare
l'intero utensile in caso di caduta.
Non gettare le istruzioni.
Leggere e comprendere le
istruzioni prima di utilizzare
questo equipaggiamento.
Manuale di istruzioni
Norme di sicurezza applicabili
Soddisfa o supera:
ANSI / ISEA 121-2018
Informazioni di sicurezza
AVVERTENZA!Non utilizzare
vicino a parti o meccanismi
in movimento, macchinari in
funzione o attrezzature rotanti.
Potrebbe contenere materiali
elettricamente conduttivi.
Non alterare in alcun modo il prodotto
rispetto al suo stato originario.
Installazione
Vedere le immagini a pagina 3
Fase 1
Inserire il trapano nel drill boot e,
quindi, stringere la cinghia regolabile
utilizzando il fermo corda (A).
Fase 2
Avvolgere la cinghia della cintura attorno al
lato anteriore della manopola del trapano.
Fase 3
Stringere la cinghia della cintura (B), quindi
assicurarsi che il perno sia completamente
inserito in un foro e che la parte rimanente
della cintura non sia libera di muoversi.

14
Specifiche
Drill Boot™con cinturino ad anello
Codice Massimo peso Massimo peso Utilizzare con Distanza da
parte dell'utensile dell'utensile utensili senza mantenere*
Ancorato alla Ancorato al fili con batterie
Struttura Personale di dimensioni
42114 3,18 kg (7 lbs) 2,72 kg (6 lbs) ≤12,7 cm (≤5") 20 cm (8")
*Per determinare a quale distanza potrebbe cadere un utensile prima di fermarsi, aggiungere la distanza da
mantenere di tutti i prodotti utilizzati.
Italiano
Configurazione alternativa
Vedere l'immagine a pagina 3
Altre configurazioni della batteria potrebbero
consentire l'utilizzo di Drill Boot, a patto
che sia possibile avvolgerne la geometria
con la cinghia regolabile (.
Fissare sempre il drill boot in modo tale
che il cinturino ad anello non sia orientato
verso la punta dell'utensile (2).
Materiali
Nylon balistico, cuoio, acciaio inossidabile.
Manutenzione, pulizia
eimmagazzinamento
Pulire con un panno inumidito e sapone
neutro, rimuovere il liquido in eccesso
e asciugare accuratamente.
Immagazzinare questo prodotto lontano
da utensili e da altri oggetti che potrebbero
provocare danni.
Fase 4
Inserire il cinturino ad anello sotto alla
cinghia di tensionamento arancione
(C)come illustrato e, quindi, stringere.

15
Български
DRILL BOOT™
СВРЪЗКОВ КЛУП
Каталожен № 42114
Важни бележки
Drill Boot™ прикачните принадлежности
са предназначени само за безжични
електрически инструменти с тегло,
по-малко от 3,18 kg (7 lbs), ивръзки за
инструменти с дължина от 152 cm (5 ft)
или по-малка.
Този продукт е предназначен за
употреба от лица, които са преминали
обучение и притежават познания
за работа с ръчни инструменти на
височини и/или в близост до машини.
Преди всяка употреба правете следните
проверки за повреди и правилна работа:
1. Проверете цялото оборудване
за абразия, деформация,
разрези и остри ръбове.
2. Проверете за разкъсвания,
разрези, претриване, абразия,
обезцветяване, изгаряния, дупки,
плесен, разединяване, раздърпани
или скъсани шевове или за други
признаци на износване или повреда.
3. Проверете целостта на възела
на жицата.
4. Не използвайте и винаги отделяйте,
ако са налице някои от горните
признаци или при повреда
или неправилна работа.
Уверете се, че местоположението
на прикачната принадлежност
иинструмента са с подходящ размер
иформа, за да поддържат инструмента
в неговата цялост в случай на падане.
Запазете ръководството.
Прочетете и осмислете ръководството,
преди да използвате това оборудване.
Ръководство
за употреба
Приложими стандарти за безопасност
Изпълнява или надхвърля:
ANSI / ISEA 121-2018
Информация за безопасност
ПРЕДУПРЕЖДЕНИЕ!Не използвайте
в близост до движещи се части,
механизми, работещи машини
или въртящо се оборудване.
Може да съдържа
електропроводими материали.
Не променяйте продукта под
каквато и да е форма в сравнение
спървоначалното му състояние.
Монтаж
Вижте изображенията на страница 3
Стъпка 1
Поставете свредлото в гнездото на
свредлото и след това затегнете
осигурителната лента с помощта
на фиксатора на жицата (A).
Стъпка 2
Увийте ремъка на колана около предната
част на дръжката на свредлото.
Стъпка 3
Затегнете ремъка на колана (B) и се уверете,
че щифтът преминава през отвора и че
свободната част от колана е прибрана.

16
Спецификации
Drill Boot™ с клуп на връзка
Каталожен № Максимално Максимално Използвайте Разстояние на
тегло на тегло на с безжични хлабина*
инструмента инструмента инструменти
Прикачено към Прикачено с размер на
конструкция към персонал батерията
42114 3,18 kg (7 lbs) 2,72 kg (6 lbs) ≤12,7 cm (≤5") 20 cm (8")
*За да определите колко далеч може да падне инструмент, преди да спре, добавете разстояние на хлабина на всички
използвани продукти.
Български
Алтернативна конфигурация
Вижте изображението на страница 3
Гнездото на свредлото може да се използва
и при други конфигурации на батерията,
при положение че геометрията може да
бъде уловена с осигурителната лента (1).
Винаги прикачвайте гнездото на свредлото
по такъв начин, че клупът на връзката да е
встрани от работния край на инструмента (2).
Материали
Балистичен найлон, кожа,
неръждаема стомана.
Поддръжка, почистване
и съхранение
Почистете с влажна кърпа и сапун
с меко действие, избършете
отпадъците и изсушете добре.
Съхранявайте този продукт далеч
от инструменти и други предмети,
които могат да причинят повреди.
Стъпка 4
Поставете клупа на връзката под
оранжевата каишка за затягане
(C),както е показано, и затегнете.

17
Hrvatski
DRILL BOOT ™S PRI
VEZNOM PETLJOM
Kataloški BROJ
Važne napomene
Nastavci Drill Boot™prikladni su
samo za akumulatorske alate težine
manje od 3,18 kg (7 lbs) i remene
za alate duljine do 152 cm (5 ft).
Ovaj proizvod namijenjen je za upotrebu
od strane zaposlenika koji su
posebno obučeni i upoznati s radnim
postupcima za rukovanje ručnim
alatima na visini i/ili pored strojeva.
Prije svake upotrebe provjerite
ispravnost te ima li oštećenja:
1. Provjerite da nema ogrebotina,
iskrivljenja, porezotina ili oštrih
rubova na mehaničkim dijelovima.
2. Provjerite ima li istrošenosti,
porezotina, habanja, abrazije,
nagorjelih dijelova, rupa,
plijesni, odvajanja, izvučenih
ili prekinutih šavova ili drugih
znakova trošenja ili oštećenja.
3. Provjerite stanje čvora na kabelu.
4. Zabranjena je upotreba i obavezno
je stavljanje u karantenu ako
postoji nešto od gore navedenog
ili ako postoji oštećenje ili
mehanizam ne radi ispravno.
Provjerite nalazi li se nastavak na
ispravnom mjestu i je li alat prikladne
dimenzije i oblika za pružanje oslonca
alatu u cijelosti u slučaju pada.
Nemojte baciti upute.
Prije upotrebe ove opreme pažljivo
israzumijevanjem pročitajte upute.
Korisnički priručnik
Primjenjive sigurnosne norme
Zadovoljava ili je iznad očekivanja za
sljedećenorme:
ANSI / ISEA 121-2018
Informacije o sigurnosti
UPOZORENJE!Zabranjena je upotreba
pored pokretnih dijelova, mehanizama,
strojeva koji rade ili okretne opreme.
Može sadržavati električki
vodljive materijale.
Zabranjeno je izvođenje preinaka
na izvornom proizvodu.
Instalacija
Pogledajte slike na 3. stranici
1. korak
Umetnite bušilicu u košuljicu za
bušilicu i zategnite pričvrsni remen
rabeći bravu na kabelu (A).
2. korak
Omotajte pojas koji ide oko struka
oko prednjeg dijela drške bušilice.
3. korak
Zategnite pojas koji ide oko struka (B)
i provjerite je li klin umetnut do kraja
u rupu i je li višak remena zataknut.

18
Specifikacije
Drill Boot™s priveznom petljom
Kataloški br. Maks. težina Maks. težina Upotrebljavajte Razmak*
alata Učvršćeno alata s akumulatorskim
na konstrukciju Učvršćeno alatima s
za radnika dimenzije
42114 3,18 kg (7 lbs) 2,72 kg (6 lbs) ≤12,7 cm (≤5") 20 cm (8")
*Kako biste odredili koliko daleko alat može pasti sve proizvode koje upotrebljavate postavite na određeni razmak.
Hrvatski
Alternativna konfiguracija
Pogledajte sliku na 3. stranici
Konfiguracije s drugim baterijama prikladne
su za upotrebu košuljice za bušilicu sve dok
odgovaraju dimenziji pričvrsnog remena (.
Uvijek pričvrstite košuljicu za bušilicu
tako da privezna petlja bude okrenuta
podalje od radnog kraja alata (2).
Materijali
Balistički najlon, koža, nehrđajući čelik.
Održavanje, čišćenje i skladištenje
Čistite vlažnom krpom i blagom sapunicom,
obrišite višak vode i dobro osušite.
Proizvod držite podalje od ostalih alata
ipredmeta koji mogu prouzročiti oštećenja.
4. korak
Umetnite priveznu petlju ispod
narančastog remena za zatezanje
(C)kao što je prikazano i zategnite.

19
Čeština
BRAŠNA NA VRTAČKU
DRILL BOOT ™SE
ZÁVĚSNÝM OČKEM
Část #
Důležité poznámky
Uchycení pro brašnu na vrtačku Drill
Boot™jsou vhodná pouze pro bezdrátové
akumulátorové nářadí ohmotnosti nižší
než3,18kg (7lb) azávěsné popruhy na
nářadí odélce 152cm (5ft) nebo kratší.
Tento výrobek je určen pro použití
personálem, který byl vyškolen akterý
má adekvátní znalosti, pokud jde
oprácisručním nářadím ve výškách
a/nebo vblízkosti strojních zařízení.
Před každým použitím zkontrolujte,
zda výrobek není poškozený
azda správněfunguje:
1. Překontrolujte veškeré součásti,
zda nejsou odřené, zdeformované,
rozřezané nebo zda na nich
nejsou ostré hrany.
2. Zkontrolujte, zda výrobek nejeví
známky potrhání, pořezání,
roztřepení, odření, vyblednutí
(skvrny), propálení, nejsou na něm
stopy plísní anemá rozpletené nebo
přetržené stehy či nejeví jiné známky
opotřebení nebo poškození.
3. Překontrolujte neporušenost šňůry.
4. Pokud se objeví cokoli zvýše
uvedeného, je-li výrobek
poškozený nebo pokud nefunguje
správně, přestaňte ho používat
adočasněvyřaďte.
Zajistěte, aby místo pro uchycení
asamotné nářadí měly vhodnou
velikost atvar adržely tak celý nástroj
vpřípadě, že by došlo kjeho pádu.
Návod nevyhazujte.
Před použitím tohoto vybavení si
přečtěte návod kpoužití aujistěte
se, že jste porozuměli pokynům.
Návod kpoužití
Platné bezpečnostní normy
Splňuje nebo překračuje:
ANSI / ISEA 121-2018
Bezpečnostní informace
VAROVNÉ UPOZORNĚNÍ!Nepoužívejte
vblízkosti pohyblivých částí, mechanismů,
běžících strojůnebo rotujících zařízení.
Může obsahovat elektricky
vodivé materiály.
Na výrobku neprovádějte žádné změny
azachovejte jej vpůvodním stavu.
Instalace
Viz obrázek na straně3
Krok 1
Vložte vrtačku do brašny autáhněte
stahovací popruh(A) pomocí
zajišťovacího jezdce šňůrky.
Krok 2
Oviňte řemínek okolo přední
části rukojeti vrtačky.
Krok 3
Utáhněte řemínek(B) aujistěte se,
že kolíček je provlečen skrze otvor
apřečnívající část je zastrčená.

20
Specifikace
Brašna na vrtačku Drill Boot™se závěsným očkem
Část # Maximální Maximální Použití Volná
hmotnost nářadí hmotnost nářadí sbezdrátovým vzdálenost*
Upevnění ke Upevnění na nářadím avelikostí
konstrukci těle personálu akumulátoru
42114 3,18kg (7lb) 2,72kg (6lb) ≤12,7cm (≤5") 20cm (8")
*Chcete-li určit, jak daleko může nástroj spadnout, nežse zastaví, uvšech používaných výrobkůpřidejte volnou vzdálenost.
Čeština
Alternativní konfigurace
Viz obrázek na straně3
Brašnu na vrtačku lze používat isjinak
uloženými akumulátory, pokud lze po obvodu
stáhnout stahovacím popruhem (.
Brašnu na vrtačku vždy připevňujte takovým
způsobem, aby zavěšovací očko směřovalo
pryčod koncové (pracovní) části nástroje(2).
Materiály
Balistický nylon, kůže, nerezavějící ocel.
Údržba, čištění askladování
Čistěte vlhkým hadříkem ajemným
mýdlem. Následněsetřete přebytečné
množství adůkladněosušte.
Tento výrobek skladujte odděleně
od nástrojůajiných předmětů,
které by ho mohly poškodit.
Krok 4
Provlečte očko závěsného popruhu pod
oranžovým napínacím popruhem(C),
jak ukazuje obrázek, autáhněte.
Table of contents
Languages: