Haier CHM9BPL3 User manual

Order No. Ref1505S017V0
©2015(HAIER ELECTRICAL APPLIANCES COR. LTD)
●
All right reserved. Unauthorized copying and distribution is a vi
●olation of law.
Contents
●
Table of Contents
● ·························································································· 1
1. General Information
● ·················································································· 2
1-1. General guideline················································································· 2
1-2. Insurance Test ···················································································· 2
1-3. How to read this Service Manual····························································· 3
2. Product Feature························································································ 4
2-1. Specifications ····················································································· 4
2-2. External views ···················································································· 6
3. Installation, adjustments and maintenance ············································ 6
SERVICE MANUAL
Chest Freezer
MODEL: CHM9BPL3
This service information is designed for experienced repair technicians only and is not designed for use by the general public. It
dose not contain warnings and cautions to advice non-technical individuals of potential dangers in attempting to service a product.
Product powered by electricity should by serviced or repaired only by experienced professional technicians. Any attempt to service
or repair the product or products dealt with in this service information by anyone else could result in serious injury or death.
Haier Group
Version: V1 Date: 20181031
WARNING

1
1
SERVICE MANUAL
3-1. Unpacking ························································································· 6
3-2. Adjusting ··························································································· 6
3-3. Electrical Requirement ········································································· 7
3-4. Operating ·························································································· 7
3-5. Cleaning ·························································································· 7
4. Disassembly ···························································································· 8
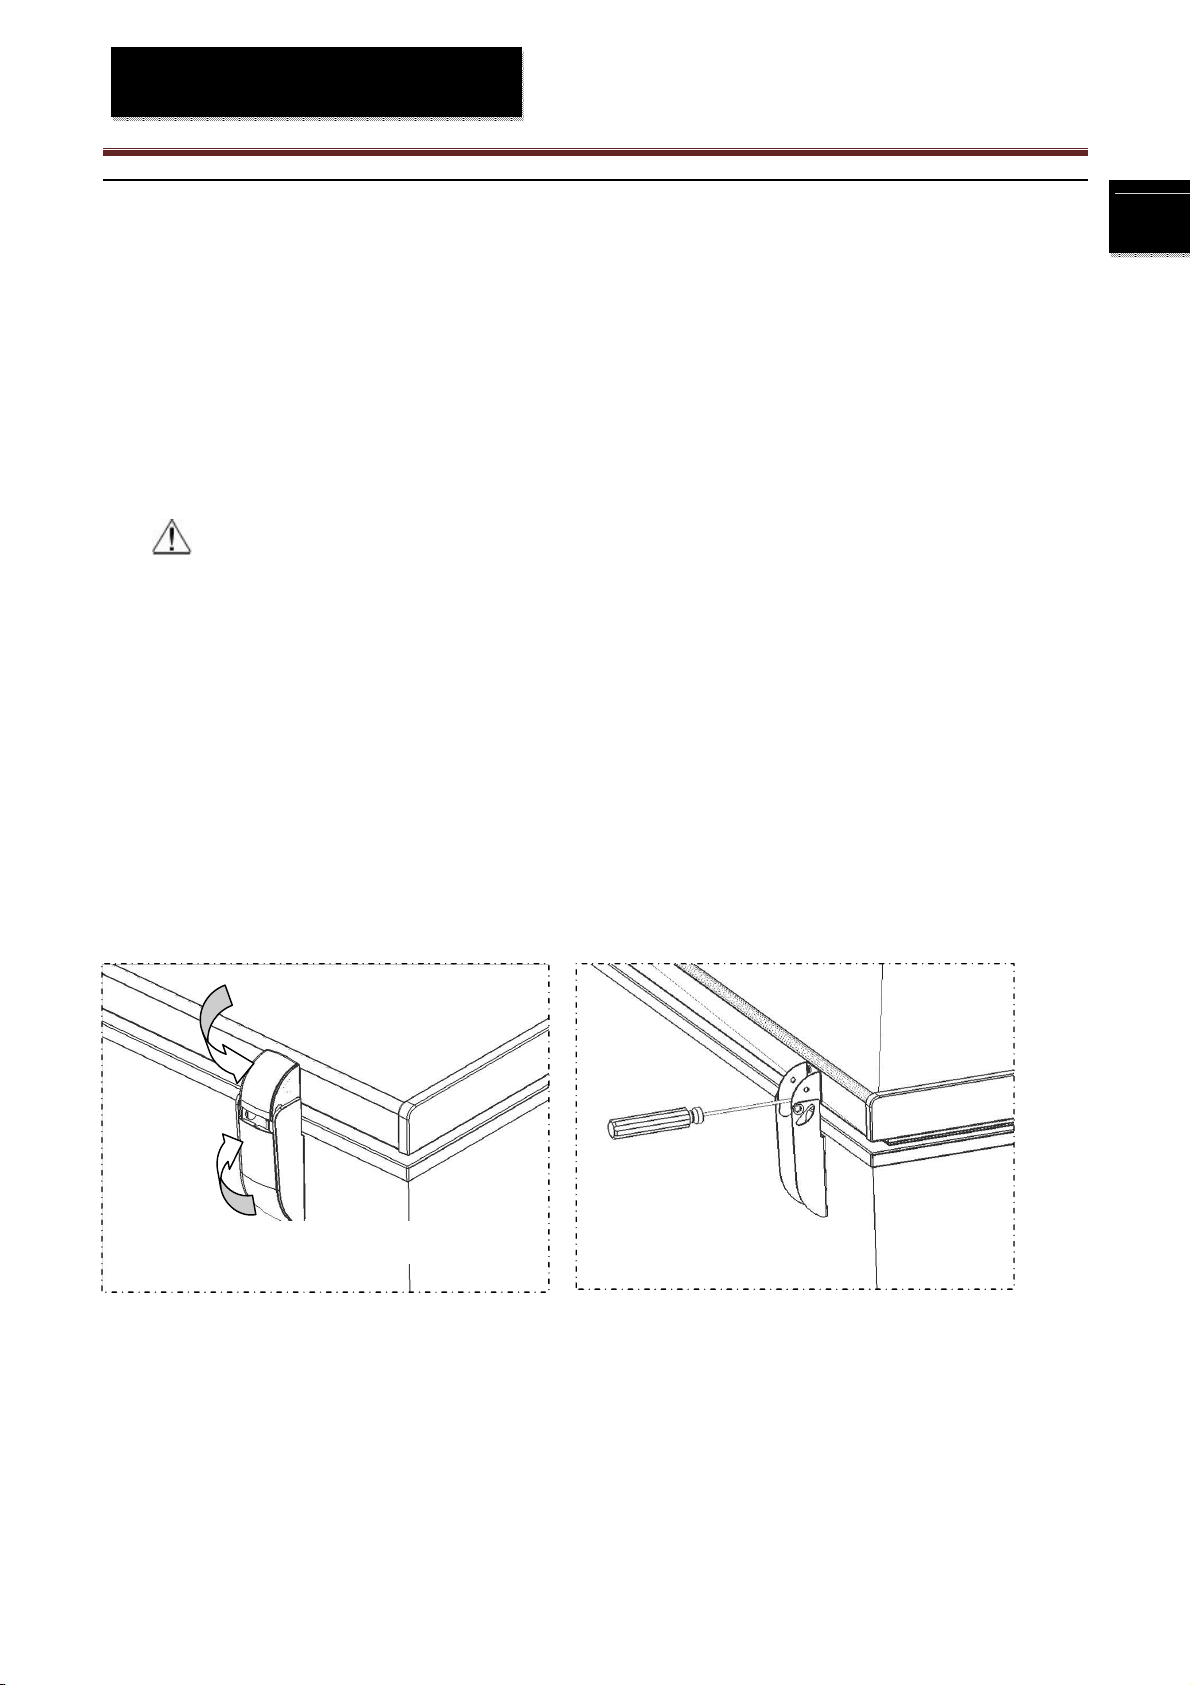
4-1. Door assembly (Door, hinge, hinge cover) ··············································· 8
4-2. Compartment Grill assembly ································································· 9
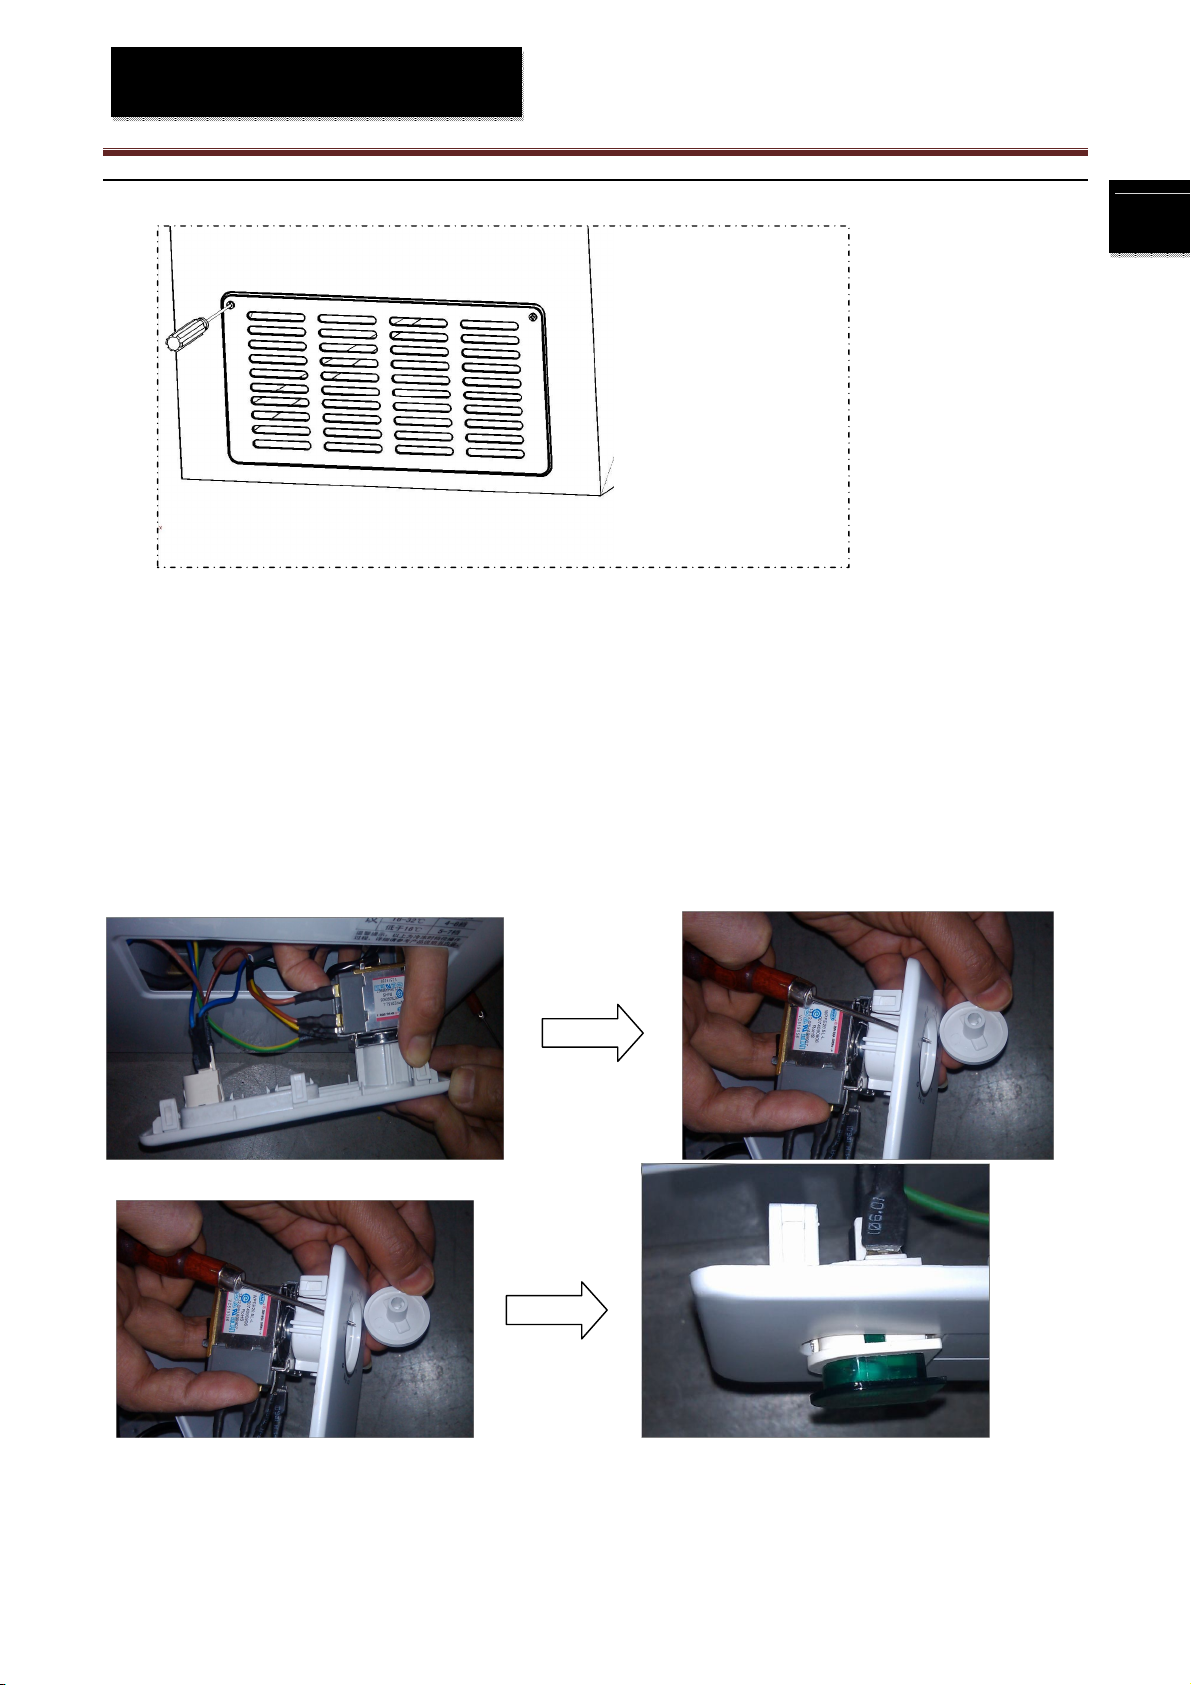
4-3. Control panel assembly (Panel, cover board, knob, indicator light) ··············· 9
4-4. Thermostat assembly ·········································································· 9
5. Control and display system ······································································· 10
5-1. Control and display panel ····································································· 10
5-2. Starting the Freezer············································································· 11
6. System flow principle ··············································································· 12
6-1. Refrigeration flow chart ········································································ 12
6-2. Refrigeration flow scenograph ······························································· 13
7. Circuit diagram ························································································ 14
7-1. Brief principle diagram ········································································· 14
8. Trouble shooting ······················································································ 15
8-1. Normal phenomena ············································································· 15
8-2. Abnormal phenomena ·········································································· 17
8-2-1. Compressor doesn’t start
● ··································································· 17
8-2-2. Poor cooling············································································· 18
9. Electrical parts specifications ···································································· 19
Chapter 1 General Information
●
1-1. General Guidelines
When servicing, observe the original lead dress. If a short circuit is found, replace all parts which have
been overheated or damaged by the short circuit.
● After servicing, see to it that all the protective devices
such as insulation barriers, insulation papers shields are properly installed.
● After servicing, make the
following leakage current checks to prevent the customer from being exposed to shock hazards.
1) Leakage Current Col
●d Check
2) Leakage Current Hot Check
3) Prevention of Electro Static Discharge (ESD) to Electrostatic Sensitive

2
2
SERVICE MANUAL
1-2. Insurance Test
1. Check if there is any leak of current.
2. Cut out the power supply before the repair to avoid an electrical shock hazard.
3. In the case of a live-line test, insulating gloves should be worn to avoid potential electrical shock.
4. Confirm the rated current, voltage and capacity before testing with any kinds of instruments.
5. Watch if the upper door is open when you check something at a lower position.
6. Take out every part in the cabinet before moving the machine, especially things like panels (e.g. glass
shelf).
7. Please wear intact cotton gloves when repair any parts of the evaporator, so that scratches by the sharp
fins can be avoided.
8. If there is a breakdown with the refrigeration system, please surrender the machine to the service
center, else the leaked refrigerant may pollute the atmosphere.
9. The refrigerator use AC of 115V with a frequency of 60Hz.
10. A big fluctuation of voltage (exceed the range 97~125V) may cause a start failure of the refrigerator, a
burn-out of the control panel and compressor, or an abnormal sound from the compressor in operation.
●
11. Take care not to damage the supply line. Don’t yank at the line; pull the plug out gently from the
receptacle. Don’t press the line under the cabinet or step on it. Take care not to roll on or damage the
supply line when moves the machine from the wall.
●
12. In the case of leakage of inflammable gases like carbon monoxide, open the door and windows. Don’t
pull out or insert the plugs of the appliance.
●
13. Don’t touch the refrigeration surface of the freezing compartment when the refrigerator is in operation,
especially when your hand is wet, else you may be glued to the surface.
14. Pull out the plug of power supply during clearance or power outage. Wait at least five minutes to resume
the power supply in order to prevent damage to the compressor caused by continuous restart.
Photo used in this manual
●
The illustration and photos used in this Manual may not base on the final design of products, which may
differ from your products in some way.
●
1-3. How to read this Service Manual

3
3
SERVICE MANUAL
1-3-1. Using Icons
The meaning of each icon is described in the table below:
Note:
A “note” provides information that is not indispensable.
Caution:
A “caution” is used when there is danger, that through incorrect manipulation, may damage equipment,
loose data, get an unexpected result or has to restart (part of) a procedure.
Warning:
A “warning” is used when there is danger of personal injury.
Reference:
A “reference” guides us to other places in this binder or in this manual, where we will find additional
information on a specific
● topic.
Chapter 2 Product
● Feature
2-1. SPECIFICATIONS
CHEST FREEZERS /
/
Photo /
●
1.
Type Model /
●
CHM9BPL3
Commercial brand /
M
abe
Product description
●
/
Chest Freezer
Type of appliance
(FS=free standing /
BI= built-in) / FS
Energy efficiency class /
/
Climate class (N=16-32℃ / ST

4
4
SERVICE MANUAL
ST=16-38℃ T=18-43℃)
Freezer star rating /
*/****
Approvals (VDE / TÜV / IMQ / NF /
ÖVE / DEMKO etc.) / ANCE
Certifications /
NOM
2.
Key features /
/
Gross capacity l
249
Total net capacity l
249
Freezing capacity(kg/24h) kg/24h
/
Energy consumption/year kWh/year
259
Max storage time at breackdown h
/
Defrosting
(Manual-Automatic) / Manual
Kind of coolant
(R134a/R600a) / R600a(51g)
Foaming components
●
(R141b/C-P) / CP/IP
3.
Technical data /
/
Voltage / frequency V/Hz 115/60
Input power / currency W /A 73.5/1.0
Lenght of cable / incl. plug cm 150
Temperature range (from>to)
●
°C 10~-18
DIN 8950 resp. 8953 / -
Energy consumption / year kWh/year
259
Energy consumption (EN153) per 24
h kWh/24 h
/
Cooling system:
(K=Compressor / A=Absorbtion)
●
/ K
Maximum noise level dB(A)
/
4.
Aesthetics /
/
Door /
●
Flat
Chest /
straight edges
Colours: /
white
Cabinet /
white
Top /
white
Door glass /
-
Door frame /
white
Fascia panel / Handle (w/b/g/s) /
white/
-
Inside door/-
drawers (W=white
T=transparent) / -/-
5.
Equipment & accessories
● /
/
Product classification (Super
eco/Eco/Standard) / Standard
Lid
(Number/Handle/Lock) / 1/-/-
Type of lid
(Hinge/Counter balanced/Sliding) / Hinge
Inside walls (Stainless
steel/Aluminium/Synthethic mat.) / PCM
Insulation Lid
thickness cm 7.2
Walls thickness cm
6.0
Baskets number
n°
2
(
plastic
)
Defrost drain
/ ●
Interior light / ●

5
5
SERVICE MANUAL
Calendar /
-
Adjustable thermostat / ●
Fast freeze lamp (yellow) /
-
On light (green) / ●
Running light (red) / ●
Fast freeze switch /
-
Freezer temperature warning indicator
(LED / by sound) / -
Thermometer (Outside /
In partition) / -
Maximum loading level marking /
-
Adjustable feet (front / rear)
n°
-
Mobility wheels (front / rear) n° ●
Flush back skin evaporator
●
/
-
6.
Product net dimensions /
/
Unit dimensions
(H / W
/ D) cm 86.5/94/66.5
Height with open lid cm
134.5
Net weight kg
40
7.
Packing dimensions & loadability
/ /
Packing dimensions
●
(H
/ W / D) cm 89/99.5/65.5
Gross weight kg
45
20 ' container load pcs
/
40 ' container load pcs
/
40 ' High cube container load pcs
/
85 mc (13,6 m) truck pcs -
120 mc jumbo truck
●
pcs -
8.
Service / /
User instruction
●
(languages) / Spanish
2-2. External views

6
6
SERVICE MANUAL
. External views
Chapter 3 Installation, adjustments
● and maintenance
3-1. Unpacking
1. Remove all packaging material; this includes the foam base and all adhesive tape holding the
●freezer
accessories inside and outside.
2. Inspect and remove any remains of packing, tape or printed materials before powering on the
●freezer.
3-2. Adjusting
1. The freezer is designed for freestanding installation
●only. It should not be recessed or built-in.
2. Place the freezer on a floor strong enough to support it fully loaded.
3. When moving freezer, never
● tilt it more than a 45-degree angle. This could damage the compressor
and the sealed system.
4. If freezer is tilted let it stand in an upright position for at least 24 hours prior to plugging. This is to allow
the refrigerant to settle.
5.Proper Air Circulation
To assure the freezer works at the maximum efficiency it was designed for, you should install it in a
location where there is proper air circulation, Plumbing and electrical connections.
The following are recommended clearances around the freezer:
Door
Control panel
Handle

7
7
SERVICE MANUAL
Sides…………..2”(50mm)
Top. ……………2”(50mm)
Back…………..2”(50mm)
Do not over fill freezer for proper internal air circulation.
3-3.Electrical Requirement
Make sure there is a suitable power Outlet with proper grounding to power the freezer.
Avoid the use of cutting off the third grounding, this is a dangerous pr
●actice since it provides no effective
grounding for the freezer and may result in shock hazard.
3-4.Defrost
Defrosting and Draining
●the Freezer
1. Defrost whenever the frost becomes 5MM thick. Never use a sharp or metallic instrument to remove
the frost as it may damage the cooling coils.(A punctured coil will void the warranty)
●
2. Unplug the unit. For draining, place a tray beneath the outer drain plug. Pull out the drain dial and
rotate it so that the arrow points down
●ward. This will let the water flow out into the tray.
3. Remove the drain plug from the inside of the freezer. Defrosting usually takes a few hours. To defrost
faster keep the freezer door open. When done, push the drain dial in and turn the arrow to the up
position. Re-plug the drain plug inside the freezer compartment. Note: monitor the container under the
drain to avoid overflow.
·Rest the temperature control to the desired setting.
●
3-5. Cleaning
Outside. Protect the paint finish. The finish on the outside of the freezer is a high quality baked-on
paint finish. With proper care, it will stay new-looking and rust-free for years. Apply a coat of appliance
polish wax when the freezer is new and then at least twice a year. Appliance polish wax also works well
to remove tape residue from freezer surfaces.
Keep the finish clean. Wipe with a clean cloth lightly dampened with appliance polish wax or mild
liquid dishwashing detergent. Dry and polish with a clean, soft cloth. Do not wipe the freezer with a soiled

8
8
SERVICE MANUAL
dishwashing cloth or wet towel. Do not use scouring pads, powdered cleaners, bleach, or cleaners
containing bleach.
Inside. Clean the inside of the freezer at least once a year. We recommend that the freezer be
unplugged before cleaning. If this is not practical, wring excess moisture out of sponge or cloth when
cleaning in the vicinity of switches, lights or controls.
An open box of baking soda in the freezer will absorb stale freezer odors. Change the box ever y
three months.
Care should be taken in moving the freezer away from the wall
●. All types of floor coverings can
be damaged particularly cushioned coverings and those with embossed surfaces.
Chapter 4 Disassembly
●
4-1. Door assembly (Door, hinge, hinge cover)
1. Unscrew the hinge cover screw with screwdriver,
●take away the top and bottom cover by pull it,
and then un
●screw the screws on the hinge, so the whole hinge could be moved.
4-2. Compartment Grill assembly
●
Unscrew the two screw of grill, we can take away the grill.
Top hinge cover
Bottom hinge cover

9
9
SERVICE MANUAL
4-3. Control panel assembly
●(Panel, cover board, knob, indicator light)
Unscrew the compartment grill (refer 4-2), push the panel claw gently with your finger or tools, at the
same time pull panel outside then take away it.
1.Take away the knob with a sharp-edged tool.
2.Press the cover board and take away it.
3.Press two claws on indicator light side and push it from back to front.
●
4-4. Thermostat assembly
●
First take off the knob (refer 4-3), Use turnbuckle spanner or acutilingual plier, unscrew the turnbuckle,
then thermostat can be moved from back of panel.

10
10
SERVICE MANUAL
Note: When assemble thermostat you should placed thermostat in originally direction.
4-5.Disassemble the handle
turn off the 2 screws of the handle bottom with a cross screwdriver anticlockwise, then take away the
handle part, then take
● off the 4 screws with a cross screwdriver anticlockwise, the handle will be taken
off.
Chapter 5 Control and display system
●
5-1. Control panel
●

11
11
SERVICE MANUAL
Freezing temperature
●selection is made by setting the control from 1 to 7 (coldest).
If you want colder or warmer temperatures, adjust the control one step at a time.
●
Allow several hours after each one-step adjustment for the freezer temperature to stabilize.
5-2. Starting the Freezer
●
1. Clean the inside of the freezer with a mild solution of baking soda and water
●
2. Connect cord to power outlet.
3. On models with a Temperature Monitor or High-Temp Alarm Switch, set the switch to the OFF
position.
4. Make sure the temperature control is set at 4.
5. Allow freezer to operate for at least four hours before placing food inside.
6. On models with a Temperature Monitor or High-Temp Alarm Switch, set the switch to the ON
position.

12
12
SERVICE MANUAL
Chapter 6 System flow principle
6-1. Refrigeration flow chart
The refrigeration
● system of direct cooling single-system cooler belongs to the category of a
single-temperature and single
●-control refrigerating system with one evaporators and is controlled by a single
temperature control.

13
13
SERVICE MANUAL
6-2. Refrigeration flow scenograph
Chapter 7 Circuit diagram
●
7-1. Brief principle
● diagram

14
14
SERVICE MANUAL
Chapter 8 Trouble shooting
●
8-1. Normal phenomena
Freezer does not
operate or
Power-On Light is
not on
Temperature control in OFF
or Min or 0 position. Move the control to a temperature setting.
Freezer is unplugged.
Push the plug completely into the outlet.
The fuse is blown/circuit
●
breaker is tripped. Replace fuse or reset the breaker

15
15
SERVICE MANUAL
Freezer
starts/stops too
frequently
Door/lid left open.
Check to see if package is holding door/lid
open.
Too frequent or too long to
door/lid openings. Reduce the time of opening the door/lid
Temperature control set too
●
cold. See About the operation of the freezer
Freezer operates
●
too long
Door/lid left open
.
Check to see if package is holding door/lid
open.
Too frequent or too long
door/lid openings. Reduce the time of opening the door/lid
Temperature control set too
cold. See About the operation of the freezer
Inadequate air circulation
space around cabinet. See Preparing to install the freezer
Fast Freeze switch is in the
ON position (on some
models)
See About the operation of the freezer
Noisy operation or
cabinet vibrates
Floor may be weak, causing
freezer to vibrate when
compressor is on.
Placing 2 X 4s (51 mm X 102 mm) under the
length of the freezer will help support it and
may reduce vibration.
Cabinet is not positioned
●
solidly on floor See Preparing to install the freezer Or use
shims for uneven floor
Freezer
temperature too
warm
Door/l
id left open.
Check to see if package is holding door/lid
open.
Too frequent or too long
door/lid openings. Reduce the time of opening the door/lid
Foods defrosting
Temperature control OFF or
Min or 0 positions. Move the control to a temperature setting.
Freezer is unplugged.
Push the plug completely into the outlet.
The fuse is blown/circuit
●
breaker is tripped.
● Replace fuse or reset the breaker
Door/lid left open.
Check to see if package is holding door/lid
open.
Too frequent or too long
door/lid openings. Reduce the time of opening the door/lid
Freezer
temperature too
cold
Temperature control set too
cold. See About the operation of the freezer
Fast Freeze switch is in the
ON position or has run for too
long (on some models)
About the operation of the freezer

16
16
SERVICE MANUAL
Moisture forms on
outside of cabinet
Not unusual during periods of
high humidity Wipe surface
Interior light does
not work (on some
models)
No power at outlet.
Replace fuse or reset the breaker
Freezer is unplugged.
Push the plug completely into the outlet.
Light bulb burned out.
●
Replace bulb.
Door/lid wont fully
●
close by itself
Package holding door/lid
open. Store only corrects quantity of food.
Slow starting time
after being off
Built
-
in overload product.
Store only corrects quantity of food.
Excessive frost
build-up
Door/lid left open.
Check to see if package is holding door/lid
open.
Too frequent or too long
door/lid openings. Reduce the time of opening the door/lid
Not unusual during periods of
high humidity Put the freezer to suitable place
8-2. Abnormal phenomena
●
8-2-1. Compressor doesn’t start
Compressor
doesn’t start
Whether lighting
and display system is
normal
Whether the
grade of thermostat is
on 0
Whether
● the
resistance of com pressor is
●
infinite or 0
Whether the
starting current is
about 5A
抯Whether PTC starter
resistance between running jack
and starting jack is 16-50 O
Measure whether
two ends of heat protector
is through
Whether the finger
of multimeter swing to 0 quickly
and then swing back slowly
when measuring two
Y
Trouble of lighting and display system
Adjust the grade according to fact
Compressor is open circuit or short
circuit
Inner trouble of compressor
If it is infinite or 0, then the starter is
out of work.
Heat protector is out of work
Capacitance is out of work
Change for a new compressor
Y
N
N
N
Y
Y
N
Y
Y
Y
N
N
N

17
17
SERVICE MANUAL
8-2-2.Poor cooling

18
18
SERVICE MANUAL

19
19
SERVICE MANUAL
Chapter 9 Electrical Parts specifications
No.
Spare parts
● Model The main parameters Picture
1 Compressor EKY70U6
115V; 60Hz;R600a
Table of contents
Other Haier Freezer manuals

Haier
Haier HF-220SAA User manual

Haier
Haier HSHF-20C User manual

Haier
Haier BD-103GAA User manual

Haier
Haier BD-181SAA User manual

Haier
Haier HF-220WAA User manual

Haier
Haier HF-320 User manual

Haier
Haier SD-242G User manual

Haier
Haier ALASKA145B2 User manual

Haier
Haier LW-120 User manual

Haier
Haier BC User manual

Haier
Haier HDF-385H User manual

Haier
Haier HF50CM23NW User manual

Haier
Haier SC-180 User manual

Haier
Haier JF-U40B User manual

Haier
Haier HCM071AW User manual

Haier
Haier HCM050LA - 05-01 User manual

Haier
Haier THERMOCOOL HF-130 User manual

Haier
Haier HCM050EB User manual

Haier
Haier HNCM035E - 3.5 cu ft Capacity Chest Freezer User manual

Haier
Haier HDF-245SD User manual