hailea HC-100 A User manual

CHILLER COOLER: Models HC-100 A; HC-150A; HC-300A; HC-500A; HC-1000A
PERFORMANCE
1) The scope of the pump must be chosen in relation to the filtering system.
2) The benefits listed in the table is calculated with a temperature of 30 °C, water of 28 °C and with a chilling
16 °C, while the volume of water to refrigerate is 100 lt for the HC-100A, 150 lt for the HC-150A, 300 lt for the
HC-300A, 500 lt for the HC-500A and 1000 lt for the HC-1000A. Of course for an aquarium with a water
capacity less than indicated, the time taken for cooling will be smaller.
3) The temperature reached by cooling is determined by the heating caused by accessories fitted into the
(heater, pump, lighting system, etc ...)
4) The refrigerator must be placed in a ventilated space and <b> not </ b> in support of the aquarium if it is
equipped with doors.
INSTALLATION
When you open the box checked that the product inside is intact with no damage caused by transport or by
accidental falls.
Check carefully that all the pieces needed to be in its machinery, if not talk to your dealer without starting the
installation with any other non-original.
A) contained in its products:
- COOLER
- USER'S EDUCATION
- N ° 4 Wheel CONNECTIONS WITH THE MACHINE FOR PIPES
- N ° 4 O-RING TO BE INSERTED IN CONNECTORS
- N ° 4 BANDS TUBE STOP
- N ° 1 FUSE SPARE (IN MODEL HC-1000A NOT 'NEED AS' THE CIRCUIT NOT NEED TO FUSE)
B) POSITION:
1) Do not install the condenser outside (see fig.1)

2) Place the refrigerator in a ventilated place, away from flammable material, to be provided by high-
temperature heaters, fireplaces and other sources of heat, direct sunlight, humidity and dust (see Figure 2).
3) Place the cooler on a stand or on the floor perfectly flat! (see fig.3).
4) Place the refrigerator for a minimum distance from walls that can become clogged air circulation! attention
to the positioning of the machine inside the mobile support of the aquarium. support should be open or be
equipped with forced ventilation with electric fans. (see fig.4).
5) Do not cover the refrigerator and do not try to move it when it is running.
(see fig.5).
6) The refrigerator is not equipped with pump, therefore needs to be connected to an immersion pump or a
filter outside.
In any case, the prevalence of the pump should not exceed 8mt, otherwise the machine could be damaged
irreparably. (see fig.6).
7) Do not turn the bars or refrigerator. Should this happen accidentally wait at least 20 minutes before you
turn it on. (see fig.7).
C) TIPS FOR INSTALLATION:
1) if you are not experts call a technician for installation.
2) connect directly to the condenser outlet with no put or triple multi taken.
3) The outlet must be accompanied by earth.
4) make sure that the outlet is adequate to withstand the power of the machine (see technical data on page
4, 5 and 6 under "power").
5) Do not connect the plug before you install the unit.
D) INSTALLATION METHOD:
As explained previously, the inlet must CONNECTED TO OPERATE pumps.
The refrigerator must not be fitted into a mobile closed. Should this be necessary, mount the electric fan for
the recirculation of air inside the cabinet INSTALLING THE GRID OF VENTILATION WITH AN AREA NOT

LESS THAN 1 / 4 OF THE SUPPORT THAT.
ARE ADVISED NOT CLEAN water to send to the refrigerator so the water must first pass forced through the
filter of your aquarium.
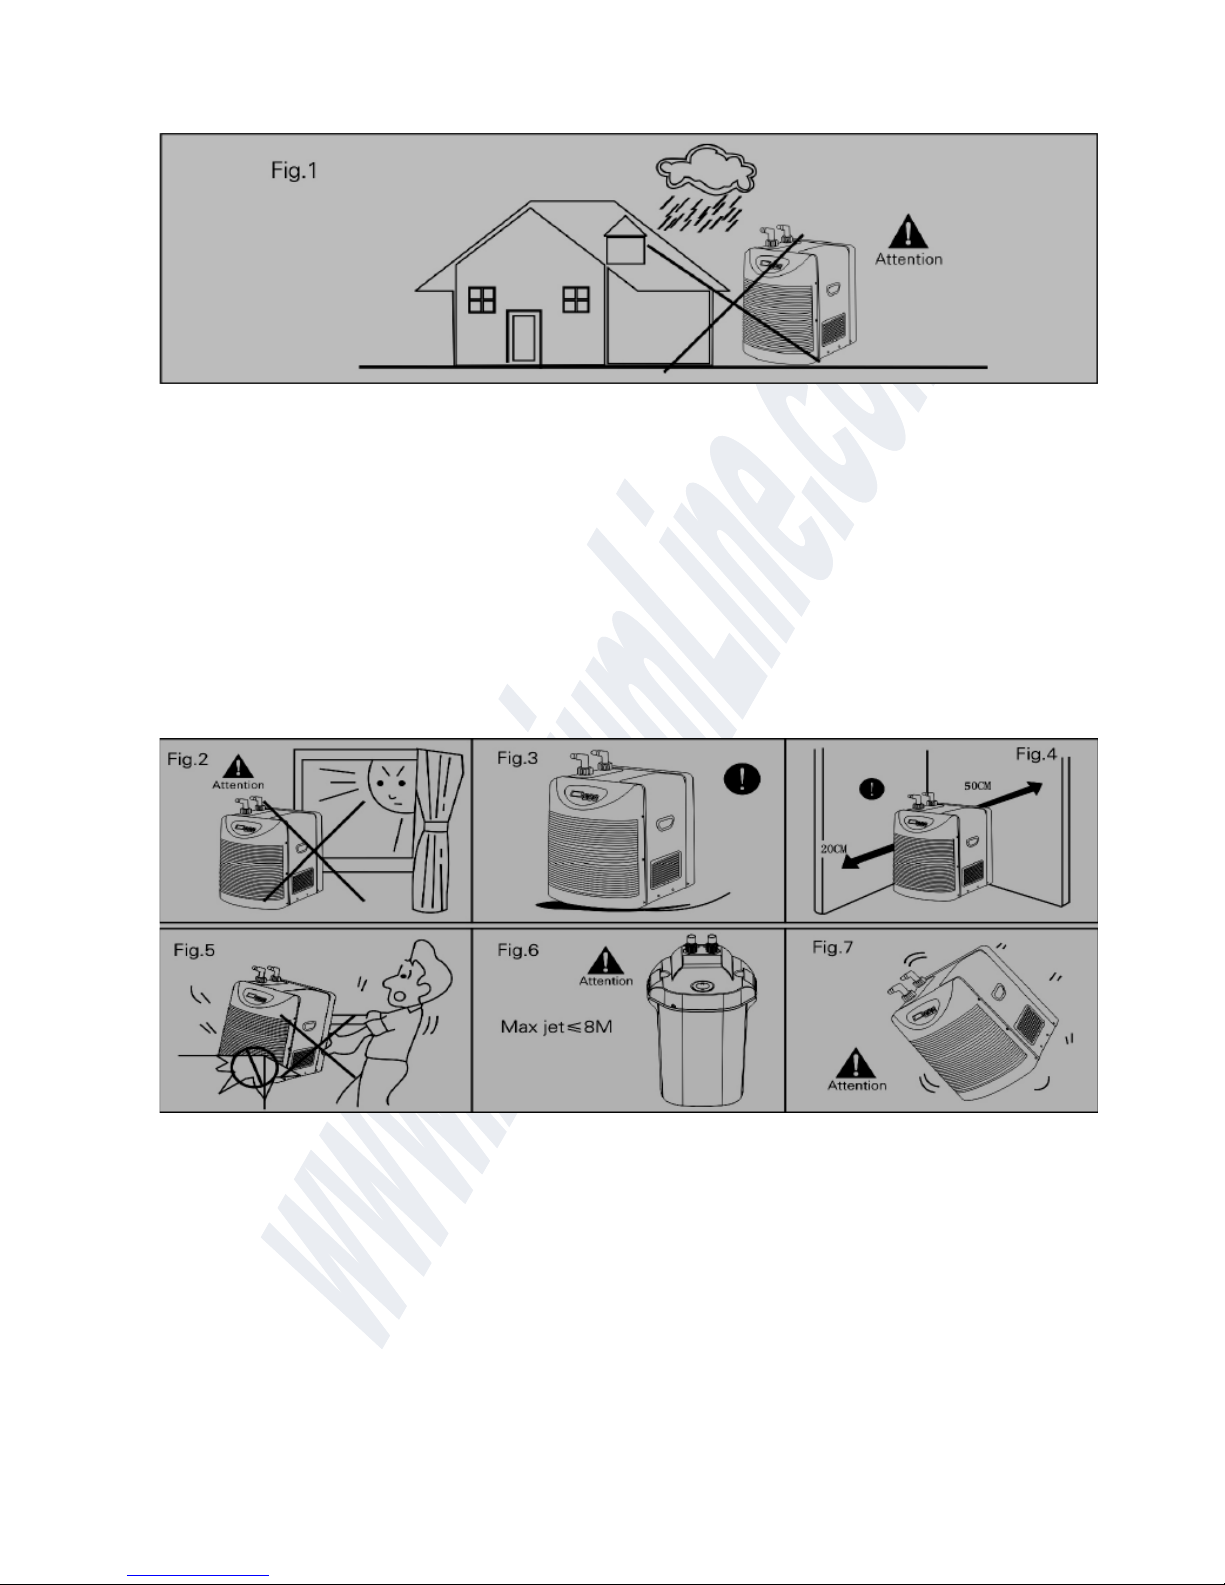
After the installation of control that these tubes are not crushed by curves do not conform to the same bend
of the tubes. King sees the FIGURE 1, 2 and 3.
E) BEFORE YOU TURN THE CAR:
1) Check that the level into the water is sufficient.
2) Turn on the recirculating water pump and check that there are LOSSES IN CONNECTION TO COOLER.
3) VERIFY THAT THE TUBES TO SEND AND RIASALITA are properly connected (see above FIG. 1, 2 and
3).
PROGRAMMING
ACTION pumps OR THE OUTER FILTER FOR 'The aquarium water throughout the COOLER AND WAIT 3
MINUTES. TO THIS POINT
TURN THE MACHINE THROUGH A SIDE switches.
A) TEMPERATURE VALUES:
Turn on the machine and after pressing the button "SET" LED will light the "1" (mod. HC-300A - 500A -
1000A) or "2" (mod. HC-100A - 150A) and next the temperature refrigeration .
A second time by pressing the button "SET", the LED light will turn off and display the temperature of the
aquarium. The blinking indicates that the machine is ready to be programmed.
B) SETTING THE TEMPERATURE:
King pressed the button "SET" for more than 3 seconds and appear dipslay temperature refrigeration.
King pressed the button to increase the temperature or the button to decrease. King pressed the button
"SET" to confirm the desired temperature or wait 8 seconds, after which it will set
and the display automatically returns the temperature of the aquarium. The values are refrigeration 4 ° C to
28 ° C.
C) AUTOMATIC PROTECTION:
The machine is equipped with an automatic electrical protection. After the first programming inside the
compressor turns on after 3 minutes; rescheduled if the temperature returns to the compressor after 1
minute.
D) SWITCH OFF AND AUTOMATIC:
When the car reaches the temperature you set will shut off automatically when the temperature of the
aquarium will increase by one degree, the machine returns automatically. Led the "7" (mod. HC-300A-500A -
1000A) or "6" (mod. HC-100A - 150A) will appear on the display when the machine is in cooling mode and
will shut off when it reaches the temperature chilling you set.
E) CAUTION:
IN CASE OF BREACH OF PROBE OF TEMPERATURE ON display ' "P1" AND THE MACHINE IS
FERMER' AUTOMATICALLY.
DO NOT ATTEMPT TO OPEN THE REFRIGERATORE MA CONTACT A QUALIFIED TECHNICIAN FOR
THE REPLACEMENT OF THE PROBE.
CARE AND MAINTENANCE

DISCONNECT THE POWER PLUG BEFORE MAKING ANY TRANSACTION FOR CLEANING AND / OR
MAINTENANCE.
MONTHLY MAINTENANCE
A) DO NOT USE SOAP AND / OR DETERGENTS. (see FIG.1)
B) Clean the water circulation pipes
C) Clean the air filter. THE OPERATION AND 'ABSOLUTELY NECESSARY AS' THE FILTER IS SPORCO
REDUCES UP TO 50% OF THE POWER OF REFRIGERATING MACHINE. (see FIG.2) AND SEE THE
NEXT PAGE IN DETAIL.
D) Clean the display only with a dry cloth (see FIG.3).
E) ABSOLUTELY NOT THE CLEAN MACHINE WITH DIRECT WATER TO WATER AND NOT IMMERSE
(see FIG.4)
F) In case of non-use:
- DISCONNECT THE POWER SOCKET
- Clear CAR Dall'Acqua (see FIG.5)
CLEANING THE FILTER
1) Unscrew the screw nut of the central front (SEE FIG.1).
2) Gently remove the ring (see FIG.2).
3) Unscrew the filter from the front ring (SEE FIG.3 and FIG.4).
4) Remove the ring side (see FIG.5).
5) Unscrew the filter from the side ring (Fig.7 AND SEE FIG.6).
6) Clean the filters with a vacuum cleaner or wash them under running water and dry THEM BEFORE
REASSEMBLING. (See Fig.8)
7) Replace the filters by repeating the previous steps in reverse.
SOLUTION TO SMALL PROBLEMS
PROBLEM: The refrigerator does not work and the display is switched off
--- PROBABLE CAUSE:
A) The refrigerator is turned off
B) Energy inadequate
C) The fuse is broken
--- SOLUTIONS:
A) Turn on the refrigerator
B) Make sure the plug is fully connected to the
C) Replace the fuse
- PROBLEM: The refrigerator is switched on and off at short intervals
--- PROBABLE CAUSE:
A) The voltage is wrong
--- SOLUTIONS:
A) Verify that the voltage is 220 Volts
B) Wait 3 minutes and the machine automatically returns
C) Reset the refrigeration temperature lower than that of the aquarium
- PROBLEM: Reduction and / or lack of refrigeration
--- PROBABLE CAUSE:
A) It is part of the automatic protection
B) The temperature of refrigerated ration temperature is higher than the temperature of the aquarium
C) air filters dirty
D) Lack of gas
--- SOLUTIONS:
A) Wait 3 minutes and the machine automatically returns
B) Reset the refrigeration temperature lower than that of the aquarium
C) Clean the filters
D) To load the machine by an Expert

- PROBLEM: Operation too much noise
--- PROBABLE CAUSE:
The machine is not mounted flat
--- SOLUTIONS:
Make sure the surface is perfectly flat or replace it.
SPARE PARTS
HC-100A 1 display control
2 electronic circuit
3 cover of the circuit
4 upper cover
adapters for 5 tubes
6 ghiere
7 handle
8 temperature sensor
9 evaporator
10 condensed re
11 fan with motor
12 base
13 interrupt re
14 fuse
15 switch box
16 grille front
17 filter
18 compressor

HC-150A
1 display control
2 electronic circuit
3 cover of the circuit
4 upper cover
adapters for 5 tubes
6 ghiere
7 handle
8 switch
9 switch box
10 evaporator e
11 base
12 compressor
13 fan with motor
14 condensed re
15 sensor temperature
16 front filter
17 grille front

HC-300A HC-500A
1 front grille
2 front filter
3 display control
4 front cover
5 electronic circuit
6 cover of the circuit
7 sleeves
8 upper cover
9 adapters for pipes
10 ghiere
11 condensed re
12 cover rear
13 handles
14 filter side
15 grid side
16 side cover
17 interrupt re
18 switch box
19 fan with motor
20 compressor
21 base
22 evaporator

HC-1000A
1 front grille
2 front filter
3 display control
4 front cover
5 electronic circuit
6 compressor
7 sleeves
8 filter side
9 grid side
10 upper cover
11 adapters for pipes
12 ghiere
13 handles
14 rear grille
15 condensed
16 fan with motor
17 base
18 compressor
19 embeddings cover
20 cover of the circuit

ELECTRICAL DIAGRAM
HC-100A
TC-01 CONTROL TEMP.
FT FUSE
FAN
OL MOTOR PROTECTION
DIP SWITCH
C-1 CAPACITOR
M COMPRESSOR
T SENSOR TEMP.
HC-150A
TC-01 CONTROL TEMP.
FT FUSE
PTC STARTER MOTOR
FAN FAN
OL MOTOR PROTECTION
DIP SWITCH
MC COMPRESSOR
T SENSOR TEMP.
HC-300A - HC-500A
TC-01 CONTROL TEMP.
FT FUSE
PTC STARTER MOTOR
FAN FAN
OL MOTOR PROTECTION
MC COMPRESSOR
T SENSOR TEMP.

HC-1000A
TC-01 CONTROL TEMP.
FAN FAN
OL MOTOR PROTECTION
M COMPRESSOR
RT1 SENSOR TEMP.
C1 CAPACITOR COMPR.
C2 FAN CAPACITOR
SAFETY AND SECURITY
IT 'AN ELECTRICAL APPLIANCE.
KEEP AWAY FROM REACH OF CHILDREN.
SAFETY: This unit complies with security officers:
MODEL HC-100A
EN55014-1: 2000 + A1: 2001 + A2: 2002
EN61000-3-2: 2000 + A2: 2005
EN61000-3-3: 1995 + A1: 2001
EN55014-2: 1997 + A1: 2001 (EN61000-4-2 / -4/-5/-6/-11)
MODEL HC-150A - HC-300A - HC-500A - HC-1000A
EN55014-1: 2000 + A1: 2001 + A2: 2002
EN61000-3-2: 2000
EN61000-3-3: 1995 + A1: 2001
EN55014-2: 1997 + A1: 2001 (EN61000-4-2 / -4/-5/-6/-11)
Do not use the equipment in bathrooms.
1) Verify that the voltage stated on the label conforms to your voltage.
2) Check the status of the machine and the power cord before connecting.
3) Maximum operating temperature range of the chill: 35 ° C
4) DO NOT ALTER THE PLUG OR THE APPLIANCE tamper AS 'MISS THE WARRANTY AND YOU MAY
AFFECT THE ELECTRICAL SAFETY.
It is recommended that the unit, being electric, is protected upstream by an earth leakage circuit breaker.
This manual suits for next models
4
Table of contents