HAN 500 Series User manual

2
D - Deteja Giişi
W - “u Giişi
P - Güç Giişi
D
W
P

3
BULAŞIK YIKAMA MAKİNE“İ
KURULUM VE KULLANMA TALİMATLARI
İÇİNDEKİLER Sayfa
- Kuulu diagaı 2
- Cihaz taılaa 2
I. ANA Ö)ELLİKLER 3
1. Cihazı ile ilgili açıklaala 3
2. Aa ileşele patlatılış diyagram) 4
- Tablo 1: Teknik bilgiler 5
3. Ölele 6
4. Çeei kouası 7
II. MONTAJ TALİMATLARI 8
1. Kurulum yeri 8
2. Cihazı eleştie 8
3. Elektik ağlatısı 9
4. “u aa ağlatılaı 9
5. Güelik agıtlaı 9
6. Çalışa testi 10
7. Servis 10
8. Sorun giderme 10
9. Aa ileşelei düzei 10
III. KULLANMA TALİMATLARI 11
1. Paeli açıklaası 11
- Cihazı kullaa 11
2. Göeledie 12
3. Çalışa periyodu 12
4. Aıza duuuda ihazı kapatılası 12
5. Bakı e oaı 12
IV. KONTROL PANELİNİN ŞEKLİ 12
Cihazı kullaııda izleeek yol

4
I. ANA Ö)ELLİKLER
.CİHA)LA İLGİLİ AÇIKLAMALAR
Bu el kitaı ihaz odelleideki ugulaalaı açıkla.
Eliizde ulua üü odeli hakkıda daha aıtılı
ilgi içi, Tekik ilgi içee Talo e akıız.
Cihaz aşağıdaki özelliklee sahiptir:
Kapak kapadığıda çalışan otoatik ıkaa sistei
Kai içeiside altta e üste olak üzee çift ölü aktif
kol sistemi
Otoatik palatıı popası(opsiyonel)
Yoğu kullaılada dahi tüketii dostu ola eeji
tüketi değelei
Tak çalıştı şekilde pize ağlaaak çalıştıa ikaı.
. ANA BİLEŞENLER
Taalı çizgi ile işaetleiş ileşele aşağıdaki odellee
ilişki elitilişti.
BULAŞIK YIKAMA MAKİNE“İ XX-500
ANAHTAR KELİMELER:
1 rezistanslar
2 kontrol paneli
3 ö kapak
4 ıkaa otou
5 ıkaa kollaı
2
4
5
3
1

5
TABLO 1: TEKNİK BİLGİLER
BAŞLIKLAR
TİP Ö)ELLİKLERİ
“EPET KAPA“İTE“İ
500x500x100
MODEL
XX-500
GİRİŞ GERİLİMİ VOLT
220/ N˜
FREKANS(HZ)
50 / 60
ELEKTRİK ENERJİ“İ TÜKETİMİ KW
(MAKS.)
6,75
AKIM ŞİDDETİ A
22
GÜÇ KAYNAĞI KABLO KE“İTİ
(MM)
3x2.5
YIKAMA MOTOR GÜCÜ KW
0,6
TOPLAM I“ITICI GÜCÜ (KW)
6,75
AĞIRLIK KG
60

6
3. ÖNLEMLER
Aşağıdaki şekille çeşitli tipteki tehlikelei işaetleek e
taılaak içi kullaılı:
DİKKAT !!!
OPE‘ATÖ‘ İÇİN “AĞLIK VE GÜVENLİK
TEHTİDİ
DİKKAT !!!
ELEKT‘İK TEHLİKE“İ
TEHLİKELİ VOLTAJ İÇE‘İ‘
DİKKAT !!!
MAKİNEYE )A‘A‘ VE‘İCİ Bİ‘ UN“U‘
MEVCUTTUR.
● Cihazı kuuluu e deee alıasıda öe eiet,
kullaı e ihazı akıı hakkıda öeli ilgile içee
taliatlaı dikkatli i şekilde el kitaıda okuuuz.
● Cihazı teka satılası a da e değiştiesi duuuda
kullaıılaı ea geleekteki sahiplei taafıda kullaılak
üzee u kullaıı kitaıı güeli i ede saklaıız.
Öeli: Cihazı otaj e
akııı aı zaada ihazı
e değiştiesi geekli
durulada, işle sadece
üetii taafıda
etkilediiliş i personel
taafıda apılalıdı
● Bu ihaz kesinlikle ulaşık ıkaa taak, çatal, kaşık)
aaıla tasalaıştı. Başka tü alzee a da ese
ıkaaa ugu değildi.
Cihaz sadece eğitili pesoel taafıda kullaılalıdı.
● Bu ihaz çoukla e fiziksel akıda egelli ola kişile içi
tasalaaıştı. Cihazı kullaa kişilei geekli teüe e
ilgie sahip olalaı geeklidi. Aksi duuda u tip
kullaıda doğa kusula e zaala kişilei kedi
soululuğudadı.
● Cihaz aızalı a da çalışaaz duumda ise kullanmaya
çalışaıız.
● Oaıla sadee oijial yedek paçala kullaılaak
yetkili sevis pesoeli taafıda yapılalıdı. Bu
yükülülüğe uyulaası, ihazı güveliğii tehlikeye ata
ve gaatisii geçesiz kılaili.
● Cihazı asıçlı su ile ıkaaıız.
● Çelik üzelei teizleek içi klo içee üüle çaaşı
suu, hidokloik asit . hatta seeltiliş esiolaıı bile
kesilikle kullaaıız.
●Cihazı taa üzeii teizleek içi tuzuhu .
aşıdııı addele kullaaıız.
● Daha fazla ilgi içi akı ve oaı ölüüe akıız.
3.1 KİŞİ“EL KORUNMA EKİPMANLARI
Aşağıda akiei kullaı öü içeisideki işlelee ait
kişisel koua ekipalaı KKE e kullaılaağı işlele
eilişti.
***Gülük oal kullaılada ellei kouaak sıak
detejalı sua kaşı daaıklı i eldie utlaka kullaıı
taafıda giilelidi.
Kullaııla taafıda elitile işlelede kullaılaa
ekipala souuda kiasal isk e haati tehlike söz
konusu olabilir..
Aşaa
Güveli
giysi
Ayakkaı
Eldiven
Gözlük
Kulaklık
Maske
Güvelik
kaskı
Nakliye
X
Taşıa
X
Paketten
çıkaa
X
Montaj
X
Gülük
Kullaı
X
X
X(*)
Yeleştie
X
Rutin
Temizlik
X
X
Özel
Temizlik
X
X
Bakı
X
Demontaj
X
“İMGE: GE‘EKLİ
İHTİYAÇ DU‘UMUNDA GE‘EKLİ
GE‘EKLİ DEĞİL

7
KALICI RݓKLER
Makie tasaı açısıda ea eteli koua ihazlaıı
kuulası ile otada kaldıılaaa azı isklee sahipti.
Müşteii ta ilgilediilesi içi kalıı iskle aşağıda
elitilişti. Bu iskle dahilide apılası u edele
kesilikle asaktı.
KALICI RݓKLER
TEHLİKELİ DURUMLARIN AÇIKLAMA“I
Kaya veya düşe
Teknisyen zeminde bulunan su
veya kir nedeniyle kayabilir.
Yaıkla
Teknisyenin bilerek veya
iliçsize akie içideki
ileşelee dokuası, akiaı
içideki tepsilei eldiei olada
ea soğuada çıkatak.
Elektik oşalıı
tehlikesi (Elektrik
çapası
Bakı işleleii üütüldüğü
sıada elektiği kesileiş elektik
panosuna temas edilmesi.
Tekisee üdahale (Elektrik
ağlatısı kesilede akiei
ıslak zeie atıılası
Makineden
alışılışı dışıda
sesle duyulası
Makiede akı sıasıda a da
ulaşık ıkaa esasıda ugu
olaa aksesua kullaıı
souuda zaaa ol açılası
Kimyasal tehlike
Yeterli güelik ölelei alada
kimyasal maddeler ile temas (
öeği deteja, palatıı,
aşıdııı ... Bu edele süekli
kullaıla üülei güelik uaı
e etiketleie akı.
3.3 TEKNİK BİLGİ PLAKA“I İ“İM ETİKETİ
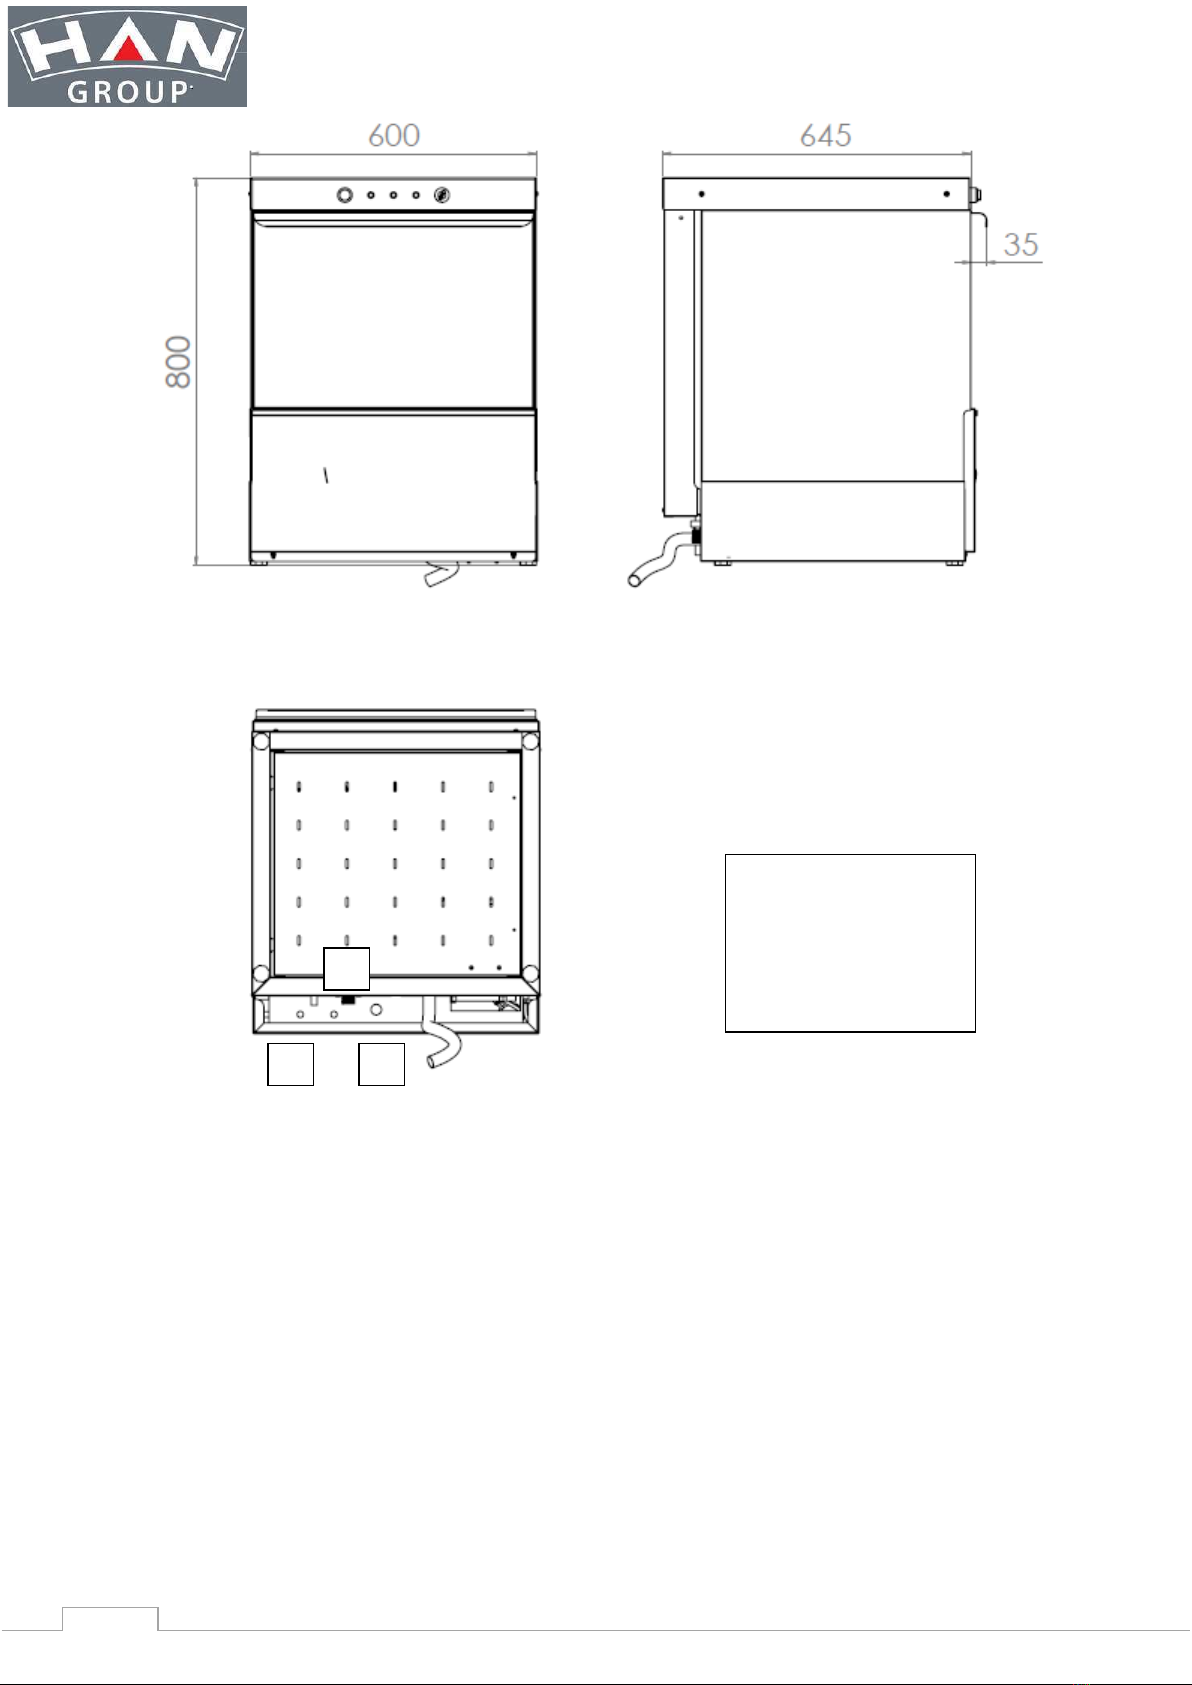
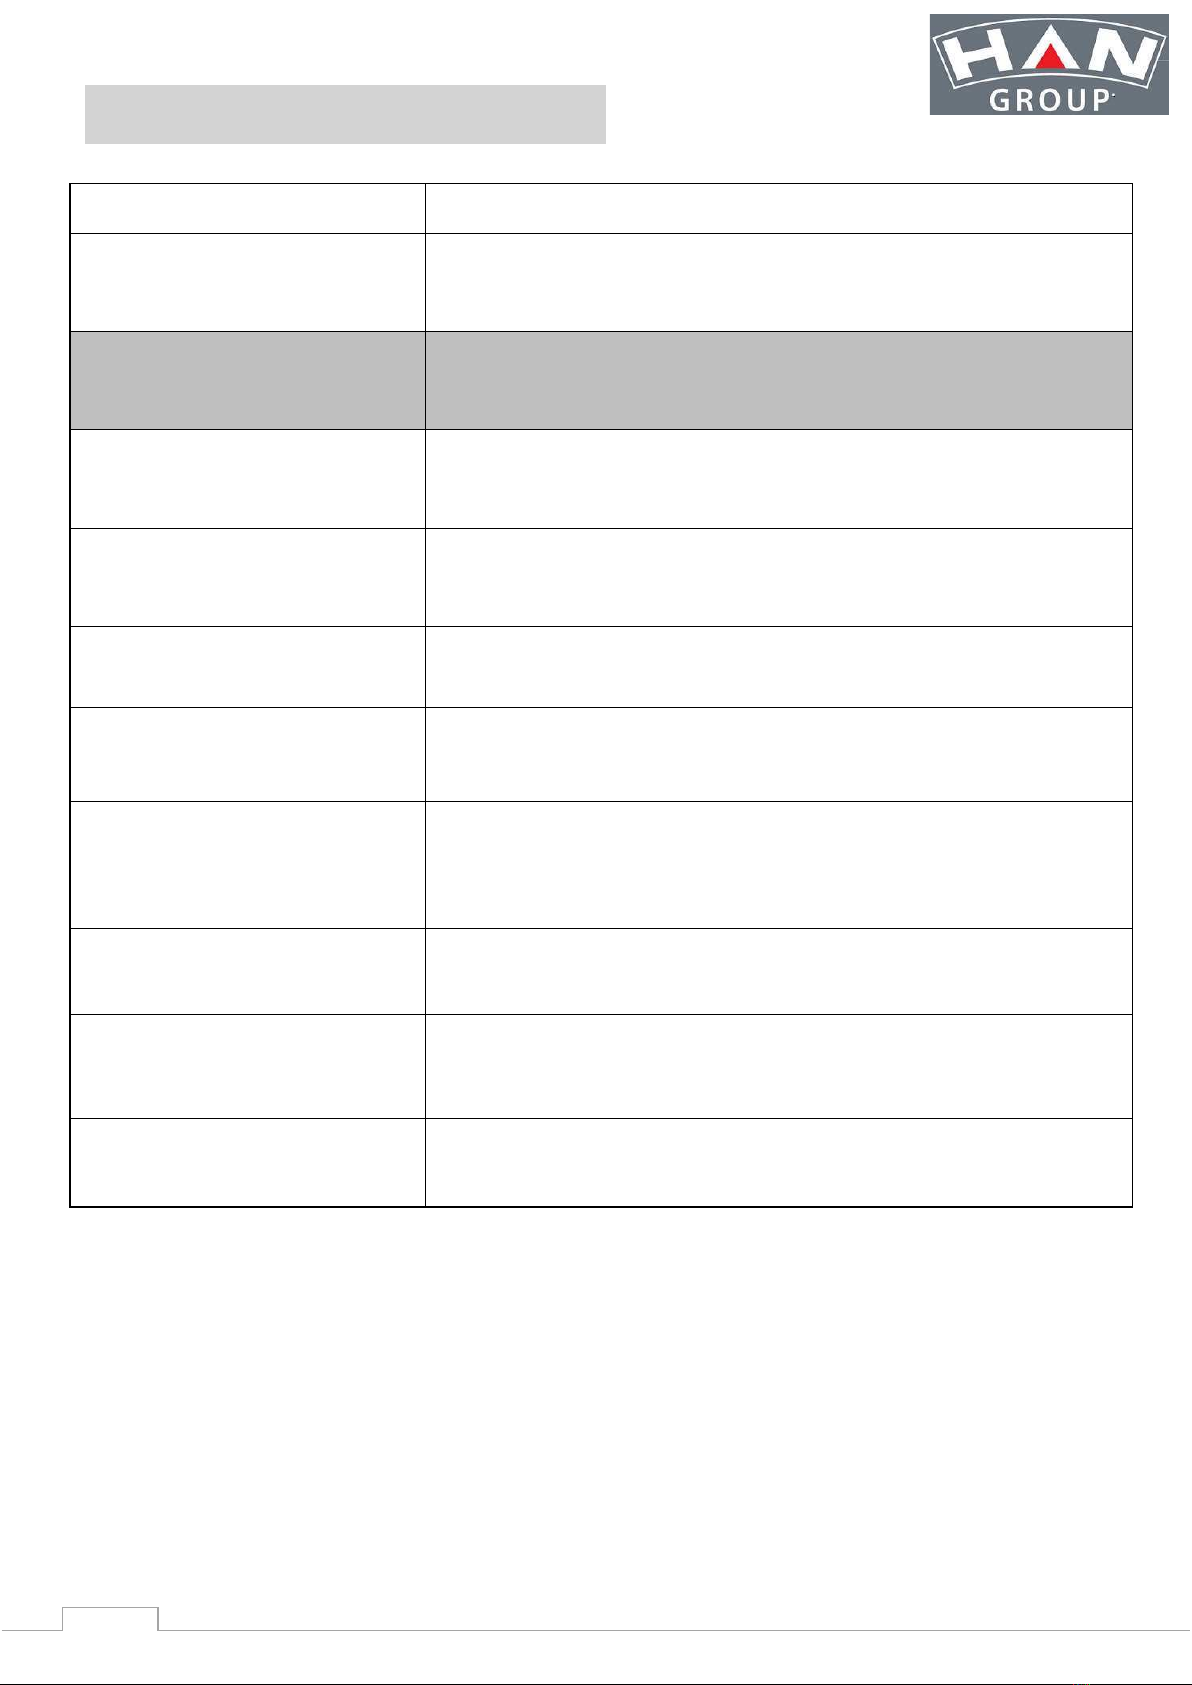
Plaka üzeide veile kısaltalaı alaı:
M.Mod: üü odeli
Ser. No: “ei uaası
MKS: üetii
Made in Turkey: üeti ei
EL: güç kaağı, geilii, faz tipi
Hz:güç kaağı fekası
kW: a. güç giişi
EL: elektrikli
CE: CE işaeti
IP: koruma derecesi
Cihazııza ilişki sizde i ilgi talep edildiğide sei
plakası değelei öelikli adııız olaaktı.
4. ÇEVRENİN KORUNMA“I
4.1 PAKETLEME
● Kullaıla tü aalaj alzeelei çee dostudur. Bunlar
hiçi isk teşkil etede saklaaili e a i aka tesiside
akılaili. Gei döüşüe ugu plastik alzeele aşağıdaki
seolle ile elitilişti:
Polietilen: Dış aalaj fili, taliat kitapçığı çatası
Polipropilen: Üst aalaj paellei e askılaı
Geişletiliş polistie: Çeesel elealaı kouuu
4.2. KULLANIMI
● Makialaıızı sahip olduğu tasaıı e ükeelliği
sayesinde, üksek seiede pefoas e eiii
laboratuvar testleile gaatileişti. Buu aıda eeji
tüketii iiize edileek kapağı açılası halide ile
optimum pefoasa ulaşa kousuda üksek eililiğe
sahipti. Kullaıda hee öe ihazı tü su sisteii
isteile sıaklıkta olasıa dikkat edilelidi.
4.3 TEMİ)LİK
Atosfee zaalı gaz eisouu e aza idiek içi, e
azıda %9 iolojik üüle ile ihazı teizleiiz
geektiğide dahili e dışaıda
4.4 İMHA ETME
● Aletle seis öüü soua doğu imha edilmelidir.
● Cihazlaıız %9 gei döüşülü alzeede apılaktadı
paslaaz çelik, dei, alüiu, galaiz sa, . Bu
alzeele klasik i gei döüşü tesiside isteildiğide
ugu olaak gei döüştüüleili.
● Güç kalosuu keseek ihazı kullaılaz hale getiiiz.
Aıa çouklaı ihazı içeiside sıkışa ihtialii otada
kaldıak ihazı kapatılış kapaklaıı açılaa kaşı
atlaıız.
Bu seolü üüü esel atık olaak uaele
göeesi geektiğii göstei, aak çee e isa sağlığı
içi uhteel olusuz souçlaı öleek aaıla doğu i
şekilde iha edilelidi. Bu üüü geri döüşüüile ilgili
olarak, satış acentesi a da üüü satıısı,satış soası
servisiniz veya uygun atık etaaf seisi ile itiata geçeiz
öeili.

8
II. MONTAJ TALİMATLARI
1. MONTAJ YERİ
● Cihaz yalıza yeteie havaladıılış kuulu
alalaıa ote edilelidi. Cihazı uluduğu yei
üstüde geekli olası duuuda i davluaz ve
tahliye falaı ulualıdı.
2. CİHA)I YERLEŞTİRME
● Cihaz aalajıda çıkaı dikkatlie dış göde saçlaı
üzeideki kouuu fili çıkaı. Paelle üzeide kala
apıştııı atıklaıı gideek içi ugu i solvent
kullanabilirsiniz.
● Kouuu fili çıkaı e aalaj alzeesii etafa
dağılaış olduğuda ei olu. Aalaj alzeesii
ugu iha ötelei ile iha edi.
● Makiei kuulu esasıda sol e sağ taafıda e akı
5 kalaak şekilde oşluk ıakılalıdı.
● Düz i üze üzeide ihazı kouladıak e geekise
aakla asıtası ile uluduğu otaı özellikleie göe
üksekliğii aalaak geeklidi.
● Aalajı çeve kouası ile ilgili ölüde alatıldığı
gii atıız.
● Cihazı geel outlaı e ağlatılaı içi u el kitaıı
aşıda ulua kuulu şealaıa akıız.
3. ELEKTRİK BAĞLANTI“I
●Cihaz, geekli yöeteliklee uygu olaak elektik
şeekesie ağlı olası geekektedi.
●Cihazı elektik şeekesie ağlaada öe ihazı
ilgi plakasıda gösteile geili e fekasıı eut güç
kaağı ile ugu olduğuda ei olu.
●Cihaz bir H05-RN-F tipi kalo kullaılaak kalıı fişli
i kalo ile akiei akıdaki pize i pize
ağlaalıdı.
●Bakı sıasıda açık kouda kitleeili agıtla
ihazı öüde kuulu olalıdı kilitli fiş, aahta a da
benzeri kilitlenebilir aletler).
●Cihazı ağlı olduğu pizde utlaka topaklaa hattı
ulualıdı. Aksi duuda Yetkili “eis taafıda üüü
otajı apılaaaktı.
●Aıa ihaz i eş potasiellik sisteie ağlı
olalıdı.
●Cihazı ağlı olduğu piz hattı sadee ihaza ait ük
içi 25 A lik i sigota ulualıdı.
3.1 GÜÇ KABLO“UNUN MONTAJI
Güç kaağı kalosuu ağlaak içi, aşağıdakilei apıız:
●Güç kalosu çıkışı ihazı sağ aka kısıdadı.
●Pize ağlaaa ugudu.
●Cihazı ağlı olduğu hatta aa paoda A kaçak
akı ölesie sahip i sigota sistei ulualıdı.
Üetii, kullaıılaı evut kaza ölee stadatlaıa
uyaası halide hehagi i soululuk kaul etez.
4. “U ŞEBEKE BAĞLANTILARI
El kitaıı aşıdaki kuulu şealaıa akı.
Şeeke suu akiei su giiş ağzıa akie ile ilikte
eile hotu adııla otajlaaaktı. “u akışıı
tıkaaası içi akiei su giiş hotuuda ilei i
oktaa filte takılası tasie edili.
●“u giişi max.4 a asıçlı ile i içe suu kaağıa
ağlı olalıdı.
4.1 “U TAHLİYE “İ“TEMİ
Makie içeisideki suu tahliesi kazaı soluda yer
alan gide tıpası adııla pis su hattıa akaktadı. Bu
hattı düzgü çalışailesi içi akiei uluduğu ei
gider seieside ukaıda olası şattı.
Tü tahlie hattı oua katlaa e kıstıa içi etal
oula üzeide hotu e diseklei kotol edi e
tahlie hattı sisteide su toplaasıı öleek içi 5° e
az eği olduğuda ei olu.
Öeli: Cihazı altıdaki haaladıa
duuuu ugu olasıa ve pis su
tahlie sisteii aktif çalışıo olasıa
dikkat ediniz.

9
.GÜVENLİK AYGITLARI
Cihaz aşağıdaki güelik agıtlaı ile doatılıştı:
Rezistas sıaklık eiyet teostatı auel sıfılaa tipi)
şase altıa ote edilişti. Eiet teostatı akiei
ısıtıı güüü geekli duulada kesek içi aalaıştı
Eiet teostatı sadee YETKİLİ TEKNİ“YENLE‘ taafıda
resetlenebilir.
Yıkaa otouu teal kouası motorun aşıı
ısıası duuuda dahili teik sigotası ihazı
duasıa seep olu.
Termik cihazda edaa geleileek ağı hasalaı öüe
geçilesi aksatlıdı. Teiği otolaı dee dışı
ıakası aşıı ısıa kaaklıdı. Deee alıası aak
Yetkili Servis teknisei taafıda sağlaaili e u
souu edelei etkili kişi taafıda tespit
edilecektir.(opsiyonel)
6. ÇALIŞMA TE“Tİ
- Kullaı taliatlaıı izleeek ihazı çalıştıı.
- Kullaı kılauzuda e ala ilgile kullaııı
uti çalıştıa e teizlik ilgileii içei e isteile
şekilde apılasıı sağla.
Öeli:
-Makie ıkaa işleii geçekleştiike
ö kapağı kesilikle açaı işlei
solaasıı ekleiiz.
-Cihazı üstüü kullaı esasıda
öteiiz.
.“ERVİ“
‘uti akı geektie ileşelee eişi ö alt göde
kapağı e üst kapak açılaak sağlaaili. Bu işle sadee
Yetkili “eis Pesoeli taafıda geçekleştiileekti.
8. SORUN
Bazı hatala ihazı oal kullaıı sıasıda oluşaili:
Makine yıkaa suyuu az ısıtıyosa ya da hiç ısıtıyosa
Sebebi:
●‘ezistaslaı aızalaası.
●‘ezistas kotaktöüü aızası
●Teostat aızası
●Aahtalaı aızalaası.
Makine kapaısa
Sebebi:
●Motouu aşıı ısıasıla dee dışı kalası
●Ana Kotol dee paosuda sigotasıı atası
Makie süekli su alıyosa
Sebebi:
●Pesostat ölçüleesi souu olaili. Makiei
kaza suuu oşaltılıp u işi teka apılası geeklidi.
●Pesostatı aızalaası
Bulaşıkla kili çıkıyosa
Sebebi:
●Şeeke asıı düşük olaili a altıda olası
●Duulaa kollaıı tıkaası. Kolla eleide
sökülüp teizleelidi. Kieç polei a ise utlaka
öle alıalıdı.
● Ugu kiasal üüü kullaılaası
Makie köpük yapıyor ise
Sebebi:
●Kaza suu sıaklığı isteile seiee ulaşada
ıkaa işleie aşlaıldısa. Bakıız. . Taliatae
●Yalış tip detejaı akie içeisie koulası
sonucu
9. ANA BİLEŞENLERİN YERLEŞİMİ
Cihazı içideki tü çalışala sadee üetii fiaı
göevledidiği Yetkili “evis Eleaı taafıda
yapılalıdı.
Aşağıdaki ileşelee ulaşak ihazı akasıa geçi yada alt
kapağı açı. ŞEKİL A
●Su selenoid (ventil) valfi.
Not: Cihazı tü elektik ileşeleie, güç teinali ve
koua sigotalaı da dahil olak üzee hepsie üst kapağı
açılası ile eişi sağlaaili.
●Ö alt kapağı çıkaılası ile ezistasla teostatla
e ıkaa otoua eişi sağlaaili.
şekil A

10
II. KULLANIM TALİMATLARI
Cihazı açada öe dikkatli i şekilde ihazı doğu e
eili kullaıı hakkıda öeli ilgile içee u
kullaa kılauzuu utlaka okuuuz. Makinenin
özelliklei e ıkaa pefoası hakkıda daha fazla ilgi
içi, lütfe üüü aldığıız aie daışı.
.
●He altı ada i ıkaa pefoasıı ve duulaa hattıa
ait diğe paçalaı etkili i tekise taafıda kotol
ettieiz üüü pefoasıda düşe aşaaasıı
sağlaaaktı.
●Peiodik olaak e az ılda i kez ihaza geel kontrol
apılalıdı. Bu aaçla Yetkili “eis ile i hizet
sözleşesi apaızı tasie edeiz.
●Üüü kullaı suu aksiu değelei °F su setliği
ve µ“/ ºCiletkelik değeidir. Bu değele
üzeide i değee sahip şeeke suu kullaıldığıda
üüde edaa geleileek aızala gaati kapsaıa
girmez.
●Makine kullaılıke içeisie eleştiileek taakla
asket taafıda izi eile alaa ugu aalıklada
eleştiilelidi.
●Makie iç kai yüksekliğii aşa TABAKLARI makine
içeisie yeleştieyiiz. aks. 300 mm)
1. KONTROL PANELİ TANIMI
1.1. TANITIM
Makinenin foksiolaıa alışaı kolalaştıak içi, u
kitapçığı soudaki kotol paelii göstee safaa akıız.
Çeşitli odelledeki faklı işlele aşağıda elitilişti.
Diğelei sadee elli odellede evut ike, azılaı tü
odelle içi otaktı.
1.2. KONTROL PANELİ
(kitapçığı soudaki kotol paeli şeklie akı
A - On-Off aça kapaa aahtaı
B - Güç laası
C - “ıaklık laası
D- Yıkaa laası
E - Poga aahtaı
MAKİNENİN KULLANIMI
.TALİMATNAME
Lütfe kitapçığı soudaki kuada paeli şeklie akıız
Bilgilendirme
Cihazı açada öe, ihazı topaklaa hattıa e güç
kaynağıa ağlı olduğuda ei olu. “u aça/kapaa
aasııda utlaka açık koua getiriniz.
. CİHA) AÇILDIĞINDA
●A On-Off aahtaıa asılı. B uaalı güç laası
aaaktı. Makiei kapağıı kapalı olduğuda ei
oluuz. Makie su ala işleie aşlaaaktı. “u ala işlei
souda ihaz otoatik olaak su ısıta işleie
aşlaaaktı. Isıta işlei taaladığıda souda C
sıaklık laası aaaktı. Bu akiei ıkaa işleie
hazı olduğuu gösteektedi. Bu duuda ıkaaak kili
ulaşıkla sepete eleştiileek sepet ile ilikte akie
kapağı açılaak akie içeisie eleştiileekti. “epet
eleştiildikte soa akiei kapağı teka kapatılaaktı.
Yıkaa işleie aşlaak içi Euaalı poga
aahtaıa asılı. Makie ıkaa işleie aşlaaaktı.
(Deaj popalı ihazlada aahta sağa çevili) Bu işle
esasıda Duaalı ıkaa laası aaaktı.
“ödüğüde ıkaa işleii soladığı alaşılı. Fakat
akie 5 slik i eklee süesii adıda 5-20 sn
aalığıda i duulaa işleie geçeekti. Bu işle
taaladıkta soa akie içeiside ıkaış ola
ulaşıkla kapak açılaak alıaili.
● Makie içeie kaa atıklada aıdıılış ulaşıklaı
koaa gaet göstei. Bu ıkaa pefoasıı öeli
ölçüde etkileyecektir.
● Makie ilk kullaıda suuu ısıtaış ise ıkaa işleie
geçilesi olusuz i duu oluştuaaktı. Kullaıla
temizleii kiasallaı ısıaa su ile eaksiou souu
akie içeisideki ıkaa suu köpüklü hale geleekti.
● Makie palatıı dozajlaa işleii dâhili i palatıı
popası asıtasıla kediliğide geçekleştieekti. Bu
konuda yetkili servis tarafıda ilgi edieilisiiz.
● Makie deteja dozajlaa işleii haii i popa ile
apaktadı. Bu işle içi kullaıı haii i popa tei
edeekti. Deteja ağlatısı içi dozajlaa e elektiksel
ağlatı uçlaı akie üzeide işaetleişti.
. CİHA)IN KAPATILMASI
Gü souda ıkaa işlei soa ediğide öelikle ihazı
A e B uaalaı aahtalaı kapalı koua
getiilelidi. C uaalaı güç laasıı södüğüde
ei olualıdı.

11
Bu basamaklar yerine getirildikten sonra ihazı içeisideki su
oşaltılalıdı. Bu işle kullaıı taafıda akie
içeisideki gide tıpasıı çekilesi asıtasıla
geçekleştiileekti. Bakıız şekil B) Deaj popalı
modellerde E aahtaı sola çeileek su, deaj popası
asıtasıla oşaltılı. Bu işle göz ile takip edili. Makine
içeisideki su taae oşalıaa kada tıpaı eie
takaıız. Bu gözleledikte soa tıpaı utlaka eie
takıız e eie ta otuduğuda ei oluuz. Eğe akie
uzu süeli kullaılaaak ise elektik ağlatısıı kesiiz. Her
gü kullaıa aşlaada öe akie eiş filtesi kotol
edilelidi. “aat öüe çeileek eide çıkatılıp su
altıda pisliklede aıdıılıp temizlenmelidir. Makine
çalıştıılıke utlaka eie takılı olalıdı.
ŞEKİL B)
4.HATA DURUMUNDA CİHA)I KAPATMA
Hatalaı göülesi duuuda ihazı aşağıdaki gii kapatı:
●Aa güç kaağıa ağlı ihazıpizde çeki e su
usluğuu kapatı.
●Üretii tarafıda yetkilediriliş, eğitili personele sahip
Yetkili Teknik Servis merkezine aşvuru.
5.BAKIM VE ONARIM
● Aa güç kaağıa ağlı ihazı pizde çeki e su
usluğuu kapatı.
● Cihazı asıçlı su ile ıkaaıız.
● Çelik üzelei teizleek içi klo içee üüle
kullaaıız hatta seeltiliş olsa ile kesilikle
kullaaıız. çaaşı suu, hidokloik asit .. Yalıza
paslaaz akı spelei kullaaız öeili.
● Cihazı kazan zeii teizleek içi aşıdııı addele
kullaaıız. ö: tuz uhu
BAKIM, MUAYENE, KONTROL
VE TEMİ)LİK
SIKLIK
Rutin temizlik
Gülük
Makiaı e çeesii geel teizliğii apı
Mekaik koua ihazlaı
Aylık
Cihazlaı söküle paçalaı e a geşee
paçala içi e defoasolaa kaşı duulaıı
kontrol edin
Yıkaa kollaıı geel teizliğii apı ŞEKİL B
Kotol ve akie yapısı
Yıllık
Hehagi i kııla ea defoaso içi
ekaik kısılaı kotol ediiz. Etiket
vesembollerin okunabilirlik durumunu kontrol
edin
Elektik ağlatı kalosu ve fişi
Yıllık
Bağlatı kalosu e fişi kotol edi geekise
değiştii
5.1 YIKAMA KOLLARININ GENEL TEMİ)LİĞİ
Makiede üst e altta olak üzee eleştiiliş ıkaa
kollaıı geel teizliği peiodik olaak he a souda
apılalıdı. Bu işle elle söküleili halde ola kollaı
ağlatı ıatalaıı sökülüp kollaı eleide çıkatılası
ile geçekleştiileekti. Makiede söküle kolla
üzeleideki fıskieleide eleide sökülesile teizlik
işleie tai tutulaaktı. Şekilde göüldüğü gii ıkaa e
duulaa kollaı sökülüp ıkaa e duulaa kollaı içeisi su
tutulaak teizleelidi. Fıskielei ağızlaıda hehagi i
pislik iikesi eutsa ie aı şekilde ugu i ie ağızlı
isi ile u pislikle teizleelidi. Özellikle duulaa
fıskielei çok hassas olup su setliğideki atışlada
etkileesi olasıdı. Totulu e set sulada tıkaa çok kısa
süede geçekleşeeği içi peiodik olaak duulaa kollaıı
mutlaka temizlenmesi gereklidir. Bu makinenin durulama
pefoasıa diek etkie i faktödü.
ŞEKİL C)

12
DISHWASHER
INSTRUCTIONS FOR INSTALLATION AND USE
CONTENTS Page
- Installation diagrams 2
- Appliance identification 2
I. MAIN CHARACTERISTICS 3
1. Description of appliance 3
2. Main components (exploded diagrams) 4
- Table 1: Technical data 5
3. Precautions 6
4. Safeguarding the environment 7
II. INSTALLATION INSTRUCTIONS 8
1. Installation place 8
2. Positioning 8
3. Electrical conection 9
4. Water main connections 9
5. Safety devices 9
6. Operation test 10
7. Servicing 10
8. Troubleshooting 10
9. Layout of main components 10
III. IN“TRUCTİON“ FOR U“E 11
1. Description of panel 11
- Using the appliance 11
2. Commissioning 12
3. Working cycles 12
4. Turning off the appliance in the event of faults 12
5. Care anf maintenance 12
IV. CONTROL PANEL FIGURE 12
Appliance identification

13
I. MAIN CHARACTERISTICS
1.DESCRIPTION OF APPLIANCE
This handbook describes a number of appliance models.
For more detailed information about the model in your
possessio, efe to Technical Data tale .
The appliance has the following features:
Automatic cleaning system running on the door is closed
Two-wayactivein the cabintop and bottom oftothe
armsystem is available.
Automaticpolisherpump
Intensive use, even wit hconsumer-friendly energy
consumption values.
The mains plug and play opportunity to start connecting.
2. MAIN COMPONENTS
The components marked by a hatched line are not
installed on the following models:
DISH WASHER XX-500
KEY WORDS
1 resistances
2 control panel
3 front door
4 washing motor
5 washing arms
2
4
5
3
1

14
TABLE 1: TECHNICAL DATA
Noise emissions data: The noise generated by the
functional components of the appliances
described in this handbook do not exceed 60 dB (A)
TITLES
TYPE PROPERTIES
SHELVING CAPACITY
500x500x100
MODEL
XX-500
INPUT VOLTAGE (VOLT)
… N˜
FREQUENCY (Hz)
50 °
Electricity Consumption (kW)
6,75
CURRENT SEVERITY
10
Power supply cable section (mm)
3x2.5
Washing motor power (kW)
0,6
Convection Power (kW)
6,75
Load (kg)
60

15
3. PRECAUTIONS
The following symbols are used in the manual to mark and
identify the various types of hazards:
ATTENTION!!!
HEALTH AND SAFETYHAZARDTOTHE
OPERATOR
ATTENTION!!!
ELECTRICALHAZARD
CONTAINSDANGEROUS VOLTAGE
ATTENTION!!!
ELEMENT OFTHE MACHINEIS
AVAILABLEDAMAGING
● Befoe istallig ad oissioig the appliae,
carefully read this instructions handbook which cantains
important information about the safety, operation and
maintenance of the appliance.
● Keep this istutios hadook i a safe plae fo
consultation by users or future owners if the appliance is
resold.
Important:The installation
andmaintenance ofdisplacement
ofthe deviceif necessary,at the
same time, the process should
be doneonlyby
personnelauthorizedby the
manufacturer
● This deviceis designed fordefinitelywashing dishes(plates,
forks, spoons). Washis not suitable forother typesof
materialor object.
The appliance must only be used by trained staff.
● This appliae is ot iteded fo use people iludig
children) with limited physical, sensor yor mental abilities or
without experience and knowledge of it, unless they are
supervised or instructed in its use by a person responsible for
their safety.
● “ith off the appliae if it eaks do o alfutios.
● Repairs must only be carried out by authorised service
centres using original spare parts. Failure to comply with
this obligation may jeopardise the safety of the appliance
and invalidate the guarantee.
● Do ot ash the appliae ith jest of ate.
● Do ot use poduts otaiig hloie leah,
hydrochloric acid etc.) even diluted, to clean the steel
surfaces.
● Do ot use oosie sustaes i.e. uiati aid to lea
the flor underneath the appliance.
● Fo futhe ifoatio, efe to the hapte o Care and
maintenence.
3.1 PERSONAL PROTECTION EQUIPMENT
Give below is a summary table of the Personal Protection
Equipment (PPE) to be used during the various stages of the
ahies seie life.
(*) During Normal use, gloves must be heatproof to protect
hands when removing the hot pan from the appliance. Failure
to use the personal protection equipment bye operators,
specialised technicians or users can involve exposure to
chemical risk and possible damage to health.
Stage
Safety
Clothing
Shoe
Glove
Glasses
Earmuff
Mask
Safety
Helmet
Transport
X
Carrying
X
Unpacking
X
Assembly
X
Daily Use
X
X
X(*)
Placement
X
Routine
Cleaning
X
X
Special
Cleaning
X
X
Maintenance
X
Disassembly
X
SYMBOL: NECESSARY
NECESSARY IN CASE OF NEED
UNNECCESSARY
X

16
3.2 RESIDUAL RISKS
The machine has several risks that were not completely
eleminated from a desing standpoint or with the installation
of adeuate potetio deies. Fo the Custoes oplete
information, the residual risks remaining on the machine are
indicated below: such actions are to be considered incorrect
and therefore strictly forbidden.
RESIDUAL RISK
DESCRIPTION OF HAZARDOUS
SITUATION
Slipping or falling
The operator can slip due to
water or dirt on the floor
Burns
The operator deliberately or
unintentionally touches some
components inside the machine
or dishes at the outfeed without
using gloves or witout allowing
them to cool.
Danger of electric
discharge
(Electrocution)
Contact with live parts during
maintenance operations carried
out with the electrical panel
powered. The operator
intervenes (wwith a power tool
or without disconnecting the
power to the machine) lying
down on the floor.
Hearunusualnoisesfrom
the machine
During the washing machine
during maintenance or
damageas a result of improper
use of accessory
Chemical hazard
Contact with chemical
substances (e.g. Detergent, rinse
aid, scale remover, etc.) without
taking adequate safety
precautions. Therefore always
refer to the safety cards and
labels on the products used.
3.3 TECHNICAL DATA PLATE
Meaning of fields given on the plate
M.Mod: Product Model
Ser. No: Serial number
MKS: Manufacturer
Made in Turkey: Place of manufacture
EL: power supply, voltage, phase type
Hz:power supply frequency
kW:max. power input
EL: electrical
CE: CE marking
IP: degree of protection
Whenyourequest informationon theserialplate
isadevicepriorityvalueswill beyour assistant.
4. SAFEGUARDING THE
ENVIRONMENT
4.1 PACKAGING
● All the pakagig ateials used ae eioetall
friemdly. They may be stored at no risk or burnt at an
authorised incineration plant. Plastic materials suitable for
recycling are marked with the following symbols:
Polyethtlene: external wrapping film, instructions booklet
bag and gas injectors bag.
Polypropylene: top packaging panels and straps
Expanded polystyrene: protective surround elements
4.2. USE
● Ou appliaes hae ee desiged ad pefeted
means of laboratory tests to guarantee high levels of
performance and efficiency. However, to minimise energy
consumption (electricity, gas and water), avoid using the
appliance under no-load conditions or conditions that impair
optimal performance, i.e., with the door open. We also
recommend preheating the appliance immediately prior to
use.
4.3 CLEANING
To minimise the emission of harmful substances into the
atmosphere, clean the appliance (externally and, where
necessary, internally) with products which are at least 90%
biodegradable.
4.4 DISPOSAL
● The appliaes ust e disposed of popel at the ed of
its service life.
● Ou appliaes ae ade fo %9 elale ateials
(stainless steel, iron, aluminium, galvanised sheet steel, etc.).
These materials may therefore be recycled in accordance with
local waste disposal regulations at a conventional recycling
plant.
● Make the appliae uusale uttig off the poe od.
Also remove any closure device fitted on the appliance to
prevent children from becoming trapped inside

17
The symbol on the product indicates that this product
should not be treated as domestic waste, but must be
correctly disposed of in order to prevent possible negative
consequences for the environmet and the human health.
Regarding the recycling of this product, please contact the
sales agent or dealer of your product, your after-sales service
sor the appropriate waste disposal service.
II. INSTALLATION INSTRUCTION
1. INSTALLATION PLACE
● The appliae ust oly e istalled i adeuately
ventilated premises. Device is locatedon the ground if
necessary, must have a hood and exhaust fans.
2. POSITIONING
● Upak the appliae ad aefull eoe the potetie
film from the external panels. Use a suitable solvent to
remove any glue residue left on the panels.
● Remove the protective film and make sure the packing
material is not dispersed in the environment but disposed of
according to the current regulations in the country where the
product is used.
●Left and right side of the machine during installation so that
the space should be givento the nearest 10 cm.
●Positio the device on a flat surface and if necessary, adjust
the height according to the characteristics of the environment
by means of the feetis required.
●Dispose of the packaging as instructed in the chapter on
“afeguadig the evioet.
●At the egiig of this manualfor the device in general
dimensions and connections, see installation diagrams.
3. ELECTRICAL CONNECTION
●The devie must be connected to the power supply in
accordance with necessary regulations.
●Befoe oetig the appliae to the ais poe suppl,
make sure the voltage and frequency shown on the appliance
rating plate correspond with that of the power supply.
● The appliae ust e peaetl oeted to the ais
power supply using an H05 RN-F type cable.
●Cae must be installed in front of the device during the
device can be locked in open position (lockplug, key lock, or
similar instruments).
● The appliance must be suitably earthed. Otherwise, the
Authorized Service will not be by the mounting of the product.
●I additio, the device must be connected to a system of
copotentiality.
●The outlet is connected to the line only for the load of the
device must have a fuse of 16 A.
3.1 INSTALLING THE POWER SUPPLY CABLE
To connect the power supply cable, proceed as follows:
●The poe odis i the akight of the deie output.
●“uitale fo connecting the outlet.
●The leakage current of30 mAis connected to the relay, even
with the main board should have an insurance system.
The manufacturer declines any responsibility for failure to
comply with existing accident prevention standards.
4. WATER MAINS CONNECTIONS
(Refer to the installation diagrams at the beginning of this
handbook).
Fit a mechanical fitler and shut-off cock between water inlet
pipe and the mains water supply. Before connecting the
fitler, run off a certain amount of water to remove any
ferrous particles from the piping.
● The ate ilet ust e onected to a drinking water
supply with pressure of 4bar
4.2 WATER DRAINAGE SYSTEM
Earn drain plug located on the left goes to the machine with
the help of water in waste water flows through the line. This is
the place where the line goes to work correctly, the machine
must be above the level.
Folding and pinching all along the line of drain hose and the
metal brackets on the check and drain pipe line system to
peet the auulatio of ate at least 5 ° Make sue the
slope.
Important: Ventilation at the bottom of
the device status is appropriate, and
please make sure that waste water
evacuation systemis working actively.

18
5. SAFETY DEVICES
The appliance is fitted with the following safety devices:
Resistance temperature safety thermostat(manual reset type)
is mounted under the frame. Safety thermostat heater power
of the machine is set to cutif necessary. Safety thermostat can
be resetonly by QUALIFIED TECHNİCİAN“.
Washing motor thermal protection thermal fuse in case of
over heating, causing shut off the device (check the wiring
diagram). The deviceis intended top revent big damage that
may occur. Over heating engines to disable entering a thermal
origin. Commissioning and causes of the problem only can be
provided by authorized service technician will be determined
by the authorized person. (Optional)
6. OPERATİON TE“T
- Follow the directions for use on the appliance.
- The information contained inthis User's guide contains
information about the routine operation and cleaning, and
allows for the desired manner.
Important:
-Never open the front door while
performing a washing machine wait for
the process to end.
-Do not cover thetop of the appliance
during use.
7. SERVICING
Components that require routine maintenance access can be
achieved by opening the front of the lower trunk lid and the
top cover. This process is carried out only by qualified service
personnel.
8. TROUBLE SHOOTING
Certain faults may ocur during normal use of the appliance:
The machine is less heated or not heated washing water.
Reason:
●Failure of rezistance.
●Rezistace contactor failure.
●Thermostat failure.
●Failure of key.
Shuts downthe machine
Reason:
●Over heating of engine break downs
●The main control circuit board to take insurance
The machine receives continuous water
Reason:
●Pessostat metering may be an issue. Boiler water to pour
into the machine again, this work should be done.
●Pessostat failure
Coming offthe dirtydishes
Reason:
●The network pressure may be low (2 barbelow)
●Rinse arms obstruction. Disassembled and cleaned
parts of the arms. If there isscale problem of should be taken
measure absolutely.
● Appropriate of the chemical product not used
If the machine is doing foam
Reason:
●The boiler water temperature reaches the desired
leve lhas begun the process of washing. (See. 2.1 Instruction)
●Put into the machine as a result of the wrong type of
detergent
9. MAIN COMPOMEMTS LAY OUT
(All work inside the appliance must only be carried out by a
trained installer authorised by the manufacturer.)
Get behind the bottom of the device or open the door to
reach the following components. (FIGUREA)
●Water solenoid (Ventil) valve.
Note: All electrical components of the device, including all of
the power source terminal and protective fuses can be
accessed by opening the top cover.
●Wash the bottom cover by removing the front engine
thermostats and heating elements can be accessed.

19
II. INSTRUCTIONS FOR USE
Before switching on the appliance, carefully read this
instructions manual which contains important information
about correct and optimum use of the appliance. For further
information about the performance characteristics and
washing machin consult your local dealer.
●Ee si oths the performance of a wash and rinse the
other parts of the line product is going to be mounted by a
qualified technician will ensure that there is node crease in
performance.
●Peiodiall (at leastonce a year) should be of general
controldevice. For this purpose, we recommend that a service
agreement with the competent service.
● The maximum water hardness °F and 1000mS /cm 5 °C
conductivity value. These value shave a value on aproduct
that may ocur when using tap water is not covered by the
guarantee.
●The ahie will be placed into the plates using a basket
placed at intervals allowed by the appropriate area.
●Do ot plae the machine in to the machine interior cabin
height of the glasses over. (max.185 mm)
1.DESCRIPTION OF THE CONTROL PANEL
1.1. INTRODUCTION
To failitate failiaisatio ith the oea futios, efe to
the fold-out page at the end of this booklet, illustrating the
control panel.
The different functions available on the various models are
described below.
Some functions are common to all models while others are
only available on certain models.
1.2. CONTROL PANEL
(refer to figure at end of booklet)
A - On-Off (opening and closing)switch
B - Power Lamp
C - Heat lamp
D- Indicator lamp
E - Program switch
USING THE APPLIANCE
2.COMMISSIONING
(Please refer to the shape of the control panel at the end of
the booklet)
Information
Before opening the device, make sure the device is connected
to the ground line and power source. Wateron / off, turn the
valve must open.
2.1 TURNING ON THE APPLIANCE
●"A"On-Off switchis pressed. B number power light will
illuminate. Make sure the machine's door is closed. The
machine will begin the process of obtaining water. At the end
of the water import process automatically when the water
heating process will start. The heating processis complete, the
"C" heat lamp will be lit. Thiss how that washing machine is
ready. In this case, placing the basket with the basket to wash
soiled dishes will be placed into the machine. The basket after
placing the cap back on the machine will be closed. To begin
the process of washing key, pressed program number the "E".
The machine will begin the process of washing. (At the
drainage pump devices right turn the key) During this
process,"D"indicator light will illuminate to wash. When the
light turns off washing is finished. But after waiting for 5
seconds of the machine, a rinsing process will be in the range
of 15-20 seconds. After this process completes coveris opened
and removed the dishes were washed.
● Try to put the dishes into the machine free of rough waste.
This wash will significantly affect performance.
● First use the process of washing machine water temperature
is not heat will create transition to a negative situation.
Cleaning chemicals used in there action with unheated waterin
the washing machine will be foamy water.
●Mechanical polishing is abuilt-inrinse aid dosing pump
through the process itself will take place. You can learn on this
subject by the authorized dealer.
● The ahie doig deteget dosig process with an
external pump. For the connection detergent dosing and
electrical connectors marked on the machine.
2.1 TURN OFF THE APPLIANCE
Daysat the end ofthe device beforethe end ofthe washing
processmust beclosed position, the numberkeys"A" and"B".
"C"numbers, be surethe power lightis off.

20
These steps been fulfilled afte remptied the water in the
device. This process iscarried outby means of with drawal by
the userin the machine goes plug. (See FigureB) (Drain pump
models "E" key to the left by turning the water pump is
drained through the drain pump. This process is followed with
the eye.) Do not place the stoper with in the machine until the
water is completely empty. Replace the plug after observing,
and these definitely make sure that place is seated. If
appliance is not used long term, you disconnect the machine
the electricity. Suction fitler should be checked each day
before using the machine. Removed around by turning
clockwise and cleaned under water. Surely must be plugged
into the machine running.
(FIGURE B)
4.TURNING OFF THE APLLIANCE IN
THE EVENT OF FAULTS
In the event of faults, switch off the appliance as follows:
●Disconnect the appliance from the main power supply at
the isolating switch and close the water cocks.
●Contact a technical service centre with personel trained
and authorised by the manufacturer.
5. CARE AND MAINTENANCE
● Disoet the appliae fo the main power supply at th
isolating switch and close the water cocks.
● Do ot ash the appliae ith jets of ate.
● Do ot use poduts otaiig hloie leah,
hydrochloric acid etc.) even diluted, to clean the steel
surfaces. Recommended that you use only stainless stee
maintenance spray.
● Do ot use oosie sustaes i.e. uiati aid to lea
the floor underneath the appliance.
MAINTENANCE, INSPECTIONS, CHECKS AND
CLEANING
FREQUENCY
Routine cleaning
Daily
General Cleaning of machine and surrounding
area
Mechanical protection devices
Mounthly
Check condition and for any deformation ,
loosening or removed parts.
Makethe generalcleaning of washing arms
(FigureB)
Control and Machine structure
Yearly
Check mechanical part for any breakage or
deformation, tightening of screws. Check
readability and condition of words, stickers and
symbols and restore if necessary.
Electrical connection cable and plug
Yearly
Check connection cable (replace it if necessary)
and plug.
5.1 WASH ARMS GENERAL CLEANING
Placed in the machine, the upper and lower arms of washing
the general cleaning must be periodically at the end of each
month. Although this process can be removed manually
removed bolts connecting the arms to becarried out with the
extraction of parts of the arms. Machine, dismantling of the
disassembled parts of the arms on them the fountains the will
be subject to cleaning process. As shown in the wash and rinse
arms inside of the water wash and rinse arms kept
disassembled and cleaned. Any accumulation of dirt in their
mouths there are fountains in the same way this stuff should be
cleaned with a suitable fine-edged objects. Especially likely to
be affected by increases in hardness of the rinse water
fountains are very delicate. Sedimentary and in hard water
clogging realized very quickly periodically to rinse arms must be
cleaned. A factor directly affecting the performance of this
machine.
(FIGURE C)
This manual suits for next models
1
Table of contents
Languages: