manuals.online logo
Brands
  1. Home
  2. •
  3. Brands
  4. •
  5. Handy Home Products
  6. •
  7. Garden House
  8. •
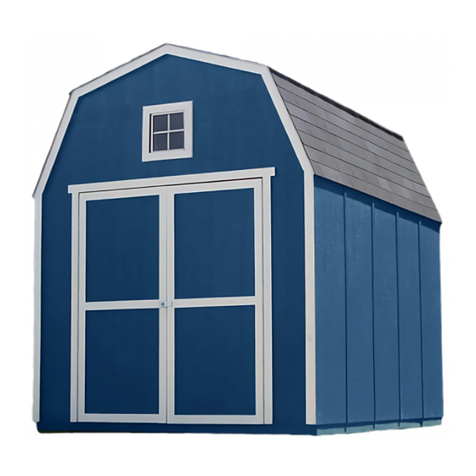
  9. Handy Home Products Meridian 8' x 12' Gable 16698 User manual

Handy Home Products Meridian 8' x 12' Gable 16698 User manual

16698
STOP!
STOP!
Call Us First!
DO NOT RETURN TO STORE.
For immediate help with assembly or product information
call our toll free number:
1-888-827-9056
or email:
customerservice@backyardproductsllc.com
Our staff is ready to provide assistance
March through November
M-F 8:00 AM to 9:00 PM EST / 6:00 PM PST
Saturday 8:30 AM to 5:00 PM EST / 2:00 PM PST
December through February
M - F 8:00 AM to 8:00 PM EST / 5:00 PM PST
Saturday 8:30 AM to 5:00 PM EST / 2:00 PM PST
(This page intentionally left blank.)
• BUILDINGRESTRICTIONSANDAPPROVALS
 Besuretochecklocalbuildingdepartmentandhomeownersassociationforspecicrestrictionsand/orrequirementsbeforebuilding.
• ENGINEEREDDRAWINGS
Contact our Customer Service Team if engineered drawings are needed to pull local permits.
• SURFACEPREPARATION
To ensure proper assembly you must build your shed on a level surface. Recommended methods and materials
to level your shed are listed on page 7.
• CHECKALLPARTS
Inventory all parts listed on pages 4-6.
• ADDITIONALMATERIALS
 Youwillneedadditionalmaterialstocompleteyourshed.Seepage3forrequiredandoptionalmaterialsandquantities.
11-05-2020
ASSEMBLY MANUAL 16698
8' x 12' Gable (243,8 x 365,8 cm)
Building12'x8'
(365,8x243,8cm)
KEEPTHISMANUALFORFUTUREREFERENCE
BEFORE YOU BEGIN
IMPORTANT!
READINSTRUCTIONSTHOROUGHLYPRIORTOBEGINNINGASSEMBLY.
***CONTACT OUR CUSTOMER SERVICE TEAM
IF ANY PARTS ARE MISSING OR DAMAGED***
- Order form and warranty at back of manual -
Call:1-888-827-9056email:[email protected]
OPTIONAL:
DOOR OFFSET
ON EAVE WALL
OPTIONAL:
DOOR CENTERED
ON EAVE WALL
2
FINISH
BEGIN
¸
1
TOOLS
Safety! Always use approved safety glasses during assembly.
OptionalRequired
HELPFUL REMINDER SYMBOLS
Lookforthesesymbolsforhelpfulremindersthroughoutthismanual.
ORIENT LUMBER AND TRIM FOR BEST APPEARANCE
=AssistanceRequired;ormorepeople.
=Ensuresquareness.
=Importantrequiredsteporoperation.
= Helpful assembly hint.
= Mark part with pencil.
= Beginning of steps for assembly or installation.
=Youhavenishedtheassemblyorinstallation.
= Level
❑Gloves
❑Clamps
Framing lumber is graded for structural strength and not appearance. Exterior trim is graded for one good side.
Always install the material leaving the best edge and best surface visible. Please remember that these blemishes in no way
negatively affect the strength or integrity of our product. (See Fig. A, B, C.)
❑Safety Glasses
❑Tape Measure
❑Paint Tools
❑Ladder
❑Caulk Gun
❑Hammer
❑Level
❑Pencil
❑Phillips
Screwdriver
❑Drill/Driver
❑3/8"DrillBit
❑#2 Philips Drive Bit
❑ToolBelt/
Nail Pouch
❑Chalk Line
❑Nail Gun
•GunNails
❑Square or
❑Shingle Blades
AB C
❑Utility Knife
3
COMPLETING YOUR SHED
Youwillneedtheseadditionalmaterials:
FOUNDATION OR FLOOR MATERIALS
ADDITIONAL MATERIALS
DRIPEDGE......................................50Feet #15ROOFINGFELT
Tocover159Sq.Ft.ofroofarea.
REFERTOTHEBACKOFTHISMANUALANDTHEMANUFACTURER’SINSTRUCTIONSFOR
INSTALLATIONOFSHINGLES,DRIPEDGEANDFELT.
3-TABSHINGLES...........................................6Bundles
PAINTFORSIDING ........................................2Gallons
Use 100% acrylic latex exterior paint. (2) coats recommended.
CAULK............................................................3 Tubes
Use acrylic latex exterior caulk that is paintable.
1"GALVANIZEDROOFINGNAILS....3Lbs
For shingles.
PAINTFORTRIM...............................1Quart
Use 100% acrylic latex exterior paint.
IMPORTANT!Dependingonyourspecicuse,youmaywanttoconstructaheavydutyoorframebyaddingadditionaloorjoists
(shown below as shaded). Below is a list of additional materials (not included).
•Ifyourshedwaspurchasedwithaoor,seeoorkithardwarebagforassemblyinstructions.
•SeetheFLOORLEVELINGsectiononpage7forrecommendedmethodsandsuggestedmaterialstoproperlylevelyouroor,
asthiswillvarydependingonyourspecicsite.
x3
x12
2 x 4 x 8' (5,1 x 10,2 x 243,8 cm) Treated Lumber
Cutlumberto2x4x93"(5,1x10,2x236,2cm)
Treated Lumber
ea.3"(7,6cm)hot-dippedgalvanizednails
Optional12"(30,5cm)spacing
REINFORCED WOOD FLOOR FRAME (OPTIONAL)
1"GALVANIZEDROOFINGNAILS...1/4Lb
Forroongfelt.
TOVALIDATEYOURWARRANTYYOUMUSTUSETHEFOLLOWING:
CAULK..............................................1Tube
For windows use acrylic latex exterior caulk that is paintable.
4
RS RS
WOODSIZECONVERSIONCHART
NominalBoardSize ActualSize
PARTS IDENTIFICATION AND SIZES
DOOR ROOF
TRIM WALLS
Partidenticationis
stamped on some parts.
•ChecktheselocationsforPartstamps
PARTS LIST
INVENTORYYOURPARTSbeforeyoubegin.
Wesuggestsortingpartsbythecategorytheyarelistedin.
OO
x2 69"(75,3cm)DoorStiffener
x12
x1 7/16x3-1/4x50-3/4"(1,1x8,3x128,9cm)OSB
AL
x4 2x4x7"(5,1x10,2x17,8tcm)
YFA
x2 2x4x68-1/2"(5,1x10,2x174cm)
ZB
x1 19/32"x2-1/2x55"(1,5x6,3x139,7cm)
SP
x2 2x4x48"(5,1x10,2x121,9cm)
AS
x2 2x6x49-1/2"(5,1x15,2x125,7cm)
TCA
x2 2x4x51"(5,1x10,2x129,5cm)
x14 2x4x55-9/16"(5,1x10,2x141,1cm)
SZ
x4 2x4x89"(5,1x10,2x226,1 cm)
TP
x2 2x4x96"(5,1x10,2x243,8cm)
VX
x2 2x6x96"(5,1x15,2x243,8cm)
UWA
x2 19/32"x2-1/2x32"(1,5x6,3x81,3cm)
EGB
x2
19/32"x2-1/2x18-5/8"(1,5x6,3x47,3cm)
JF
x2 1 x 4 x 60 (2,5 x 10,2 x 152,4 cm)
TM
x25 2x4x72"(5,1x10,2x182,9 cm)
1 x 4 .................3/4" x 3-1/2" (1,9 x 8,9 cm)
2 x 4 ..............1-1/2" x 3-1/2" (3,8 x 8,9 cm)
2 x 3
..............1-1/2" x 2-1/2" (3,8 x 6,3 cm)
1 x 3 .................3/4" x 2-1/2" (1,9 x 6,3 cm)
x8 3/8x1-3/4x75-3/4"(1x4,4x192,4cm)
3/4"
(1,9 cm)
1x3x5"(2,5x7,6x12,7cm) GAUGEBLOCKfor3/4"(1,9cm)measurement.
GAA
x1
NXC
x4 2x4x62-3/16"(5,1x10,2x158cm)
YOR
x2 19/32"x2-1/2x63-1/16"(1,5x6,3x160,2cm)
JUB
x2 19/32"x2-1/2x62-3/4"(1,5x6,3x159,4cm)
HUL
x2 19/32"x3-1/2x62-3/16"(1,5x8,9x158cm)
YOL
x2 19/32"x2-1/2x63-1/16"(1,5x6,3x160,2cm)
BSA
x2 19/32"x2-1/2x91"(1,5x6,3x231,1cm)
HUR
x2 19/32"x3-1/2x62-3/16"(1,5x8,9x158cm)
TZA
5
ROOF PANELS
WALL PANEL & DOOR PARTS LIST
NOTE:Panelpartsarenotstampedwithpartidentication.
NOTE:RoofPanelsare7/16"(1,1cm)thick
13-7/8x96"
(35,2 x 243,8 cm)
x2
48x96"
(121,9 x 243,8 cm)
x2
47-7/8x48"
(121,6 x 121,9 cm)
x2
13-7/8x48"
(35,2 x 121,9 cm)
x2
x2x2
x1
LEFTDOOR
x1
RIGHTDOOR
x8
3/8x48x76"
(1 x 121,9 x 193 cm)
x2
3/8x23-7/8x76"
(1 x 60,6 x 193 cm)
x1
3/8x3-7/8x48"
(1 x 9,8 x 121,9 cm)
6
ACCESSORIES & DOOR HARDWARE
FASTENER / HARDWARE BAG
x1
T-HANDLE
x2
1-1/2"(3,8cm)
x2
x8
3/4"(1,9cm)
1-1/4"(3,2)
x160
x65
x55
1-1/2"(3,8cm)
2"(5,0cm)
3"(7,6cm)
3/4"(1,9cm)
x120
x88
x48
x8
2"(5,0cm)
1"(2.5cm)
NOTE:
If you are using a nail gun, nails
may be used where screws are
shown for quicker assembly.
Length of nail must match screw length.
x2
x3 BOXES
x4 BOXES
NAIL BOXES
3"(7,6cm)
2"(5,1cm)
7
Therearemultiplewaystolevelyouroorframe.Ourrecommendedlevelingmethodisshownbelow.
Levelingmaterialsarenotincludedinthiskit.
PREFERREDMETHOD-4x4TREATEDRUNNERS
Measurements to
centersof4x4's.
•3"Screws
angled into 4x4.
•(2)ateachpointframe
•and 4x4 touch.
12"
(30,5 cm)
12"
(30,5 cm)
•Levelunder4x4runnersonly.
•Locatelevelingmaterial12"(30,5cm)fromendsofrunnersandnomorethan48"(121,9cm)apart.
•Asphaltshinglesshouldbeusedbetween4x4runnersandblocksortreatedlumber.Neveruse
shingles in direct contact with ground.
•Forbestresultsandaidinginwaterdrainageusegravelundereachconcreteblock.
LEVELINGMETHODS
•If you are building your shed on a concrete foundation see the following page.
CONCRETE
MATERIALREQUIRED
x2 4 x 4 x 12' (10,2 x 10,2 x 365,8 cm)
Treated Lumber
FastenersforFrameto4x4.
(3"screwsshownasoneoption.)Minimum(40)3"screws/exteriorgrade.
Useonlywoodtreatedforgroundcontactandfastenersapprovedforusewithtreatedwood.
Always support frame seams.
Levelinghigherthan16"(40,3cm)notrecommended.
LEVELINGMATERIALS
Gravel
2x4 Treated Lumber
SolidMasonryBlocksin1",2",4"or8"thickness
Asphalt Shingles
8"Block8"Block
4"Block
Gravel
Gravel
4x4 Runner
Shingle
Shingle
Maximum between leveling
material locations.
48"
(121,9 cm)
12"
(30,5 cm)
12"
(30,5 cm)
2x4 Treated Lumber
2"Block
Level
Donotexceed16"
(40,3 cm).
8
A
B
C
4"
(10,2 cm)
3-1/2"
(8,9 cm)
DOOR
2 x 4 x 8' (5,1 x 10,2 x 243,8 cm)
Caulk
Requires:
x2
x2
x1
MUSTbetreatedlumber.
96"(243,8cm)
96"x144"(243,8x365,8cm) 137"(348cm)8'x12'(365,8x243,8cm) 144"(365,8cm)
AActualSize B CBuildingSize
CONCRETE FOUNDATION
Yourkitcontainsallmaterialstoconstructawoodenoor.
Ifyouchoosetoinstallyourkitonaconcreteslabrefertothediagrambelow.
•Atreated2x4(5,1x10,2cm)sillplateisrequiredwheninstallingyourshedonconcrete.
Hint:Purchasefulllengthtreatedlumber.
•Useahighqualityexteriorgradecaulkbeneathallsillplates.
•Fasten2x4(5,1x10,2cm)sillplatestoslabusingapprovedconcreteanchors(fastenersnotincluded).
•Checklocalcodeforconcretefoundationrequirements.
NOTES
Treated Sill Plate
Caulkbetween
sill plate and
concrete.
Allow new concrete slabs to cure for at least seven (7) days.
2 x 4 x 12' (5,1 x 10,2 x 365,8 cm)
9
DOOR
First, secure
at ends with
one fastener.
Second, secure
at ends with
one fastener.
173-1/16"
(439,6 cm)
173-1/16"
(439,6 cm)
FINISH
LEVEL AND SQUARE FLOOR FRAME
Beforeattachingoordecking,itisimportanttolevelandsquaretheoorframe.
Alevelandsquareoorframeisrequiredtocorrectlyconstructyourshed.
2
3
4
Uselevelandchecktheframeislevelbeforeapplyingoorpanels.
Checkforframesquarenessbymeasuringdiagonallyacrosscorners.Ifthe
measurementsarethesame,theframeissquare.Thediagonalmeasurement
willbeapproximately173-1/16"(439,6cm).
Whentheframeislevelandsquaresecureonesideofframetothe4x4runners
using one fastener at ends of each runner. Move to the opposite end of the frame.
Secure the frame to 4x4 runners using one fastener at ends of each runner making
suretheframeremainssquare(Fig.A).
Seepage7forthepreferredoorlevelingmethod.
FLOOR FRAME
BEGIN
1
Oncetheoorframeislevelandsquare,fastentheframeateachpointwheretheframecontactsthe4x4runners.
Fig. A
10
GableWall
GableWall
GableWall
EaveWall
EaveWall
Checkthattheoorframeislevelafterinstallingoorpanels.
Re-levelifneeded.
•Theoorshouldbeusedasalevelworksurfaceforwallconstruction.
• Organizeyourwallsectionsduringsub-assemblytoavoidover-handlingofthewalls.
HINT:
IMPORTANT!
Door centered on
Eave Wall
- Optional -
Door offset on
Eave Wall
- Optional -
11
PARTSREQUIRED:
3"(7,6cm)
DOOR HEADER
x18
Stack TCA and OSB as shown.
Nailwith3"nailsinthepatternshown.
Your door header is now assembled.
FINISH
1
BEGIN
1
OSB
ASSEMBLED
ENDVIEW
TCA
TCA
2Flip header assembly over and nail as shown on the other side.
Flush
Flush
x2
2x4x51"(5,1x10,2x128,9cm)
TCA
x1
7/16x3-1/4x50-3/4"(1,1x8,3x170,2cm) OSB
CENTER CENTER
12
CHOOSEYOURDOORLOCATIONATTHISTIME
ASYOUWILLASSEMBLEYOURDOORWALLFIRST.
OPTIONAL:
DOOR CENTERED
ON 12' EAVE WALL
12'EAVEWALLWITHDOOR:
IFYOUCHOOSETHEEAVEWALLWITHDOORCENTERED
GOTOPage15TOBEGINBUILDINGYOURWALLS.
OPTIONAL:
DOOR OFFSET
ON 12' EAVE WALL
12'EAVEWALLWITHDOOR:
IFYOUCHOOSETHEEAVEWALLWITHDOOROFFSET
GOTOPage17TOBEGINBUILDINGYOURWALLS.
8'GABLEWALLWITHDOOR:
IFYOUCHOOSETHEGABLEWALLFORDOORLOCATION
GOTOPage13TOBEGINBUILDINGYOURWALLS.
STANDARD:
DOOR LOCATED
ON 8' GABLE WALL
STOP
x1
PreAssembledHeader
18 1/4"
70 3/4"
89"
(46,4 cm)
(179,7 cm)
75"
(190,5 cm)
(226,1 cm)
18 1/4" 18 1/4"
(46,4 cm) (46,4 cm)
13
3"(7,6cm)
x42
8' WALL WITH DOOR
HINT:
For easier nailing
stand on frame.
PARTSREQUIRED:
TM TM
SZ
SZ
TM
x2
2x4x72"(5,1x10,2x182,9 cm)
YFA
x2
2x4x68-1/2"(5,1x10,2x174cm)
YFA YFA
Pre-AssembledHeader
Orientpartsonedgeonoor.Measureandmark.
Maintaina48"(121,9cm)measurementindooropening(betweenYFA).
Securewith(2)3"nailsateachmark.
2x4x89"(5x10,2x226,1cm)
x2 SZ
1-1/2"
(3,8 cm)
1
BEGIN
1
48"
(121,9 cm)
InstallHeaderin
this position
14
Ifyourdoorisonthe8'wall,gotopage19tocontinueassembly.
x54
2"(5,1cm)
8' WALL WITH DOOR
FINISH
Flush Flush
Flush Flush
PARTSREQUIRED:
2"
(5,1cm)
Nails
Your 8' wall with door is now assembled.
3/8x3-7/8x48"
(1 x 9,8 x 121,9 cm)
x1
3/8x23-7/8x76"
(1 x 60,6 x 193 cm)
x2
Place (2) 23-7/8"x76" panels and 3-7/8"x48" panel on wall frame as shown. Flush all panels to top plate
andushthe23-7/8"x76" panels along edge of door frame.
Panelswilloverlaptheframeapproximately3-1/2"(8.9cm)ateachside.
Securepanelswith2"nailsspaced6"apart.
Carefullyipthefrontwallover.
2
6"
(15,2 cm)
23-7/8"
(60,6 cm)
23-7/8"
(60,6 cm)
3-1/2"
(8,9 cm)
3-1/2"
(8,9 cm)
48"
(121,9 cm)
FlushFlush
Install all panels with the primed side facing up.
3-7/8"x48"
12"
36"
45 3/4"
96"
48"
98 1/4"
108"
132"
144"
(30,5 cm)
1-1/2"
(3,8 cm)
(91,4 cm)
(116,2 cm)
(243,8 cm)
(121,9 cm)
(249,6 cm)
(274,3 cm)
(335,3 cm)
(365,8 cm)
15
PARTSREQUIRED:
3"(7,6cm)
x66
12' WALL WITH DOOR CENTERED
TMx8
SP
TM TM
TP
Orientpartsonedgeonoorasshown.Measureandmark.
Securepartswith(2)3"nailsateachmarkand(4)3"nailsatseams. HI NT:
For easier nailing
stand on frame.
3"(7,6cm)
Nails
x10 TM
2x4x72"(5,1x10,2x182,9cm)
SP
x1
2x4x48"(5,1x10,2x121,9cm)
TP
x1
2x4x96"(5,1x10,2x243,8cm)
Flush
Flush
Flush
Flush
72"
(182,9 cm)
72"
(182,9 cm)
72"
(182,9 cm)
x1
PreAssembledHeader
YFA
x2
2x4x68-1/2"(5,1x10,2x174cm)
YFA YFA
InstallHeaderin
this position
1
BEGIN
1
Pre-AssembledHeader
16
Ifyourdoorisonthe12'wall,gotopage19tocontinueassembly.
12' WALL WITH DOOR CENTERED
PARTSREQUIRED:
Install all panels with the primed side facing up.
x120
2"(5,1cm)
3/8x3-7/8x48"
(1 x 9,8 x 121,9 cm)
x1 3/8x48x76"
(1 x 121,9 x 193 cm)
x2
3"(7,6cm)
x2
OO
FINISH
Flush Flush
Your 12' wall with door is now assembled.
Place (2) 48"x76" panels and 3-7/8"x48" panel on wall frame as shown.
Flushallpanelstotopplateandushthe48"x76" panels along edge of door frame.
Carefullyipthe12'wallover.
2
6"
(15,2 cm)
48"
(121,9 cm)
48"
(121,9 cm)
48"
(121,9 cm)
12"
(30,5 cm)
Maintaina48"(121,9cm)dooropeningusingOO as a temporary brace.
Securepanelswith2"nailsspaced6"apartonedgesand12"insidepanels.
Secure OO with(2)3"screws.
3
3"(7,6cm)
Screws
FlushFlush Flush
OO
x1
69"(75,3cm)DoorStiffener
TemporaryBrace
3-7/8"x48"
2"
(5,1cm)
Nails
Flush Flush
SEAM
(Notsecured)
48"
(121,9 cm)
72"72"
21-3/4"
1-1/2"
48"
96"
74-1/4"
96"
120"
144"
72"
(182,9 cm)(182,9 cm)
21-3/4"
(121,9 cm)
(243,8 cm)
(188,6 cm)"
(243,8 cm)
(304,8 cm)
(365,8 cm)
(182,9 cm)
(3,8 cm)
17
You may choose to have the door offset to the left side of the 12' wall.
PARTSREQUIRED:
3"(7,6cm)
x60
12' WALL WITH DOOR OFFSET
TMx6
SP
TM TM
Orientpartsonedgeonoorasshown.Measureandmark.
Securepartswith(2)3"nailsateachmark. HINT:
For easier nailing
stand on frame.
3" (7,6 cm)
Nails
x8 TM
2x4x72"(5,1x10,2x182,9cm)
SP
x1
2x4x48"(5,1x10,2x121,9cm)
TP
x1
2x4x96"(5,1x10,2x243,8cm)
Flush
Flush
Flush
Flush
TP
x1
PreAssembledHeader
YFA
x2
2x4x68-1/2"(5,1x10,2x174cm)
YFA YFA
InstallHeaderin
this position.
1
BEGIN
1
Pre-AssembledHeader
SEAM(Notsecured)
18
12' WALL WITH DOOR OFFSET
PARTSREQUIRED:
Install all panels with the primed side facing up.
x125
2"(5,1cm)
3/8x3-7/8x48"
(1 x 9,8 x 121,9 cm)
x1
3/8x48x76"
(1 x 121,9 x 193 cm)
x1
3"(7,6cm)
x2
OO
FINISH
Flush
FlushFlush
2"
(5,1cm)
Nails
Your 12' wall with door is now assembled.
Place (2) 23-7/8"x76" panels and 3-7/8"x48" panel on wall frame as shown.
Flushallpanelstotopplateandushthe23-7/8"x76" panels along edge of door frame.
Carefullyipthe12'wallover.
2
4
6"
(15,2 cm)
48"
(121,9 cm)
48"
(121,9 cm)
48"
(121,9 cm)
48"
(121,9 cm)
12"
(30,5 cm)
Maintaina48"(121,9cm)dooropeningusingOO as a temporary brace.
Securepanelsusing2"nails6"apart.SecureOO with(2)3"screws.
Install 48x76"panelushtoinstalledpanel.
Securepanelwith2"nailsspaced6"apartonedgesand12"insidepanel
3
3"(7,6cm)
Screws
Flush FlushFlush
OO
x1
69"(75,3cm)DoorStiffener
TemporaryBrace
3/8x23-7/8x76"
(1 x 60,6 x 193 cm)
x2
3-7/8"x48"
Flush Flush
Ifyourdoorisonthe12'wall,gotopage19tocontinueassembly.

Other Handy Home Products Garden House manuals

Handy Home Products Mackinaw Loft 15649 User manual

Handy Home Products

Handy Home Products Mackinaw Loft 15649 User manual

Handy Home Products MARCO Series User manual

Handy Home Products

Handy Home Products MARCO Series User manual

Handy Home Products MONARCH User manual

Handy Home Products

Handy Home Products MONARCH User manual

Handy Home Products GABLE 8'x10' User manual

Handy Home Products

Handy Home Products GABLE 8'x10' User manual

Popular Garden House manuals by other brands
HOKLARTHERM teahouse Assembly instruction

HOKLARTHERM

HOKLARTHERM teahouse Assembly instruction

FIberWood SCANDINAVE FW-E2843LW-003 installation instructions

FIberWood

FIberWood SCANDINAVE FW-E2843LW-003 installation instructions

Solid S7749 manual

Solid

Solid S7749 manual

Mercia Garden Products 02DTTWRS0605-V1-PEFC General instructions

Mercia Garden Products

Mercia Garden Products 02DTTWRS0605-V1-PEFC General instructions

Karibu Askola 4 Building instructions

Karibu

Karibu Askola 4 Building instructions

Palmako I44-4738 installation manual

Palmako

Palmako I44-4738 installation manual

Forest PENT SUMMERHOUSE 6x4 instructions

Forest

Forest PENT SUMMERHOUSE 6x4 instructions

Sojag 440-9160123 Assembly manual

Sojag

Sojag 440-9160123 Assembly manual

Duratuf Kinloch Assembly instructions

Duratuf

Duratuf Kinloch Assembly instructions

Lemeks Palmako FRJ34-4232 installation manual

Lemeks

Lemeks Palmako FRJ34-4232 installation manual

Palmako FR19-2929 installation manual

Palmako

Palmako FR19-2929 installation manual

Cello Hammarland User instructions

Cello

Cello Hammarland User instructions

Palmako PA44-3535 manual

Palmako

Palmako PA44-3535 manual

Luoman LILLEVILLA Garage 30 Assembly and Maintenance

Luoman

Luoman LILLEVILLA Garage 30 Assembly and Maintenance

Dunster House ARIANE H4-2412BSH installation manual

Dunster House

Dunster House ARIANE H4-2412BSH installation manual

Palmako 514715 installation manual

Palmako

Palmako 514715 installation manual

total sheds Apex Shed 6ft x 7ft Assembly manual

total sheds

total sheds Apex Shed 6ft x 7ft Assembly manual

Forest garden Bloxham 7' x 5’ Summer manual

Forest garden

Forest garden Bloxham 7' x 5’ Summer manual

manuals.online logo
manuals.online logoBrands
  • About & Mission
  • Contact us
  • Privacy Policy
  • Terms and Conditions

Copyright 2025 Manuals.Online. All Rights Reserved.