Harbor Freight Tools 91038 User manual

3491 Mission Oaks Blvd., Camarillo, CA 93011
Visit ourWeb site at http://www.harborfreight.com
Copyright © 2003 by Harbor Freight Tools®. All rights reserved. No portion of this
manual or any artwork contained herein may be reproduced in any shape or form
without the express written consent of Harbor FreightTools.
For technical questions and replacement parts, please call 1-800-444-3353
91038
HEAVY DUTY MANUAL
CAN OPENER
ASSEMBLY AND OPERATING INSTRUCTIONS

Specification
This Heavy Duty Manual Can Opener can open the lid tops on cans up to 12” high.
SaveThis Manual
You will need the manual for the safety warnings and precautions, assembly
instructions, operating and maintenance procedures, parts list and diagram.
Keep your invoice with this manual. Write the invoice number on the inside of the
front cover. Keep the manual and invoice in a safe and dry place for future
reference.
Safety Warnings and Precautions
WARNING:When using this product, basic safety precautions should always
be followed to reduce the risk of personal injury and damage to equipment.
Read all instructions before using this product!
1. Keep work area clean. Cluttered areas invite injuries.
2. Keep children away. Do not let allow children to use this product.
3. Store idle equipment. When not in use, keep this product out of the reach
of children.
4. Use the right tool for the job. Do not attempt to force a small tool or
attachment to do the work of a larger industrial tool.There are certain
applications for which this product was designed. It will do the job better
and more safely at the rate for which it was intended. Do not modify this
product and do not use this product for a purpose for which it was not
intended.
5. Dress properly. Do not wear loose clothing or jewelry as they can be caught
in moving parts. Nonskid footwear are recommended when working. Wear
restrictive hair covering to contain long hair.
6. Maintain tools with care. Keep tools sharp and clean for better and safer
performance. Follow instructions for lubricating and changing accessories.
Inspect product periodically and, if damaged, have it repaired by an
authorized technician.
SKU 91038 Page 2
ITEM
Construction
Blade
Sliding Bar
Handle Dimensions (Up)
Base Dimensions
Unit Weight
DESCRIPTION
Steel w/Nickle Plated Base and Sliding Bar
Stainless Steel
12-1/2” X 1” X 8/8”
21-1/2”L X 6-1/2”W
8-5/8”L X 4”W X 3-1/4”H
4.50 Lbs.

7. Do not overreach.Keep proper footing and balance at all times.
8. Clean all parts. All parts need to be cleaned with an antibacterial soap before
and after using. Use caution when cleaning the Blade (16).
Unpacking
When unpacking, check to make sure the following parts (shown on page 5) are
included. If any parts are missing or broken, please call Harbor Freight Tools at the
number on the cover of this manual.
Operation
The Heavy Duty Manual Can Opener is ideal for opening oversized cans.
Mounting Instructions
1. Plan the best location to accommodate your Can Opener. Choose an area where
people passing by will not brush against the Can Opener. The area should have a
strong mounting surface for the “L” shaped Base (2) over the edge of a table or
bench.This mounting surface should be capable of supporting the weight of the
Can Opener and the pressure applied to open cans. See Figure 1.
2. Use the Base (2) as a templet to mark the holes for mounting. Predrill holes (1/4” in
diameter) into a solid wooden table or bench.
See Figure 1.
3. Use Screws (1) and fix Base (2) to the bench securely.
4. Before placing Body (5) into Base (2), wash Blade (16) and Body with anti-bacteria
soap.
5. Slide Body (5) with Bar and Blade (16) into opening at the end of the Base (2).
CAUTION: This assembly has a very sharp blade and the weight of this assembly
is heavy. Use extreme caution. Leave Handle (10) in a horizontal position until you
are ready to lift up and position a large can on the Base (2).
See Figure 2.
Note: Assembly will slide down to the Base (2) until you lift it up to position a can
underneath.The can is what holds it up and the weight of this assembly is what
secures the can.
See Figure 2.
SKU 91038 Page 3
Use to mark
for drill in
three places.
Base (2) Bar
Body (5)
Opening in
Base (2)
Base (2)
Handle (10)
Figure 2
Figure 1
Blade (16)
(not shown)
Hole
Hole
Hole Bar

SKU 91038 Page 4
Maintenance
1. When cleaning, use a soft damp cloth and mild soap or cleanser.
2. Dry the Can Opener before storing it in a location that is out of reach of
children.
Operating Instructions
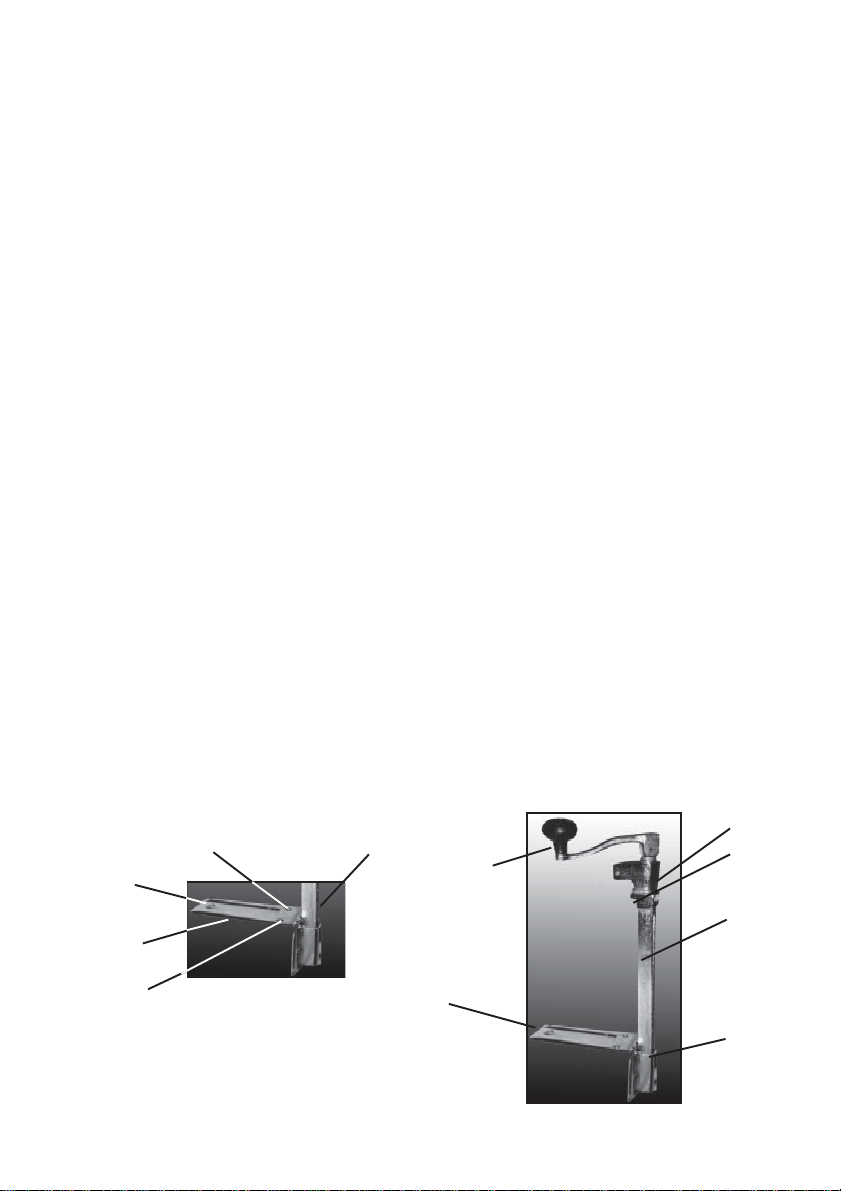
1. Lift the Body (5) assembly high enough to place the can on the Base (2). Be sure
the can is up close to the Bar on the Body.With the Handle (10) in an upright
position
(See Figure 3),
locate the rim of the can. Hold onto the side of the can.
Lower the assembly.Slowly push the Handle (10) into a horizontal position.The
Knife (16) located in the Body should be positioned on the inside of the rim of the
can. If placed correctly, this should make a puncture into the top of the can when
pressure is applied. If not, lift Handle (10), adjust can, and lower Handle until
puncture is in the correct position.
Keep your hands away from the Blade at all
times.
See Figure 4.
2. With the Handle (10) in the horizontal position, turn continuously to the right.The
can will automatically turn. It will cut the can.When you have reached the point
where you began cutting, the lid of the can lifts. Remove the lid to prevent it from
falling into the can’s contents. Caution: The lid is very sharp.
3. Lift the Handle (10) to an upright position. Raise the Handle and Body (5) with
the Bar and remove the can.
4. When finished using, lift and remove the Body (5) with Bar from the Base (2).
Lay it aside with the Handle (10) in the horizontal position.This will prevent the
Spring (6) from needing to be replaced often.
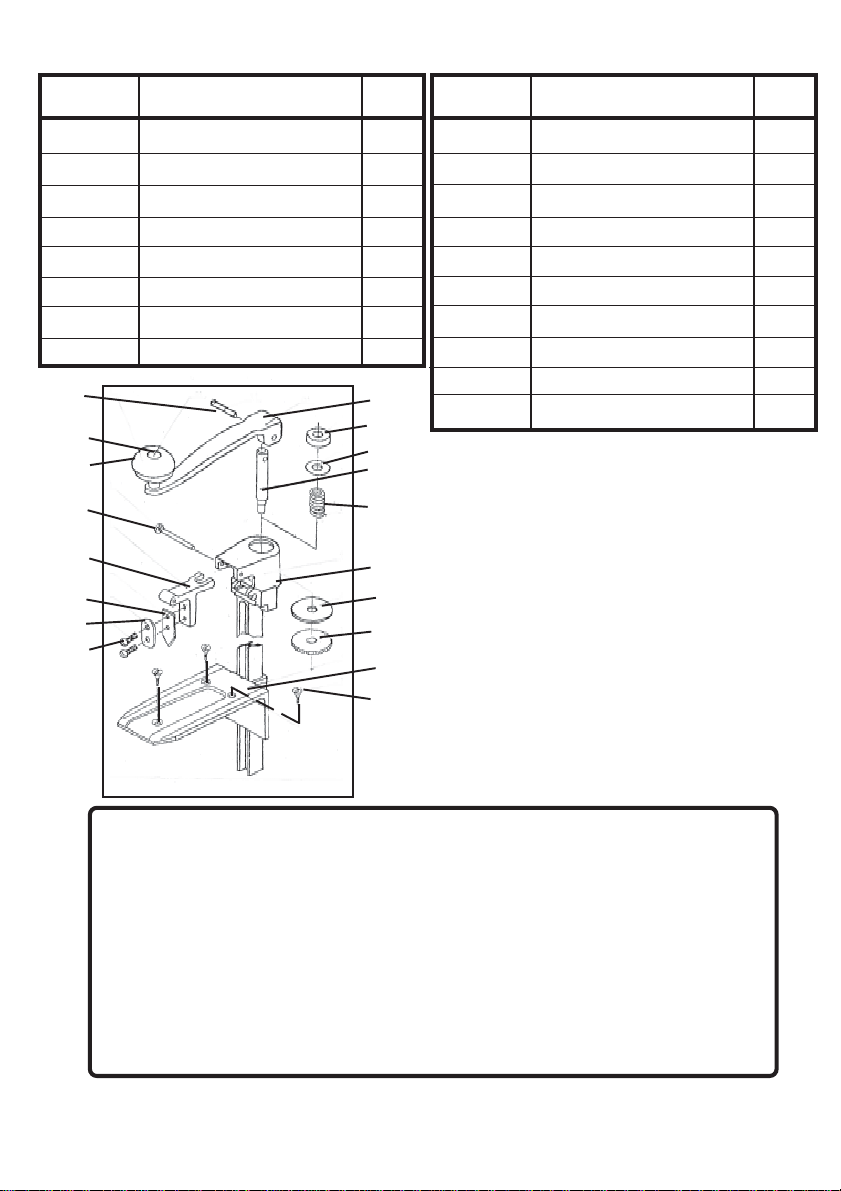
Taking the Blade Out to be Sharpened
1. After taking the Body (5) with the Blade out of the Base (2), lift the Handle (10)
and remove the Screws (18) from the Blade Spacer (17) and Body (5) with a flat
head screwdriver. Set Screws and Blade Spacer aside and carefully remove the
Blade (16). Sharpen the Blade with a sharpening tool. (Not included). Place
sharpened Blade back into Body (5).Tighten the Screws (1).
See Figure 5 & 6.
Figure 4
Handle
(10)
Body
w/Bar(5)
Base
(2)
Can
Rim
of Can
Knife
Bar
Figure 5 Figure 6
Handle
(10)
Screws (1) Blade (16)
Handle
(10) Screws (1)
Blade (16)
Figure 3
Handle
(10)

SKU 91038 Page 5
PLEASE READTHE FOLLOWING CAREFULLY
THE MANUFACTURER AND/OR DISTRIBUTOR HAS PROVIDED THE PARTS DIAGRAM
IN THIS MANUAL AS A REFERENCE TOOL ONLY. NEITHER THE MANUFACTURER
NOR DISTRIBUTOR MAKES ANY REPRESENTATION OR WARRANTY OF ANY KIND TO
THE BUYER THAT HE OR SHE IS QUALIFIED TO MAKE ANY REPAIRS TO THE
PRODUCT OR THAT HE OR SHE IS QUALIFIED TO REPLACE ANY PARTS OF THE
PRODUCT. IN FACT, THE MANUFACTURER AND/OR DISTRIBUTOR EXPRESSLY
STATES THat ALL REPAIRS AND PARTS REPLACEMENTS SHOULD BE UNDERTAKEN
BY CERTIFIED AND LICENSEDTECHNICIANS AND NOT BY THE BUYER.THE BUYER
ASSUMES ALL RISK AND LIABILITY ARISING OUT OF HIS OR HER REPAIRS TO THE
ORIGINAL PRODUCT OR REPLACEMENT PARTS THERETO, OR ARISING OUT OF HIS
OR HER INSTALLATION OF REPLACEMENT PARTS THERETO.
NOTE: Some parts are listed and shown for illustration purposes only and are not
available individually as replacement parts.
PARTS LIST
PART # DESCRIPTION QTY
1
2
3
4
5
6
7
8
3
1
1
1
1
1
1
1
Screw
Base
Gear
Gear Spacer
Body
Spring
Arbor
Spring Washer
1
1
1
1
1
1
1
1
1
2
Bushing
Handle
Handle Pin
Knob Rivet
Knob
Blade Holder Pin
Blade Holder
Blade
Blade Spacer
Screw
PART # DESCRIPTION QTY
9
10
11
12
13
14
15
16
17
18
Part 11
Part 12
Part 13
Part 14
Part 15
Part 16
Part 17
Part 18
Part 10
Part 8
Part 7
Part 6
Part 5
Part 4
Part 3
Part 2
Part 1
Part 9
Table of contents
Popular Can Opener manuals by other brands

Sunbeam
Sunbeam OpenAll CA2800 user manual

Black & Decker
Black & Decker Grand Openings EC1200 Series Use and care book

Cuisinart
Cuisinart GHI0303IB-1-1 Instruction booklet

gourmetmaxx
gourmetmaxx KC126 instructions

Black & Decker
Black & Decker Hideaway EC500B Use and care book

Westfalia
Westfalia 10 33 90 instruction manual