HARMAN/BECKER BE 7928 User manual

User’s Manual
HARMAN/BECKER AUTOMOTIVE SYSTEMS
BE 7928

Trademarks
All brand and product names are trademarks or registered trademarks of their
respective companies.
Disclaimer
Specifications and manuals are subject to change without notice. Mio Technology

assumes no liability for damage incurred directly or indirectly from errors,
omissions, or discrepancies between the device and the manuals.


i
Table of Contents
Table of Contents...................................................................................i
Precautions and Notices .....................................................................iii
1Getting Started................................................................................1
1.1
Understanding Hardware Components................................................ 1
Front Components ............................................................................... 1
Back Components................................................................................ 2
Left-Side Components ......................................................................... 3
Right-Side Components....................................................................... 3
Top Components.................................................................................. 4
Bottom Components ............................................................................ 4
1.2
Performing the Initial Start Up.............................................................. 5
1.3
Connecting to AC Power and Charging the Battery............................. 6
1.4
Using Your Device in a Vehicle............................................................7
Connecting the Car Charger................................................................ 7
1.5
Operating Basics.................................................................................. 8
Turning On and Off ..............................................................................8
Navigating on the Screen..................................................................... 8
1.6
Inserting a SD/MMC Card.................................................................... 9
1.7
Using the FM Transmitter................................................................... 10
2Connecting a Blutooth Phone......................................................11
2.1
General............................................................................................... 11
Phone number download................................................................... 11
Last mode / auto-connect phone........................................................ 11
Quick access...................................................................................... 11
2.2
Phone Main Menu.............................................................................. 12
Dial number........................................................................................ 12
Phone book........................................................................................ 13
Connect phone................................................................................... 13
Phone / Bluetooth settings................................................................. 14

ii
3Troubleshooting and Maintenance.............................................. 15
3.1
Resetting Your System ...................................................................... 15
3.2
Troubleshooting ................................................................................. 15
Power Problems................................................................................. 15
Screen Problems................................................................................ 15
Connection Problems......................................................................... 16
GPS Problems.................................................................................... 16
3.3
Maintaining Your Device.................................................................... 17
4Regulatory Information ................................................................19
4.1
Regulations Statements..................................................................... 19
European Notice ................................................................................ 19
4.2
FCC Notice......................................................................................... 23
4.3
Specially Notice.................................................................................. 24
4.4
Safety Precautions............................................................................. 24
About Charging .................................................................................. 25
About the AC Adapter........................................................................ 25
About the Battery ............................................................................... 25

iii
Precautions and Notices
For your own safety, do not operate the controls of the product while driving.
Use this product prudently. The product is intended for use solely as a
navigation aid. It is not for precise measurement of direction, distance,
location or topography.
The calculated route is for reference only. It is the user’s responsibility to
follow the traffic signs and local regulations along the roads.
When you get out of the car, do not leave your device on the dashboard
subjected to direct sunlight. Overheating of the battery can cause malfunction
and/or danger.
GPS is operated by the United States government, which is solely responsible
for the performance of GPS. Any change to the GPS system can affect the
accuracy of all GPS equipments.
GPS satellite signals cannot pass through solid materials (except glass). When
you are inside a tunnel or building, GPS positioning is not available.
A minimum of 4 GPS satellite signals is needed to determine current GPS
position. Signal reception can be affected by situations such as bad weather or
dense overhead obstacles (e.g. trees and tall buildings).
Other wireless devices in the vehicle might interfere with the reception of
satellite signals and cause the reception to be unstable.

iv
A car holder is needed when using the device in a car. Be sure that you place
the device in an appropriate place, so as not to obstruct the driver’s view, or
deployment of airbags.
Do not mount where the driver’s
field of vision is blocked. Do not place unsecured
on the dashboard.
Do not mount in front of
airbag panels. Do not mount in front of an
airbag field of deployment.

1
1 Getting Started
1.1 Understanding Hardware Components
NOTE: Depending upon the specific model purchased, the color of your device may not
exactly match the device shown in this manual.
Front Components
Ref
Component Description
Touch Screen Displays the output of your device. Tap the screen with your
fingertip to select menu commands or enter information.
Phone button Accepts or rejects the incoming calls.
Day/Night
button Switches between the Day view and the Night view when
using the Navigation program.
Power Button Press the button for more than 3 seconds to power on and off.
Back Button Press briefly to go back to the previous screen.

2
Home button Press to navigate to your home if you have set the home
address.
Main/Map
button Switches between the Main screen and the Map screen.
Bluetooth
Indicator Flashes in blue to indicate that Bluetooth is on.
Charge
Indicator Glows bright amber to indicate that the battery is charging,
and turns green when the battery is fully charged.
Bac Components
Ref
Component
Description
Speaker Sends out music, sounds and voice.
Cradle
Connector Connects to the device cradle or TMC cradle.

3
Left-Side Components
Ref
Component Description
Headphone
Connector Connects to stereo headphones.
USB Connector Connects to the USB device.
SD/MMC Slot Accepts a SD (Secure Digital) or MMC (MultiMediaCard)
card for accessing data such as MP3 music.
Right-Side Components
Ref
Component Description
Volume Control Adjusts the volume level of your device.
Power Connector
Connects to the AC adapter.

4
ON/OFF Switch The main power/battery cutoff switch. Please leave the
switch in the “ON” position for normal operation.
Top Components
Ref
Component Description
External GPS
Antenna
Connector
This connector (under rubber dust cover) allows use of an
optional external GPS antenna with magnetic mount, which
may be positioned on top of the car for better signal reception
in areas with poor reception.
Bottom Components
Ref
Component Description
Mini-USB Connector
Connects to the USB cable.
Reset Button Restarts your device (soft reset).

5
1.2 Performing the Initial Start Up
1. Slide the ON/OFF switch to the ON position.
NOTE: For normal operation, briefly press the power button to turn
on and off your device.
2. Your device turns on. Immediately charge your device as described in the
next section.
3. The Home screen appears. You can now use your device.
6
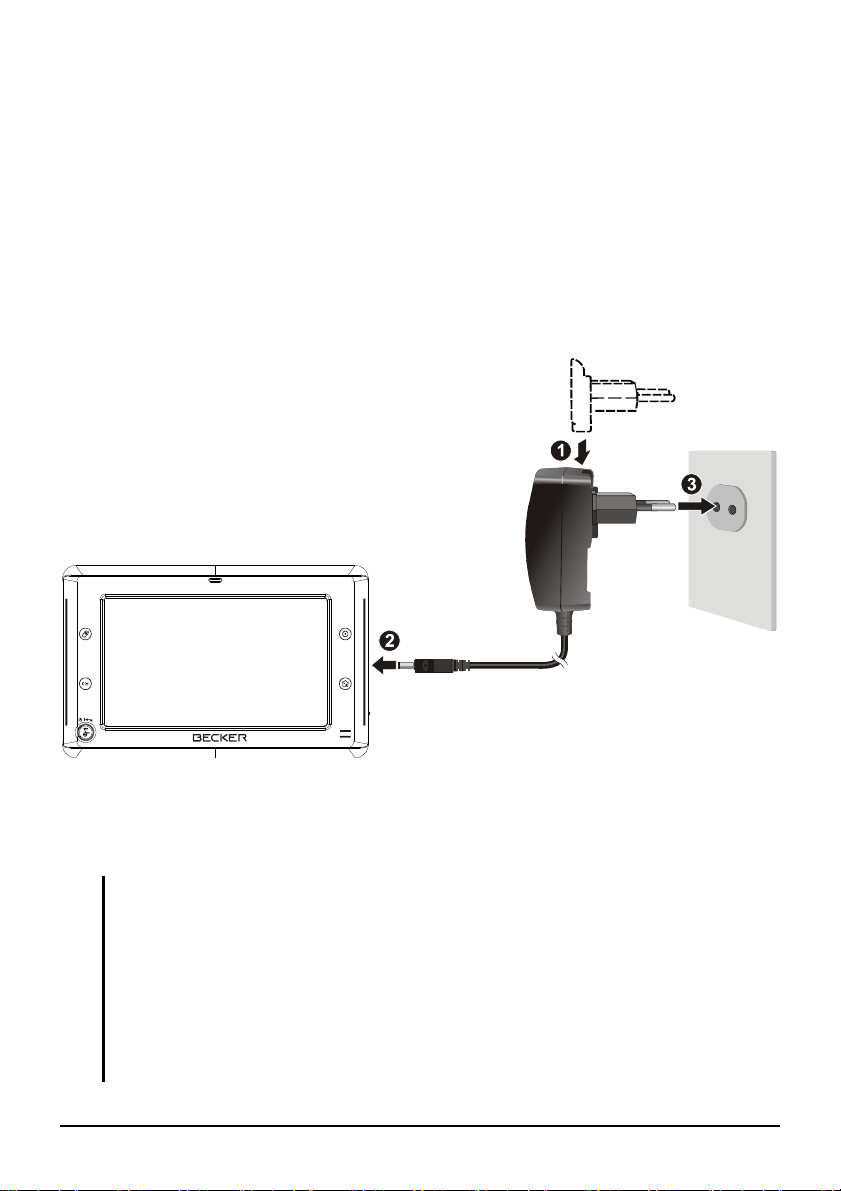
1.3 Connecting to AC Power and Charging the
Battery
When charging the battery for the very first time, you should charge it for at least
8 hours.
1. Slide and click the connector converter onto the AC adapter.
2. Connect the adapter cable to the bottom of your device.
3. Plug the AC adapter into a wall outlet.
4. The charge indicator glows amber when charging is in progress. Do not
disconnect your device from AC power until the battery is fully charged, the
charge indicator will turn green. This will take a couple of hours.
NOTE:
Do not immediately turn on your device after connecting the AC adapter to charge a
power-depleted battery. If you need to turn on the device again, wait for at least one
minute.
Depending on your region of purchase, the connector converter may not loo exactly the
same as the picture shown.
CAUTION: For optimal performance of the lithium battery:
Do not charge the battery where the temperature is high (e.g. in direct sunlight).
There is no need to fully discharge the battery before charging. You can charge the battery
before it is discharged.

7
When storing the product for a long period of time, be sure to fully charge the battery at
least once every two wee s. Over discharge of the battery can affect the charging
performance.
1.4 Using Your Device in a Vehicle
CAUTION:
Select an appropriate location for mounting the device in a vehicle. Never place the device
where the driver’s field of vision is bloc ed. Ma e sure that the GPS antenna has a clear
view of the s y.
If the car’s windshield is tinted with a reflective coating, an external antenna (optional) may
be needed to route the antenna to the top of the vehicle through a window. When closing
the window, be careful not to pinch the antenna cable.
Connecting the Car Charger
The car charger supplies power to your device when you are using the device in a
car.
CAUTION: To protect your device against sudden surges in current, connect the car charger
only after the car engine has been started.
1. Connect one end of the car charger to the power connector of the cradle.
2. Connect the other end to the cigarette lighter in the car to power and charge
your device. The indicator on the car charger lights in green to indicate that
power is being supplied to your device.

8
1.5 Operating Basics
Turning On and Off
Press and hold the power button for more than 3 seconds to turn on and off your
device.
When you press the power button to turn off the unit, your device actually enters
into a suspend state and the system stops operating.
Navigating on the Screen
To operate your device, touch the screen with your fingertip. You can perform the
following actions:

9
Tap
Touch the screen once with your fingertip to open items or select onscreen
buttons or options.
Drag
Hold your fingertip on the screen and drag up/down/left/right or across the
screen.
Tap and hold
Tap and hold your fingertip until an action is complete, or a result or menu is
shown.
1.6 Inserting a SD/MMC Card
Your device has a SD/MMC slot where you can insert an optional Secure Digital
or MultiMediaCard storage card. It supports up to 2GB storage card.
To use a SD/MMC card, insert it into the slot, with the connector pointing to the
slot and its label facing the front of the device.
To remove a card, first make sure that no application is accessing the card, then
slightly push the top edge of the card to release it and pull it out of the slot.
NOTE:
Ma e sure that no foreign objects enter the slot.
Keep a SD or MMC card in a well-protected box to avoid dust and humidity when you are
not using it.

10
1.7 Using the FM Transmitter
With the built-in FM transmitter of your device, you can output the sound to an
external FM radio. For example, when running the MP3 Player program, the FM
radio in your car (instead of the speaker of your device) plays the music.
Run MP3Player.exe
Launch Navigation application->enter into setting application->enter into FM
transmitter application->launch it
Save the frequency you need, such as 88MHz
Set the FM receiver in the car as the same frequency
Tap “play”, then FM transmitter will be open and the music will be heard by
FM receiver.
Tap “pause”, the music will be paused and the FM transmitter will be close,
there will be no music in FM receiver.
Tap “stop”, the music will be paused and the FM transmitter will be close,
there will be no music in FM receiver.
Tap “exit”, the MP3 player will exit and the FM transmitter will be close,
there will be no music in FM receiver.
Note:
FM transmitter is a wireless like as Bluetooth.

11
2 Connecting a Blutooth
Phone
2.1 General
BT-phones can only be paired and connected via the device. This process cannot
be started via the BT-phone. Only one phone can be connected at the same time.
Phone number download
When a phone is connected, the phone numbers saved on that phone’s SIM-card
are downloaded to the device. If technically possible, the numbers saved in the
phone’s internal phone book should also be downloaded. If possible, the phone
numbers downloaded from the last connected phone should be saved in the
device. If the same phone is connected again, this list of numbers should be
available immediately. There should be an automatic update of the saved list
based on any changes in the external phone’s phone book/SIM-card content (e.g.
user has added phone number on his phone – add it to list).
Last mode / auto-connect phone
If the device is switched on and BT is active, the first phone from the list of paired
devices will be connected. If that phone is not available, the next phone from the
list will be tried.
Quic access
The quick access shows the list of the last calls, including protected entries. The
last called number or received call is displayed at the top of the list. Up to 50
entries can be stored.

12
The quick access contains only numbers of calls that were accepted, missed or
dialled when handsfree was active. No call lists of connected BT-phones are
downloaded. If the number of a caller is nor known, “Unknown” is displayed.
Selecting an entry immediately dials that number (if a phone is ready).
2.2 Phone Main Menu
Dial number
The function allows the user to dial a number by using a keypad.
Table of contents


