Nisis G4 EASYPEN User manual

NISIS G4 Graphic Tablet Installation Guide Rev 1.4
MANUAL
Setting up your NISIS G4 EASYPEN Graphic Tablet
Welcome
Thank you and congratulations on your purchase of the NISIS G4 Graphic Tablet.
Introduction
The NISIS G4 Graphic Tablet provides an intuitive, cordless, Radio Frequency pen-type pointing device for use
with drawing, painting, graphics, CAD and photographic applications. NISIS Graphic Tablets also offer non-
mechanical and cordless, Radio Frequency mice. Having no moving parts, these mice do not suffer from the
frustrating problem that mechanical mice experience when the internal rollers become dirty, leading to the cursor
not moving when the mouse is moved.
The active area on the NISIS Graphics Tablets are covered with a transparent lift-up film so you can slide in
photographs or drawings and trace images with the pen. The pen can detect up to 512 levels of pressure which
can be used for many different effects, such as to vary the width of the line you draw, or the density of paint
coverage when using an air brush type tool.
Bundled with Handwriting recognition software, Annotation software for Microsoft Word, Signature verification
and encryption software and Art Dabbler, a powerful graphics package, NISIS Graphics Tablets offer the most
cost effective solution you will find in the market today.
Package Contents
Please check that your NISIS G4 Graphic Tablet package contains the following items. If you find any parts
missing, please contact your supplier immediately.
1. NISIS G4 Graphic Tablet
2. RF Pen with 2 spare nylon pen nibs*
3. RF Mouse
4. Serial COM port connector
5. Keyboard connector
6. Keyboard AT to PS/2 type converter
7. 9-pin to 25-pin serial port converter
8. 2 type AAA 1.5 Volt batteries
9. Installation CD and Application CD
10. Installation Guide (this document)

NISIS G4 Graphic Tablet Installation Guide Rev 1.4
* When removing the pen from its clear plastic bag, take care not to loose the two spare nylon pen tips which are
also in the same bag.
Minimum System Requirements
IBM compatible PC with serial port
Windows 95, 98, ME, NT4 or 2000 operating system
CD ROM Drive
AT or PS/2 Keyboard connector
* Not suitable for Laptop PCs–see the NISIS G3 Graphic Tablet Web page on the NISIS Web site
Checking for the latest Manuals and Software Drivers
NISIS continuously strives to improve its products and services, so manuals and software drivers are updated
frequently. Before you start the installation of this product, we strongly recommend you visit the NISIS web site
at nisis.comto see whether there is a later manual and later drivers for this product.
You will find the latest drivers and manuals under the Drivers & Manuals section on the web site. All new
manuals have a Revision No. so you can compare the Rev. No. of your manual with the latest Revision on the
web site.
Similarly, Drivers have Version Numbers so you cancheck to see whether you already have the latest Drivers
Version. At the moment, you can only check which version of drivers you have, after you have completed the
installation.
In Control Panel, double click on the “Tablets” icon and select the “About” tab. The Drivers version will be
displayed.
If the Drivers version number on your installation is earlier than the version on the NISIS web site, then you can
download the latest drivers and upgrade your installation.
Installation Instructions
IMPORTANT NOTES:
?? Please check that your PC meets the minimum system requirements before attempting to install your
NISIS Product.
?? Please take the time to follow these instructions very carefully. An extra few minutes that it takes to
ensure you follow these instructions precisely and completely, will help ensure the installation of
your NISIS product is successful. If you miss or ignore any of these instructions you may end up with
a partial or failed installation, and it can be very difficult to correct a partial or failed installation.
Background Tasks
Before installing any Programs, Drivers or Hardware, you should ensure that all other programs and background
tasks are closed. This applies to whatever Programs, Drivers or Hardware you are installing and is not specific to
NISIS products. To check what background tasks are running, hold the “Ctrl” and “Alt” keys down on your
keyboard while you press the “Delete” key once only.
Windows 95, 98 or ME
If you are running Windows 98, or ME, you should see a list of programs that are running in the background.
Windows 2000
If you are running Windows 2000, you should see a Windows Security window. Click on the Task Manager
button to see a list of programs that are running in the background.
Some of these programs or background tasks are necessary for Windows to function correctly, but most others
are background tasks such as mouse drivers, virus checkers and other communication programs, should be shut
down, temporarily, while you install new application programs, drivers or hardware.

NISIS G4 Graphic Tablet Installation Guide Rev 1.4
If you see "Explorer" listed, leave it displayed. If you see "Systray" listed, leave it displayed. All other tasks can
be ended.
You close down a Task by highlighting it, then clicking on the "End Task" button. Some tasks will end
immediately, while others may take some time before you see the screen confirming the task has ended.
Once all the tasks that you have chosen to close down, have ended, you can start the installation of your NISIS
product drivers.
When you restart your PC, all tasks that you ended, will start again as usual.
Don't forget that each time you restart your PC, background tasks are enabled again. So if you are installing
several programs, which require you to reboot your PC after each installation, you will need to temporarily end
each background task after every restart until you have completed all the installations.
Installing the G4 Graphic Tablet Drivers
Insert the Installation CD into your CD ROM Drive. The CD should automatically show the Installation screen.
If the CD does not autostart, then you can start the “Setup.exe” program manually by clicking on the Windows
“Start” button, select the “Run…” option, click on the “Browse…” button, and locate your CD ROM Drive
(usually drive “D”), and select the “Setup.exe” program, click on the “Open” button, and finally click on the
“OK” button.
Select “NISIS Tablet Driver” and follow the instructions on the screen.
If Windows shows a Digital Signature Not Found window, then select Yes and continue with the installation.
At the end of the installation, Windows will ask you to restart your PC.
Restart your PC.
You have now completed the installation of the G4 Graphic Tablet drivers.
Connecting the G4 Graphic Tablet to your PC
Ensure you have loaded the G4 Graphic Tablet Drivers BEFOREyou connect your Graphic Tablet to your PC.
Switch off your PC.
Identify the type of Keyboard socket you have on your PC.
PS/2 Keyboard socket is a Mini DIN plug about 9mm in diameter.
AT Keyboard socket is a 5 pin DIN plug about 13mm in diameter
If you have a PS/2 Keyboard connector
Plug the Keyboard AT to PS/2 type converter’s AT plug end into the AT type socket on the cable connected to
the Graphic Tablet.

NISIS G4 Graphic Tablet Installation Guide Rev 1.4
Plug your Keyboard PS/2 plug into the PS/2 type socket on the Keyboard ATto PS/2 type converter.
Plug the PS/2 type plug on the cable connected to the G4 Graphic Tablet, into the PS/2 Keyboard socket on the
back of your PC.
Now jump to the section headed “Connecting to the serial port”
If you have an AT Keyboard connector
Plug the Keyboard AT to PS/2 type converter’s PS/2 socket end into the PS/2 type plug on the cable connected
to the Graphic Tablet.
Plug your Keyboard AT plug into the AT type socket on the cable connected to the G4 Graphic Tablet.
Plug the AT type plug on the Keyboard AT to PS/2 type converter into the AT Keyboard socket on the back of
your PC.
Now jump to the section headed “Connecting to the serial port”
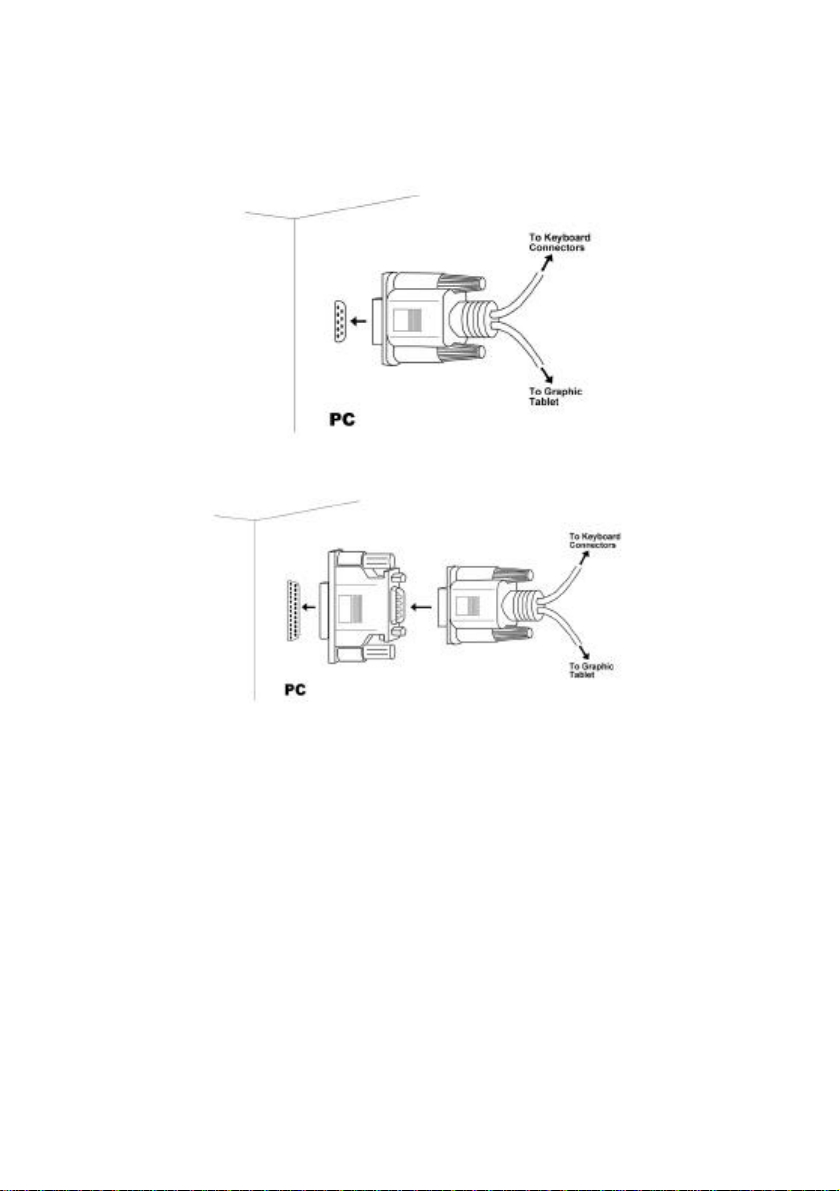
NISIS G4 Graphic Tablet Installation Guide Rev 1.4
Connecting to the serial port
Plug the 9-pin serial socket on the cable connected to the G4 Graphic Tablet, into the first free serial port on the
back of your PC. Choose serial COM port 1 if that is free, or serial COM port 2 if you are already using serial
COM port 1.
?? If your serial ports have 25-pin connectors, then use the enclosed 9-pin to 25-pin serial port converter.
Inserting Batteries into the RF pen and RF Mouse
The pen and mouse each use a single type AAA battery.
IMPORTANT NOTE: Ensure that you plug the battery in the correct direction so that the + positive connector
connects to the + connector in the mouse or pen.

NISIS G4 Graphic Tablet Installation Guide Rev 1.4
Installing the Mouse battery
Unclip the battery cover on the bottom of the mouse and check with the diagram in the battery holder to ensure
you insert the battery the correct way round. Replace the battery cover.
Installing the Pen battery
Unscrew the pen’s cover and with the pen nib pointing downwards, insert the battery with the + positive end
pointing downwards, i.e. towards the nib. Screw the pen cover back on, taking care not to over tighten, otherwise
the case may split
You can now switch on your PC.

NISIS G4 Graphic Tablet Installation Guide Rev 1.4
Installation of Application Software.
Don't forget that each time you restart your PC, background tasks are enabled again. So if you are installing
several programs, which require you to reboot your PC after each installation, you will need to temporarily end
each background task after every restart until you have completed all the installations.
Insert the Installation CD into your CD ROM Drive. The CD should automatically show the Installation screen.
If the CD does not autostart, then you can start the “Setup.exe” program manually by clicking on the Windows
“Start” button, select the “Run…” option, click on the “Browse…” button, and locate your CD ROM Drive
(usually drive “D”), and select the “Setup.exe” program, click on the “Open” button, and finally click on the
“OK” button.
Select the first application you wish to install, and follow the instructions on the screen.
You may be asked to enter a CD-Key No. You will find this number printed on the front of the CD, or on the CD
cover.
Repeat until you have installed all the applications you wish to install from the Installation CD.
Once you have installed the applications on the Installation CD, you can install the Corel Art Dabbler application
by inserting the Corel Art Dabbler Installation CD and following the instructions on the screen.
Application Manuals
You will find manuals that can be printed for each application on the Installation CDs.
Registering you NISIS G4 Graphic Tablet
Please register your NISIS G4 Graphic Tablet on-line by visiting the NISIS web site atnisis.com. You will be
issued with a NISIS Registration Number which you will need to quote to receive free technical support.
Please visit the NISIS web site and read the Frequently Asked Questions section covering your NISIS product.
There you will find useful Hints and Tips on how to get the very best out of your new device.
If you have problems with the installation of your NISIS G4 Graphic Tablet
If you have problems during the installation, please first of all, visit the Support pages on the NISIS web site at
nisis.com. Please check the Frequently Asked Questions (FAQs) which contain Hints and Tips on how to
overcome some of the more usual problems you may encounter during installation and operation of the product.
If you are still unable to find a solution, then please complete and submit the NISIS Technical Support
Questionnaire on the NISIS web site. You will then be issued a case number automatically. We shall then
contact you with our suggestions, as soon as possible.
IMPORTANT NOTE: We will need you to complete and submit the NISIS Technical Support Questionnaire
on the NISIS web site, to supply our technical staff with enough information about your system set up, to
determine the best remedy.
Contact details
Web site: nisis.com
Telephone: 0845 458 8750 at local rates from within the UK or
+44 845 458 8750 from outside the UK
* Please complete and submit the NISIS Technical Support Questionnaire, before calling
the NISIS Technical support department.
Email: [email protected]
Post: NISIS Technology
P.O.Box 155
Tonbridge
Kent
TN9 1WG
United Kingdom

NISIS G4 Graphic Tablet Installation Guide Rev 1.4
For more products and full information visit our web site at:-
nisis.com
NISIS Graphic Tablets Frequently Asked Questions (FAQ)
QUESTIONS ANSWERS
When using the NISIS G4 Graphic Tablet with the
bundled software it comes with, the Pressure
sensitivity works fine, but it does not appear to work
when using it with Paintshop Pro v6.02. What am I
doing wrong?
The most likely problem is that the "Tools Options" in
the Paintshop Pro application, have not been set up
correctly. If you select the "Tools Options" window,
you need to "tick" the appropriate boxes next to :-
"Pressure Sensitive Tablet-Vary opacity, Vary color,
and/or Vary width".
My word processor is Microsoft's Word 2000. When
trying to load the Pensoft Application, Word97
Annotator, I get an error message saying "Can not find
Word97 in your computer, Word Annotator would not
work". Do you have a version that works with Word
2000 ?
Actually, despite the error message, if you continue
with the installation, you will find that this application
works perfectly well with Word 2000. We will try to fix
this misleading error message in the next release of the
software.
I am finding it difficult to understand how to connect
my G2/G4 Graphics Tablet to my PC. Do you have
any diagrams to help me, please ?
Yes. The latest G2 and G4 Installation Guides have
several diagrams that will help you with your
installation. You can read and download the manuals by
clicking on the "Manuals" button under the main index
on the NISIS web site.
Please explain what I can do with the Function keys at
the top of the Graphics tablet. At the moment, if the particular application
programming you are using has enabled the Function
key "F1" to perform a particular function, such as
launch a Help file, then by pressing the pen onto the F1
area on the tablet, you can launch the applications Help
file.
None of the other Function keys are enabled on the
current version of the tablet drivers, but later versions of
tablet drivers may enable these function keys.
Please visit the NISIS web site regularly, to check for
later drivers.
What is the significance of the clear lift-up film
covering the active area of the Graphic Tablets? You can place an image or photograph under this clear
film, and then use the pen to trace around the object you
wish to draw.
Where can I find more details on how to use the
Pensoft applications? Visit the FAQs section on the NISIS Web site.
How do I install a new pen nib? If your nylon pen nib wears out, you can replace it with
one of the two new pen nibs that came with the Graphic
Tablet by gripping the old pen nib with a pair of pliers
or other gripping tool, and gently pull the nib out of the
pen. You install the new pen nib by pushing it into the
pen.

NISIS G4 Graphic Tablet Installation Guide Rev 1.4
I am having problems
installing the software
programs that came with the
Graphic Tablet. Have you
any suggestions, please?
Before you start installing any newdrivers or application programs, it is strongly
recommended that you close all application programs, before attempting to install
the new application program.
To see what applications are currently running, hold down the "Ctrl" and "Alt"
keys on the leftof your Keyboard, then press down once only, the "Delete" key.
For Windows 95, 98, and ME, you should see a list of programs that are running
in the background.
For Windows 2000, you will see a Windows Security window; click on the Task
Manager button.
Some of these programs are necessary for Windows but most others are
background tasks such as mouse drivers, virus checkers and other communication
programs, which can be temporarily shut down while you install new application
programs.
You will need to make the decision on which tasks can be temporarily shut down.
Most applications listed will be recognised by the name of the background task.
For example, "Touchmgr" shows that the Keyboard Touch Manager is running.
This can be temporarily shut down. ONLY shut down applications you recognise
as not being necessary for Windows.
The programs you temporarily shut down will restart when you next restart your
PC.
Don't forget that each time you restart your PC, background tasks are enabled
again. So if you are installing several programs, which require you to reboot your
PC after each installation, you will need to temporarily end each background task
after every restart until you have completed all the installations.
Can I use a NISIS Graphic
Tablet on my Laptop PC? The NISIS G2 and G4 Graphics Tablets are not compatible with Laptop PCs
because both of these Tablets rely upon taking power from the PCs Keyboard
socket (NOT Mouse socket). However, if your Laptop has a USB port, and you
are running Windows 98, ME or 2000 and in all other areas your Laptop meets or
exceeds the minimum requirements as specified on the G3 Product Web page,
you should be able to use the NISIS G3 Graphic Tablet.
The Graphics Tablet set up
screen mentions Absolute
and Relative Tracking
modes. What does this
mean?
Absolute tracking mode means that the Tablet corresponds precisely with your
PC monitor screen. So when you touch the pen on the Tablet in the top left
corner, the cursor on the screen moves to the top left corner. If the pen is then
touched on the middle of the Tablet, then the cursor moves to the middle of the
screen.
By default, the mouse uses Relative tracking.
Relative tracking is the same as your original mouse. When you place your
Graphics Tablet RF mouse on the Tablet, the cursor remains in the same position
it was in before you lowered the mouse on to the Tablet. As soon as you begin to
move the mouse in any direction, the cursor on the screen moves in the same
direction.

NISIS G4 Graphic Tablet Installation Guide Rev 1.4
Since installing my NISIS
Graphics Tablet, my PC fails to
start. When I disconnect the
Tablet, the computer starts up
normally. Have you any
suggestions please?
The most likely reason for this problem is related to your computer power
supply. Most of us are now connecting more and more devices to our
computers; Scanners, Digital Cameras, Graphics Tablets, Modems, Speakers,
black and white Printers, colour Printers, musical Keyboards, Mice etc.
Most of these devices draw some power from your PC. Your computer Power
Supply will automatically cut out when too much current is being drawn from
it.
One method of checking if this is the problem you are experiencing, is to
disconnect all unnecessary external devices, other than your Graphics Tablet.
If your computer boots up successfully, you can then reconnect each external
device, one at a time, rebooting after each new connection. If you PC fails to
start after you have reconnected all your external devices, then it is more than
likely, your computer Power Supply is not capable of supporting all your
devices.
Most computer Power supplies are between 200-250 Watts. The power rating
is usually on a sticker on the Power Supply. You can purchase a more
powerful Power Supply, say 300 Watts, from most PC retailers.
This manual suits for next models
3
Table of contents


