Harol TUCAN 065842 User guide

TUCAN
MONTAGE HANDLEIDING
NOTICE DE MONTAGE
MOUNTING INSTRUCTION
MONTAGE ANWEISUNG
Artikelnummer: 065842
ZONWERING
PROTECTION SOLAIRE
SUN PROTECTION
SONNENSCHUTZ
ROLLUIKEN
VOLETS
SHUTTERS
ROLLLÄDEN

MONTAGE - MOUNTING TUCAN
05/2023 | 2
INHOUDSOPGAVE
1. ALGEMEEN - GÉNÉRALITÉS - GENERAL - ALLGEMEIN 3
2. INFO 4
3. MONTAGE TYPES - TYPES DE MONTAGE - MOUNTING TYPES - MONTAGETYP 6
4. AFMETINGEN - DIMENSIONS - ABMESSUNGEN 8
5. MONTAGE/ MOUNTING TYPE 1 - TYPE 2 10
ELEKTRISCHE BEDIENING / COMMANDE ÉLECTRIQUE / MOTOR OPERATION / ELEKTRISCHER ANTRIEB
6. MONTAGE/ MOUNTING TYPE 1 - TYPE 2 18
HANDBEDIENING / CONTRÔLE MANIVELLE / CRANK HANDLE OPERATION / KURBELBEDIENUNG
7. MONTAGE/ MOUNTING TYPE 3 -TYPE 4 21
ELEKTRISCHE BEDIENING / COMMANDE ÉLECTRIQUE / MOTOR OPERATION / ELEKTRISCHER ANTRIEB
8. MONTAGE/ MOUNTING TYPE 3 -TYPE 4 26
ELEKTRISCHE BEDIENING / COMMANDE ÉLECTRIQUE / MOTOR OPERATION / ELEKTRISCHER ANTRIEB
9. TECHN. TEKENINGEN - DESSINS TECHN. - TECHN. DRAWINGS - TECHN. ZEICHNUNGEN 29
10. F.A.Q 31
11. ELECTRISCHE SCHEMA’S - SCHEMAS ELECTRIQUE - ELECTRICAL SCHEMES - 34
ELECTRISCHES SCHEMAS
Harol behoudt zich het recht toe productwijzigingen door te voeren zonder voorafgaande
verwittiging.

MONTAGE - MOUNTING TUCAN
05/2023 | 3
Beste klant,
dank u voor uw keuze van een HAROL
overkapping “TUCAN”.
Onze onderneming heeft ervoor gekozen
om te investeren in kwaliteit en innovatie,
door zowel de materialen als de produc-
tieprocessen te selecteren en te perfecti-
oneren.
OPGELET: Leest u, voordat u de zonwe-
ring gebruikt, aandachtig alle waarschu-
wingen en instructies in deze handleiding
en in de handleiding met gebruiksinstruc-
ties door. Deze handleidingen zijn onder-
deel van het product en moeten voor
toekomstig gebruik bewaard en altijd ter
beschikking worden gehouden, zolang de
zonwering niet wordt afgedankt.
Dear Customer,
thanks for having chosen a HAROL cover
“TUCAN”.
Our company has been designing and
producing sun awnings since 1960. since
our very beginning we have chosen to
invest on quality and innovation, selecting
and improving both the materials used
and the productive processes.
WARNING: before using the awning, read
carefully this instructions manual and also
the one called“Instructions Manual” .
This manuals are part of the product and
must be properly stored for any future
need until the awning disposal.
Cher Client, merci d’avoir choisi une
structure HAROL
“TUCAN”.
Notre société conçoit et produit des stores
pare-soleil depuis 1960 ; dès le départ,
nous avons choisi d’investir sur la qualité
et sur l’innovation, en sélectionnant et en
perfectionnant tant les matériaux que les
processus de fabrication.
ATTENTION : avant d’utiliser le store, lire
attentivement tous les avertissements et
les instructions gurant dans ce manuel et
dans le manuel“Manuel d’utilisation.”
Ces manuels font partie intégrante du
produit et ils doivent être conservés et
être toujours à disposition pour toutes
consultations futures, jusqu’à l’élimination
du store.
Sehr geehrter Kunde, vielen Dank für die
Wahl eine HAROL Abdeckung“TUCAN”.
Unsere Firma entwirft und produziert
Markisen seit 1960; vom Anfang an haben
wir gewählt in Qualität und Innovation
zu investieren, indem die Materialien
wie auch die Produktionsvorgänge
ausgewählt und verbessert wurden.
ACHTUNG: vor der Markisenbenutzung
bitte alle Hinweise und Anleitungen in
diesem Handbuch und im Handbuch
“Bedienungsanleitung”sorgfältig lesen.
Diese Handbücher begleiten das Produkt
und müssen sorgfältig aufbewahrt
werden um für jede weitere Information
gribereit zu bleiben, bis die Markise
entsorgt wird.
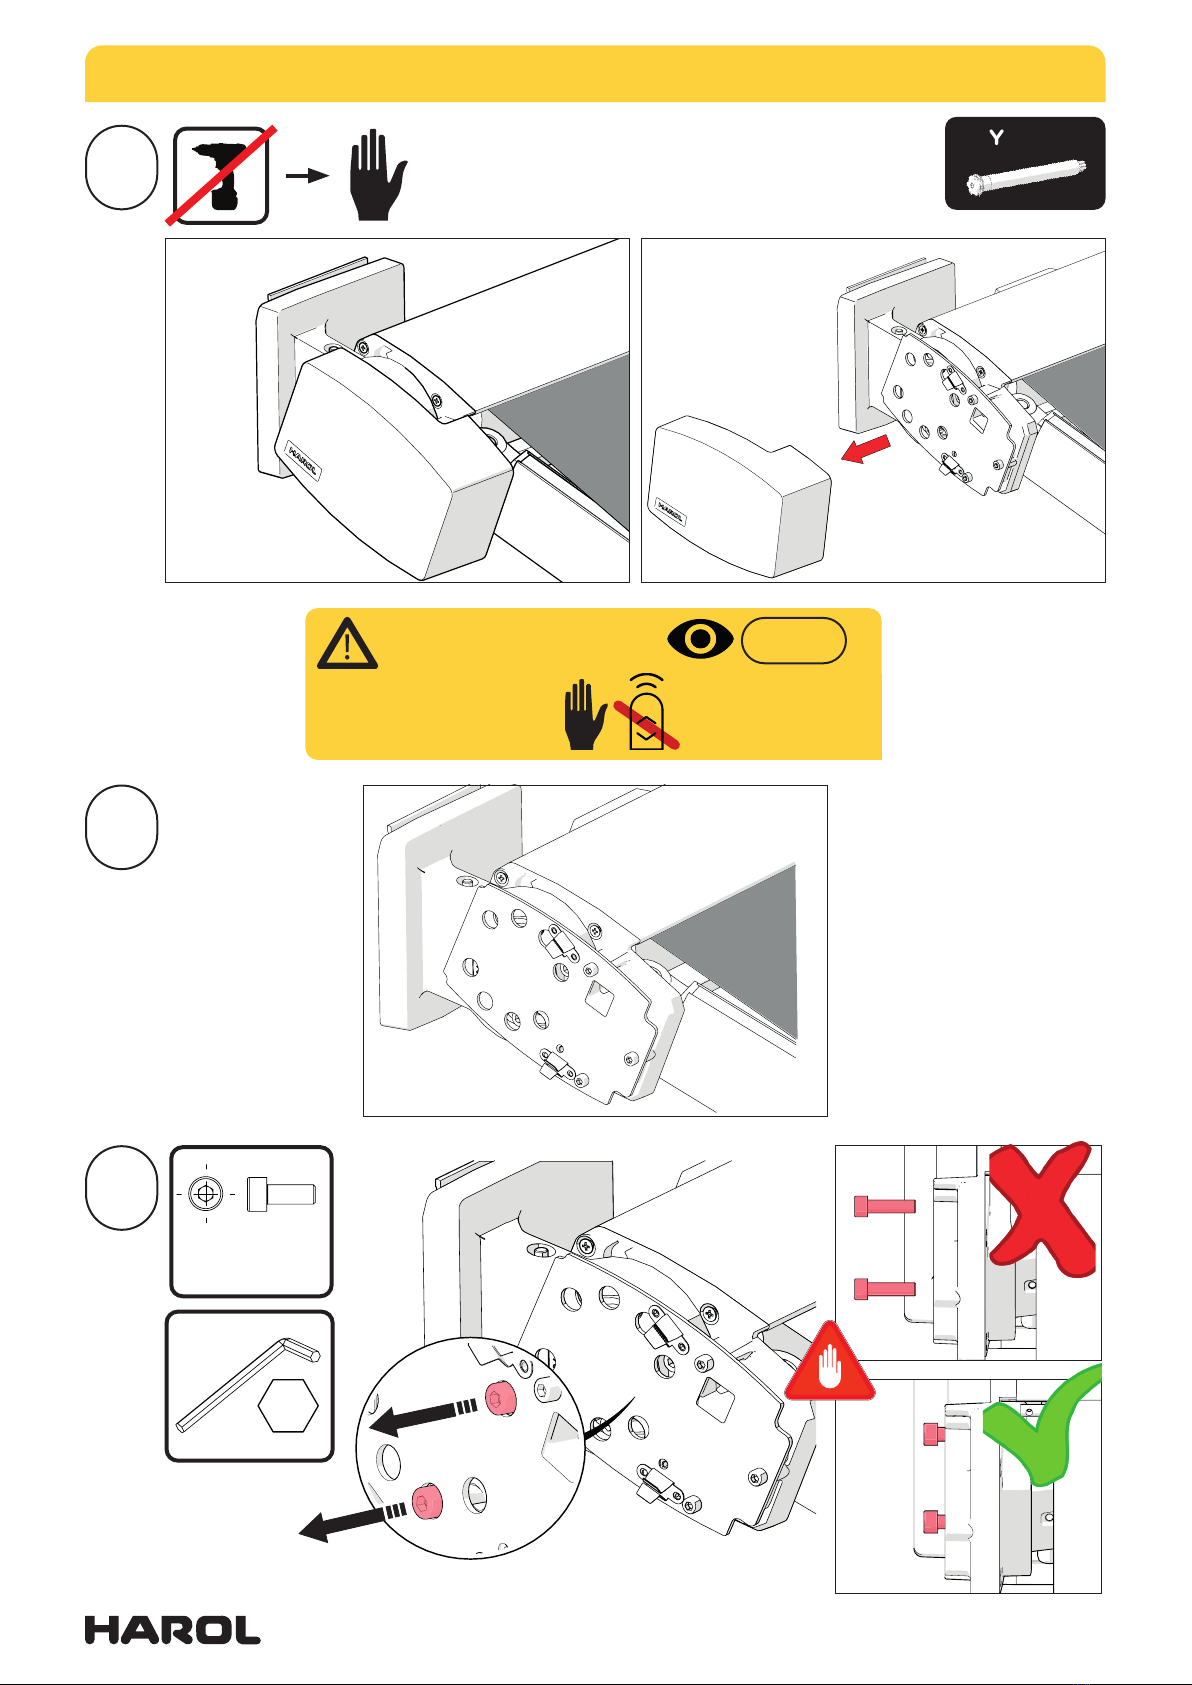
Algemene informatie
Opmerkingen
NEDERLANDS ENGLISH FRANÇAIS DEUTSCH
General Information
Warnings
Informations Générales
Avertissements
Allgemeine Hinweise
Anmerkung
De installatie moet worden uitge-
voerd door gekwaliceerd personeel in
overeenstemming met de IEC-normen
en de nationale bepalingen inzake civiele
elektrische installaties.
Raadpleeg ook de technische che
! Lees deze handleiding vooraf zorgvuldig
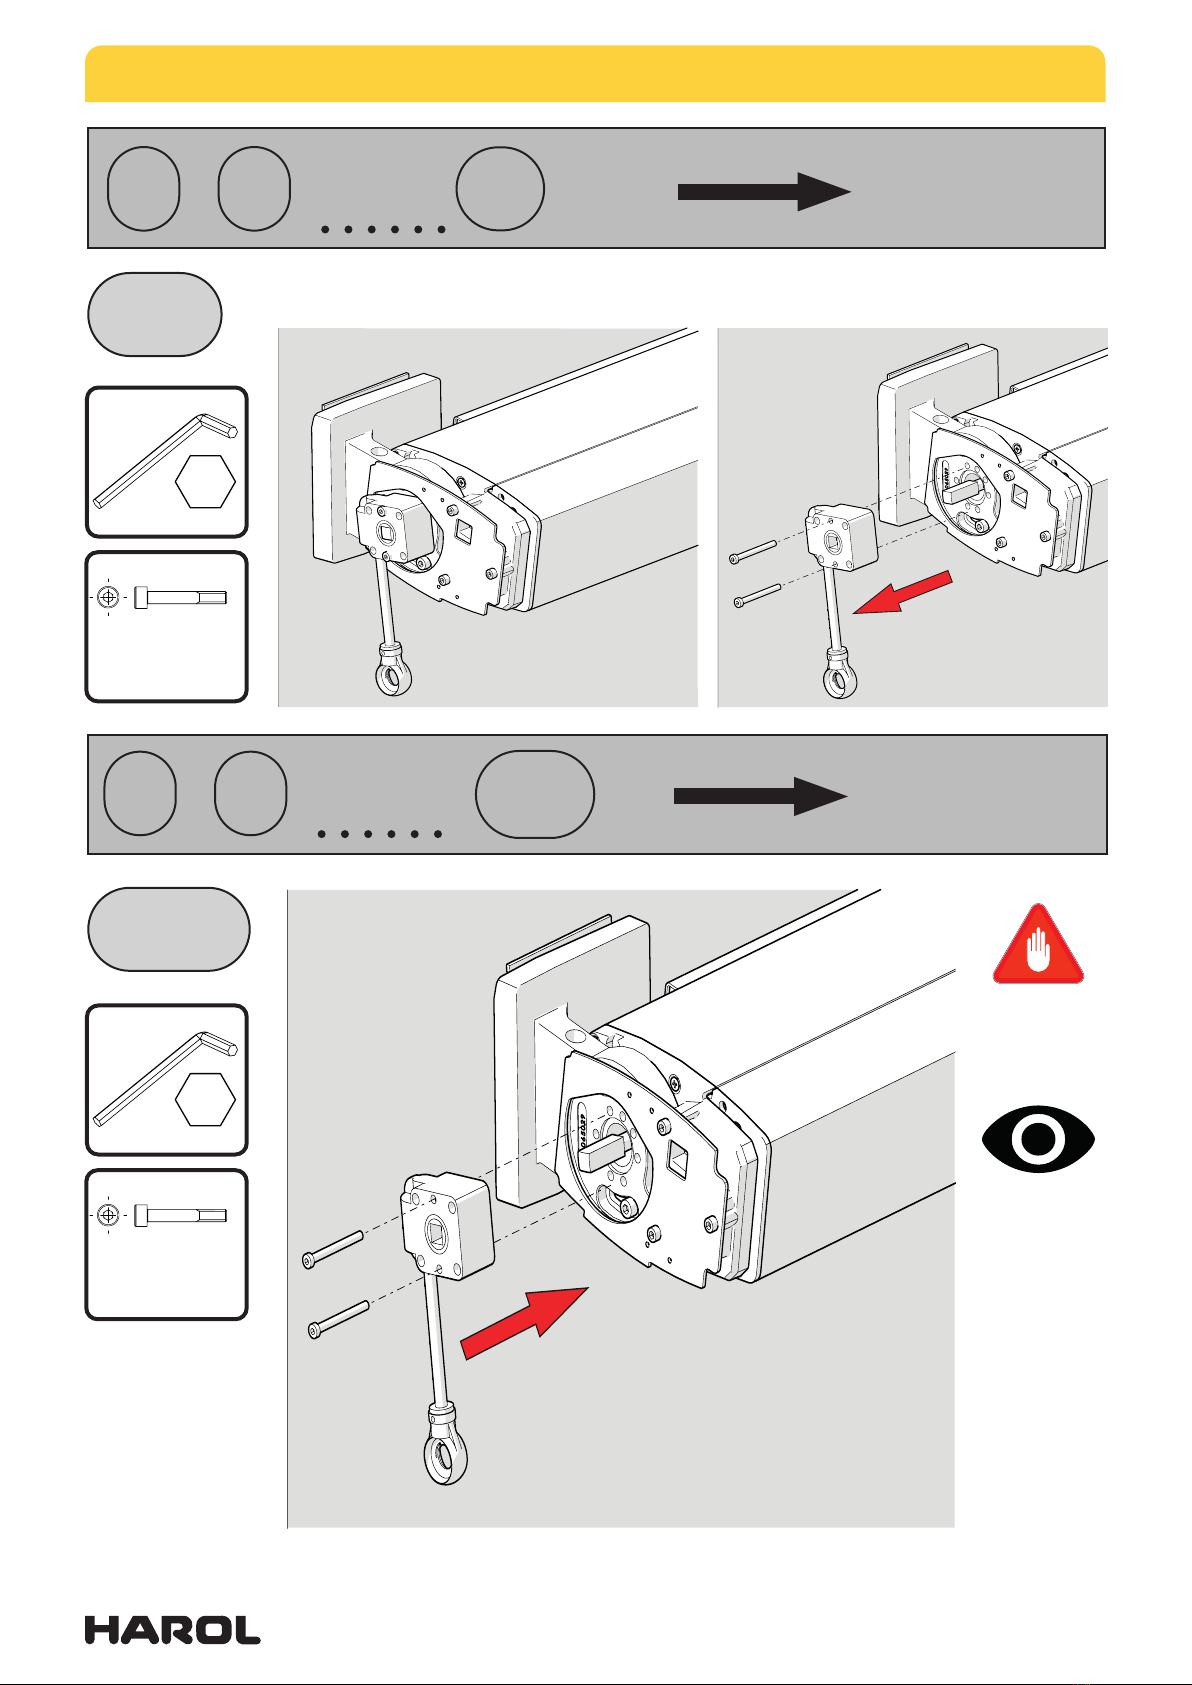
door.
! Door het opspannen van de veren
ontstaan er grote krachten. Ga voorzichtig
te werk. Zorg dat u stevig staat.
! Zorg voor een montageruimte met
voldoende licht. Verwijder obstakels
en vuil. Zorg ervoor dat er geen andere
personen dan monteurs aanwezig zijn.
Onbevoegden kunnen in de weg lopen of
gevaar lopen tijdens de montage.
Dit symbool duidt op mogelijk
gevaar voor personen of
schade aan het product.
Dit symbool geeft“Opgelet”aan.
Dit symbool geeft het gebruik
van kracht aan om de aangege-
ven werkzaamheid te verrichten.
Wanneer u elektrische schroe-
vendraaiers gebruikt, stelt u
dan de juiste koppelwaarde in.
Dit symbool geeft aan dat er een
visuele controle dient uitgevoerd
te worden
De fabrikant is niet aansprakelijk voor
eventuele onjuistheden te wijten aan
druk- fouten die in deze handleiding
kunnen aanwezig zijn. Hij behoudt zich
het recht voor om nodige of voor de
gebruiker nuttige wijzigingen aan zijn
producten door te voeren, zonder afbreuk
te doen aan de functionaliteit en de
veiligheid.
Geen aanpassingen aan design en con-
guratie zonder consultatie van fabricant.
De gebruikershandleiding moet overhan-
digd worden aan de eindgebruiker.
Installation must be carried out by quali-
ed personnel in compliance with EN and
local safety regulations relative to domes-
tic electrical systems.
See also product technical data document.
! Before you start ,please do read these
instructions thoroughly.
! The tightening of springs creates impor-
tant powers. Be very careful and make
sure of a solid footing whilst operating.!
Provide sucent light in the tting area.
Dispose of obtsacles and dirt. Make sure
that, except for the tters, no other people
areinthe tting area. Unauthorized people
might be in the way or at risk themselves.
This symbol indicates the
possibility of injury to persons
or damage to the product.
This symbol means“Warning”.
This symbol means to use force
during the shown operation.
Using electric screwdri-
vers set the correct torque
value.
This symbol means the
need of a visual control.
The manufacturer accepts no liability for
any inaccuracies or printing errors that
may be contained in this manual. The
manufacturer reserves the right to intro-
duce any modications to the product
that are considered necessary or in the
interests of the user and which do not
alter the essential operational and safety
characteristics of the appliance.
No modication of the design or con-
guartion without consulting the manufac-
terer.
The instruction of use shall be provided to
the end user.
L’installation doit être eectuée par du
personnel qualié conformément aux
normes NF et aux dispositions nationales
relatives aux installations électriques civiles.
Voir aussi la che technique
! Commencez par lire attentivement cette
notice!
! La tension des ressorts crée une force
importante. Procédez avec précaution.
Positionnez-vous de manière stable.
! Veillez à ce que le lieu de montage soit
susamment éclairé. Débarrassez-vous
des obstacles et des crasses. Assurez-
vous qu’il n’y a personne d’autre que
les monteurs. Des personnes incom-
pétentes pourraient vous gêner ou
courir un danger pendant le montage.
Ce symbole indique un risque
de danger pour les personnes
ou de dommage à le produit.
Ce symbole indique: «Attention».
Cesymbolevousindiqued’utiliser
de la force au coursde l’opération.
Si on utilise un visseuse électri-
que il faut dénir la valeur de
couple correcte pour le serrage.
Ce symbole vous indique qu’il
faut éectuer un controle visuel.
Le Fabricant décline toute responsabi-
lité pour les éventuelles inexactitudes
imputables à des erreurs d’impression
ou de transcription contenues dans cette
notice. Il se réserve la faculté d’apporter à
ses produits toutes les modications qu’il
estime nécessaires au utiles, y compris
dans l’intérêt des utilisateurs, sans
modier leurs caractéristiques essentielles
de fonctionnalité et sécurité.
Aucune modication de conception ou
de conguration sans consultation du
fabricant.
L’instruction d’utilisation doit être fournie
à l’utilisateur nal.
Die Installation ist von Fachpersonal und
unter Beachtung der IECBestimmungen
und der örtlichen Vorschriften bezüglich
elektrischer Anlagen auszuführen.
Siehe auch die Technische Angaben.
! Lesen Sie die Anleitung vor der Montage
sorgfältig durch !
! Durch das Spannen der Federn entste-
hen grosse Kräfte. Gehen Sie bitte vorsich-
tig vor und sorgen Sie dafür, dass Sie einen
festen Stand haben !
! Sorgen Sie für ausreichend Licht
auf der Montageäche. Entfer-
nen Sie Hindernisse und Abfall.
Dieses Symbol weist auf eine
mögliche Gefahr für Personen
bzw. Schäden am Produkt.
Dieses Symbol steht für“Vorsicht!”
Dieses Symbol bedeutet,
Kraftanwendun
g bei der Operati-
onsdur
chführung
.
Wenn Sie Elektrische Schrau-
ber benutzen, achten Sie bitte
auf den korrekte Drehmoment.
Dieses Symbol bedeutet, dass ein
visuell Steuerung angewendet
werden muss.
Für Unrichtigkeiten in diesem Handbuch,
die auf Druck- oder Abschreibfehler
zurückzuführen sind, übernimmt der
Hersteller keine Haftung. Der Hersteller
behält sich das Recht vor, alle für notwen-
dig erachteten bzw. im Interesse der
Abnehmer liegenden Änderungen an
seinen Produkten vorzunehmen, ohne
jedoch deren wesentliche Funktions- und
Sicher-heitseigenschaften zu beeinträch-
tigen.
Keine Änderung der Gestaltung oder
Konguration der Ausrüstung ohne
Rücksprache mit dem Hersteller.
Die Gebrauchsanleitung für den Endnut-
zer bereitzustellen ist.
MONTAGE - MOUNTING TUCAN
05/2023 | 4
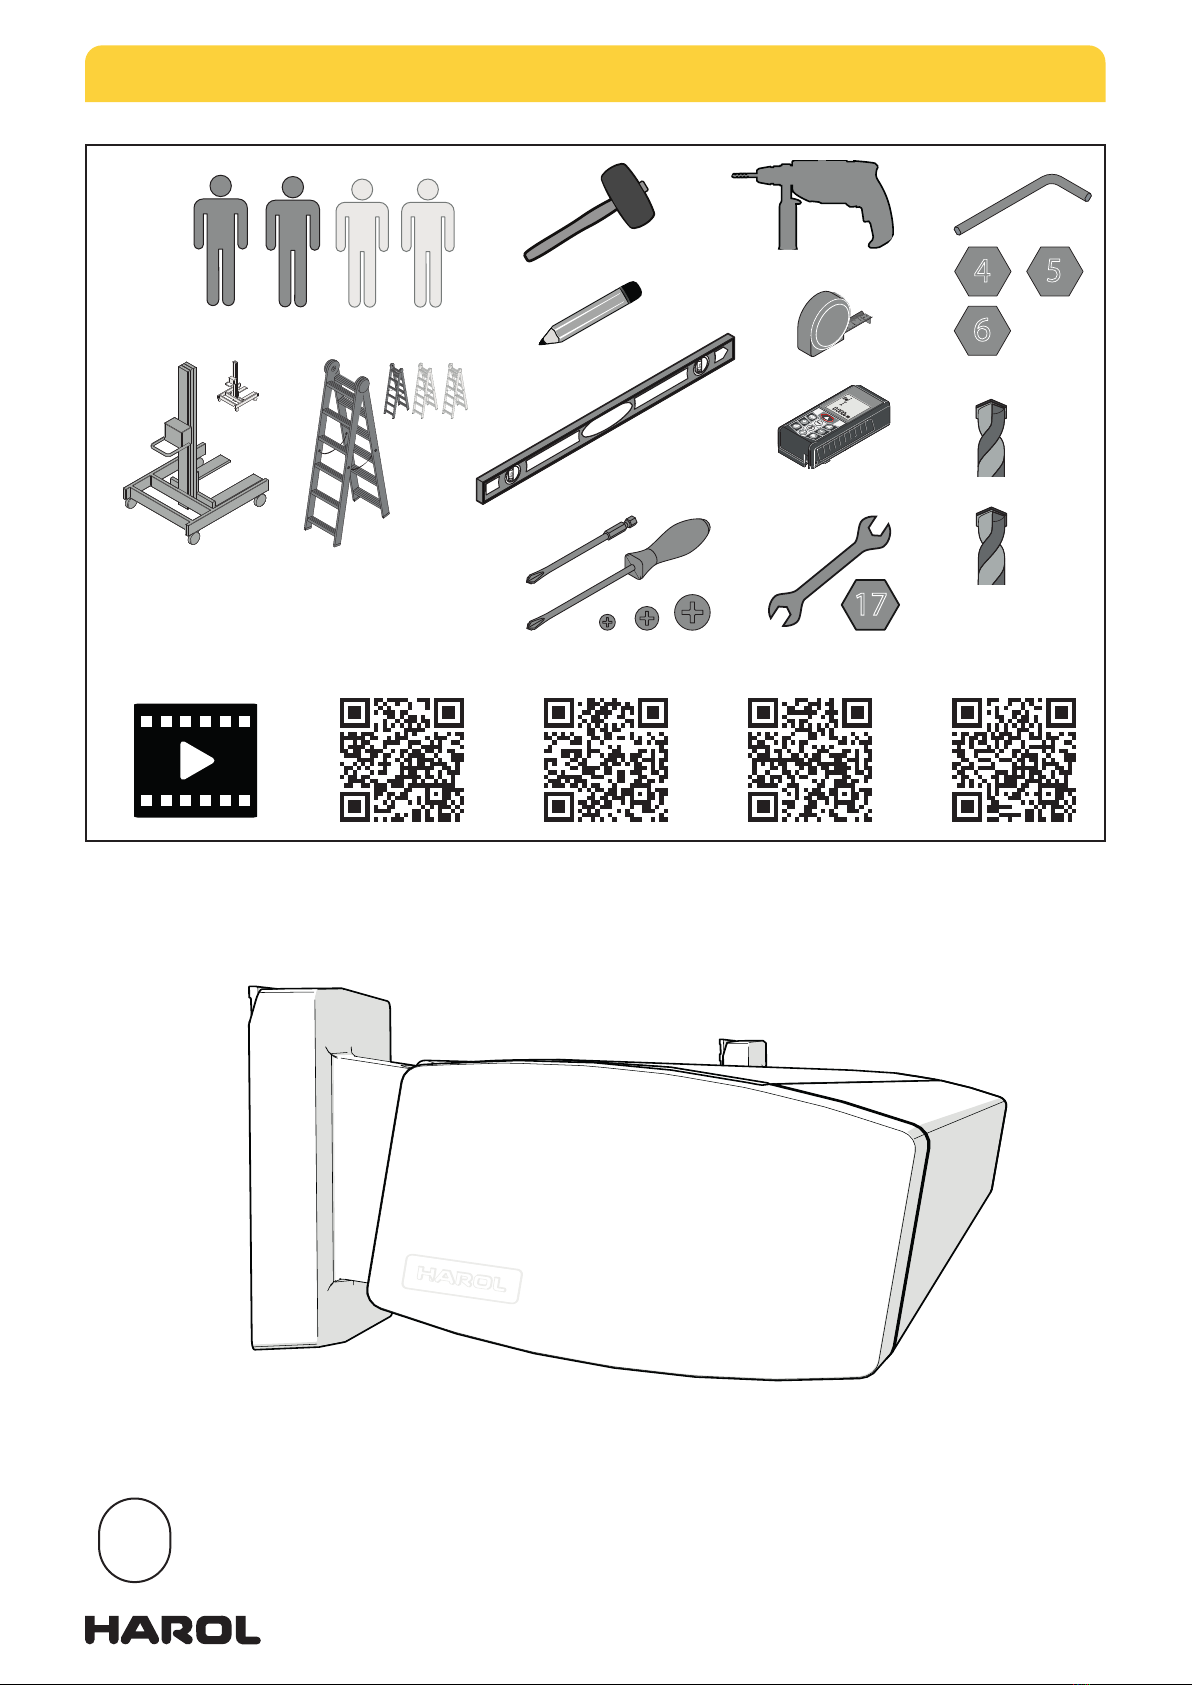
xMONTAGESTAPPEN
ETAPPES DE MONTAGE
MOUNTING STEPS
MONTAGESCHRITTEN
5
4
6
1
2
3
4
5
Ø12
LASER
min.
17
MONTAGE VIDEO
VIDEO DE MONTAGE
MOUNTING VIDEO
MONTAGE VIDEO NL FR EN DE
Ø16
CHEMISCH VERANKEREN
ANCRAGE CHIMIQUE
CHEMICAL ANCHORING
CHEMISCHE VERANKERUNG

MONTAGE - MOUNTING TUCAN
05/2023 | 5
TUCAN
BREEDTE
LARGEUR
WIDTH
BREITE
B
ELEKTRISCHE BEDIENING /
COMMANDE ÉLECTRIQUE
/ MOTOR OPERATION /
ELEKTRISCHER ANTRIEB
HANDBEDIENING / CON-
TRÔLE MANIVELLE /
CRANK HANDLE OPERATI-
ON / KURBELBEDIENUNG
UITVAL
PROFONDEUR
SLOPE
AUSFALL
U
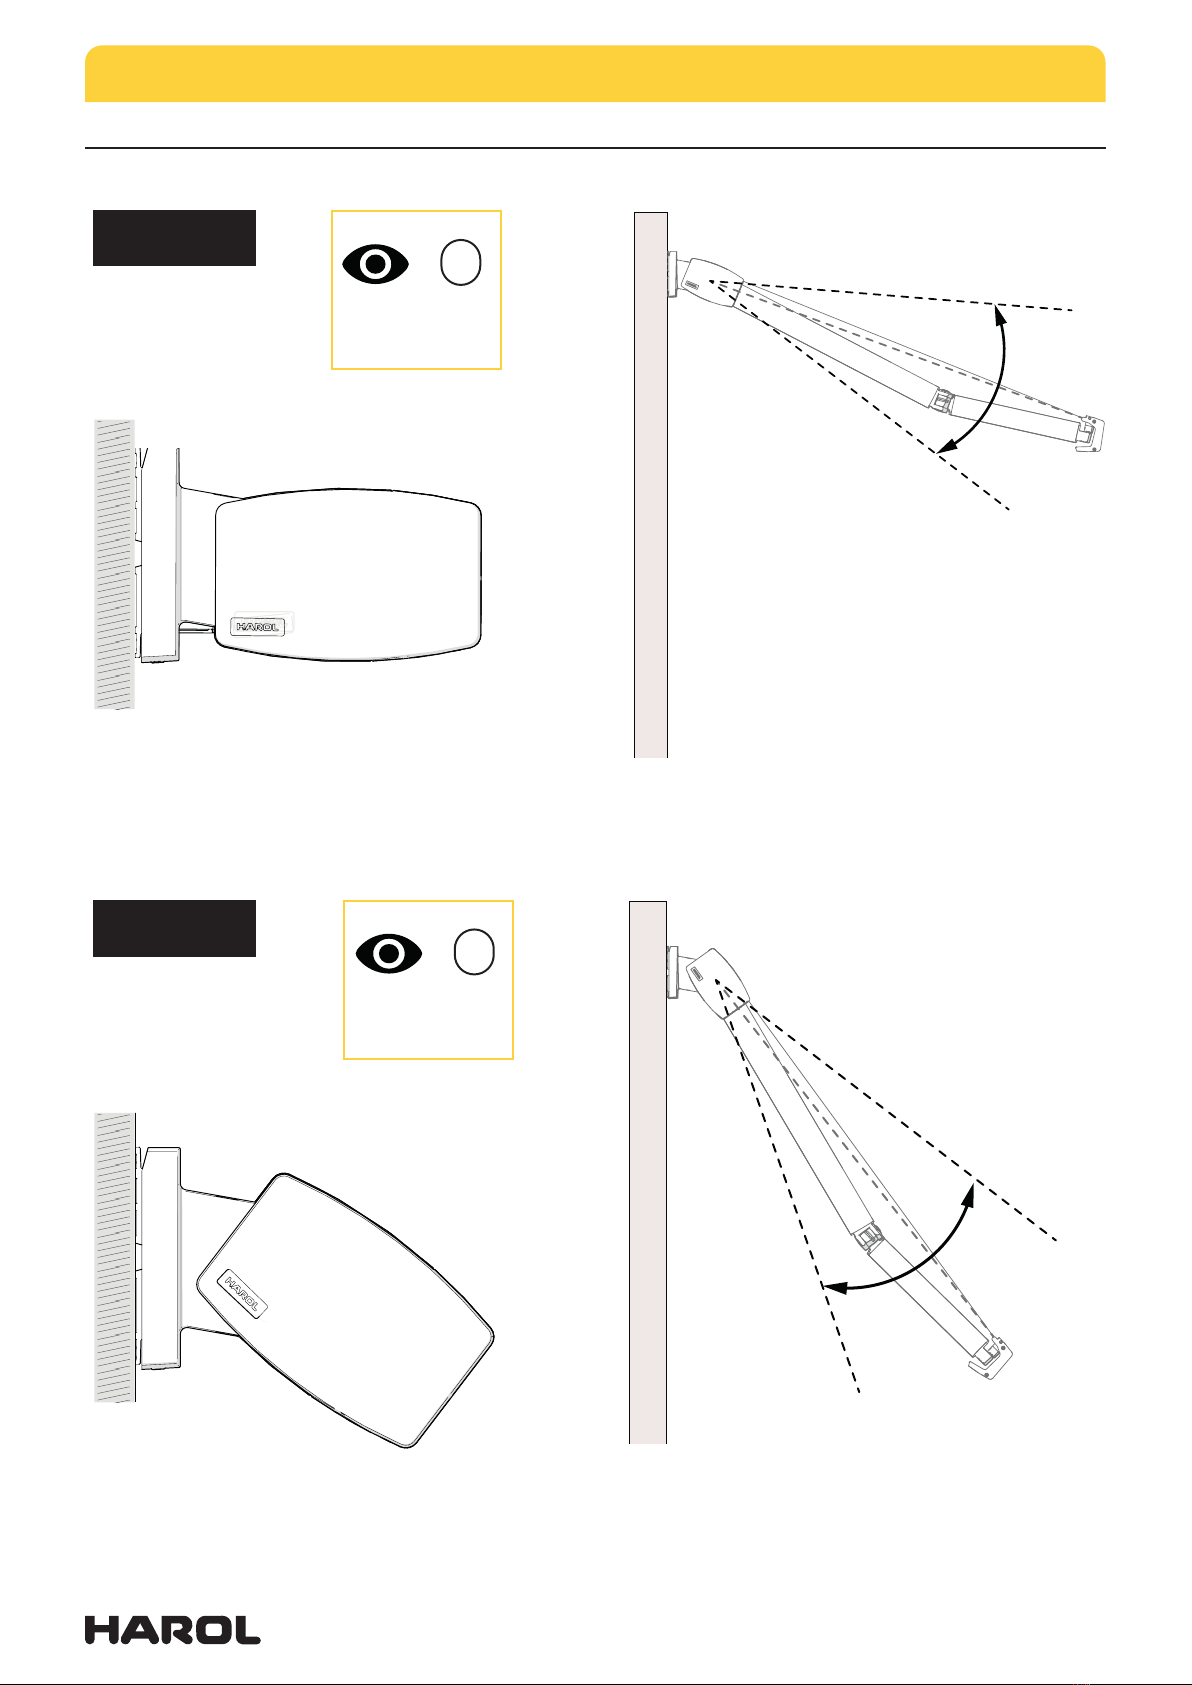
iNSTELLINGSHOEK - ANGLE D’INCLINAISON
ANGLE OF DISPLACEMENT - NEIGUNGSWINKEL
MONTAGE - MOUNTING TUCAN
05/2023 | 6
MONTAGE TYPES - TYPES DE MONTAGE - MOUNTING TYPES - MONTAGETYP
TYPE 2
MUURMONTAGE
MONTAGE MURAL
WALL MOUNTING
MAUER MONTAGE
MONTAGE - MOUNTING
1
zie p.10
voir p.10
see p.10
sehen p.10
TYPE 1
MUURMONTAGE
MONTAGE MURAL
WALL MOUNTING
MAUER MONTAGE
MONTAGE - MOUNTING
1
zie p.10
voir p.10
see p.10
sehen p.10
instellingshoek - angle d’inclinaison
angle of displacement - Neigungswinkel
5° - 38°
instellingshoek - angle d’inclinaison
angle of displacement - Neigungswinkel
38° - 76°

MONTAGE - MOUNTING TUCAN
05/2023 | 7
TYPE 3
PLAFONDMONTAGE
MONTAGE PLAFOND
CEILING MOUNTING
MONTAGE AN DER DECKE
MONTAGE - MOUNTING
1
zie p.18
voir p.18
see p.18
sehen p.18
TYPE 4
PLAFONDMONTAGE
MONTAGE PLAFOND
CEILING MOUNTING
MONTAGE AN DER DECKE
MONTAGE - MOUNTING
1
zie p.18
voir p.18
see p.18
sehen p.18
instellingshoek - angle d’inclinaison
angle of displacement - Neigungswinkel
14° - 52°
instellingshoek - angle d’inclinaison
angle of displacement - Neigungswinkel
52° - 90°
MONTAGE - MOUNTING TUCAN
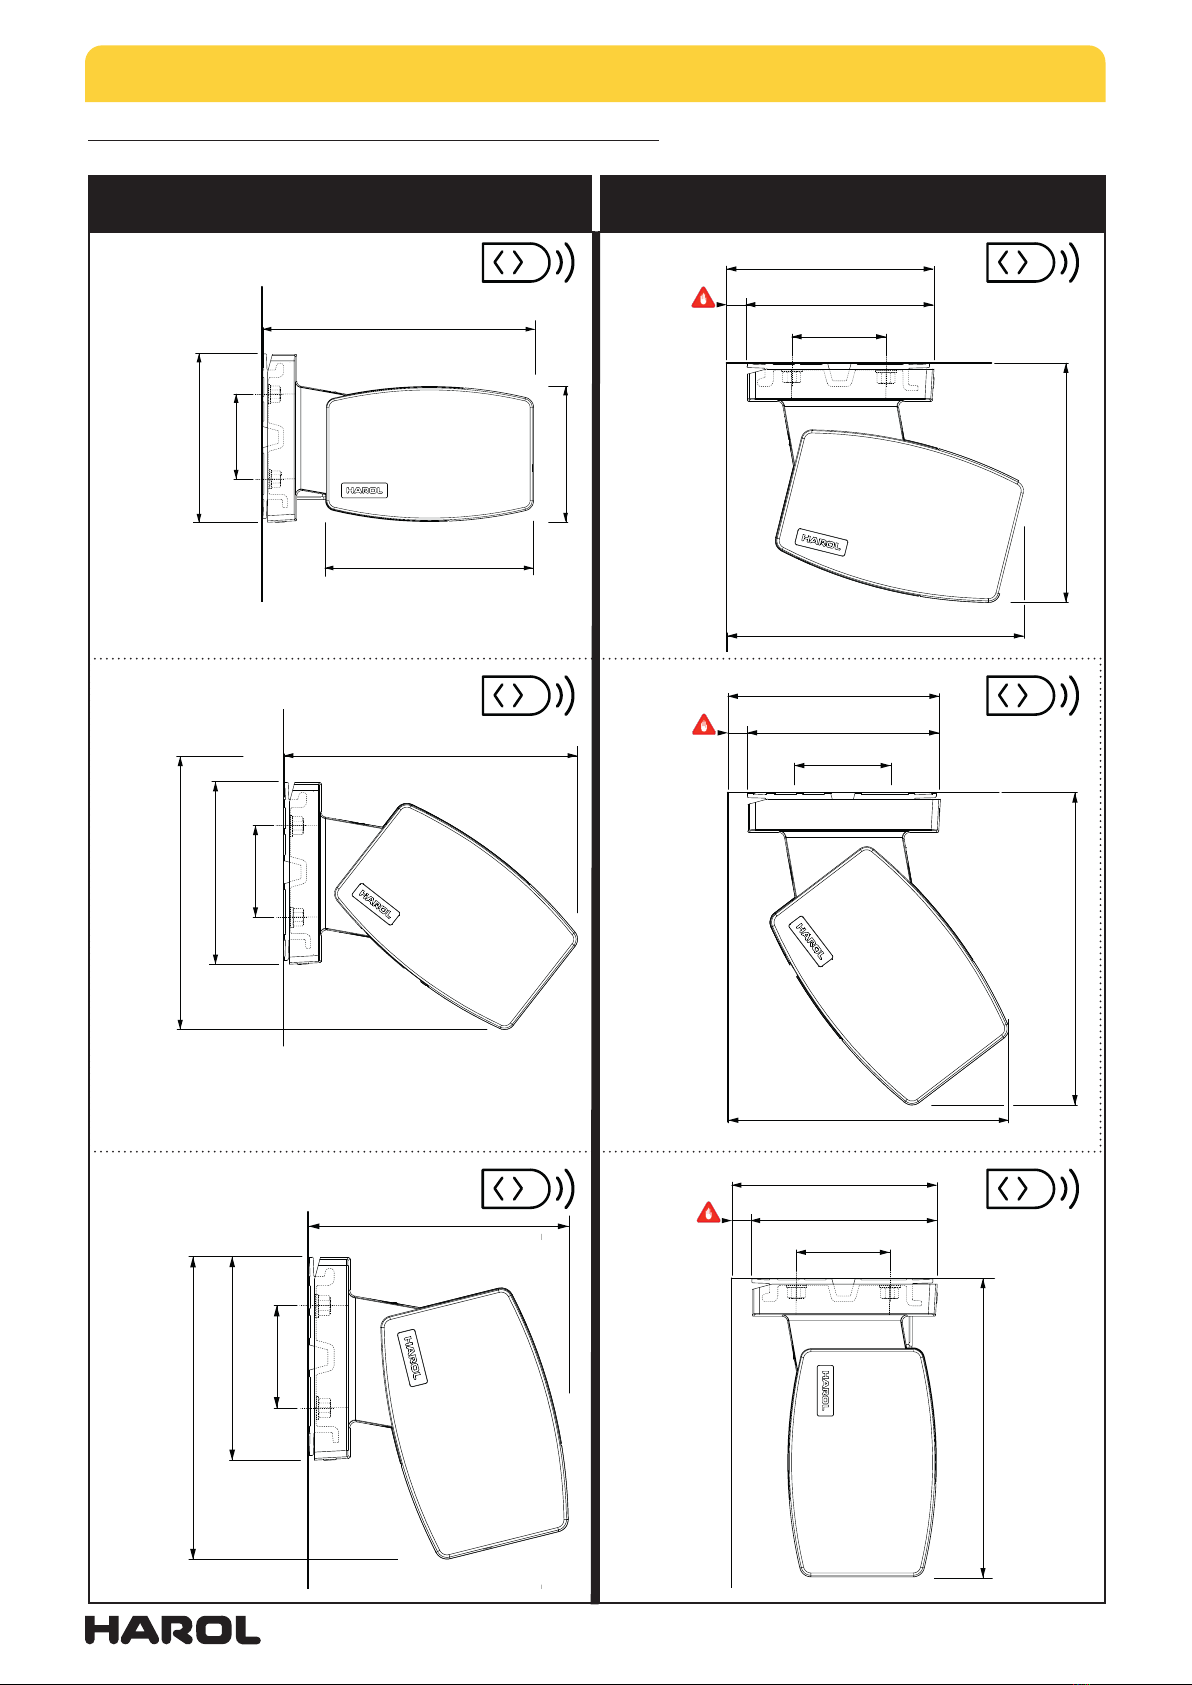
05/2023 | 8
TYPE 1 / TYPE 2
AFMETINGEN - DIMENSIONS - ABMESSUNGEN
260
162
75
130
200
0°
instellingshoek - angle d’inclinaison
angle of displacement - Neigungswinkel
260
162
75
225
38°
instellingshoek - angle d’inclinaison
angle of displacement - Neigungswinkel
245
75
205
162
76°
instellingshoek - angle d’inclinaison
angle of displacement - Neigungswinkel
162
75
260
20
182
162
75
205
20
182
240
162
75
260
20
182
210
90°
instellingshoek - angle d’inclinaison
angle of displacement - Neigungswinkel 52°
instellingshoek - angle d’inclinaison
angle of displacement - Neigungswinkel 14°
instellingshoek - angle d’inclinaison
angle of displacement - Neigungswinkel
TYPE 3 / TYPE 4
Elektrische bediening / Commande électrique /
Motor operation / Elektrischer Antrieb

MONTAGE - MOUNTING TUCAN
05/2023 | 9
TYPE 1 / TYPE 2
AFMETINGEN - DIMENSIONS - ABMESSUNGEN
260
162
75
280
0°
instellingshoek - angle d’inclinaison
angle of displacement - Neigungswinkel
260
162
75
260
225
38°
instellingshoek - angle d’inclinaison
angle of displacement - Neigungswinkel
162
75
255
45
205
235
305
52°
instellingshoek - angle d’inclinaison
angle of displacement - Neigungswinkel 14°
instellingshoek - angle d’inclinaison
angle of displacement - Neigungswinkel
TYPE 3 / TYPE 4
Handbediening / Contrôle manivelle / Crank
handle operation / Kurbelbedienung
162
75
260
45
205
235
254
TYPE
4
TYPE
3
TYPE
2
TYPE
1
MONTAGE - MOUNTING TUCAN
05/2023 | 10
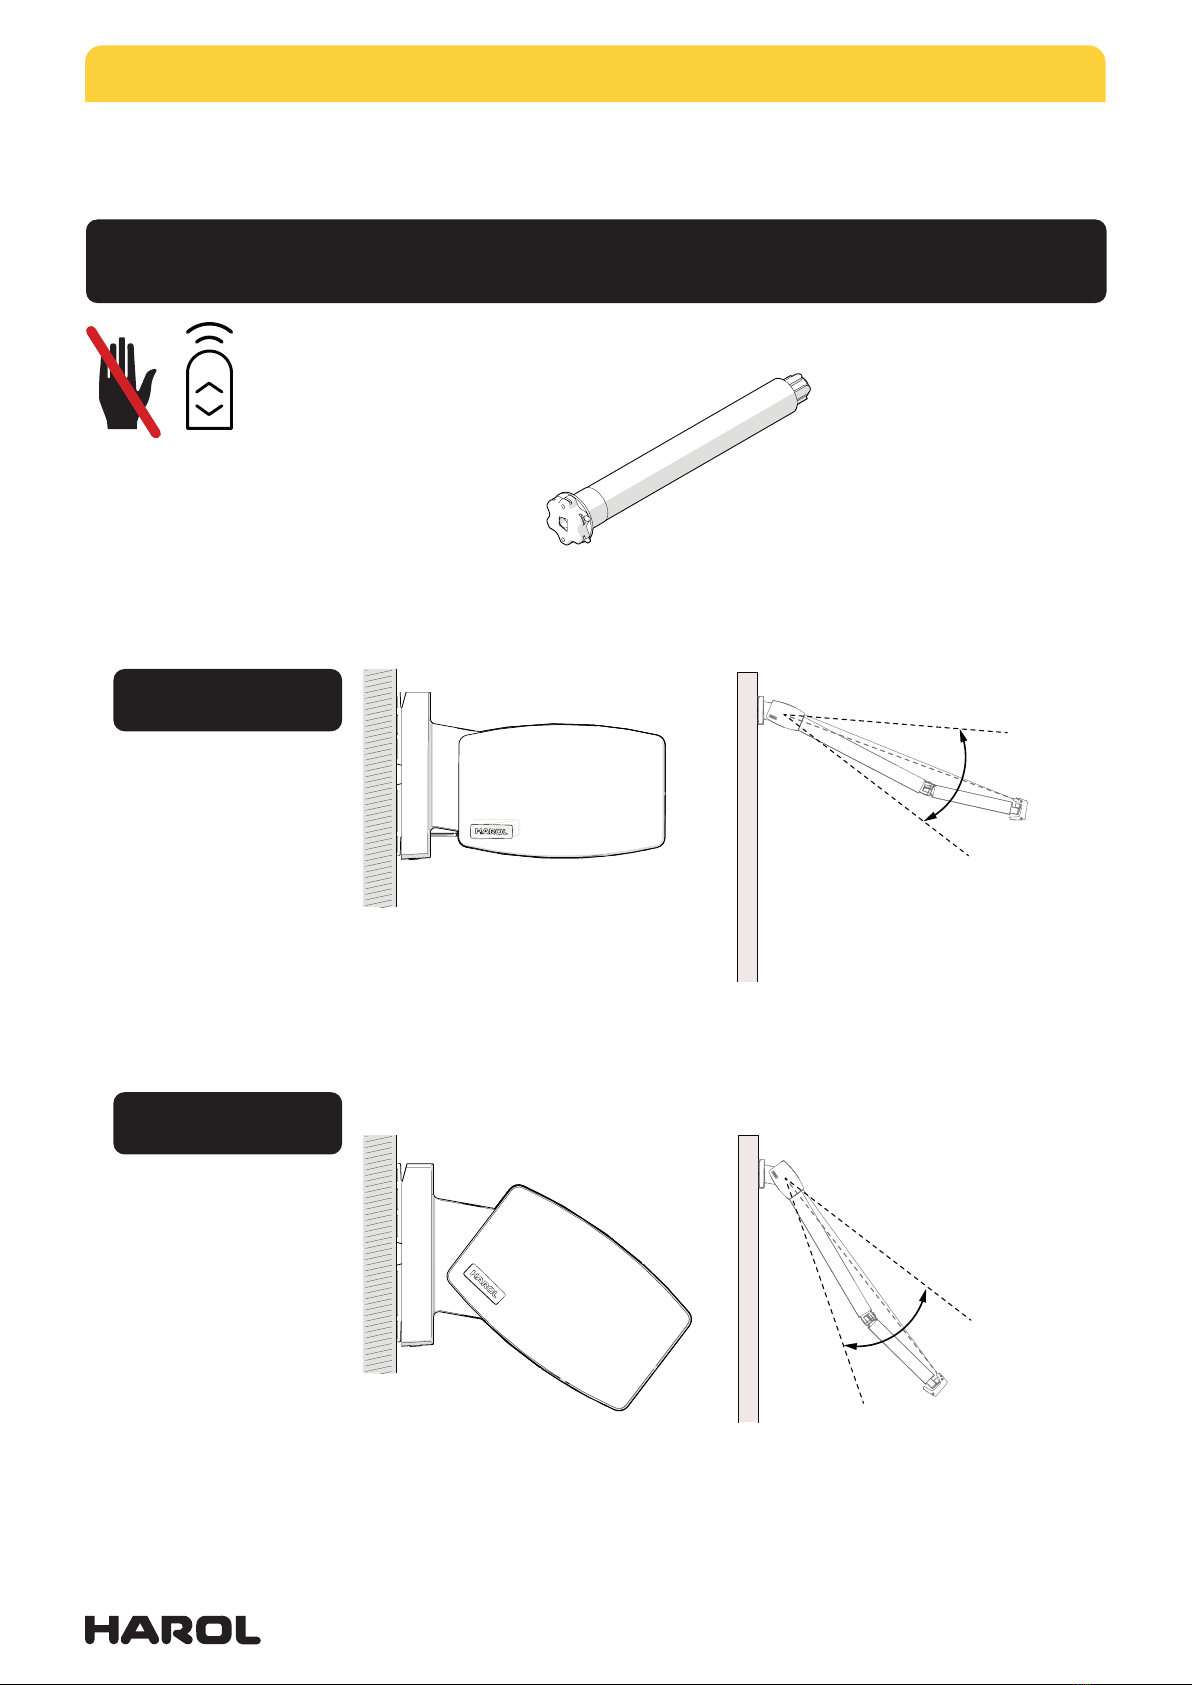
TYPE 1 - 2 Elektrische bediening / Commande électrique /
Motor operation / Elektrischer Antrieb
MONTAGE - MOUNTING
TYPE 1
TYPE 2
instellingshoek - angle d’inclinaison
angle of displacement - Neigungswinkel
5° - 38°
instellingshoek - angle d’inclinaison
angle of displacement - Neigungswinkel
38° - 76°

MONTAGE - MOUNTING TUCAN
05/2023 | 11
158
40,5 42,5
75
120
80
20 20
21
15
15
21
1
BREEDTE - LARGEUR - WIDTH - BREITE
= (BREEDTE - LARGEUR - WIDTH - BREITE) -330 mm
1
2
3
4
5
TYPE 1 - 2
= (BREEDTE - LARGEUR - WIDTH - BREITE) -210 mm
105 105

MONTAGE - MOUNTING TUCAN
05/2023 | 12
Ø
MIN.
12mm
ZIE DOCUMENT “KRACHTEN OP SCHROEVEN”
VOIR DOCUMENT “FORCES SUR LES VIS”
SEE DOCUMENT “FORCES ON SCREWS”
SEHEN DOKUMENT “SCHRAUBENBELASTUNG”
KRACHTEN OP SCHROEVEN - FORCES SUR LES VISES - SCHRAUBENBELASTUNG - FORCES ON SCREWS
01/2021 art. nr. 066464
Schermbevestiging op drukvaste ondergrond.
Fixation des bannes sur surface pression-rigide.
Markisenbefestigung auf druckfeste Befestigingsuntergrund.
Mounting of the awning on a pressure-stable mounting base.
Opmerking voor alle tabellen - Remarque pour tous les tabelles - Bemerkung für alle Tabellen - Remarks for all tables :
Trekkracht per bovenste bevestigingspunt van een standaard muurconsole [N].
Force de traction par chaque point de fixation suppérieur d’une console murale [N].
Zugkraft pro oberem Befestigungspunkt jedes Standard-Wandhalters [N].
Traction force per upper fasteningspoint, per standard wallbracket [N].
LUX (Acryl) met standaard voorlijst - LUX (Acryl) avec barre de charge standard -
LUX (Acryl) mit Standard Fallstange - LUX (Acryl) with standard extension pole
LUX (Acryl) met variovolant (Acryl 2000 mm) - LUX (Acryl) avec variovolant (Acryl 2000 mm) -
LUX (Acryl) mit Variovolant (Acryl 2000 mm) - LUX (Acryl) with variovolant (Acryl 2000 mm)
CADIZ (Acryl) met standaard voorlijst - CADIZ (Acryl) avec barre de charge standard -
CADIZ (Acryl) mit Standard Fallstange - CADIZ (Acryl) with standard extension pole
CADIZ (Acryl) met variovolant (Acryl 2000 mm) - CADIZ (Acryl) avec variovolant (Acryl 2000 mm) -
CADIZ (Acryl) mit Variovolant (Acryl 2000 mm) - CADIZ (Acryl) with variovolant (Acryl 2000 mm)
U \ B 2250 2500 2750 3000 3250 3500 375 0 4000 4250 4500 475 0 5000 5250 5500 5750 6000 6250 6500 6750 7000
1500 705 776 846 917 988 1058 1129 1199 1270 1340 1411 1482 1552 1623 1693 1764 1223 1270 1317 1364
2000 1284 1392 1500 1607 1715 1823 1930 2038 2146 2253 2361 2469 2576 2684 1861 1933 2005 2 076
2500 2103 2255 2406 2558 270 9 2861 3012 3164 3315 3467 3618 3770 2614 2715 2816 2917
3000 3203 3405 3607 3809 4011 4213 4415 4617 4819 5021 3482 3617 3752 3886
3500 4623 4883 5142 5401 5661 592 0 6180 6439 4465 4638 4811 4984
4000 5758 6082 6405 6729 7052 7375 769 9 8022 6211
U \ B 2250 2500 2750 3000 3250 3500 375 0 4000 4250 4500 475 0 5000 5250 5500 5750 6000 6250 6500 6 750 7000
1500 1164 1282 1401 1519 16 37 1755 1873 1992 2110 2228 2346 2464 2583 270 1 2819 2937 2037 2116 2195 2273
2000 2098 2276 2453 2631 2809 2986 3164 3341 3519 3697 38 74 4052 4229 4407 3056 3175 3293 3412
2500 3406 3653 3900 41 47 4394 4641 4888 5135 5382 5628 5875 6122 4246 4411 4576 4 740
3000 5147 5473 5799 6125 6452 677 8 7104 7431 7757 8083 5606 5824 6041 6259
3500 7380 7796 8211 8627 9043 9458 9 874 10290 7137 74 14 7691 7968
4000 10167 10682 11197 11711 12226 12 741 9867
U \ B 2250 2500 2750 3000 3250 3500 375 0 4000 4250 4500 475 0 5000 5250 5500 5750 6000 6250 6500 6750 7000
1500 968 1065 1161 1258 1354 1450 1547 1643 1740 1836 1933 2029 2125 2222 2318 241 5 1674 1738 1803 1867
2000 1779 1928 2076 2225 2 373 2522 2670 2819 2968 3116 3265 3413 3562 3710 2573 2 672 2771 2870
2500 2934 3145 3356 3566 3777 3988 4198 4409 4620 4830 5041 5252 3642 3782 3922 4063
3000 4493 4776 5059 5342 5625 59 07 6190 6473 6756 7038 4881 5069 5258 5446
3500 6517 6882 7246 761 1 7976 8341 8706 9071 6290 6533 6777 702 0
4000 9064 9521 9978 10434 10891 11348 8784
U \ B 2250 2500 2750 3000 3250 3500 375 0 4000 4250 4500 475 0 5000 5250 5500 5750 6000 6250 6500 6750 7000
1500 838 923 1008 1094 1179 1264 1349 1435 1520 1605 1691 1776 1861 1946 2032 2117 1468 1525 1582 1639
2000 1500 1627 1755 1882 2009 2137 2264 2391 2518 2646 2773 2900 3027 3155 2188 2273 2358 2443
2500 2422 2598 2774 2950 3126 3302 3 478 3654 3830 4006 4182 4358 3023 3140 3258 3 375
3000 3644 3876 4107 4339 4570 4802 5033 5265 5496 57 28 3973 4127 4281 4436
3500 5207 5501 5794 6088 6382 6676 6969 72 63 5038 5234 5429 5625
4000 6425 6788 7151 7513 7876 8239 8601 8964 6943
KA2020
20 mm 20 mm
2
min. 3mmmin. 3mm
3
min. Ø 24
STEEL / INOX
DIN 913
M10 x 30
5
DIN 933
M10 x 20
16

MONTAGE - MOUNTING TUCAN
05/2023 | 13
4ELECTRISCHE AANSLUITING - CONNECTION ELECTRIQUE -
ELECTRICAL CONNECTION - ELECTRISCHES VERBINDUNG
230 V
N
L1
LED
MET OPTIE LED
AVEC OPTION LED
WITH LED OPTION
MIT OPTION LED
5
TYPE 1 - 2
www.somfy.com
OREA 50 WT 25/17
OREA 50 WT 40/17
Orea 25/17 LT50 RTS
Orea 40/17 LT50 RTS
Sunea 50 IO 25/17
Sunea 50 IO 40/17
see instruction manual Somfy (included)
zie gebruikershandleiding Somfy (bijgevoegd)
voir manuel d’instruction Somfy (inclus)
siehe Bedienungsanleitung Somfy (inbegrien)
MONTAGE - MOUNTING TUCAN
05/2023 | 14
7
6TYPE 1 - 2
8DIN 912
M8 x 30
6
zie p.19
voir p.19
see p.19
sehen p.19
HANDBEDIENING
CONTRÔLE MANIVELLE
CRANK HANDLE OPERATION
KURBELBEDIENUNG
6+

MONTAGE - MOUNTING TUCAN
05/2023 | 15
9
6
instellingshoek - angle d’inclinaison
angle of displacement - Neigung-
swinkel
0° - 38°
TYPE 1
instellingshoek - angle d’inclinaison
angle of displacement - Neigung-
swinkel
38° - 76°
TYPE 2
TYPE 1 - 2
DIN 912
M8 x 90
ENKEL ONDERSTEUNEN, NIET TREKKEN !
SEULEMENT SOUTENIR, PAS TIRER !
ONLY SUPPORT, NOT PULL !
NUR STÜTZEN, NICHT ZIEHEN!

MONTAGE - MOUNTING TUCAN
05/2023 | 16
6
11
10 TYPE 1 - 2
DIN 912
M8 x 30
zie p.19
voir p.19
see p.19
sehen p.19
HANDBEDIENING
CONTRÔLE MANIVELLE
CRANK HANDLE OPERATION
KURBELBEDIENUNG
10+

MONTAGE - MOUNTING TUCAN
05/2023 | 17
TYPE 1 - 2
12

MONTAGE - MOUNTING TUCAN
05/2023 | 18
TYPE 1 - 2
HANDBEDIENING / CONTRÔLE MANIVELLE /
CRANK HANDLE OPERATION / KURBELBEDIENUNG
MONTAGE - MOUNTING
TYPE 1
TYPE 2
instellingshoek - angle d’inclinaison
angle of displacement - Neigungswinkel
5° - 38°
instellingshoek - angle d’inclinaison
angle of displacement - Neigungswinkel
38° - 76°
MONTAGE - MOUNTING TUCAN
05/2023 | 19
zie p.11 - p.14
voir p.11 - p.14
see p.11 - p.14
sehen p.11 - p.14
87 zie p.14 - p.16
voir p.14 - p.16
see p.14 - p.16
sehen p.14 - p.16
10+
6+
6
2
1
10
POSITIE /
POSITION
zie p.20
voir p.20
see p.20
sehen p.20
4
DIN 7984
M6 x 70
4
DIN 7984
M6 x 70

MONTAGE - MOUNTING TUCAN
05/2023 | 20
zie p.16 - p.17
voir p.16 - p.17
see p.16 - p.17
sehen p.16 - p.17
11
TYPE 1
TYPE 2
TYPE 3
TYPE 4
TYPE 1
TYPE 2
12


