Haus DW9-AFM Series User manual
0120505913A
Freestanding dishwasher
Instructions manual
DW9-AFM Series
Customer helpline: 0845 600 4632


Index
1
en
Safety information
Installation
Electrical Connection
Getting to know your dishwasher
How to fill the salt container
How to fill rinse aid container
How to fill the detergent dispenser
Not suitable for the dishwasher
Dishes arrangement in dishwasher
Programme overview
Using the appliance
How to keep your dishwasher in shape
Care and maintenance
Trouble shooting
Technical data
Important information
Disposal information
Product guarantee
2
4
6
7
8
10
11
12
13
15
16
17
18
19
23
23
25
26
Customer Helpline 0845 600 4632HAUS Dishwasher User Manual
2
At time of delivery
Site the dishwasher and connect it up in accordance with the installation instructions.
The dishwasher must not be connected to the electricity supply while installation is being carried out.
Ensure that the domestic wiring is properly earthed.
The mains electricity supply must conform to the details shown on the dishwasher rating plate.
Do not connect the dishwasher to the electricity supply using an extension cable.
Built-under and built-in appliances should always be installed under a continuous work surface which
is attached to the adjacent cupboards in order to ensure that the appliance is entirely stable.
After the appliance has been installed, the mains plug should still be easily accessible.
The plastic housing on the water inlet contains an electrically operated valve. The connecting wires
are inside the inlet hose. Do not cut through this hose and do not immerse the plastic housing in
water.
During installation, the power cable must not be excessively or dangerously kinked or flattened.
Check packaging and dishwasher immediately for signs of transport damage. If the appliance is
damaged, do not use it and contact the retailer or our approved customer service department without
delay.
Please dispose of packaging materials properly.
During installation
The dishwasher must only be used by adults for the washing of household dishes and cooking utensils.
This appliance cannot be installed outdoors, even if the area in which it is installed is covered by a
roof. It is very dangerous to leave the appliance exposed to rain and the elements.
Do not place any heavy objects on the door or stand on the door when it is open. The appliance could
tip forward.
The water inside the dishwasher is not suitable for drinking.
Do not use solvents of any kind inside your dishwasher. There is a risk of explosion.
Open the door carefully if the dishwasher is operating. There is a risk of water coming out.
During normal use
Do not touch the heating element during or after a wash cycle.
Fundamental rules to follow when using the appliance:
- Never touch the dishwasher when barefoot or with wet hands or feet.
- Do not use extension cords and multiple socket.
- If the appliance is not operating properly or maintenance must be performed, disconnect the
appliance from the power supply.
Safety information
en
Customer Helpline 0845 600 4632HAUS Dishwasher User Manual
If your family includes children or the infirm
This appliance is not intended for use by persons (including children) with reduced physical, sensory
or mental capabilities, or lack of experience and knowledge, unless they have been given supervision
or instruction concerning use of the appliance by a person responsible for their safety.
Children should be supervised to ensure that they do not play with the appliance.
Keep detergents out of the reach of children.
If a fault occurs
If the appliance malfunctions, turn off the water supply to the appliance and disconnect the plug from
the wall socket. Then, consult the section entitled "Trouble shooting". If you cannot solve the problem,
contact a service centre.
Only specialised personnel are authorised to make repairs.
If the power cable is damaged, it must be replaced by the manufacturer or an authorised service
agent.
To maintain the EFFICIENCY and SAFETY of this appliance, we recommend:
- Call only a manufacturer-approved service engineer or contact the manufacturer directly.
- Always use original spare parts.
When disposing of old appliances
Appliances which are no longer being used must be made inoperable by disconnecting the plug from
the wall socket, cutting the power cable and removing the door lock.
Take the appliance to a designated waste disposal centre.
Warning
Children could get locked or stuck in the appliance (risk of
suffocation). Therefore: Remove the mains plug and cut themains
wire. Damage the door lock so that the door can no longer be
closed.
Dangerous voltage
3
en
Customer Helpline 0845 600 4632HAUS Dishwasher User Manual
4
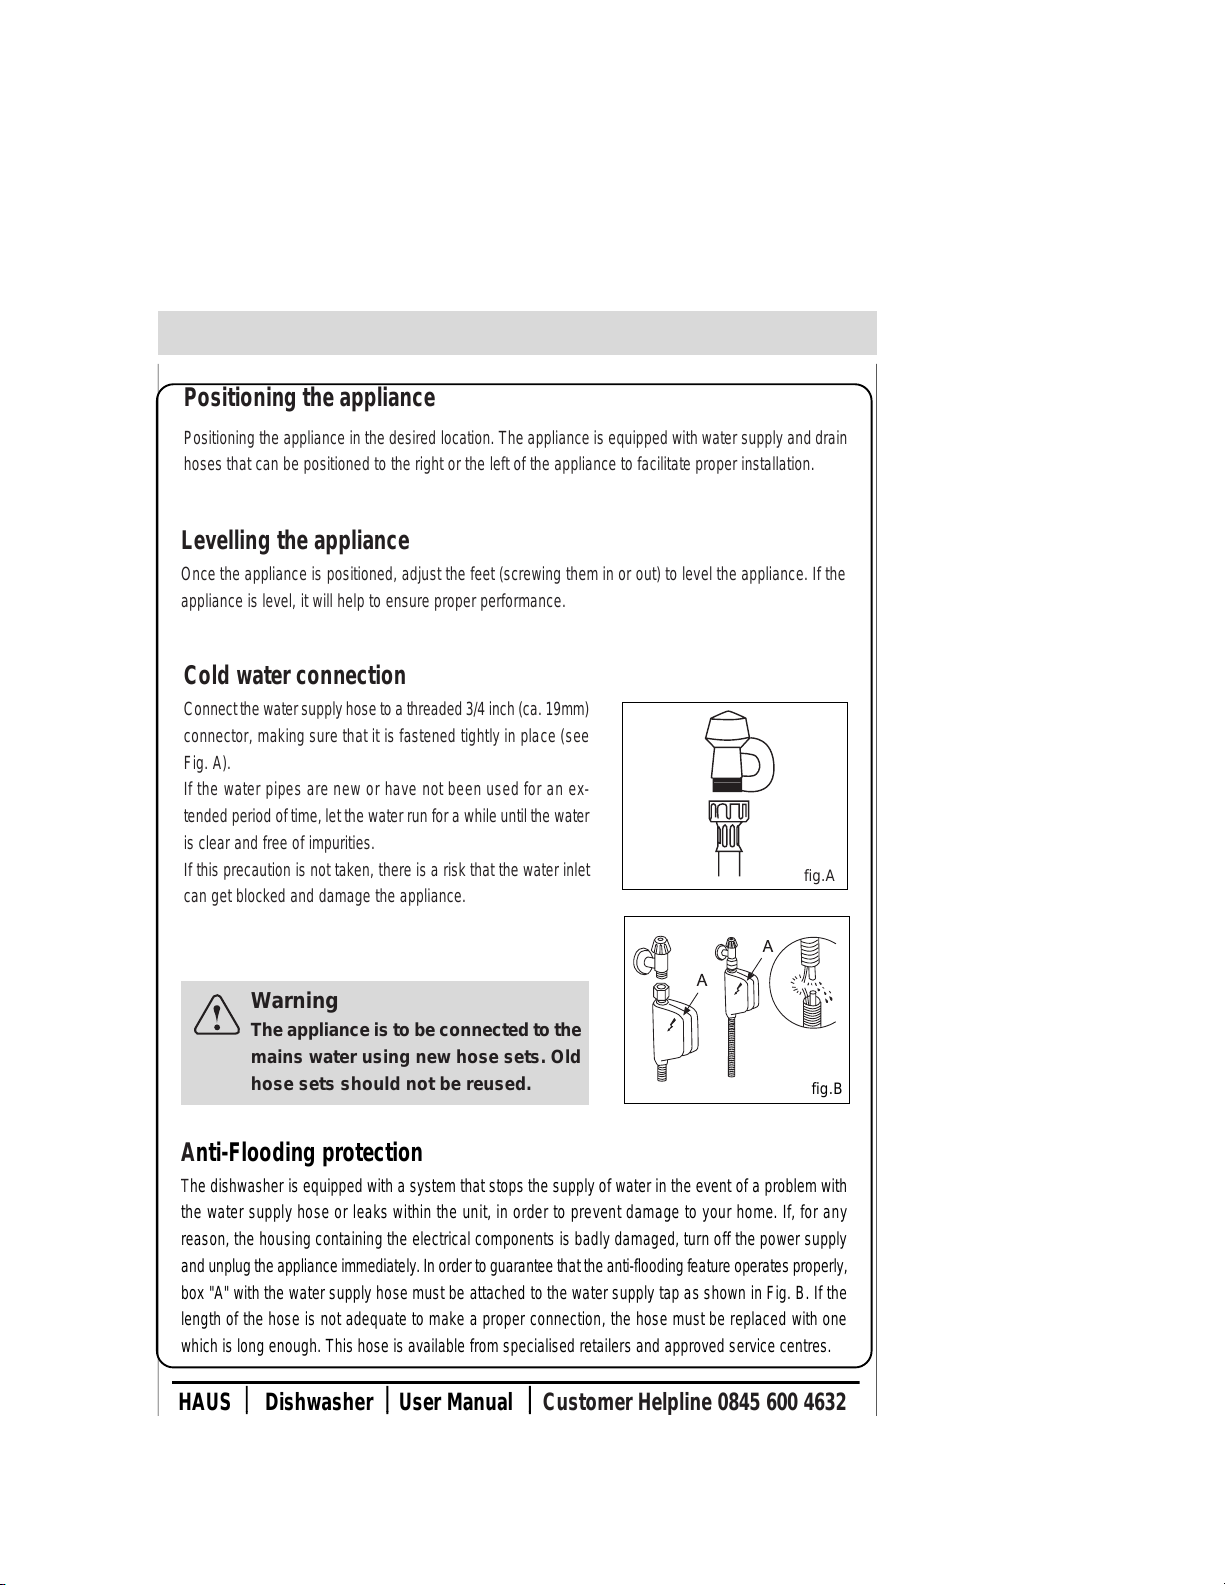
Cold water connection
Connect the water supply hose to a threaded 3/4 inch (ca. 19mm)
connector, making sure that it is fastened tightly in place (see
Fig. A).
If the water pipes are new or have not been used for an ex-
tended period oftime, let the water run for a while untilthe water
is clear and free of impurities.
If this precaution is not taken, there is a risk that the water inlet
can get blocked and damage the appliance.
Positioning the appliance
Positioning the appliance in the desired location. The appliance is equipped with water supply and drain
hoses that can be positioned to the right or the left of the appliance to facilitate proper installation.
fig.A
Anti-Flooding protection
The dishwasher is equipped with a system that stops the supply of water in the event of a problem with
the water supply hose or leaks within the unit, in order to prevent damage to your home. If, for any
reason, the housing containing the electrical components is badly damaged, turn off the power supply
and unplug the appliance immediately.In order to guarantee that the anti-flooding feature operates properly,
box "A" with the water supply hose must be attached to the water supply tap as shown in Fig. B. If the
length of the hose is not adequate to make a proper connection, the hose must be replaced with one
which is long enough. This hose is available from specialised retailers and approved service centres.
fig.B
Levelling the appliance
Once the appliance is positioned, adjust the feet (screwing them in or out) to level the appliance. If the
appliance is level, it will help to ensure proper performance.
Installation
Warning
The appliance is to be connected to the
mains water using new hose sets. Old
hose sets should not be reused.
en
Customer Helpline 0845 600 4632HAUS Dishwasher User Manual

5
Drain hose connection
Insert the drain hose into a drain pipe with a minimum diameter of 4cm, making sure to avoid kinking or
pinching. If necessary, fit a syphon trap (U-bend) as in Fig. C. The free end of the hose must be at a
height between 40 and 100 cm and must not be immersed in water.
fig.C
Attention:
The siphon trap (U-bend) must be fastened to the wall to pre-
vent the drain hose from moving and allowing water to spill.
Electrical Connection
After making sure that the voltage and frequency values for your domestic electricity supply correspond
to those on the rating plate (located on the inner door of the appliance), insert the plug into an electrical
socket which is properly earthed (the earthing of the appliance is a legal safety requirement).
If the plug is not appropriate for the socket, replace the whole cable, rather than using plug adaptors or
the like, as they could cause overheating and burns.
Caution:
The dishwasher's mains plug must be accessible even when the
appliance is installed as a built-in unit so thatmaintenance can
be carried out safely.
en
Customer Helpline 0845 600 4632HAUS Dishwasher User Manual
6
en
Electrical Connection
ÉÉ Before connecting, check that the voltage indicated on the rating plate
corresponds with the main voltage in your home.
If this is not the case, consult your dealer and do not use.
ÉÉ This appliance may be fitted with a non-rewirable plug. If you need to
change the fuse in a non-rewirable plug, the fuse cover must be refitted. If
the fuse cover is lost or damaged, the plug must not be used until a
replacement is obtained (available from the appliance manufacturer).
ÉÉ If the plug has to be changed because it is not suitable for your socket, or
becomes damaged, it should be cut off and appropriate plug fitted
following the wiring instructions. The plug removed must be disposed of
safely as insertion into a mains socket is likely to cause an electrical
hazard.
ÉÉ This unit must be earthed. This equipment must be disconnected from the
mains when not in use. Do not allow this unit to be exposed to rain or
moisture.
For your own safety read the following instructions carefully before
attempting to connect this unit to the mains.
You should only plug the applianc
GREEN AND
YELLOW WIRE=EARTH(E)
BLUE OR BLACK
NEUTRAL(N) BROWN OR RED
WIRE=LIVE(L)
e into a 220V-240V AC, 50Hz supply.
Connecting it to other power sources may damage the appliance.
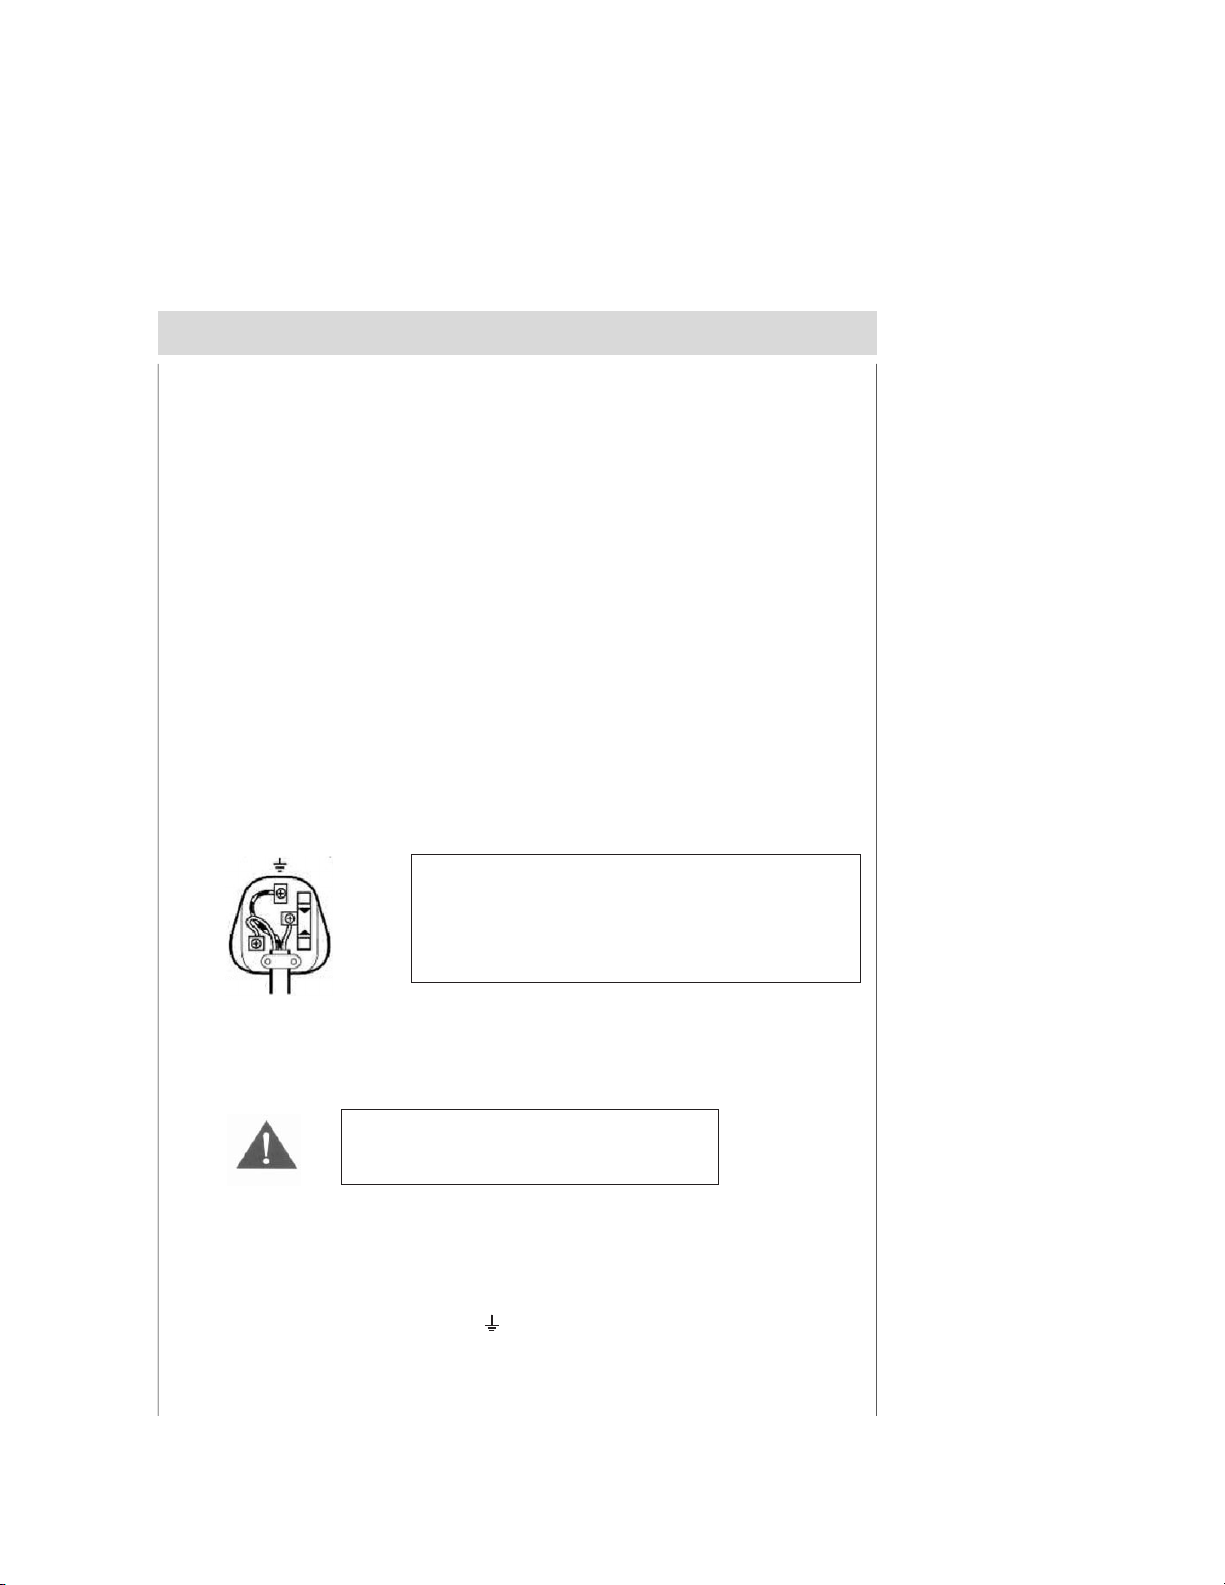
IMPORTANT
The colours of the wires in the mains lead of this appliance may not
correspond with the coloured markings identifying the terminals in your plug,
proceed as follows:
ÉÉ The blue wire must be connected to the terminal marked with the letter N
or coloured black.
ÉÉ The brown wire must be connected to the terminal marked with the letter L
or coloured red.
ÉÉ The green and yellow wire must be connecting to the terminal marked with
the letter E or the earth symbol. ( ).
The wires in this mains lead are coloured in
accordance with the following code:
BLUE = NEUTRAL
BROWN = LIVE
GREEN + YELLOW = EARTH
Caution
To prevent electric shock disconnect from
the mains before removing the cover
If a 13 Amp (BS1363) fused plug is used it must be fitted with a 13A fuse
conforming to BS1362 and be ASTA approved.
If in doubt contact a qualified electrician.

7
Getting to know your dishwasher
Close-up view (control panel)
Dishwasher interior
A
B
C
D
Upper Rack
Rack Height Adjustor
Top Spray Arm
Lower Rack
E
F
G
H
Washing Filter
Bottom Spray Arm
Detergent and Rinse Aid Dispenser
Salt Container Cap
en
A
B
C
"ON-OFF" Light
"ON-OFF" Button Programme selection dial.
Door handle
D
E
Low Salt Indicator Light
Customer Helpline 0845 600 4632HAUS Dishwasher User Manual
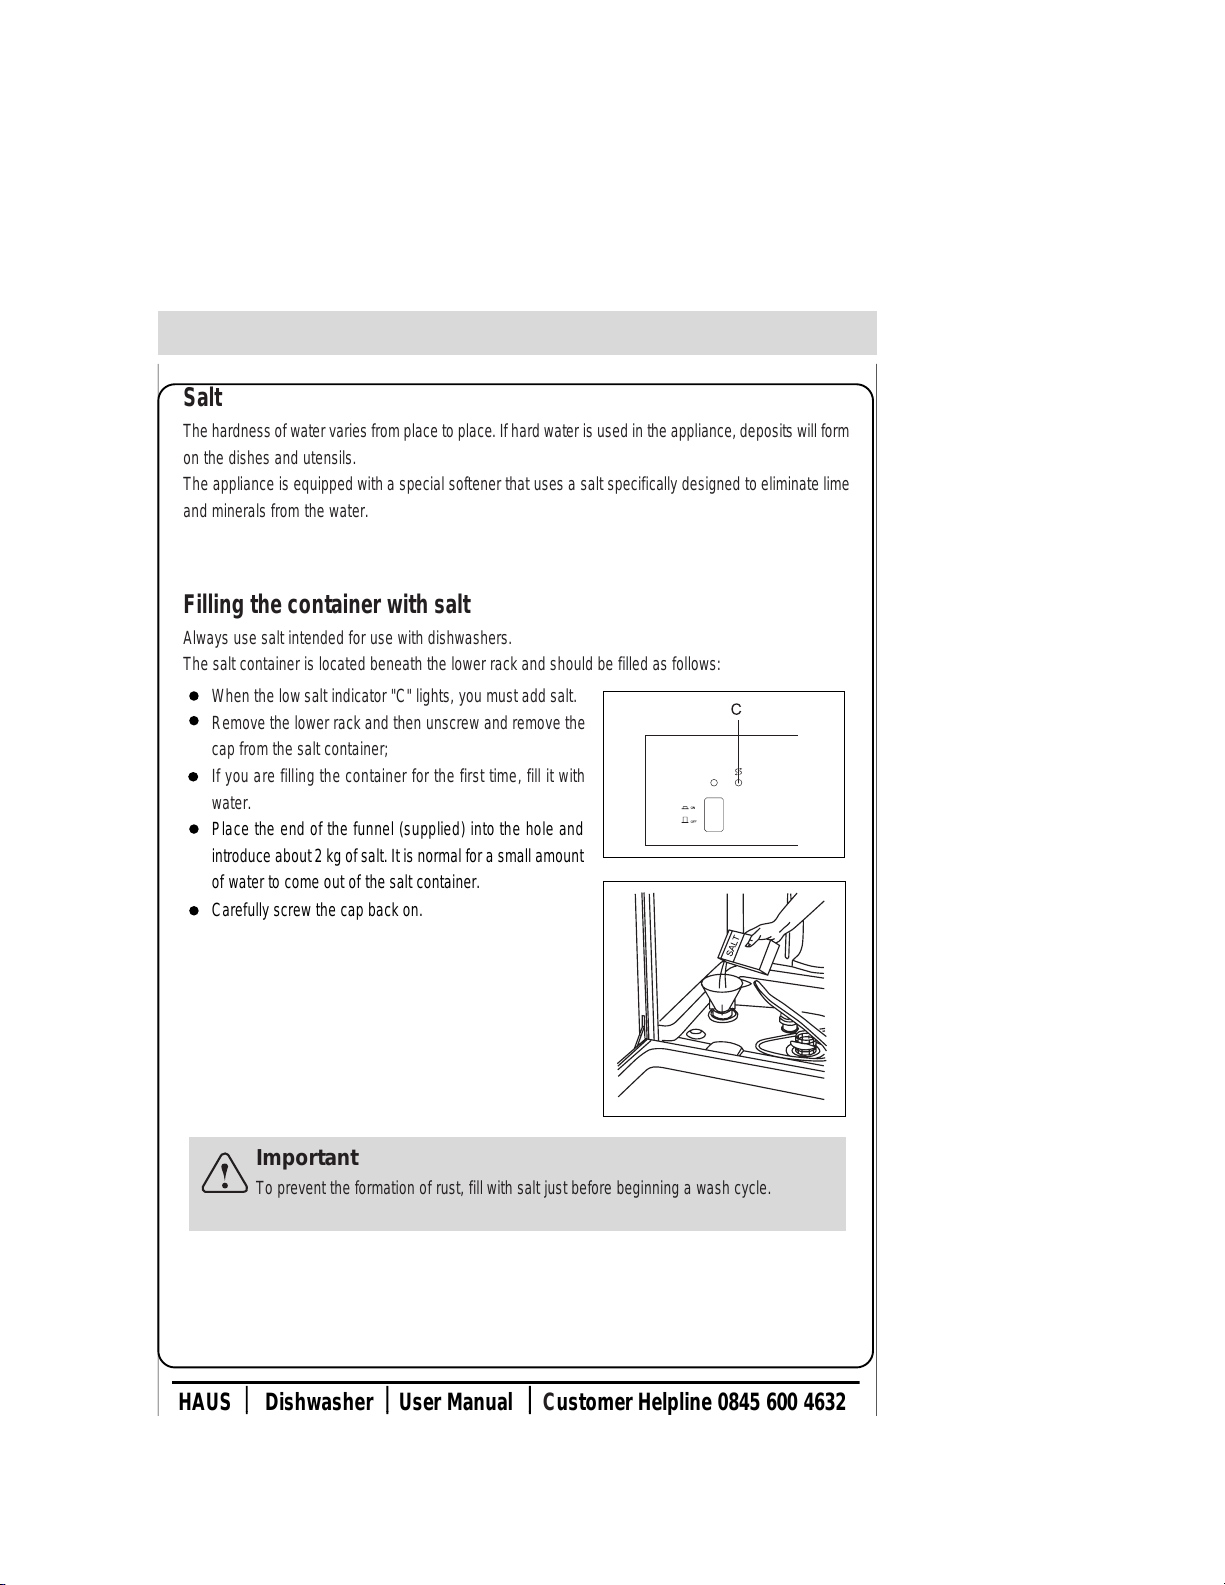
Salt
The hardness of water varies from place to place. If hard water is used in the appliance, deposits will form
on the dishes and utensils.
The appliance is equipped with a special softener that uses a salt specifically designed to eliminate lime
and minerals from the water.
How to fill the salt container
Filling the container with salt
Always use salt intended for use with dishwashers.
The salt container is located beneath the lower rack and should be filled as follows:
8
When the low salt indicator "C" lights, you must add salt.
Remove the lower rack and then unscrew and remove the
cap from the salt container;
If you are filling the container for the first time, fill it with
water.
Important
To prevent the formation of rust, fill with salt just before beginning a wash cycle.
en
Place the end of the funnel (supplied) into the hole and
introduce about2 kg of salt. It is normal for a small amount
of water to come out of the salt container.
Carefully screw the cap back on.
Customer Helpline 0845 600 4632HAUS Dishwasher User Manual

Adjusting salt consumption
You can adjust the amount of salt used to suit the hardness
of the water in your area. This is intended to optimize the
level of salt consumption so that it remains at a minimum.
To adjust salt consumption, proceed as follows:
Unscrew the cap from the salt container;
There is a ring on the container with an arrow on it (see figure to the side),
If necessary, rotate the ring in an anticlockwise direction from the "-" setting towards the "+" sign,
based on the hardness of the water being used.
It is recommended that adjustments be made in accordance with the following table:
9
en
Water Hardness
Clarke
degrees ºdH mmol/l Selector
position
Salt
consumption
(Grams/cycle)
Autonomy
(cycles/2kg)
0-14 0-17 0-1,7
1,8-4,418-4414-36
36-71 45-89 4,5-8,9
>89>71 >8,9
/
"-"
Middle
/0
20
40
60"+"
60
40
25
Level
1
2
3
4
Customer Helpline 0845 600 4632HAUS Dishwasher User Manual
10
en
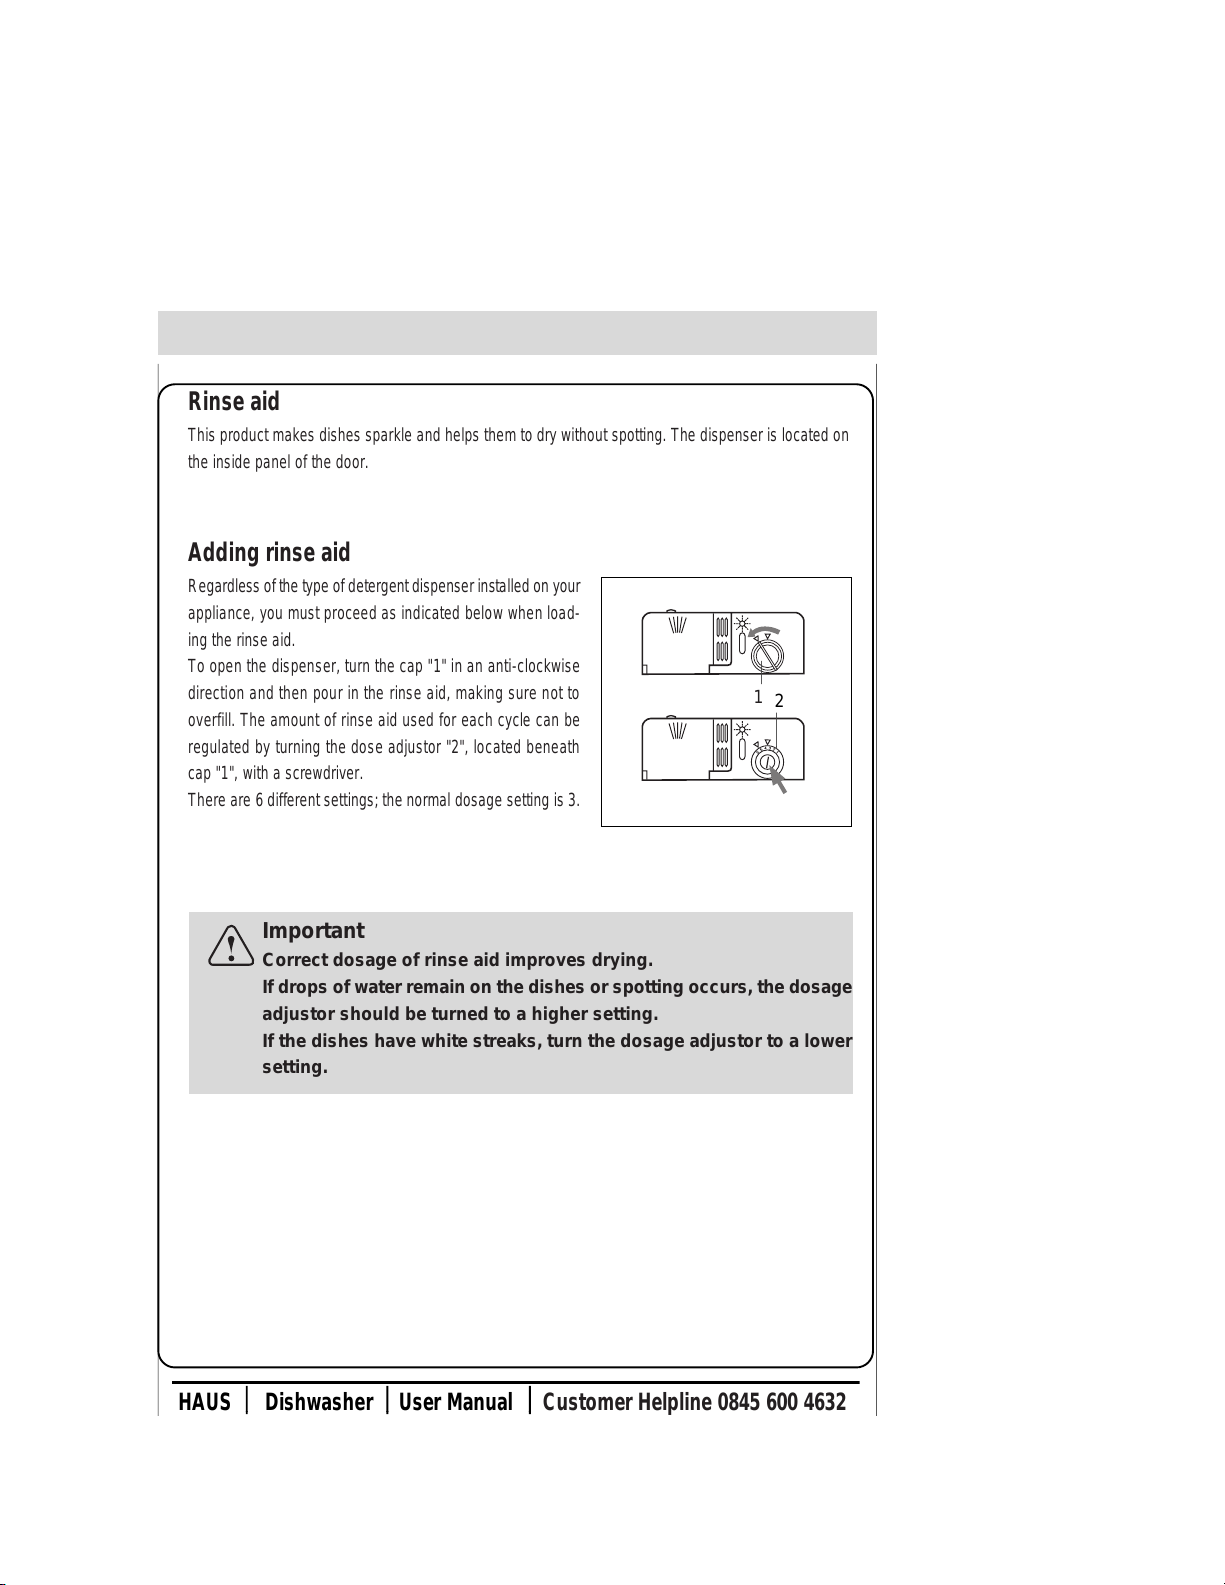
Rinse aid
This product makes dishes sparkle and helps them to dry without spotting. The dispenser is located on
the inside panel of the door.
Adding rinse aid
Regardless of the type of detergent dispenser installed on your
appliance, you must proceed as indicated below when load-
ing the rinse aid.
To open the dispenser, turn the cap "1" in an anti-clockwise
direction and then pour in the rinse aid, making sure not to
overfill. The amount of rinse aid used for each cycle can be
regulated by turning the dose adjustor "2", located beneath
cap "1", with a screwdriver.
There are 6 different settings; the normal dosage setting is 3.
How to fill the rinse aid container
12
Important
Correct dosage of rinse aid improves drying.
If drops of water remain on the dishes or spotting occurs, the dosage
adjustor should be turned to a higher setting.
If the dishes have white streaks, turn the dosage adjustor to a lower
setting.
Customer Helpline 0845 600 4632HAUS Dishwasher User Manual

11
en
Detergent
Detergent specifically intended for use with dishwashers
must be used. The dispenser must be refilled before the start
of each wash cycle following the instructions provided in the
"Programme overview". The detergent dispenser is located
on the inside panel of the door.
Adding detergent
Notice:
To facilitate closing the cover, remove any excess detergent on
the edges of the dispenser.
To open cover "3" on the dispenser, press button "4".
The detergent for the wash cycle should be poured into
compartment "5".
The detergent for the pre-wash cycle should be poured
into compartment "6".
After the detergent has been placed in the dispenser,
close the cover and press down until it clicks in place.
How to fill the detergent dispenser
5
6
4
3
Notice:
3 in 1 or similar tablets should not be used when Rinse, Rapid wash
or Soak programmes are selected.
Customer Helpline 0845 600 4632HAUS Dishwasher User Manual
12
en
Not suitable for the dishwasher
What you should not put into the dishwasher
Cutlery and tableware manufactured in whole or part from wood. These will become faded and unsightly
in appearance. Furthermore, the adhesives that are used are not suitable for the temperature inside the
dishwasher.
Delicate decorative glassware and vases, special antique or irreplaceable china. The decorative pat-
terns on such items will not be dishwasher-proof.
Plastic objects that are not resistant to hot water, copper and pewter utensils are also not suitable.
Items with decorative patterns printed or painted onto the surface of crockery, glasses, etc.
Aluminium and silver items tend to become discoloured or faded if washed in the dishwasher.
Some types of glass can become opaque in appearance after they have been washed many times in a
dishwasher.
Highly absorbent materials, such as sponges and towels, should never be placed in the dishwasher.
Our recommendation
In the future, only purchase table or kitchenware that is dishwasher-proof.
Important
Items that have been soiled by tobacco ash, wax, lubricating grease
or paint, should not be put in the dishwasher.
Damage to glassware and other dishes
Possible causes
Type of glass or manufacturing process.
Chemical composition of detergent.
Water temperature and duration of dishwasher programme.
Use glassware or porcelain dishes that have been marked ‘dishwasher-proof’ by the manufacturer.
Use a mild detergent that is described as ‘kind to dishes’. If necessary, seek further information from
detergent manufacturers.
Select a programme with a low temperature and as short a duration as possible.
To prevent damage, take glass and cutlery out of the dishwasher as soon as possible after the
programme has ended.
Suggested remedy
Customer Helpline 0845 600 4632HAUS Dishwasher User Manual

13
en
Before placing the dishes in the dishwasher, remove larger food particles to prevent the filter from be-
coming clogged, which results in reduced performance.
If the pots and pans have baked-on food that is extremely hard to remove, we recommend that they are
soaked before being washed. This will eliminate the need for extra wash cycles.
Pull out the rack to load the appliance.
How to use the lower rack
We recommend that you place the most difficult to clean items
on the bottom rack: pots, pans, lids, serving dishes and bowls,
as shown in the figure to the right.
It is preferable to place serving dishes and lids on the sides of
the racks in order to avoid blocking the rotation of the top spray
arm.
Pots, serving bowls, etc, must always be placed face down
(see Fig. D).
Large pots should be placed at an angle to allow the water
to flow out.
fig.D
Normal daily load
Warning
Knives and other utensils with sharp points must be loaded in the basket
with their points down or placed in a horizontal
position.
The cutlery basket cannot be separated (see Fig. E).
fig.E
Customer Helpline 0845 600 4632HAUS Dishwasher User Manual
Dishes arrangement in dishwasher
14
en
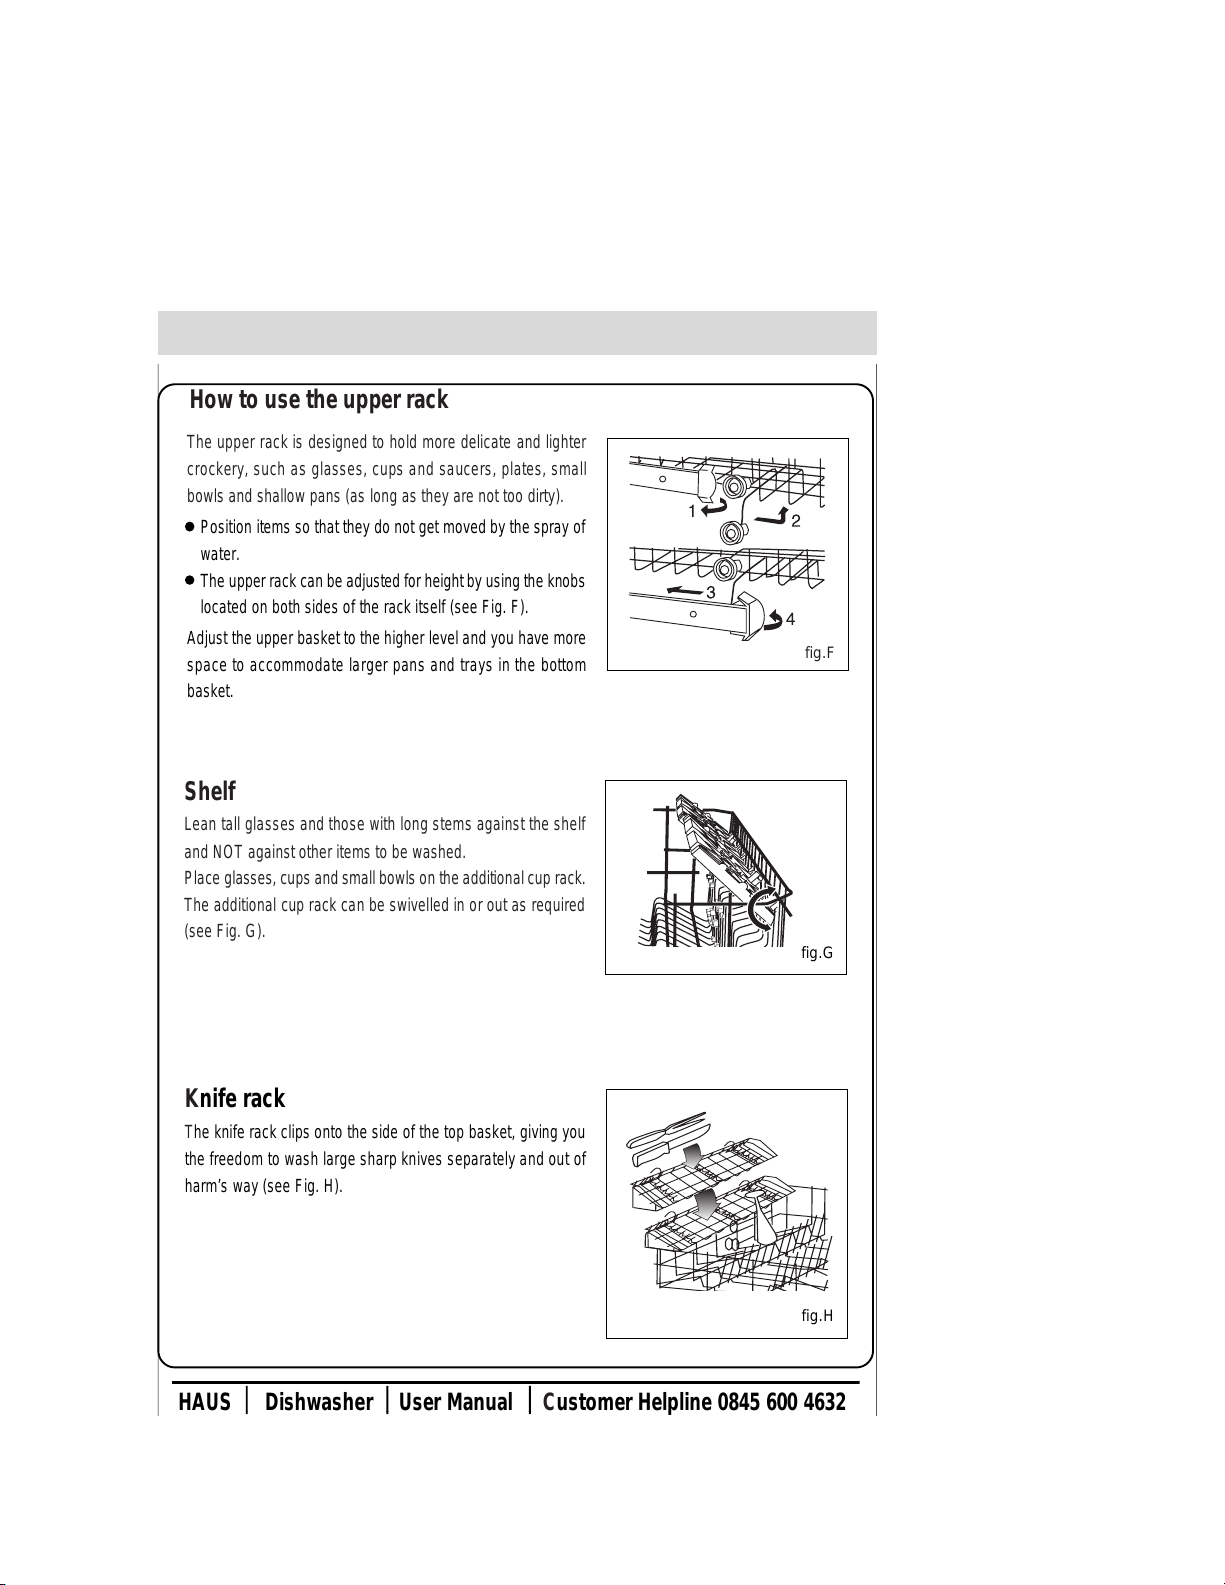
The upper rack is designed to hold more delicate and lighter
crockery, such as glasses, cups and saucers, plates, small
bowls and shallow pans (as long as they are not too dirty).
How to use the upper rack
fig.F
Adjust the upper basket to the higher level and you have more
space to accommodate larger pans and trays in the bottom
basket.
Position items so that they do not get moved by the spray of
water.
The upper rack can be adjusted for height by using the knobs
located on both sides of the rack itself (see Fig. F).
fig.G
Shelf
Lean tall glasses and those with long stems against the shelf
and NOT against other items to be washed.
Place glasses, cups and small bowls on the additional cup rack.
The additional cup rack can be swivelled in or out as required
(see Fig. G).
Knife rack
The knife rack clips onto the side of the top basket, giving you
the freedom to wash large sharp knives separately and out of
harm’s way (see Fig. H).
fig.H
Customer Helpline 0845 600 4632HAUS Dishwasher User Manual

15g
27g
Programme overview
(5)
15
en
30g
Cycle Cycle Selection
Information Description of cycle Detergent Rinse aid
Heavy Duty
Normal Wash
Rinse
Rapid Wash
Soak
For dishes that need to be
rinsed and dried only.
Economic,fast cycle to be
used to on not very dirty
dishes right after they are
used. No drying cycle.
Pre-wash of dishes, pots and
pans while waiting for the
load to be complete after the
subsequent meal.
Very dirty dishes,pots and
pans(not to be used with
delicate items).
Normally dirty dishes,pots
and pans .Standard daily
cycle.
EN 50242
Short cold wash to prevent
food residue from drying on
the dishes .
Pre-wash with hot water.
Extended wash at 55°C.
Rinse with cold water.
Rinse with hot water.
Drying.
Extended wash at 55°C.
Rinse with cold water.
Rinse with hot water.
Drying.
Rinse with cold water.
Rinse with hot water.
Drying.
Short wash at 55°C.
Cold rinse.
Customer Helpline 0845 600 4632HAUS Dishwasher User Manual

16
en
Notice:
When washing, the dial will rotate automatically.
Using the appliance
Starting a wash cycle...
Make sure the appliance is plugged in.
Make sure that the water supply is turned on and the tap fully open.
Load the dishwasher.
Pour in the detergent.
Turn the program dial in a clockwise direction to select the desired program.
Press the "ON-OFF" button, and the "ON-OFF" light will turn on. At this point, the wash cycle will
begin.
When the dial reaches the STOP mark (see figure), the cycle has finished. Turn off the appliance using
the ON-OFF button and open the door of the dishwasher. Wait a few minutes before unloading the dish-
washer to avoid handling the dishes and utensils while they are still hot and more susceptible to breakage.
They will also dry better.
At the end of the wash cycle...
Press the ON-OFF button and the ON Light will turn off. Rotate the dial clockwise to the desired cycle
setting. Then, turn the dishwasher back on using the ON-OFF button.
Cancelling or modifying a wash cycle setting...
Customer Helpline 0845 600 4632HAUS Dishwasher User Manual
How to keep your dishwasher in shape
After every wash
After every wash, set the ON-OFF button “A” to off and leave the door slightly ajar so that moisture and
odours are not trapped inside.
Remove the plug
Before cleaning or performing maintenance, always switch of the electricity supply and remove the plug
from the socket.
No solvents or Abrasive Cleaning Products
To clean the exterior and rubber parts of the dishwasher, do not use solvents or abrasive cleaning
products. Use only a cloth and warm soapy water.
To remove spots or stains from the surface of the interior, use a cloth dampened with water and a little
white vinegar, or a cleaning product made specifically for dishwashers.
Seals
One of the factors that cause odours to form in the dishwasher is food that remains trapped in the seals.
Periodic cleaning with a damp sponge will prevent this from occurring.
The door should not be left in the open position since this could present a tripping hazard.
Moving the appliance
When you go on holiday
When you go on holiday, it is recommended that you run a wash cycle with the dishwasher empty and
then remove the plug from the socket, turn off the water supply and leave the door of the appliance
slightly ajar. This will help the seals last longer and prevent odours from forming within the appliance.
17
en
Customer Helpline 0845 600 4632HAUS Dishwasher User Manual
Care and maintenance
Regular inspection and maintenance of your appliance helps to prevent problems from occurring. This
saves time and aggravation. You should therefore carefully inspect the inside of your dishwasher from
time to time.
18
en
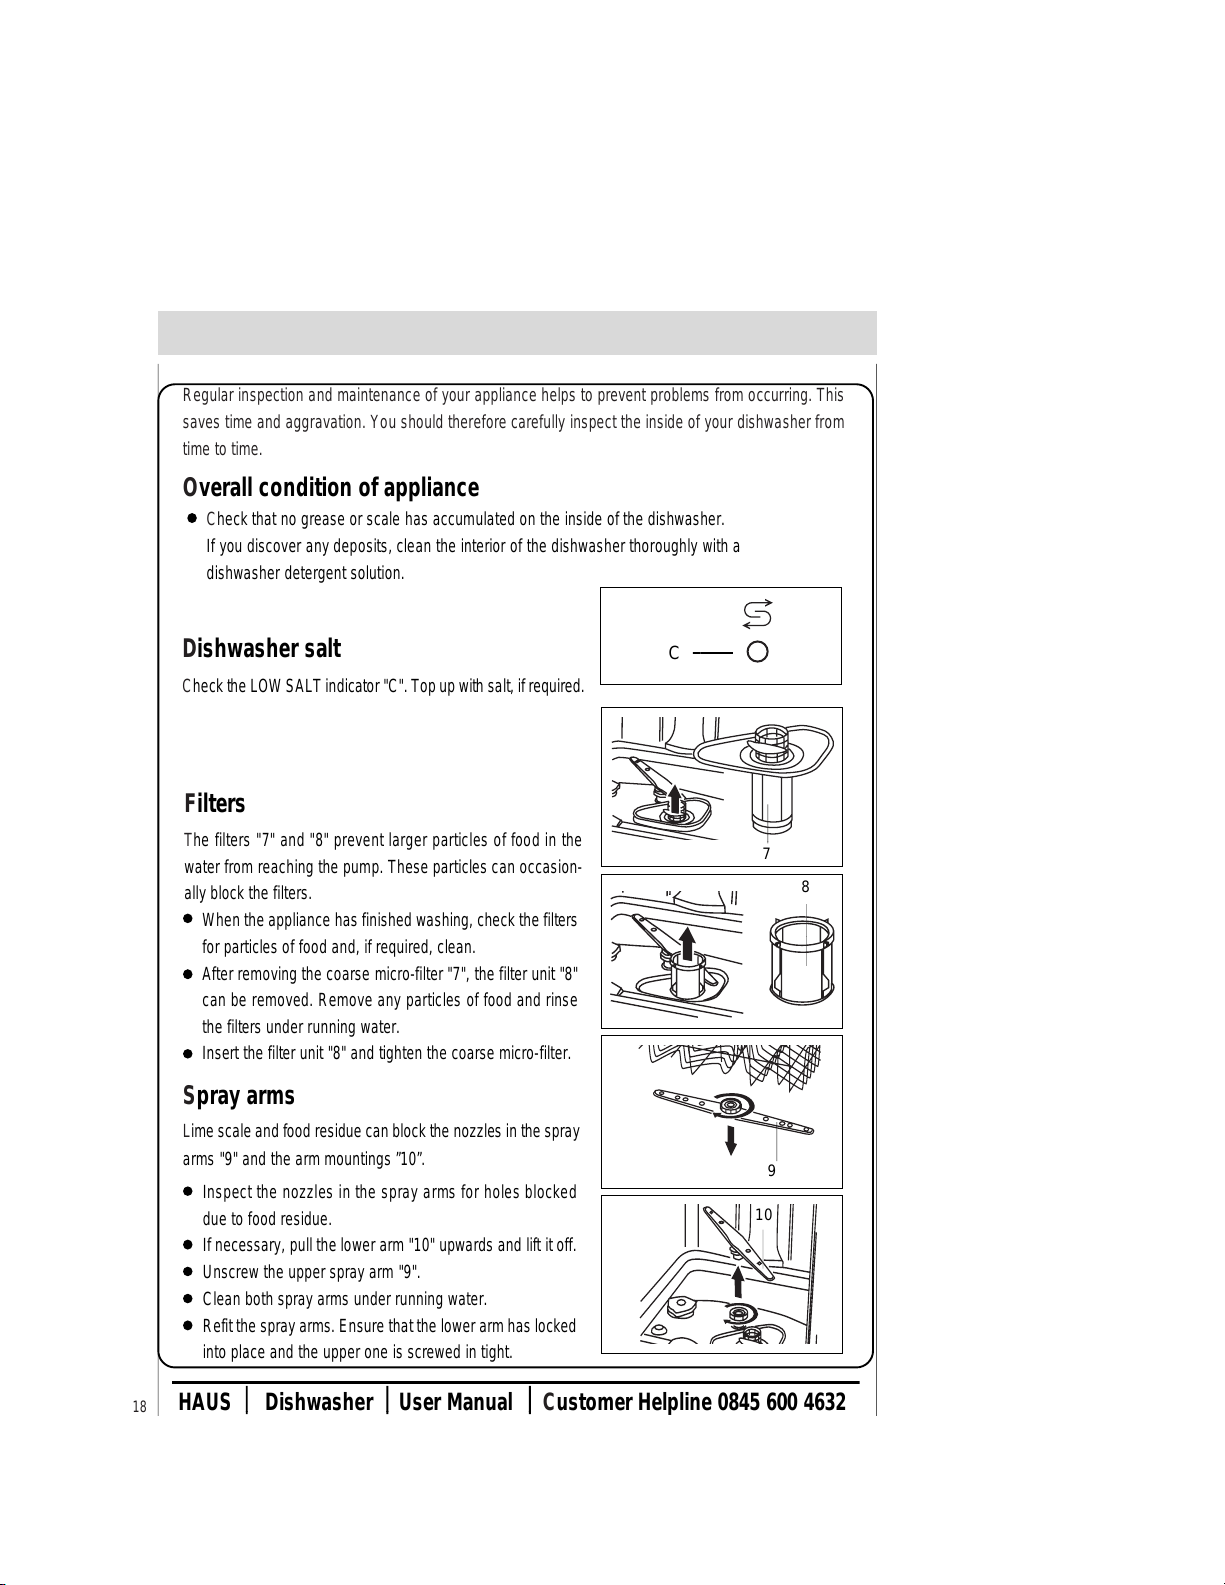
Inspect the nozzles in the spray arms for holes blocked
due to food residue.
If necessary, pull the lower arm "10" upwards and lift it off.
Unscrew the upper spray arm "9".
Clean both spray arms under running water.
Refit the spray arms. Ensure that the lower arm has locked
into place and the upper one is screwed in tight.
Spray arms
Lime scale and food residue can block the nozzles in the spray
arms "9" and the arm mountings ”10”.
8
7
9
10
Overall condition of appliance
Check that no grease or scale has accumulated on the inside of the dishwasher.
If you discover any deposits, clean the interior of the dishwasher thoroughly with a
dishwasher detergent solution.
Filters
The filters "7" and "8" prevent larger particles of food in the
water from reaching the pump. These particles can occasion-
ally block the filters.
When the appliance has finished washing, check the filters
for particles of food and, if required, clean.
After removing the coarse micro-filter "7", the filter unit "8"
can be removed. Remove any particles of food and rinse
the filters under running water.
Insert the filter unit "8" and tighten the coarse micro-filter.
Dishwasher salt
Check the LOW SALT indicator "C". Top up with salt, if required.
C
Customer Helpline 0845 600 4632HAUS Dishwasher User Manual
Table of contents


