HAUSSLER 304016 User manual
Operang instrucons
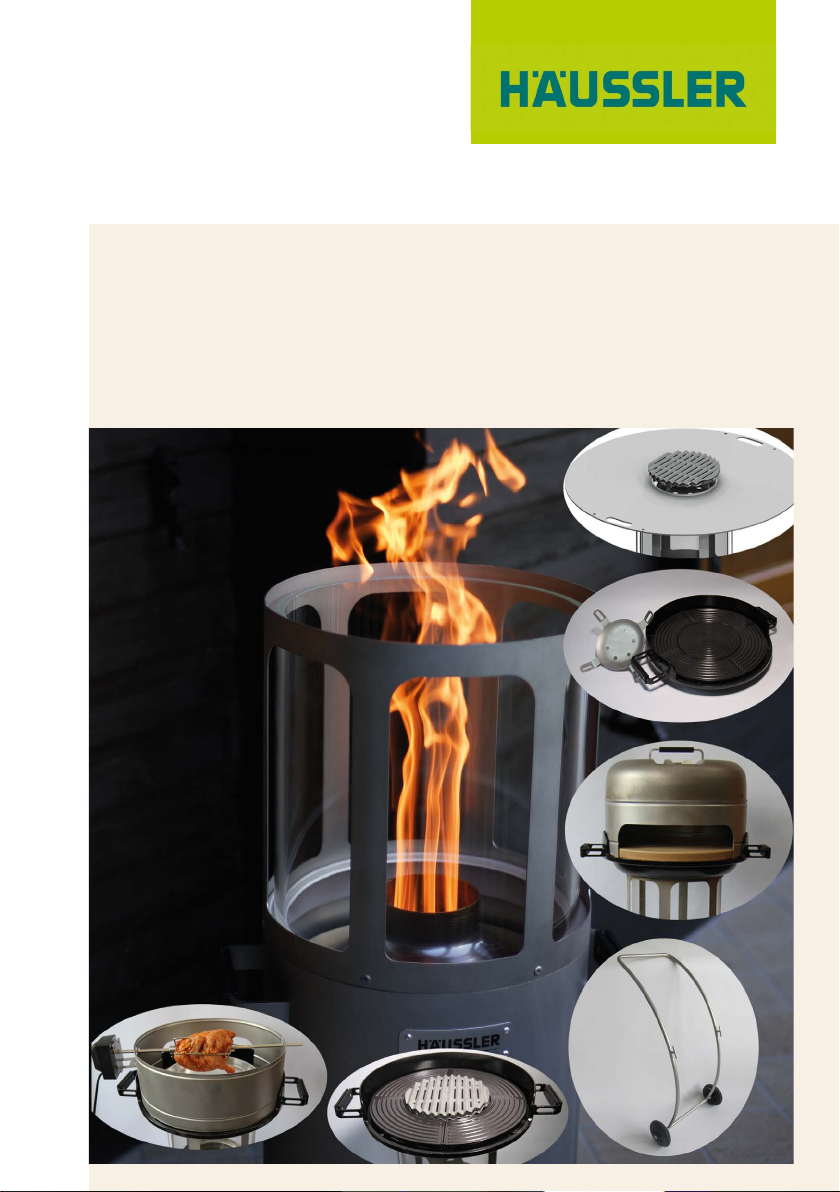
Häussler barbecue accessories
Original operang instrucons

Contents
1 Welcome… .........................................................................................................4
2 For your safety ..................................................................................................5
2.1 Table of symbols ............................................................................................. 5
2.2 Intended use................................................................................................... 5
2.3 Basic rules ....................................................................................................... 5
2.4 Safety informaon .......................................................................................... 5
3 Grill grate ...........................................................................................................7
3.1 Product descripon ........................................................................................ 7
3.2 Technical data ................................................................................................. 7
3.3 Grill grate scope of delivery ............................................................................ 8
3.4 Required accessories ...................................................................................... 8
3.5 Seng up the device ...................................................................................... 8
3.6 Cleaning the device for the rst me ............................................................. 8
3.7 Assembling the device .................................................................................... 8
3.8 Illustrated grill grate set-up instrucons......................................................... 9
4 Plancha ............................................................................................................10
4.1 Product descripon ...................................................................................... 10
4.2 Technical data ............................................................................................... 10
4.3 Plancha scope of delivery ............................................................................. 11
4.4 Required accessories .................................................................................... 11
4.5 Seng up the device .................................................................................... 12
4.6 Cleaning the device for the rst me ........................................................... 12
4.7 Assembling the device .................................................................................. 12
4.8 Illustrated plancha set-up instrucons ......................................................... 12
5 Spit ..................................................................................................................15
5.1 Product descripon ...................................................................................... 15
5.2 Technical data ............................................................................................... 15
5.3 Spit scope of delivery.................................................................................... 16
5.4 Required accessories .................................................................................... 16
5.5 Seng up the device .................................................................................... 16
5.6 Cleaning the device for the rst me ........................................................... 16
5.7 Assembling the device .................................................................................. 17
5.8 Illustrated spit instrucons ........................................................................... 17
6 Pizza stone .......................................................................................................20
6.1 Product descripon ...................................................................................... 20
6.2 Technical data ............................................................................................... 20
6.3 Pizza stone scope of delivery ........................................................................ 21
6.4 Required accessories .................................................................................... 21
2

6.5 Seng up the device .................................................................................... 21
6.6 Cleaning the device for the rst me ........................................................... 21
6.7 Assembling the device .................................................................................. 22
6.8 Illustrated pizza stone instrucons ............................................................... 22
7 Transport dolly for the light pillar .....................................................................24
7.1 Product descripon ...................................................................................... 24
7.2 Technical data ............................................................................................... 24
7.3 Transport dolly scope of delivery.................................................................. 25
7.4 Seng up the device .................................................................................... 25
7.5 Illustrated transport dolly instrucons ......................................................... 26
8 Wind deector .................................................................................................28
8.1 Product descripon ...................................................................................... 28
8.2 Technical data ............................................................................................... 28
8.3 Wind deector scope of delivery.................................................................. 29
8.4 Required accessories .................................................................................... 29
8.5 Assembling the device .................................................................................. 29
8.6 Illustrated wind deector instrucons.......................................................... 30
9 Good to know: Helpful hints around grilling .....................................................31
10 Cleaning ...........................................................................................................32
11 Maintenance ....................................................................................................33
12 Troubleshoong ...............................................................................................34
13 Disposal ...........................................................................................................35
14 Accessories ......................................................................................................36
15 Warranty ..........................................................................................................39
16 For your notes ..................................................................................................40
3

1 Welcome…
to the world of milling, kneading, baking, and pasta-making!
Häussler stands for doing it yourself. With our devices, you can create wonderful
delicacies with a second-to-none taste. Immerse yourself in the world of milling,
kneading, baking, barbecuing, and pasta-making.
Häussler stands for uncompromising quality – Made in Germany. Decades of
experience and thousands of devices shipped worldwide speak for themselves.
Häussler stands for customer service. Even aer you’ve made a purchase, we will not
hesitate to provide you with support. We want you to be happy with your device for
a long me, receive new helpful hints now and again, and discover fresh recipe ideas
at Häussler.
You have decided to purchase new accessories for your Häussler barbecue and can
now experience the great diversity of grilling.
Plenty of pleasure and always successful.
4
Welcome…

2 For your safety
2.1 Table of symbols
Symbol descripon
⚠Danger symbol
Prompt to acon
iInformaon
Bullet point
Tab. 1: Table of symbols
2.2 Intended use
Häussler barbecue accessories meet the prescribed, product-specic safety
regulaons.
Häussler barbecue accessories may only be used in conjuncon with the Häussler
barbecue and are intended for use in the roasng, grilling, and baking of various
foods. Any other use shall be considered improper use. Karl-Heinz Häussler GmbH
shall not be liable for any damage to property or persons resulng from improper use
of the product.
2.3 Basic rules
Carefully read the operang instrucons before you commission the device.
Observe the safety informaon and warnings in the operang instrucons.
Only operate the device when it is in perfect condion.
Keep the operang instrucons available in the vicinity of the device.
Always include these operang instrucons when selling this device to a third party.
Conduct a visual inspecon before commissioning every me the device is used.
2.4 Safety informaon
Observe the operang instrucons supplied with the Häussler barbecue.
iIf the display of operang instrucons or parts of them is too small,
you can view the operang instrucons on our website www.back-
dorf.de and enlarge them there.
5
For your safety

⚠Risk of burns from heated components
Do not leave the barbecue and/or accessories unaended during and aer opera-
on.
Set up the barbecue and accessories out of the reach of children under 14 and al-
ways supervise children in the vicinity of the device. Do not leave infants, children,
or animals unaended in the vicinity of the barbecue.
Let the barbecue and accessories cool down completely before touching them.
When handling the barbecue and/or accessories, wear barbecue mis.
Use proper barbecue tools with long, heat-resistant handles.
Let the barbecue aachment and accessories cool down completely before cleaning
them.
⚠Risk of burns from high ames
Do not wear loose-ng clothes.
Persons with long hair should e it back.
⚠Risk of re from hot components
Place the hot cover, barbecue aachment, and all other accessory parts on a heat-
resistant surface only.
Keep ammable materials away from the grilling, roasng, and baking surface.
⚠Risk of crushing from falling parts
Ensure that the accessory parts are properly seated on the light pillar or the bar-
becue.
6
For your safety
3 Grill grate
3.1 Product descripon
You have purchased a grill grate, which is a wonderful enhancement for your griddle
insert. With the grill grate, you can cook perfect steaks and other delicacies. The
ames that dart through the grate give your food the delighul aroma of wood. The
uted form sears your food perfectly.
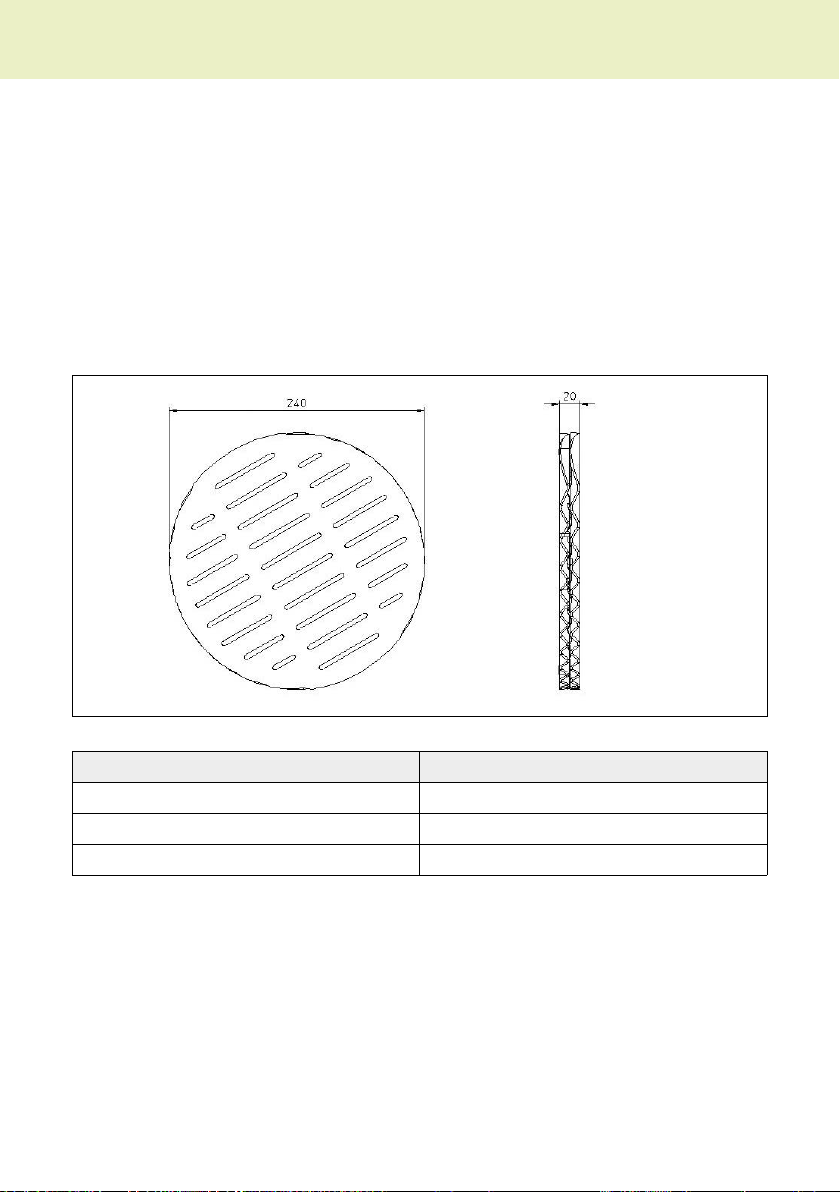
3.2 Technical data
Name Value
Grill grate diameter approx. 240 mm
Height approx. 20 mm
Weight approx. 1.5 kg
Tab. 2: Dimensions
7
Grill grate
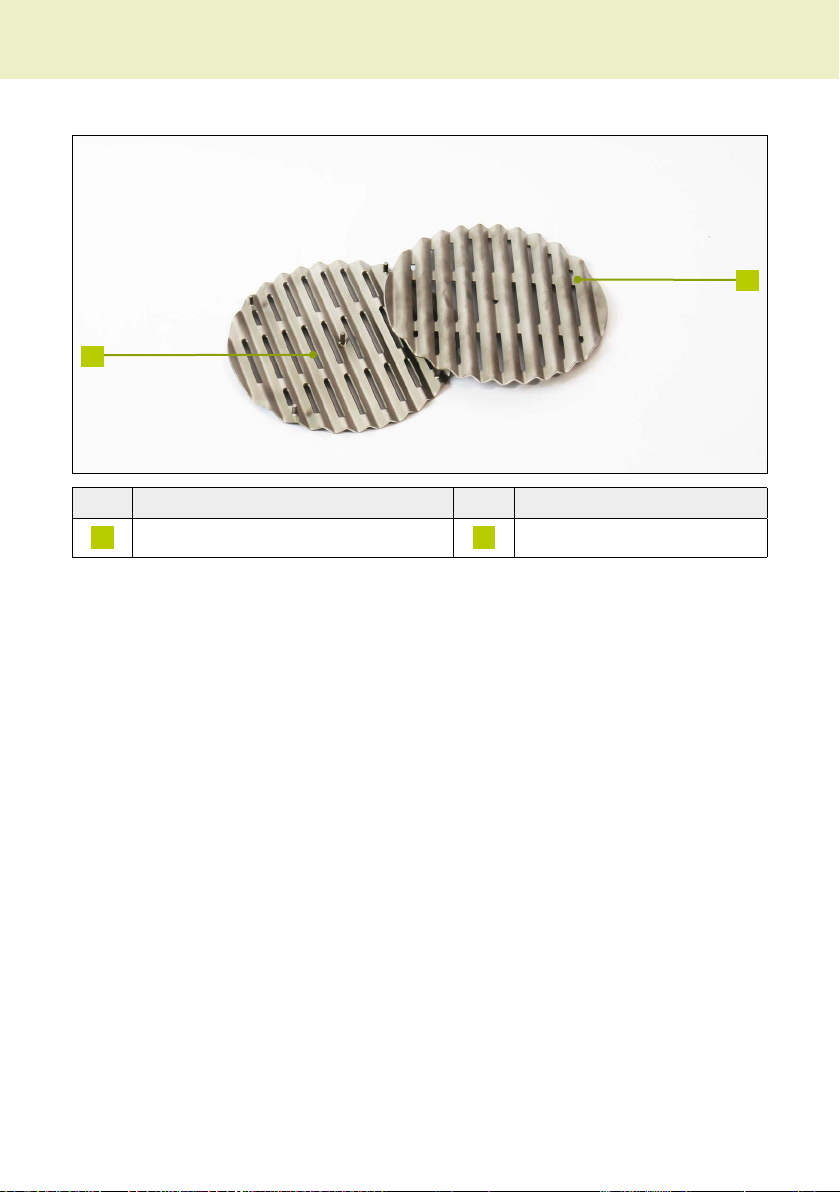
3.3 Grill grate scope of delivery
1
2
No. Designaon No. Designaon
1Griddle insert 1 2Griddle insert 2
Tab. 3: Scope of delivery
3.4 Required accessories
iTo properly commission the grill grate, you will need the following accessories: bar-
becue aachment and ame splier.
3.5 Seng up the device
Use Table 3 “Grill grate scope of delivery” on page 8 to help you check the delivery
for completeness.
Create enough room to work on the device.
3.6 Cleaning the device for the rst me
iFor reasons of hygiene, all parts that come into contact with the food to be barbe-
cued must be removed and cleaned before inial commissioning.
Clean all parts, see Chapter 10 „Reinigen“ auf Seite 32.
3.7 Assembling the device
Remove the inner insert from the barbecue aachment.
Place the grill grate in the recess of the large inserts.
8
Grill grate
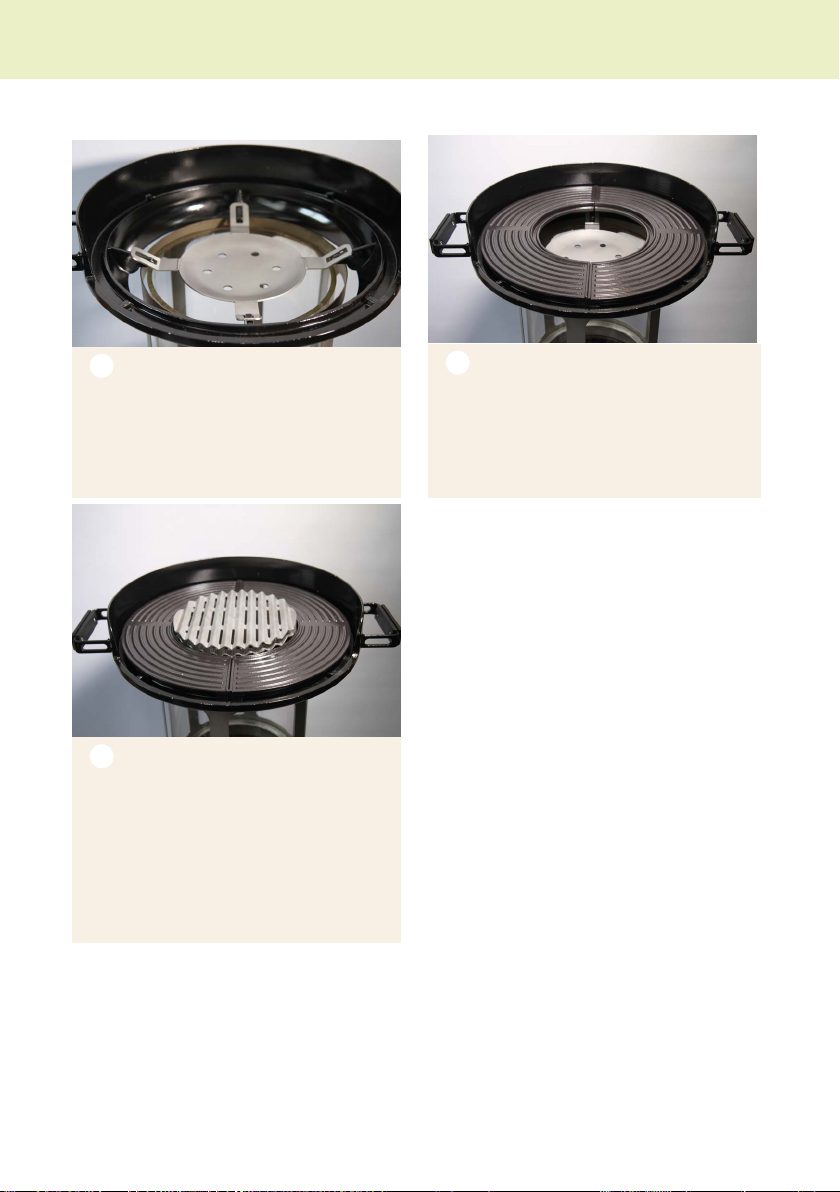
3.8 Illustrated grill grate set-up instrucons
1. Insert the ame splier
Place the barbecue aachment on
the light pillar.
Place the ame splier in the bar-
becue aachment.
2. Insert the uted inserts
Place the large uted inserts in the
barbecue aachment.
3. Insert the grill grate
Put the two grill grates on top of
each other.
i Make sure that the utes are
parallel.
Put the grill grate in the centre.
9
Grill grate
4 Plancha
4.1 Product descripon
You have purchased a plancha for your Häussler barbecue and can now grill larger
quanes of food at the same me. The plancha is made of stainless steel with a
special alloy. Developed in collaboraon with one of the leading steel manufacturers,
the alloy unites the strengths of normal steel and stainless steel. The plancha is
100% rust-free, which means it does not required extra protecon against corrosion.
It is food-safe and easy to clean. Calculaons and trials yielded an opmal disc
thickness of 5 mm. As a result, the plancha achieves a balance between weight and
dimensional stability while featuring opmal temperature zones. Heang it will
cause the plancha to bend slightly upwards so that neither grease nor the food on
it can drip or roll o. The inner ring keeps the grease from dripping into the ames,
prevenng grease explosions and soiling. The integrated handles and eyes for your
barbecue tools add the nishing touch to the plancha.
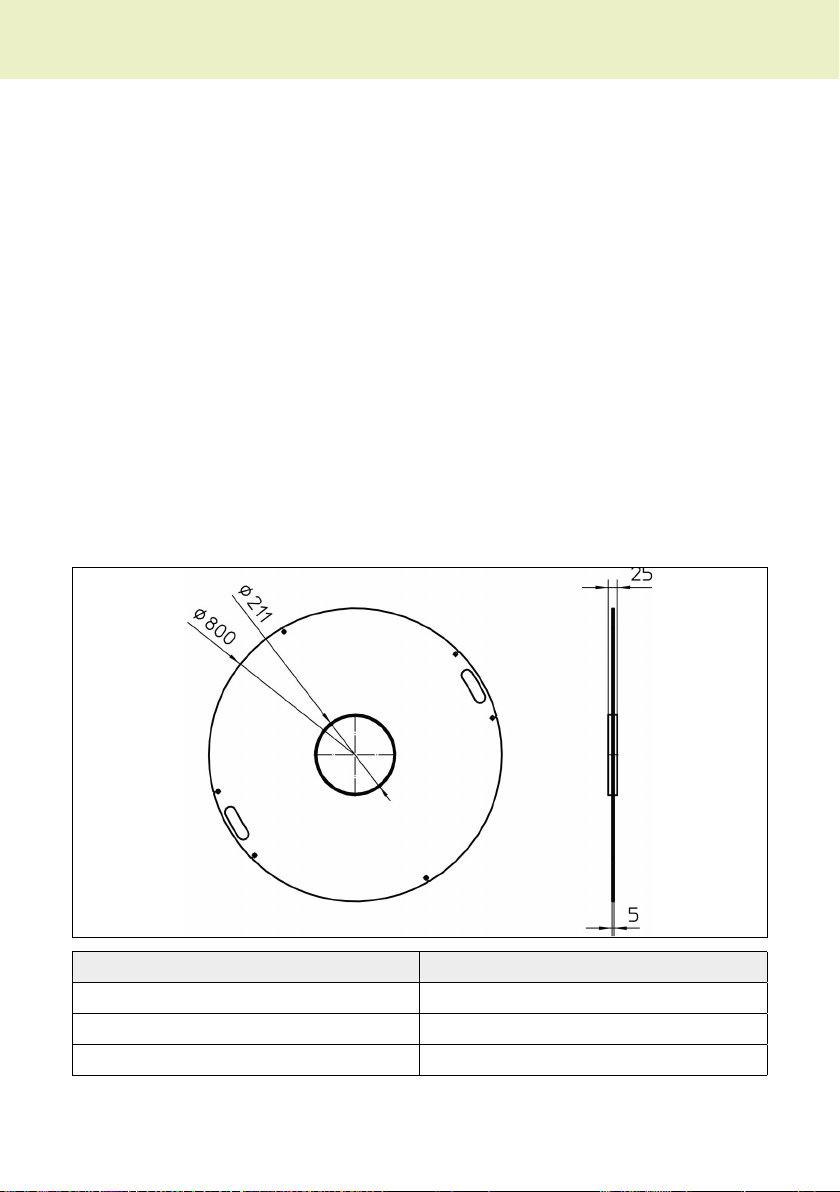
4.2 Technical data
Name Value
Outer diameter 800 mm
Inner diameter 211 mm
Disc thickness 5 mm
10
Plancha
Name Value
Weight approx. 18 kg
Inner plancha temperature 300 - 400 °C
Centre plancha temperature 200 - 250 °C
Outer plancha temperature 80 - 130 °C
Material Stainless steel
Tab. 4: Plancha tech. data
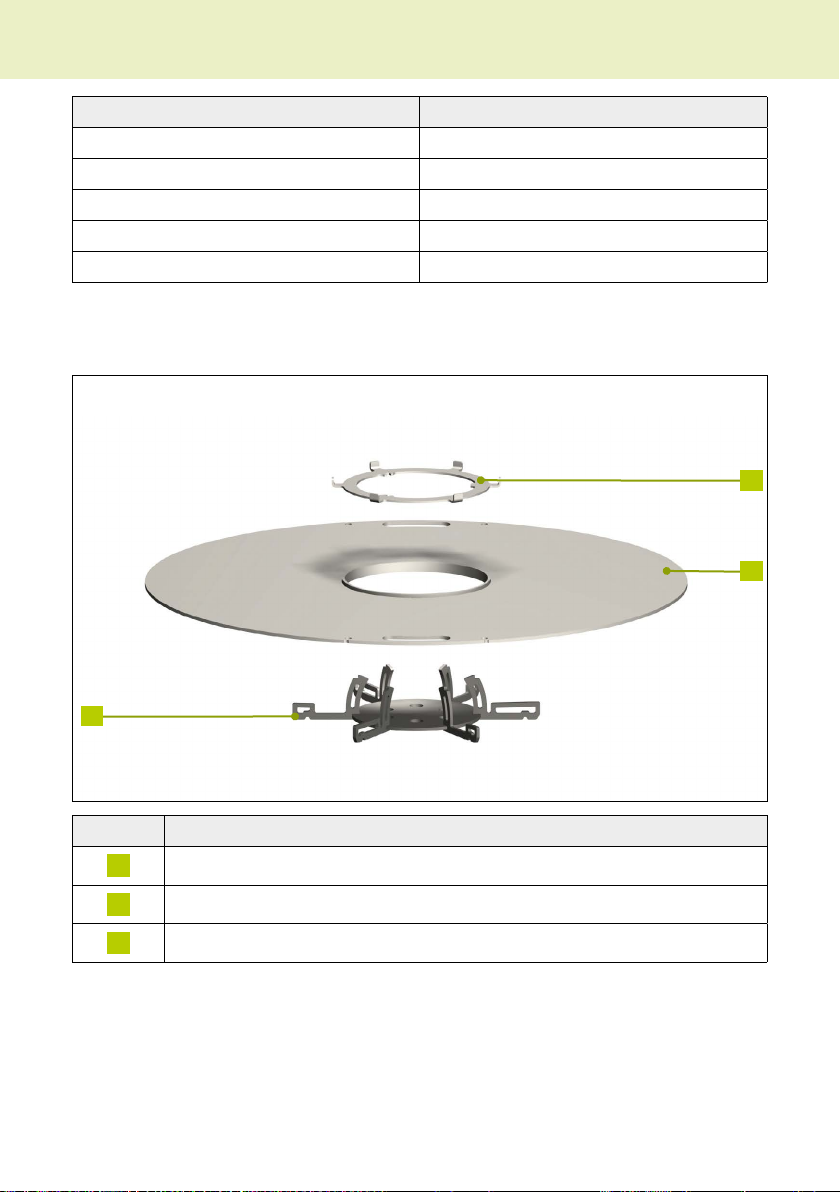
4.3 Plancha scope of delivery
1
2
3
No. Designaon
1Grill grate support
2Plancha
3Plancha ame splier
Tab. 5: Plancha scope of delivery
4.4 Required accessories
iTo properly commission the plancha, you will need the following accessories: Hä-
ussler light pillar.
11
Plancha
4.5 Seng up the device
Use Table 5 “Plancha scope of delivery” on page 11 to help you check the delivery
for completeness.
Create enough room to work on the device.
4.6 Cleaning the device for the rst me
iFor reasons of hygiene, all parts that come into contact with the food to be barbe-
cued must be removed and cleaned before inial commissioning.
Clean all parts, see Chapter 10 „Reinigen“ auf Seite 32.
4.7 Assembling the device
Place the ame splier of the plancha on the light pillar.
Now place the plancha on the ame splier.
As required, place the griddle insert, grill grate, or wok on top.
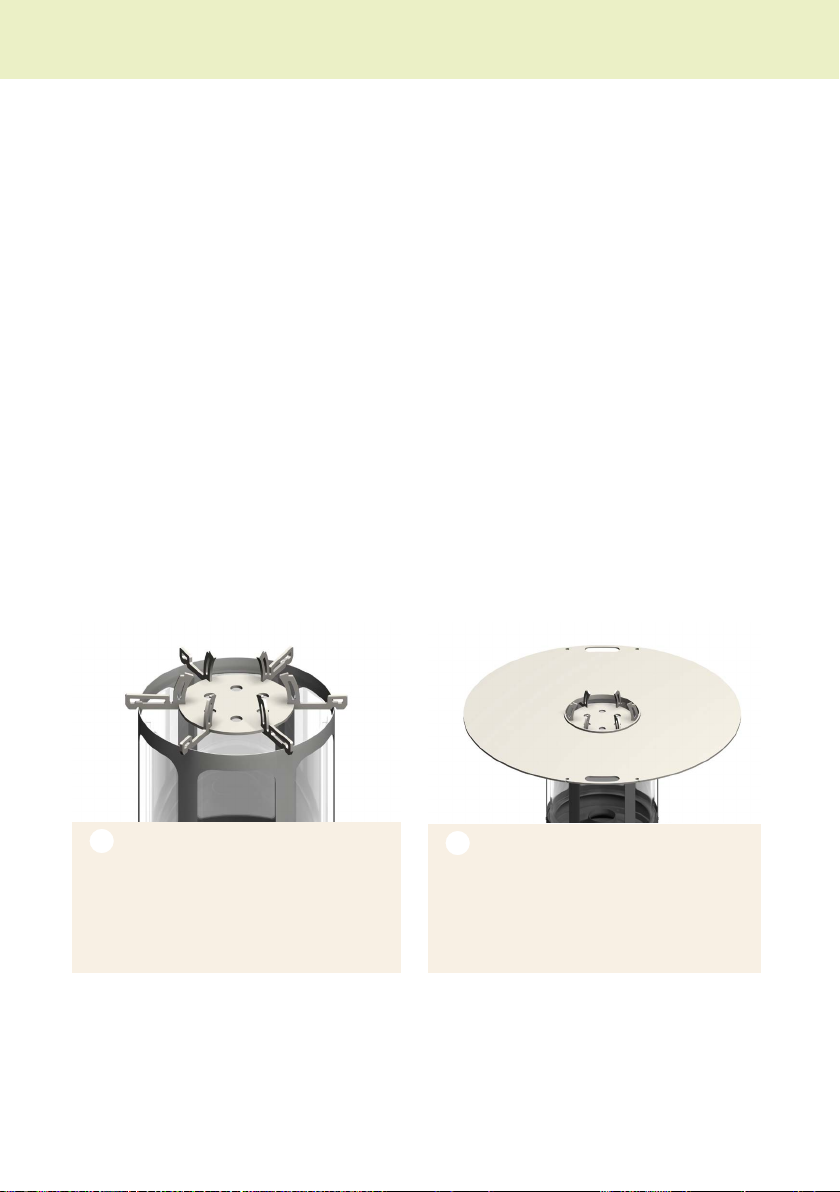
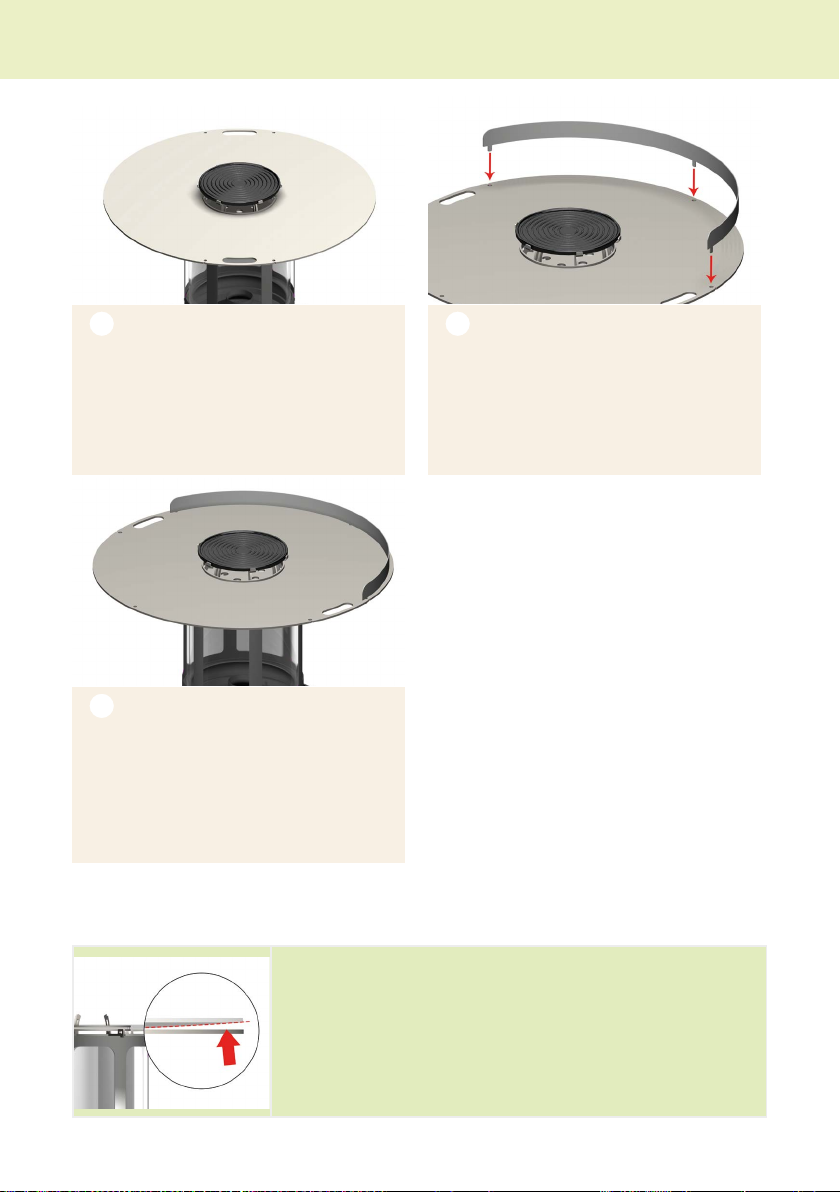
4.8 Illustrated plancha set-up instrucons
1. Posion the ame splier
Place the ame splier of the plan-
cha on the light pillar.
2. Posion the plancha
Place the plancha on the ame split-
te r.
12
Plancha
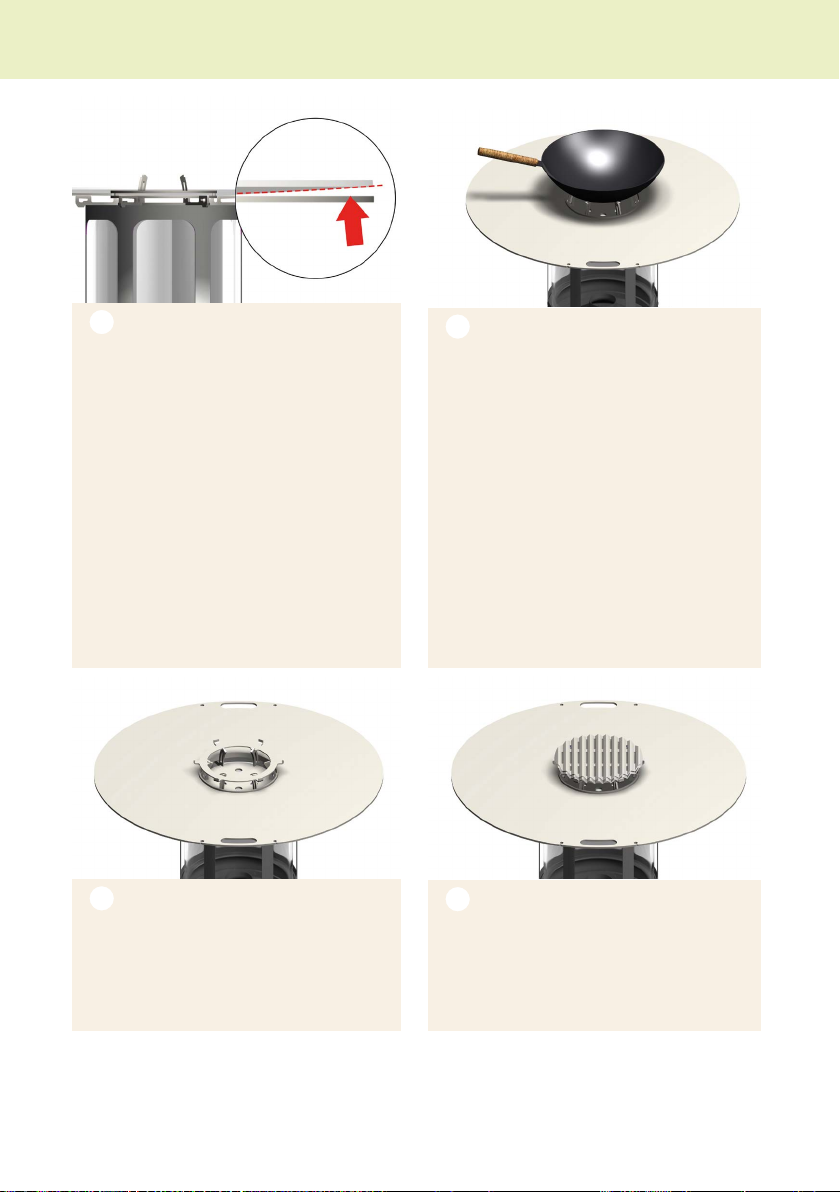
3. Disc bending direcon
Let the plancha warm up for 5 min.
and observe the direcon in which
it bends.
iThe plancha must bend upwards.
If the plancha bends downwards,
turn it upside down.
⚠Cauon: Risk of burns!
Wear barbecue mis to turn the
plancha upside down.
iThe plancha always bends in the same
direcon.
4. Use of the wok*
Place the wok on the ame splier,
which is on the light pillar.
iWhen using the wok, you do not
need the grill grate support.
5. Posion the grill grate support
Place the grill grate support on the
plancha.
6. Insert the grill grate*
Place the grill grate support on the
grill grate support.
13
Plancha
7. Posion the insert*
i Instead of the grill grate, you can use
the small insert from the barbecue
aachment.
Place the small insert on the grill
grate support.
8. Posion the edge strip*
When inserng the edge strip, make
sure that all three guide pins are lo-
cated above the relevant holes.
9. Insert the edge strip*
Slightly bend the edge strip and
push the guide pins into the posi-
oning holes.
Make sure that the edge strip is on
top of the plancha.
iItems with * are not included in the plancha scope of delivery. They can be ordered individu-
ally as accessories. See chapter 14 “Accessories” on page 36.
Why does the plancha bend?
Due to its material properes, stainless steel warps under
the inuence of heat. We have used this property to your
advantage. The heat of the light pillar will cause the plancha
to slightly bend upwards. This means that the grease from
the food will drip towards the inside and not onto your feet.
14
Plancha
5 Spit
5.1 Product descripon
You have purchased a spit, a high-quality enhancement. The spit is simple to operate,
easy-care, and requires virtually no maintenance. You can now prepare browned
grilled chicken and other tasty delicacies.
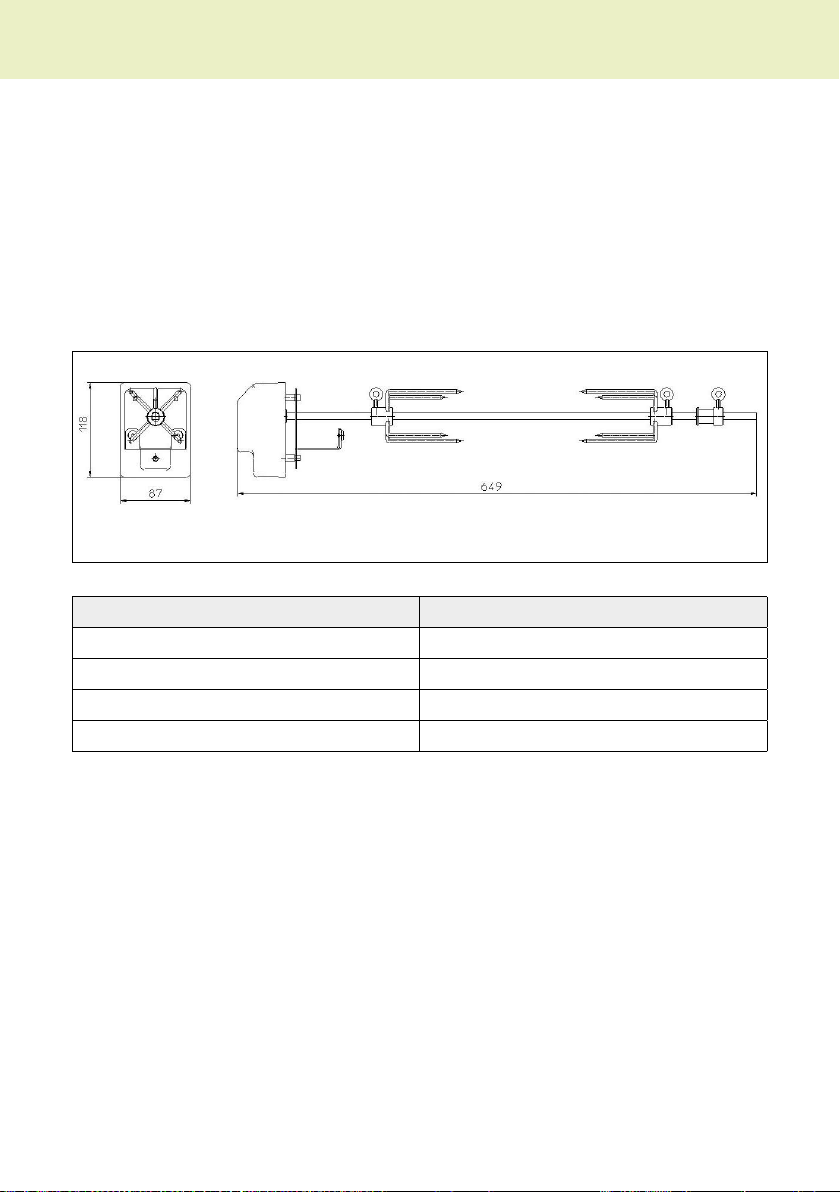
5.2 Technical data
Name Value
Length 649 mm
Height 118 mm
Width 87 mm
Weight approx. 1.8 kg
Tab. 6: Dimensions
15
Spit
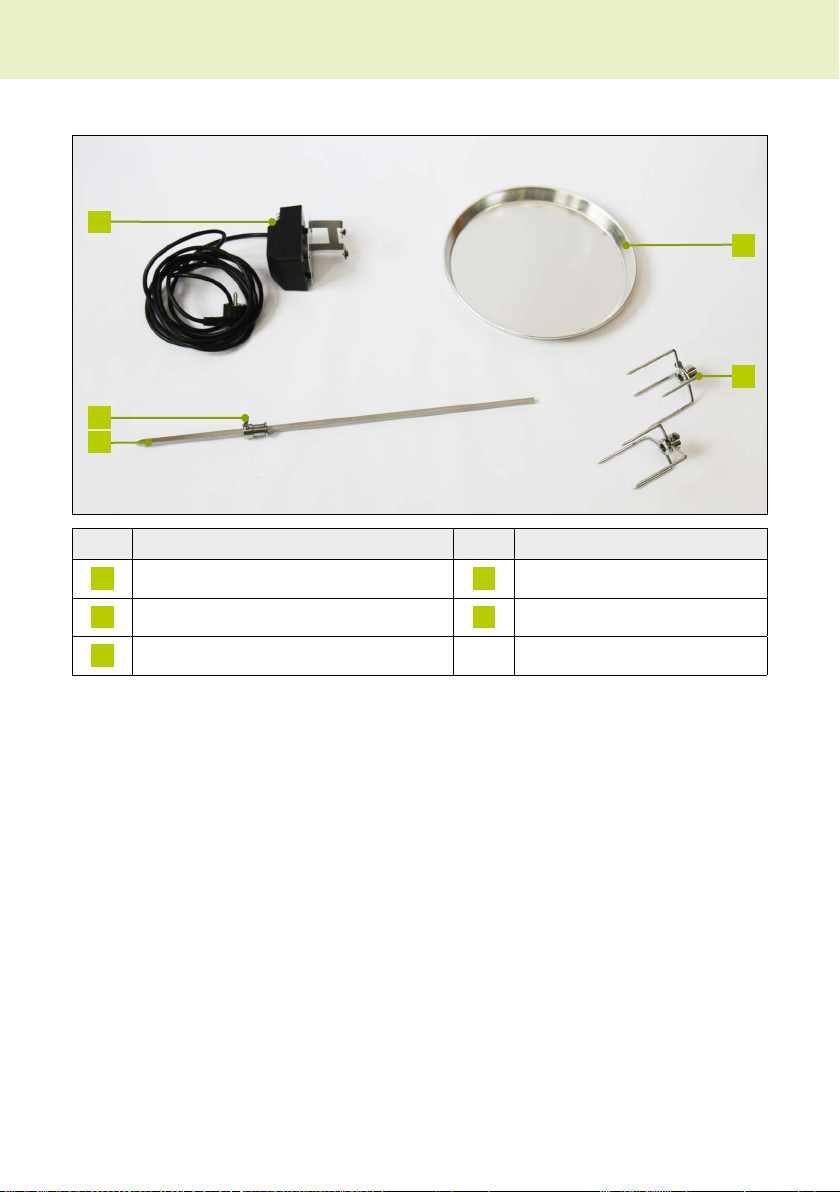
5.3 Spit scope of delivery
1
2
3
4
5
No. Designaon No. Designaon
1Drip tray 4Fixing screw
2Spit with adjusng screw 5Motor
3Spit sha
Tab. 7: Scope of delivery
5.4 Required accessories
iTo properly commission the spit, you will need the following accessories: barbecue
aachment. barbecue cover, and intermediate ring.
5.5 Seng up the device
Use Table 7 “Scope of delivery” on page 16 to help you check the delivery for com-
pleteness.
Create enough room to work on the device.
5.6 Cleaning the device for the rst me
iFor reasons of hygiene, all parts that come into contact with the food to be barbe-
cued must be cleaned before inial commissioning.
16
Spit
Clean all parts, see Chapter 10 „Reinigen“ auf Seite 32.
5.7 Assembling the device
Place the barbecue aachment on the light pillar.
Place the drip tray on the centre of the barbecue aachment.
Place the intermediate ring in the barbecue aachment.
Suspend the motor.
Insert the spit sha.
Fix the spit in posion using the xing screw.
Posion the barbecue cover.
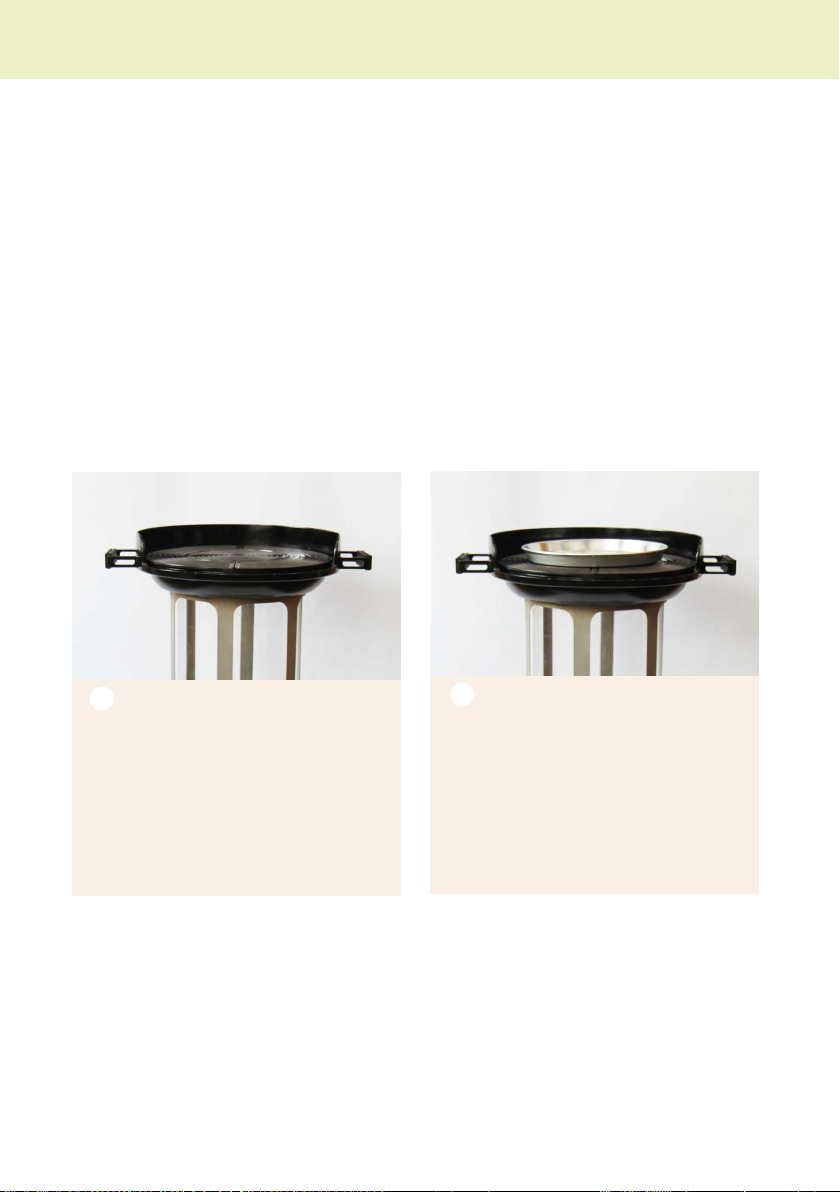
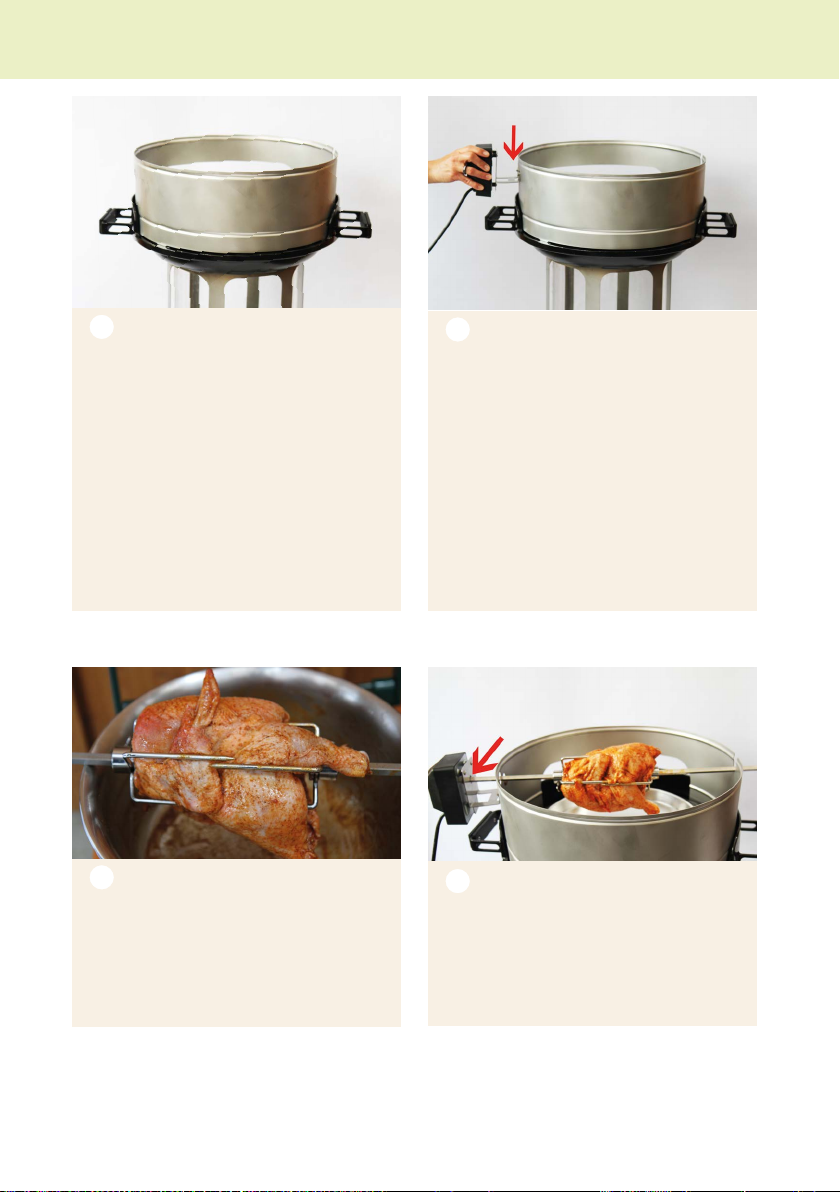
5.8 Illustrated spit instrucons
1. Prepare the barbecue aachment
Place the barbecue aachment on the
light pillar.
Put the insert into the barbecue aach-
ment.
2. Add the drip tray
Place the drip tray on the inserts.
iThe drip tray must be centred beneath
the food.
Fill the drip tray with water at least half-
way.
17
Spit
3. Add the intermediate ring
Place the intermediate ring on the bar-
becue aachment.
Ensure that the recess in the intermedi-
ate ring is poinng to the rear.
iWhen the intermediate ring is turned,
the opening through the barbecue
aachment is almost completely co-
vered. This raises the temperature in
the roasng chamber and distributes
the heat opmally. As a result, the food
is done more quickly.
4. Suspend the motor
Suspend the motor from the motor
support on the intermediate ring.
5. Prepare the food to be grilled
Push the spit through the food.
Make sure that chicken legs remain
close to the spit when turning.
If necessary, truss them.
6. Assemble the spit
Guide the spit into the motor.
18
Spit

7. Fix the spit in posion
Use the xing screw to prevent the spit
from shiing.
To do so, clamp the spit in the interme-
diate ring.
Use your thumb to press the sha to-
wards the motor and at the same me,
release the xing screw.
iMake sure that the thicker part
touches on the inside. (red arrow)
8. Posion the cover
Put on the cover.
While grilling, ensure that the drip tray always contains some water.
If necessary, add water.
iThe drip tray must always contain water because otherwise the dripping grease and
meat juice will burn on the heated insert, resulng in dense smoke.
19
Spit
6 Pizza stone
6.1 Product descripon
You have purchased a pizza stone, which is a wonderful enhancement. Now you can
bake crispy pizza and delicious tarte ambee. A delicious change of pace for summer
barbecues!
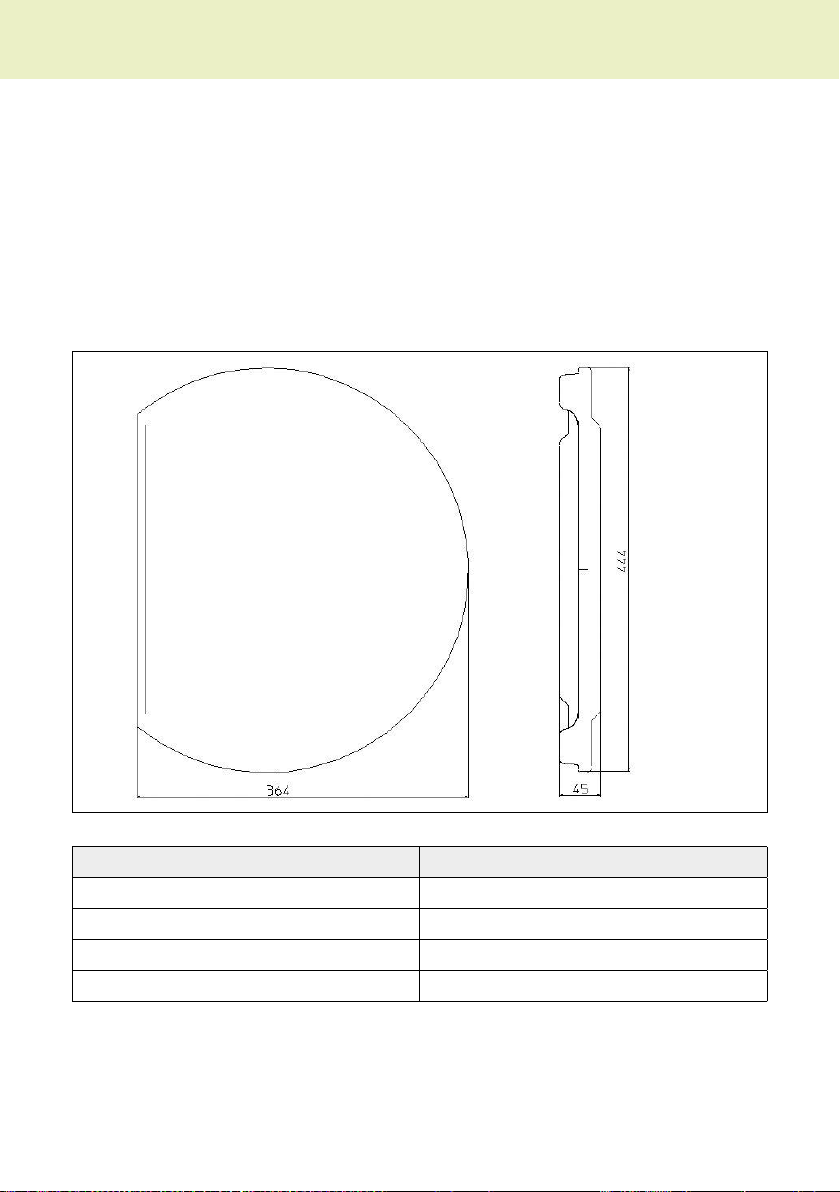
6.2 Technical data
Name Value
Width 364 mm
Length 444 mm
Height 45 mm
Weight approx. 3.9 kg
Tab. 8: Dimensions
20
Pizza stone
This manual suits for next models
11
Table of contents


