Havit PJ202 User manual
1080P HD PROJECTOR PJ202
User Manual • Uživatelský manuál •
Užívateľský manuál • Használati utasítás •
Benutzerhandbuch •Manuel de l'utilisateur

2
English
3 –21
Čeština
22 –40
Slovenčina
41 –60
Magyar
61 –79
Deutsch
Français
80 - 98
99 –118

3
The product user guide contains product features, how to use, and the operating
procedure. Read the user manual carefully to get the best experience and avoid
unnecessary damage. Keep this manual for future reference. If you have any questions
or comments about the device, please contact the customer line.
✉www.alza.co.uk/kontakt
✆+44 (0)203 514 4411
Importer Alza.cz a.s., Jankovcova 1522/53, Holešovice, 170 00 Praha 7, www.alza.cz

4
PACKING LIST
NOTICE
Recommended
Projector
Remote (Batteries
Not Included)
User Manual
AV Cable
HD Cable
Power Cable
Video,
Movie
5
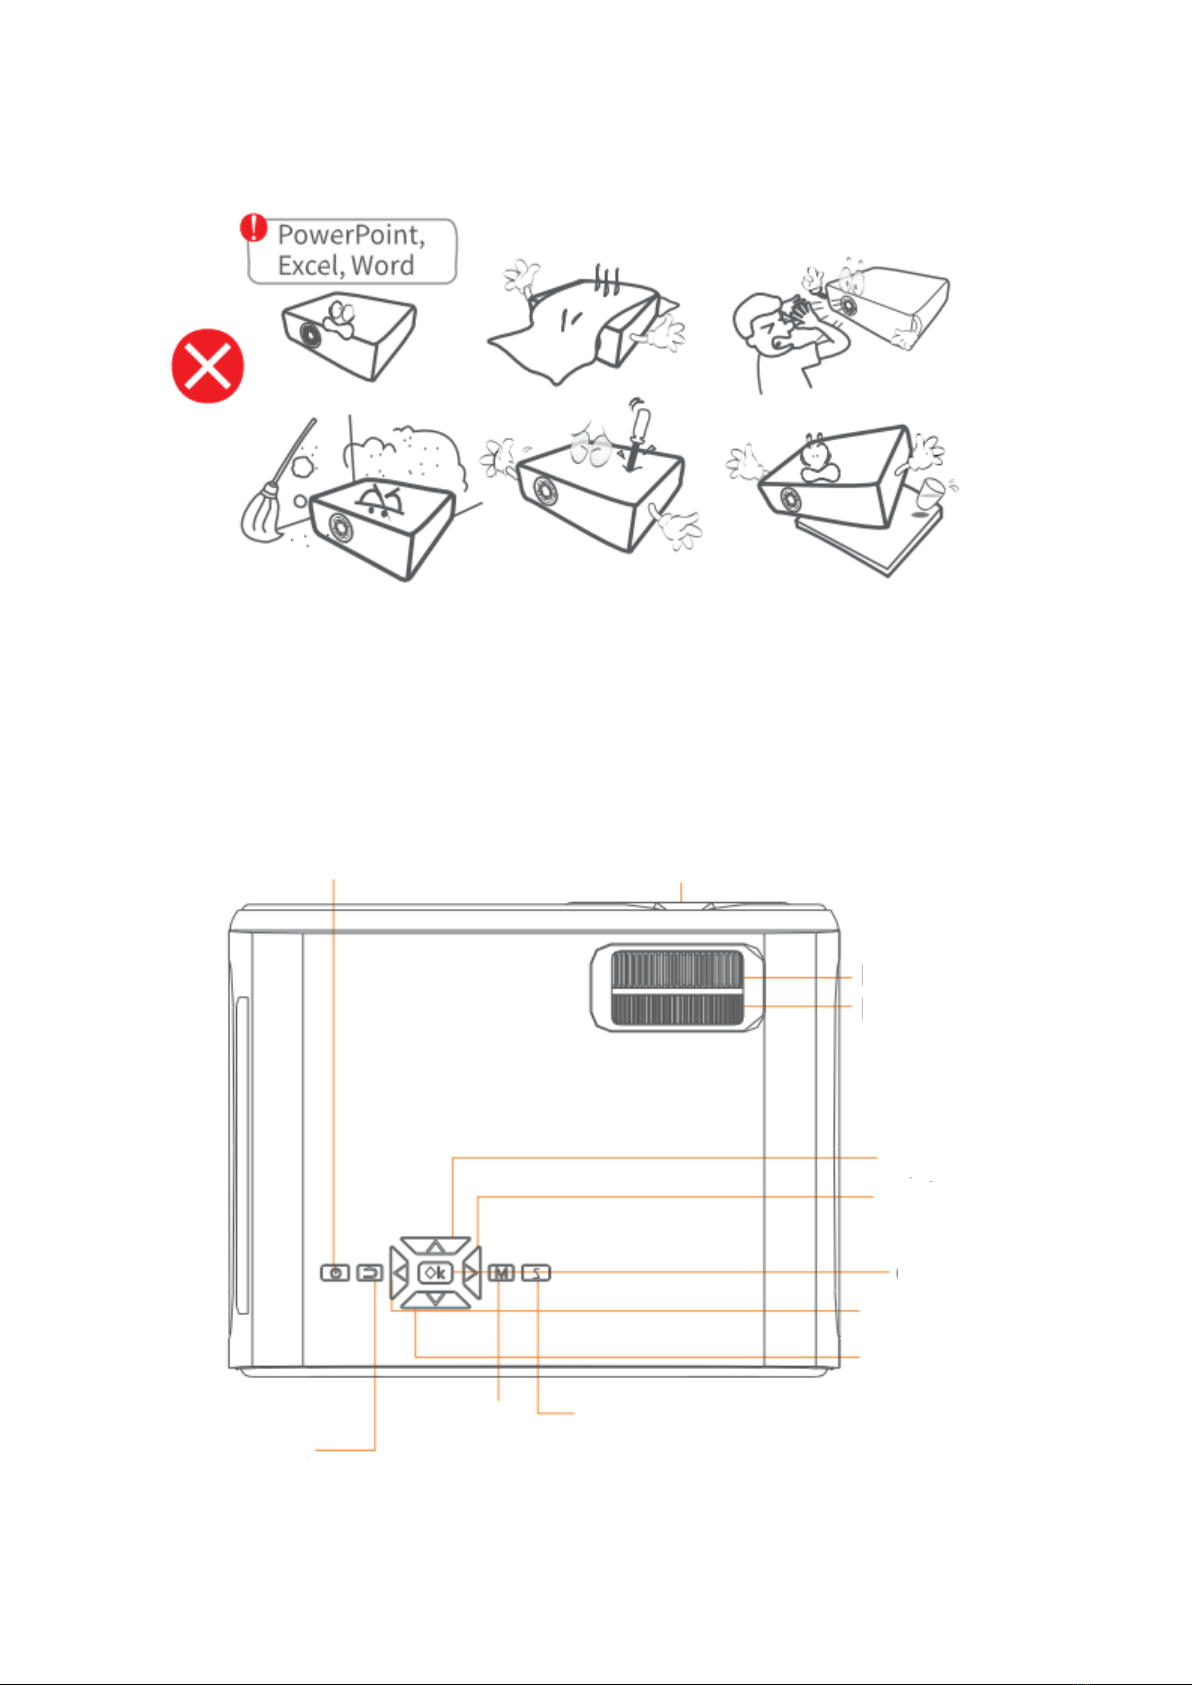
FUNCTION OVERVIEW
Power Button
Lens
Focus
Keystone
Up
Right
OK
Left
Down
Input Source
Menu
Back
NOT Recommended
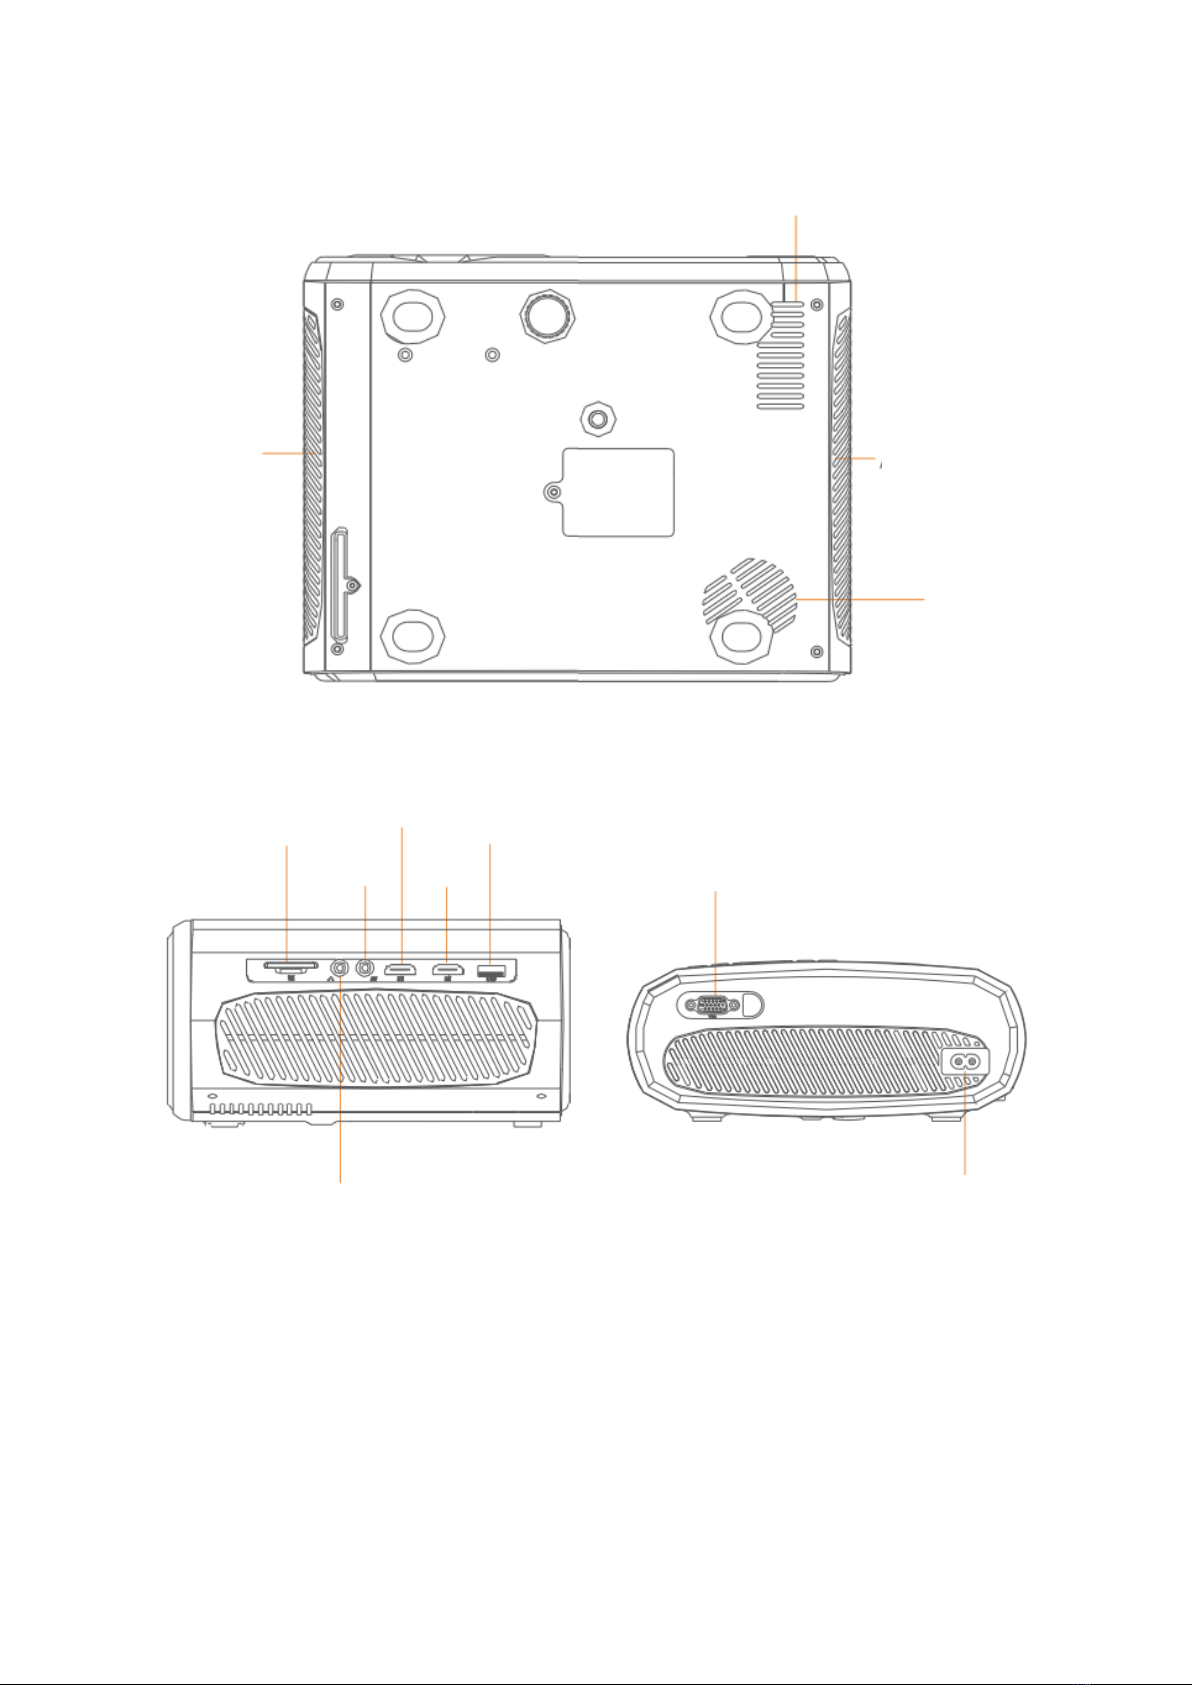
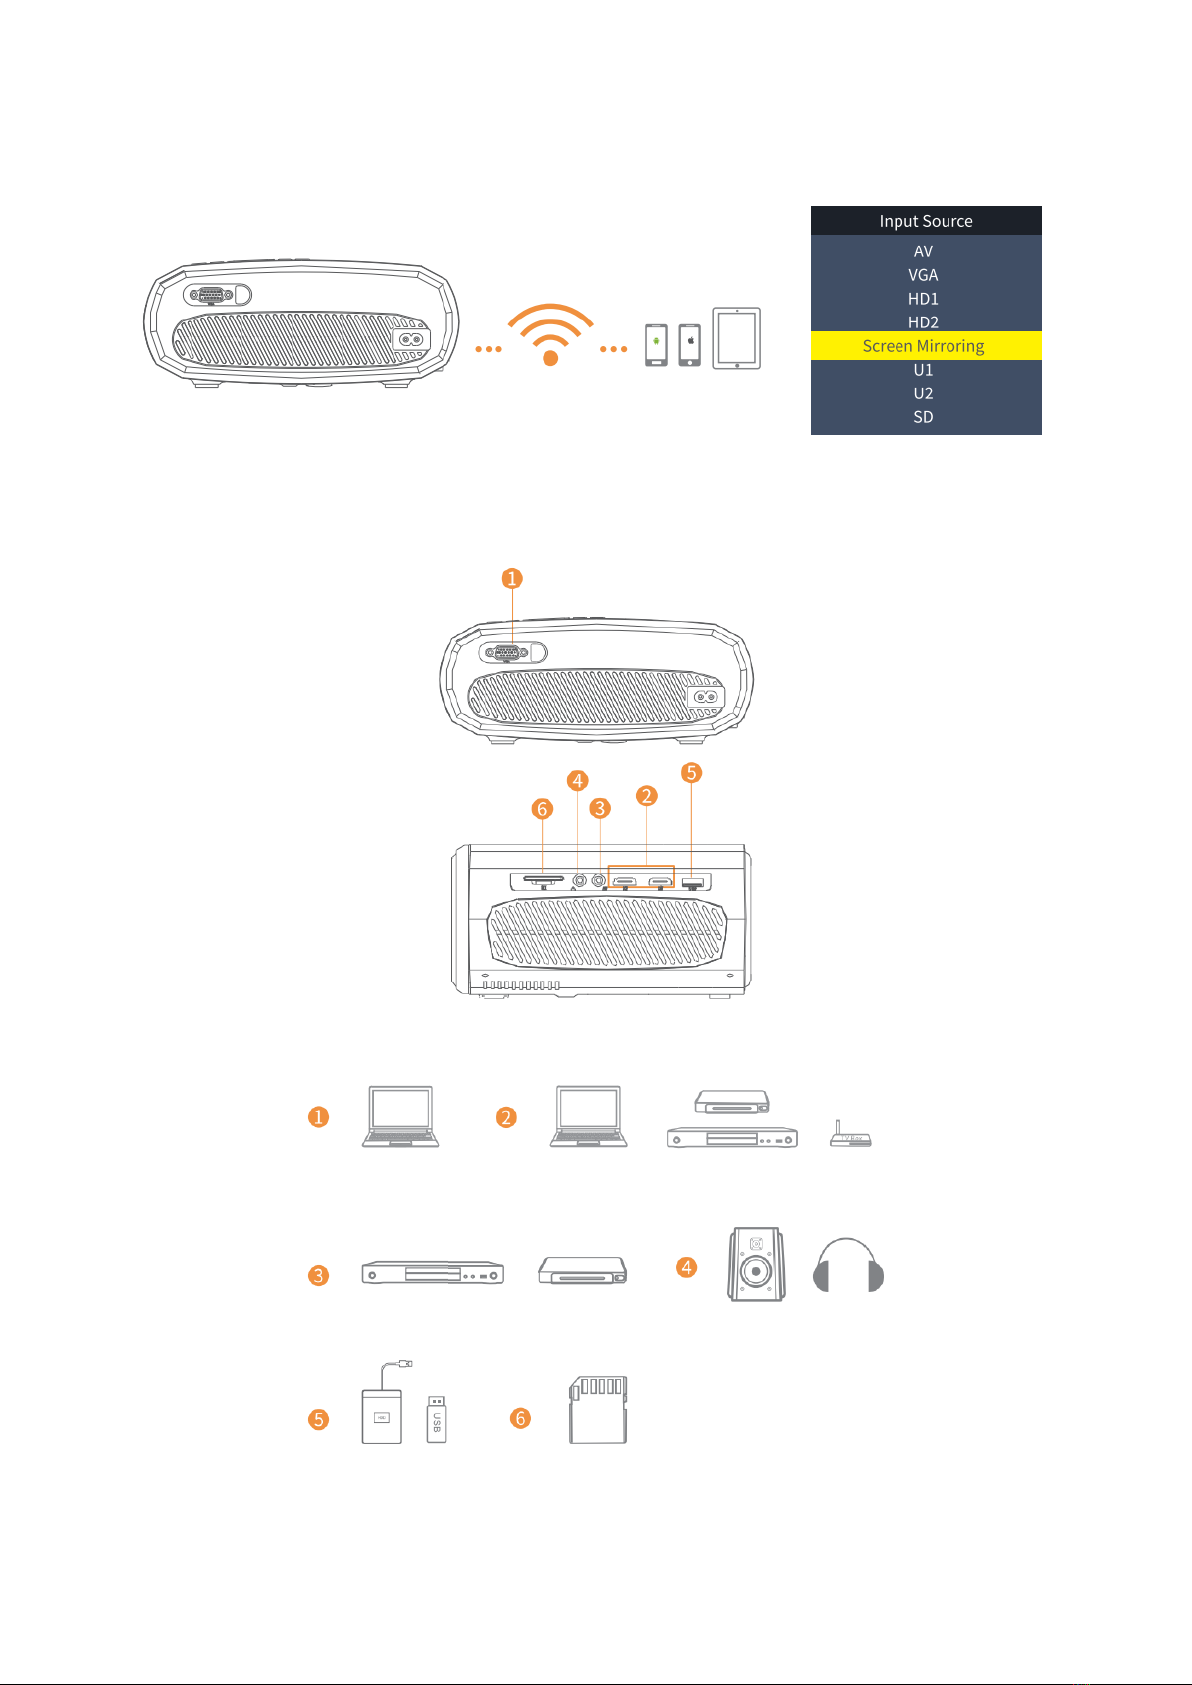
6
Air Inlet
Air Outlet
Speaker
Air Outlet
SD
AV IN
HD2
HD1
USB
VGA
Power Input
Audio Output
VGA
7
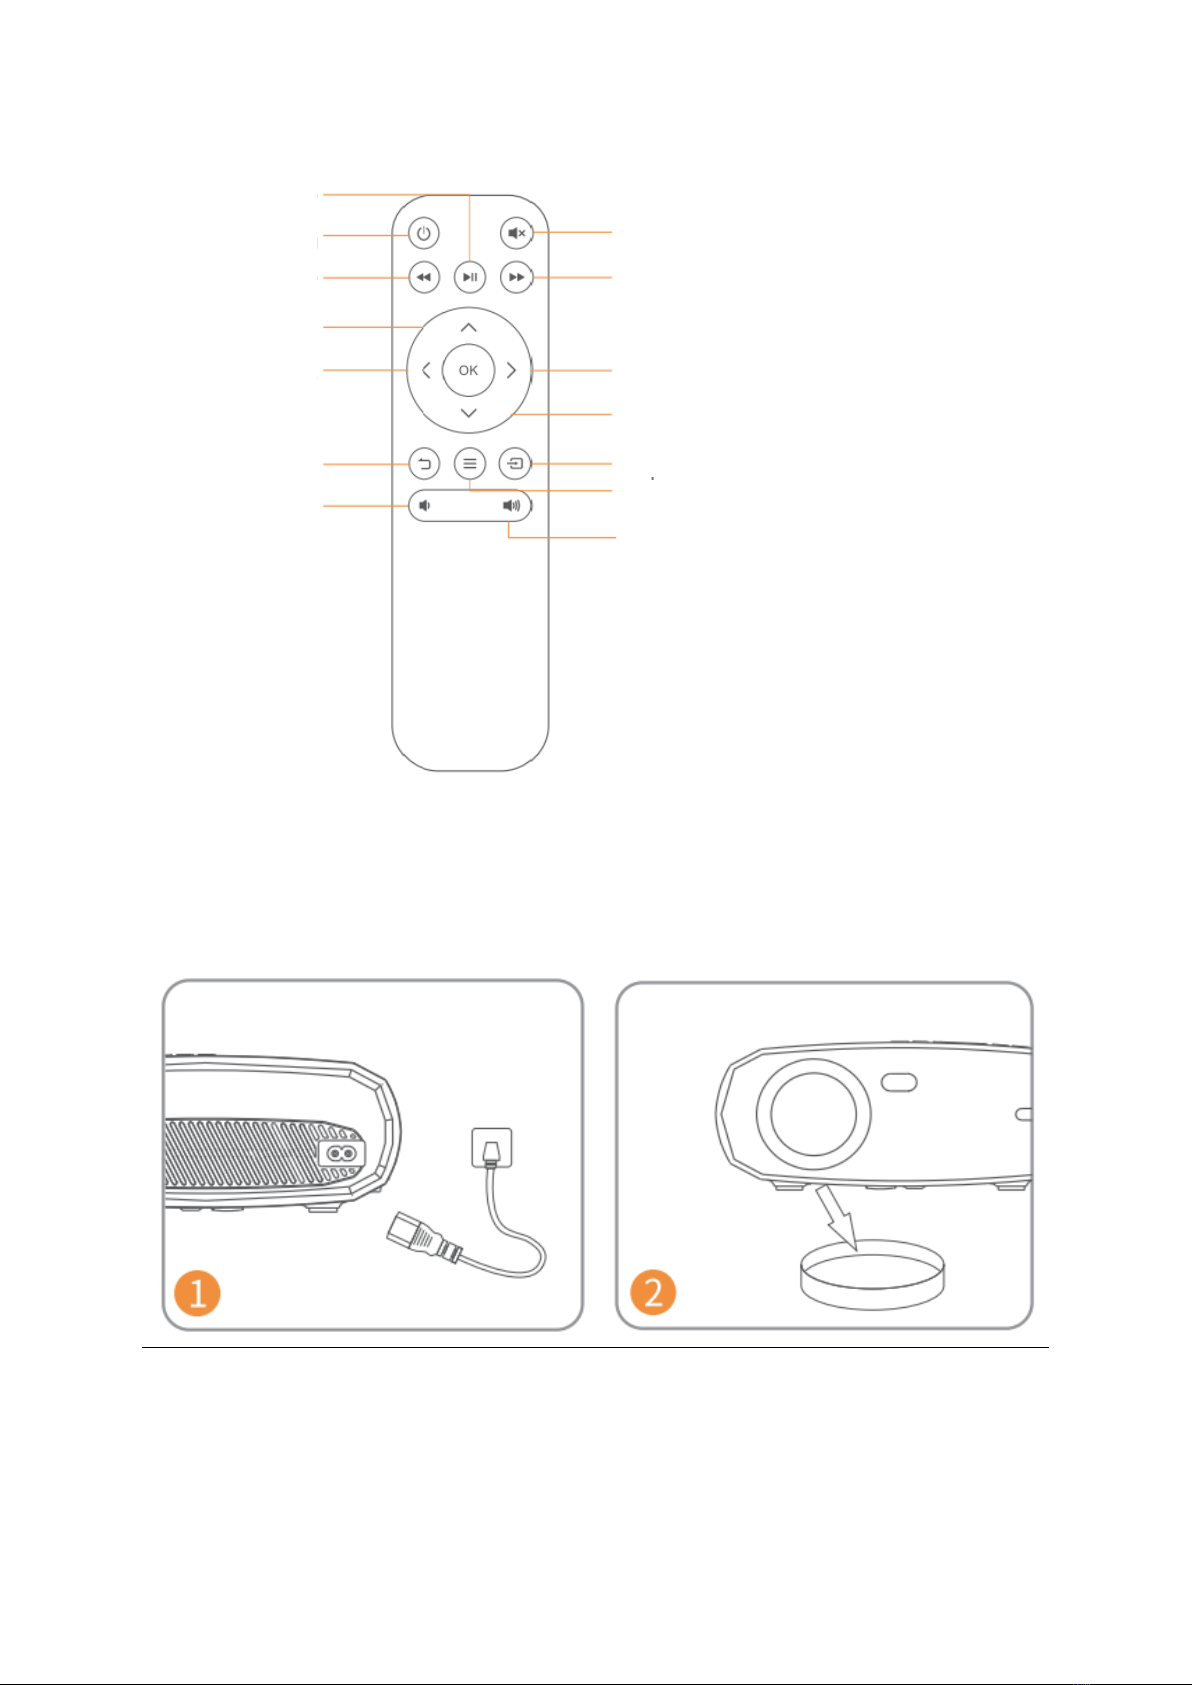
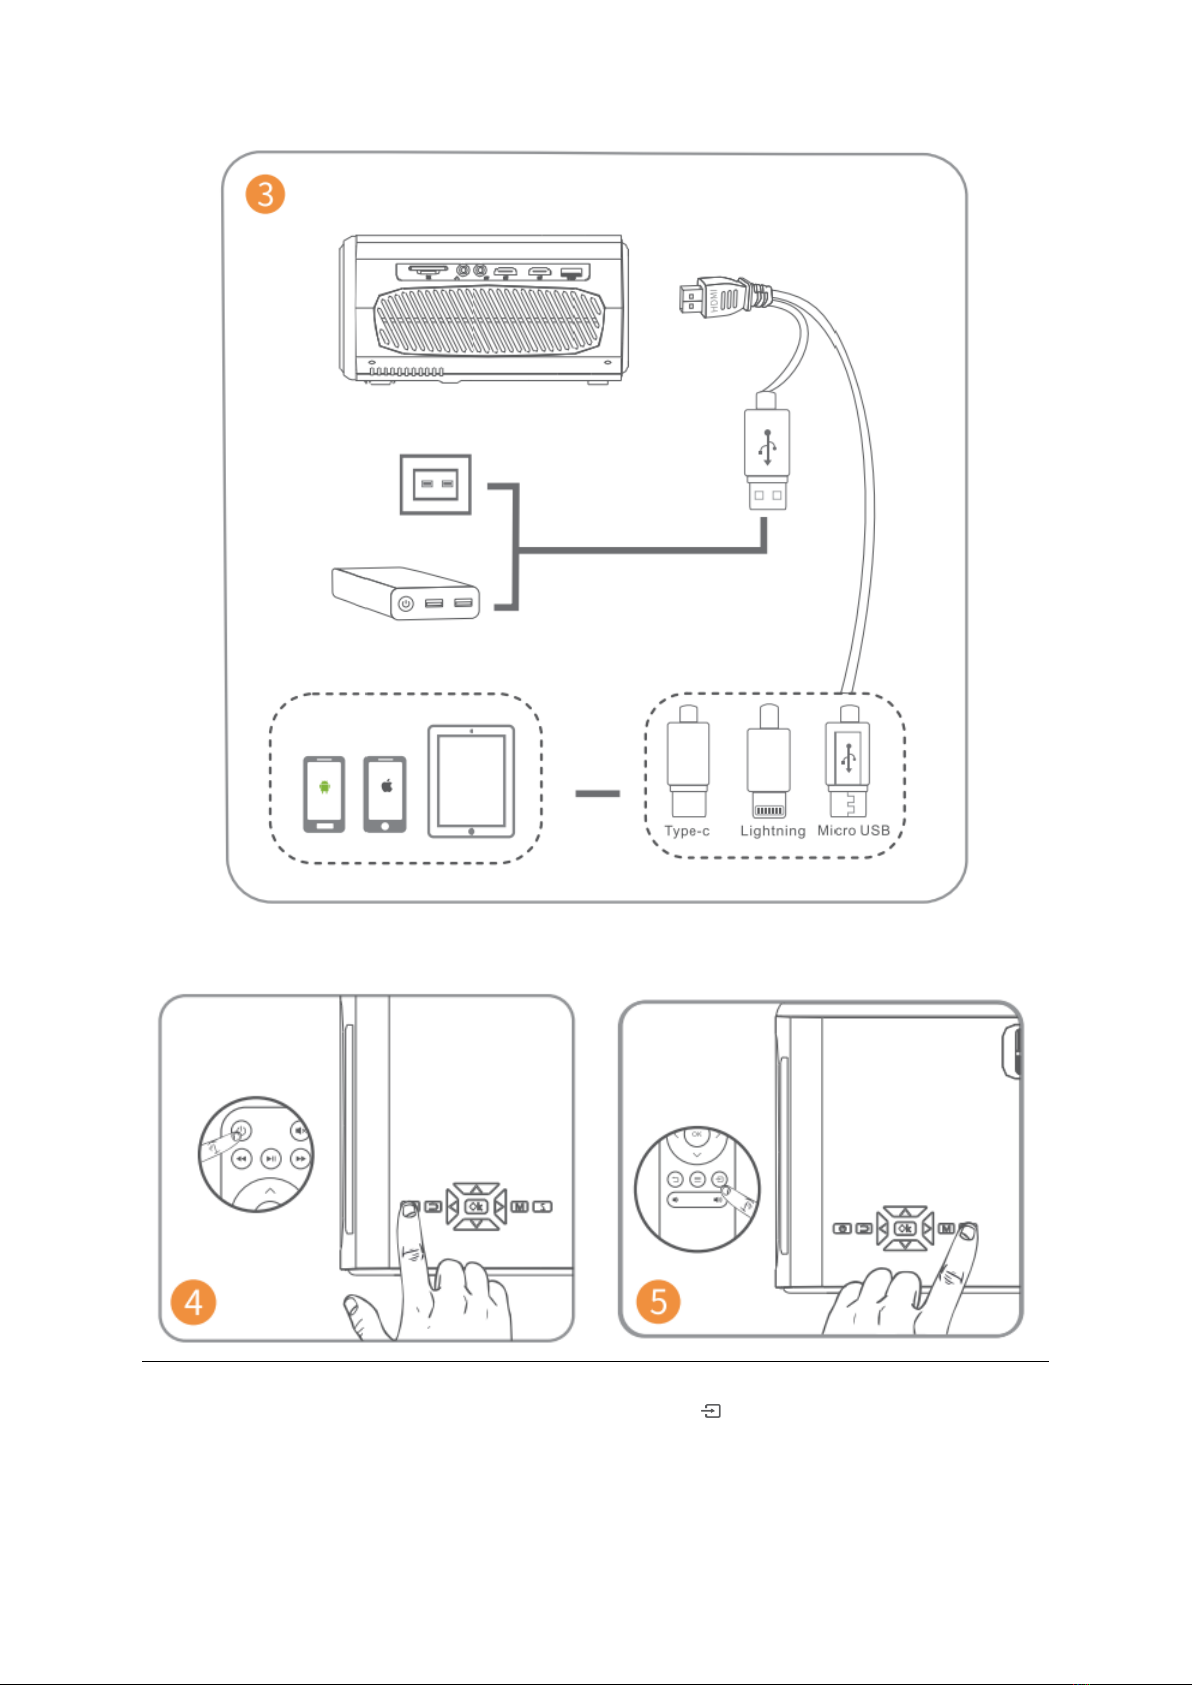
QUICK START
Plug the power cord into an outlet.
Take off the lens cover.
Play/Pause
Power Button
Fast Reverse
Up
Left
Back
Volume
Mute
Fast Forward
Right
Down
Input Source
Menu
Volume +
8
Connect your device to the projector correctly.
Press the Power Button to turn on the
projector.
Select the correct input source by
pressing button.
*Sold Separately
9
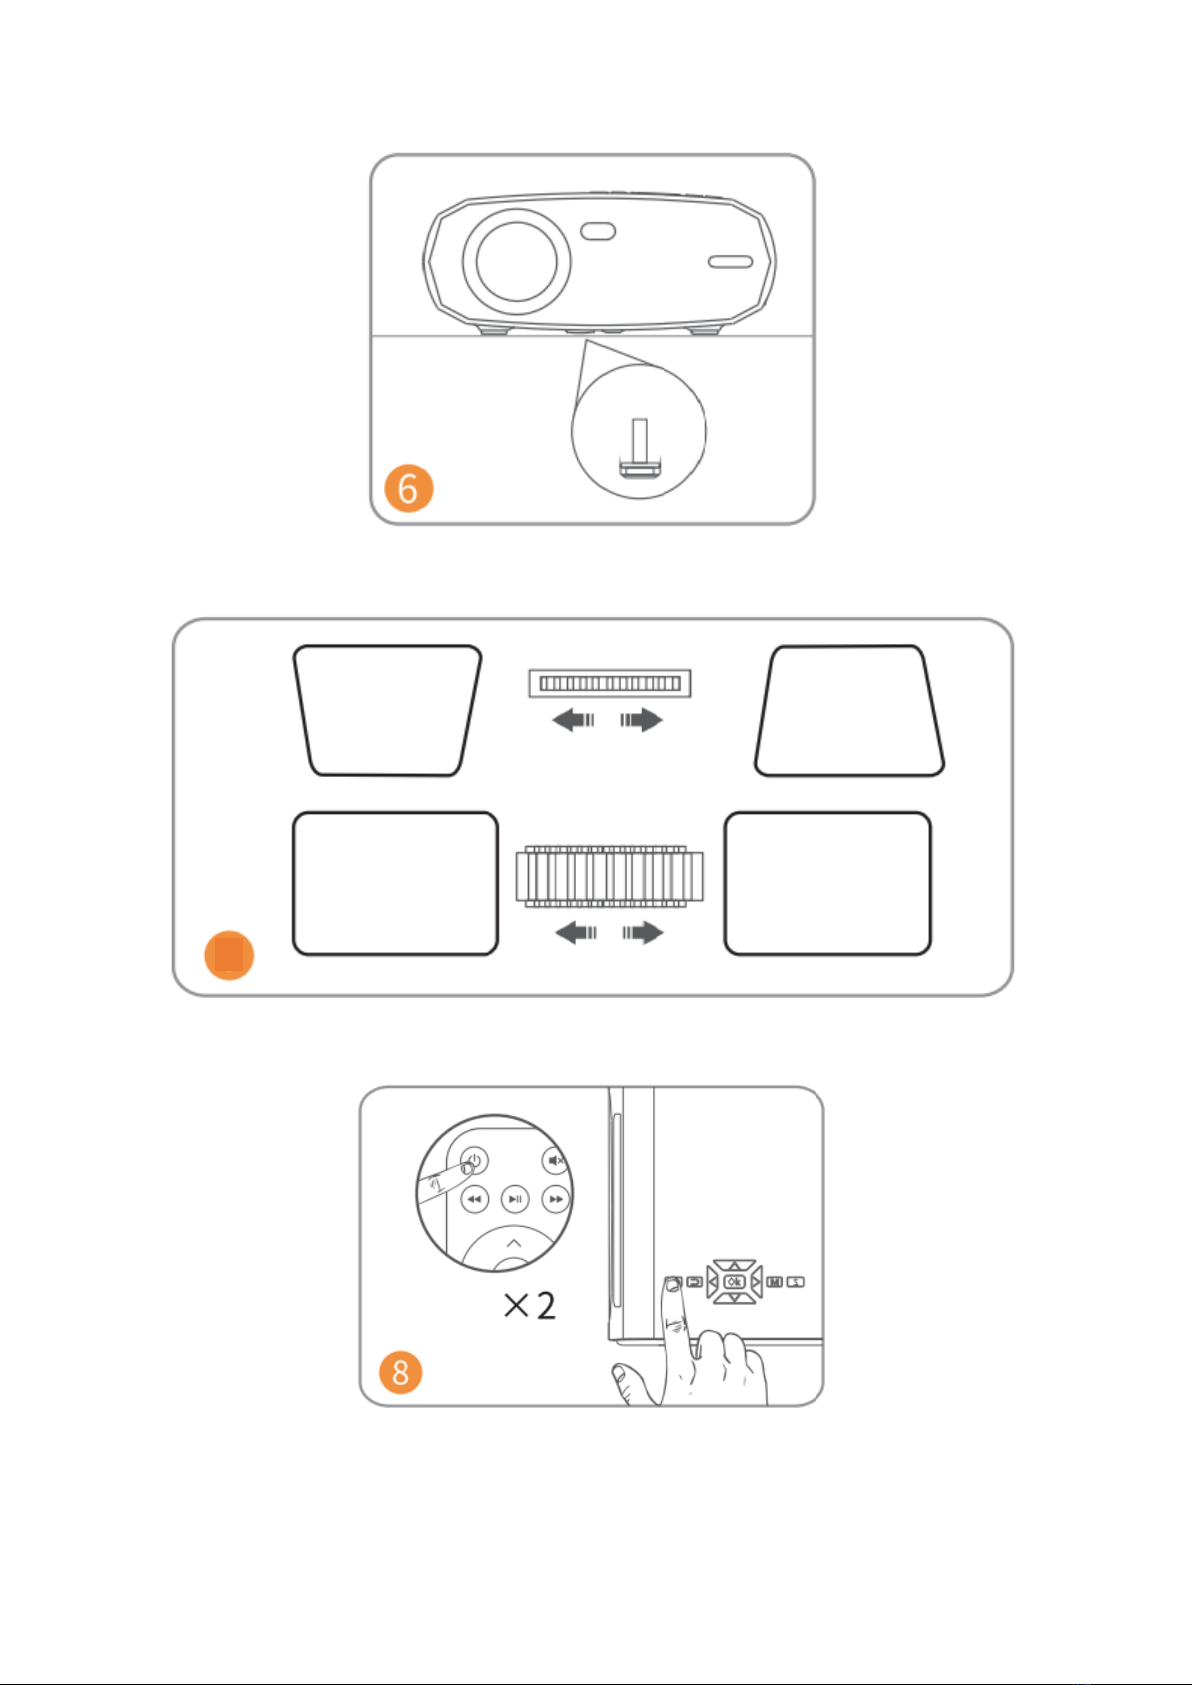
Adjust the kickstand accordingly.
Adjust the keystone and focus ring on the best image performance.
Press the Power Button twice to turn off the projector.
7
KEYSTONE
FOCUS

10
INPUT SOURCE
Press on the projector or remote to enter the interface of Input Source.
A. Multimedia Connection
B. HD Connection
C. VGA Connection
11
D. Screen Mirroring
PROJECTOR CONNECTING

12
SCREEN MIRRORING
Know System Settings before Screen Mirroring
Step 1:
Press button “S” on the projector or press on the remote to enter the Input Source
interface, then select Screen Mirroring.
Step 2:
In the interface of screen Mirroring, press OK to enter the WiFi selection interface.
iOS Connect by Cables
1. Connect the phone to the USB slot of the projector via the original iPhone
charger cable. (Cable has USB port and Lighting port)
2. Click “Trust” when connecting with the iPhone
Android Cast
•Connect with Android Phone
1. Open the wireless display on your Phone.
2. Find the device named “HAVIT PJ202” and connect it.
iOS Cast
•Connect with iOS Phone via screen mirroring:
1. Open WIFI and find “HAVIT PJ202” from your phone. Then input the password
“12345678” on your phone.
2. Click Airplay/Screen mirroring on your phone and connect “HAVIT PJ202”.
•Connect with iOS Phone via WIFI:
1. Press OK to enter the WIFI selection interface from the projector. Choose your
WIFI and select password by remote control.
2. Connect the same WIFI from your phone.
3. Click Airplay/Screen mirroring on your phone and connect “HAVIT PJ202”.
Note: To enter WiFi Selection interface, please press OK in the interface of Screen
Mirroring.

13
Starting Screen Mirroring
Important:
Before screen mirroring, please press button “S” on the projector or press to enter
Input Source interface and select Screen Mirroring.
Screen Mirroring through Wireless Connection
For iOS System
*Screen Mirroring via Router´s WiFi
1. Turn on the projector, select Screen Mirroring as the input source to enter the
Screen Mirroring Interface.
2. Press OK to enter WiFi selection interface and connect the projector to your
router´s WiFi with correct password
3. The WiFi icon on the interface will change from to , and the router´s WiFi
will be displayed on interface of Screen Mirroring after a successful connection.
4. Get back to the WiFi setting of your iOS mobile device, then connect it to the
SAME router´s WiFi.
5. Activate Screen Mirroring/Airplay Mirroring on your iOS mobile device and search
for the projector, then select HAVIT PJ202 from the searching results to connect.
6. The content of your iOS mobile device will be mirrored to the wall/screen after
WiFi connection.
Tips:
1. If you´d like to connect another router´s WiFi, please press OK in the Screen
Mirroring Interface, then repeat the procedures mentioned in the section of
Screen Mirroring via Router´s WiFi.
2. If you already connected your projector with the WiFi and now you want to
connect it with iOS device cellular data please go to the WiFi Selection, and
disconnect the current WiFi connection the follow the steps in the section of
Screen Mirroring via Cellular Data.

14
*Screen Mirroring via Cellular Data
1. Turn on the projector, select Screen Mirroring as the input source to enter the
interface of Screen Mirroring.
2. Go to the setting of your iOS mobile device and connect it to the WiFi HAVIT PJ202
(password: 12345678)
3. Activate Screen Mirroring/Airplay Mirroring on your iOS mobile device and search
for the projector.
4. Select HAVIT PJ202 from the searching results to connect.
5. The content on your iOS mobile device will be mirrored to the wall/screen vi
cellular data after a successful connection
For Android System
To activate this function, your Android device must support Multi-Screen/Wireless
display. Names may differ from different devices.
1. Turn on the projector, select Screen Mirroring as the input source to enter the
interface of Screen Mirroring.
2. Turn on the WiFi switch in the Android device, and search for the projector´s WiFi
“HAVIT PJ202” (Password: 12345678) to connect
Note:
Successful WiFi connection is not a must, but please make sure the WiFi is switch on.
3. Activate Cast/Multi-screen/Wireless Display/Screen Morring/Smart View function
on your Android device, then connect to the WiFi “HAVIT PJ202”
4. The content on your Android device will be mirrored to the wall/screen after a
successful connection.
For Windows 10 System
To activate this function, your Windows 10 device must support the Miracast feature.
1. Turn on the projector, select Screen Mirroring as the input source to enter the
interface of Screen Mirroring.
2. Turn ON the WiFi switch in your Windows 10 device.
Note:
Successful WiFi connection is not a must, but please make sure the WiFi is switch on.
3. Press the “Windows Logo+P” key combination on your keyboard to enter the
PROJECT interface, then select “Connect to a wireless display” to search the
projector.
4. Select HAVIT PJ202 from the searching results to connect.
5. The content on your Windows 10 device will be mirrored to the wall/screen after
successful connection.

15
Notes:
1. The fluency of screen mirroring will be affected by the network environment. A
bandwidth of 100Mbit or more is recommended when using screen mirroring.
2. Make sure your mobile device is close to the projector when using wireless
connection. A distance within 3ft is recommended.
3. Some mobile devices may not support screen mirroring due t the compatibility.
4. Due to the copyright restriction from Hulu, Netflix, and similar services, the
contents CAN NOT be mirrored or cast.
5. If the projected image freezes, please reboot the projector or press OK in the
Screen Mirroring Interface to go to the WiFi Selection Interface and disconnect
the current WiFi connection and re-connect the Home WiFi.
Screen Mirroring through Wired Connection
For iOS System
1. Turn on the projector, select Screen Mirroring as the input source to enter the
interface of Screen Mirroring.
2. Connect your iOS mobile device to the USB port of the projector with the
ORIGINAL lighting cable.
3. Select Trust in the pop-up window of Trust This Computer?
4. The display of your iOS mobile device will be mirrored to the wall/screen after a
while.
Tip:
If the projection fails, please unplug the lighting cable from the projector or reboot the
projector, then repeat the steps mentioned above.
Trust This Computer?
Your settings and data will be accessible from
this computer when connected wirelessly or
using a cable
Trust
Don´t Trust

16
For Android System
1. Turn on the projector, select Screen Mirroring as the input source to enter the
interface of Screen Mirroring.
2. Go to the settings of your mobile device, find Developer options and turn on the
USB debugging.
Tip:
The steps turn on Developer options vary from different models of Android device. You
may check it from internet or contact us for the detailed steps. We take Samsung Galaxy
S8+ as an example.
•Go to settings of your Android device, then tap About phone > Software
information > Build number.
•Continuously tap on Build number for several times until it shows Developer
mode had been turned on.
•Get back to the settings of your mobile device, it will show Developer options.
3. Connect your Android mobile device to the USB port of the projector with the
ORIGINAL USB cable.
4. Tap OK when your Android mobile device pops out the window of Allow USB
debugging? Then the display of your Android mobile device will be mirrored to
the wall/screen after a while.
Notes:
1. The USB cable MUST be the ORIGINAL cable or the cable which can transfer data,
otherwise screen mirroring may fail. You can plug the cable into your laptop to
check the availability of transferring data.
2. Some mobile devices may not support screen mirroring due to the compatibility.
3. Some Android mobile devices may only transfer the display without audio due to
the protocol restrictions.
Allow USB debugging?
USB debugging is intended for development
purposes only. Use it to copy data between your
computer and your device, install apps on your
device without notifications, and read logo data.
Cancel
OK

17
SPECIFICATION
Display Technology
LCD
Resolution
Native 1920*1080
Installation Type
Front/Rear/Ceiling
Focus
Manual
Speaker
3W/4ohm
Until Dimension
234.5*187.6*96.1
Photo Format Supported
JPG/JEPG/PNG/BMP/GIF
Video Format Supported
AVI/MKV/MP4/MOV/MPG/MPEG/TS/TP/M2TS/
DAT/FLV/SWF/ASF/VOB/RM/RMVB/3GP/3GPP
Mounting Screw
1/4“
Light Source
LED
Input Signal
480 576i 576P 720i 720P 1080i 1080P
Aspect Ratio
4:3/16:9/Auto
Keystone
±15°
Power Supply
AC 100-240V, 50/60Hz
Unit Net Weight
1.41kg
Audio Format Supported
MP3/AVI/WMV/MKV/DAT/VOB/MPG/MPEG/TS
Ports
AV*1\VGA*1\USB*1\HDMI*2\SD*1
Number of Screw
1
PROJECTION DISTANCE&SIZE
•The recommended projection distance varies with different projection contents.
Please adjust the distance between the wall/screen and the projector as needed.
•Ambient darkness will improve the clarity of the projected images.

18
TROUBLESHOOTING GUIDE
Blurry Image
•Adjust focus ring/keystone
•Projector and screen/wall must be in effective distance.
Remote Unresponsive
•Make sure remote points at IR receiver directly.
•Do not cover IR receiver.
•Try a new pair of AAA batteries.
Mobile Connection
•iOS: Genuine lighting to HDMI cable
•Android: Micro USB to HDMI adapter/Type C to HDMI cable
Upside Down Images
•Go to Menu > Picture > Reduce Display Size to adjust the image site.
Auto Off
•Go to Menu > Time > Sleep Timer to adjust the time period before the projector
automatically turns off.
CAUTION
To avoid replacement of battery with and incorrect type.
Don´t dispose of a battery into fire or a hot oven, or mechanically crush or cut a Battery.
Don´t leave a battery in an extremely high temperature surrounding environment.
To avoid battery subjected to extremely low air pressure.
The mains plug is used as the disconnect device, the disconnect device shall remain
readily operable.
The symbol indicates for indoor use only.
Class II equipment
The symbol indicates DC voltage
The symbol indicates AC voltage
RECYCLING

19
Warranty Conditions
A new product purchased in the Alza.cz sales network is guaranteed for 2 years. If you
need repair or other services during the warranty period, contact the product seller
directly, you must provide the original proof of purchase with the date of purchase.
The following are considered to be a conflict with the warranty conditions, for
which the claimed claim may not be recognized:
•Using the product for any purpose other than that for which the product is intended
or failing to follow the instructions for maintenance, operation and service of the
product.
•Damage to the product by a natural disaster, the intervention of an unauthorized
person or mechanically through the fault of the buyer (e.g. during transport, cleaning
by inappropriate means, etc.).
•Natural wear and aging of consumables or components during use (such as
batteries, etc.).
•Exposure to adverse external influences, such as sunlight and other radiation or
electromagnetic fields, fluid intrusion, object intrusion, mains overvoltage,
electrostatic discharge voltage (including lightning), faulty supply or input voltage and
inappropriate polarity of this voltage, chemical processes such as used power
supplies, etc.
•If anyone has made modifications, modifications, alterations to the design or
adaptation to change or extend the functions of the product compared to the
purchased design or use of non-original components.

20
EU Declaration of Conformity
Identification data of the manufacturer's / importer's authorized representative:
Importer: Alza.cz a.s.
Registered office: Jankovcova 1522/53, Holešovice, 170 00 Prague 7
CIN: 27082440
Subject of the declaration:
Title: HD Projector
Model / Type: PJ202
The above product has been tested in accordance with the standard(s) used to
demonstrate compliance with the essential requirements laid down in the
Directive(s):
Directive (EU) 2014/53/EU
Directive (EU) 2011/65/EU as amended 2015/863/EU
Prague, 28.12.2021
Table of contents
Languages:


