chinavasion CVAK-E214 User manual

ffi4. LED WBIill,ff.,Eif,,EE
lnstruction Manual

1. oUTLINE
The prcjector omprises high performane light engine, based on 3RGB LED as light source. The user-friendly design largely enhances
reliability a;d handiness of the prcjector. lt brings you more vivid and fluent image quality'
a 2000 : 'l contrast ratio ;
a 800 ' 600 resolution :
. RyG/B LED light source, 20,000 hours life, energy saving ;
. 100%offset;
. Support HDMUAV /GA(HDMI SupportstoVereion 1 3) ;
Build-in Mp4 function. with onboard flash memory, 72OP video/music/photo/eBoougame supportive. (Select)
. USB/SD direct playback supportive;
a 16.7 million colors display, natuEl color reproduction'
I MPORTANT SAFETY I NSTRUCTIONS
1. Please read the manual carefully before using the projector. store the manual for future reference'
2. Avoid staring/facing directly into the prciector beam The beam may ham your eyes'
3. Do not block any ventilation openings. To ensure reliable operation of the projector and to protect from overheating, it is recommended
to install the projector in a lo@tion that does not block ventilation'
4. Do not use the prcjector near water or moisture areas. To reduce the risk offire and/or electric shock' do not expose the prcjector to
rain or moisture environments.
5. Do not install/put the projector near heat sources such as radiators, heaters, stoves or any other apparatus such as amplifiers that
emitting heat.
6. Do not use the prcjector in direct sunlight.
7. Do not use the prcjector near any appliance generating a strong magnetic field'
8. Do not use the prcjector in areas susceptible to excessive dust and dirt'
9. Ensure that the ambient room temperature is within 0- 35'C'
10. Ensure that the ambient relative humidity is 0 - 85% (Max)'
'l 1. Only use AC adapter specified by the manufacturer' Others may damage the prcjector'
1 2. Do not disassemble, modify, drop or thrcw your product'
1 3. Do not let object or liquid enter the prcjector. They may damage dangerous voltage points and short out parts that could result in fire or
Electric shock. Turn offthe prcjector if any objects enter inside the prcjector'
14. Donotattempttoseruicetheunityourself.openingorremovingcoversmayexposeyoutodangerousvoltagesorotherhazards'
Ptease @ntact Your local reseller,

PACKAGE OVERVIEW
Open the package and make sure it includes all below items, if any
wt
PROJECTOR OVERVIEW
&
AY*
-i,ffi -.friltE
zlffi
-*w
ffif
llar
Power Cord
-"!
!t
l':.,
tt
r- *-----/l
Warranty Card
Projector
lE${H
t'*l
Manual
**S
&**fds
USB OTG Cable
VGA Cable USB Cable
1. DC Socket
2. Safety Hole
3. VGA Socket
-,4:llDl*t€cclrct
5. A / Socket
6. USB Socket
7. Earphone Socket
8. Back lR
9. SD Slot
'10- Back Fun
1 1. Focus
12. Contrcl Panel (Referthe
key definition)
'13. Frcnt Fun
14. Lens Cap
15. Frcnt lR
16. Heighten TEy
17. Tripped Hole
'18. Nameplate
'19. FootTips
20. Speaker 15

Control Panel Definition Projector System
'l Power
2 lnput , Source (HDMIA/GAJAV/MP4)
3 Mute
4 Menu(ln system menu , exit system menu)
5 Volume Up/Down
6 Keystone Up/Down
7 Right and Left in OSD
I Up/Down in OSD (Up could return previous menu)
I Ol(Enter in OSD
MP4 System
'10 Up/Down, Previous/Next page, Volume Up/Down
11 OK, Play/Pause
12 LefuRight, Previous/Next (Short Press), Fast Reverse/Fast
Foruard (Long Hold)
13 Menu : Display submenu
'14 ESC : ESC to previous menu
PROJECTED DISTANCE AND SCREEN SIZE (Reference Only)
The distance of the prcjector lens to the screen and video format may affect the screen size. Please refer to the below graph as per
prcjected distance and screen size.
Projec'tor System
1 . Power
2. lnput (VGA,/HDMUAV/MP4)
MP4 System
3. Up/Down, Previous/Next page, Volume Up/Down
4. OK, Play/Pause
5. LefvRight, Previous/Next (Short Press), Fast Reverse/Fast
Foruard (Long Hold)
6. Menu : Display submenu
7. ESC : ESC to previous menu

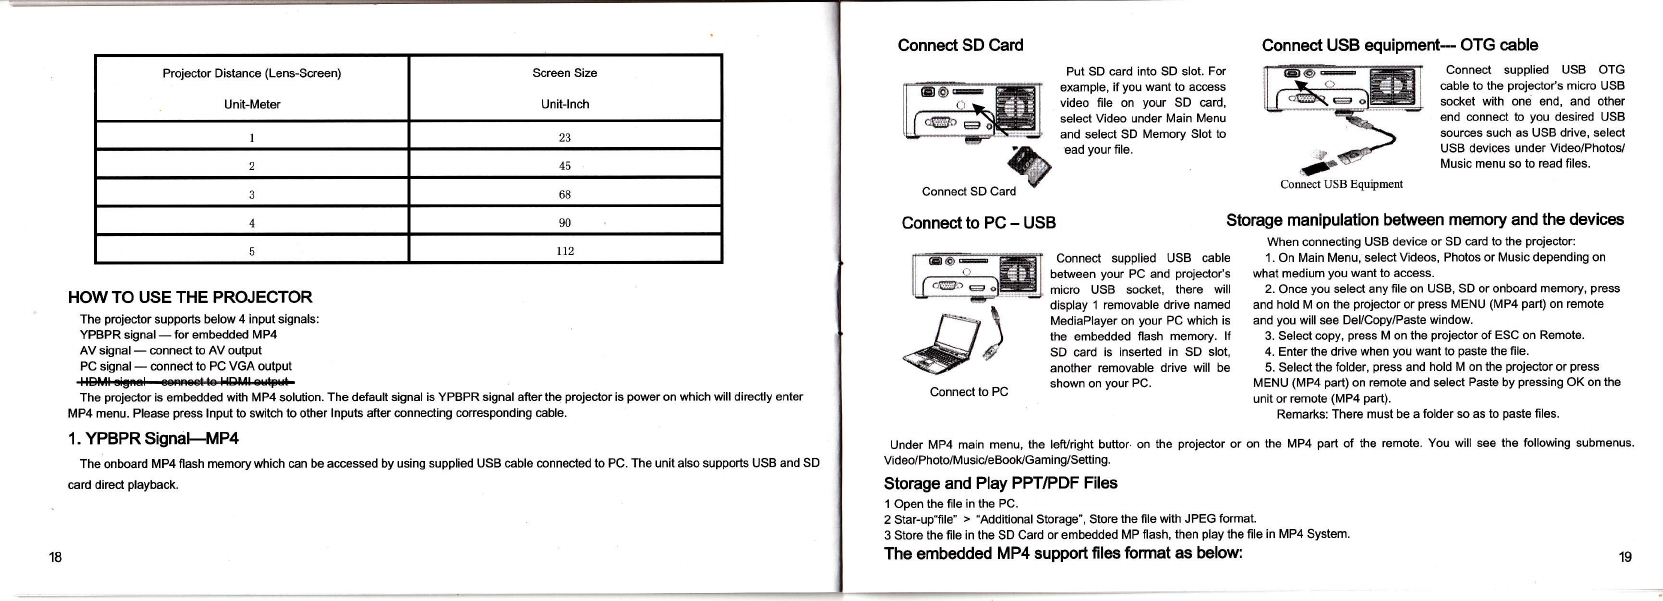
Prcjector Distance (Lens-Screen)
Unit-Meter
Screen Size
Uni!lnch
245
368
490
5tt2
HOWTO USETHE PROJECTOR
The prcjector supports below 4 input signals:
YPBPR signal - for embedded MP4
AV signal - connect to AV output
PC signal - connect to PC VGA output
ffi
The pmjector is embedded with MP4 solution. The default signal is YPBPR signal after the prcjector is power on which will directly enter
MP4 menu. Please press lnput to switch to other lnputs after connecting mrresponding eble.
1. YPBPRSignaH\4P4
The onboard MP4 flash memory which mn be accessed by using supplied USB eble mnnected to PC. The unit also supports USB and SD
card direcl playback.
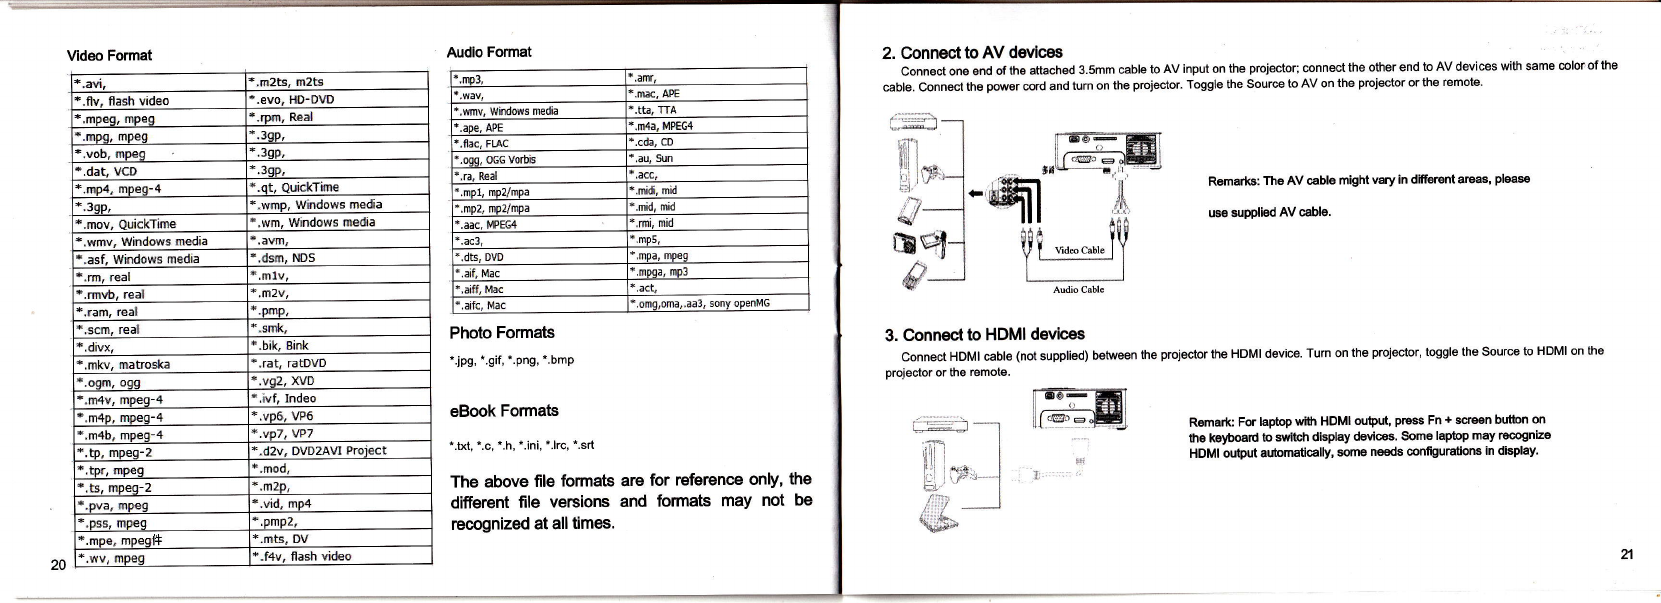
Put SD €rd into SD slot. For
example, if you want to acess
video file on your SD card,
select Video under Main Menu
and select SD Memory Slot to
ead your file.
Connect supplied USB cable
between your PC and projoctor's
micro USB socket, there will
display 1 removable drive named
MediaPlayer on your PC which is
the embedded flash memory. lf
SD card is inserted in SD slot,
another removable drive will be
shown on your PC.
Connec't USB equipment- OTG cable
Connect supplied USB OTG
cable to the prcjector's micro USB
socket with one end, and other
end connect to you desired USB
sources such as USB drive, select
USB devies under Video/Photov
Music menu so to read files.
Storage manipulation between memory and the devices
When connecting USB device or SD card to the prcjector:
1. On Main Menu, select Videos, Photos or Music depending on
what medium you want to access.
2. Once you select any file on USB, SD or onboard memory, press
and hold M on the prcjector or press MENU (MP4 part) on remote
and you will see Del/Copy/Paste window.
3. Select copy, press M on the prcjector of ESC on Remote.
4. Enter the drive when you want to paste the file.
5. Select the folder, press and hold M on the prcjector or press
MENU (MP4 part) on remote and select Paste by pressing OK on the
unit or remote (MP4 part).
Remarks: There must be a folder so as to paste files.
on the MP4 part of the remote. You will see the following submenus.
Connec't SD Card
ib
connect SD Card 7
Connect to PC - USB
I oo- ffiL
lf.^*,affil
dP)
Connect to PC
Under MP4 main menu, the lefvright buttor'on the prcjector or
Video/Photo/Musici/eBooldcaming/Seft ing.
Storage and Play PPT/PDF Files
1 Open the lile in the PC.
2 Star-up"lile" > "Additional Storage", Store the file with JPEG format.
3 Store the lile in the SD Card or embedded MP flash, then play the file in MP4 System.
The embedded MP4 support files format as below:
18 19

Video Format
.m2ts. mzts
-iv. fla*r video r.evo, IS-DVD
*,mrea" tM6 *-m. ReEl
*-ll!s,6mc ',3€o"
*.vob, m!,eg .3s9.
dat. VC0
do4 aneS-4 .6t. ArKkTiffi
lnr *.m. Wlndows medta
* lrsv nrti.kT:lm *.wm- wi.rdows reda
+.wmv, !\findows redia '.evm.
E.asf, whdows medie "d$r, IlDs
",m, real .m1v,
:.na*b, real ',m2v,
".ram, retl 8,ffi,
".scm. real E"snk.
e.diux ",bik, Bnk
*.mkv. rotrcs&a '.rat, ratDvD
+-M- ooc *.va2, XvD
,m4v. mreq-4 *,ivf, lndeo
*,m4D, trs€o-4 .vo6. VP6
-w7.W7
*-to. ffi-? '-d2v. DVD2A\rl Prcrtrt
".tpr. r{}eg *.mod
..ts, fflpeq-2 .il?o-
,DVa. mp€q * vi.l. mn4
",Ds, m9eq *.sffi82.
r.mse. mpeol* *.mts, DV
*.wv, ffio *,f4v. flash video
Audio Format
,flp3, *,atr,
.w, APE
w, windsws reda ,tta. fiA
age, APE ,n4a, trlF€G4
,flar, FLAC .cda, c0
.w. oG€ Vorbis ,au, su
.ra, Real *.mid- mid
'.srid, mid
+.aac. l4PlG4 +.8i. mid
',ac3, '.rus,
*.dts.0!t .@a. meE
*.af- Mic F9oa, rp3
".aiff, Mac
+-eif.. Mac -omd.ma..aa3, sonY gmnilG
Photo Formats
..jpg, ..gif, -.png, ..bmp
eBook Formats
*.txt, *.c, *.h, *.ini, *.lrc, *.srt
The above file formats
different file vercions
recognized at all times.
rffi
2. Connect to AV dorlces
Gonnect ons ond of th€ attachsd 3.5mm cable to AV input on the projector; connect the other end to AV devices with same color'of the
cable. Connect th6 power cord and turn on the proiector. Toggle the Source to AV on the prcjector or the remole'
Remarks: The AV cable might vary in difrerent areas, pleaso
use supplied AV cablo.
3. Connec't to HDMI devices
Connect HDMI cable (not supplied) betwe6n the poector the HDMI device. Turn on the proiector, toggle the Sour@ to HDMI on the
proiector or ths remote.
l-;J ---rI
1., , I
liirr - I
''j fitr I
I , ir"-
&l
/ n--*-1
qdl
mql
fll
ff-
15-l
'.il:it
:.Y I
= , --"]
iiri&*
'\t'tts
,,m---w
ql*
tii *.*.".'.lY
r---_l
Romark For laptop with HDMI ouDut, Press Fn + scre€n butbn on
the keyboard to swltcfi display devic€s. Som€ laptoP may rocognizo
HDMI output aubmatically, sorne nesds configuratlons in disPlay.
are for reference only, the
and formats may not be
z
20

4. Connect to PC
Connect one end of supplied VGA cable to VGA port on the prcjector, mnnect the other end to a laptop or desktop mmputer. Turn on the
prcjector, toggle the Source to VGA on the prcjector or the remote.
Rgmarks: lf the prcjector is properly turned on and the signal is properly selected,
and you still do not get the mmputer image display through the projector, please
check your computer in the following steps.
1. Please make sure VGA cable is properly @nnected, make sure the source of
the prcjector has been switched to VGA channel.
2. Set the computer resolution to 800 x 600.
3. Turn on the plugging video port, press Fn and screen switch button on the
keyboard at the same time. Copy or switch to plugging poector.
There is copy or exlension to plugging displays in compuler selup. lf you are not
sure whether it is prcjecled or not, pleas use copy to confirm the proper
connection to lhe computer.
How To ADJUST OSD
You can adjust OSD only via the remote. Some changes mighLaffect the prcjection image, ifyou think the image is not in appropriate status,
please reset to the factory default. Press menu under projector system to enter OSD, select via lefurighuup/down.
lmage
Brightness 0--100
Contrast 0- 100
Aspect Ratio Fill/Native/4:3/1 6:g/Anomorphic
Color 0--100
Tint -128--128
Color Spac€ Automatic/RGBrYCbCT^/PbPr
Advanced Sattlngs
Picture Mode Brillianwideo/Film/Photographic^/ivid/RGB
Brightness Selecl Standard/Bright
Color Temperature 0--6
Test Pattern
Setup
Lenguage English/German/Chinese/Japanese
Projgctor Position Mode Rear Vx
Vtr
Ceiling
Auto Source Select v x
Auto Keystone Select Mx
Magniry 0-10070
Factory Resel Ot(Cancel
Remad<: pl tr
TROUBLESHOOTING
lf you experienca a problem with your prcjector, please refer to the following infomation. lf a problem pe6ists, please contact your local
reseller or servlce center. (See the supplied warranty Grd).
22 23

The prcjsctor des not tum on
Cause Solution
No power from the power cable
Plug the AC adapter into the DC lN socket on the prcjector, plug
the power cord into the AC inlet on the AC adapter, plug the
power cord into the power outlet. lf the power outlet has a
switch, make sure that it is switched on.
Overheat protection Wait until the cooling down process has completed.
Blun€d lmag.
Cau!a Solution
Ths lons is not focused Adjust the focus.
The prcjector and the screen are
not aligned properly Adjust the prcjection angle and direction as well as the height of the unit if necessary,
No image appears on-reen
Cause Solution
The video source is not turned on or
connected correctly Turn the video source on and check that the signal cable is connected correcfly.
The prcjector is not correctly
connected to the input signal device Please check the connection.
The input signal has not been
correctly selected Select the correct input signal with the lnput key on the projector or remote Control.
Remote contol dogS not work
Cau!c Solution
Ths battory 18 out of power Replace the battery with new one
There ls an obotacls botwoen the
remote control and tho proloctor Remove the obstacle
You are too far away from th€
prcjector Stand within 4 meters (1 3 feet) ofthe Projector
Table of contents
Other chinavasion Projector manuals

chinavasion
chinavasion CVSL-E167 User manual

chinavasion
chinavasion CVAEL-E394-2GEN User manual

chinavasion
chinavasion CVYI-E234 User manual

chinavasion
chinavasion PortiMax HDMI User manual

chinavasion
chinavasion CVJV-E178 User manual

chinavasion
chinavasion UC40 User manual

chinavasion
chinavasion UC80 User manual

chinavasion
chinavasion CVAK-E232 User manual

chinavasion
chinavasion CVAK-E440 User manual

chinavasion
chinavasion CVQF-E158 User manual