HD Radio HD Jump User manual

User GUIde
™


Introduction 2
HD Jump™ Radio Car Cradle Setup 9
Playing the HD Jump™ Radio in Your Car 16
HD Jump™ Radio Home Cradle Setup 19
Using the HD Jump™ Radio 24
Setup Options 33
Customer Support 36
Table of Contents
1

THANK YOU FOR CHOOSING THE VISTEON姞HD JUMP™ SYSTEM
We have designed this product to provide you with access to the full spectrum of features that
the new HD Radio™ technology offers. Across the country, AM and FM radio broadcasters are
upgrading to digital HD Radio transmissions, which the HD Jump receiver is specially designed to
receive. Plug your HD Jump receiver in your car cradle, or in the home cradle, and you are ready
to experience the improved clarity and content of HD Radio broadcasts!
iBiquity Digital’s HD Radio technology enhances the audio quality of AM and FM broadcasts. The
digital signals allow FM stations to be enjoyed with CD-quality sound and boosts AM quality up to
that of FM sound. The static, hiss, pops and fades heard on today’s analog radios are virtually
eliminated with HD Radio technology. Program associated data, such as real-time song titles,
artist and album information, is also provided, as well as multicasting (where available). More
than 1,000 radio stations now broadcast HD Radio signals in the U.S., with over 400 offering new
formats on their multicast channels. To learn more about HD Radio technology and to find HD
Radio stations in your area, visit www.hdradio.com.
IMPORTANT SAFETY INSTRUCTIONS
READ INSTRUCTIONS
All the safety and operating instructions should be read before the product is operated.
RETAIN INSTRUCTIONS
The safety and operating instructions should be retained for future reference.
HEED WARNINGS
All warnings on the product and in the operating instructions should be adhered to.
FOLLOW INSTRUCTIONS
All operating and use instructions should be followed.
Introduction
2

NOTICE TO ALL DRIVERS
Do not operate the HD Jump in a manner that may divert your attention from safe driving. As the
driver, you are responsible for safely operating your vehicle at all times in accordance with traffic
safety laws.
NOTICE TO DRIVERS IN CALIFORNIA AND MINNESOTA
State law prohibits drivers in California and Minnesota from having devices mounted on their
windshields while operating motor vehicles. The instrument panel suction cup adhesive disc
(included in the optional car cradle package) or some other attachment method should be used
in those states. Visteon is not responsible for any fines, penalties or damages that may be
incurred as a result of disregarding this notice. (See California Vehicle Code Section 26708 (a)(1);
Minnesota Statues 2006 Section 169.71 Sub 1)
CLEANING
Unplug this product from the Car or Home Cradles before cleaning. The product should be
cleaned only with a polishing cloth or a soft dry cloth. Never clean with furniture wax, benzene or
other volatile liquids as they may corrode the unit.
ATTACHMENTS
Do not use attachments not recommended by the product manufacturer as they may cause
hazards.
WATER AND MOISTURE
Do not use this product near water – for example, near a bathtub, washbowl, kitchen sink, or
laundry tub; in a wet basement or near a swimming pool.
ADEQUATE VENTILATION
Do not block any ventilation openings. Install in accordance with the manufacturer’s instructions.
Introduction
3

Maintain a minimum distance of 1” (25mm) around the front, rear, and sides of the product for
sufficient ventilation. The ventilation should not be impeded by placing on or around the product
items such as newspapers, table cloths, curtains, etc.
POWER SOURCES
This product should be operated only from the type of power source indicated on the marking
label. If you are not sure of the type of power supply to your home, consult your product dealer
or local power company.
LOCATION
Home: This product should be installed in a stable location.
Car: This product should be installed in a location that will not interfere with any automotive
safety devices or controls and should not obstruct the driver’s view
POWER CORD PROTECTION
Power supply cords should be routed so that they are not likely to be walked on or pinched by
items placed upon or against them, paying particular attention to cords at plugs, convenience
receptacles, and the point where they exit from the product.
LIGHTNING
For added protection for this product during a lightning storm, or when it is left unattended and
unused for long periods of time, unplug it from the wall outlet. This will prevent damage to the
product due to lightning and power line surges.
OVERLOADING
Do not overload wall outlets, extension cords, or integral convenience receptacles as this can
result in risk of fire or electric shock.
Introduction
4

OBJECT AND LIQUID ENTRY
Never push objects of any kind into this product through the openings as they may touch
dangerous voltage points or short-out parts that could result in a fire or electric shock. Avoid
spilling liquids of any kind on the product.
SERVICING
Do not attempt to service this product yourself as opening or removing covers may expose you to
dangerous voltage or other hazards. Refer all servicing to qualified service personnel.
DAMAGE REQUIRING SERVICE
Unplug this product from the wall outlet or car cradle and refer servicing to qualified service
personnel under the following conditions:
•When the power supply cord or plug is damaged.
•If liquid has been spilled, or objects have fallen into the product.
•If the product has been exposed to rain or water.
•If the product does not operate normally by following the operating instructions. Adjust only
those controls that are covered by the operating instructions as an improper adjustment of
other controls may result in damage and will often require extensive work by a qualified
technician to restore the product to its normal operation.
•If the product has been dropped or damaged in any way.
•If the product exhibits a distinct change in performance.
Introduction
5
REPLACEMENT PARTS
When replacement parts are required, be sure the service technician has used replacement parts
specified by the manufacturer or that have the same characteristics as the original part.
Unauthorized substitutions may result in fire, electric shock, or other hazards and will void the
warranty.
SAFETY CHECK
Upon completion of any service of repairs to this product, ask the service technician to perform
safety checks to determine that the product is in proper operating condition.
HD JUMP MODULE KIT
The HD Jump radio kit includes the following:
HD Jump Radio Owner Guide
Introduction
6

HD JUMP CAR CRADLE KIT (OPTIONAL)
The Car Cradle kit includes the following:
Surface Preperation
Cleaning Kit
Car
Cradle
Suction Cup
Mount
Cradle Mount
Screws
Surface Cleaning
Pad
Suction Cup
Adhesive Disk
Power
Cable
Aux
Cable
Antenna
Out Cable
Antenna
In Cable
Introduction
7
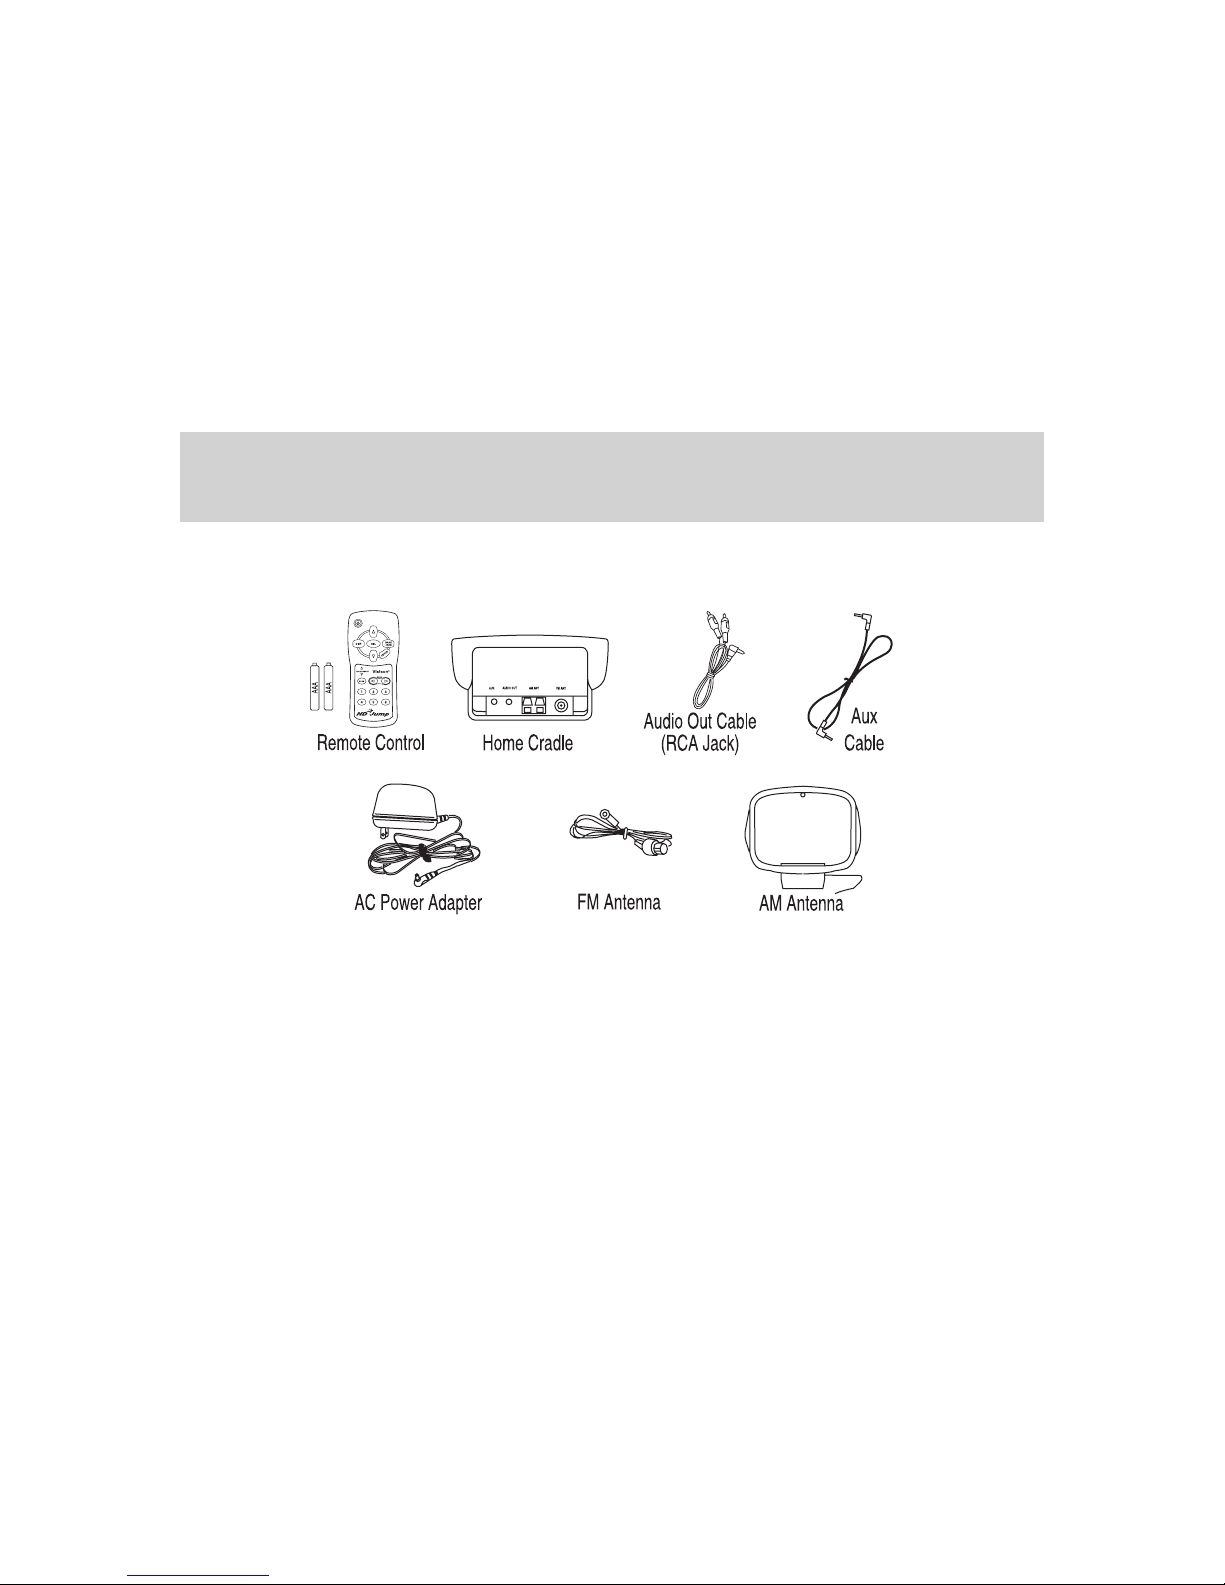
HD JUMP HOME CRADLE KIT (OPTIONAL)
The Home Cradle kit includes the following:
Note: Actual product may differ slightly from those illustrated.
Introduction
8

If you choose to install the HD Jump radio yourself, you should read through the following
installation instructions to be sure you can complete the task. Since installing this product
in-vehicle may require removal of the vehicle’s radio and a direct power connection, Visteon
recommends professional installation.
SUCTION CUP MOUNT
Use the suction cup mount to attach the car cradle to your windshield. You can also mount the
car cradle to your instrument panel using the included adhesive disk described later.
Pick a spot where you can easily reach the HD Jump radio once it is mounted and does not
obstruct vehicle features, warning lights, and safety devices such as airbags.
NOTICE TO DRIVERS IN CALIFORNIA AND MINNESOTA: State law prohibits drivers in
California and Minnesota from having devices mounted on their windshields while operating
motor vehicles. The instrument panel adhesive disc (included in the package) or some other
attachment method should be used in those states. Visteon is not responsible for any fines,
penalties, or damages that may be incurred as a result of disregarding this notice. (See California
Vehicle Code Section 26708 (a) (1); Minnesota Statues 2006 Section 169.71 Sub 1)
HD Jump™ Radio Car Cradle Setup
9

To mount the car cradle using the suction cup mount:
1. Attach the suction cup mount to the car cradle using the
four screws provided.
2. Clean the area you are attaching the suction cup to with the cleaning pad provided in the car
kit. This will help remove dirt and residual oils and allow the suction cup to stick better.
3. Make sure the lock lever is in the up position and then
position the suction cup mount where you would like it and
press in the center of the suction cup.
HD Jump™ Radio Car Cradle Setup
10

4. Press the lock lever down to lock the suction cup. You can
then adjust the mount arm by loosening the adjustment nut
and moving the cradle as you would like. Tighten the
adjustment nut when finished.
ADHESIVE DISK
If you choose to mount the car cradle to your instrument panel or other plastic interior part, you
can also use the included suction cup adhesive disk to provide a smooth surface for the suction cup
mount. This generally will work better than mounting the suction cup directly to plastic parts and
rough surfaces, such as grain patterns on vehicle instrument panels, etc. Pick a spot where you can
easily reach the HD Jump radio once it is mounted and does not obstruct vehicle features, warning
lights and safety devices such as airbags. The area you choose to mount the adhesive disk should
be as flat as possible to maximize holding power. To mount the adhesive disk:
1. Be sure the temperature is within 50° F–80° F for the adhesive disc to stick well.
2. Clean the area with the cleaning pad provided in the car kit. This will help remove dirt and
residual oils and allow the disk to stick better. Allow the area to dry thoroughly before the next
step.
3. Peel off the protective backing on the adhesive disk and press the disk firmly into place.
4. Attach the suction cup mount to the disk as explained previously.
HD Jump™ Radio Car Cradle Setup
11
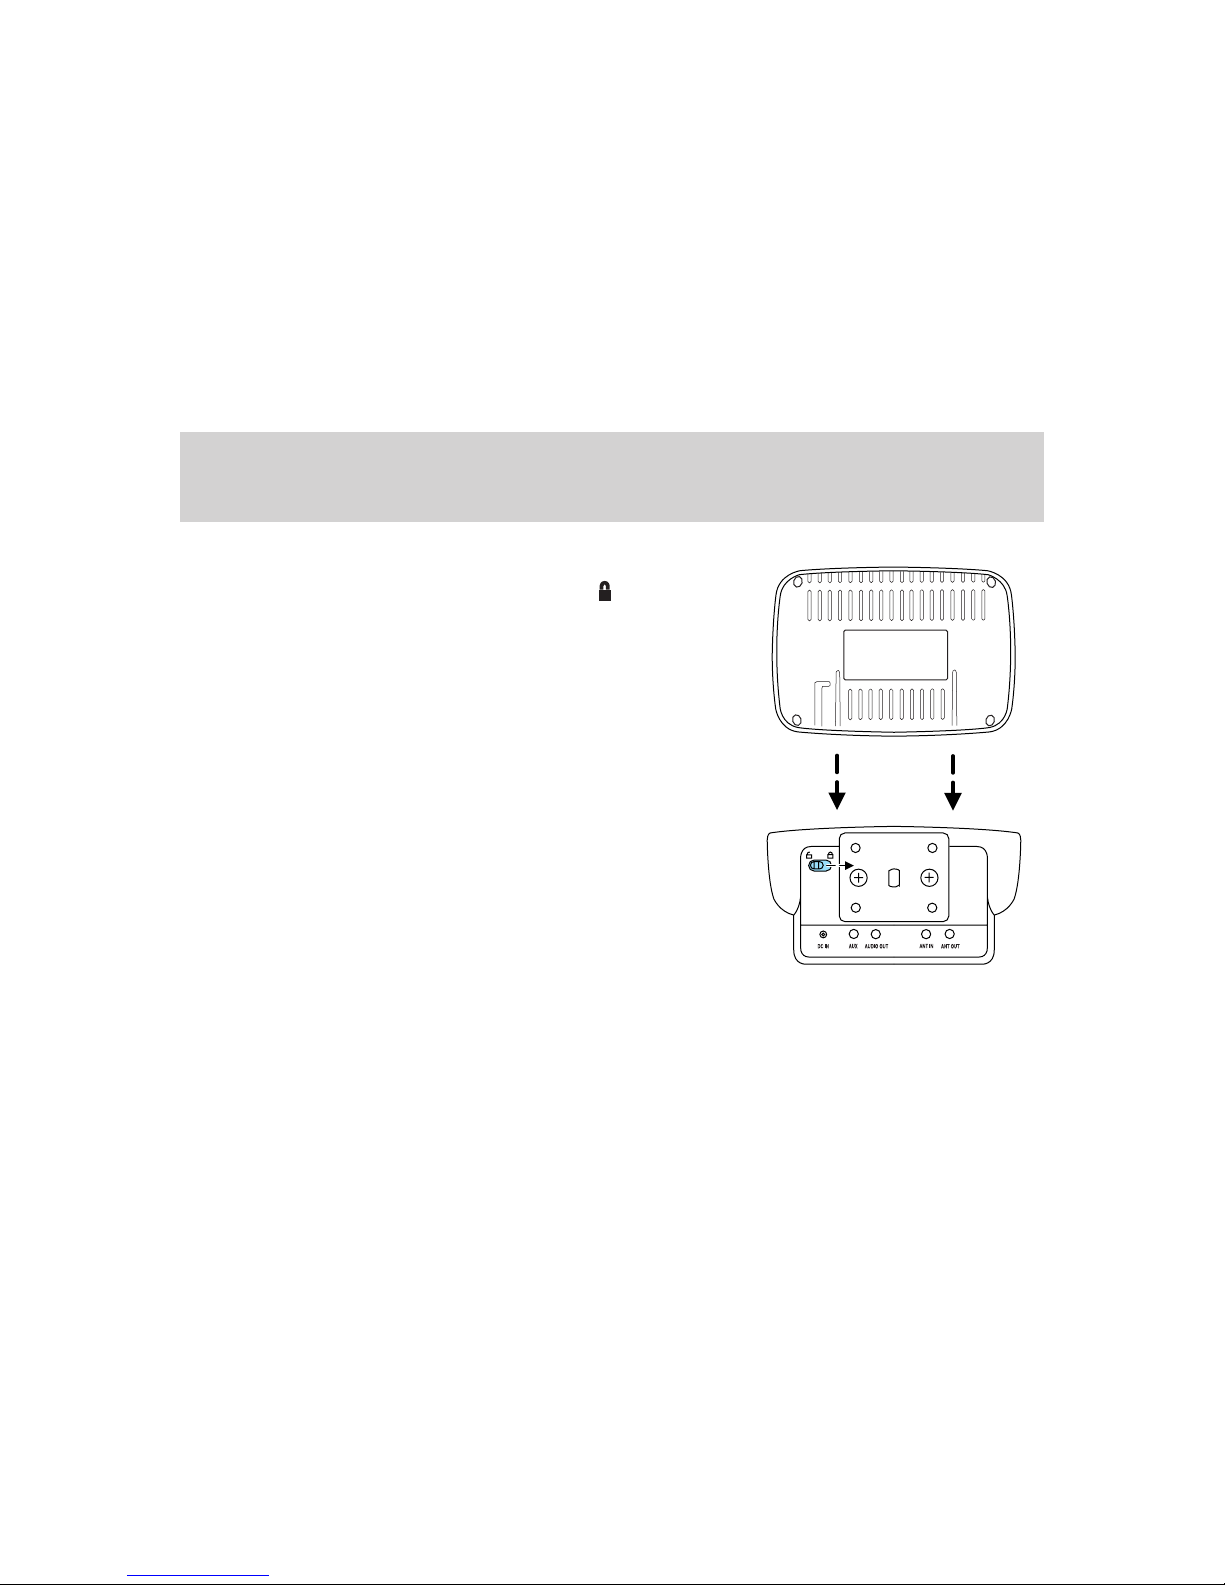
CAR CRADLE LOCK
Slide the HD Jump radio into the car cradle and slide the
lock lever on the back of the cradle to the lock position in
order to secure the unit.
Always remember to unlock and re-lock the radio when
removing and re-installing it in the car cradle.
CAR CRADLE CONNECTIONS (ANTENNA AND 12–VOLT DC POWER CABLE)
In order to achieve the clearest signal and retain digital clarity of the HD Radio signal, the
antenna wiring is a direct connection that may require temporary removal of the vehicle radio in
order to install it.
HD Jump™ Radio Car Cradle Setup
12

The 12–Volt DC power cable is a also a direct (hard wired) connection to ensure a more reliable
power delivery and cleaner overall look of installation.
Due to this, we recommend professional installation of the car cradle antenna wiring and 12–Volt
DC power cable. Following are directions that should be referenced by your installer:
HD Jump™ Radio Car Cradle Setup
13

•12–Volt DC power cord (1) – connect to a switched ignition ON only power source in the
vehicle. Using an always on power source could drain your vehicle’s battery if you leave the
HD Jump radio on while the ignition is OFF.
NOTE: The white striped wire on the power cord is the (+) positive lead. The plain (all black)
wire is the (–) negative lead.
•Antenna out cable (2) – plug this into the back of your car radio’s antenna in jack.
•Antenna in cable (3) – plug the vehicle antenna’s incoming wire into this cable.
If you find the antenna wire and car antenna connector in your vehicle does not fit with the
antenna in and antenna out wires included with the Car Cradle kit, you will need to obtain
aftermarket adapters to make the necessary connections.
When you have made all of the direct connections, connect the other ends of the cables to the
car cradle as follows:
•Insert the 12–Volt DC power supply cord (1) into the port
labeled DC IN on the rear of the car cradle.
•Insert the antenna out cable (2) into the port labeled
ANT OUT on the rear of the car cradle.
HD Jump™ Radio Car Cradle Setup
14

•Insert the antenna in cable (3) into the port labeled ANT
IN on the rear of the car cradle.
Note: Be sure all connectors are fully seated in the cradle
ports.
Fuse Holder
If the HD Jump radio does not work when connected to a proper 12–Volt DC power supply, the
protective fuse may have blown. To replace the fuse:
1. Unlatch and flip open the fuse box cover and remove the
fuse to inspect it.
2. If the small wire inside the fuse looks broken or burnt, it will need to be replaced. Use an
equivalent fuse of the same type and with the same amperage rating.
If you experience problems with the fuse blowing often, there may be a wiring problem with the
power cord or a problem with the HD Jump radio. In this case, discontinue use of the radio and
have the power supply wiring or radio serviced.
HD Jump™ Radio Car Cradle Setup
15

IN-CAR HD JUMP PLAY OPTIONS
Once you have made the necessary antenna and electrical connections for the car cradle you
need to choose how you will play the HD Jump radio through your vehicle’s audio system. The
HD Jump radio gives you the choice of using its built in RF modulator or using the AUDIO OUT
jack combined with your vehicle’s auxiliary input jack if it is equipped with one.
Use the following options to best suit your needs:
Using the RF Modulator
Your HD Jump radio contains a built-in RF modulator in the car cradle. This gives you the ability
to listen to whatever your HD Jump radio is playing through your car’s FM radio. Just set your
HD Jump’s modulator and the car’s FM radio to the same frequency.
To turn on modulator and set frequency:
1. Dock your HD Jump radio in the car cradle.
2. Find an unused FM frequency on your car radio. Make a note of that frequency.
3. Press SETUP on the HD Jump radio and turn the TUNE/ADJUST knob to scroll through the
menu list until you reach RF MODULATION and then select it by pressing the knob. Turn the
TUNE/ADJUST knob to pick ON. Press the knob and the modulator frequency will now become
highlighted.
4. Turn the tune knob to change the modulator’s frequency. Stop at the same FM frequency you
picked on the car radio. You should hear your HD Jump’s programming coming through the car’s
FM radio when both frequencies are set to match.
5. Adjust the HD Jump’s RF modulator volume, see “Line Out Volume” in the Setup Options
chapter.
Playing the HD Jump™ Radio in Your Car
16

You should pick a RF modulator volume that allows you to use a nominal volume setting on the
car radio; that is, you should not have to turn the car radio to it’s highest or lowest setting to
hear the HD Jump radio program at a comfortable listening level.
You should assign one of your car radio’s presets to the modulator frequency for convenience.
Using the HD Jump Radio with a Vehicle’s Auxiliary Input
You can use the HD Jump’s AUDIO OUT jack to connect it to your vehicles auxiliary input jack, if
it is equipped with one. You can use this instead of using the RF modulator. You will need to turn
the RF modulator off first to use this function. See “Using the RF Modulator” previously.
1. Connect the Aux cable included with the Car Cradle kit, to your vehicle’s auxiliary input jack.
2. Insert the other end of the Aux cable into the port labeled
AUDIO OUT on the rear of the HD Jump’s car cradle.
3. To adjust the HD Jump’s audio out volume, see “Line Out Volume” in the Setup Options
chapter.
You should pick a Line Out Volume that allows you to use a nominal volume setting on the car
radio; that is, you should not have to turn the car radio to its highest or lowest setting to hear
the HD Jump radio program at a comfortable listening level.
Connecting Auxiliary Input Devices (MP3 Player, CD Player) to the HD Jump
You can connect auxiliary input devices such as MP3 players to the HD Jump radio for playback
through your car audio system. For instance, connect your MP3 player to the HD Jump radio and
then use the HD Jump radio’s RF modulator to play your MP3 player through your car stereo. See
“Using the RF Modulator” in this chapter for more information.
Playing the HD Jump™ Radio in Your Car
17

1. Turn off the auxiliary device and connect the auxiliary device to the aux cable included with
the Car Cradle kit.
2. Insert the other end of the aux cable into the port labeled
AUX on the rear of the HD Jump’s car cradle.
3. Turn on the HD Jump radio and press the BAND/AUX
button until the unit enters the AUX screen.
4. Use the auxiliary device’s volume to find a level that provides the best sound without
distortion. Use the car audio system’s volume to find a comfortable listening level.
DC IN ANT OUT
ANT IN
AUDIO OUT
AUX
Playing the HD Jump™ Radio in Your Car
18
Table of contents


