Scion PT546-00120 User manual

SCION xB 2012 - RECEIVER ASSEMBLY RADIO UNIT
Preparation
Page 1 of 7 pages
Issue: A 03/03/2011
Part Number: PT546-00120,
PT546-00121
NOTE: Part number of this accessory may not be
the same as the part number illustrated.
Kit Contents
Item # Quantity Reqd. Description
1 1 Receiver Assembly Radio Unit
2 1 Owner’s Manual
3 1 Hardware Bag
4 1 Conversion Cable: USB
5 1 Conversion Cable : 28Pin
6 1 Conversion Cable : Antenna
Hardware Bag Contents
Item # Quantity Reqd. Description
1 8 Bolt (M5 8)
iPod Cable Contents
Item # Quantity Reqd. Description
Additional Items Required For Installation
Item # Quantity Reqd. Description
Conflicts
None
Recommended Tools
Personal & Vehicle
Protection Notes
Vehicle protection Blankets
Special Tools Notes
USB Flash Drive Media Must contain MP3 songs
Installation Tools Notes
Panel Clip Removal Tool e.g. Toyota SST P/N:-
00002-06002-01
Wrench Open End, 10mm
Socket 10mm
Screwdriver Phillips, #2
Torque Wrench 4.1 N·m (36 lbf ·in)
Masking Tape (2’’ wide)
Special Chemicals Notes
None
General Applicability
All Scion xB
Recommended Sequence of Application
Item # Accessory
*Mandatory
Vehicle Service Parts (may be required for reassembly)
Item # Quantity Reqd. Description
Legend
STOP: Damage to the vehicle may occur. Do not
proceed until process has been complied with.
OPERATOR SAFETY: Use caution to avoid risk of
injury.
CAUTION: A process that must be carefully observed
in order to reduce the risk of damage to the
accessory/vehicle and to ensure a quality installation.
TOOLS & EQUIPMENT: Used in Figures calls out the
specific tools and equipment recommended for this
process.
REVISION MARK: This mark highlights a change in
installation with respect to previous issue.
SAFETY TORQUE: This mark indicates that torque is
related to safety.
SCION xB 2012 - RECEIVER ASSEMBLY RADIO UNIT
Preparation
Page 2 of 7 pages
Issue: A 03/03/2011
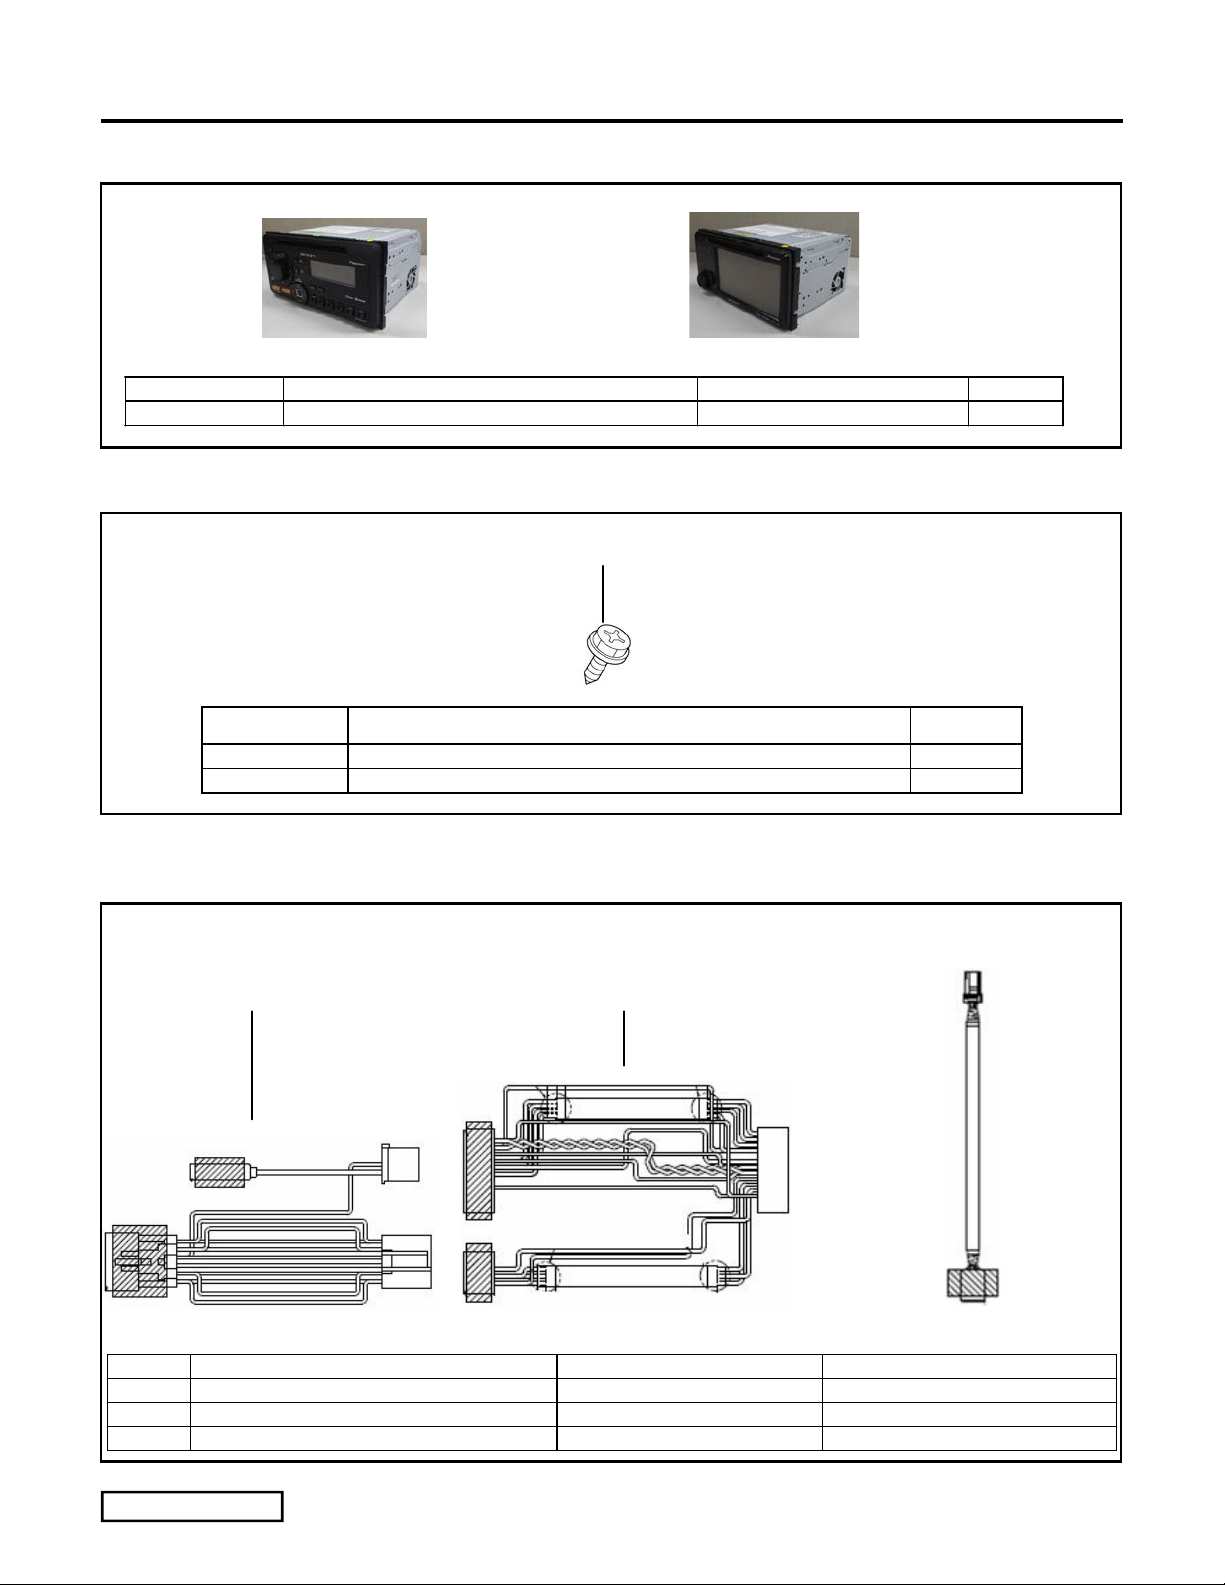
Parts Description of Receiver Assembly Radio Unit (PT546-00120 or PT546-00121)
PT546-00120 PT546-00121
Parts Description of Mounting Kit
Parts Description of Conversion Cable Harness
1 2 3
Item # Parts Name Qty
1 Bolt (M5 x L8) 8
Item # Parts Name Parts No. Qty
1 Conversion Cable : Antenna PT546-00120-AD 1
2 Conversion Cable : 20pin + 8pin to 28pin PT546-00120-CH 1
3 Conversion Cable : USB PT546-00120-US 1
1
Item # Parts Name Parts No. Qty
1 Receiver Assembly Radio Unit PT546-00120 or PT546-00121 1
1 1

SCION xB 2012 - RECEIVER ASSEMBLY RADIO UNIT
Procedure
Page 3 of 7 pages
Issue: A 03/03/2011
Care must be taken when installing this accessory to ensure damage does not occur to the vehicle. The installation of this
accessory should follow approved guidelines to ensure a quality installation.
These guidelines can be found in the "Accessory Installation Practices" document.
This document covers such items as:-
Vehicle Protection (use of covers and blankets, cleaning chemicals, etc.).
Safety (eye protection, rechecking torque procedure, etc.).
Vehicle Disassembly/Reassembly (panel removal, part storage, etc.).
Electrical Component Disassembly/Reassembly (battery disconnection, connector removal, etc.).
Please see your Toyota dealer for a copy of this document.
1. Vehicle Protection
(a) Remove the negative battery cable (Fig. 1-1).
(1) Protect the fender before starting.
(2) Do not touch the positive terminal with
any tool when removing cable.
(b) Check kit contents.
2. Disassembly of Vehicle
NOTE: Place all removed parts on a protected
surface.
NOTE: When disconnecting wiring connectors
do NOT pull on the wiring, pull on the
connector only.
NOTE: Engage the parking brake while working.
(a) Remove the audio cluster.
(1) In order to prevent scratches, apply tapes
around the audio cluster (shaded areas in
the figure) before removing the audio
cluster (Fig. 2-1).
Fig. 2-1
Tape
Audio Cluster
10mm Socket, Ratchet
Fig. 1-1
N
egative Battery Cable
Batter
y

SCION xB 2012 - RECEIVER ASSEMBLY RADIO UNIT
Procedure
Page 4 of 7 pages
Issue: A 03/03/2011
(2) Insert a removal tool to the section
marked “A”, and disengage the claws and
clips ( ) through ( ), then remove the
audio cluster (Fig. 2-2).
(3) Disengage the clips and remove the audio
cluster under plate (Fig. 2-3).
(b) Remove the radio brackets (R) and (L) from
the interior panel (Fig. 2-4).
Phillips Screwdriver Screws ( 4)
Radio Bracket (R)
Radio Bracket (L)
Fig. 2-4
Panel Removal Tool
Fig. 2-3 Clips ( 2)
Fig. 2-2
Clips ( 4)
Claws ( 3)
A
Panel Removal Tool

SCION xB 2012 - RECEIVER ASSEMBLY RADIO UNIT
Procedure
Page 5 of 7 pages
Issue: A 03/03/2011
(c) Remove the taping on the harness for the
radio unit (Fig. 2-5).
3. Installing the receiver assembly radio unit
(a) Install the radio brackets (R) and (L) on the
receiver using the bolts from the hardware
bag (Fig. 3-1).
(b) Connect each conversion cable to the
vehicle harness, and then to the radio.
(Fig. 3-2) Note: the connectors wrapped
with foam are to be plugged in to the
vehicle harness
(c) Install the receiver in the instrument panel.
(Fig. 3-3)
(1) Fasten the receiver assembly radio unit
with four screws.
Fig. 3-1
Phillips Screwdriver
Radio Bracket (R)
Radio Bracket (L)
Bolts (M5 8)( 4)
Bolts (M5 8) ( 4)
Receiver Assembly Radio Unit
Phillips Screwdriver
Fig. 3-3 Connect the antenna cable
and connectors to the radio.
Screws ( 4)
Harness for radio
Remove the taping.
Fig. 2-5
Fig. 3-2
Connect this end to radio
Connect this end to the vehicle

SCION xB 2012 - RECEIVER ASSEMBLY RADIO UNIT
Procedure
Page 6 of 7 pages
Issue: A 03/03/2011
4. USB check procedure.
(a) Connect the USB flash drive media to the
vehicle’s USB/AUX connector. (Fig. 4-1)
(b) Press iPod/USB button on the head unit to
select the USB audio function. (Fig. 4-2)
(c) Confirm song plays.
(d) Remove flash drive from USB connector.
(e) Press the engine switch off.
Note: Select USB mode on the premium radio
by pressing the “source” button on the touch
display screen, then selecting USB mode.
iPod button
5. Completing the installation
(a) Complete the reassembly of the vehicle.
(1) Reconnect any disconnected connectors.
(2) Verify the panels fit together properly
with no uneven gaps between them.
(b) Clean up and remove any trash.
(c) Reconnect the vehicle’s negative battery
cable to original factory position. (Fig. 4-1).
(1) Tighten the nut to 4.1 N•m (36 lbf•in).
(2) Do not touch the positive terminal with
any tool when replacing the cable.
(d) Perform functional checks.
(e) Place the owner’s manual in the glove box.
Torque Wrench, 10mm Socket
Fig. 4-1 Negative Battery Cable
Batter
y
Fig. 4-2 iPod/USB button

SCION xB 2007 - Receiver Assembly Radio Unit
Checklist - these points MUST be checked to ensure a quality installation.
Check: Look For:
Page 7 of 7 pages
Issue: A 03/03/2011
Accessory Function Checks
Insert CD audio disc and confirm operation.
Turn radio on and confirm operation.
Antenna is functional.
Fade
Balance
PT546-00121: Press following sequence.
.PT546-00120: With radio off, press and hold
the multi knob for 5 seconds. Then go to
Car Type menu.
Vehicle Function Checks
Steering Wheel audio controls
Rheostat
Functioning CD player
Radio functions properly.
Reception of AM/FM stations
Functioning fade, front to rear speakers
Functioning balance, left to right speakers
Verify radio’s vehicle type is set xB.
Functioning audio controls
Functioning dimmer control
System Vehicle Settings
This manual suits for next models
1
Table of contents
Other Scion Car Receiver manuals

Scion
Scion PT546-00130 User manual

Scion
Scion PT546-00100 User manual

Scion
Scion BeSpoke Premium Audio pt296-00142 User manual

Scion
Scion PT546-18130 User manual

Scion
Scion scion audio system User manual

Scion
Scion PT546-00140 User manual

Scion
Scion BeSpoke User manual

Scion
Scion 2012 xB User manual

Scion
Scion PT546-00160 User manual


