Heartland HCTMR20RWHT User manual

AGA Marvel
1260 E. VanDeinse St.
Greenville MI 48838
Toll free phone: 800-223-3900
Fax: 616-754-9690
www.agamarvel.com
THANK YOU for purchasing this high-quality product. If you should experience a problem not covered
in TROUBLESHOOTING, please visit our website at www.agamarvel.com for additional information. If
you still need assistance, call us at 1-800-223-3900.
You will need your model and serial number, located on the inside wall of the refrigerator compart-
ment.
Classic Model HCTMR20A Refrigerator User Instructions

2
NOTE
NOTE
!CAUTION
!CAUTION
Important Safety Instructions
Warnings and safety instructions appearing in this guide
are not meant to cover all possible conditions and situa-
tions that may occur. Common sense, caution, and care
must be exercised when installing, maintaining, or operat-
ing this appliance.
Recognize Safety Symbols,
Words, and Labels.
!WARNING
WARNING-You can be killed or seriously injured if
you do not follow these instructions.
!WARNING
State of California Proposition 65 Warning:
This product contains one or more chemicals known
to the State of California to cause cancer.
!WARNING
State of California Proposition 65 Warning:
This product contains one or more chemicals known
to the State of California to cause birth defects or
other reproductive harm..
CAUTION-Hazards or unsafe practices which could re-
sult in personal injury or property / product damage.
NOTE-Important information to help assure a problem
free installation and operation.
Table of Contents
Table of contents ................................................................2
Safety .................................................................................2
Unpacking your appliance ..................................................3
Electrical information ..........................................................4
Product dimensions ............................................................5
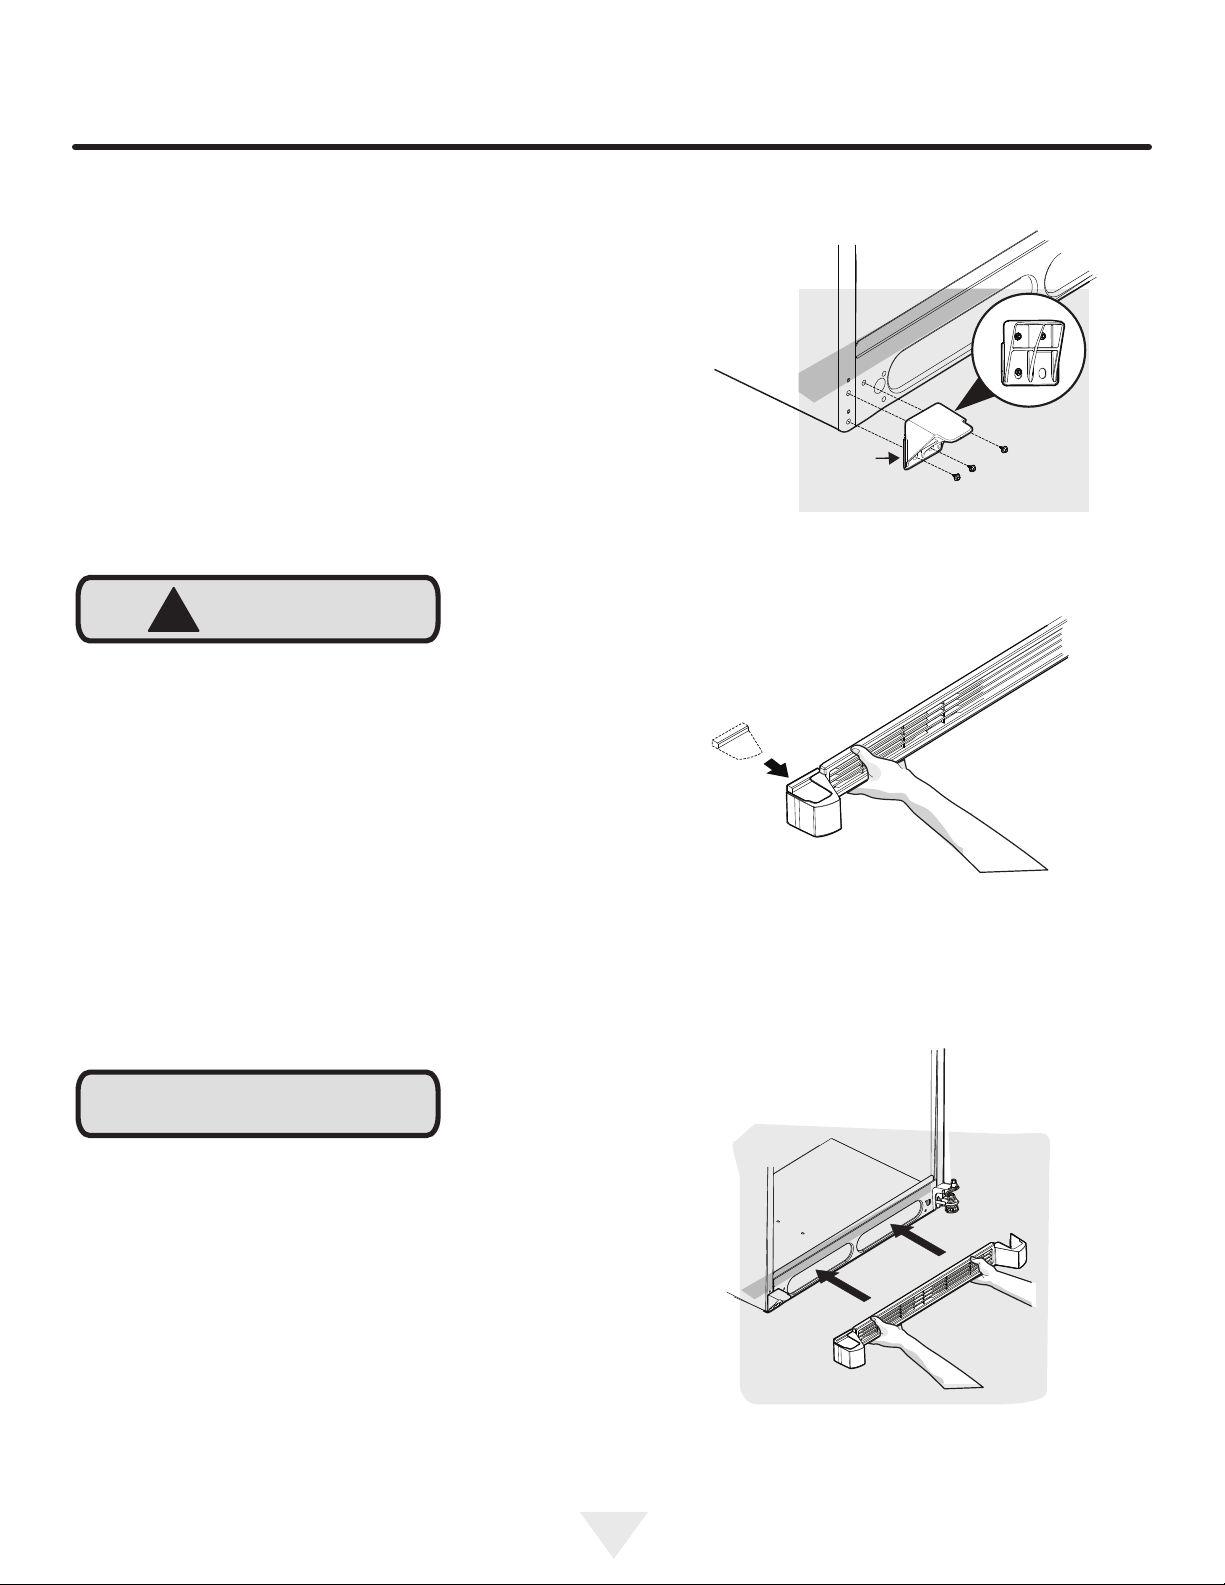
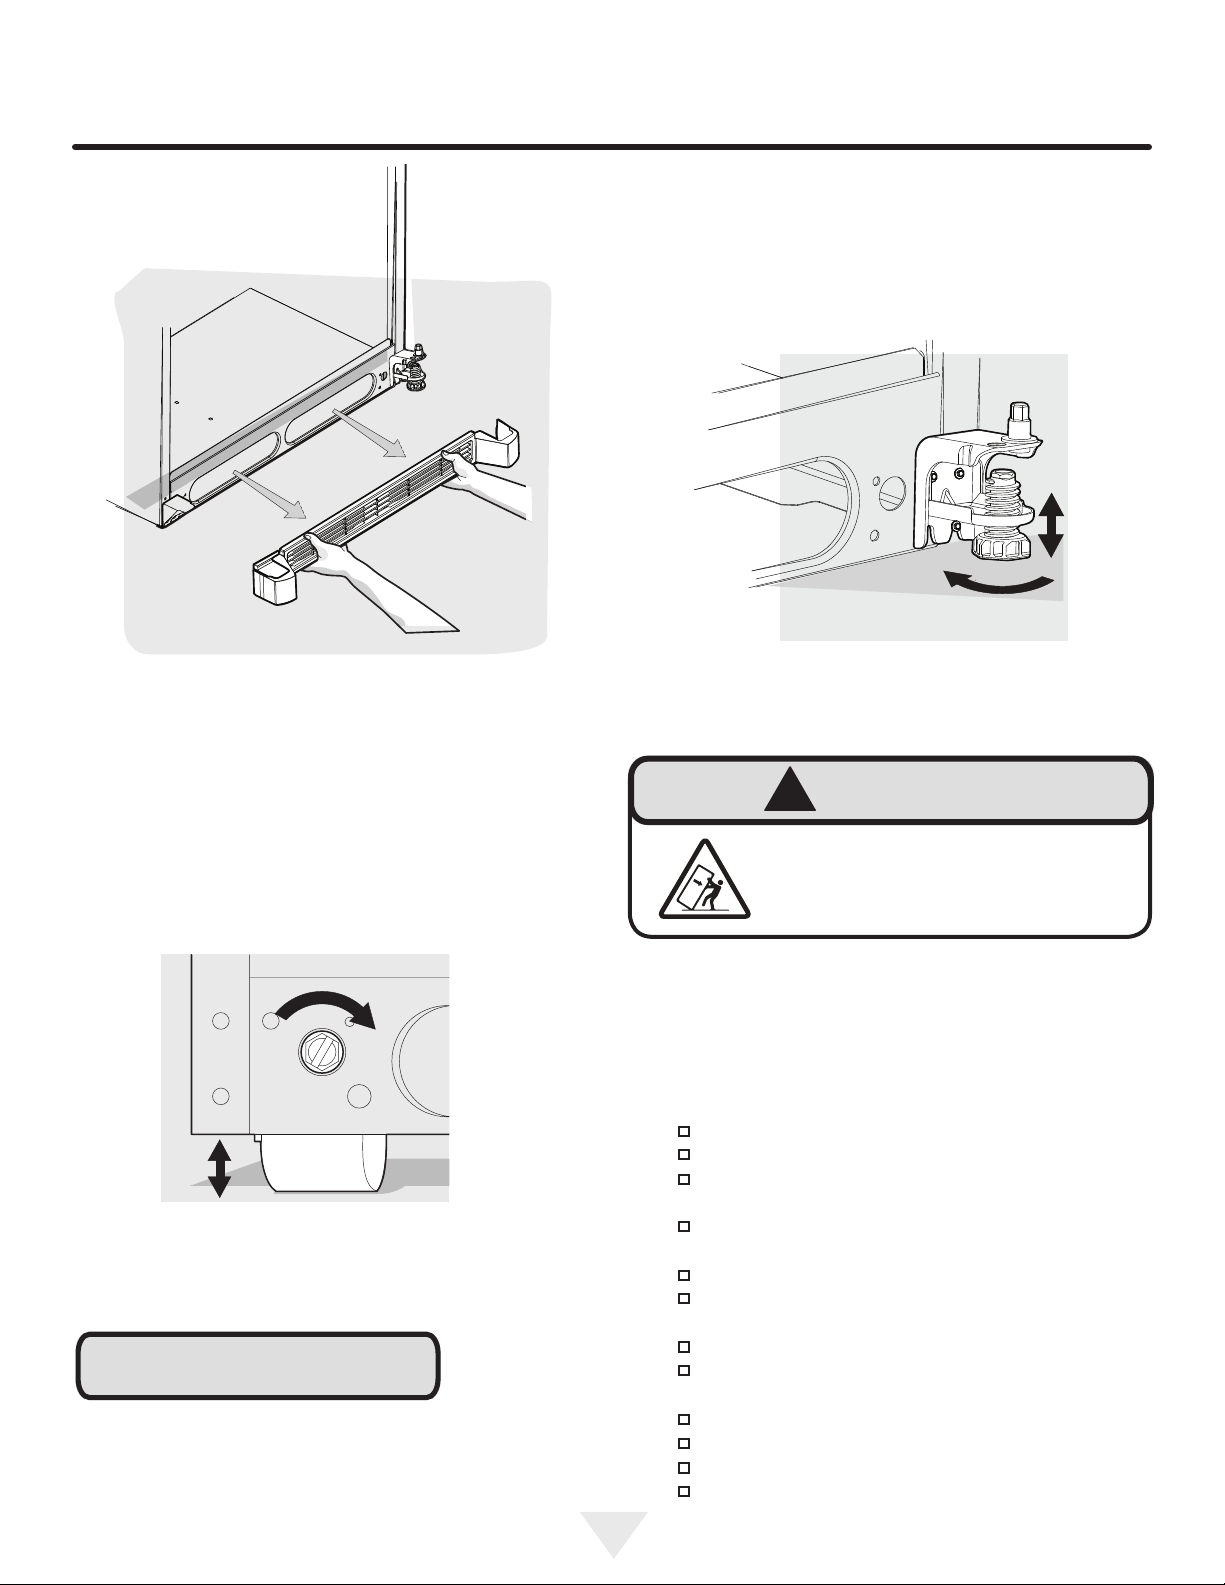
Installation ..........................................................................6
Removing the doors ...........................................................8
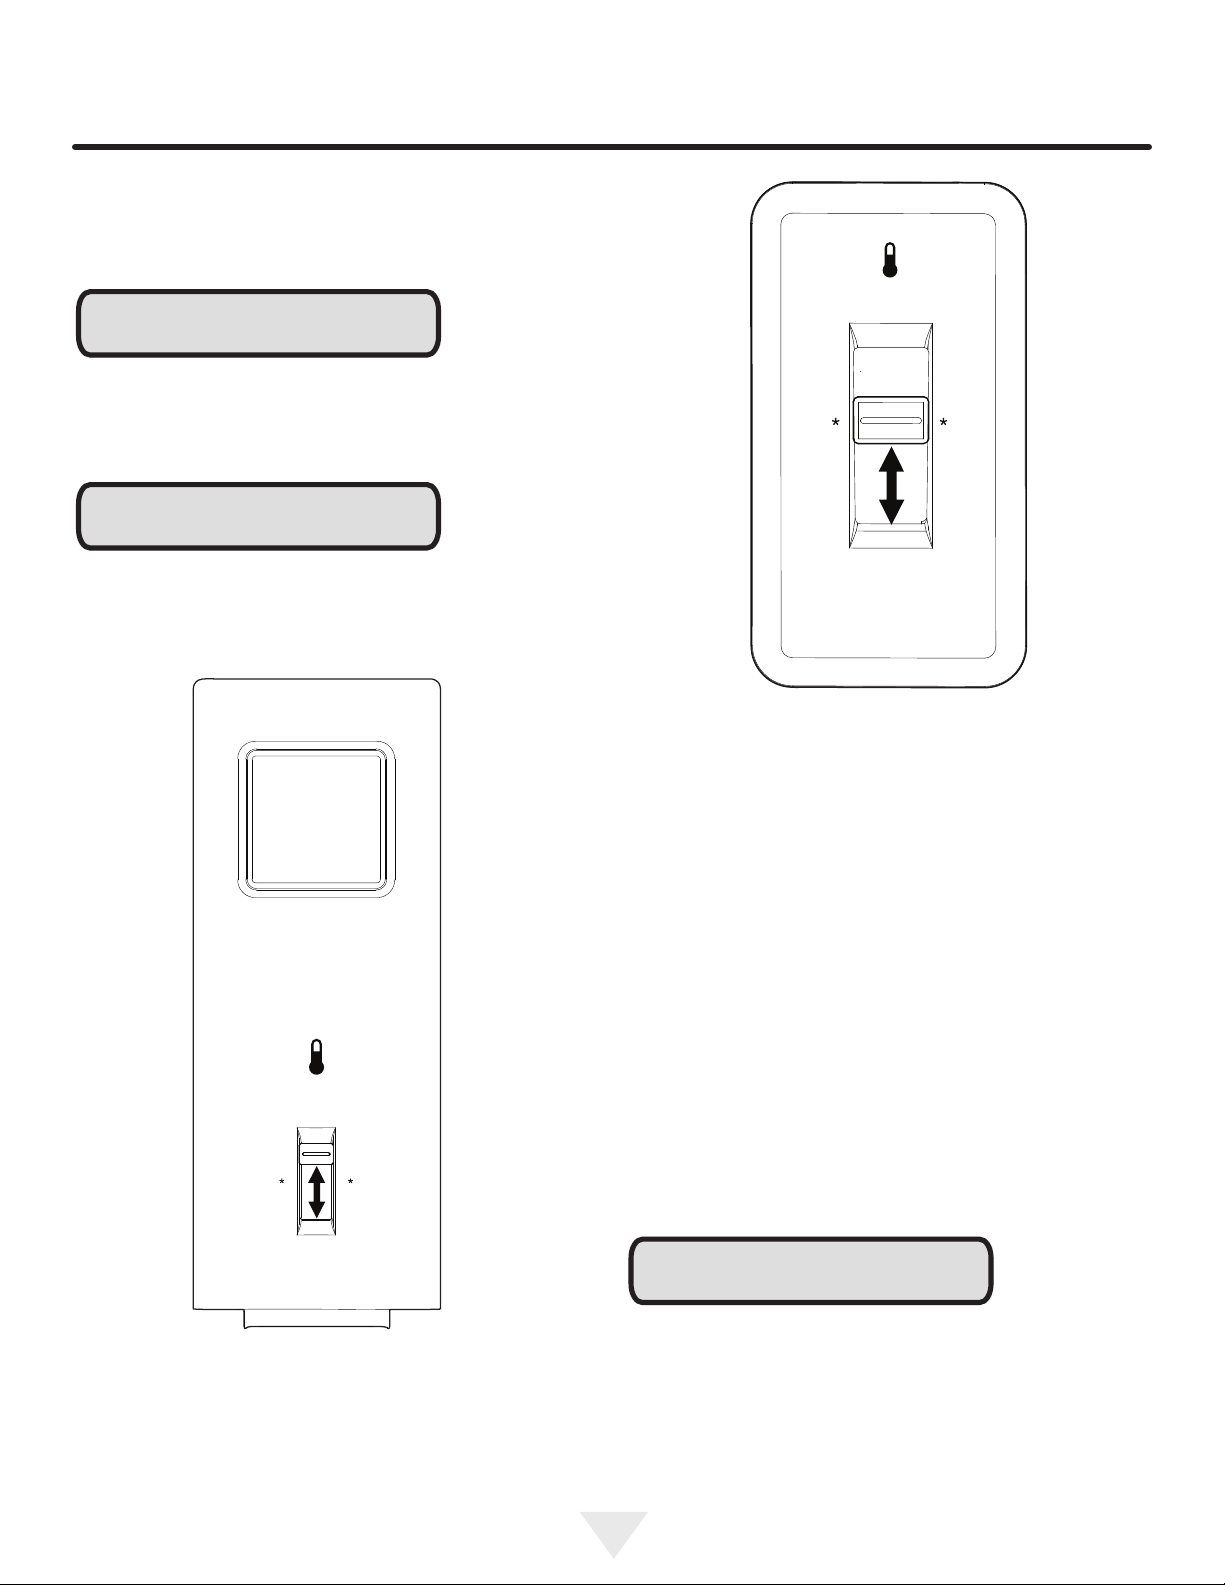
Controls .............................................................................9
Normal operating sounds .................................................10
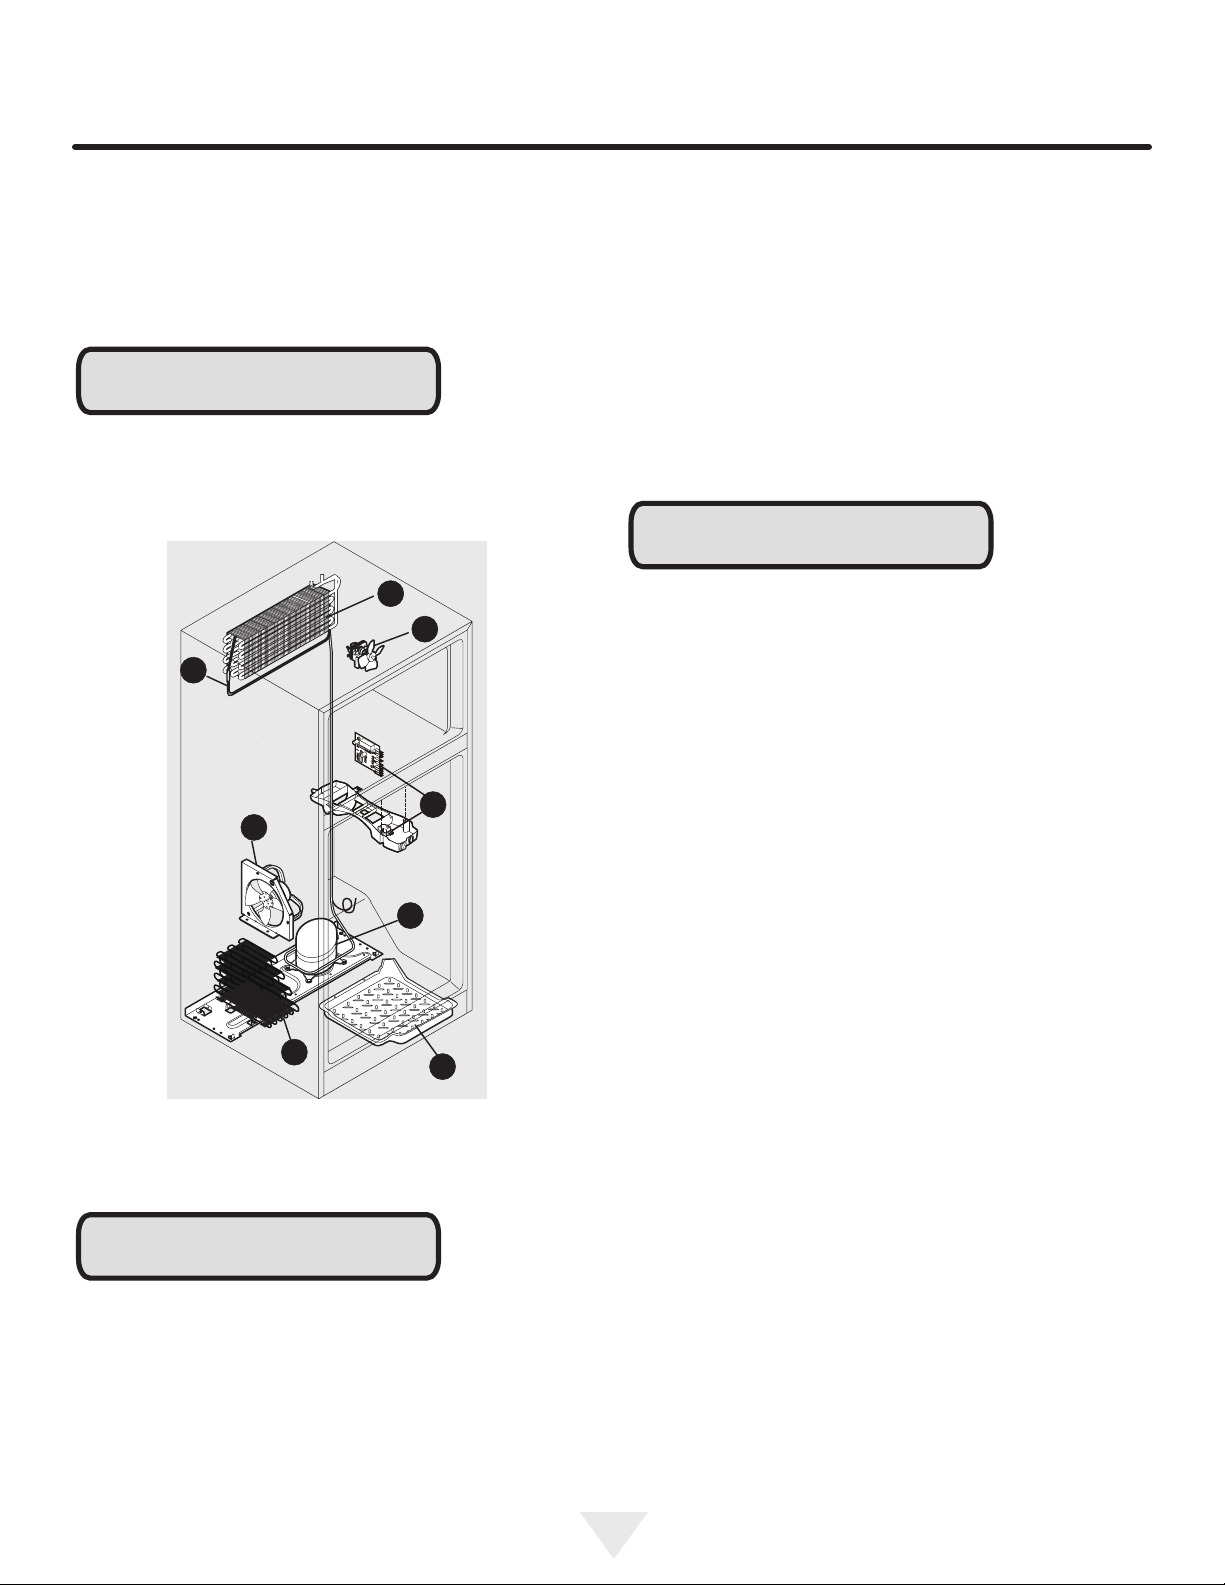
Care and cleaning ............................................................11
Troubleshooting.................................................................13
Warranty ...........................................................................14
FINDING INFORMATION AND SAFETY
CFC/HCFC DISPOSAL
Your old refrigerator may have a cooling system that used
CFCs or HCFCs (chlorouorocarbons or hydrochlorouo-
rocarbons). CFCs and HCFCs are believed to harm strato-
spheric ozone if released to the atmosphere. Other refriger-
ants may also cause harm to the environment if released to
the atmosphere.
If you are throwing away your old refrigerator, make sure
the refrigerant is removed for proper disposal by a qualied
technician. If you intentionally release refrigerant, you may
be subject to nes and imprisonment under provisions of
environmental legislation.
• Do not store or use gasoline or other ammable liquids
near this or any other appliance. Read product labels
for warnings regarding ammability and other hazards.
• Do not operate the refrigerator in the presence of ex-
plosive fumes.

3
!WARNING
Dispose of the plastic bags which can be a suffoca-
tion hazard.
!WARNING
Help Prevent Tragedies
Child entrapment and suffocation are not problems
of the past. Junked or abandoned refrigerators are
still dangerous - even if they sit out for "just a few
hours".
If you are getting rid of your old refrigerator, please
follow the instructions below to help prevent acci-
dents.
Before you throw away your old refrigerator or
freezer:
• Take off the doors or remove the drawers.
• Leave the shelves in place so children may not
easily climb inside.
NOTE
!CAUTION
!WARNING
EXCESSIVE WEIGHT HAZARD
Use two or more people to move product.
Failure to do so can result in personal injury.
Remove Interior Packaging
Your appliance has been packed for shipment with all parts
that could be damaged by movement securely fastened.
Remove internal packing materials and any tape holding in-
ternal components in place. The owners manual is shipped
inside the product in a plastic bag along with the warranty
registration card, and other accessory items.
Important
Keep your carton and packaging until your appliance has
been thoroughly inspected and found to be in good condi-
tion. If there is damage, the packaging will be needed as
proof of damage in transit. Afterwards please dispose of all
items responsibly.
Note to Customer
This merchandise was carefully packed and thoroughly
inspected before leaving our plant. Responsibility for its
safe delivery was assumed by the retailer upon acceptance
of the shipment. Claims for loss or damage sustained in
transit must be made to the retailer.
DO NOT RETURN DAMAGED MERCHANDISE TO THE
MANUFACTURER - FILE THE CLAIM WITH THE
RETAILER.
If the appliance was shipped, handled, or stored in other
than an upright position for any period of time, allow the ap-
pliance to sit upright for a period of at least 24 hours before
plugging in. This will assure oil returns to the compressor.
Plugging the appliance in immediately may cause damage
to internal parts.
Warranty Registration
It is important you send in your warranty registration card
immediately after taking delivery of your appliance or you
can register online at www.agamarvel.com.
The following information will
be required when registering
your appliance.
Model Number
Serial Number
Date of Purchase
Dealer’s name and address
The service number and serial number can be found on the
serial plate which is located inside the right side refrigerator
cabinet on the right side of the cabinet liner. (See gure 1).
Figure 1
Online registration
available at
www.agamarvel.com
UNPACKING YOUR APPLIANCE

4
Electrical information
• The refrigerator must be plugged into its own dedicat-
ed 115 Volt, 60 Hz, AC-only non-GFCI electric outlet.
The power cord of the appliance is equipped with a
three-prong grounding plug for your protection against
electrical shock hazards. It must be plugged directly
into a properly grounded three-prong receptacle. The
receptacle must be installed in accordance with local
codes and ordinances. Consult a qualied electrician.
Do not use an extension cord or adapter plug.
• If the power cord is damaged, it should be replaced
by the manufacturer, service technician, or a qualied
person.
• Never unplug the refrigerator by pulling on the power
cord. Always grip the plug rmly and pull straight out
from the receptacle to prevent damaging the power
cord.
• To avoid electrical shock, unplug the refrigerator before
cleaning and before replacing a light bulb or LED light.
• Performance may be affected if the voltage varies by
10% or more. Operating the refrigerator with insufcient
power can damage the compressor. Such damage is
not covered under your warranty.
• Do not plug the unit into an outlet controlled by a wall
switch or pull cord to prevent the refrigerator from being
turned off accidentally.
Figure 2
Figure 3
Do not remove
ground prong
!WARNING
You must follow these guidelines to ensure
that your refrigerator’s safety mechanisms are
operating correctly.
Figure 4
Grounding type
wall receptacle
!CAUTION
!CAUTION
To turn off power to your refrigerator, unplug the power cord
from the wall outlet.
NOTE
Turning the Freezer and Fresh Food controls to “OFF” will
disable your refrigerator’s cooling system, but does not
disconnect the power to the light bulb and other electrical
components. To turn off power to your refrigerator you must
unplug the power cord from the electrical outlet.
To avoid personal injury or property damage, handle tem-
pered glass shelves carefully. Shelves may break suddenly
if nicked, scratched, or exposed to sudden temperature
change.
ELECTRICAL INFORMATION

5
PRODUCT DIMENSIONS
Dimensions
58-1/2”
(148.6 cm)
28-1/2”
(72.4 cm)
69”
(175.3 cm)
67-7/8”
(172.4 cm)
Cabinet Width
29-3/4”
31-3/4”
(75.6 cm)
(80.6 cm)
Hinge
with refrigerator
door open
Rough In
Measurement
s
30”
(77 cm)
28-1/2”
(72 cm)
68-3/4” (174.6 cm)
with-out cowl
74-1/4” (188.6 cm)
with 5-1/2” cowl
OPTIONAL COWL
5-1/2” (138 mm)
27-1/2”
(70 cm)
Refrigerator
• Optional 5-1/2” (14 cm) high cowl -
part
39029-color
• Cut-out height of opening will
dependant on installation of cowl
option. See adjacent Figure.
Dimensions
E
lectrical
3/8”(1 cm)
air gap
4” (10 cm) gap
required for proper
door swing
25” (63.5 cm)
counter depth
24” (61 cm)
cabinet depth
Top View
Left hand shown
Door width
30-1/8”
(76.5 cm)

6
!CAUTION
NOTE
INSTALLATION
This Use & Care Guide provides general operating instruc-
tions for your model. Use the refrigerator only as instructed
in this Use & Care Guide. Before starting the refrigerator,
follow these important rst steps.
Location
• Choose a place that is near a grounded electrical out-
let. Do Not use an extension cord or an adapter plug.
• If possible, place the refrigerator out of direct sunlight
and away from the range, dishwasher or other heat
sources.
• The refrigerator must be installed on a oor that is level
and strong enough to support a fully loaded refrigerator.
Do Not install the refrigerator where the temperature will
drop below 55°F (13°C) or rise above 110°F (43°C). The
compressor will not be able to maintain proper tempera-
tures inside the refrigerator. Do Not block the toe grille on
the lower front of your refrigerator. Sufcient air circulation
is essential for the proper operation of your refrigerator.
Installation
Installation clearances
• Allow the following clearances for ease of installation,
proper air circulation, and plumbing and electrical con-
nections:
Sides & Top ⅜ inch
Back 1 inch
If your refrigerator is placed with the door hinge side
against a wall, you may have to allow additional space so
the door can be opened wider.
Guidelines for nal positioning of your refrig-
erator:
• All four corners of the cabinet must rest rmly on the
oor.
• The cabinet should be level at the front and rear.
• The sides should tilt ¼-inch (6 mm) from front-to-back
(to ensure that doors close and seal properly).
• Doors should align with each other and be level.
To install the toe grille:
1. Attach toe grille support bracket to cabinet using 3 bolts
supplied.
2. Install left toe grille cover onto slot on left side of toe
grille.
3. Attach toe grille to cabinet.

7
INSTALLATION
NOTE
Raise the front of the refrigerator enough so the doors
close freely when opened halfway. The refrigerator should
slope ¼ inch to ½ inch from front-to-back. Then level the
refrigerator from side-to-side.
!WARNING
The anti-tip device must be installed
according to the instructions in your
Use & Care Manual. Failure to do so
will result in injury.
To level the cabinet using the front rollers:
1 Remove the toe grille.
2 Use a at-blade screwdriver or ⅜ inch socket
wrench to raise or lower the front rollers (Figure 2).
RAISE
Figure 2
Figure 3
LOWER
3 Lower the anti-tip bracket leveler clockwise until it
contacts the oor. See Figure 3.
Installation checklist:
Doors
Handles are secure and tight.
Door seals completely to cabinet on all sides.
Freezer door is level across the top.
Leveling
Refrigerator is level, side to side and tilted 1/4"
(6 mm) front-to-back.
Toe grille is properly attached to the refrigerator.
Cabinet is setting solid on all corners.
Electrical Power
House power turned on.
Refrigerator plugged in.
Final Checks
Shipping material removed.
Fresh food and freezer temperatures set.
Crisper humidity controls set.
Registration card sent in.

8
DOOR AND HINGE REMOVAL INSTRUCTIONS
NOTE
Before you begin, turn the refrigerator temperature control
to “OFF” and remove the electrical power cord from the wall
outlet. Remove any food from door shelves.
Door removal instructions:
1. Remove toe grille.
2. Remove top hinge cover. Trace around the hinge with a
soft lead pencil. This makes reinstallation easier. Remove
top hinge and lift door off center hinge pin. Set door aside.
3. Unscrew center hinge
pin using adjustable
wrench and save for re-
assembly. Ensure plastic
washer stays on hinge pin.
Top
hinge
cover
Top
hinge
4. Lift refrigerator door off of bottom hinge and set aside.
5. Remove center hinge and shim by removing inside
screw and loosening two outside screws enough to allow
hinge and shim to slide out.
Door
stop
screw Door
stop
Washer
Hinge
pin
Shim
Center
hinge
Screws
Tools Necessary:
Phillips™ Head
3/8" xed
wrench
Socket
wrench set
Adjustable
wrench
Top hinge
cover front
screw
Top hinge
cover rear
screw
Top
hinge
screw
Bottom
hinge
screw
Anti-tip bracket
Toe grille
support
Toe grille
cover
6. Remove the 3 screws from the anti-tip bracket with the
3/8" socket wrench and remove the anti-tip bracket from
the cabinet.
7. Remove the 3 screws from the toe grille support with the
3/8" socket wrench and remove the toe grille support from
the cabinet.
Reassembly is the reverse of the above procedure.

9
CONTROLS
Cool Down Period
To ensure safe food storage, allow the refrigerator to oper-
ate with the doors closed for at least 8 hours before loading
it with food.
NOTE
NOTE
When rst turning refrigerator on, adjust the refrigerator
control to (*). This is the recommended initial setting. After
24 hours, adjust the controls as needed.
If your unit is in a garage or area where the temperature is
below 55°, adjust the freezer control to the coldest setting.
Temperature Adjustment
• Adjust temperature gradually: adjust the knob in small
increments, allowing the temperature to stabilize.
Adjusting the refrigerator/freezer control will change tem-
peratures in both compartments. The auxiliary freezer con-
trol can be left at the factory pre-set recommended (*) or
adjusted as desired; it has no effect on electrical power to
the refrigerator.
To maintain temperatures, a fan circulates air in the refrig-
erator and freezer compartments. For good circulation, do
not block cold air vents with food items.
NOTE
Adjusting the refrigerator/freezer temperature control to
“off” turns off the compressor and prevents the refrigerator
from cooling, but does not disconnect the power to the light
bulb and other electrical components. To turn off power to
your refrigerator, you must unplug the power cord from the
wall outlet.
Refrigerator / Freezer Control
(Located on left side wall in refrigerator compartment)
temperature
coldest
cold
off
* recommended
Auxiliary Freezer Control
(Located on back wall in freezer compartment)
temperature
coldest
cold
off
* recommended
garage

10
NORMAL OPERATING SOUNDS AND SIGHTS
A
B
C
F
G
E
H
D
Understanding the sounds you may hear
Your new, high-efciency refrigerator may introduce unfa-
miliar sounds. These sounds normally indicate your re-
frigerator is operating correctly. Some surfaces on oors,
walls, and kitchen cabinets may make these sounds more
noticeable.
NOTE
Rigid foam insulation is very energy efcient, but is not a
sound insulator.
NOTE
If the Fresh Food door is left open form more than 5 min-
utes, an alarm will sound. The alarm will sound for 2 min-
utes and then stop. If the “Door Ajar” condition remains, the
alarm will repeat every 30 minutes for two intervals.
After 15 minutes of a “Door Ajar” Condition, the unit will turn
the Fresh Food light off until the door is closed. The door
switch in the Fresh Food can be pressed and released to
reset the alarm and light.
NOTE
During the automatic defrost cycle, you may notice a red
glow in the vents on the back wall of your freezer compart-
ment. This is normal during the defrost cycle.
Following is a list of major components in your refrigerator
and the sounds they can cause:
AEvaporator Refrigerant through the evaporator may cre-
ate a boiling or gurgling sound.
BEvaporator fan You may hear air being forced through
the refrigerator by the evaporator fan.
CDefrost heater During defrost cycles, water dripping onto
the defrost heater may cause a hissing or sizzling sound.
After defrosting, a popping sound may occur.
D Condenser May create minimal sounds from forced air.
EElectronic defrost control These parts can produce a
snapping or clicking sound when turning the cooling system
on and off.
FCondenser fan You may hear air being forced through the
condenser.
G Compressor Modern, high-efciency compressors run
much faster than in the past. The compressor may have a
high pitched hum or pulsating sound.
HDrain pan (not removable) You may hear water dripping
into the drain pan during the defrost cycle.

11
CARE AND CLEANING
Protecting your investment
Keeping your refrigerator clean maintains appearance and
prevents odor build-up. Wipe up any spills immediately and
clean the freezer and fresh food compartments at least
twice a year. When cleaning, take the following
precautions:
• Never use CHLORIDE or cleaners with bleach to clean
stainless steel.
• Do not wash any removable parts in a dishwasher.
• Always unplug the electrical power cord from the wall
outlet before cleaning.
• Remove adhesive labels by hand. Do not use razor
blades or other sharp instruments which can scratch
the appliance surface.
• Do not remove the serial plate.
Do not use abrasive cleaners such as window sprays,
scouring cleansers, brushes, ammable uids, cleaning
waxes, concentrated detergents, bleaches or cleansers
containing petroleum products on plastic parts, interior
doors, gaskets or cabinet liners. Do not use paper towels,
metallic scouring pads, or other abrasive cleaning materials
or strong alkaline solutions.
NOTE
If you set your temperature controls to turn off cooling, pow-
er to lights and other electrical components will continue
until you unplug the power cord from the wall outlet.
!CAUTION
• Pull the refrigerator straight out to move it. Shifting it
from side to side may damage ooring. Be careful not
to move the refrigerator beyond the plumbing connec-
tions.
• Damp objects stick to cold metal surfaces. Do not touch
refrigerated surfaces with wet or damp hands.
NOTE
If you store or move your refrigerator in freezing tempera-
tures, be sure to completely drain the water supply system.
Failure to do so could result in water leaks when the refrig-
erator is put back into service. Contact a service represen-
tative to perform this operation.

12
CARE AND CLEANING
Care and Cleaning Tips
Part What To Use Tips and Precautions
Interior and door liners • Soap and water
• Baking soda and water
Use 2 tablespoons of baking soda in 1 quart of water. Be
sure to wring excess water out of sponge or cloth before
cleaning around controls, light bulb or any electrical part.
Door gaskets • Soap and water Wipe gaskets with a clean soft cloth
Drawers and bins • Soap and water Use a soft cloth to clean drawer runners and tracks
Toe grille • Soap and water
• Mild liquid sprays
• Vacuum attachment
Vacuum dust from front of toe grille. Remove toe grille
(see Installation Instructions). Vacuum backside, wipe with
sudsy cloth or sponge. Rinse and dry.
Glass shelves • Soap and water
• Glass cleaner
• Mild liquid sprays
Allow glass to warm to room temperature before immers-
ing in warm water.
Exterior and handles • Soap and water
• Non abrasive glass cleaner
Do not use commercial household cleaners containing
ammonia, bleach or alcohol to clean handles. Use a soft
cloth to clean smooth handles. DO NOT use a dry cloth to
clean smooth doors.
Exterior and handles
(Stainless steel models)
• Soap and water
• Stainless steel cleaners
Never use CHLORIDE or cleaners with bleach to clean
stainless steel.
Clean stainless steel front and handles with nonabrasive
soapy water and a dishcloth. Rinse with clean water and
a soft cloth. Use a non-abrasive stainless steel cleaner.
These cleaners can be purchased at most home improve-
ment or major department stores. Always follow manufac-
turer’s
instructions. Do not use household cleaners containing
ammonia or bleach.
NOTE: Always clean, wipe and dry with the grain to pre-
vent scratching. Wash the rest of the cabinet with warm
water and mild liquid detergent. Rinse
well, and wipe dry with a clean soft cloth.
Replacing light bulbs • Unplug refrigerator
• Wear gloves
• Remove light cover
• Replace old bulb
• Replace light cover
• Plug in refrigerator
CAUTION: Wear gloves when replacing light bulbs to
avoid getting cut. Use same wattage when replacing bulb

13
TROUBLESHOOTING
Common Occurences Before calling for service, review this list. It may save you time and expense.
This list includes common occurrences that are not the result of defective work-
manship or materials in this appliance.
Refrigerator does not run. • Ensure plug is tightly pushed into electrical outlet.
• Check/replace fuse with a 15 amp time-delay fuse. Reset circuit breaker.
• The refrigerator/freezer control is turned to “OFF”.
• Refrigerator may be in defrost cycle. Wait 20 minutes and check again.
Freezer temperature is colder than
preferred. Refrigerator temperature is
satisfactory.
• Set auxiliary freezer control to a warmer setting until freezer temperature is
satisfactory. Allow 24 hours for the temperature to stabilize.
Refrigerator temperature is too cold.
Freezer temperature is satisfactory.
• Set refrigerator/freezer control to a warmer setting. Allow 24 hours for
temperature to stabilize. Then check freezer temperatures and adjust as
needed.
Freezer temperature is warmer than
preferred. Refrigerator temperature is
satisfactory.
• Set auxiliary freezer control to a colder setting until freezer temperature is
satisfactory. Allow 24 hours for the temperature to stabilize.
Refrigerator temperature is too warm.
Freezer temperature is satisfactory.
• Set refrigerator/freezer control to a colder setting. Allow 24 hours for tem-
perature to stabilize. Then check refrigerator temperatures and adjust as
needed.
Refrigerator is noisy or vibrates. • The cabinet is not level.
• Floor is weak.
• See Normal Operating Sounds and Sights section.
Odors in refrigerator. • Interior needs to be cleaned.
• Foods that produce odors should be covered or wrapped.
Cabinet light not working. • Replace light bulb.
• Ensure plug is tightly pushed into electrical outlet.
• Light switch may be stuck. Push in light switch, located on the refrigerator
control box, to release.
Refrigerator makes beeping sound. • Close door.
• Press light switch.

14
WARRANTY
Entire Product – Limited One Year Warranty
AGA Marvel warrants the replacement or repair of all parts,
of this appliance which prove to be defective in material or
workmanship, with the exception of the painted or porcelain
enamel nish or plated surfaces, for one year from the date
of original purchase. Such parts will be repaired or replaced
at the option of Heartland without charge, subject to the
terms and conditions as set out below.
Limited Warranty - Major Refrigeration Com-
ponents
Second Through Fifth Year - After the rst year from the
date of original purchase, through the fth year, the man-
ufacturer will repair or replace, at its option, free of charge
for parts and labor only, any part of the sealed refrigeration
system (consisting of the compressor, evaporator, condens-
er, drier and connecting tubing) and the cabinet liner (ex-
clusive of the door liner) which fail in normal home use. All
other costs, including mileage, transportation, trip charge
and diagnostic charge, if required, shall be the responsibili-
ty of the owner.
Limited Warranty - Water Filter-
30 days - From the original retail purchase date, any part of
the water lter cartridge which fails due to a defect in work-
manship or materials will be replaced free of charge.
What is not covered by this Warranty
1. Customer education or instructions on how to use the
refrigerator/freezer.
2. Any food loss due to product failure. (Warranter is not
be liable for any incidental or consequential damage
including food loss.
3. Any expenses involved in making this appliance readily
accessible for servicing.
4. Transportation, delivery, or subsequent damages.
5. Use commercially or rental use or use other than nor-
mal household.
6. Improper installation, misuse, abuse, accident or
alteration, use on wiring not conforming to electrical
codes, low voltage, failure to provide necessary main-
tenance or other unreasonable use.
7. Parts of service not supplied or designated by the
factory.
8. Accident, re, ood, acts of God.
9. Alteration, or the removal or defacing of the serial plate,
10. The original Bill of Sale, delivery date or serial number
cannot be veried.
11. The product is moved from place of original installation,
and reinstalled without reviewing installation proce-
dures with dealer or manufacturer.
12. Light bulbs
13. If the product is installed outside the normal service
area, any cost of transportation expenses [tolls, ferry
trip charges, or mileage expenses, etc.] involved in the
repair of the product, or the replacement of a defective
part, shall be borne by the customer [owner].
THE WARRANTIES, SET FORTH HEREIN ARE THE
ONLY WARRANTIES EXTENDED BY HEARTLAND. ANY
IMPLIED WARRANTIES, INCLUDING THE IMPLIED
WARRANTY OF MERCHANTABILITY, ARE LIMITED TO
THE DURATION OF THESE EXPRESS WARRANTIES.
IN NO EVENT SHALL HEARTLAND BE LIABLE FOR
ANY CONSEQUENTIAL OR INCIDENTAL DAMAGES OF
EXPENSES RESULTING FROM BREACH OF THESE OR
ANY OTHER WARRANTIES, WHETHER EXPRESSED
OR IMPLIED. Some states do not allow the exclusion or
limitation of consequential damages or limitations on how
long an implied warranty lasts, so the above exclusion or
limitation may not apply to you. Warranty applies to prod-
uct only in the country in which it was purchased.
No person, rm or corporation is authorized to make any
other warranty or assume any other obligation for HEART-
LAND. To obtain performance of the warranty, report any
defects to: Your Dealer or Heartland Appliances Service
Representative.
AGA Marvel
1260 E. VanDeinse St.
Greenville MI 48838
phone: 800-223-3900
fax: 616-754-9690
PLACE OF PURCHASE
DATE OF PURCHASE
SERIAL NUMBER
MODEL NUMBER

15

16
41014303-EN rev A
12/7/15
All specications and product designs subject to change without notice. Such revisions do not entitle
the buyer to corresponding changes, improvements, additions, replacements or compensation for
previously purchased products.
www.agamarvel.com

AGA Marvel
1260 E. VanDeinse St.
Greenville MI 48838
Toll free phone: 800-223-3900
Fax: 616-754-9690
www.agamarvel.com
Nous vous REMERCIONS d'avoir acheté ce produit de haute qualité. Si vous rencontrez un problème non mentionné
dans la section DÉPANNAGE, veuillez visiter notre site Web www.agamarvel.com pour des informations supplémentaires.
Si vous avez toujours besoin d'assistance, veuillez nous téléphoner au 1-800-223-3900.
Classic Modèle HCTMR20A Instructions D’Utilisation
Du Réfrigérateur

2
REMARQUE
REMARQUE !ATTENTION
!ATTENTION
AVERTISSEMENT - Risque possible de décès ou
de blessure grave si vous ne suivez pas les instructions.
!AVERTISSEMENT
Importantes instructions de sécurité
Les avertissements et les instructions de sécurité qui ap-
paraissent dans ce guide n’ont pas la prétention de couvrir
toutes les conditions et situations possibles pouvant arriver.
Il faut faire preuve de bon sens, de précautions et de soins,
pour installer, utiliser ou entretenir cet appareil.
Reconnaissance des symboles,
des mots et des étiquettes
concernant la sécurité.
ATTENTION - Risques ou pratiques dangereuses
pouvant entraîner des blessures individuelles, des dégâts
matériels ou des dommages au produit.
REMARQUE - Information importante pour réaliser une
installation et une utilisation sans problèmes.
Table des matières
Renseignements.........................................................2
Sécurité...................................................................2
Déballage de votre appareil ............................................................3
Électriqué .......................................................................................4
Dimensions du produit ..................................................................5
Installation..................................................................6
Dépose des portes...................................................................... .8
Commandes................................................................................. .9
Bruits et éléments visuels d’un fonctionnement normal.............. 10
Entretien et nettoyage................................................................ 11
Solutions aux problèmes courants.............................................. 13
Garantie....................................................................................... 14
ÉLIMINATION DE CFC/HCFC
Votre vieux réfrigérateur peut avoir un système de refroidissement
qui utilise les CFC ou HCFC (chlorouorocarbures ou hydrochlo-
rouorocarbures). Les CFC et les HCFC sont jugés nocifs pour la
couche d’ozone stratosphérique s’ils sont libérés dans l’atmo-
sphère. D’autres réfrigérants peuvent également causer des
dommages à l’environnement lorsqu’ils sont rejetés dans l’atmo-
sphère.
Si vous vous débarrassez de votre vieux réfrigérateur, as-
surez-vous que les réfrigérants sont retirés pour une élimination
appropriée par un technicien qualié.
Si vous libérez intentionnellement des réfrigérants, vous pouvez
être soumis à des amendes et à des peines d’emprisonnement en
vertu des dispositions de la législation environnementale.
TABLE DES MATIÈRES ET SÉCURITÉ
• N’entreposez pas et n’utilisez pas d’essence ni d’autres
liquides inammables à proximité de cet appareil ou de tout
autre appareil électroménager. Lisez les étiquettes du produit
concernant les risques d’inammabilité et autres avertisse-
ments.
• Ne faites pas fonctionner le réfrigérateur en présence de
vapeurs explosives.
Avertissements de la proposition 65 de l'État de Cal-
ifornie : Ce produit contient au moins un produit
chimique connu par l’État de Californie pour être à
l’origine de malformations et autres déciences de
naissance.
!AVERTISSEMENT
Avertissements de la proposition 65 de l'État de Califor
nie : Ce produit contient au moins un produit chimique connu
par l’État de Californie pour être à l’origine de cancers.
!AVERTISSEMENT

3
Jetez bien les sacs en plastique qui représentent un risque de
suffocation.
!AVERTISSEMENT
!AVERTISSEMENT
!ATTENTION
REMARQUE
Enregistrement de la garantie
Il est important que vous postiez votre carte de garantie
immédiatement après avoir pris livraison de votre réfrigérateur.
Les informations suivantes
seront nécessaires au mo-
ment de l’enregistrement
de votre appareil :
Numéro de service
Numéro de série
Date d’achat
Nom et adresse du revendeur
Le numéro de service et le numéro de série se trouvent sur la
plaque signalétique qui est située à l’intérieur de l’armoire, du
côté gauche près du haut (Voyez la Figure 1).
!AVERTISSEMENT
Contribuez à éviter des tragédies
L’emprisonnement d’enfants et leur asphyxie ne
sont pas des problèmes du passé. Des épaves de
réfrigérateurs abandonnés continuent de présenter
un danger - même en restant dehors pour «juste
quelques heures».
Si vous devez vous débarrasser de votre vieil appar-
eil de refroidissement, veuillez suivre ces instructions
pour aider à éviter des accidents possibles.
Avant de jeter votre vieux réfrigérateur ou congéla-
teur :
• Démontez ses portes ou enlevez ses tiroirs.
• Laissez les étagères en place de façon à ce que
des enfants ne puissent pas facilement monter
dedans.
AVERTISSEMENT
RISQUE DE POIDS EXCESSIF
Utilisez deux personnes ou plus pour déplacer le produit.
Sinon vous pourriez vous blesser.
Enlèvement de l’emballage intérieur
Votre réfrigérateur a été emballé pour l’expédition avec toutes les
pièces pouvant être endommagées par le mouvement solidement
attachées. Enlevez les matériaux d’emballage intérieur et toute
bande maintenant des composants intérieurs en place. Le manuel
de l’utilisateur est envoyé à l’intérieur de l’appareil dans un sac en
plastique, accompagné de la carte d’enregistrement de la garan-
tie, et d’autres articles accessoires.
Important
Conservez votre carton d’emballage jusqu'à ce que votre ré-
frigérateur ait été complètement inspecté et trouvé en bon état.
S’il présentait des dommages, cet emballage serait nécessaire
comme preuve qu’ils sont survenus durant le transit. Ensuite
veuillez mettre tous ces matériaux d’emballage au rebut d’une
façon responsable.
Note pour le client
Cette marchandise a été soigneusement et complètement
inspectée avant de quitter notre usine. La responsabilité pour
sa livraison sûre a été assumée par le revendeur à l’acceptation
de cette expédition. Les réclamations pour perte ou dommages
survenus durant le transit sont à adresser au revendeur.
NE RENVOYEZ PAS DE MARCHANDISE ENDOMMAGÉE
AU FABRICANT – DÉPOSEZ UNE RÉCLAMATION
AUPRÈS DU REVENDEUR.
Si l’appareil a été livré, manipulé ou entreposé dans une position
autre que debout, pendant une durée quelconque, laissez-le
reposer debout pendant au moins 24 heures avant de la brancher
électriquement. Cela assurera le retour de l’huile au compresseur.
Un branchement immédiat de l’appareil pourrait endommager des
parties internes.
Figure 1
Enregistrement en
ligne disponible sur
www.agamarvel.com
DÉBALLAGE DE VOTRE APPAREIL

4
Figure 2
Figure 3
Figure 4
Type de mise à la terre
prise murale
RACCORDEMENT ÉLECTRIQUE
Vous devez suivre ces directives pour que les mécanis-
mes de sécurité de votre réfrigérateur fonctionnent
correctement.
!AVERTISSEMENT
Électricité
• Le réfrigérateur doit être branché sur sa propre prise
électrique (CA seulement) de 115 V, de 60 Hz et de 15
A. Le cordon d’alimentation de l'appareil est muni d’une
che à trois broches avec mise à la terre an de vous
protéger contre les chocs électriques. Cette che doit
être branchée directement sur une prise murale à trois
alvéoles correctement mise à la terre. La prise murale
doit être installée selon les codes et règlements locaux.
Consultez un électricien qualié. Évitez de brancher le
réfrigérateur à un circuit muni d'un disjoncteur de fuite
à la terre. N'utilisez pas de rallonge électrique ni de
che d'adaptation.
• Si le cordon d’alimentation est endommagé, il doit être
remplacé par un technicien de service autorisé an
d’éviter tout danger.
• Ne débranchez jamais le réfrigérateur en tirant sur le
cordon. Tenez fermement la che et tirezla hors de la
prise électrique en ligne droite pour éviter d'endom-
mager le cordon d'alimentation.
• An d'éviter les chocs électriques, débranchez le
réfrigérateur avant de le nettoyer ou de remplacer une
ampoule.
• Une tension variant de 10% ou plus risque de nuire aux
performances de votre appareil. L’utilisation du ré-
frigérateur sans une alimentation électrique sufsante
peut endommager le compresseur. Un tel dommage
n’est pas couvert par la garantie.
• Ne branchez pas le réfrigérateur sur une prise élec-
trique commandée par un interrupteur mural ou un
cordon de tirage pour éviter qu’il ne soit accidentelle-
ment éteint.
REMARQUE
Le fait d’ajuster les commandes du congélateur et du réfrigérateur
à « OFF » (ARRÊT) désactivera le système de refroidissement
de votre réfrigérateur, mais ne coupera pas l’alimentation de
l’ampoule et d’autres composants électriques. Pour mettre votre
réfrigérateur hors tension, vous devez débrancher le cordon d’ali-
mentation de la prise électrique.
!ATTENTION
!ATTENTION
Pour éviter les blessures et les dommages, manipulez les clay-
ettes en verre trempé avec soin. Les clayettes peuvent casser
subitement si elles sont craquelées, égratignées ou exposées à
de brusques changements de température.
Pour couper le courant de votre réfrigérateur, débranchez
la che de la prise de courant.
N’enlevez pas la
borne de terre de
la che du cordon
secteur.
This manual suits for next models
10
Table of contents
Languages:
Other Heartland Refrigerator manuals