Heinner VDE003 User manual

www.heinner.com VDE003
Instructions - GB
Instrucțiuni de utilizare - RO
Anleitung - D
Eredeti használati utasítás - HU
Ръководство за употреба - BG
Instrukcja obsługi - PL

ELECTRIC CHAIN SAW
Thank you for choosing Heinner!
max.
min.

ELECTRIC CHAIN SAW
2/10 sec.
Pulling
force
Extrusion
force
Pulling
force
Extrusion
force
Pulling force
Extrusion force
Falling cross section
Fracture zone is at least 1/10 of
the master diameter of the tree.
Intended falling direction
Top of falling notching
Falling notching pitch is about
30° to 45°
Bottom of falling notching is
at least 1/3 to 1/5 of the
master diameter of the tree
Cross section
At least 1/10 of the master
diameter of the tree

ELECTRIC CHAIN SAW
PICTOGRAM ILLUSTRATION AND EXPLANATION
Warning!
Unplug immediately if the power cord or plug becomes damaged!
Protect from the damp.
Read the operation manual and follow the warnings and safety instructions!
Wear protective helmet, goggles and earmuffs!
Always pull the plug out of the power socket before doing any work on the chainsaw!
Always keep the children and bystanders away from the working area.
DESCRIPTION (Fig. 1)
1. Rear grip
10. Claw stop
2. Front grip
11. Safety lock-off button
3. Front finger guard / Chain break
12. Cable hook
4. Saw chain
13. ON/OFF switch
5. SDS system
14. Oil tank cap
6. Guide bar cover
15. Oil gauge
7. Guide bar
16. Chain wheel
8. Rear finger guard
17. Guide bolt
9. Power cable
18. Chain tensioning bolt
SAFETY INSTRUCTIONS
The safety instructions must be observed when using the chainsaw. For your own safety and the safety of
others, please read this information carefully before using the chainsaw and keep it in a safe place for
reference. Use the chainsaw only to saw wood or objects made of wood. Any other types of use are at your
own risk and could be dangerous. The manufacturer cannot be held liable for damage caused by improper
or incorrect usage.
Safety Instructions and Accident Prevention
To prevent the incorrect handling of the chainsaw, please read the operating instructions in their entirety
before using the chainsaw for the first time. All the information on the handling of the chainsaw is relevant
to your personal safety. Ask a professional to show you how to use the chainsaw!
•Before plugging in, check the plug and cable for damage. If damage is discovered, have it repaired by a
specialist immediately.
•Never use a damaged cable, connection or plug or a power cable which does not comply with the
requirements. If the cable is damaged or severed, unplug immediately.
•Switch the chainsaw off before releasing the chain brake.
•Always wear goggles and protective gloves when working with the chainsaw.
•To prevent injury, wear tight-fitting clothes and safety boots.
•To prevent damage to your hearing, wear earmuffs, helmets with a visor are particularly advantageous.
•Make sure you have a firm footing when working with the chain saw.
•Keep your place of work tidy.
•To prevent electric shock, avoid contact with earthed parts.
•Always pull the plug out of the power socket before doing any work on the chainsaw.
•Only plug in when the chainsaw is switched off,
•The chainsaw must be used only by one person at a time. All other persons must stay clear of the
chainsaw’s area of swing. Children and pets in particular must be kept well away at all times.
•The saw must not be touching anything when it starts up.
•Hold the chainsaw firmly in both hands when working with it.
•The chain saw must not be operated by children and young people. The only exception to this prohibition
are young persons of 16 years and over who can use the chain saw under supervision as part of their
training. Lend the saw only to those persons who are familiar with this type of chainsaw and know how
to handle it. Always pass on the operating instructions together with the chainsaw.
•Make sure the chain saw is stored in a place inaccessible to children.
•The saw may be operated only by persons who are rested and in good health, i.e. in a good physical
condition. If you start to tire, have a break in time. The chainsaw should not be used after the consumption
of alcohol.

ELECTRIC CHAIN SAW
•Never expose the chainsaw to rain or bad weather. Make sure there is enough light at the place of work.
Do not use power tools in the vicinity of combustible liquids or gases.
•If the chainsaw is not being used for a while, it must be set aside in such a way that no other person is
endangered.
•Before making a cut, always set the claw stop before you start to saw.
•Remove the chainsaw from the wood only with the saw chain still running. Anyone who saws without a
stop can be pulled forwards.
•Never use the chainsaw when standing on a ladder, in a tree or in any other instable places. Do not saw
with one hand.
•The power cable must always be behind the saw operator.
•The power cable must always lead away from the rear of the chainsaw.
•Use only original accessories.
•Chainsaws used outdoors must be connected up to an earth-leakage circuit-breaker.
•Do not overload your power tools. They run best and safest within given range of capacity.
•Always use the correct power tool. Do not use low-powered chainsaws for heavy jobs.
•Use the cable only for its proper purpose. Never carry your electric tool by its cable. Do not use the cable
to pull the plug out of the socket. Protect the cable from heat, oil and sharp edges.
•Extension cables out of doors
•Use only authorized and accordingly labelled extension cables out of doors.
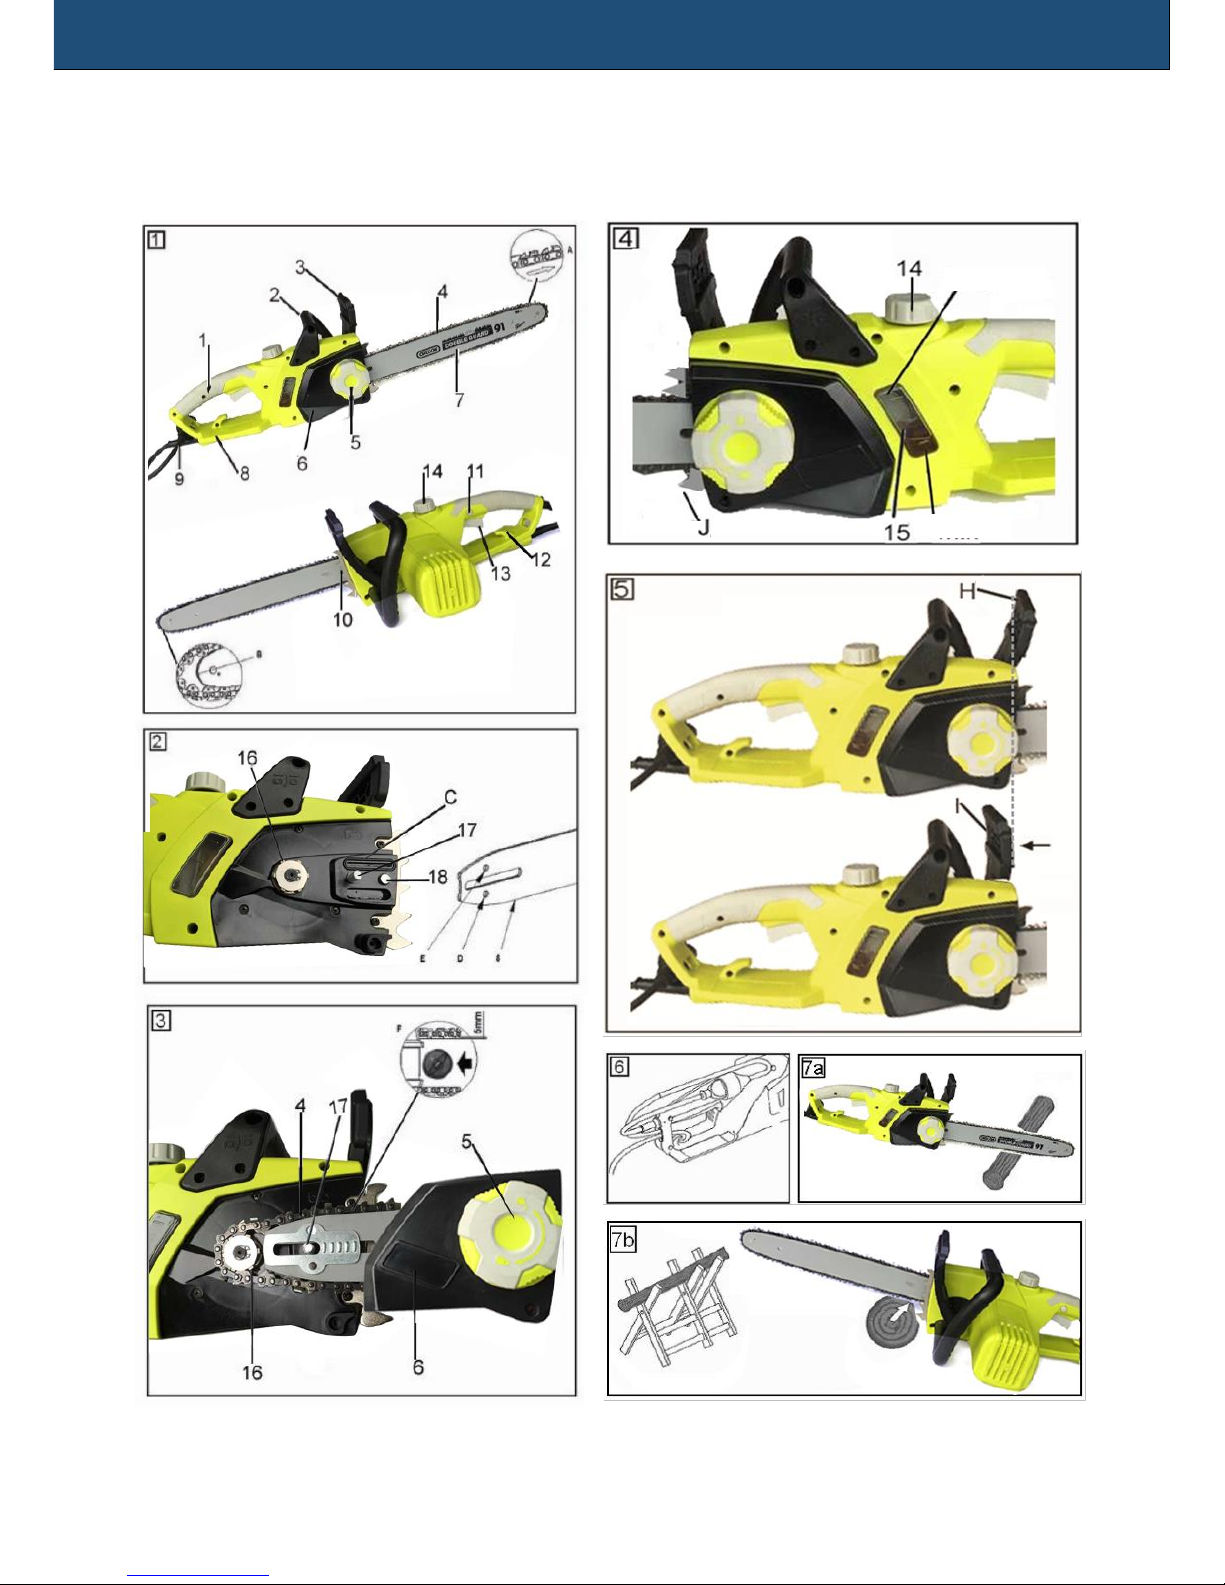
•Use a strong support when sawing converted timber and thin branches (saw-horse, Fig. 7b). Do not stack
the timber and do not have it held by a second person or with your foot.
•Logs must be secured in position.
•On sloping ground, always work facing upwards.
•When cross-cutting always set the claw stop against the timber you want to saw (see Fig. 7b)
•Always set the claw stop before cross-cutting. Only then switch on the chainsaw and start sawing into the
wood. Pull the chainsaw upwards at the rear and lead the direction with the front grip. Use the claw stop
as a fulcrum. To reposition for further cutting, interrupt the sawing process and exert a slight pressure on
the front grip. Pull the saw back a little, position the claw stop further down the cut and pull up the rear
grip (see Fig. 7a).
•Pull the saw out of the wood only when the saw chain is running.
•If you carry out several cuts, switch off the chain saw in-between.
•Plunge cuts and horizontal cuts may only be carried out by professionals (high risk of kick-back, see Fig.
8).
•For horizontal cuts, position the smallest possible angle. This requires extreme caution, as the claw stop
cannot be applied in this case.
•If the chain gets stuck when sawing with the upper side it may be thrust towards the operator. For this
reason, you should saw wherever possible with the bottom side, as the chainsaw will then be thrust away
from the body towards the wood (see Fig. 9 and 10).
•Pay extra attention when cutting splintered wood. Sawed off pieces of wood may be catapulted in any
direction ( Risk of injury!)
•Do not use the chainsaw to remove or similar objects.
•When lopping off branches, the chain saw should be supported wherever possible against the trunk. Do
not cut with the tip of the guide bar ( Risk of kick-back, see Fig. 8).
•Leave branch lopping work should be carried out by trained personnel! Risk of injury!
•Pay special attention to branches under tension. Do not cut through freely suspended branches from
underneath.
•Never stand on the trunk when loping off branches.
•The chainsaw should not be used for forest work, i.e. for felling and lopping off branches in the forest.
Because of the cable connection the saw operator does not have the necessary mobility and his safety is
not guaranteed!
•Always stand to the side of the tree being felled.
•When the tree is being felled, watch out for falling branches when stepping back.
•On slopes the saw operator should stand to the upper or left or right side the trunk or lying tree, never to
the bottom side.
•Watch out for trunks rolling towards you. Kick-back!
•The power saw is likely to recoil if the tip of the guide bar (especially the top quarter) accidentally touches
wood or any other solid objects. In this case the saw will move uncontrolled and will be hurled towards
the operator at full power ( Risk of injury!).
In order to prevent kick-back, please follow these safety instructions:
•Never start cutting with the tip of the guide bar!
•Never cut with the tip of the guide bar! Be careful, when continuing cuts you are already working on!
•Always start cuts with the chainsaw already running!

ELECTRIC CHAIN SAW
•Make sure that the saw chain is always properly sharpened.
•Never cut through more than one branch at a time! When lopping off branches, be careful not to touch
any other branches.
•When cross-cutting, pay attention to trunks standing very close to each other. If possible use a saw-horse.
Transporting the chainsaw
Before transporting the chainsaw, always remove the plug from the power socket and slide the chain guard
over the rail and chain. If several cuts are to be performed with the chain saw, the saw must be switched off
between cuts.
BEFORE STARTING UP
The voltage and current supply must comply with the ratings on the type plate. Before commencing work,
always check that the chainsaw works properly and is safe to operate. Check also that the chain lubrication
and the oil gauge are in good working order (see Fig. 4). When the oil lever is approx. 5 mm from the bottom
mark, you must top up with oil. When the oil level is above this mark you can work without worry. Switch
on the chain saw and hold it above the ground. Be careful not allow the chainsaw to touch the ground. For
safety reasons it is best to keep a clearance of at least 20 cm. If you now see growing traces of oil, the chain
lubrication system is working correctly. If there are no traces of oil at all, try cleaning the oil outlet (Fig 2, C),
the upper chain tensioning borehole (E) and the oil duct, or contact your Customer Service. (Be sure to read
the section “Filling in chain oil and chain lubrication” on this point). Check the chain tension and retention if
necessary (see the section “Tensioning the saw chain” on this point). Make sure the chain brake is working
properly (see also the section “Releasing the chain brake”).
Assembling the guide bar and saw chain (Fig. 1, 2, 3)
The chainsaw must be unplugged.
Important: The front finger guard (3) must always be in the top (vertical) position (Fig. 5).
The guide bar and saw chain are supplied separately. To assemble, first unscrew the lock knob (5) and
remove the guide bar cover (6). The chain tensioning bolt (18) must be in the center of the guide. If
necessary, adjust the chain tensioning bolt with the screw (16). To prevent injury on the sharp cutting edges,
always wear gloves when assembling, tensioning and checking the chain. Before assembling the guide bar
with the saw chain, check the cutting direction of the teeth! The running direction is marked with an arrow
on the Fig 1 (A). To determine the direction of cut, it may be necessary to turn over the saw chain (4). Hold
the guide bar (7) vertically with the tip pointing upwards and put on the saw chain (4) beginning at the tip
of the bar. Then assemble the guide bar with the saw chain as follows: Place the guide bar with the saw
chain on the guide bolt (17) and chain tensioning bolt (18). Place the saw chain round the chain wheel (16)
and make sure it is correctly mounted (see Fig. 3). Place the guide bar cover (6) on top and tighten gently
with the lock knob (5) by hand. Now the saw chain has to be correctly tensioned.
Tensioning the saw chain
Always pull the plug out of the power socket before doing any work on the chainsaw!
Wear safety gloves!
Make sure the saw chain (4) is inside the guide groove of the guide bar (7) (Fig. 1 A)!
Turn the lock knob (5) clockwise by hand until the saw chain is correctly tensioned. Do not tension the chain
too tightly. When cold, it should be possible to lift the chain in the middle of the guide bar approx. 5 mm.
Tighten the guide bar cover (6) securely.
When warm, the saw chain will expand and slacken and there is a danger of it jumping off the rail altogether.
Re-tension if necessary. If the saw chain is re-tensioned when hot, it must be loosened again when the
sawing work has been completed. Otherwise, the contraction which takes place as the chain cools would
result in excessively high tension. A new saw chain requires a running-in period of approx. 5 minutes. Chain
lubrication is very important at this stage. After running in, check chain tension and re-tension if necessary.
Filling in chain oil (Fig 4)
To prevent dirt getting inside the tank, clean the oil tank cap (21) before opening. Check the contents of the
oil tank during sawing work by checking the oil gauge (15). Close the oil tank cap tightly and wipe away any
spills.
Securing the extension lead (Fig 6)
Only use extension leads suitable for outdoor use. The cross section of the cable (max. length of extension
cord: 75 m) must be at least 1,5 mm2. secure the chainsaw flex to the extension lead by inserting the
extension lead into the strain relief gap of the housing. Extension leads longer than 30 m will reduce the
performance of the chainsaw.

ELECTRIC CHAIN SAW
Chain lubrication
To prevent excessive wear, the saw chain and guide bar must be evenly lubricated during operation.
Lubrication is automatic. Never work without chain lubrication. If the chain runs dry, the entire cutting
apparatus will quickly become severely damaged. It is therefore important to check both chain lubrication
and the oil gauge every use (Fig. 4). Never use the saw when the oil level is below the “Min.” mark.
•Min.: When only approx. 5 mm of oil is visible at the lower rim of the oil gauge (15), you must top up with
oil.
•Max.: Top up with oil until the window is full.
Checking the automatic lubrication
Before commencing work, check the automatic chain lubrication and oil gauge. Switch on the chain saw and
hold it above the ground. Be careful not to allow the chain saw to touch the ground. For safety reasons it is
best to keep a clearance of at least 20 cm. If you now see growing traces of oil, the chain lubrication system
is working correctly. if there are no traces of oil at all, try cleaning the oil outlet (Fig 2, C), the upper chain
tensioning borehole (E) and the oil duct, or contact your Customer Service.
Chain lubricants
The service life of saw chains and guide bars depends to a large extent on the quality of the lubricant used.
Old oil must not be used! Use only environment-friendly chain lubricant. Store chain lubricant only in
containers which comply with the regulations.
Guide bar
The guide bar (7) is subjected to especially severe wear and tear at the nose and the bottom. To avoid one-
sided wear and tear, turn the guide bar over every time when you sharpen the chain.
Chain wheel
The chain wheel (16) is subjected to especially high wear and tear. If you notice deep wear marks on the
teeth, the chain wheel must be replaced. A worn chain wheel curtails the service life of the saw chain. Have
the chain wheel replaced by a specialist dealer or your Customer Service.
Chain guard
The chain guard must be clipped onto the chain and sword as soon as the sawing work has been completed
and whenever the chainsaw has to be transported.
Chain brake
In the event of kick-back, the chain brake (3) will be actuated via the front finger guard. The front finger
guard is pushed forwards by the back of the hand and this causes the chain brake to stop the chain saw, or
rather the motor, within 0.12 s (Fig 5, I).
Releasing the chain brake (Fig 5)
To be able to use your chain saw again, you must release the saw chain again. First switch off the chainsaw.
Then push the front finger guard (3) back into the vertical position until it locks in place (Fig 5, H). The chain
brake is now fully functional again.
Sharpening the saw chain
You can have your saw chain sharpened fast and correctly by specialist dealers, from whom you can also
obtain chain sharpening equipment to enable you to sharpen the chain yourself. Please follow the
corresponding operating instructions. Take care of your tools. Keep your tools sharp and clean to enable
you to work well and safely. Follow the maintenance regulations and the instructions for changing tools.
STARTING UP
Always wear safety goggles, ear muffs, protective gloves and heavy-duty work clothes!
Use the saw only with approved extension cables with the prescribed insulation and connections designed
for outdoor use (approved rubber-sheathed cables) which fit the chainsaw plug. The chain saw is equipped
with a two-handed safety switch. The chainsaw works only when one hand holds the front grip (2) and the
other hand actuates the switch on the rear grip (1).
If the chainsaw does not run, the chain brake must be released at the front finger guard (3). Be sure to read
the sections “Chain brake” and “Releasing the chain brake” on this point.
After switching on, the chainsaw will run immediately at high speed.
To switch off: Release either the ON/OFF switch (13) on the rear grip or the other switch (2) on the rear grip.
The release of ON/OFF switch results the stop of the chainsaw within 2 sec., and heavy sparkling. This is
normal and safe for the proper operation of the chainsaw.
After working with the chainsaw, you should always: Clean the saw chain and guide bar and replace the

ELECTRIC CHAIN SAW
chain guard.
Chainsaw protection
Never use the chainsaw in the rain or in damp conditions.
If the extension cable is damaged, pull the plug out of the power socket immediately. Never work with a
damaged cable.
Check the chainsaw for damage. Before using your tool again, check the safety devices or any slightly
damaged parts to ensure that they are in good working order. Make sure the moving parts are working
correctly. All the parts must be correctly assembled and meet all the conditions required to ensure that the
chainsaw works correctly. Any damaged safety devices and parts must be properly repaired or replaced
immediately by a Customer Service workshop, unless there are instructions to the contrary in these
operating instructions.
Notes on working practice
Kick-back (Fig 8)
You can avoid accidents by not sawing with the tip of the guide bar as this may cause the saw to rear up
suddenly.
Always use the complete safety equipment and clothes when working with the saw.
Kick-back is an upward and/or backward movement of the guide bar which can occur if the saw chain at the
tip of the guide bar encounters an obstruction.
Make sure your work-piece is firmly secured. Use clamps to stop the work-piece slipping. This also makes it
easier to operate the chainsaw with both hands.
Kick-back causes the saw to behave uncontrollably and thus brings with a slack or blunt chain. A poorly
sharpened chain increases the risk of kick-back. Never saw above shoulder height.
TIPS ON CHAIN SAW USE
Sawing up wood (Fig. 7a, 7b)
To saw up wood, please observe the safety regulations and proceed as follows: Make sure the wood to be
sawed cannot slip. Clamp short pieces of wood in place before sawing. Saw only wood or wooden objects.
When sawing, make sure that no stones or nails are touched as these could be thrown out and damage the
saw chain. Avoid bringing the running saw into contact with wire fences or the ground. When lopping off
branches, support the chainsaw as far as possible and do not saw with the tip of the guide bar. Watch out
for obstacles such as tree stumps, roots, ditches and hillocks as these could cause you to fall.
Remember:
The chainsaw must be running before it comes into contact with the wood.
To switch on: Press the safety lock-off (2) and ON/OFF switch on (13). Place the lowest claw (Fig 4, J) on the
wood. Raise the chain saw by the rear grip (2) and saw into the wood. Move the chain saw back a little and
place the claw further down. Be careful when sawing splintered wood as pieces of wood may be ripped off.
Wood under tension
Fig. 11a: Top side of under tension. Danger: Tree will rear up!
Fig. 11b: Bottom side of trunk under tension. Danger: Tree will move downwards!
Fig. 11c: Thick trunks and high tension. Danger: Tree will move suddenly and with immense force!
Fig. 11d: Both sides of trunk under tension. Danger: Tree will move sideways.
Felling trees
To fell trees, observe all the safety regulations and proceed as follows:
The chain saw may be used to fell only tress which are smaller in diameter than the length of the motor still
running. If the saw chain gets jammed, release it using a wooden wedge.
Remember:
Danger zone: Falling trees can bring down other trees with them. The danger zone is therefore twice the
length of the tree being felled. (Fig. 12)
Felling trees is dangerous and requires practice. If you are a beginner or inexperienced, do not try to teach
yourself but seek professional training. (Fig. 13)
Falling direction:
•First estimate the direction of fall, taking into account the centre of gravity of the crown and the wind
direction. The chain saw must be running before it comes into contact with the wood. Switch on the chain
saw. Saw an undercut in the tree in the direction of fall and then make a horizontal cut (back cut) on the
side opposite to the undercut.
•Make the undercut: This will give the tree a direction and guidance.
•Check the direction of fall: If you have to correct the undercut, always re-cut over the entire width.
•Call now “Timber!“

ELECTRIC CHAIN SAW
•Only now make the back cut, which must be higher than the sole of the undercut. Insert wedges in time.
•Leave the bridge in place as it will function as a hinge. If you cut through the bridge, the tree will fall
randomly.
Fell the tree by driving a wedge into the back cut, not by sawing through it.
When the tree falls, step back and watch the crown.
Wait for the crown to stop swinging. Do not continue working under branches which have got stuck.
Do not fell trees:
•If you can longer distinguish details within the danger zone, e.g. owing to fog, rain, snow drifts or twilight.
•If the direction of fall cannot be reliably estimated owing to wind or gusts of wind. Felling work on sloping
ground, black ice, frozen or dewy ground is safe only if you can get a firm foothold.
To switch off: Pull the plug out of the power socket.
To fell the tree, you must drive a wedge into the back cut. When retreating after making the back cut, watch
out for falling branches.
MAINTENANCE AND CLEANING
Always pull the plug out of the power socket before doing any work on the chainsaw!
Keep the cooling vents on the motor housing clean and unobstructed at all times. Only the maintenance
work described in these operating instructions may be carried out. Any other maintenance work must be
carried out by our Customer Service. Do not modify the power saw in any way as this could jeopardize its
safety. Should the chainsaw fall despite our careful manufacturing and inspection procedures, have it
repaired by an authorized Customer Service work-shop. In the event of any inquiries and spare parts orders,
always quote the type designation and the parts number.
Storage
Keep your chain saw in a safe place. The unused chainsaw should be stored clean, on a flat surface and in
a dry place which is inaccessible to children.
TROUBLESHOOTING
Fault
Cause
Remedy
Motor does not run
No electricity
Check socket, cable and plug.
Damaged cable: Have repaired by Customer Service. It is
prohibited to patch the cable with insulating tape.
Damaged switches have to be replaced by a Customer Service
workshop.
Chain brake
See section „chain brake” and „Releasing the chain brake”.
Running out of carbon
brush
Change the carbon brush, ask a Customer Service workshop
Chain does not move
Chain brake
Check the chain brake, release if necessary.
Poor cutting performance
Blunt chain
Sharpen the chain
Chain tension
Chain wrongly fitted
Check that the chain is
fitted correctly
Check the chain tension
Saw works only with
difficulty Chain jumps off
sword
Chain tension
Check the chain tension
Chain becomes hot
Chain lubrication
Check oil level
Chain lubrication
TECHNICAL DATA
Model number
VDE003
Rated voltage (V)
230-240V~ 50Hz
Rated power (W)
2200
Blade length (mm)
405mm
Cutting length(mm)
385mm
Chain speed (m/s)
15m/s
Oil tank capacity (ml)
150ml
Chain brake time (s)
0.12
Sound pressure level dB(A)
103.9
Sound power level dB(A)
90.4
Vibration of rear handle (m/s2)
7.156
Vibration of front handle (m/s2)
5.628
Protection class
II
Net weight (kg)
4.6KG

ELECTRIC CHAIN SAW
RECYCLING
Electrical and electronic equipment waste (DEEE) might contain dangerous materials which can have a
negative impact on the environment and human health if not collected separately.
This item is in conformity with the European Directive EU DEEE (2012/19/EU) and is marked with an
electronic and electrical waste logo graphically represented in the image below.
This icon shows that DEEE should not be collected with household waste but separately.
We recommend you to consider the following:
- Materials and components used when manufacturing this item are high quality materials
which can be reused and recycled;
- Do not throw away the item with household waste at the end of life;
-Take the item to a collecting point where it will be collected for free;
-Please contact the local authorities for details on the collecting centers.
Conformity with the RoHS Directive: the item you purchased is in conformity with the EU Directive RoHS
(2011/65/UE). It does not contain materials listed as harmful or prohibited in the Directive.
Thank you for helping us protect the environment and our health!
Manufactured for
Network One Distribution
Marcel Iancu St., no. 3-5, Bucharest, 020757
2018
Table of contents
Other Heinner Chainsaw manuals