Helio O Series User manual

OWNER’S MANUAL
Series

Thank you for choosing a Helio ultralight trailer. We are happy to
welcome you to your new lifestyle, which will allow you to travel
everywhere, hassle-free. At Helio, we are proud of our products
and have invested much time in their conception, especially in the
R&D and ergonomics departments. We use quality equipment
and components in order to oer you a trailer that meets all of
your expectations.
Your Helio trailer is conforms to all applicable Canadian and U.S.
federal motor vehicule safety standards in eect. The equipment
contained in your new trailer must be used in accordance with
the Helio manufacturer’s specications as well as the other
manufacturers’ terms of use for the equipment and accessories
included in your trailer. In order to ensure the longevity and
durability of your Helio trailer, some maintenance work must be
attended to.
Before using your trailer, we therefore suggest that you read
attentively all of the dierent documents included in your
trailer for you to become more familiar with it. Should you have
any questions, do not hesitate to contact your Helio dealer.
Please read all the documents provided with your new trailer,
including all the Helio warranty information and appliance
warranty registrations by lling out and returning by post
all the individual warranty cards for each of the respective
manufacturers.
Please follow and observe all the instructions and warnings
regarding the use of your trailer. Remember that accidents are
generally caused by omitting to observe basic and fundamental
safety instructions and precautions. Accidents can be prevented
by recognizing the cause of the accident and avoiding the action
or inaction that may cause them. An attentive owner is the best
insurance against accidents.
Your Helio trailer has been thoroughly inspected before delivery.
However, to ensure your complete satisfaction, an inspection
of the dierent components will be conducted with you before
delivery. Use this time to ask your questions about the product.
This introduction will help you become more familiar with your new
Helio trailer and its components, while giving you the assurance
that everything is working well.
If you are not familiar with towing a trailer, ask all of your questions
at this time. Your Helio has been built for recreational and short-
term use. It is not meant to be used as a permanent residence.
If you encounter a problem for which you need assistance, contact
your Helio dealer. If there is a problem with one of the appliances,
check the appliance manufacturer’s information in the envelope or
on the USB ash drive.
If you encounter a problem with your trailer while you are traveling
and the trailer is still covered by the warranty and you cannot nd
a dealer nearby, contact your Helio dealer as soon as possible
BEFOREHAND in order to have the cost estimate approved and
the repairs done by an independent RV center. Your dealer can
let you know what the warranty covers. If a component covered
by the warranty needs to be replaced, return it as well as your bill
to your Helio dealer. This will allow your dealer to take note of
the problem and ensures your expenses will be aptly reimbursed.
Alterations made to your trailer without Helio’s written
authorization can lead to a warranty reduction or loss of
coverage. Make sure you contact your dealer before such
alterations are made.
We reserve the right to alter the make or material of any component
at any time, without incurring any obligation to make any such
modications in trailers previously sold.
We wish you a pleasant time in a peaceful state of mind and hope
your Helio will help you create some great memories.
WELCOME TO YOUR NEW HELIO!

© 2021 HELIO V.R. - All rights reserved
Printed in Canada

1. WARRANTY ................................................................................................................................5
2. SAFETY & IDENTIFICATION........................................................................................6
Vehicle identication labels................................................................................................7
Propane gas safety regulations......................................................................................7
Safety devices ....................................................................................................................................8
Fire safety...............................................................................................................................................9
Tire safety........................................................................................................................................... 10
Tire pressure and load limits........................................................................................ 11
Air pressure...................................................................................................................................... 13
Spare tire and tire change ............................................................................................... 13
3. WEIGHTS & LOADING...................................................................................................14
Denition of weight terms............................................................................................... 14
Tow vehicle requirements................................................................................................ 14
Cables..................................................................................................................................................... 15
Cable color code......................................................................................................................... 15
Electrical hook-up (7 pin)................................................................................................... 15
Brakes..................................................................................................................................................... 15
Coupling the trailer to the tow vehicle............................................................... 16
Safety chains................................................................................................................................... 16
Before leaving on a long trip......................................................................................... 17
Thinking ahead............................................................................................................................. 18
4. SYSTEMS & COMPONENTS......................................................................................19
Propane gas (O2 & O3 Series)...................................................................................... 19
Propane gas tank....................................................................................................................... 19
Filling up your propane gas tank.............................................................................. 19
Propane gas regulator ......................................................................................................... 19
Ice in the regulator................................................................................................................... 20
Other factors to consider in cold weather..................................................... 20
Collapsible hoses and propane gas system connections.............. 20
Checking for leaks in the propane gas system ......................................... 21
Electrical system ......................................................................................................................... 23
12 V system ...................................................................................................................................... 23
120 V system................................................................................................................................... 23
External power cord............................................................................................................... 23
Fuses, circuit breakers, and light bulbs............................................................. 23
Interior LED ...................................................................................................................................... 24
Water systems............................................................................................................................... 24
Fresh water tank......................................................................................................................... 24
Emptying the water tank ................................................................................................... 24
Pressurized water supply (water system)....................................................... 25
Transporting water when traveling....................................................................... 25
Water pump..................................................................................................................................... 25
Water decontamination...................................................................................................... 26
TABLE OF CONTENTS

Cassette toilet (O4)................................................................................................................... 26
5. WINTERIZATION & DEWINTERIZATION.....................................................27
6. MAINTENANCE & TROUBLESHOOTING.....................................................29
Water systems
........................................................................................................................
29
Windows and roof air vent
..........................................................................................
29
Outer berglass shell
........................................................................................................
29
Exterior component seals
.............................................................................................
30
Cabinet doors
..........................................................................................................................
30
Fiberglass shower (O2 series only)
.......................................................................
30
Refrigerator (O2 and O3 series)
...............................................................................
30
Propane gas heating (Optional)
...............................................................................
31
Axle and electric brakes
.................................................................................................
32
7. CONTACT INFORMATION ........................................................................................36
WARRANTY REGISTRATION FORM .......................................................................37
DELIVERY INSPECTION......................................................................................................38
MAINTENANCE SCHEDULE............................................................................................39
NOTES.................................................................................................................................................43

5
1. WARRANTY
Summary of warranty
Helio guarantees the original owner only that the trailer is free from
defects in material and workmanship, operated under normal
use, for a period of two years after the possession date for parts
and labor. This warranty does not apply to defects relating to
the unit’s aesthetic or physical appearance, nor does it apply
to the deterioration of the soft trim or cosmetic items, as they
are subject to wear, exposure, road hazards, or any normal wear
such as that of tires or brake hubs/drums.
Exclusions
1. Helio is not liable for the defects in workmanship or the
well-functioning of components covered by a separate
warranty. These products may be covered under the indivi-
dual manufacturers’ warranty. Helio will not do maintenance
work on the components covered by a separate warranty, nor
will these be repaired or xed by Helio. If maintenance work
or spare parts are needed for these products, contact the
manufacturer in question for the location of the service center
closest to you.
2. Helio does not warrant the components made by a third party,
including but not limited to tires, equipment, batteries, axles,
hubs, bearings, convertors, and oors. These parts may or may
not be covered by their respective manufacturer’s warranties;
however, Helio assumes no obligation regarding these products.
3. This warranty does not apply to road hazards and normal
maintenance, such as wheel bearing lubrication and lug nut
adjustments, nor to damage resulting from misuse or lack
of maintenance.
4. The warranty does not cover the ripping, perforation, shrinking,
color fading, or staining of fabric items such as window
screenings and pillows. The warranty only covers the defects
in material and workmanship.
5. Misuse, negligence, or use on dangerous roads will nullify
the present warranty. Helio does not warrant anything
regarding a non-registered and normally used product in the
United States or Canada.
6. Any use of the trailer during the frost period without proper
winterization will cause the warranty to be null and void.
Notice of damage non-liability
You and any other user of a Helio product and any person to
whom this unit is transferred, as well as any person who becomes
a beneciary, intended or not, of this unit, are not entitled to any
incidental or consequential damages, including but not limited
to lack of use of the unit, drawbacks, food, lodging expenses,
material damage, or loss of revenue or prots. Certain states or
provinces do not allow the exclusion or limitation of incidental
or consequential losses; this may therefore not apply in your case.
Exoneration and limitations of implied warranties
Helio limits all implied warranties of merchantability or tness
for particular purpose to a warranty period of two years.
No warranty, expressed or implied, can extend the two-year
warranty period. No person is authorized to extend or modify
this warranty. No action enforcing this warranty may be brought
six (6) months after the warranty’s expiration date.
Certain states or provinces do not allow period limitations on an
implied warranty; therefore, the limitations mentioned above
may not apply to you. The present warranty gives you certain
specic legal rights, and you may also have other rights that vary
from one state or province to the other.

6
Helio obligations
Helio will correct any substantial defect in material or
workmanship caused by Helio. The company may choose one
of the following ways to correct the defect: repair or replacement
with an equivalent part at the discretion of Helio.
The repair service covered by the warranty can only be done by
a Helio authorized dealer. To benet from the service oered
by the warranty, you must pay all expenses incurred for the
transportation of the trailer. Helio must correct the defect within
a reasonable time frame, which cannot exceed sixty (60) days.
All expenses incurred during the correction of the defect will be
paid by Helio.
Alteration of parts and design
Helio reserves the right to alter the parts and design of its
recreational vehicles from time to time, without notice, and the
repairs or replacements may be done with new or dierent parts.
Registration of the warranty
The warranty registration documents must be lled out and
returned to the components’ manufacturers, which may be
a condition of this warranty.
2. SAFETY & IDENTIFICATION
Key
Below you will nd the signal words and descriptions found in
this manual. They are used to alert you to potentially dangerous
situations. When you see these signal words, read the information
attentively and follow the instructions, both for your own safety
and to prevent any damage to your recreational vehicle.
Indicates a dangerous situation
which, if not prevented, can result
in severe personal injury or death.
This signal is generally in RED.
Indicates a dangerous situation
which, if not prevented, could
result in severe personal injury
or death. This signal is generally
in ORANGE.
Indicates a dangerous situation
which, if not prevented, could
result in damage to the trailer
or minor to moderate injury. This
signal is generally in YELLOW.
DANGER
DANGER
DANGER
DANGER
WARNING
WARNING
WARNING
WARNING
CAUTION
CAUTION
CAUTION
CAUTION
7
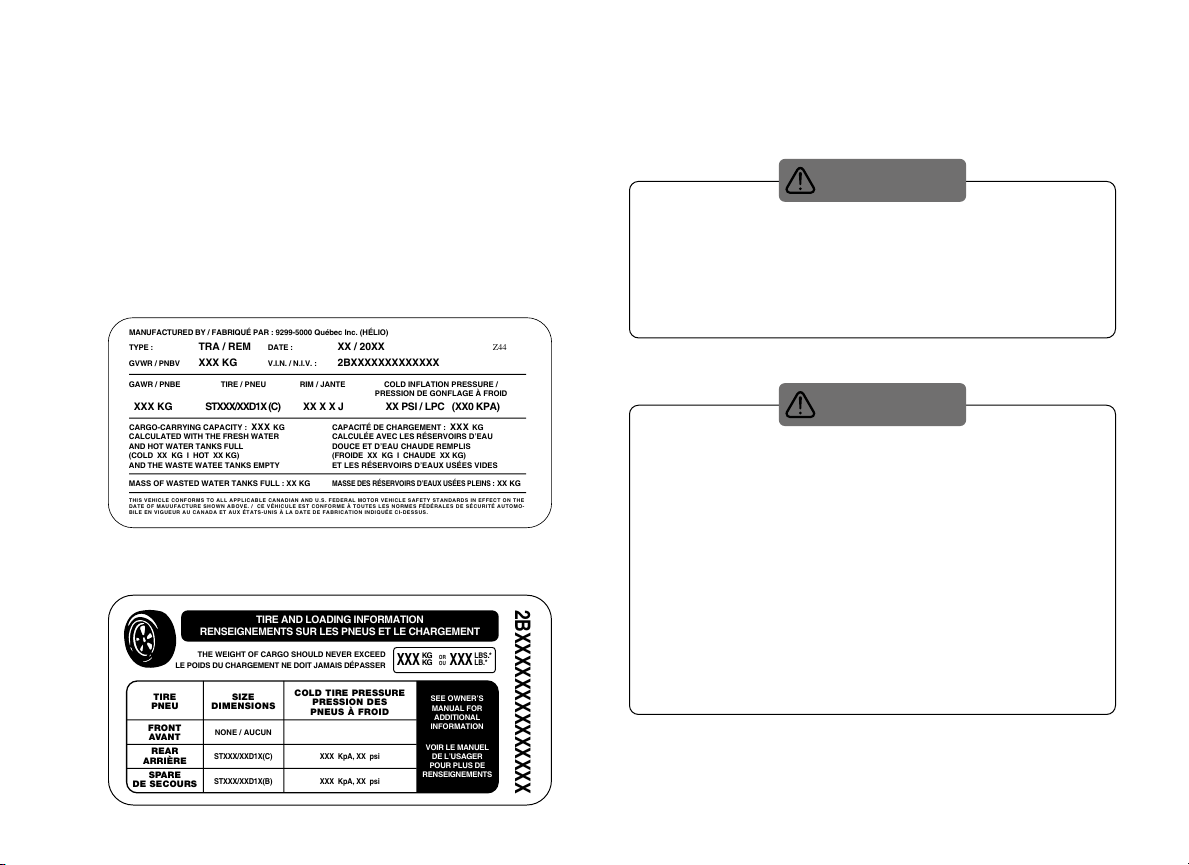
Vehicle identication labels
On the front left-hand side, you will nd two information
labels regarding your Helio trailer. Be ready to provide the make,
vehicle identication number (V.I.N.), and year of your trailer
when ordering parts or requesting specic information about
your vehicle.
Furthermore, we recommend that you keep a copy of this
information separate from the trailer in case of theft or vandalism,
in the event that you are asked to show a copy to the authorities.
Vehicle identication number label
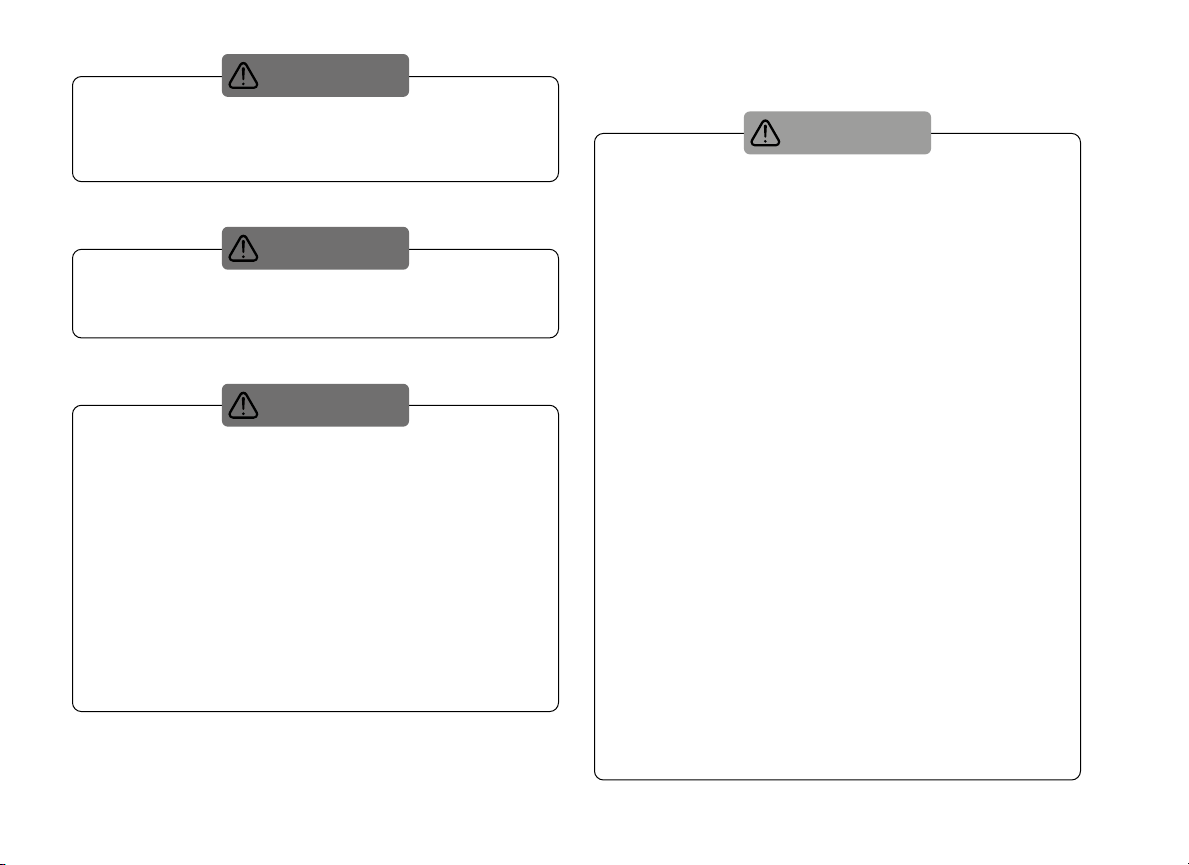
Tire and loading information
Propane gas safety regulations
All trailer occupants must heed to the following warnings. It is
important to read and understand them. Here is the list of warnings:
MANUFACTURED BY / FABRIQUÉ PAR : 9299-5000 Québec Inc. (HÉLIO)
CARGO-CARRYING CAPACITY : XXX KG
CALCULATED WITH THE FRESH WATER
AND HOT WATER TANKS FULL
(COLD XX KG I HOT XX KG)
AND THE WASTE WATEE TANKS EMPTY
MASS OF WASTED WATER TANKS FULL : XX KG
THIS VEHICLE CONFORMS TO ALL APPLICABLE CANADIAN AND U.S. FEDERAL MOTOR VEHICLE SAFETY STANDARDS IN EFFECT ON THE
DATE OF MAUUFACTURE SHOWN ABOVE. / CE VÉHICULE EST CONFORME À TOUTES LES NORMES FÉDÉRALES DE SÉCURITÉ AUTOMO-
BILE EN VIGUEUR AU CANADA ET AUX ÉTATS-UNIS À LA DATE DE FABRICATION INDIQUÉE CI-DESSUS.
CAPACITÉ DE CHARGEMENT : XXX KG
CALCULÉE AVEC LES RÉSERVOIRS D’EAU
DOUCE ET D’EAU CHAUDE REMPLIS
(FROIDE XX KG I CHAUDE XX KG)
ET LES RÉSERVOIRS D’EAUX USÉES VIDES
MASSE DES RÉSERVOIRS D’EAUX USÉES PLEINS
: XX KG
TYPE :TRA / REM
XXX KG
XXX KG XX PSI / LPC (XX0 KPA)XX X X JSTXXX/XXD1X (C)
2BXXXXXXXXXXXXX
XX / 20XX
DATE :
V.I.N. / N.I.V. :GVWR / PNBV
GAWR / PNBE TIRE / PNEU RIM / JANTECOLD INFLATION PRESSURE /
PRESSION DE GONFLAGE À FROID
Z44
THE WEIGHT OF CARGO SHOULD NEVER EXCEEDKG
KG
OR
OU
LBS
.*
LB.*
LE POIDS DU CHARGEMENT NE DOIT JAMAIS DÉPASSER
NONE / AUCUN
TIRE
PNEU
SIZE
DIMENSIONS
COLD TIRE PRESSURE
PRESSION DES
PNEUS À FROID
FRONT
AVANT
REAR
ARRIÈRE
SPARE
DE SECOURS
XXXXXX
STXXX/XXD1X(C) XXX KpA, XX psi
STXXX/XXD1X(B) XXX KpA, XX psi
2BXXXXXXXXXXXXXX
TIRE AND LOADING INFORMATION
RENSEIGNEMENTS SUR LES PNEUS ET LE CHARGEMENT
SEE OWNER’S
MANUAL FOR
ADDITIONAL
INFORMATION
VOIR LE MANUEL
DE L’USAGER
POUR PLUS DE
RENSEIGNEMENTS
Propane gas containers must not be placed or stored in an RV living
space. Propane gas containers are equipped with safety devices
that get rid of extra pressure by releasing gas into the atmosphere.
Propane is a very ammable gas. Failure to conform to these
guidelines may cause a re or explosion resulting in severe personal
injury or death.
DANGER
DANGER
DANGER
DANGER
For cooking appliances to operate safely, it is important to let in
fresh air. Before turning them on, open the roof air vent, door
and/or window. Propane gas ames consume oxygen that must be
replaced for there to be adequate combustion. Improper use can
result in severe personal injury or death.
Warning labels are located in the cooking area to remind you to
let in enough fresh air for combustion. Unlike houses, the amount
of oxygen is limited in the smaller space of an RV. Adequate
ventilation when using cooking appliances will prevent the risk
of asphyxia.
Make sure your propane gas tank has been well installed. Check
that the connection with the propane gas collector has been made.
For any questions, ask your dealer to explain how to ll up your
propane gas tank and check the system’s sealing.
DANGER
DANGER
DANGER
DANGER
8
Safety devices
It is not safe to use cooking appliances for heating purposes.
Non-conformance to these guidelines may cause carbon monoxide
poisoning which can result in severe personal injury or death.
DANGER
DANGER
DANGER
DANGER
Do not stock propane gas, fuel, or other ammable liquid tanks
inside the vehicle, as this may cause a re or explosion.
DANGER
DANGER
DANGER
DANGER
IF YOU SMELL GAS:
1. Blow out any open ame, turn o any night light, and stop any
tobacco product use.
2. Turn o the gas supply to the tank valves or the gas connection.
3. Do not touch electrical switches.
4. Open the doors and other ventilating outlets.
5. Leave the area until the odor has gone.
6. Have the system checked and the leak source repaired before
reuse.
Flammable vapors that catch re can cause a re or explosion and
can result in severe personal injury or death.
DANGER
DANGER
DANGER
DANGER
Never ignore the alarms on a safety device. If the alarm goes o
and you are not absolutely certain of its source, evacuate the unit
immediately.
• Always have an evacuation plan. Keep it updated and practice it
every six months.
• Hold a meeting and discuss the plan by showing everyone, including
the guests, what they must do.
• Do not waste time collecting your valuable objects or dressing
yourself. Sometimes, each second counts!
•Vacuum regularly and use the soft hairbrush to remove dust.
•
DO NOT spray cleaning or waxing products directly on the
detectors, as this may damage the sensors.
SMOKE DETECTOR
• The smoke detector alarm may not go o before
the re has caused damages, injuries, or death.
• A smoke detector detects smoke, not re.
• The alarm only goes o if the smoke reaches
the sensor.
• Check the batteries at least once a week when the RV is in use.
• This detector cannot alert hard-of-hearing people. Special alarms
equipped with strobe lights are necessary for hard-of-hearing
people.
• Smoke detectors have a limited life time and cannot be entirely
depended upon.
• Replace defective smoke detectors and never try to repair them.
• Never disconnect the battery to shut o the alarm.
WARNING
WARNING
WARNING
WARNING
9
Fire safety
Fire safety is an important aspect to consider for the owner of
a recreational vehicle. The following simple rules for preventing
a re can help you eliminate the risk of re:
1. Never stock ammable liquids in the recreational vehicle.
2. Never leave something cooking without surveillance.
3. Never smoke in bed and always use an ash tray.
4. Never allow children to play with electrical or propane gas
equipment.
5. Never use an open ame as a ashlight.
6. Have defective or damaged electrical components and wiring
repaired immediately.
7. Never overload electric circuits.
8. Locate any propane gas leak and repair it immediately.
9. Keep cooking surfaces clean and trash-free.
10. Do not let scraps build up.
11. Never clean with a ammable substance.
Note:
Leave the emergency exits unobstructed, and make sure everyone
in your RV knows the location of all exits, including the window exits.
Make sure everyone in your RV knows how to use and where
to locate the re extinguishers.
Familiarize yourself and all the other RV occupants with the
following procedure (PASS):
• Pull: pull the pin (some re extinguishers may have a cartridge
you have to push)
• Aim: point the nozzle toward the base of the re
• Squeeze: press the handle to release the extinguishing agent
• Spray: spray the base of the re (If you aim for the ames,
you will not put out the re.)
Testing laboratories classify res into three classes:
• Class A: res arising from wood, paper, fabric, rubber,
and certain types of plastic
• Class B: ammable liquids, such as grease, cooking oils,
gasoline, or kerosene
• Class C: electric re caused by a live electric wire or a
short-circuited engine or switch
Smoke, propane gas, and carbon monoxide detectors may have an
expiration date. Check the expiration date regularly and make sure
the battery is well charged; otherwise, replace the battery.
WARNING
WARNING
WARNING
WARNING
PROPANE GAS AND CARBON
MONOXIDE (Co) DETECTOR
• This detector detects propane gas and
Co in the air. It is not designed to detect
smoke, re, or other gases. It detects
the presence of propane gas and Co at
the level of the sensor, but explosive gases may still be present
elsewhere in the vehicle.
• Test your propane detector every week.
• If the alarm is located behind a closed door, it may not be heard.
• Do not try to repair the detector. If the test fails, replace the
batteries. If it still does not work, replace the whole detector.
WARNING
WARNING
WARNING
WARNING

10
Tire safety
Use the following information to make tire safety a regular and
integral part of your vehicle maintenance routine.
Evacuate everyone from the recreational vehicle immediately.
DO NOT ATTEMPT TO PUT OUT A FIRE WITH WATER.
Water can spread certain types of res and cause electrocution. Exit
the vehicle immediately and call the re department. Propane gas
regulators must always be installed with the vent directed downwards.
Regulators that are not in compartments have been equipped with
a weather cover. Make sure the regulator vent faces downwards and
the weather cover is placed so as to minimize the blocking of the vent
(this can lead to excessive gas pressure resulting in a re or explosion).
WARNING
WARNING
WARNING
WARNING
Avoid inhaling the re extinguisher’s dry chemical products. While
non toxic, they could cause temporary irritation. Once the re is
put out, clean the area as soon as possible. The chemical products
can damage the surfaces if left there too long. Do not use water to
put out a re. Water can spread certain types of res and cause
electrocution.
DANGER
DANGER
DANGER
DANGER
Safety rst – basic tire maintenance. Properly maintained tires
improve the steering, stopping, traction, and loading-carrying
capacity of your vehicle. Underinated tires and overloaded
vehicles are the leading causes of tire failure. Therefore, to prevent
at tires and other types of failures, you should maintain proper
tire pressure, observe tire and vehicle load limits, avoid road
hazards, and regularly inspect your tires.
CAUTION
CAUTION
CAUTION
CAUTION
Portable combustion equipment, such as stoves and wood and
charcoal grills, must not be used inside the vehicle. This could cause
a re, an explosion, carbon monoxide poisoning, or asphyxia. If you
determine it is safe to put out a re using a re extinguisher:
• Remove the security tape covering the push-button
(do not shake).
• Hold it steady and position yourself between six and ten feet from
the re while having direct access to an exit.
• Press the button all the way, aim for the base of the re,
and spray in a quick, lateral motion.
WARNING
WARNING
WARNING
WARNING
THE WEIGHT OF CARGO SHOULD NEVER EXCEEDKG
KG
OR
OU
LBS
.*
LB.*
LE POIDS DU CHARGEMENT NE DOIT JAMAIS DÉPASSER
NONE / AUCUN
TIRE
PNEU
SIZE
DIMENSIONS
COLD TIRE PRESSURE
PRESSION DES
PNEUS À FROID
FRONT
AVANT
REAR
ARRIÈRE
SPARE
DE SECOURS
XXXXXX
STXXX/XXD1X(C) XXX KpA, XX psi
STXXX/XXD1X(B) XXX KpA, XX psi
2BXXXXXXXXXXXXXX
TIRE AND LOADING INFORMATION
RENSEIGNEMENTS SUR LES PNEUS ET LE CHARGEMENT
SEE OWNER’S
MANUAL FOR
ADDITIONAL
INFORMATION
VOIR LE MANUEL
DE L’USAGER
POUR PLUS DE
RENSEIGNEMENTS

11
TIRE PRESSURE AND LOAD LIMITS
Your vehicle’s recommended tire pressure and load limits
Tire information placards and vehicle certication labels contain
information on tires and load limits. These labels indicate
the vehicle manufacturer’s information, including:
• Recommended tire size
• Recommended tire ination pressure
• Vehicle capacity weight (VCW – the maximum occupant and cargo
weight a vehicle is designed to carry)
• Gross Axle Weight Rating (GAWR – the maximum weight the axle
systems are designed to carry).
When taking the trailer out of storage, inspect the tires carefully
and make sure there are no cracks in the grooves and no cord
is apparent. Cracks in the sidewall may indicate internal damage
or separation in the tire.
Tires and load limits
Tire ination pressure is the level of air in the tire that provides it
with load-carrying capacity and aects the overall performance of
the vehicle. The tire ination pressure is a number that indicates
the amount of air pressure – measured in pounds per square inch
(psi) – a tire requires to be properly inated. This number can also
be expressed in kilopascals (kPa), which is the metric measure used
internationally.
Vehicle manufacturers determine this number based on the vehicle’s
tire size and the vehicle’s design load limit, that is, the greatest amount
of weight a vehicle can safely carry. The proper tire pressure for your
vehicle is referred to as the “recommended cold ination pressure.”
To get an accurate tire pressure reading, you must measure tire
pressure when the tires are cold. A cold tire is one that has not been
driven on for at least three hours. When you drive, your tires get
warmer, causing the air pressure within them to increase. Therefore,
you can only get an accurate tire pressure reading if the tires are cold.
Checking tire pressure
Given that tires are designed to be used on several types of
vehicles, tire manufacturers provide the maximum permissible
ination pressure on the tire’s sidewall. This number represents
the maximum ination pressure to which a tire may be inated
under normal driving conditions.
Note:
It is important to check your vehicle’s tire pressure at least once
a month for the following reasons:
• Most tires may naturally lose air over time.
• Tires can lose air suddenly if you drive over a pothole or if you strike
the curb when parking.
•
With radial tires, it is usually not possible to determine underination
by visual inspection. For convenience, purchase a tire pressure
gauge to keep in your vehicle.
TIRE SAFETY TIPS
Preventing tire damage
• Slow down if you have to go over a pothole or other object in
the road.
• Do not run over foreign objects in the roadway, and try not to
strike the curb when parking.

12
Tighten each lug nut in the order shown in the diagram below.
Start by tightening all the lug nuts by hand to prevent cross
threading. Torque requirements for lug nuts vary according to
the size and manufacturer of the wheel. Always follow the wheel
manufacturer’s recommendations. The nal tightening torque
must be 85 to 95 ft-lbs.
1
25
34
Practical tips regarding tires:
• Make sure all wheel lug nuts are securely tightened. Use a torque
wrench.
• This is the only way to ensure the nuts are tightened.
• Inspect tires for uneven wear patterns on the tread, cracks,
foreign objects, or other signs of wear or trauma.
• If you are towing a trailer, remember that part of the trailer’s
weight is transferred to the tow vehicle.
• A trailer’s hub bearings must be greased after a long storage
period.
WARNING
WARNING
WARNING
WARNING
Tire safety and maintenance checklist:
• Check tire pressure regularly (at least once a month), including
the spare.
• Inspect tires for uneven wear patterns on the tread, cracks,
foreign objects, or other signs of wear or trauma.
• Remove bits of glass and foreign objects wedged in the tread.
• Make sure your tire valves have valve caps.
• Check tire pressure before going on a long trip.
• Do not overload your vehicle. Check the Tire Information Placard
for the maximum recommended load for the vehicle.
• When towing your trailer, remember that part of the trailer’s
weight is transferred to the tow vehicle.
WARNING
WARNING
WARNING
WARNING
Never exceed the wheel manufacturer’s recommendations.
WARNING
WARNING
WARNING
WARNING
Make sure you use lug nuts compatible with the wheels.
Inadequate lug nut torque can cause a wheel to separate from
the wheel’s mounting surface while driving, which can lead to
material damage, death or serious injury. Do not over-tighten.
DANGER
DANGER
DANGER
DANGER
It is important to maintain proper torque for lug nuts to
ensure
the wheel is securely mounted to the hub and drum.
WARNING
WARNING
WARNING
WARNING

13
Air pressure
Remember that the air pressure inside your trailer’s tires is not
the same as that in your car or SUV’s tires. Always maintain proper
tire pressure. Avoid under or over ination.
Under ination can cause heat build-up in tires, which reduces
a tire’s useful life and lowers the trailer’s security load limit. Over
ination can lead to dicult and irregular driving, which can
damage the trailer or the load. Cold ination pressure refers
to a tire that has not been driven on for at least three hours or
has been driven on for less than 2 km (1,25 miles). A hot tire’s
ination pressure can indicate a 6 psi increase compared to that
of a cold tire.
O Series Tire Pressure Chart:
Spare tire and tire change
Safety is the rst priority when a tire needs to be replaced during
your trip.
The Helio O Series trailers are equipped with a spare tire.
It is located under the trailer, in the back. Follow these steps
to use the spare tire:
1. If a at or damaged tire occurs while driving, stop your
vehicle and trailer gradually and in a controlled manner.
2. Slowly pull up on the side of the road.
3. Turn on your four-way ashers.
4. If a at or damaged tire occurs at night, use ares or warning
lights also.
5. Use a wheel chock to block the opposite wheel.
6. Slightly raise the trailer using a hydraulic or scissor jack
placed directly under the trailer’s aluminum frame.
7. Loosen hub bolts.
8. Use jack to raise the tire from the ground.
9. Remove hub bolts and keep them together somewhere easily
accessible.
10. Remove the wheel and replace it with the spare wheel
and tire.
11. Replace hub bolts and tighten them by hand.
12. Lower the wheel and tighten hub bolts by following
the sequence above.
13. Put away the at tire, jack and all safety tools and equipment.
Tire
size
Speed
index
(MPH)
Tire pressure (PSI) – Load capacity (Lbs)
15 20 25 30 35 40 45 50
ST175/
80R13 65 670 795 905 1000 1100(B) 1190 1270
1360(C)
Optional
LT27X8.50R14 99 - - - - 1165 1280 1390
1521(C)

14
After changing a at tire, have it repaired or replaced as soon as
possible. If you have a at tire but no spare tire or you are unable
to x it yourself, contact a towing company or support center.
If you must leave the trailer for any reason, make sure your trailer
is well stabilized so it doesn’t move.
3. WEIGHTS & LOADING
Denition of weight terms
GVWR (Gross Vehicle Weight Rating) – maximum allowable gross
weight of the trailer and its contents.
GAWR (Gross Axle Weight Rating) – maximum gross weight that
an axle can safely support.
Note:
Do not take for granted that it will be possible for you to ll all
the tanks and storage spaces and still be within the GVWR limits
shown on the compliance label.
Tow vehicle requirements
When buying a tow vehicle, keep in mind the following
requirements regarding safety and usability:
1. Transmission – The transmission can be manual or automatic,
but an automatic transmission better controls engine charges.
2. Power
– Make sure your vehicle has sucient power to
hitch your trailer on the type of roads you’ll be taking. Here
are the factors to take into account: engine power, cooling
capability, and axle ratio. Discuss your vehicle’s towing capacity
with your dealer.
3. Tires and suspension – It is important to make sure your
vehicle’s tires and suspension are designed to support the
additional capacity needed to haul a trailer. Refer to your
dealer and your vehicle’s owner’s manual for the type of tires
and pressure required.
4. Coupling – Your vehicle must be equipped with a hitch
whose rated towing capacity is equal to or greater than the
trailer GVWR. Make sure it is installed according to the hitch
manufacturer’s instructions and it satises the adaptation and
performance requirements of the tow vehicle. Also make sure
Never use the back stabilizer bar as a jack to raise the trailer at
any time or even for a at tire. Please refer to the manufacturer’s
recommendations.
WARNING
WARNING
WARNING
WARNING

15
to install the appropriate electrical cables providing a 12 V
electrical current to the trailer turn signals and brake lights.
5. Safety equipment – Install the appropriate safety equipment
such as side view mirrors on the tow vehicle. In most states or
provinces, these are required by law. Most available kinds are
not permanent and can easily be installed or removed.
Cables
In addition to the hitch, it is also necessary to install the appropriate
electrical connection between the tow vehicle and your trailer.
A exible connector at the end of the vehicle is provided with wires
long enough for it to connect to your vehicle’s electrical system.
Make sure you select the proper gauge for your length of cable, with
enough slack between the trailer and tow vehicle to permit tight
turns, but not be close to the road surface to drag. Ask your vehicle
dealer or hitch installer to help you with the installation.
Cable color code
The cable color code for connections is as follows:
White – grounding
Green – tail light, side marker light, and running light
Red – left turn signal and brake light
Brown – right turn signal and brake light
Blue – electric brakes
Black – interior lighting and accessories
Although your Helio trailer has been inspected at the manufacturing
plant, we recommend you visually inspect all the lights to make sure
they work before leaving the dealer’s.
Electrical hook-up (7 pin)
Place the trailer’s exible connector into the jack located on the tow
vehicle. Make sure you leave enough slack to avoid separation on
tight turns. Check that all lights work before setting out.
# 1 14 AWG white cable:
side marker lights, tail lights – grounding
# 2 14 AWG blue cable:
brakes
# 3 14 AWG green cable:
side marker lights, tail lights – positive terminal
# 4 10 AWG black cable:
battery connection – positive terminal
# 5 14 AWG red cable:
left turn signal, brake lights – positive terminal
# 6 14 AWG brown cable:
right turn signal, brake lights – positive terminal
# 7 14 AWG yellow cable:
reverse lights, left and right tail lights, auxiliary – positive
terminal
Brakes
Your trailer’s brakes are wired to the tow vehicle via a exible
electrical connection that allows the braking eect to be
uniformly distributed to the tow vehicle and trailer. Refer to your
electric connection installer for 7 pin wiring to know the types
of brake controllers available and the appropriate installation of
your vehicle’s controller.
Ask them to explain how the electric brakes work and how to use
them adequately, as well as the importance of the ballast resistor
and the breakaway safety switch.
Test the brakes and adjust them, if needed, according to the
brake controller manufacturer’s instructions. Adequate brake
adjustment can help prevent dangerous wandering or a jackknife
occurring on a slippery road or when making an emergency
stop. Before leaving on a trip, perform a short road test to check
that the brakes are working well. Press the brakes several times
at dierent speeds and pressures. In case of wheel lockup,
16
the brake shoe adjustment is too tight. If the trailer does not brake
adequately, the brake shoe adjustment is not tight enough. Do
not drive faster than 45 km/h (28 miles/h) during this road test.
Maintenance & Troubleshooting for axle and electric brake
adjustment, maintenance, and troubleshooting procedures.
Coupling the trailer to the tow vehicle
When attaching the trailer coupler to the tow vehicle’s hitch,
follow these steps:
1. Raise the coupler by rotating the operating lever of the rear
wheel clockwise.
2. Back up the tow vehicle until the hitch ball is aligned under
the coupler. Ask someone to help you by using predetermined
hand signals. Make sure this person is visible at all times and
proceed slowly and cautiously.
3. Raise the coupler locking bar.
4. Lower the coupler onto the hitch ball by rotating the operating
lever of the rear wheel counter clockwise. Allow the coupler to
fully engage the hitch ball.
5. Lower the coupler locking bar, and make sure it is locked in
place using a lock pin or safety lock.
6. Raise and lower the rear wheel against the tow vehicle’s hitch.
Safety chains
After attaching the trailer coupler to the hitch ball adequately,
the safety chains must be rigged. According to safety regulations,
safety chains must crisscross underneath the tow bar and hitch to
prevent the tow bar from falling to the ground in case of hitch or
coupler failure.
Connecting safety chains
1. Crisscross the chains underneath the tow bar and hitch.
2. Loop the hooks around a member of the frame of the tow
vehicle or attach them to holes provided in the hitch system.
3. Make sure the slack in the chain lengths is equal on both sides
and there is enough to permit tight turns, but not be close to
the road surface to drag.
Do not attach safety chains to the bumpers of the vehicle.
WARNING
WARNING
WARNING
WARNING
Do not attempt to repair a damaged chain. If the safety chain is
damaged, it must be replaced.
WARNING
WARNING
WARNING
WARNING
The Helio trailer is not designed for adding rear supports
transporting tool boxes, bicycles, motorcycles, or any other
heavy equipment that would risk overloading the frame,axles,
wheels, and tires. It is strictly forbidden to alter the frame or add
equipment to the trailer without Helio’s written consent;
otherwise, the associated warranty may not be valid.
WARNING
WARNING
WARNING
WARNING

17
Before leaving on a long trip
Whether you are setting out from your home, a rest area, or a
camp site, you must check the following before leaving on a trip
inside or outside your trailer.
• Tires
These must be inspected before each trip. A tire must be
replaced when it is worn 1/16 inch deep in at least two adjacent
grooves, in three spots on the tire’s surface. Check for uneven
wear, foreign objects, bumps, or excessive chipping. When
buying new tires, make sure they are the same size and have
the same ply rating and load range as that of the old ones.
Do NOT mix radial tires with bias or belted bias tires.
Each morning, check the state and pressure of the tires of your
trailer and tow vehicle. The heat caused by surface friction
increases a tire’s air pressure by about 6 to 9 psi. Therefore, do
not drain a hot tire of its air. Inate the tire to its recommended
pressure, as indicated on the tire or in the tire manufacturer’s
instruction leaet.
• Wheel nuts
These must be tightened before you leave, then at every
100 km (62 miles) for the rst 300 km (187 miles) during your
initial voyage, and after each tire replacement. Afterwards,
tighten wheel nuts regularly, then again before using your trailer
after a storage period.
• Lubricate hub bearings
For more details, see the axle reference in the Section 6:
Maintenance & Troubleshooting for axle and electric brake. It is
generally recommended to lubricate hub bearings at least once
a year or at every 18,000 km (11,000 miles).
• Hitch
Check the hitch to ensure it has not loosened. The lock pin
or safety lock must be installed in the coupler.
• Front end
Make sure the front end is aligned horizontally with the hitch
and coupler is locked in this position. The recommended height
for the hitch is around 15 inches (38 cm) from the ground to
2 inches (5 cm) above the hitch ball.
• Propane gas tank
The connections must be tightly made and the service valve
turned on or o according to the following instructions. Certain
states or provinces prohibit vehicles equipped with a propane
gas tank from using tunnels. Other states or provinces prohibit
anyone from travelling if the service valve is turned on. Check
the regulations of the states or provinces you plan on visiting.
• Safety chains
Safety chains must be properly rigged to the tow vehicle.
• 7 pin exible connector
It must be correctly connected to the tow vehicle’s electrical
system.
• Tail, stop, and turn lights and headlights
Trailer and tow vehicle lights must be checked, including brake
lights, turn lights, four-way ashers, night lights, tail lights, and
tow vehicle headlights.
• Interior lighting and electrical panel
Make sure all interior lighting is turned o and the power supply
is turned “ON” to allow the recharging/maintaining of the
battery by the front vehicle.
• Power cord
The 120 V external power cord must be unplugged from its
external power source, placed in the storage box, and the ap
well shut.
• Water hose
The exible hose must be disconnected and placed in the
storage space with the cap well closed.

18
• Tanks
The freshwater, waste, and propane gas tanks are lled
adequately.
• Sewer drain hose
The sewer hose must be disconnected and stored in the sewer
hose compartment under the trailer. The waste tank valves
(Gray – Black) are closed, and the waste outlet cap is well
tightened. Please dispose of wastes in an authorized area.
• Roof air vent
Make sure the roof air vent/fan is well shut and the crank is in
locked position.
• Inside doors and drawers
Make sure the doors, windows, and drawers are well closed.
Loose objects must be secured or stored.
• Refrigerator door
The refrigerator door must be secured using the travel lock.
• Outside storage door
The access door to the inside storage must be closed and locked
using the appropriate key.
• Outside handspray
The access door to the outside handspray must be closed and
locked using the correct key.
• Step
Check that the integrated step is in stored position.
• Porch light
Make sure the outside light is turned o when traveling.
• Main door
Both door locks must be locked using your main key.
Thinking ahead
Here is a list of articles you might nd useful:
• First aid kit
• Spare 12 volt fuses, automobile type (see table of fuses on
electrical panel)
• Tool box: regular, star, and square screwdrivers; pliers, crescent
wrench, level, keys for gas and water pipe connections (adapted
to the water lines and gas pipes), good pressure gauge, electric
tape, ashlight
• Water hose – must be at least 25 feet long to ll up the water
tank and connect to the city’s hydrant
• Pressure regulator (45 PSI)
• Sewer drain hose
• Extension cord – must correspond to the strength of your
recreational vehicle (30 A)
• Chemical products for the waste tank
•
Registration and insurance information (for both the recreational
and tow vehicle)
• Key duplicates
• Three wooden blocks for stabilizing your vehicle in uneven
camping spaces. These may be useful, even with the back
stabilizer bar. Wooden blocks can also be used to prevent
the vehicle from rolling backward or forward if you are parked
on uneven terrain.
• Doormat
• Phone numbers of people to call in an emergency.

19
4. SYSTEMS & COMPONENTS
Propane gas (O2 & O3 Series)
Your trailer’s propane gas system supplies the fuel necessary for
cooking, optional heating, and water heating. Propane gas can
also be used as another energy source for your refrigerator.
When manipulation and safety precautions are observed, propane
gas can be a clean, ecient, and safe form of energy. It allows you
to benet from a comfortable lifestyle at a time when other forms
of energy cannot be used.
The propane gas is stocked in liquid form in a special storage tank.
This tank is xed on the chassis at the front of the trailer, next
to the hitch and coupler, and is protected by a berglass case,
which also contains the deep-cycle battery.
The propane gas is stored under extreme pressure in the tank,
with enough space to allow for expansion under vapor form.
The pressure of this vapor is reduced when it goes through a
regulator. This reduction of pressure is a two-step process that
ensures constant pressure in the propane gas used, no matter
the outside temperature, climate, or altitude.
Propane gas tank
Propane gas tanks are tested to sustain pressure levels exceeding
those usually met during expected normal use. Furthermore, all
propane gas tanks are equipped with an integrated safety device
that regulates the extent to which they should be lled. Propane
cylinders are designed to be lled with propane gas at only 80%
of their capacity. With the cylinder lled to only 80% of its capacity,
this leaves 20% of space left for vapor. This extra space allows
the vapor to recede via the Acme QCC1 connection while also
providing space for the liquid to expand. If the tank were
completely full, an increase in the outside temperature could
cause a propane gas discharge via the expansion valve.
Filling up your propane gas tank
Before removing a propane cylinder to ll it up or perform
work on the propane gas system, blow out all open ames and
discontinue the use of any fumigant.
1. Disconnect all devices running on propane gas and turn o all
pilots (water heater, refrigerator, heating (optional).
2. Shut o the service valve on the propane gas tank and remove
the Acme QCC1 connection, which is threaded left hand and
must be twisted clockwise to be removed. Never use a wrench
to shut o the service valve. If a leak occurs while shutting it o
manually, have the service valve repaired or replaced.
3. Install a cap or block the entrance of the service valve to prevent
any penetration of dust or dirt.
4. Untighten the bolt on the clamp ring, then remove the tank from
the trailer. Always transport the propane cylinder in a vertical
position. Never transport, install, or use a vertical tank in a
horizontal or upside down position.
5. Bring the tank to a qualied propane gas supplier who observes
the regulations in eect.
6. Ask the supplier to plug the nozzle to your tank’s lling up
connection.
7. Although the tank is equipped with an automatic stop valve
at 80%, which prevents the lling up of the tank past 80% of its
capacity, let the supplier check the 20% liquid tank level gauge
and stop the lling up process if liquid appears.
Propane gas regulator
The regulator reduces the pressure of the propane vapor inside the
tank to that required for household appliance use. The regulator
rarely requires maintenance. Always protect it from the elements
and extreme temperatures.
The regulator has been preregulated by the manufacturer,
and adjustments should not be necessary. However, should
Table of contents


