Helios HVD2085 User manual
HVD2085
HD UPSCALING DVD PLAYER
NEODIGITS.COM

General introduction
Thank you for purchasing your new HELIOS HVD2085 HD Upsca ing DVD P ayer.
The HVD2085 is integrated with the atest cutting edge video techno ogy. The main
feature of this p ayer is to upsca e standard DVD tit es to high definition reso ution.
In addition, the HVD2085 offers a arge se ection of high definition video modes and
connection options.
The p ayer supports the fo owing video modes and connection outputs:
Component v deo output:
480i / 480p / 576p / 720p/ 1080i / 1080p
HDMI v deo output:
480p / 576p / 720p / 1080i / 1080p
VGA output:
VGA (640 x 480) / SVGA (800 x 600) / XGA (1024 x 768) / SXGA (1280 x 1024)
How wi I benefit from the HVD2085s high definition video output?
If you own a HDTV (or any other high definition disp ay device), you wi on y be ab e
to p ay standard DVD tit es to as high as 480p (NTSC progressive scan) or 576p (PAL
progressive scan) reso ution video input. However, your HDTV actua y has the capacity
to show images much greater than 480p or 576p. Therefore, you are not getting the
most out of your HDTVs high definition reso ution.
The HVD2085 Upsca ing DVD P ayer a ows you to upsca e standard DVD tit es to
as high as 1080p reso ution. With its range of reso ution options, you are ab e to
se ect from a arge number of reso utions in order to get that right match with your
HDTVs native reso ution. The resu t is a noticeab y sharper and c earer image on the
screen.

Safety Precautions .............................................................................................
P ayer Features ..................................................................................................
Package Contents ..............................................................................................
Supported Disc Formats ....................................................................................
DVD Disc Purchase Guide .................................................................................
Regiona Code Distribution ....................................................................................
DVD Disc Logos .................................................................................................
Disc Usage and Maintenance .............................................................................
Disp ay Pane .....................................................................................................
Remote Contro ..................................................................................................
Front Pane Overview .........................................................................................
Rear Pane Overview ..........................................................................................
System Connections ..........................................................................................
P aying Discs ................................................................................................................
Using OSD Guide Menu .....................................................................................
P ayer Menu System ..........................................................................................
Troub eshooting .................................................................................................
Product Specifications .......................................................................................
1
2
3
4
5
5
5
6
6
7
8
9
10
16
17
24
32
33

An exc amation point within a triang e is an a ert for
important instructions on the use of the p ayer.
To avoid the risk of e ectric shock, DO NOT open the cover
of the p ayer.
A ighting f ash and arrowhead within a triang e is a warning
sign a erting you of dangerous vo tage inside the p ayer.
1)Symbols
a.
b.
c.
CAUTION:
To reduce the risk of fire, e ectrica shock or damage to the p ayer, do not expose this
device to moisture and do not p ace water fi ed objects c ose to or on top of it.
2)Usage Not ce
a.
b.
c.
d.
e.
f.
Warning: key operations and maintenance instruction enc osed with the p ayer
Caution: DO NOT open the cover of the p ayer to avoid the risk of fire or e ectric
shock. Contact a professiona for repair.
Warning: Dangerous high vo tage inside and risk of e ectrica shock.
Before p ugging in this device, make sure your power supp y vo tage matches
the product. The working vo tage of this p ayer is marked on the rear pane .
To avoid damage to the audio system, switch the vo ume of connected devices
such as speakers or amp ifiers to minimum before turning the p ayer on/off.
Unp ug the p ayer when unused for ong periods.
Do not unp ug by pu ing on the power cab e.
Do not p ace heavy objects on top of the p ayer.
Do not put fingers or other objects into the p ayer.

3)Ma ntenance Not ce
a.
b.
c.
4)Caut on
a.
b.
5)Rem nders
a.
b.
c.
To ensure proper use of this player, please read the user manual carefully and
store for future reference.
Should this player require maintenance, contact the dealer, an authorized
service center or an experienced radio/TV technician.
All pictures in the instructions are for reference only. Specific contents are
subject to actual display version
o not expose the player to excessive heat, direct sunlight, dust, moisture,
vibration, shock, moisture, liquids, speakers or magnetic objects.
Trouble with getting the player to work may arise due to condensation on the
lens when moved from a warm to cold environment. To resolve this, turn on
the player to warm it up, and then play a disc 1-2 hours after. ( o not leave a
disc inside the player while it is warming up)
Clean the surface of the player with neutral detergent instead of organic
substances such as alcohol or gasoline. o not burnish with sand paper.
To avoid the possibility of fire, electric shock or damage to player, do not
expose this device to liquids or moisture.
This player employs a laser system. To prevent direct exposure to laser beam,
do not open the cover. Visible laser beams when uncovered. O NOT stare
into beam.
Supports 720p / 1080i / 1080p (via component and H MI)
Supports SVGA / XGA / SXGA (via VGA output)
Video outputs include composite video output, S-Video, component, H MI and
VGA
Audio outputs include optical, coaxial, mixed stereo and 5.1 channel audio outputs
Upscales standard V s to high definition resolution
Supports PAL (50hz) and NTSC (60hz) 720p / 1080i / 1080p video modes
Universal region code free
Supports V , Audio C , VC , SVC , H C and MP3 playback
Supports firmware upgrade
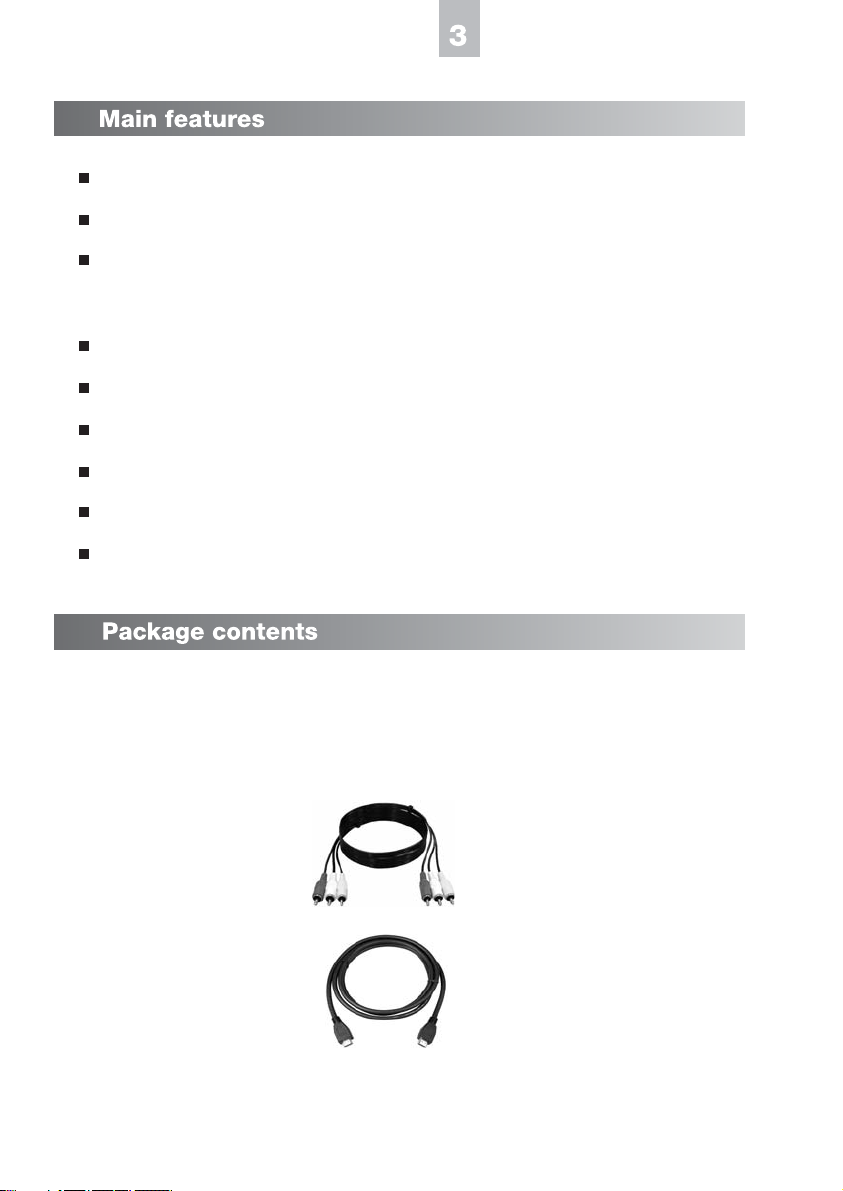
H V player x 1
Remote control x 1
Batteries x 2
AV connection cable x 1
H MI connection cable x 1
Power cord x 1
User manual x 1

Supported disc formats:
Remarks
Includes
Includes

Regional code distribution
Reg on Code Reg on
USA, Canada
Japan, Europe, South Africa, Middle East, Greenland
South Korea, Taiwan, Hong Kong, Parts of South East Asia
Australia, New Zealand, Latin America (including Mexico)
Eastern Europe, Russia, India, Africa
China
DVD logos
o not touch the signal (reflective) surfaces. Hold discs by the edges, or by one
edge and the center hole.
o not affix labels or adhesive tapes to the disc surface this will unbalance the
disc.
o not scratch or damage the label this will make the disc unreadable.
iscs run at high speeds inside the player. o not use damaged (scratched or
warped) discs.
irty discs can cause player malfunctions. Always keep discs clean by gently
wiping the surface with a soft clean cloth (moving from the inner to the outer
perimeter)
If I disc is dirty, wet a soft cloth in water, wring out the cloth thoroughly, wipe the
dirt away gently, and then remove any water drops from the disc with a soft dry
cloth.
o not use record-cleaning sprays or anesthetic agents on discs. Never clean
discs using benzene, thinner or other volatile solvents which may cause damage
to disc surfaces.
To avoid warping discs, store discs in their original cases. o not leave discs
under high temperature and humidity.
Proper use and handling of discs:
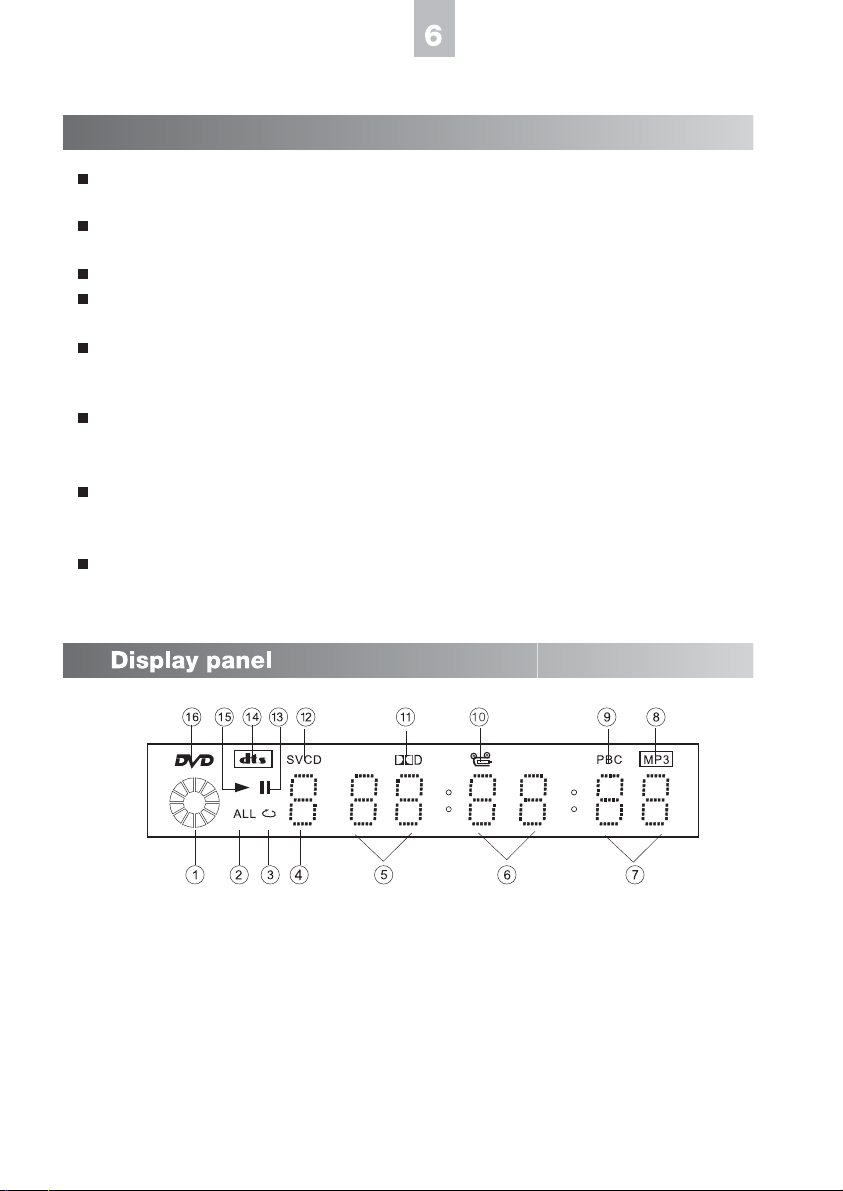
isc running display
Repeat all
Repeat track
Chapter/Track number
Hours
1.
2.
3.
4.
5.
Minutes
Seconds
isc type(MP3)
PBC
V playback angle
6.
7.
8.
9.
10.
olby igital
SVC
Pause mode
TS logo
Play mode
isc type( V )
11.
12.
13.
14.
15.
16.

Remote control overview
7
1. Power on/off
2. isplay: shows or hides OS menu
3. Mute: press once to mute, twice to undo mute
4. Eject: open or closes disc tray
5. AB Repeat
6. Repeat: repeats chapters or titles
7. Program: Opens the programmable play list
8. Setup: displays system setup menu
9. VGA mode: switch between VGA / SVGA / XGA / SXGA
10.H video mode: switch between 480p / 576p / 720p /
1080i / 1080p
11.50/60hz.: press to switch between 50hz and 60hz. Only
applicable for 720p / 1080i / 1080p H modes
12.PAL/NTSC: switches between normal PAL/NTSC video modes
13.Volume increase
14.Volume decrease
15.Up cursor
16.Left cursor
17.Right cursor
18. own cursor
19.Enter / OK
20.Numeric buttons
21.Clear: erases the number or data you just entered
22.Bookmark: press to make a bookmark
23.Fast backward
24.Play
25.Fast forward
26.Previous: skip backward
27.Pause
28.Stop
29.Next: skip forward
30.Step: plays video frame by frame
31.Slow: slow motion playback
32.Zoom
33.Audio: switches audio tracks
34.Title: jumps to main title page of V title
35.Menu: jumps to menu of V title
36.Subtitle: switche s between subtitle options
37.Angle: switches play angles
38.Search
1 2 3 4
5 6 7 8
9 10 11 12
13 14
15
17
16
18
19
20
21 22
23 24 25
26 27 28 29
30 31 32 33
34 35 36 37
38

Note:
1. o not mix different types of batteries
2.Replace batteries when the remote controls functions and range are weak
3. o not expose remote control to excessive heat or moisture
4. o not leave the remote control under direct sunlight to avoid signal interference
5.Use remote control within 7 meters and 30 degrees of the player
Front panel overview
1. LE screen: displays system information
2. Sensor: point remote control towards sensor to operate the player
3. isc Tray (Note: load discs label-side up)
4. Power on/off
5. [Eject] Open/Close: inserts or ejects disc tray
6. [Play Pause]Play/Pause: plays or pauses disc
7. [Previous] Previous: skips to previous track or page
8. [Next] Next: skips to next track or page
9. Standby light (LE )
123 6794 5 8
7
123456811910
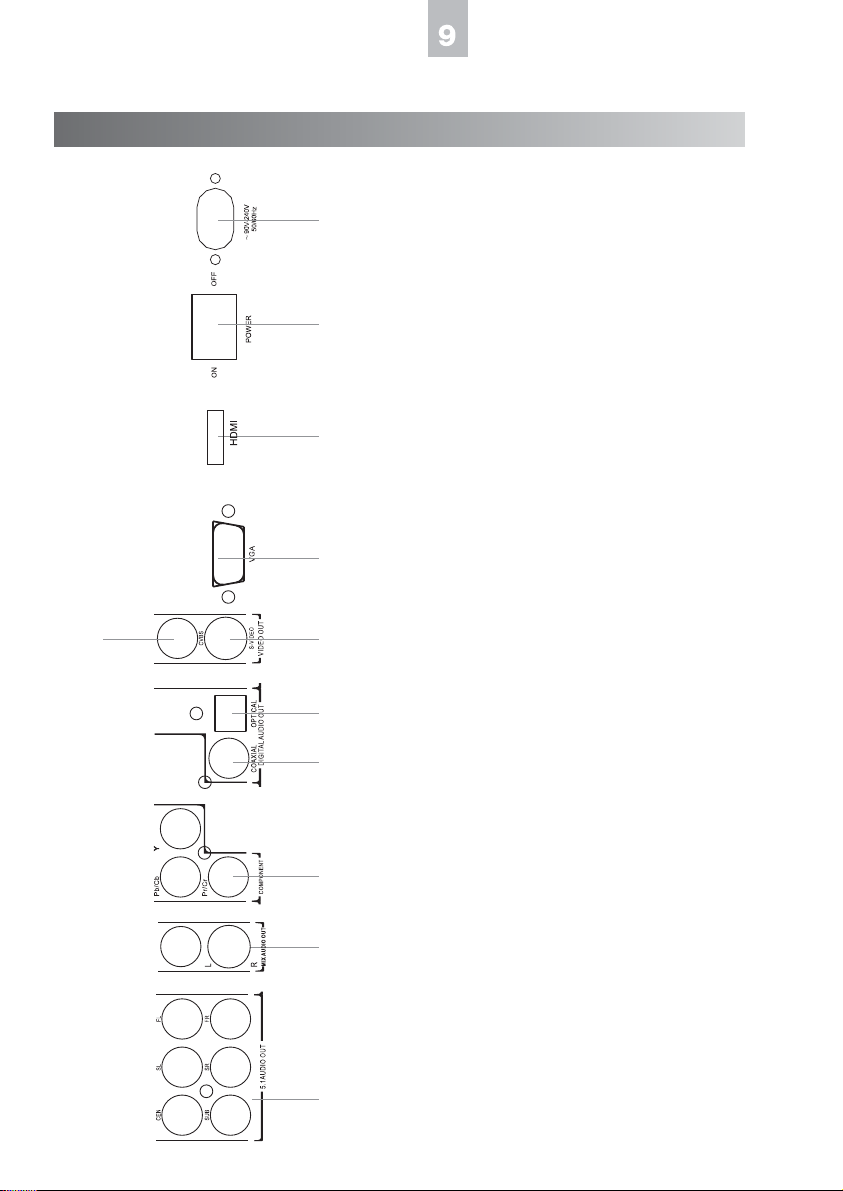
1. 5.1 channel surround sound audio outputs
2. MIXE audio outputs
3. Component video outputs
4. Coaxial audio output
5. Optical audio output
6. S-Video output
7. Composite video output
8. VGA output
9. Power on/off
10.Power IN (90V-240V 50/60hz)
11.H MI output
Rear panel overview
How to connect the player to your AV system
Connect ng v a compos te v deo
Using the AV cables supplied, insert the yellow cable into the video socket of your TV.
Insert the white cable into the left channel socket and the red cable into the right channel
socket , and then connect the other ends of the white (left) and red (right) cables to the
corresponding inputs on your TV.
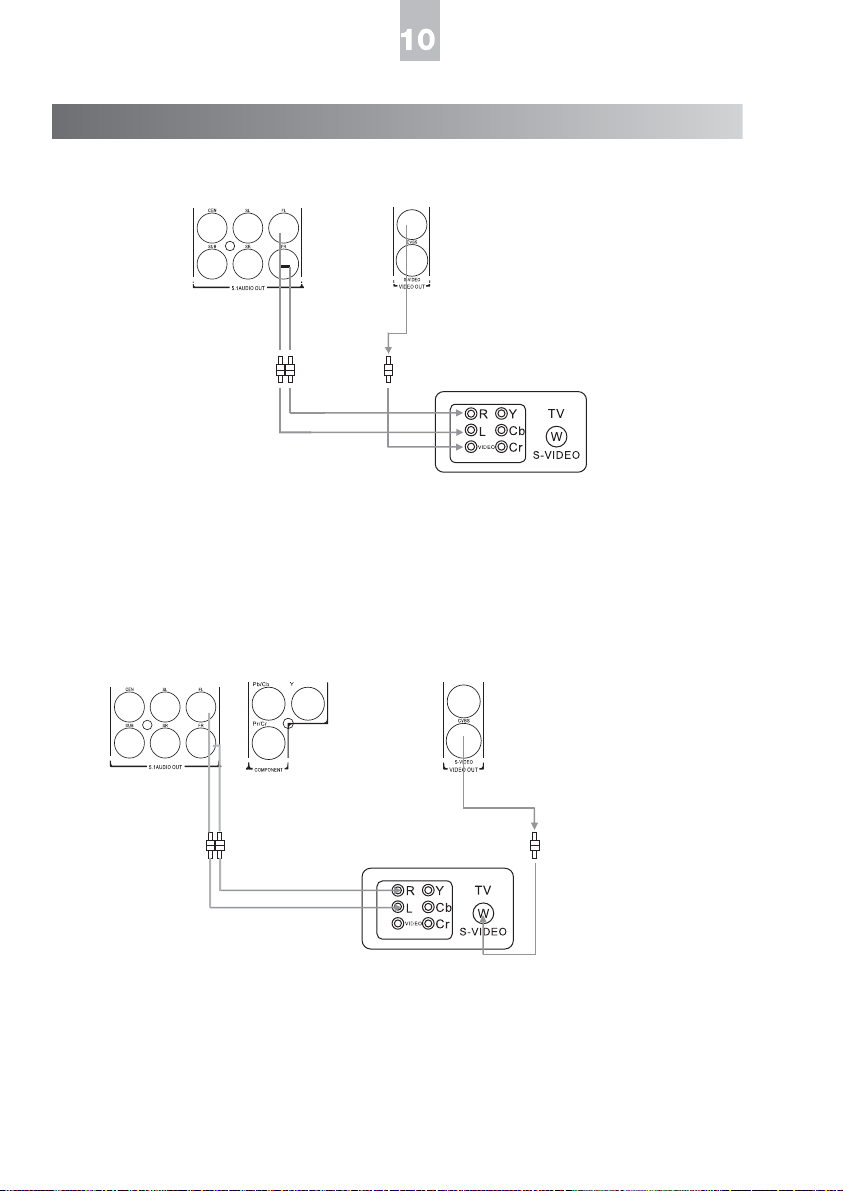
Connect ng v a S-v deo
If there is an S-video input socket in your TV set you can connect the TV and the player
using the S-video cable.
Use the supplied audio cable to connect the player to your TV.
Or you can use the digital audio connection (coaxial/optical) or 5.1 channel connection to
your AV receiver.
Connect ng v a component v deo connect on
Insert one end of the component video (Y / Cb / Cr) cable into the red/blue/green socket
of the component video output located on the rear of the player. Insert the other end of the
cable into the component video input socket located on your TV.
Use the supplied audio cable to connect the player to your TV.
Or you can use digital audio connection (coaxial/optical) or 5.1 channel connection to your
AV receiver.
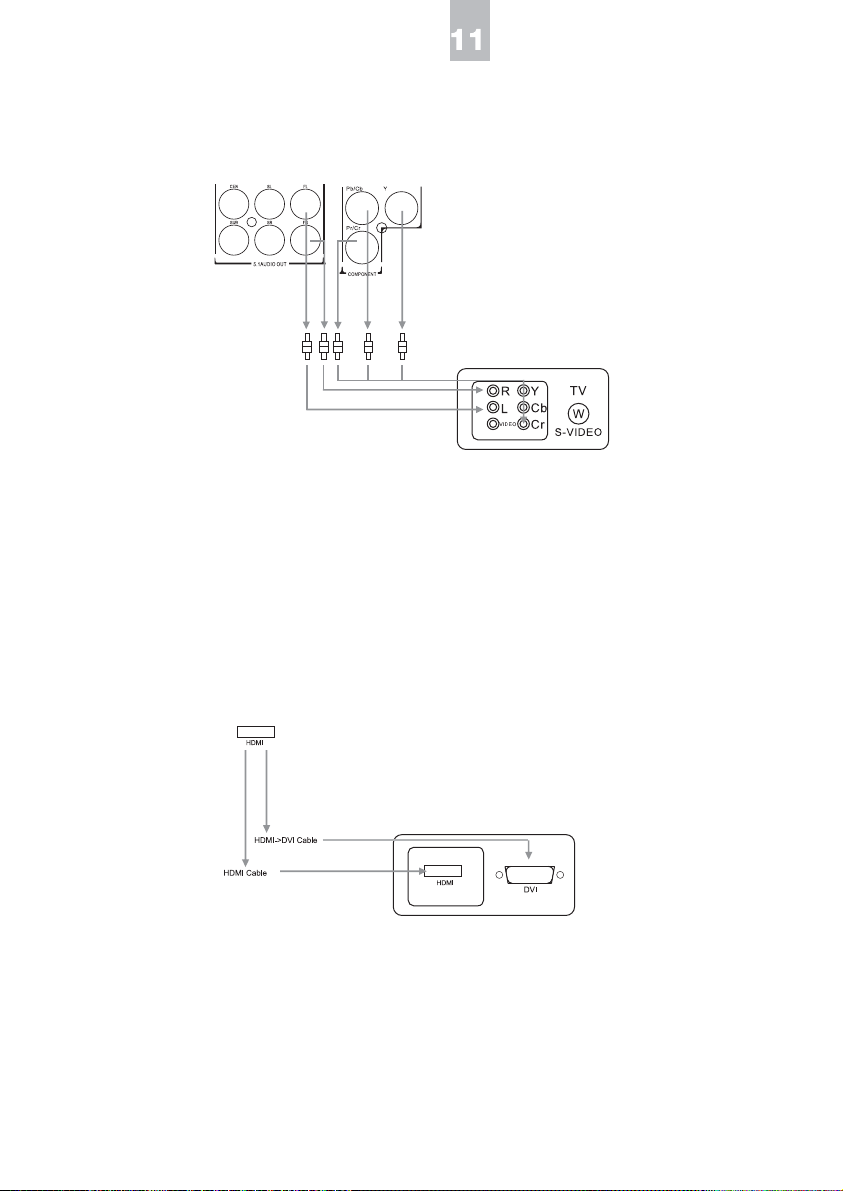
Connect ng v a HDMI/DVI v deo
Use the H MI cable to connect the player to H MI input of your TV.
You need an H MI to VI cable to connect the player to VI input.
H MI will output both video and audio (you need to turn off the digital output in the players
setup in order to get audio from H MI)

Connect ng v a VGA
Use the VGA cable to connect the VGA output of the player to the VGA input of your TV.
Note that the VGA output will only be able to output standard VGA signals (VGA / SVGA /
XGA / SXGA). It will not output 720p / 1080i video signals via VGA connection.

Connect ng to a 2 channel aud o ampl f er
Connect the video output of the V player to the video input of your TV using the
corresponding cables (video cable / S-video cable / component cable).
Connect the audio cables FL and FR to the sound input L/R socket on the amplifier.

Connect ng to AV rece ver for d g tal aud o connect on
Connect the video output of the V player to the video input of your TV using the corresponding
cables (video cable / S-video cable / component cable).
Use a fiber optic cable or coaxial cable to connect the optical or coaxial socket located on
the rear panel of the player to the AV receiver.
To setup the igital Audio options you can go to the system setup. Please see igital Sound
Output

Connect ng to a 5.1 channel ampl f er
Connect the video output of the V player to the video input of your TV using the
corresponding cables (video cable / S-video cable / component cable).
Connect the 5.1 audio output terminals of the player to the amplifier using the respective
connection cables (L and R of MIXE /FRONT, L and R of SURROUN , CENTER and
SUBWOOFER).
Ensure that the 6 speakers are connected to the corresponding outputs of the amplifier.

Playing discs
1. Compatible discs: This player can play all kinds of discs including V , VC , Audio C ,
and SVC .
2. Play discs:
i. Connect TV set to the player
ii. Turn on the player
iii. Eject the tray by pressing the Open/Close button
iv. Place the disc on the tray and press Open/Close
v. The disc will be played automatically (some discs may require you to press the
Play button to play)
3. Zoom: Press the ZOOM button to enlarge the image. Each time you press the button, the
image will be enlarged 2-3-4-5 times bigger, and then it will return to its normal size. While
zoomed, you can move the viewing area using the cursor buttons.
4. Mute: Press the MUTE BUTTON once to turn on mute and press again to turn off mute.
5. Title: Some discs will include a Title option. This is often a short introduction to the video
before going to the V menu. Press the TITLE button to play the V from the Title
6. Menu: This is the V menu. Common options for a V menu are Language options,
special features and episode selection. Press the MENU button to open the V menu.
To return to normal play, press the MENU button again.
Using OS menu
The OS (On Screen isplay) menu lets you select from playback options while playing a
disc.
Press ISPLAY to see playback options. Use cursor keys to select a playback function.
Note: you can only select a playback function that is supported by the disc you are playing.
If a function is not supported by the disc, the icon will be highlighted grey.
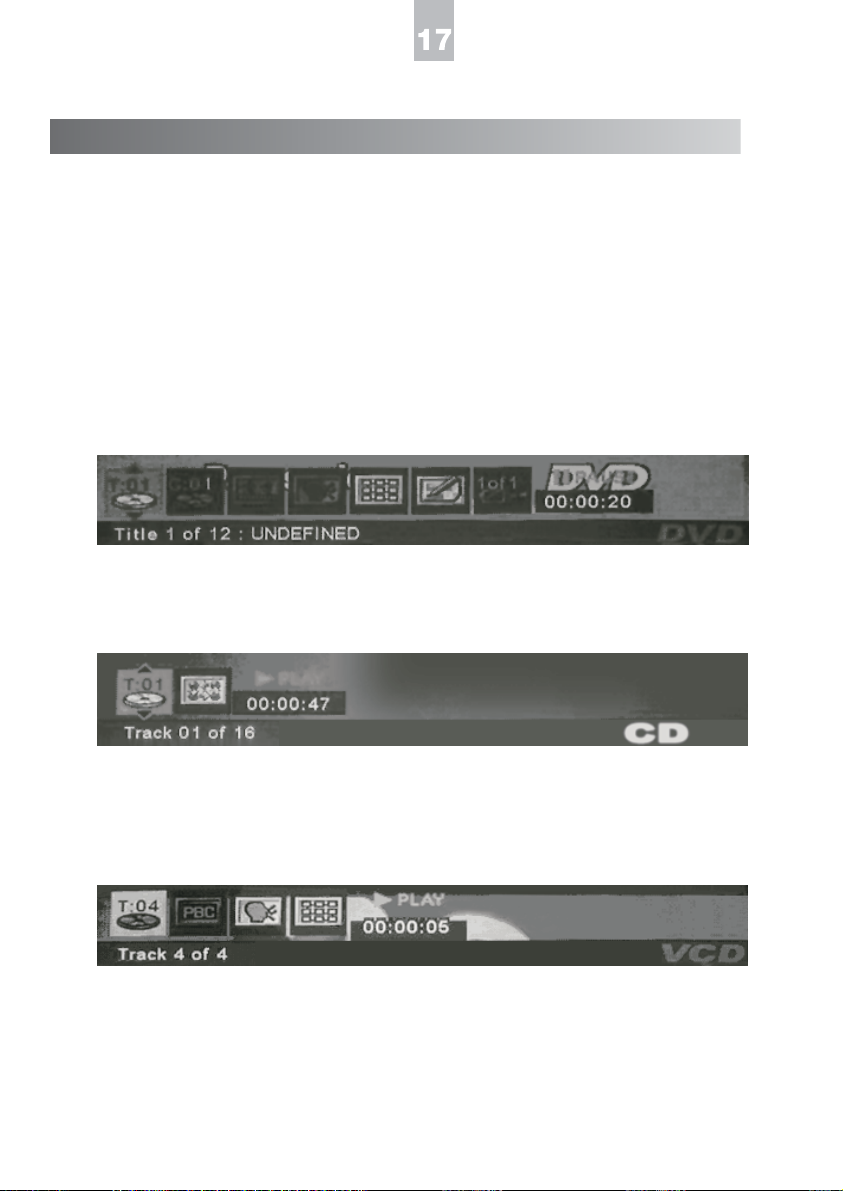
DVD screen d splay:
Title | Chapter | Subtitle | Channel | Repeat | Bookmark | Multi-angle | Time
Aud o CD d splay:
Track | Play mode | Time
VCD d splay:
Music Playing Control | Channel | Repeat | Time
This manual suits for next models
1
Other Helios DVD Player manuals


