HELIX PP20/AUX User manual

Instore "130"you
canfind and buy almostall necessarygoodsforyourauto
in
Kyiv and othercities,deliveryby ground andpostal services. Ourexperienced
consultantswill provide youwithexhaustive informationand helpyoutochose
the very particular thing.We arewaiting foryou at the address
http://130.com.ua
PHONES
(044) 360-7-130
(050) 336-0-130
(063) 788-0-130
(067) 233-0-130
(068) 282
-
0
-
130
Internet storeof
autogoods
CARRECEIVERS —Receivers •Mediareceiversandstations•Nativereceivers •CD/DVD changers •FM-modulators/USBadapters•Flashmemory•Faciaplates and adapters •Antennas •Accessories |
CARAUDIO —Car audiospeakers •Amplifiers•Subwoofers •Processors•Crossovers •Headphones•Accessories|TRIPCOMPUTERS —Universalcomputers •Modelcomputers •Accessories|
GPSNAVIGATORS —PortableGPS•Built-in GPS•GPSmodules •GPStrackers •Antennas forGPSnavigators•Accessories|VIDEO —DVR •TVsetsand monitors•Car TVtuners•Cameras •Videomodules
•Transcoders •Car TVantennas•Accessories|SECURITYSYSTEMS —Car alarms •Bikealarms •Mechanicalblockers •Immobilizers •Sensors •Accessories |OPTICANDLIGHT —Xenon•Bixenon •Lamps
•LED •Stroboscopes •OpticandHeadlights •Washers •Light,rainsensors •Accessories |PARKTRONICS ANDMIRRORS —Rear parktronics•Frontparktronics •Combined parktronics •Rear-viewmirrors
•Accessories |HEATINGANDCOOLING —Seat heaters •Mirrorsheaters •Screen-wipers heaters •Engineheaters •Auto-refrigerators •Airconditioningunits •Accessories |TUNING —Vibro-isolation
•Noise-isolation •Tintfilms •Accessories |ACCESSORIES —Radar-detectors•Handsfree,Bluetooth•Windowlifters•Compressors •Beeps,loudspeakers •Measuring instruments •Cleaners •Carsits
•Miscellaneous|MOUNTING —Installationkits •Upholstery•Grilles•Tubes•Cableand wire •Tools•Miscellaneous|POWER —Batteries •Converters •Start-chargingequipment•Capacitors
•Accessories |MARINE AUDIOANDELECTRONICS —Marinereceivers•Marineaudiospeakers •Marinesubwoofers •Marineamplifiers•Accessories |CARCARE PRODUCTS —Additives •Washer fluid •
Care accessories •Car polish •Flavors •Adhesives andsealants |LIQUIDANDOIL —Motoroil•Transmissionoil •Brakefluid •Antifreeze•Technicallubricant
ICQ
294-0-130
597-0-130
SKYPE
km-130

PP20/AUX
PLUG AND PLAY
4-Kanal-Endstufe 4x30/60 Watt
4-Channel-Amplier 4x30/60 Watts
deutsch / english
130.com.ua
Autogood products Internet store “130”

Sehr geehrter Kunde,
Wir gratulieren Ihnen zum Kauf dieser hochwer-
tigen HELIX-Endstufe.
HELIX setzt mit der PP20/AUX erstmals Maßstä-
be im aufstrebenden Plug‘n Play-Markt. Dabei
protieren Sie als Kunde direkt von unserer nahe-
zu 30jährigen Erfahrung in der Forschung und der
Entwicklung von Audiokomponenten.
Allgemeines zum Einbau von HELIX-Kompo-
nenten
Um alle Möglichkeiten des Produktes optimal aus-
schöpfen zu können, lesen Sie bitte sorgfältig die
nachfolgenden Installationshinweise. Wir garan-
tieren, dass jedes Gerät vor Versand auf seinen
einwandfreien Zustand überprüft wurde.
Vor Beginn der Installation unterbrechen Sie
den Minusanschluss der Autobatterie. Wir
empfehlen Ihnen, die Installation von einem Ein-
bauspezialisten vornehmen zu lassen, da der
Nachweis eines fachgerechten Einbaus und An-
schlusses des Gerätes Voraussetzung für die Ga-
rantieleistungen sind.
Installieren Sie Ihren PP20/AUX-Verstärker an
einer trockenen Stelle im Auto und vergewissern
Sie sich, dass der Verstärker am Montageort ge-
nügend Kühlung erhält. Montieren Sie das Gerät
nicht in zu kleine, abgeschlossene Gehäuse ohne
Luftzirkulation oder in der Nähe von wärmeab-
strahlenden Teilen oder elektronischen Steue-
rungen des Fahrzeuges.
Im Sinne der Unfallsicherheit muss der Verstärker
professionell befestigt werden. Dieses geschieht
über Schrauben, die in eine Montageäche ein-
geschraubt werden, die wiederum genügend Halt
bieten muss.
Bevor Sie die Schrauben im Montagefeld befes-
tigen, vergewissern Sie sich, dass keine elek-
trischen Kabel und Komponenten, hydraulische
Bremsleitungen, der Benzintank etc. dahinter
verborgen sind. Diese könnten sonst beschädigt
werden. Achten Sie bitte darauf, dass sich solche
Teile auch in der doppelten Wandverkleidung ver-
bergen können.
Allgemeines zum Anschluss des PP20/AUX-
Verstärkers
Der PP20/AUX-Verstärker darf nur in Kraftfahr-
zeuge eingebaut werden, die den 12V-Minuspol
an Masse haben. Bei anderen Systemen kann die
HELIX PP20/AUX und die elektrische Anlage des
Kfz beschädigt werden.
Verwenden Sie zur Verbindung des HELIX
PP20/AUX mit dem Autoradio ausschließlich
das beiliegende HELIX-Anschlusskabel! Die
Verwendung eines anderen Kabels kann zu
Schäden an ihrer Aanlage führen. Die Siche-
rung am Anschlusskabel darf nur mit dem
gleichen Wert (20A) ersetzt werden, um eine
Beschädigung des Gerätes zu verhindern. Hö-
here Werte können zu gefährlichen Folgeschä-
den führen.
Die Kabelverbindungen müssen so verlegt sein,
dass keine Klemm-, Quetsch- oder Bruchgefahr
besteht. Bei scharfen Kanten (Blechdurchfüh-
rungen) müssen alle Kabel gegen Durchscheuern
gepolstert sein. Ferner darf das Versorgungskabel
niemals mit Zuleitungen zu Vorrichtungen des Kfz
(Lüftermotoren, Brandkontrollmodulen, Benzinlei-
tungen etc.) verlegt werden.
Dieser 4-Kanal Plug‘n Play-Verstärker wurde von
uns nach neuesten technischen Erkenntnissen
entwickelt und zeichnet sich durch hervorragende
Verarbeitung und eine überzeugende Anwendung
ausgereifter Technologien aus.
Viel Freude an diesem Produkt wünscht Ihnen das
Team von
AUDIOTEC FISCHER
Herzlichen Glückwunsch!
2
Allgemeine Hinweise
130.com.ua
Autogood products Internet store “130”
86
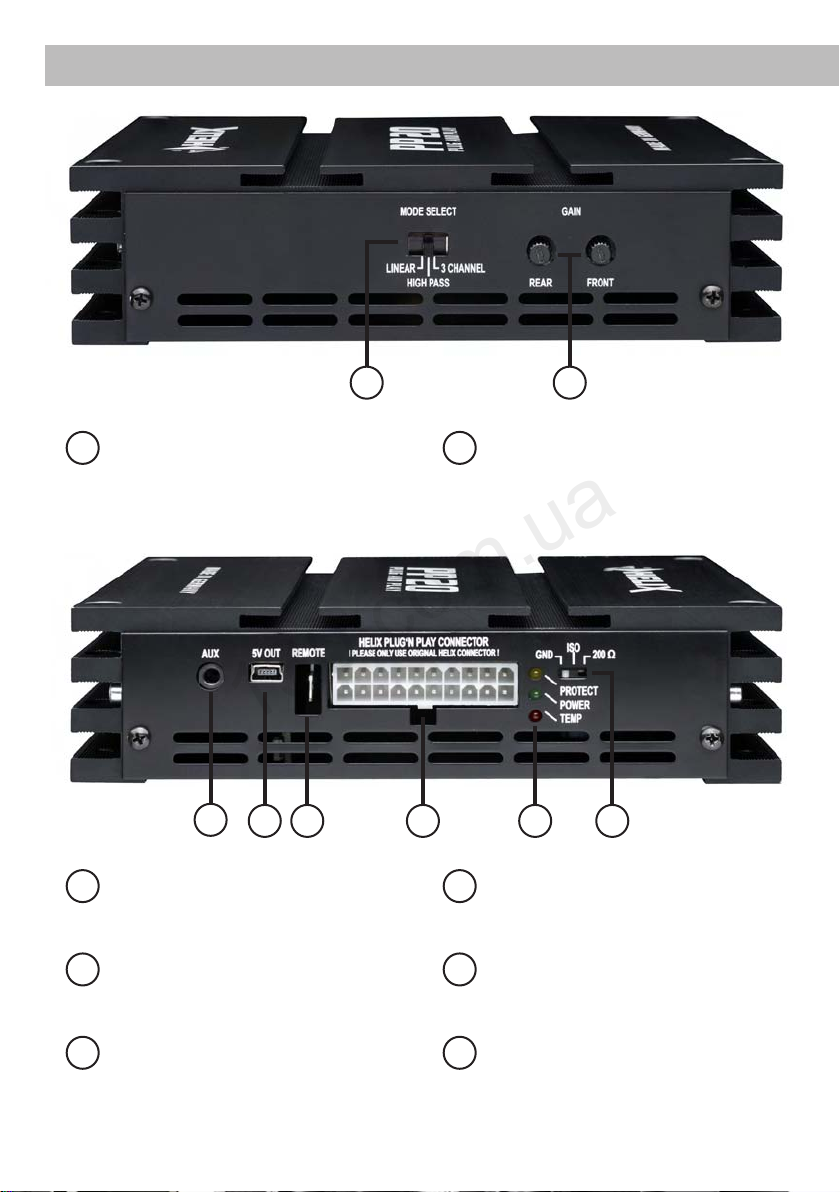
Anschluss- und Bedienelemente
3
3
AUX-Input (nur PP20 AUX)
3,5mm Klinkenbuchse zum Anschluss
von z.B. Navi, Telefon, iPod etc.
3
4
5
6
7
8
45
5V-Ausgang (nur PP20 AUX)
Mini-USB-Buchse zum Auaden von z.B.
Navi, Handy etc.
Remote
Der Remote-Anschluss kann sowohl als
Ein- oder Ausgang benutzt werden.
HELIX Plug‘n Play Connector
Verwenden Sie nur das HELIX Original-
kabel zum Anschluss der PP20/AUX!
CPS - Colour Protection System
Die LEDs zeigen den Betriebszustand
der Endstufe an.
GND-Schalter
Mit Hilfe des Schalters lässt sich die Ver-
bindung zwischen Fahrzeug- und End-
stufenmasse einstellen.
7
Mode Select
Linear, Highpass und 3-Kanal
1 2 Gain
Levelregler für die Kanäle FL+FR und
RL+RR
1 2
130.com.ua
Autogood products Internet store “130”
1 Mode Select
Die PP20/AUX verfügt über drei Anschlussvarian-
ten, die mit diesem Schalter ausgewählt werden
können:
1.1 Linear
Die PP20/AUX wird mit den Front- und Rear-Laut-
sprechern verbunden. Bei dieser Schalterstellung
werden alle Lautsprecher linear betrieben, also
ohne zusätzliche Filter.
1.2 Highpass
Die PP20/AUX wird mit den Front- und Rear-Laut-
sprechern verbunden. Bei dieser Schalterstellung
werden alle Lautsprecher mit einem Hochpasssig-
nal von 80Hz 18dB/oct. betrieben. Diese Schalter-
stellung fungiert als Schutz vor tiefen Frequenzen
unterhalb 80Hz für original Werkslautsprecher mit
geringerer Leistung. Werden die Werkslautspre-
cher durch hochwertige HELIX-Lautsprecher er-
setzt, kann auf diese Einstellung gegebenenfalls
verzichtet werden
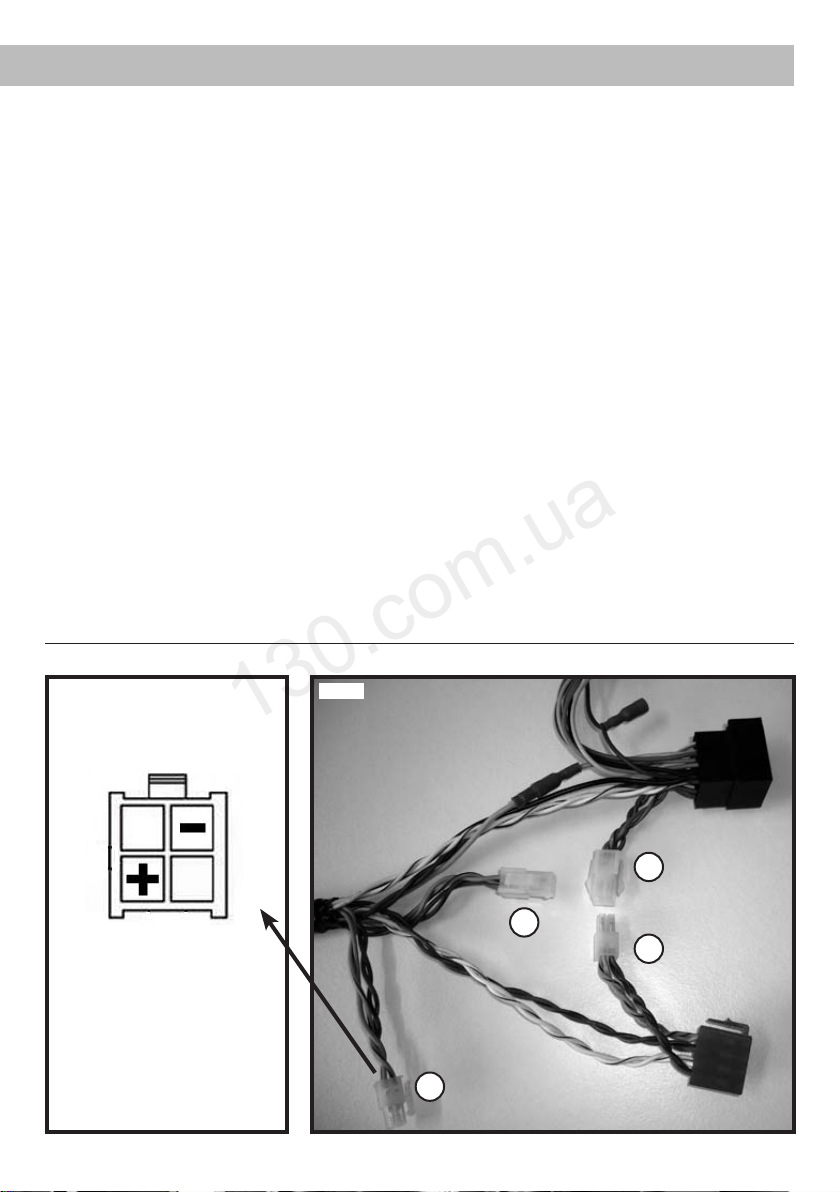
1.3 3-Channel (3-Kanal)
Die PP20/AUX wird in dieser Schalterstellung als
3-Kanal-Verstärker betrieben, d.h. die Front-Laut-
sprechern werden über die beiden Kanäle FR und
FL angesteuert. Die beiden Kanäle für die hin-
teren Lautsprecher RR und RL werden gebrückt
und bilden ein Mono-Signal zum Anschluss eines
passiven Subwoofers. Dazu ist es zwingend erfor-
derlich, die Steckverbindung A/B zu trennen. Die
hinteren Lautsprecher sind damit von der PP20/
AUX entkoppelt. Am Stecker B liegt nun das Si-
gnal für den Subwoofer an. Durch die Brücken-
schaltung ergibt sich hier eine gesteigerte Leistung
von 85/170 Watt RMS/Musik. Die Front-Lautspre-
cher werden nun mit einem Hochpasssignal von
80Hz 18dB/oct. betrieben. Der Anschluss für den
passiven Subwoofer hat die folgenden Werte:
Subsonic-Filter: 25Hz 18dB/oct. • Tiefpass: 115
Hz 18dB/oct. • Bassboost: +3dB bei 45Hz.
Die Impedanz des anzuschließenden Subwoo-
fers muss mindestens 4 Ohm betragen! Wird
die Impedanz unterschritten, kann die Be-
triebssicherheit der PP20/AUX nicht garantiert
werden. Wenn nötig, informieren Sie sich bei
Ihrem Fachhändler.
Durch die Trennung der Steckverbindung A/B
sind die hinteren Lautsprecher RR und RL (falls
werksseitig vorhanden) nicht mehr angeschlos-
sen. Um diese im 3-Kanal-Modus wieder zu ak-
tivieren, können Sie das ursprüngliche Radiosig-
Inbetriebnahme und Funktionen
4
A
C
D
B
Anschlussbelegung
für Subwoofer
(Stecker B)
Das Anschlusskabel mit einer
Länge von 5m (2x1,5mm²) ist
als original HELIX-Zubehör
erhältlich.
HELIX Art.-Nr.: H424900
grün = plus (+)
lila-schwarz = minus (-)
Anschluss eines passiven Subwoofers an die PP20/AUX
Abb.1 Abb.2
130.com.ua
Autogood products Internet store “130”

nal verwenden. Gehen Sie dazu folgendermaßen
vor: Trennen Sie die Steckverbindung C/D und
verbinden Sie die Stecker A und C. So wird
das Radioausgangssignal direkt auf die hinteren
Lautsprecher übertragen. Sie erhalten so ein voll-
wertiges 5-Kanal-System mit einem voluminösen
Klang. Achtung: Da die Rear-Lautsprecher in
diesem Fall (5-Kanal-System im 3-Kanal-Mo-
dus) direkt vom Radio und ohne Einbeziehung
des Verstärkers betrieben werden, kann das
Signal des AUX-Eingangs der PP20 AUX nicht
auf den hinteren Lautsprechern (RR und RL)
wiedergegeben werden.
2 Levelregler
Über die Levelregler wird die Eingangsempnd-
lichkeit für die Kanäle Front und Rear eingestellt.
Achtung: Seien Sie vorsichtig bei der Einstel-
lung der Lautstärke. Überhöhte Pegel, die sich
durch einen verzerrten Klang bemerkbar ma-
chen, können die Lautsprecher beschädigen.
Bitte beachten Sie dazu auf Seite 6 die Aus-
führungen zur Optimierung der Lautstärkeein-
stellung!
3 AUX-Input (nur bei PP20 AUX)
3,5 mm Klinkenbuchse zum Anschluss eines Na-
vigationsgeräts, iPods, mp3-Players etc:
Der intelligente AUX-Eingang der PP20 AUX er-
kennt die eingehenden Signale externer Geräte
automatisch. Nach Anschluss eines externen
Gerätes wird dessen Signal wiedergegeben und
das Radiosignal gemutet. Sollte länger als ca. 3
Sekunden kein Signal am AUX-Input anliegen,
so schaltet der Verstärker automatisch wieder auf
das Radiosignal um.
Hinweis: Der Betriebszustand kann über einen
Schalter, der sich unter dem Bodenblech der PP20
AUX bendet, auf Navigationsmodus umgeschal-
tet werden. Im Navigationsmodus wird das AUX-
Signal nur auf die beiden vorderen Lautsprecher
gegeben und das Radiosignal auf den hinteren
Lautsprechern wird während der Navigationsan-
sage abgesenkt. Bei der Einstellung dieses Mo-
dus ist Ihnen Ihr Fachhändler gerne behilich.
Die Lautstärke für denAUX-Eingang wird direkt am
angeschlossenen Gerät eingestellt. Beachten Sie
bitte, dass die PP20AUX das Signal bei zu geringer
Lautstärke nicht mehr erkennen kann und dann
wieder auf Radiobetrieb umschaltet.
4 5-Volt-Ausgang (nur bei PP20 AUX)
Mini-USB-Buchse zur Stromversorgung von Navi-
gationsgerät, iPod, mp3-Player etc. Die Stromver-
sorgung wird auch bei ausgeschalteter Zündung
aufrechterhalten. Fällt die Batteriespannung unter
11,5 V, so schaltet sich die 5V-Spannung automa-
tisch ab, um die Batterie zu schützen. Der maxi-
male Ladestrom ist auf 500mA begrenzt.
5 Remote
Der Remote-Anschluss kann sowohl als Eingang
oder Ausgang benutzt werden.
Sollte sich der PP20/AUX-Verstärker nicht über
das Autoradio einschalten lassen, können Sie
den 6,3mm Flachstecker als Remote-Eingang
benutzen. Als Ausgang dient er zur Ansteuerung
weiterer Komponenten wie z.B. eines aktiven
Subwoofers.
6 HELIX Plug‘n Play Connector
Die Buchse dient zum Anschluss des mitgeliefer-
ten Kabelbaums. Verwenden Sie zur Verbindung
des HELIX-PP20/AUX-Verstärkers mit dem Auto-
radio ausschließlich das beiliegende HELIX-An-
schlusskabel! Achtung: Die Verwendung ande-
rer oder ähnlicher Kabel kann zur Zerstörung
des Verstärkers, des Autoradios oder der an-
geschlossenen Lautsprecher führen!
7 CPS - Colour Protection System
Die LEDs zeigen den Betriebszustand der End-
stufe an:
rot = Übertemperatur
grün = betriebsbereit
gelb = Unterspannung
8 GND-Schalter
Gelegentlich kann es vorkommen, dass Lichtma-
schinengeräusche auftreten, wenn Radio und Ver-
stärker verschiedene Masseverbindungen nutzen.
Um diese Geräusche zu vermeiden, haben wir die
HELIX PP20 mit verschiedenen Masseverbin-
dungsmöglichkeiten ausgestattet.
GND: NF-Masse und Fahrzeugmasse
sind miteinander verbunden
ISO: Keine Verbindung (isolierte
Masse) zwischen NF-Masse und
Fahrzeugmasse
200 Ohm: NF-Masse und Fahrzeugmasse
sind über einen 200Ohm Wider-
stand miteinander verbunden
5
130.com.ua
Autogood products Internet store “130”

Die HELIX PP20/AUX wird wie nachfolgend be-
schrieben an das Autoradio angeschlossen.
Achtung: Für die Durchführung der nachfol-
genden Schritte werden Spezialwerkzeuge
und Fachwissen benötigt. Um Anschlussfeh-
ler und Beschädigungen zu vermeiden, fragen
Sie im Zweifelsfall bitte Ihren Fachhändler und
beachten Sie zwingend die allgemeinen An-
schluss- und Einbauhinweise (siehe Seite 2)
1. Nachdem das Radio mit Hilfe der entspre-
chenden Werkzeuge ausgebaut ist, trennen Sie
den Fahrzeugkabelbaum vom Autoradio. Verbin-
den Sie den Fahrzeugkabelbaum anschließend
mit den ISO-Kupplungen des HELIX-Anschluss-
kabels (siehe Nr.1, Abb.3).
2. Verbinden Sie die ISO-Stecker des HELIX-
Anschlusskabels mit dem Autoradio (siehe Nr.2,
Abb.3). Je nach Fahrzeugtyp benötigen Sie hier-
für gegebenenfalls einen fahrzeugspezischen
Adapter. Überprüfen Sie bitte anhand der Audio-
tec-Fischer-Fahrzeugliste, ob Sie zum Anschluss
der PP20/AUX einen zusätzlichen Adapter benö-
tigen. Dieses können Sie online unter www.audi-
otec-scher.com in der Sektion Plug‘n Play über-
prüfen.
3. Verbinden Sie das HELIX-Anschlusskabel
mit der HELIX PP20/AUX. (siehe Nr.3, Abb.3)
4. In Bezug auf die Stromversorgung der PP20/
AUX gibt es zwei Alternativen, die nachfolgend
unter 4a und 4b beschrieben sind.
4a. Stromversorgung über den Kabelbaum des
Fahrzeugs: Je nach Fahrzeugtyp können die An-
schlüsse für Zündplus und Dauerplus vertauscht
sein. Die PP20/AUX darf ihre Stromversorgung
jedoch nicht über die Zündleitung beziehen, da
sonst die Kfz-Elektronik beschädigt werden kann.
Aus diesem Grund muss vor der endgültigen
Inbetriebnahme (die Batterie muss wieder ange-
schlossen sein) die Zuordnung von Zündplus und
Dauerplus an den Leitungen E(gelb) und F(blau)
mit einem Voltmeter überprüft werden. Dauerplus
ist die Leitung, an der auch bei ausgeschalteter
Zündung eine Spannung von 12V messbar ist.
Verbinden Sie nach erfolgter Messung das Kabel
Gmit dem Dauerplus (siehe Abb.4a). Die Plus-
leitung des Kabelbaums ist in der Regel mit max.
20A abgesichert.
Sollten Sie sich bezüglich der Zuordnung nicht
sicher sein, fragen Sie Ihren Fachhändler.
4b. Direkte Stromversorgung über Batterie:
Lässt sich der Strombedarf der PP20/AUX nicht
über den Fahrzeugkabelbaum decken (max. 20
A), so haben Sie die Möglichkeit, die Stromversor-
gung der PP20/AUX direkt über die Autobatterie
anzuschließen. Trennen Sie dafür die Kabelver-
bindungen H(Masse) und I (+12V). Das Masseka-
bel muss anschließend (mit Hilfe einer Kabelver-
längerung, min. 1,5mm²) an einem blanken, von
Lackresten befreiten Massepunkt des Kfz-Chas-
sis angeschlossen werden. Vor dem Anschluss
des +12V-Versorgungskabels an das Bordnetz
muss die Autobatterie abgeklemmt werden.
Das +12V-Versorgungskabel ist am Pluspol der
Batterie anzuschließen. Die Plusleitung sollte in
einem Abstand von max. 30cm von der Batterie
mit einer Hauptsicherung (20 A) abgesichert wer-
den. Die nun freien Leitungen Jsind einzeln zu
isolieren. Die Autobatterie ist nun wieder anzu-
schließen (siehe Abb.4b).
Optimierung der Lautstärkeeinstellung: Dre-
hen Sie zur Einstellung der optimalen Lautstär-
ke die Levelregler Front und Rear auf Minimum
(Linksanschlag). Schalten Sie dann das Autoradio
mit seiner maximalen Lautstärke ein (Rechtsan-
schlag) und stellen den Fader auf Front. Danach
drehen Sie den Levelregler Front der PP20/AUX
langsam nach rechts bis Sie ein Verzerren der
Lautsprecher wahrnehmen und drehen dann den
Levelregler wieder ein Stück zurück. Stellen Sie
danach den Fader des Autoradios auf Rear und
wiederholen den Vorgang mit dem Levelregler
Rear. Zum Schluss stellen sie den Fader des Au-
toradios wieder auf Ihre vorher gewählte Einstel-
lung.
Warnhinweis:
Der PP20-Verstärker hat evtl. eine höhere
Leistung als das original Autoradio. Die meis-
ten originalen Lautsprecher können das pro-
blemlos verkraften. Seien Sie jedoch bitte
vorsichtig mit der Einstellung der Lautstärke.
Überhöhte Lautstärken, die sich durch einen
verzerrten Klang bemerkbar machen, können
die Lautsprecher beschädigen.
6
Einbau und Installation
130.com.ua
Autogood products Internet store “130”

2
3
1
JI
H4b
4a
E
F
G
Abb.3
Abb.4a
Abb.4b
7
130.com.ua
Autogood products Internet store “130”

Ausgangsleistung: Mode Select: ............................Linear oder Highpass
• pro Kanal an 4 Ohm: .............................................4x30/60 Watt RMS/Musik
Ausgangsleistung: Mode Select: ............................3 Channel
• an 2x4 Ohm Front-System: ...................................2x30/60 Watt RMS/Musik
und Subwoofer 4 Ohm: .........................................1x85/170 Watt RMS/Musik
Frequenzbereich.........................................................10 Hz - 40 kHz
Klirrfaktor (THD) .........................................................< 0,022%
Geräuschspannungsabstand......................................> 95 dB
Dämpfungsfaktor ........................................................>200
Eingangsimpedanz.....................................................68 Ohm
Hochpass....................................................................80 Hz 18dB/oct.
Subsonic (3-Kanal-Modus).........................................25 Hz 18dB/oct.
Tiefpass (3-Kanal-Modus) ..........................................115 Hz 18dB/oct.
Bassboost (3-Kanal-Modus).......................................3,5 dB bei 45Hz
Sicherung ...................................................................20 A
Abmessungen (H x B x T) in mm................................42 x 167 x 140
Gewicht netto..............................................................1,1 kg
HELIX-Produkte geniessen aufgrund ihres hohen
Qualitätsniveaus international eine ausgezeichne-
ten Ruf. Daher gewähren wir eine Garantie von zwei
Jahren. Die Produkte werden während der gesam-
ten Fertigung ständig kontrolliert und geprüft. Bitte
beachten Sie im Servicefall folgende Hinweise:
1. Die 2jährige Garantiezeit beginnt mit dem Kauf
des Produktes und gilt nur für den Erstbesitzer.
2. Während der Garantiezeit beseitigen wir etwaige
Mängel, die nachweislich auf Material- oder Fabri-
kationsfehlern beruhen, nach unserer Wahl durch
Austausch oder Nachbesserung der defekten
Teile. Weitergehende Ansprüche, insbesondere
auf Minderung, Wandlung, Schadenersatz oder
Folgeschäden sind ausgeschlossen. Ersetzte Teile
gehen in das Eigentum von Audiotec Fischer über.
Die Garantiezeit wird von einer Garantieleistung
durch uns nicht berührt.
3. Am Produkt dürfen keine unsachgemäßen Ein-
griffe vorgenommen worden sein.
4. Bei Inanspruchnahme der Garantie wenden Sie
sich bitte zuerst an Ihren Fachhändler. Sollte es
notwendig sein, das Produkt an uns einzuschicken,
so beachten Sie bitte folgende Hinweise:
a) Das Produkt muss in einwandfreier Originalver-
packung verschickt werden.
b) Das Produkt muss frachtfrei zugestellt werden,
d.h. Porto und Risiko gehen zu Ihren Lasten
c) Die Kaufquittung muss beiliegen.
5. Von der Garantie ausgenommen sind:
a) Transportschäden, sichtbar oder unsichtbar
(Reklamationen solcher Schäden müssen so-
fort bei der Transportrma eingereicht werden)
b) Kratzer in Metallteilen, Frontabdeckungen usw.
Diese Defekte müssen innerhalb von 5 Tagen
nach Kauf direkt bei Ihrem Fachhändler rekla-
miert werden.
c) Fehler, die durch fehlerhafte Montage, falschen
Anschluss, unsachgemäße Bedienung, Bean-
spruchung oder äußere gewaltsame Einwirkung
entstanden sind.
d) Unsachgemäß reparierte oder geänderte Ge-
räte, die von anderer Seite als von uns geöffnet
wurden.
e) Folgeschäden an fremden Geräten.
f) Kostenerstattung bei Schadensbehebung durch
Dritte ohne unser vorheriges Einverständnis.
g) Geräte mit entfernten Typenschildern oder
Seriennummern.
Technische Daten
Garantiebestimmungen
8
130.com.ua
Autogood products Internet store “130”

Dear Customer,
Congratulations on purchasing this high-quality
HELIX-product.
For the rst time, HELIX sets standards in the
emerging plug‘n play market with the new ampli-
er PP20/AUX. Again, HELIX highlights best qua-
lity, excellent manufacturing and state-of-the-art
technology. After almost 30 years of experience in
General installation instructions for HELIX-
components
To nd out how this HELIX amplier works best
for you, read this manual carefully and follow the
instructions for installation. We guarantee that this
product has been checked for proper functioning
before shipping.
Before you start installation, disconnect the
car battery at the minus pole. We would urge
you to have the installation work carried out by a
specialist as verication of correct installation and
connection of the unit is a prerequisite for warranty
cover of this HELIX product.
Install your HELIX PP20/AUX at a dry location
where there is sufcient air circulation to ensure
adequate cooling of the equipment. For safety
reasons, the amplier must be secured in a pro-
fessional manner. This is performed by means of
the xing screws screwed into a mounting surface
offering sufcient retention and stability.
Before drilling the holes for the screws, carefully
examine the area around the installation position
and make sure that there are no electrical cables
or components, hydraulic brake lines or any part
of the petrol tank located behind the mounting
surface - otherwise these could be damaged. You
should be aware of the fact that such components
may also be concealed in the double-skin trim pa-
nels/mouldings.
General instruction for connecting the HELIX
PP20/AUX amplier
The HELIX PP20/AUX may only be installed in
motor vehicles which have a 12-volt minus pole
connected to the chassis ground. Any other sys-
tem could cause damage to the amplier and the
electrical system of the vehicle.
Please do only use the provided HELIX cable
for the connection of the PP20/AUX. The use of
other or similar cables can result in the dama-
ge of the amplier, of the head unit / radio or
the connected loudspeakers!
The fuse of the HELIX cable must only be re-
placed by an identical fuse (20A) in order to
avoid the damage of the amplier. Moreover,
the use of fuses with higher Ampere values
can result in serious consequential damages
and losses.
Install the cabling in a manner which precludes
any danger of the leads being exposed to shear,
crushing or rupture forces. If there are sharp
edges in the vicinity (e.g. holes in the bodywork)
all cables must be cushioned and protected to pre-
vent fraying. Never lay the power supply cables
adjacent to leads and lines connecting other ve-
hicle equipment (fan motors, re detection mo-
dules, gas lines etc.).
the research and development of audio products
this plug‘n play amplier is another milestone con-
cerning sound quality.
We wish you many hours of enjoyment with your
new HELIX PP20/AUX.
Yours,
AUDIOTEC FISCHER
Congratulations!
9
General instructions
130.com.ua
Autogood products Internet store “130”

86
Connectors and Control Units
3
AUX-Input (only PP20 AUX)
3,5mm jack plug for connecting e.g. navi-
gation system, handsfree set, iPod etc.
3
4
5
6
7
8
45
5V-Output (only PP20 AUX)
5V Mini-USB Charger for navigation
system or additional external device
Remote
The Remote connector can be used as
an input or an output.
HELIX Plug‘n Play Connector
Do only use the original HELIX Cable for
connecting the PP20/AUX!
CPS - Colour Protection System
The LEDs show the operation mode of
the amplier.
GND-Isolation-Switch
By using this switch you can use the
alternative grounding connections of
vehicle or amplier.
7
Mode Select
Linear, Highpass and 3-Channel
1 2 Gain
Level controls for the channels FL+FR
and RL+RR
1 2
10
130.com.ua
Autogood products Internet store “130”

11
Cont. power rating: Mode Select: ............................Linear or Highpass
• per Channel at 4 Ohms: ........................................4x30/60 Watts RMS/Music
Cont. power rating: Mode Select: ............................3 Channel
• at 2x4 Ohms Front-System: ..................................2x30/60 Watts RMS/Music
and Subwoofer 4 Ohms: ........................................1x85/170 Watts RMS/Music
Frequency Range.......................................................10 Hz - 40 kHz
Total harmonic distortion (THD)..................................< 0,022%
Signal to noise ratio....................................................> 95 dB
Damping factor ...........................................................>200
Input Impedance.........................................................68 Ohms
Highpass.....................................................................80 Hz 18dB/oct.
Subsonic (3-Channel-Mode).......................................25 Hz 18dB/oct.
Lowpass (3-Channel-Mode) .......................................115 Hz 18dB/oct.
Bassboost (3-Channel-Mode).....................................3,5 dB bei 45Hz
Fuse............................................................................20 A
Dimensions (H x B x T) in mm....................................42 x 167 x 140
Weight net. .................................................................1.1 kgs
Due to the high quality standard Helix products
achieved an excellent international reputation. The-
refore we grant a warranty period of 2 years. The
products are checked and tested carefully during
the entire production process. In the case of service
note the following:
1. The 2 years warranty period commences with the
purchase of the product and is applicable only to
the original owner.
2. During the warranty period we will rectify any
defects due to faulty material or workmanship by
replacing or repairing the defective part at our deci-
sion. Further claims, and in particular those for pri-
ce reduction, cancellation of sale, compensation for
damages or subsequential damages, are excluded.
The warranty period is not altered by the fact that
we have carried out warranty work.
3. Unauthorized tampering with the product will in-
validate this warranty.
4. Consult your authorized dealer rst, if warranty
service is needed. Should it be necessary to return
the product to the factory, please ensure that
a) the product is packed in original factory packing
in good condition.
b) the warranty card has been lled out and atta-
ched to the product.
c) the product is shipped prepaid, i.e. at your ex-
pense and risk.
d) the receipt/invoice as proof of purchase is en-
closed.
5. Excluded from the warranty are:
a) Shipping damages, either readily apparent or
concealed (claims for such damages must be
immediately notied to the forwarding agent).
b) Scratches in metal parts, front panels or covers
etc. This must be notied to your dealer within 5
days of purchase.
c) Defects caused by incorrect installation or con-
nection, by operation errors, by overloading or
by external force.
d) Products which have been repaired incorrect-
ly or modied or where the product has been
opened by other persons than us.
e) Consoquential damages to other equipments.
f) Reimbursement when repairing damages by
third parties without our previous permission.
g) Products with removed serial numbers.
Technical Data
Warranty Regulations
130.com.ua
Autogood products Internet store “130”
12
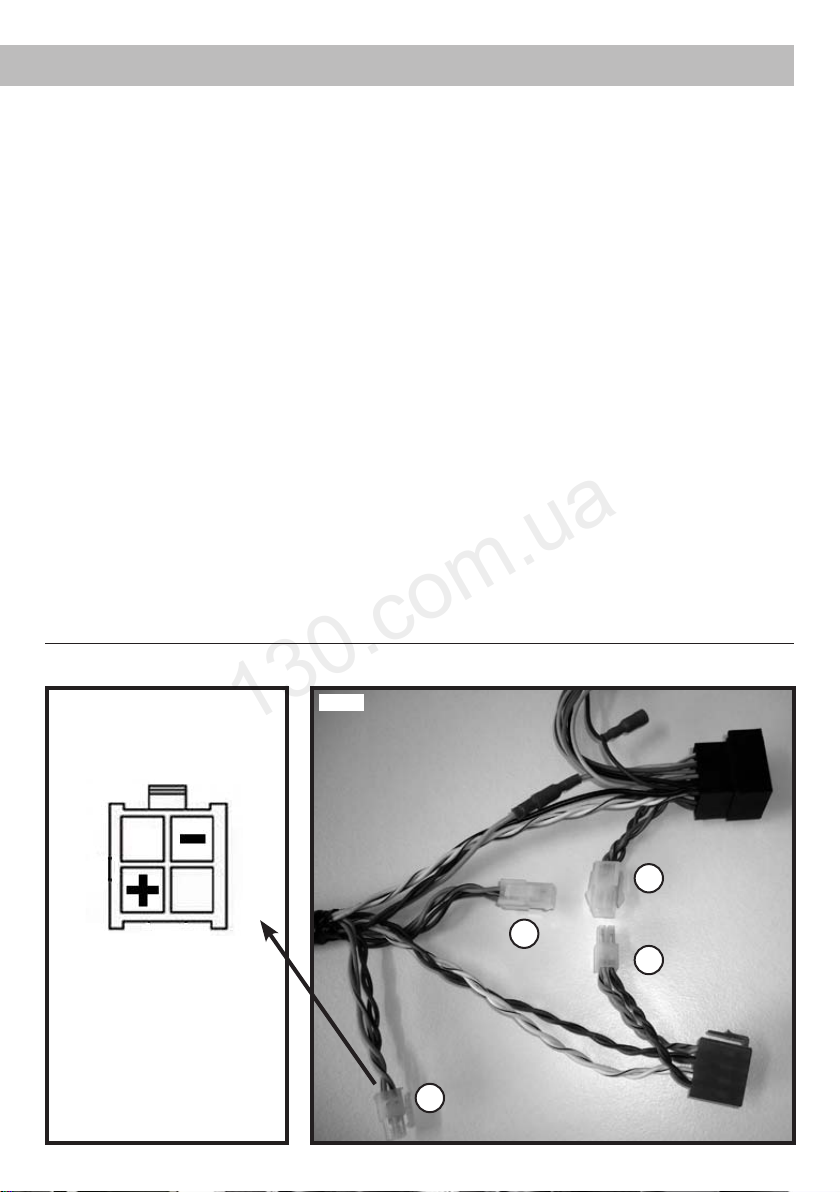
A
C
D
B
Pin assignment
for subwoofer
(Connector B)
The Connection cable with a
lenght of 5m (2x1,5mm²) is
available as original HELIX-
accessory.
HELIX Art.-Nr.: H424900
green = plus (+)
purple-black = minus (-)
Connection of a passive subwoofer to the PP20/AUX
Fig.1 Fig.2
1 Mode Select
The PP20/AUX has three connecting modes which
can be chosen by using this switch:
1.1 Linear
The PP20/AUX is connected to the front- and rear-
loudspeakers. In this mode all loudspeakers are
driven in a linear mode, this means without any
lters.
1.2 Highpass
The PP20/AUX is connected to the front- and
rear-loudspeakers. In this mode all loudspeakers
are driven with a highpass signal of 80Hz 18dB/
oct. This mode works as protection against low
frequencies below 80Hz for loudspeakers of the
original factory system with only little power. You
can do without this mode if you replace the lou-
dspeakers of the factory system by high quality
HELIX- loud-speakers.
1.3 3-Channel
In this mode the PP20/AUX works as a 3-Chan-
nel-Amplier, i.e. the front loudspeakers are driven
via the two channels FR and FL. The two channels
for the rear loudspeakers RR and RL are bridged
and form a mono signal for connecting a passive
subwoofer. To do so, it is mandatory to disconnect
the connection A/B. The rear loudspeakers are
now decoupled from the PP20/AUX. The connec-
tor B now carries the subwoofer signal. By brid-
ging the two channels output power will increase
to 85/170 Watts RMS/Music. Moreover, the front
loudspeakers are driven with a highpass signal
of 80Hz 18dB/oct. The connection of the passive
subwoofer works with the following technical data:
Subsonic lter: 25Hz 18dB/oct. • Lowpass: 115
Hz 18dB/oct. • Bassboost: +3dB bei 45Hz.
Your passive subwoofer must at least have an
impedance of 4 Ohms! If you fall below this im-
pedace the operating safety of the PP20/AUX
can not be guaranteed. If necessary, contact
your dealer for further information.
By disconnecting the connection A/B, the rear
loudspeakers (if part of your factory system) are
no longer connected to the system. In order to
reactivate them in the 3-channel mode, you can
make use of the original radio signal. Please pre-
cede as follows:
Disconnect the connection C/D and connect the
connectors A and C. Thus, the radio output signal
is directly transmitted to the rear loudspeakers.
Initial start-up and functions
130.com.ua
Autogood products Internet store “130”

13
You now have an adequate 5-channel system
with a voluminous sound. Caution: In this case
(5-channel system in a 3-channel mode), the
rear loudspeakers are driven by the radio sig-
nal without inclusion of the amplier. Thus, the
signal of the AUX-Input of the PP20 AUX can
not be reproduced via the rear loudspeakers
RR and RL.
2 Level controls for input sensitivity
These controls can be used to match the input
sensitivity for the channels front and rear.
Caution: Please be very careful with the volume
if you set up the input sensitivity. To prevent
damage to the loudspeakers, avoid excessive
volume for too long periods which is noticable
by an unpleasant distorted sound. Please no-
tice the chapter on optimizing the volume set
up on page 14 of this manual!
3 AUX-Input (only PP20 AUX)
3,5 mm jack plug for connecting a navigation sys-
tem, iPod, mp3-players etc:
The intelligent AUX-Input of the PP20 AUX auto-
matically detects input signals of external devices.
After connecting an external device to the PP20
AUX, its signal will be rendered and the radio si-
gnal will be muted. If there is no signal for more
than ca. 3 seconds at the AUX-Input, the amplier
automatically switches back to the radio signal.
Please note: The operation mode can be swit-
ched to navigation mode via a switch below the
bottom plate. In the navigation mode the AUX si-
gnal is only transmitted to the two front loudspea-
kers and the radio signal on the two rear speakers
is lowered during the navigation announcements.
Please contact you dealer for further informa-
tion or assistance.
The volume of the AUX-Input has to be set up
direcly at the extenal device. Please note that
the PP20 AUX will not detect the signal if the
volume of the external device is too low. In this
case it will automatically render the radio signal.
4 5-V-Output (only PP20 AUX)
5V Mini-USB Charger for the power supply of a
navigation system, iPod, mp3-player etc. The
power supply is also provided if the PP20 AUX is
switched off. If the battery voltage falls below 11.5
V, the voltage switches off automatically in order to
protect the battery. The maximum charge current
is limited to 500mA.
5 Remote
The Remote connector can be used as an input
or an output.
If the PP20/AUX cannot be switched on via the
radio, you can use the 6.3mm blade terminal as
input. Using it as an output, you can control further
external devices with this blade terminal, such as
an active subwoofer.
6 HELIX Plug‘n Play Connector
The connector has to be used for connecting the
provided cable harness. Please use the provided
HELIX cable for this connection exclusively! Cau-
tion: The use of other or similar cables can re-
sult in the damage of the amplier, of the head
unit / radio or the connected loudspeakers!
7 CPS - Colour Protection System
The LEDs show the operation mode of the am-
plier:
red = overheating
green = in operation
yellow = undervoltage
8 GND-Schalter
Occasionally alternator noise may appear in a
system because the source unit and amplier are
using different grounding schemes. To help in this
situation, we have provided alternative grounding
connections.
GND: Signal ground and vehicle ground
are connected
ISO: Signal ground and vehicle ground
are not connected (isolated ground)
200 Ohm: Signal ground and vehicle ground
are connected via a 200 ohms
resistor
130.com.ua
Autogood products Internet store “130”

14
The HELIX PP20/AUX has to be connected to
the head unit (radio) as follows:
Caution: For carrying out the following steps
you will need special tools and technical know-
ledge. In order to avoid connection mistakes
and damages, please ask your dealer for help
if you have any questions and please follow
the mandatory instructions on page 9 of this
manual.
1. After removing the head unit / radio from the
radio slot by using the respective tools, disconncet
the vehicle cable harness from the head unit / ra-
dio. Afterwards, connect the vehicle cable harness
to the ISO terminals of the HELIX cable harness
(compare No.1, Fig.3).
2. Connect the ISO terminals of the HELIX cable
harness to the head unit / radio (compare No.2,
Fig.3). According to your vehicle type, you might
need a specic adapter. Please check our vehicle-
list (compare the plug‘n play section on www.audi-
otec-scher.com) for nding out if you need such
an additional adapter for installing the PP20/AUX.
3. Connect the HELIX cable harness to the
PP20/AUX. (compare No.3, Fig.3)
4. Concerning the power supply of the PP20/
AUX there are two alternatives which are descri-
bed in the chapters 4a and 4b.
4a. Power supply via vehicle cable harness: De-
pending on the vehicle type, the connectors for
ignition-plus and permanent-plus can be altered.
The PP20/AUX must not be powered via the igni-
tion plus because this might result in a damage of
the vehicle‘s electronic circles. Thus, the assign-
ment ignition-plus and permanent-plus (the batte-
ry has to be connected again) has to be checked
before the nal start of operation at the cables
E(yellow) and F (blue) with a voltmeter. Perma-
nent-plus is the cable where you a messure a 12V
signal if the ignition of the car is switched off.
After measuring, connect cable Gto the perma-
nent plus (compare Fig.4a). the plus-cable of the
cable harness is normally secured by a fuse of
max. 20A.
If you are not sure with the assignment of igni-
tion-plus and permanent-plus, please ask your
dealer for help.
4b. Direct power supply via the battery:
If the power supply of the PP20/AUX cannot be
provided via the vehicle cable harness (max. 20
A), you can connect the PP20/AUX directly to the
car battery. To do so, disconnect the connection
H(ground) and I (+12V). Afterwards, the ground
cable should be connected to a central ground re-
ference point (this is located where the negative
terminal of the battery is grounded at the metal
body of the vehicle), or to a bright bare-metal loca-
tion on the vehicle chassis, i.e. an area which has
been cleaned of all paint residues. Before you
undergo this step, disconnect the car battery
at the minus pole. Connect the +12V power ca-
ble to the positive terminal of the battery. The plus
cable from the battery for the complete system
should be provided with a main fuse (20 A) at a
distance of max. 30cm from the battery. Each of
the cables Jwhich are now out of use has to be
insulated. You can now reconnect the car battery
(compare Fig.4b).
Optimizing the volume set up: In order to set up
the ideal volume, turn the level controls Front an
Rear to the minimum (left stop). Now switch on the
head unit / radio with its maximum volume (right
stop) and turn the fader to front. Afterwards, turn
the level control Front of the PP20/AUX slowly to
the right until you can realize a slight speaker dis-
tortion. Now, turn the level control a little bit back
to the left. Turn the fader of the head unit / radio to
rear and repeat the procedure with the level cont-
rol Rear. Finally, turn the fader back to its original
position.
Caution:
Caution: The PP20/AUX might have more pow-
er than your head unit / radio. Most factory
system loudspeakers can cope with this easi-
ly. Nevertheless, please be very careful with
the volume control. Excessive volumes can
result in a distorted sound and can damage
the loudspeakers.
Installation
130.com.ua
Autogood products Internet store “130”

15
2
3
1
JI
H4b
4a
E
F
G
Fig.3
Fig.4a
Fig.4b
130.com.ua
Autogood products Internet store “130”

Audiotec Fischer GmbH
Gewerbegebiet Lake II · Hünegräben 26 · D-57392 Schmallenberg
Tel.: +49 (0) 2972-97880 · Fax: +49 (0) 2972-978888
E-mail: helix@audiotec-scher.com · Internet: www.audiotec-scher.com
130.com.ua
Autogood products Internet store “130”
Table of contents
Languages:
Other HELIX Car Amplifier manuals

Popular Car Amplifier manuals by other brands

JL Audio
JL Audio Slash 450/4 user guide

Carson
Carson SA-500-10 14V Installation and operating manual

Audiosystem
Audiosystem X Series owner's manual

MB QUART
MB QUART Nautic NAA 665 Installation and operation

PowerAcoustik
PowerAcoustik STAX-1200/4 brochure

PowerAcoustik
PowerAcoustik Crypt CPT1-1500 owner's manual


