HENX HSX1420 User manual
1/30
WARNING : To reduce the risk of injury, user must read this manual before assembling, opera ng
and maintaining this unit, You are responsible for opera ng the product properly & safely.
FOR SERVICE CALL: 1-866-678-8989
20INCH SINGLE-STAGE SNOW BLOWER

2/30
WARNING!
Read the following instructions before using the product!
These instructions below are for your safety. Please read through them
thoroughly before use and retain them for future reference. Familiarise yourself
with them to reduce hazards like personal injuries and damage to property.
TABLE OF CONTENTS
Safety Rules.………………….……………………………………………………………………………2
Symbols..……………………………………………………………………………………………………6
Product Specifications.……….………………………………………………………………………9
Know Your Snow Blower..….……………………………………………………………………10
Assembly……….…..……………………………………………………………………………………11
Operation…………………………………………………………………………………………………15
Maintenance…………………….………………………………………………………………………20
Toubleshooting…………………………………………………………………………………………25
Exploded View……………….…………………………………………………………………………26
Part List………………………….…………………………………………………………………………28
SAFETY RULES
Safety warnings
1. This product is not intended for use
by persons (including children) with
reduced physical, sensory or mental
capabilities, or lack of experience and
knowledge, unless they have been
given supervision or instruction
concerning use of the product by a
person responsible for their safety.
2. Children should be supervised to
ensure that they do not play with the
product.
Training
1. Read the operating and service
instruction manual carefully. Be
thoroughly familiar with the controls
and the proper use of the product.
Know how to stop the product and
disengage the controls quickly.
2. Never allow adults to operate the
product without proper instruction.
3. Keep the area of operation clear of all
persons, particularly small children,
and pets.
4. Exercise caution to avoid slipping or
falling, especially when operating in
reverse.
Preparation
1. Thoroughly inspect the area where
the product is to be used and remove
all doormats, sleds, boards, wires,
and other foreign objects.

3/30
2. Disengage all clutches and shift into
neutral before starting the engine.
3. Do not operate the product without
wearing adequate winter garments.
Wear footwear, which will improve
footing on slippery surfaces.
4. Handle fuel with care; it is highly
flammable.
Use an approved fuel container.
Never add fuel to a running or hot
engine.
Fill fuel tank outdoors with
extreme care. Never fill fuel tank
indoors.
Replace gasoline caps securely and
wipe up spilled fuel.
5. Use a grounded three-wire plug-in for
all units with electric drive motors or
electric starting motors.
6. Adjust the collector housing height to
clear gravel or crushed rock surface.
7. Never attempt to make any
adjustments while the engine is
running (except where specifically
recommended by manufacturer).
8. Let engine and product adjust to
outdoor temperatures before starting
to clear snow.
9. The operation of any powered
product can result in foreign objects
being thrown into the eyes. Always
wear safety glasses or eye shields
during operation or while performing
an adjustment or repair.
Operation
1. Do not put hands or feet near or
under rotating parts. Keep clear of
the discharge opening at all times.
2. Exercise extreme caution when
operating on or crossing gravel drives,
walks, or roads. Stay alert for hidden
hazards or traffic.
3. After striking a foreign object, stop
the engine, remove the wire from the
spark-plug, thoroughly inspect the
product for any damage, and repair
the damage before restarting and
operating the product.
4. If the product should start to vibrate
abnormally, stop the engine and
check immediately for the cause.
Vibration is generally a warning of
trouble.
5. Stop the engine whenever you leave
the operating position, before
unclogging the collector/impeller
housing or discharge guide, and when
making any repairs, adjustments, or
inspections.
6. When cleaning, repairing, or
inspecting, make certain the
collector/impeller and all moving
parts have stopped. Disconnect the
spark—plug wire, and keep the wire
away from the plug to prevent
accidental starting.
7. Do not run the engine indoors, except
when starting it and for moving the
product in or out of the building.
Open the outside doors; exhaust
fumes are dangerous.
8. Do not clear snow across the face of
slopes. Exercise extreme caution
when changing direction on slopes.
Do not attempt to clear steep slopes.
9. Never operate the product without

4/30
proper guards, plates or other safety
protective devices in place.
10. Never operate the product near glass
enclosures, automobiles, window
wells, offs, etc. without proper
adjustment of the snow discharge
angle. Keep children and pets away.
11. Do not overload the product capacity
by attempting to clear snow at too
fast a rate.
12. Never operate the product at high
transport speeds on slippery surfaces.
Use care when reversing.
13. Never direct discharge at bystanders
or allow anyone in front of the
product.
14. Disengage power to the
collector/impeller when product is
transported or not in use.
15. Use only attachments and
accessories approved by the
manufacturer of product (such as
wheel weights, counterweights, cabs,
etc.).
16. Never operate the product without
good visibility or light. Always be sure
of your footing, and keep a firm hold
on the handles. Walk; never run.
17. Do not carry passengers.
18. Never operate the product without
good visibility or light.
19.Take all possible precautions when
leaving the product unattended.
Disengage the power take-off, lower
the attachments, shift into neutral,
set the parking brake, stop the engine
and remove the key.
Maintenance and storage
Check shear bolts; engine-mounted bolt,
etc., at frequent intervals for proper
tightness to be sure the product is in
safe working condition.
1. Never store the product with fuel in
the fuel tank inside a building where
ignition sources are present such as
hot water and space heaters, clothes
dryers, etc. Allow the engine to cool
before storing in any enclosure.
2. Always refer to owner’s guide
instructions for important details if
the product is to be stored for an
extended period.
3. Maintain or replace safety and
instructions labels, as necessary.
4. Keep run the product few minutes
after throwing snow to prevent
freeze-up of the collector/impeller.
Additional warnings
1. If the product starts to vibrate
abnormally, check it immediately.
Excessive vibration can cause injury.
2. Always ensure the product is fully
assembled before using it. Never
attempt to use an incomplete product
or one fitted with an unauthorised
modification.
3. Do not overload the product.
Fuel handling
1. Follow the maintenance and repair
instructions for this product. Never
carry out any modifications of the
product. Never change the preset
rotary speed or the engine and
product settings. Information about

5/30
maintenance and repair is provided
in this user manual.
2. Never carelessly touch the product,
you can burn yourself. While the
product is in operation or shortly
thereafter, its parts such as the
exhaust pipe, engine, and other
surfaces are extremely hot! Pay
attention to the markings on the
product.
3. Make sure that the air intake of the
combustion engine is clear. Keep the
air intake free of dust, dirt particles,
gases and fumes.
4. Make sure that air circulation is
adequate and good. The product
must be easily accessible from all
sides.
5. Always switch the product off and let
it cool down, before refuelling it. Fuel
is highly flammable. Never smoke
when you are refuelling the product.
Do not refuel the product if there is
an open fire in the vicinity!
6. Always use suitable aids such as
funnels and filler necks. Do not spill
any fuel on the product or its exhaust
system. There is a risk of ignition.
However, if fuel should be spilled,
then you must remove it carefully
from all parts of the product. Any
residue which may be present must
be completely removed, before the
product is operated!
7. Exhaust gases and fuel fumes are
noxious. Fuel fumes can ignite. Never
use the product in environments
where there is a risk of explosion.
8. Never breathe in any fuel fumes,
when you are refuelling the product.
Never fill the tank in enclosed spaces,
such as basements or sheds. There is a
risk of poisoning and explosion!
9. Avoid skin contact with fuel.
10. Do not eat or drink, while you are
refuelling the product. If you have
swallowed fuel or oil, or if fuel or oil
has got into your eyes, then seek
medical advice immediately.
11. Close the tank lid immediately after
filling the tank. Make sure that it is
properly closed.
12. Do use caution when handling fuel.
To avoid any accidental fires, move
the product at least 3 metres (10’)
from the fuelling point before
starting the engine.
13. If fuel is ignited, put out the fire with
a dry powder fire extinguisher.
Vibration and noise reduction
To reduce the impact of noise and
vibration emission, limit the time of
operation, use low-vibration and
low-noise operating modes as well as
wear personal protective equipment.
Take the following points into account to
minimize the vibration and noise
exposure risks:
1. Only use the product as intended by
its design and these instructions.
2. Ensure that the product is in good
condition and well maintained.
3. Use correct accessories for the
product and ensure they in good
condition.

6/30
4. Keep tight grip on the handles/grip
surface.
5. Maintain this product in accordance
with these instructions and keep it
well lubricated (where appropriate).
6. Plan your work schedule to spread any
high vibration tool use a longer period
of time.
Emergency
Familiarise yourself with the use of this
product by means of this instruction
manual. Memorise the safety directions
and follow them to the letter. This will
help to prevent risks and hazards.
1. Always be alert when using this
product, so that you can recognise
and handle risks early. Fast
intervention can prevent serious
injury and damage to property.
2. Stop the engine and unplug the spark
plug connector if there are
malfunctions. Have the product
checked by a qualified professional
and repaired, if necessary, before you
operate it again.
3. In case of fire stop the engine and
unplug the spark plug connector. Take
fire-extinguishing measures
immediately if the garden power tool
switch is no longer accessible.
WARNING! Never use
water to extinguish a
product on fire. Burning
fuel must be extinguished with special
extinguishing agents! We recommend
that you keep a suitable fire
extinguisher within reach in your work
area!
Residual risks
Even if you are operating this product in
accordance with all the safety
requirements, potential risks of injury
and damage remain. The following
dangers can arise in connection with
the structure and design of this product:
Symbols
1. Health defects resulting from
vibration emission if the product is
being used over long periods of time
or not adequately managed and
properly maintained.
2. Injuries and damage to property due
to broken application tools or the
sudden impact of hidden objects
during use.
3. Danger of injury and property
damage caused by flying objects.
4. Burns, if touching hot surfaces.
WARNING! This product
produces an
electromagnetic field
during operation!This field
may under some circumstances
interfere with active or passive medical
implants! To reduce the risk of serious
or fatal injury, we recommend persons
with medical implants to consult their
doctor and the medical implant
manufacturer before operating this
product!

7/30
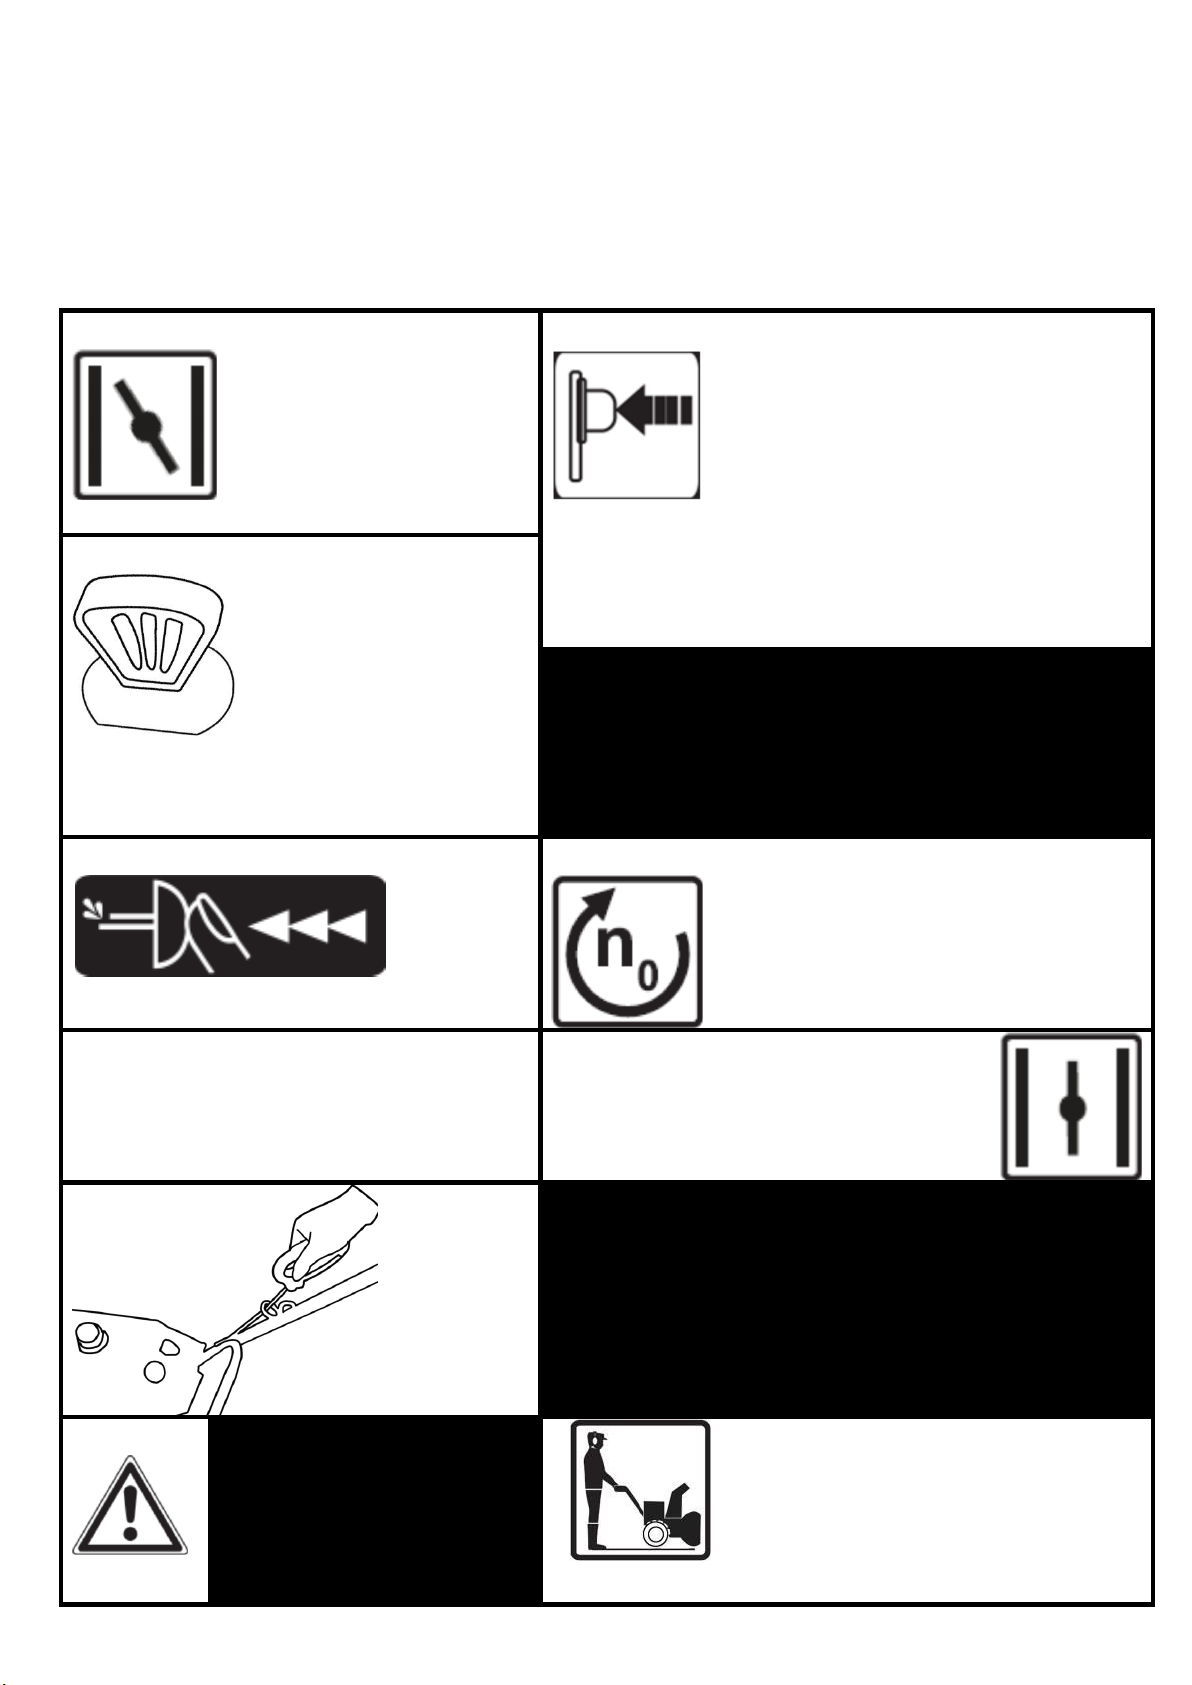
Symbol Illustration Symbol Illustration
Note
Open flames in the work
area, around the product
and in the vicinity of
flammable materials are
prohibited!
Warning.
Do not smoke in the work
area, around the product
and in the vicinity of
flammable materials!
Read the instruction
manual.
Do not expose the product
to rain or wet conditions.
Wear hearing protection.
Wear eye protection.
Risk of fire / flammable
materials
Wear protective gloves.
Switch the engine off while
you are refilling the tanks!
Wear protective,
slip-resistant footwear.
Do not open or remove
safety shields while engine
is running.
Objects thrown by the
product could hit the user
or other bystanders. Always
ensure that other people
and pets remain at a safe
distance from the product
when it is in operation. In
general, children must not
come near the area where
the product is.
When cleaning, repairing,
or inspecting, make certain
that all mowing parts have
stopped. Disconnect the
spark plug connector, and
keep the connector away
from the plug to prevent
accidental starting.
Wait until all moving parts
have come to a complete
stop before touching them.
Auger continues to rotate
after the product is
switched off.
Only add unleaded fuel.

8/30
Do not operate this
machine in house
Add engine oil (Oil has
been drained for shipping.
And the engine must be
filled before beginning to
operater). Oil type 5W-30.
Warning! Avoid injury from
rotating working tool -
keep hands, feet and
clothing away.
Primer (press 3 times)
Warning! Keep hands out of
inlet and discharge
openings while machine is
running ,There are rotating
blades inside
Choke –CLOSE position
Warning! Rotating
impeller, keep fingers /
hand away.
Choke –OPEN position
Do not operate on steep
slopes!
Ignition key(if equipped)
O : STOP position
I: START position
This product produces
noxious exhaust fumes. If
the product is used
improperly, these fumes
can lead to poisoning, a loss
of consciousness or death!
Electric start button (if
equipped)
Hot surface, do not touch.
High temperatures on the
product’s surfaces and
structural parts that could
cause burns, if they are
touched. The product can
also stayhot for a longer
period of time after
operation!
Auger control lever (if
equipped):
O : STOP position
I : RUN position

9/30
PRODUCT SPECIFICATIONS
Model #
Description Single-stage Snowthrower
Oil tank capacity 0.35L/11.8 OZ.
Engine oil type 5W-30
Fuel tank capacity 1.6L/0.4Gal
Fuel type #93, unleaded fuel
Engine type 4-stroke
Start mode Recoil start
Engine displacement 87cc
Net Power 1.65kW
Max. engine speed 3600rpm
Working width 20”
Max. snow height 12”
Discharge distance 0~9m
Discharge Chute Rotation 180 degree
Chute Deflector 60 degree
Wheels Diameter 7”
HSX1420
10/30
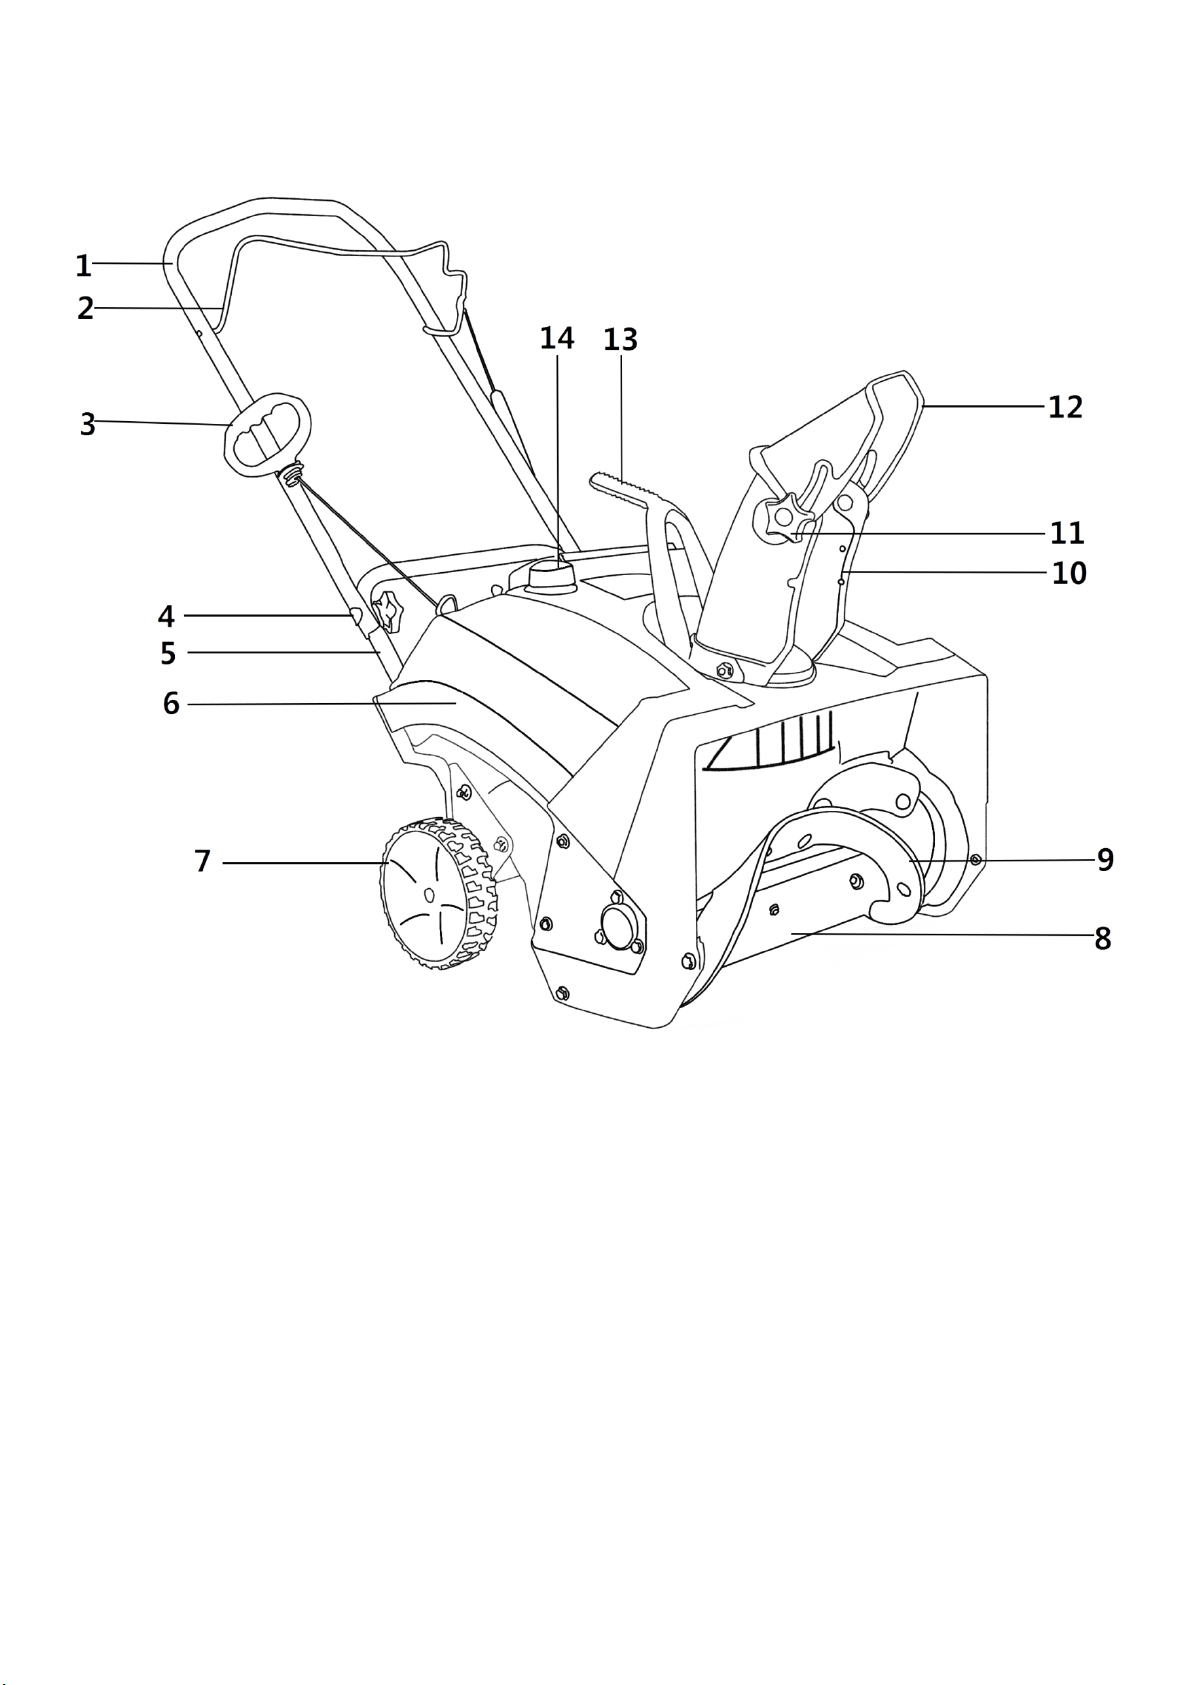
KNOW YOUR SNOW BLOWER
1 Handle 8 Snow Scraper
2 Auger Control 9 Auger
3 Starter Handle 10 Chute
4 Fixing screw(including
washer and knob) for handle
11 Knob
5 Lower handle 12 Chute Deflector
6 Upper Cover 13 Chute Direction Control
7 Wheel 14 Fuel Tank Cap
11/30
ASSEMBLY
NOTE: The product is heavy,
ask another person for
assistance if required.
Unpack all parts and lay them on a flat,
stable surface.
Remove all packing materials and
shipping devices if applicable.
Make sure the delivery contents are
complete and free of any damage. If you
find that parts are missing or show
damage do not use the product but
contact your dealer. Using an
incomplete or damaged product
represents a hazard to people and
property.
Ensure that you have all the accessories
and tools needed for assembly and
operation. This also includes suitable
personal protective equipment.
WARNING! The product must
be fully assembled before
operation! Do not use a
product that is only partly
assembled or assembled with
damaged parts!
Follow the assembly
instructions step-by-step and
use the pictures provided as a
visual guide to easily
assemble the product.
Do not insert the ignition key!
NOTE: Take care of small parts
that are removed during
assembly or when making
adjustments. Keep them secure
to avoid loss.
You will need
(items not supplied)
10cm wrench
Suitable personal protective
equipment
Fuel funnel with filter
Fuel
Engine oil
Lubrication oil/Grease
Fuel collecting container
Oil collecting container
(items supplied)
Spark plug wrench 1pc
Oil funnel 1pc
Ignition key 1pc
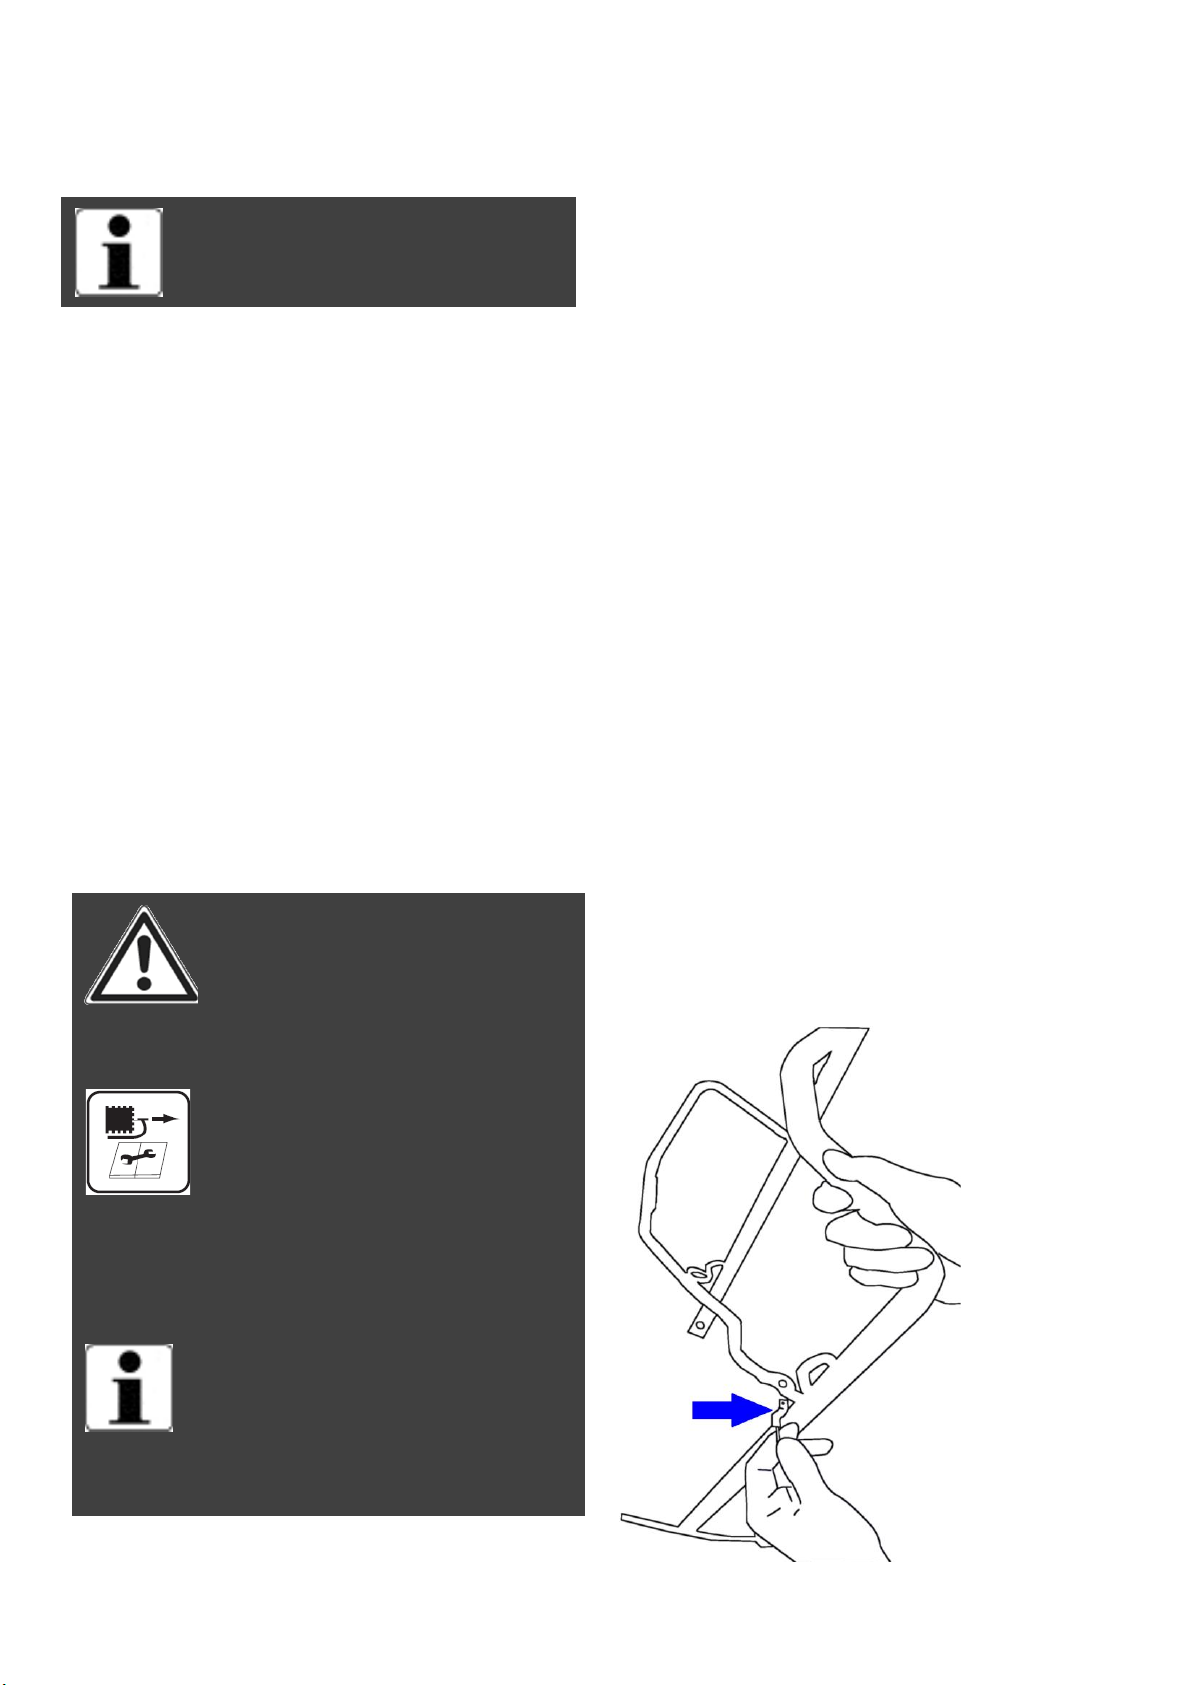
Assembly
1. Auger Cable
Install the “Z” hook to the auger driver
lever.Auger Cable Install the “Z” hook
to the auger driver lever.
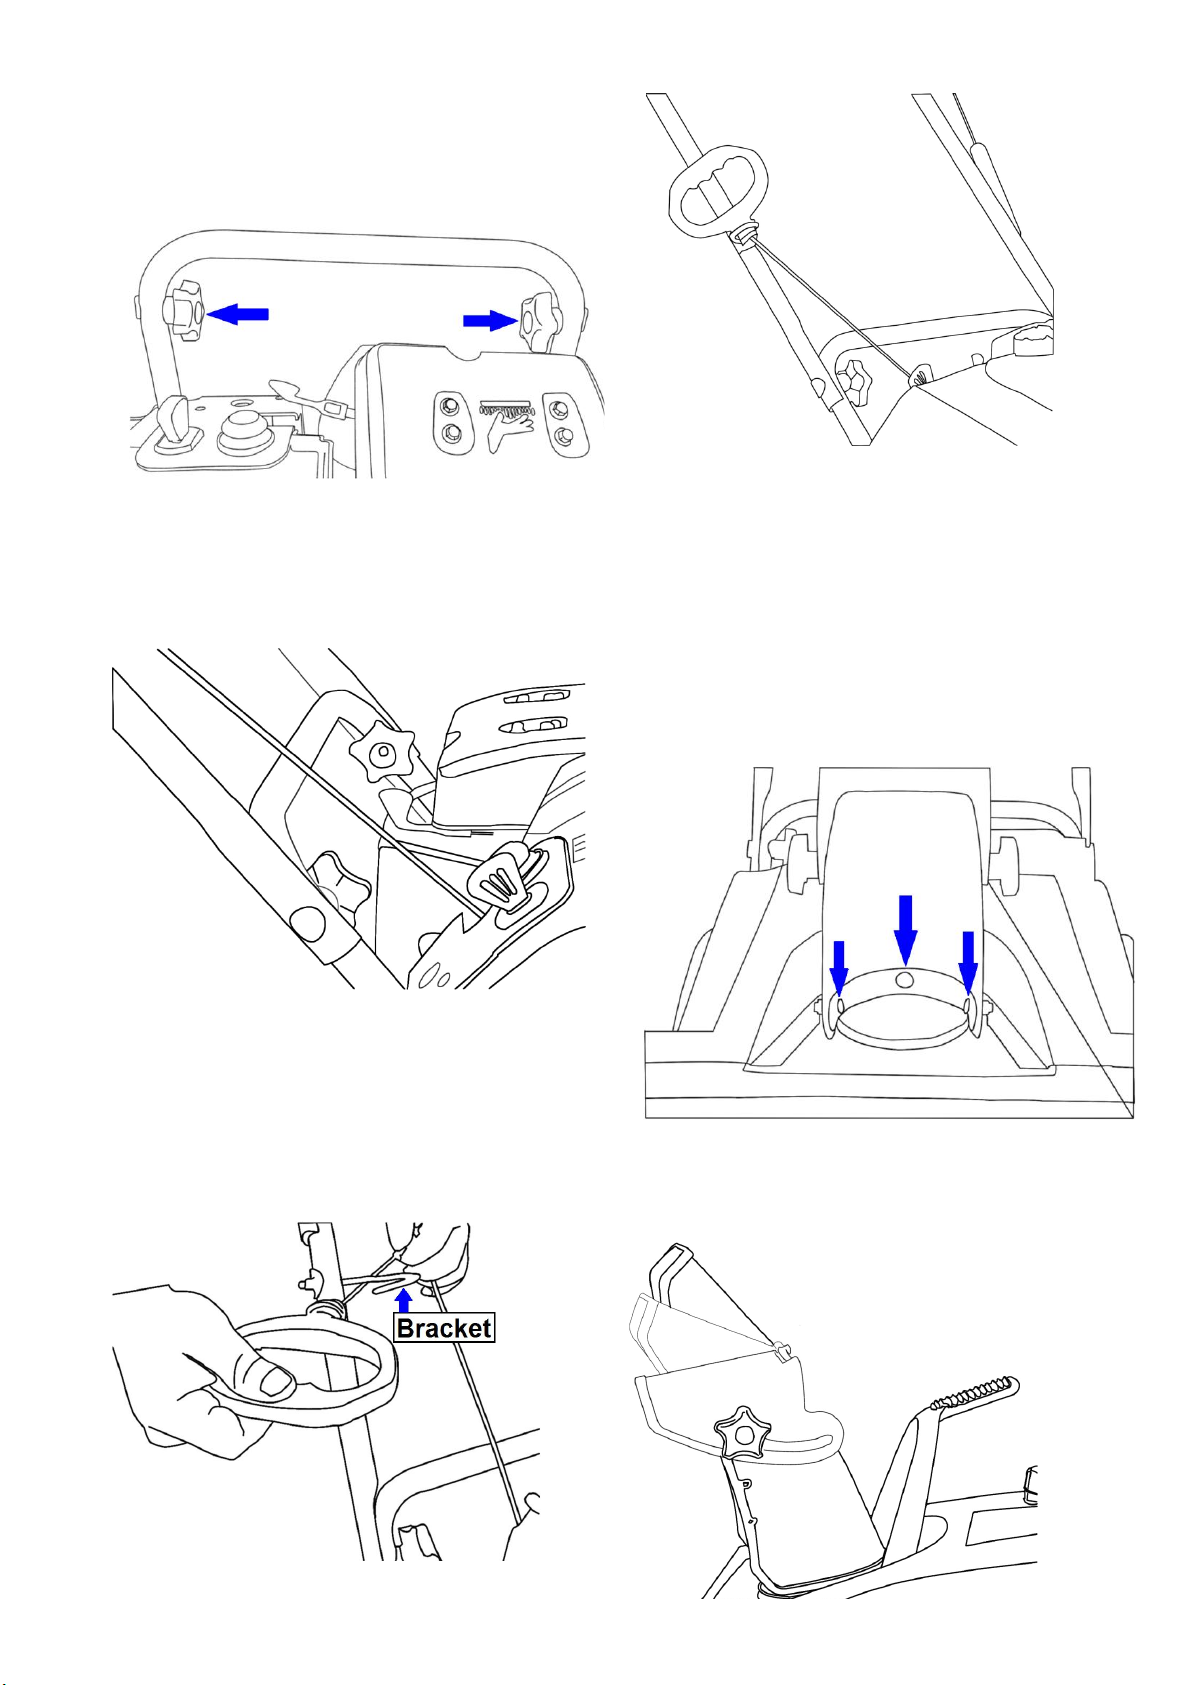
12/30
Upper Handle
1. Loosen the knobs on each side of the
lower handle.
2. Align the holes in the upper handle
with the holes in the lower handle.
And secure the connection with the
knobs, washers and screws.
Note: Make sure the cables are not
caught between the upper and lower
handle
3. One hand holds recoil starting handle,
another pulls rope firmly. Then set
the rope into the bracket as photo.
Discharge chute
1. Unscrew the bolts from the lower
chute. Fit chute on the discharge hole
of thrower. Tip the lower chute
backward until the hole in the chute
ring is aligned with the hole in the
lower chute. Attach the lower chute
with bolt and nut.
2. Adjust the chute deflector in proper
angle, and hold the knob outside to
finish the angle adjustment.

13/30
3. Rotate the chute in proper direction
by crank.
Engine oil and Fuel
This product is equipped with a 4-stroke
engine. Before operation you must add
proper fuel and engine oil.
1. Place the product on a stable, level
surface. We recommend laying a
non-flammable sheet underneath.
2. Use proper funnels. Avoid splitting
and overfilling the tanks.
WARNING! Ensure that
there are no naked flames
around the product!
Do not smoke while filling fuel and oil!
3. Always dispose fuel, used oil and
objects contaminated with them in
accordance with local regulations.
Engine oil
WARNING! This product is
not supplied with oil.
However, for
Before operating this product it is
essential to fill it with proper oil
(see ”Specification”)!
1. Set up the machine. Unscrew and
remove the oil tank cap. Insert the oil
funnel.
2. Gradually add good-quality engine oil
(5W-30). Allow the oil to settle.
3. Check the oil level frequently while
filling. Wipe the oil dipstick clean; refit
and tighten the oil tank cap and then
remove it again. The oil level must be
between the “H(High)” and “L(Low)”
markings. Add more oil if necessary. Do
not overfill.

14/30
4. Wipe spilled oil with a soft cloth and
screw the oil tank cap.
Fuel
WARNING! WARNING! This
product is not supplied with
fuel! Before operating this
product it is essential to fill it with
proper fuel! (see ”Specification”)
1. Always use clean, fresh unleaded
petrol. Purchase fuel in quantities that
can be used within 30 days.
2. Never mix oil with fuel. Avoid getting
dirt, dust or water in the fuel tank.
3. Unscrew and remove the fuel tank
cap. Then, close the tank cap.
NOTE: Fuel deteriorates over
time. It may be difficult to
start the engine if you use
fuel which has been kept for more than
30 days.Towards the end of the season,
it is advisable to put only as much fuel
in the tank as you need for each use,
since it should be completely used up
before storing the product. Empty
remaining fuel from the tank when
storing the product for over 30 days.
4. Wipe any spilled fuel with a soft cloth
and screw the fuel tank cap.
15/30
OPERATION
Cold Start (low environment temperature -20°C)
If it has never started before your start or the engine stops for a while (more than
20min) after your start, follow below steps.
1
Set choke to the
CLOSE position.
5
Electric start (If equipped, 110V
or 230V): ①connect
extension cord to start and
plug extension into 110V or
230V 3-wire, grounded outlet
②press starter button on
2
Insert ignition key.
DO NOT twist the
key after it is
inserted.
engine until engine starts③remove the
connect extension cord from the grounded
outlet.
Note: DO NOT operate starter more than 15
seconds per minute, as overheating and
damage can occur. (If engine does not start,
refer to TROUBLESHOOTING in Care and
Maintenance.)
3Press primer 3 times.
6
Run idle for 20-30 seconds to
warm it up.
4Pull recoil starter handle slowly
until you feel a definite resistance
(starter engaged)and then pull
firmly to start the engine.
7Set choke to the OPEN
position.
NOTE:When moving the choke to the OPEN
position and the engine speed gets
inconsistent.Then move the choke to middle
position
WARNING! Allow the
cable to return slowly
and in a controlled
manner each time it is
pulled.
8
Operate your snowthrower.

16/30
Warm Start
1
Set choke to the
OPEN position
4
Electric start (if so
equipped, 110V or
230V):
①connect extension
cord to start and plug
extension into 110V.
or 230V 3-wire,grounded outlet.
②press starter button on engine until
engine starts.
2
Insert ignition key.
DO NOT twist the
key after it is
inserted.
③remove the connect extension cord
from the grounded outlet.
NOTE:DO NOT operate starter more
than 15 seconds per minute, as
overheating and damage can occur.(If
engine does not start, refer to
TROUBLESHOOTINGin Care and
Maintenance) .
3 Pull recoil starter handle slowly
until you feel a definite resistance
(starter engaged)and then pull firmly to
start the engine.
5
Run idle for 20-30
seconds to warm it up.
6
Operate your
snowthrower.
WARNING! Allow the cable
to return slowly and in a
controlled manner each
time it is pulled!

17/30
Intended use
This product is intended for clearing
garden paths, yards and private
approach lanes from snow in domestic
areas. The product may not be used on
high plateaus like roof gardens.
For safety reasons it is essential to read
the entire instruction manual before first
operation and to observe all the
instructions therein.
This product is intended for private
domestic use only, not for any
commercial trade use. It must not be
used for any purposes other than those
described.
Clearing snow
WARNING! Foreign objects,
such as rocks, broken glass,
nails, wire, or string, can be
picked up and thrown by the
product, causing damage and serious
personal injury! Ensure that no hidden
objects are covered by the snow!
Remove all foreign objects from the
area to be cleared before operating the
product!
1. Keep the area of operation free of
foreign objects that can become
thrown by the auger. Perform a
thorough inspection of the area since
some objects may be hidden from view
by surrounding snow. If the product
hits an obstruction or picks up a foreign
object during use, stop the product,
switch off and disconnect from the
power supply, remove the obstruction,
and inspect the product for damage.
Repair or replace any damaged part
before restarting and operating the
product.
2. Keep children, pets, and bystanders
away from the area of operation. Be
aware that the normal noise of the
product when turned on may make it
difficult for you to hear approaching
people.
3. Pay attention to the wind direction. If
possible, move in the same direction
as the wind so that the snow is not
thrown against the wind (and thus
back into your face and on the just
cleared path).
4. Do not push the product with
excessive force. You should push the
product gently and evenly in
accordance with the products throw
rate.
5. Some parts of the product may freeze
under extreme temperature conditions.
Do not attempt to operate the product
with frozen parts. If the parts freeze
while the product is in use, stop the
product, switch off and disconnect
from the power supply, and inspect for
frozen parts. Free all parts before
restarting or operating the product.
Never force controls that are frozen.
Adjust discharge direction
and distance
Adjust the discharge direction in vertical
and horizontal position before each use.
The proper direction depends among
others on the snow condition and
working area.
If the deflector is in a lower position the
snow is thrown in a short distance; if the
deflector is in an upper position the
snow is thrown farther.

18/30
WARNING! Never direct the
chute deflector at the
operator, at bystanders,at
vehicles or at nearby
windows! The discharged snow and
foreign objects accidentally picked up
by the product can cause serious
damage and personal injury! Always
orient the discharge chute in the
Opposite direction from where you,
bystanders, surrounding vehicles, or
windows are located!
The chute deflector on the top of the
discharge chute controls the distance of the
snow stream.
1. Loosen the fixation knobs on the both
sides of the chute deflector.
2. Raise or lower the chute deflector to the
desired distance.
3. Retighten the fixation knobs.
4. The discharge chute can be adjusted
approx. 180 degrees by rotating the
crank. Rotate the crank clockwise to turn
the discharge chute to the left;
anticlockwise to turn the chute to the
right.
Auger control lever
The auger control lever is located in the
front of the handle. Pull the lever to
engage the auger. Release the lever to
stop the snow throwing action.
NOTE: Also refer to auger
control test prior to operating
this product.
Auger control test
NOTE: Perform the following
test before operating your
product for the first time and
the start of each winter season.
When the auger control lever is released
and in the disengaged front position, the
auger wire should have very little slack.
It should not be tight.
1. Stand behind the product.
2. Engage the auger.
3. Allow the auger to remain engaged
for approximately ten seconds
4. Release the auger control lever.
5. Repeat the step 2, 3 and 4 for several
times.
6. Confirm that the auger has
completely stopped when releasing
the lever.
Wear causes stretching on
both the control cable and
auger drive belt, periodic
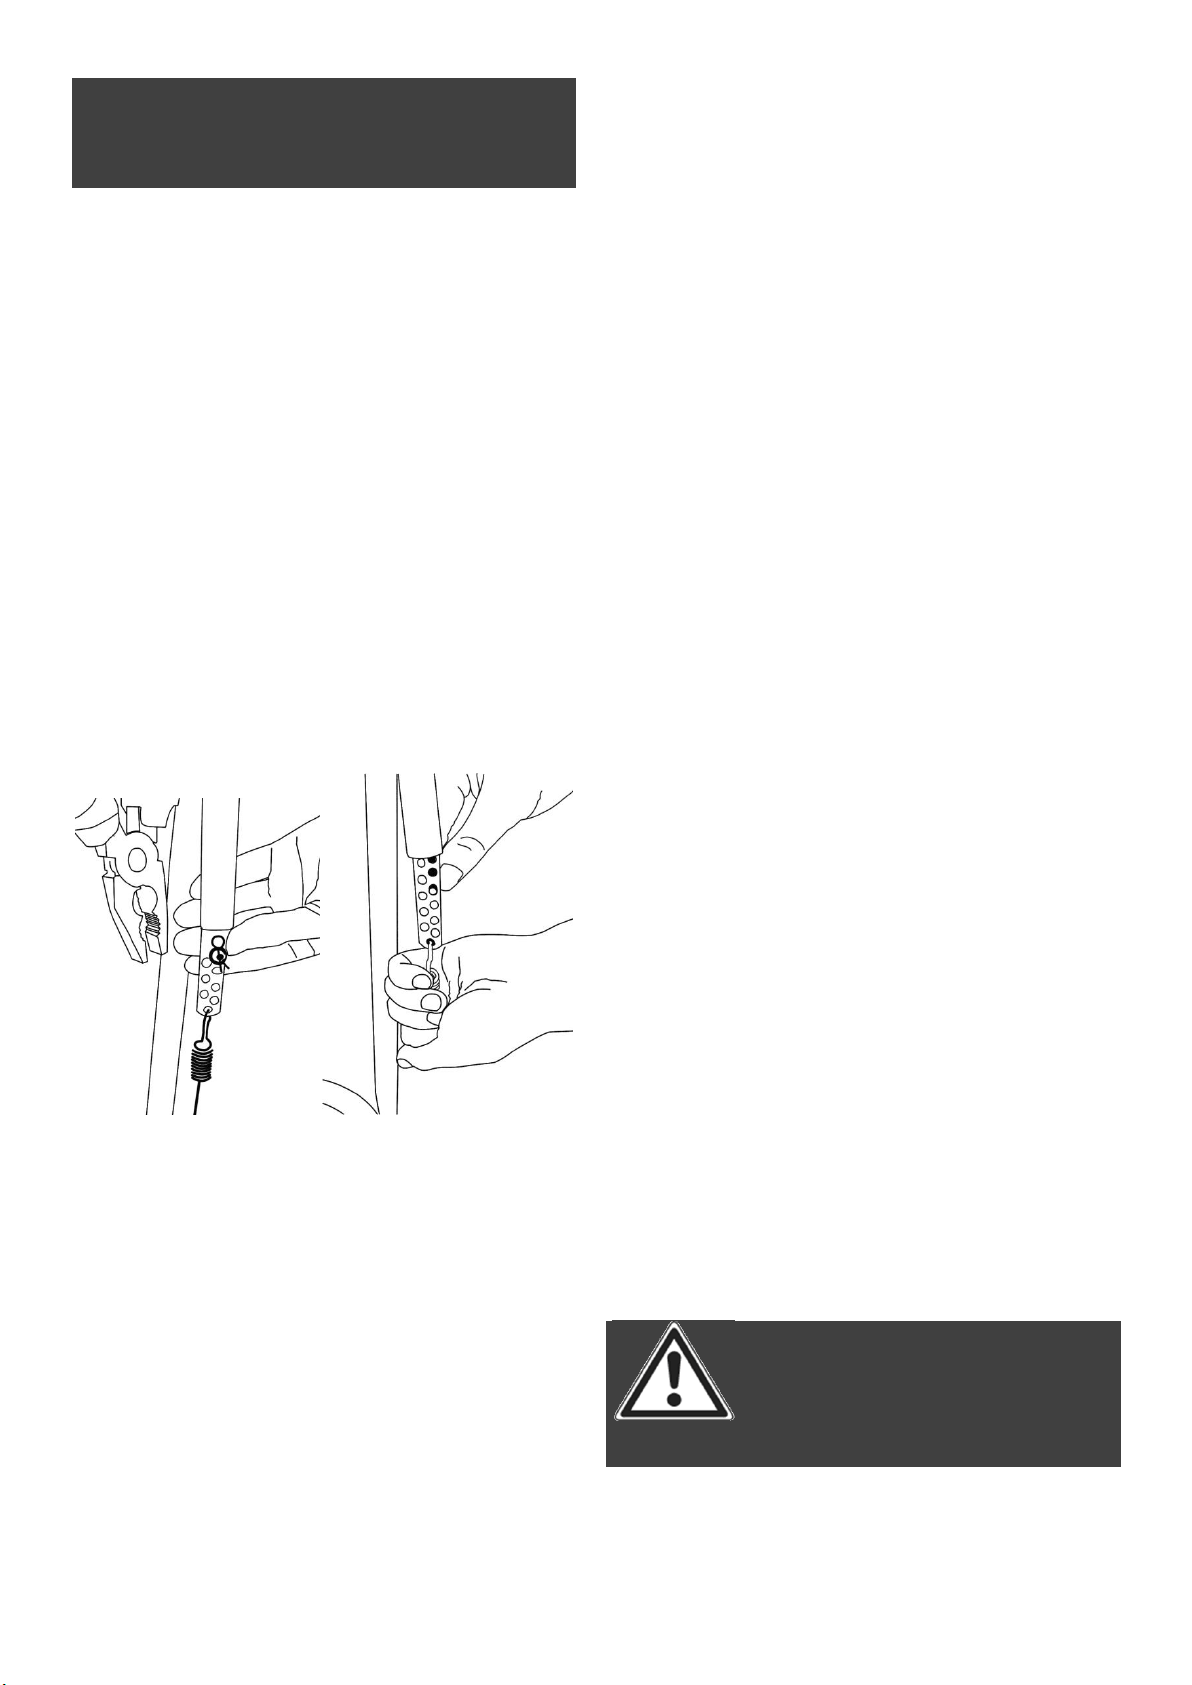
19/30
adjustments may be necessary. If the
auger seems to hesitate when
rotating, proceed as follows:
1. Slide the cable boot off the cable
adjustment bracket. Take off the clip
and washer by a plier. Then, remove
“L”hook from the cable adjustment
bracket. See below photo A
2. One hand holds the lower auger cable.
Lift it up and move the “L”hook to
the next adjustment hole. See below
photoB
3. Replace the clip and washer. Put the
cable boot over the cable adjustment
bracket.
4. To check the adjustment, start the
snow thrower. Make sure the auger
does not rotate when the auger drive
lever is released.
A B
Control lever push forward. The cable
gets slightly slacked. When is the
lever released the cable must be
neither slacked nor tensed. If you find
some play, it is necessary to adjust
and tense the cable. When the cable
is correctly tensed the lever must
touch the handle when pushed. In
different case is necessary to adjust
the cable.
Carburettor
If the auger fails to operate at
operational speed the carburettor may
need to be adjusted. Please contact an
authorised service centre or similar
qualified specialist.
General operation
1. Check the product as well as
accessories for damage before each
use. Do not use the product if it is
damaged or shows wear.
2. Double check that accessories are
properly fixed.
3. Check the fuel and engine oil level,
refill if necessary.
4. Push the product forward by its
handle. Keep the handle dry and
clean to ensure safe support.
5. Ensure that the air vents are always
unobstructed and clear. Clean them if
necessary with a soft brush. Blocked
air vents may lead to overheating and
damage the product.
6. Switch the product off immediately if
you are disturbed while working by
other people entering the working
area. Always let the product come to
complete stop before putting it
down.
7. Do not overwork yourself. Take
regular breaks to ensure you can
concentrate on the work and have
full control over the product.
WARNING! In some countries
regulations define at what
time of the day and on what
Special days products are

20/30
allowed to be used and what
restrictions apply! Ask your community
for detailed information and observe
the regulations in order to preserve a
peaceful neighbourhood and avoid
committing administrative offences!
MAINTENANCE
After use
1. Switch the product off, disconnect the
spark plug connector and let it cool
down.
2. Check, clean and store the product as
described below.
The golden rules for care
WARNING! Always switch
the product off, disconnect
the spark plug connector and
let the product cool down
before performing
inspection, maintenance and
cleaning work!
1. Keep the product clean. Remove
debris from it after each use and
before storage.
2. Regular and proper cleaning will help
ensure safe use and prolong the life
of the product.
3. Inspect the product before each use
for worn and damaged parts. Do not
operate it if you find broken and worn
parts.
WARNING! Only perform
repairs and maintenance
work according to these
instructions! All further
works must be performed by a qualified
specialist!
General cleaning
1. Clean the product with a damp cloth.
Use a brush for areas that are hard to
reach.
NOTE: Do not use chemical,
alkaline, abrasive or other
aggressive detergents or disinfectants
to clean this product as they might be
harmful to its surfaces.
2. Check for any damage and wear.
Repair damages in accordance with
this instruction manual or take it to
an authorised service centre before
using the product again.
Maintenance Table
Part To do Before/after
each use
5
hours
25
hours
50 hours /
half year
100 hours /
once a year
Engine Oil Check x
Engine Oil Change x
Spark plug Check x
Spark plug Clean x
Spark plug Replace whenever necessary
Valve play Adjust whenever necessary
Exhaust area Clean x
Table of contents


