Herrnhuter A1e User manual
1. Verwenden Sie zur Beleuchtung des Sterns nur das mitge-
lieferte Zubehör (Leuchtmittel / Kabel) und eine Stromquelle
passend für 6 V / 0,3 A (Schwachstrom).
2. Stecken Sie die Aderenden der Beleuchtung niemals direkt
in eine Steckdose!
3. Die Schraubenköpfe an den Steckern dürfen sich nicht berühren.
4. Achten Sie darauf, dass das Leuchtmittel mit der Fassung
fest und gerade in der Kappe steckt.
5. Der Stern ist ein Dekorationsmittel und nicht als Spielzeug
geeignet. Durch die spitzen Zacken besteht unter
Umständen Verletzungsgefahr.
6. Der Bastelstern A1b ist zum Zusammenbau für Kinder ab
7 Jahren unter Aufsicht von Erwachsenen geeignet.
Achtung, elektrisches Gerät. Nicht ohne Aufsicht betreiben!
5.) Gebrauchs- und Sicherheitshinweise
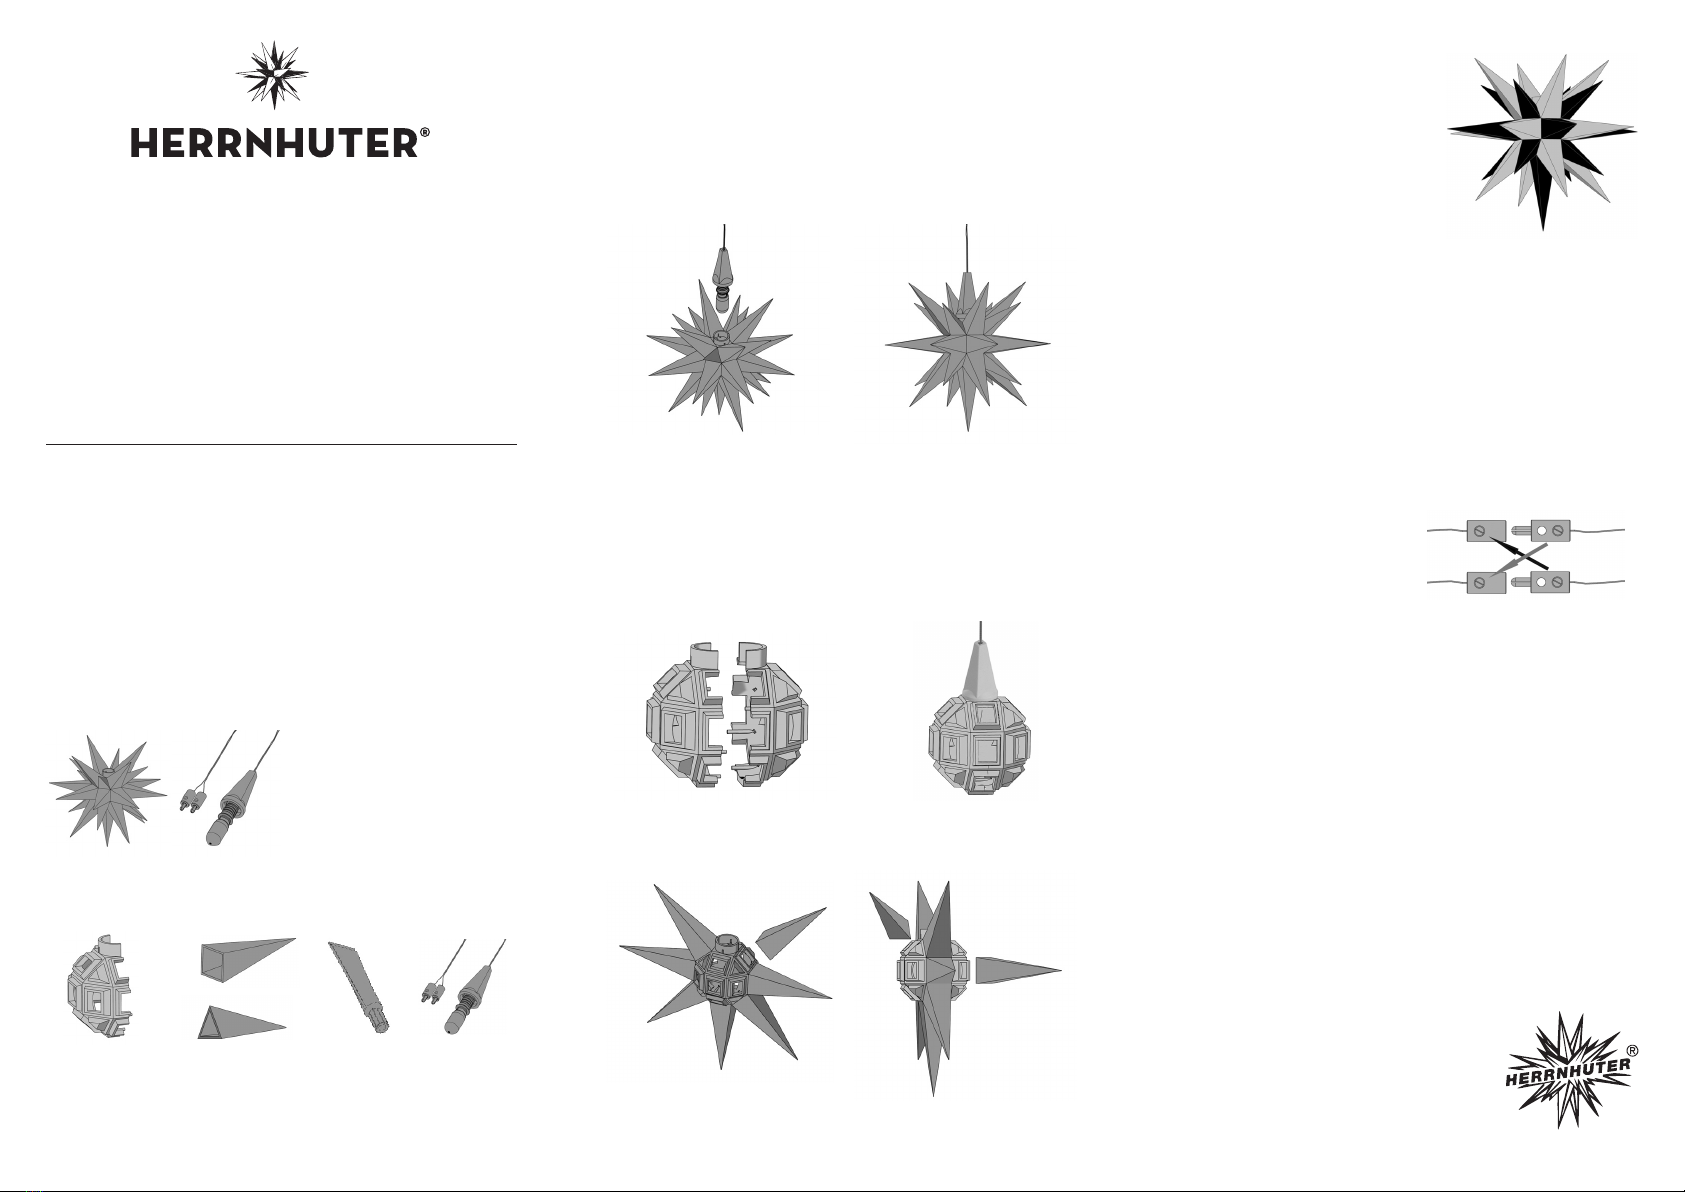
3.) Anleitung zum Aufbau
1. Fügen Sie zuerst die beiden Körperhälften mit Hilfe des
Klebers zusammen. Tragen Sie den Leim sehr sparsam auf
und entfernen Sie übertretende Leimreste sofort!
3. Kleben Sie jetzt die restlichen Viereck- und Dreieckzacken
auf die jeweils vorgesehenen Erhebungen am Körper.
Einzelstern A1e:
Bastelstern A1b:
2. Kleben Sie nun die einzelnen Zacken an die Passformen auf
dem Körper, beginnend mit 7 viereckigen Zacken, die über
die Klebenaht der Körperhälften gesetzt werden.
4.Bitte beachten Sie beim
Zusammenbau zweifarbiger
Sterne die Farbanordnung
gemäß der Abbildung rechts.
Tragen Sie den Leim stets spar-
sam auf; er darf im Inneren nicht
in die Zacken zurückfließen.
© Herrnhuter Sterne GmbH, Änderungen vorbehalten 02/2018
Herrnhuter Sterne GmbH
Oderwitzer Straße 8 . 02747 Herrnhut
Tel. +49-35873 3640 . Fax +49-35873 36435
4.) Hinweise zur Beleuchtung
Um den Stern zu beleuchten, verbinden Sie die Stecker des
Beleuchtungssets mit den Anschlussbuchsen am Netzgerät
oder Batteriehalter. (als Zubehör separat erhältlich)
Einige Sterne werden serienmäßig mit LED-Leuchtmittel aus-
gestattet. (betrifft Sterne in: grün, blau, gr/weiß, bl/weiß, Sonderedition)
Als Stromquelle empfehlen wir Ihnen unser Zubehör:
- Netzgerät 500 mA stabilisiert auf 6 V (für 1 Stern)
- Netzgerät 1000 mA stabilisiert auf 6 V (für 1 bis 3 Sterne)
- Batteriehalter für 1 Stern
Falls die LED nicht leuchtet:
Bitte die Anschlüsse der
Beleuchtung an den Buchsen
des Netzgerätes tauschen.
1.) Ihr Produkt
Modell: A1e oder A1b
Größe: Ø 13 cm
Farben: Gelb, Weiß, Rot, Gelb/Rot, Weiß/Rot, Blau, Grün,
Grün/Weiß, Blau/Weiß, Sonderedition
Material: Kunststoff (Typ A), Verwendung im Innenbereich
Montageanleitung
Herrnhuter Sterne A1e und A1b
Werter Kunde,
vielen Dank, dass Sie sich für dieses Produkt aus der
Herrnhuter® Manufaktur entschieden haben. Wir wünschen
Ihnen damit viel Freude und stimmungsvolle Momente.
Ihre Herrnhuter Sterne GmbH
2.) Inhalt dieses Sets
• 2 Körperhälften
• 17 viereckige Zacken
• 8 dreieckige Zacken
• 1 Tube Kunststoffkleber
• 1 Einzelstern aus Kunststoff
• 1 Beleuchtungsset mit:
- 1 Leuchtmittel 6.3 V, E10
Radioröhrenlampe oder LED
- Abdeckkappe in der Farbe
des Sterns
- 3 Meter Zuleitung mit Stecker
Modell A1b (Bastelstern, Bausatz):
17x
8x 1x 1x
1x1x
2x
Modell A1e (Einzelstern, vormontiert):
• 1 Beleuchtungsset mit:
- 1 Leuchtmittel 6.3 V, E10
- Abdeckkappe in Sternfarbe
- 3 Meter Zuleitung mit Stecker
1. Stecken Sie die Beleuchtung mit dem Leuchtmittel voran
in die Öffnung des Sterns und befestigen Sie diese durch
Andrücken der Kappe auf dem Hals des Sterns.
2. Nun können Sie den Stern am Beleuchtungskabel aufhängen.
Tipp: Stecken Sie danach zur Stabilisierung und zum besseren
Halt bei der weiteren Montage die Kappe der Beleuch-
tung auf den Hals des Körpers. (Kappe nicht anleimen!)

1. To illuminate the star, please only use our recommended
accessories (bulb / cable) provided with the star and a
power source suitable for 6 V /0,3 A (low-voltage current).
2. Never plug the ends of the cabling directly into a wall socket!
3. The screw heads of the plugs should not touch each other.
4. Make sure that lamp and socket are well and straight fixed
into the cap. The lamp needs to be fitted in the middle of
the body.
5. The Herrnhut star and the lighting kit is for decoration
only and is not suitable as a toy for children. The sharp
points may cause injury. Please handle with care.
6. The star assembly kit, model A1b might be assembled
under adult supervision and by children 7 years and older.
Attention, electric device. Do not operate without supervision!
1. Place the bulb into the opening of the star and fasten the
cap firmly onto the neck of the star.
5.) Operating- and safety instructions
3.) Assembly instructions
2. Now you can hang up the star with the use of the cable.
1. Start with sticking the two halves of the body base together.
Please apply the glue slightly. Remove all remains of glue on
the splice.
3. Now stick the remaining points onto the appropriate
elevated sections of the body base.
Single star A1e:
DIY-kit A1b:
2. Now fix the single points onto the appropriate sections
of the body. Start with 7 square points and stick them
along the seam of the body.
4. Please consider the colour
scheme of bicoloured stars
according to this picture.
Please apply the glue slightly!
© Herrnhuter Sterne GmbH, Subject to change 02/2018
Herrnhuter Sterne GmbH
Oderwitzer Straße 8 . 02747 Herrnhut
Tel. +49-35873 3640 . Fax +49-35873 36435
4.) Basic notes on the lighting kit
For lighting-up the star, please connect the plugs of the
lighting kit with the sockets of the power supply or battery
holder cabling. (available separately, see accessories)
Some stars are provided with LED-lamps as standard.
(concerns stars in: green, blue, green/white, blue/white, limited edition)
As power source we recommend our products:
- Power supply unit 500mA suitable for 6 V (for 1 star)
- Power supply unit 1000mA suitable for 6 V (for 1 – 3 stars)
- Battery holder for 1 star
If the LED does not light up:
Please swap the connection
pins of the lighting kit and
the power supply unit.
1.) Your product
Model: A1e or A1b
Size: Ø 13 cm (5,1 inches)
Colours: yellow, white, red, yellow/red, white/red, green,
blue, green/white, blue/white, special edition
Material: plastic (type A), for indoor use
Assembly Instructions
Herrnhut Stars A1e and A1b
Dear customer,
we would like to thank you for choosing this product
from our manufacture. We hope you enjoy your star and
have many enjoyable and uplifting moments with it.
The Herrnhut Star Company
2.) Product contents
• 2 halves of the body base
• 17 square points
• 8 triangular points
• 1 tube of glue
• 1 single star, made of plastic
• 1 lighting kit:
- 1 lamp (bulb or LED) 6.3 V, E10
- cover cap in colour of the star
- cable with plugs, lenght 3m
Model A1b (DIY-kit, self-assembly):
17x
8x 1x 1x
1x1x
2x
Model A1e (single star, assembled):
• 1 lighting kit:
- 1 lamp (bulb or LED) 6.3 V, E10
- cover cap in colour of the star
- cable with plugs, length 3m
Tip: For better stability and handling during further
assembly, you can attach the cap of the lighting on the
neck of the body. (Do not glue the cap!)
This manual suits for next models
1
Table of contents
Languages:
Other Herrnhuter Home Lighting Accessories manuals

Popular Home Lighting Accessories manuals by other brands

Philips
Philips Naturelle IMAGEO 69188/60/PU manual

DS Produkte
DS Produkte NC2347MM-SMLCL instructions

Home Accents Holiday
Home Accents Holiday TY294-1311-1 Assembly instructions

Coopers of Stortford
Coopers of Stortford H700 Instructions for use

Alpine
Alpine CRD100S-MC owner's manual

IKEA
IKEA ORMANÄS manual


