Highlander MAGNOPHONIC User manual

The information and graphics contained in this document are the property of Highlander Musical Audio Products. Copying of any kind is prohibited, except for personal use only.
©
Highlander Musical Audio Products 1991-2009
Pickup and Preamp for the Tricone Resophonic Guitar
Pickup and Preamp for the Tricone Resophonic Guitar
h
ighlanderpickups.com
ighlanderpickups.com
For more information please visit our web site.
email: [email protected]
Contact us at:
USA & Canada Toll Free: 888.658.1819, Phone: 805.547.1410, Fax: 805.547.1228
870 Capitolio Way, Unit 3, San Luis Obispo, CA 93401
At Highlander we appreciate that it takes years of practice, dedication and personal growth
for an acoustic musician to develop the skills and spirit necessary to express themselves fully
through their music. Through years of practice, dedication and personal growth our highly
skilled team is crafting amplification equipment for these musicians that is so pure, we can all
fully appreciate and be moved by the true spirit of their music.
Thank you for purchasing
the Magnophonic Pickup
for Tricone Resonator
Guitars.
Built to take the rigors of
the road, you can rely on a
Highlander.

P
O
W
E
R
S
T
H
E
G
U
I
T
A
R
A
S
T
E
R
E
O
G
U
I
T
A
R
C
A
B
L
E
Audio
Power
MONO
CABLE
For optimum pickup performance and ease of installation, please take a
For optimum pickup performance and ease of installation, please take a
moment to read through this Installation Guide before beginning. Thank You.
moment to read through this Installation Guide before beginning. Thank You.
THIS INSTALLATION SHOULD ONLY BE UNDERTAKEN BY A LUTHIER WITH EXPERIENCE
THIS INSTALLATION SHOULD ONLY BE UNDERTAKEN BY A LUTHIER WITH EXPERIENCE
WORKING ON RESO-PHONIC STRINGED INSTRUMENTS.
WORKING ON RESO-PHONIC STRINGED INSTRUMENTS.
Using the wrong techniques or tools could result in permanent damage to your Instrument.
Highlander is not responsible for any damage resulting from the installation of this pickup system.
Parts Included:
Qty. Description
1 Magnophonic Pickup
1 Magnophonic (Matching) Preamplifier
1 Magnophonic T-Clip (mounts on the T-Bridge)
1 Hardware Mounting Kit comprising of:
1 Replacement Pan Screw (stainless steel)
1 Pickup Mounting Stud (stainless steel)
2 Screws
2 Washers
2 Preamp Clamps
1 Male RCA Connector
4 Pieces of Self Adhesive Velcro® for cable strain relief
1 External Power Adapter comprising of:
1 External Power Box (battery not included)
1 15 foot Stereo Cable
Tools Required:
1) HAND DRILL or ELECTRIC DRILL (cordless preferred)
2) 3/8" DRILL BIT, RELIEVED ON RAKE EDGES
Used for drilling guitar for the Output Jack
3) 1/2" NUT DRIVER
For tightening the nut on the Output Jack.
4) 3/16" (4.5mm) DRILL BIT
For drilling a hole in the pan for the Pickup Cable
5) SMALL SOLDERING IRON AND MULTICORE SOLDER
(must be electronic grade multicore solder not acid based)
For soldering the RCA Connector to the Pickup Cable
6) CROSS HEAD (PHILLIPS) SCREWDRIVER
7) WIRE CUTTERS
For trimming excess wire from the RCA Solder joins
8) 1/16" (1.5mm) HEX WRENCH (ALLEN KEY)
For securing the Pickup to the Mounting Stud
The information and graphics contained in this document are the property of Highlander Musical Audio Products. Copying of any kind is prohibited, except for personal use only.
©
Highlander Musical Audio Products 1991-2009
Magnophonic INSTALLATION
Magnophonic INSTALLATION
For more information check out our web site: highlanderpickups.com
ighlanderpickups.com
About External Power
This unique pickup is designed to work in conjunction with a matching
preamplifier. For optimum performance it is important to have the preamplifier
mounted as close to the pickup as possible.
The preamp requires a 9V battery. While Highlander systems can run for 1000
hours on one 9V battery, this battery will have to be replaced from time to time. In
an acoustic flat top guitar this is easily accomplished through the sound hole;
however, it is not so easy to access the inside of a resonator guitar. That is why
the External Power Accessory is highly recommended by Highlander and the
National Reso-Phonic Guitar Company. The cover plate on these guitars was not
designed to be removed and replaced regularly. Apart from the hassle, there is a
possibility that over time this could cause problems. The External Power Option
is easy to use, eliminating the hassle and potential problems.
Power is delivered to the guitar on the
‘ring’ of a stereo cable. If a mono cable is
inadvertently plugged into the guitar jack
on the External Power Box, the battery
will be shorted out. This will cause the
battery to run down very quickly, and
there is also the possibility that the
battery could get quite warm. If this
happens the battery should be replaced.
Please note the External Power Box is
used to power the preamp that is in the
guitar -- there is no preamplifier in the
External Power Box.
This Unique, Magnophonic Pickup and Preamplifier System was
designed specifically for the National Resophonic Tricone Guitar.
Listen to the instrument. If there are no apparent problems continue with the installation. In the event of a string buzz or other
problem, deal with this first then continue with the installation.
Remove the strings and cover plate. Remove the cones and 'T' bridge, carefully place them out of harm's way.
An easy method of removing and replacing the strings and cover plate:
Release the tension on all the strings.
Place a piece of masking tape over the nut and the string retaining
holes in the tail piece.
Carefully remove the screws holding the cover plate.
Unscrew the strap nut and remove the tailpiece, cover plate and
strings, carefully placing them to one side of the guitar while leaving
the strings on the tuning pegs.
The information and graphics contained in this document are the property of Highlander Musical Audio Products. Copying of any kind is prohibited, except for personal use only.
©
Highlander Musical Audio Products 1991-2009
Magnophonic INSTALLATION
Magnophonic INSTALLATION
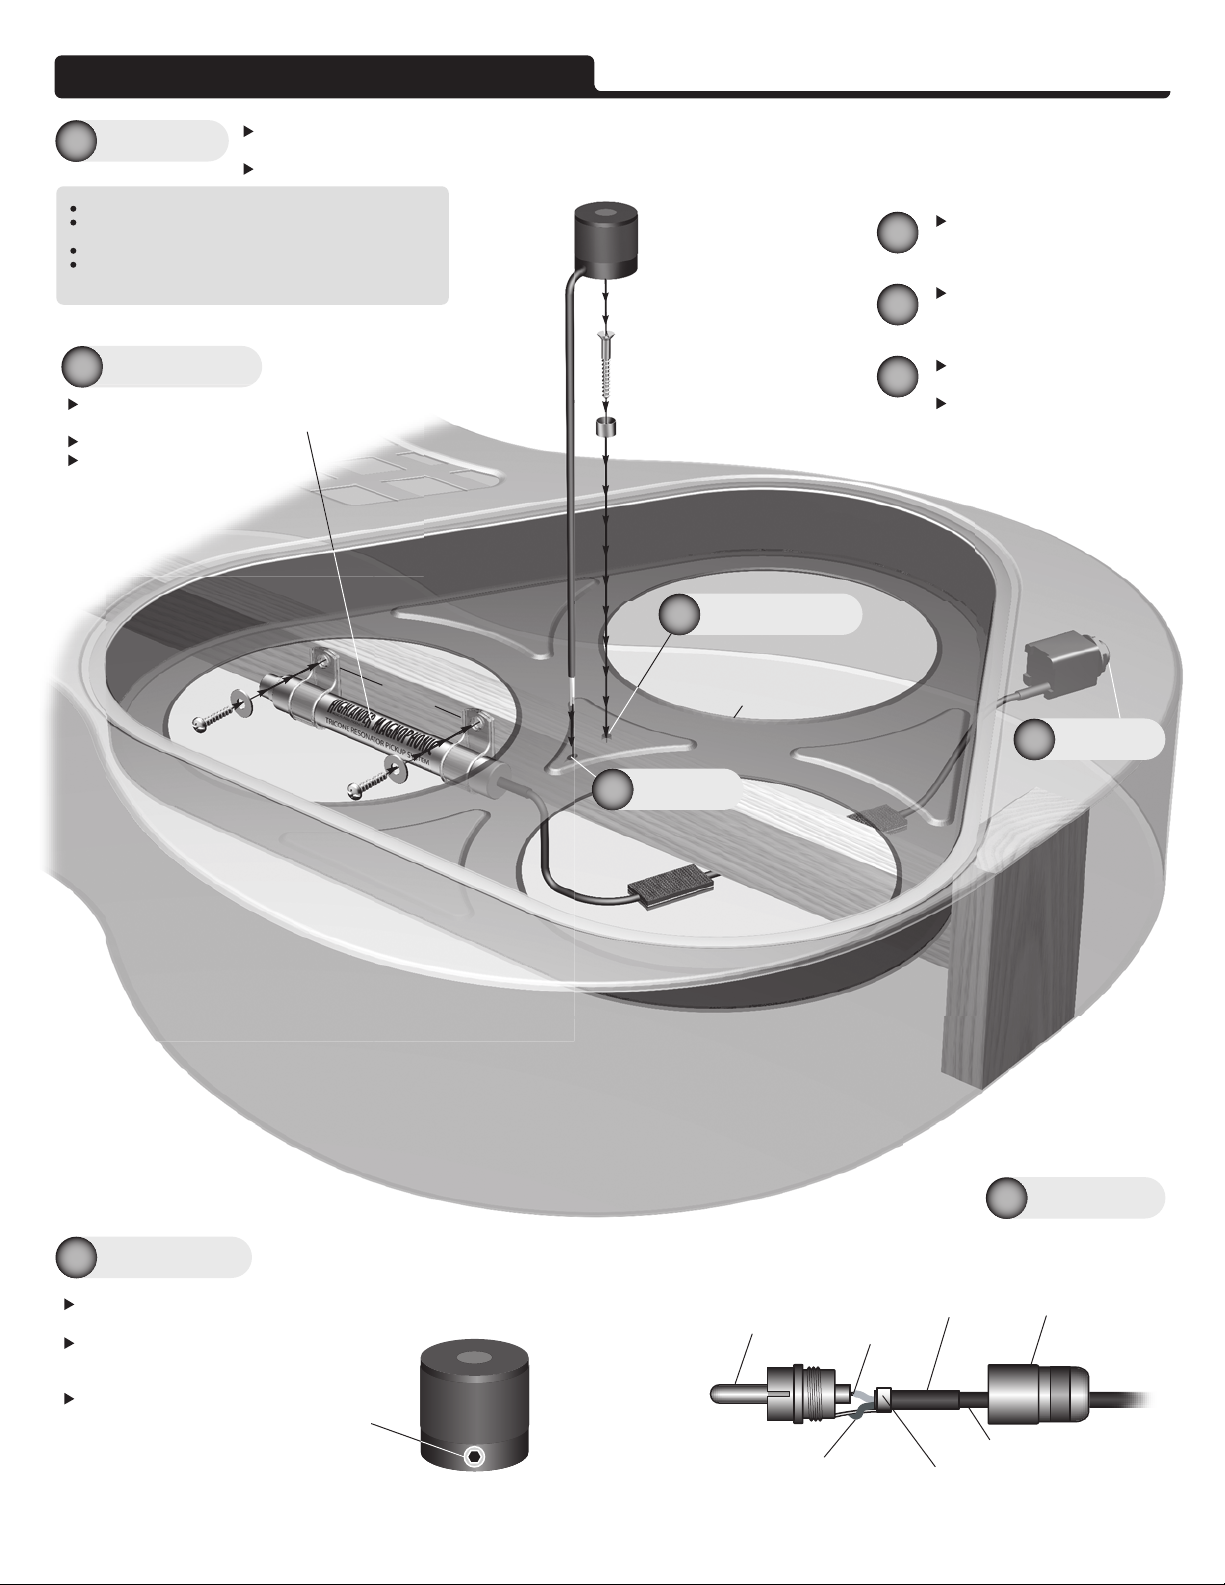
Pickup
Replacement
Pan Screw
Pickup
Cable
Mounting Stud
(for the pickup)
Drill a 3/16" (4.5mm) hole for
the pickup cable.
Remove sharp edges.
Remove the existing 'Pan
Screw'.
Drill a 3/8" (9.5mm) hole for
the Output Jack.
Alternatively, the Jack can
be mounted in one of the grill
holes.
Preparation
1
Drill Hole
2
2
Remove Screw
3
Solder RCA
7
Drill Hole
4
Install Preamp
54
3
Mount Pickup
6
Install the Preamp on the neck stick using the
clamps, screws and washers as indicated.
Install the Output Jack.
Secure the Output Cable to
the back of the Tricone
with Velcro
®
.
Secure the Mounting Stud to the pan using
the replacement screw.
Thread the pickup cable through the 3/16"
hole and slip the Pickup onto the mounting
stud, pushing it down onto the pan.
Secure the Pickup in place by tightening
the 'set screw' in the base of the Pickup.
Please don't over-tighten the 'set screw'.
Output
Jack
End
Block
Velcro
®
Output
Cable
PAN
Neck Stick
Clamps
White Wire
Pin
Heatshrink Cover
Bare Copper Shield (Ground)
The Red wire has been stripped and
twisted with the Bare Copper Shield.
Cable Clamp
Clamp onto the Heatshrink
Pickup Cable
An RCA Connector is used to connect the pickup to the preamp.
This connector was chosen for its 100% shielding, large contact
area (providing a very low noise connection) and long term
resistance to corrosion.
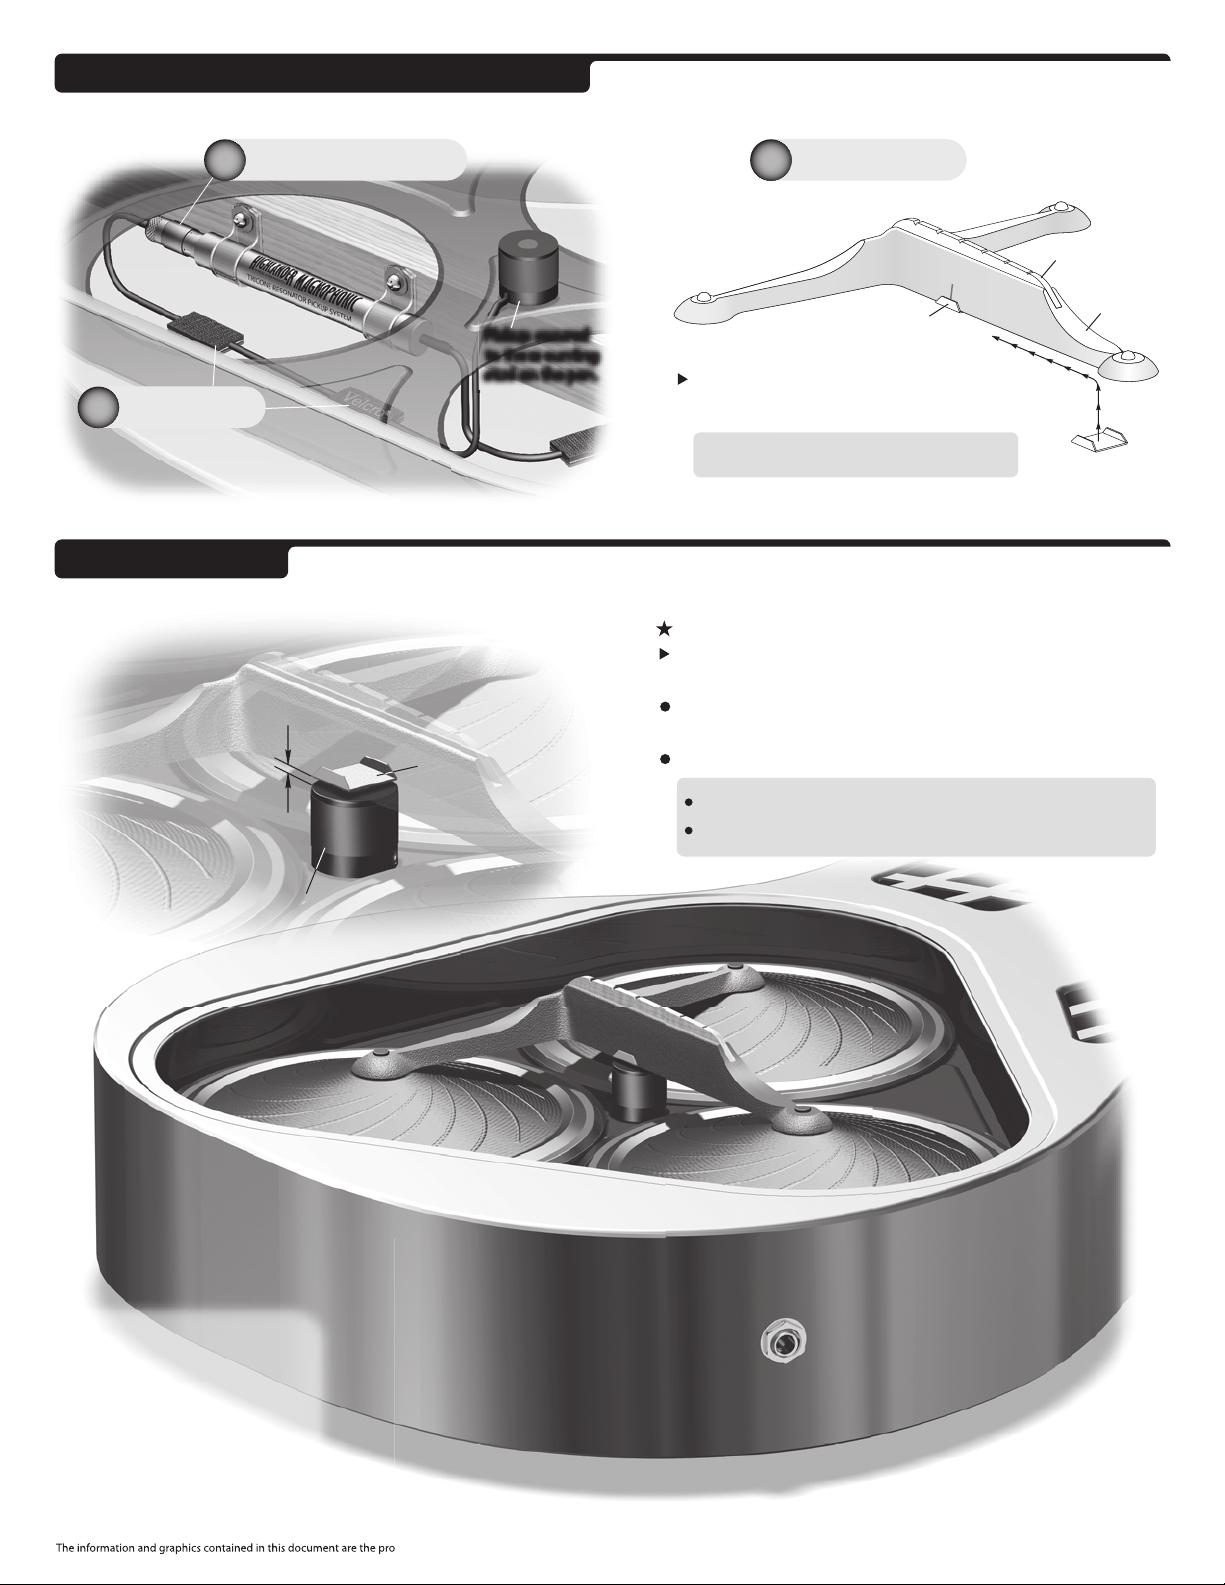
T-Clip
T-Clip
in place
T-Bridge
Saddle
o
pert
y
o
f
Highlander Musical Audio Products.Cop
y
ing o
f
an
y
kind is prohibited, except
f
or personal use onl
y
.
©
Highlander Musical Audio Products 1991-2009
Velcro
®
Install the T-Clip by locating it at narrow part
of the T-Bridge and pushing it back so that it
is positioned above the center of the pickup.
Tip: Place the cones in the pan, locate the T-Bridge on the cones
and mark the center of the pickup on the side of the T-Bridge
with a pencil.Use the pencil mark to line up theT-Clip.
Center line
of Pickup
There must be a gap between the T-Clip and the Pickup for the system to operate correctly
CHECK THE GAP
CHECK THE GAP
The T-Clip and Pickup use magnetic principles that are similar to dynamic
microphones, using the structure of the Tricone to create a virtual microphone
Plug in the Pickup and Slip on the Clip
Plug in the Pickup and Slip on the Clip
UNDER STRING TENSION:
UNDER STRING TENSION:
Measure the Gap between the bottom of the T-Clip
and the top of the Pickup.
The Gap must be between 1/16" and 3/32"
(1.5mm / 2.4mm).
The T-Clip must not rest on or touch the Pickup.
THE GAP
THE GAP
If the GAP is too Small:
Check between the pan and the neck stick for any wooden shims. Removing or
reducing the thickness of any shims will lower the pan and increase the GAP.
It may also help to remove a small amount of material from the underside of the T-
Bridge at the point where the T-Clip is located. This should be limited to 1/32" (0.8mm).
T-Clip
Pickup
Last but not Least:
Last but not Least:
If the portion of strings between
the tailpiece and the saddle is
free to resonate, harmonics that
normally cannot be heard are
amplified and made audible.
This can be prevented by
damping the area with a piece of
dense felt or leather, woven
through the strings.
For clarity the tailpiece
For clarity the tailpiece
and strings are not shown
and strings are not shown
UNDER STRING TENSION
UNDER STRING TENSION
MEASURE
MEASURE
Plug in the RCA Jack
8a
Velcro
®
Cable
8b
Install the T-Clip
9
Pickup secured
Pickup secured
to the mounting
to the mounting
stud on the pan.
stud on the pan.


