Hisense C2005US User manual

C2005US
OWNER'S MANUAL
COLOR TELEVISION
R
Part No: IES050157

Important safety instructions................................ .......... .......... .......... .......... .......... .....1
Brief Operating Instructions................................. .......... .......... .......... .......... .......... .....3
Learning about your new TV ................................ .......... .......... .......... .......... .......... .....5
Selecting a location for the TV............................... .......... .......... .......... .......... .......... .....5
Connecting your TV......................................... .......... .......... .......... .......... .......... .....5
Connecting the audiovisual equipments ................ .......... .......... .......... .......... .......... .....6
Connecting the antenna ................................ .......... .......... .......... .......... .......... .....6
Connecting a cable converter box ...................... .......... .......... .......... .......... .......... .....7
Preparing the remote control for use ........................ .......... .......... .......... .......... .......... .....8
Using the TV features....................................... .......... .......... .......... .......... .......... .....9
Understanding the TV features ......................... .......... .......... .......... .......... .......... .....9
Watching a TV program ................................ .......... .......... .......... .......... .......... .....9
Using the OPTION menu ............................... .......... .......... .......... .......... .......... .....9
Using the PRESET menu .............................. .......... .......... .......... .......... .......... .....10
Changing channels..................................... .......... .......... .......... .......... .......... .....10
Adjusting the picture ................................... .......... .......... .......... .......... .......... .....11
Adjusting the sound .................................... .......... .......... .......... .......... .......... .....11
Using the CLOCK menu ............................... .......... .......... .......... .......... .......... .....12
Using the closed caption feature....................... .......... .......... .......... .......... .......... .....13
Using the V-CHIP feature .............................. .......... .......... .......... .......... .......... .....13
Setting the sleep timer ................................. .......... .......... .......... .......... .......... .....14
Displaying the current channel number on screen ...... .......... .......... .......... .......... .......... .....15
Switching between two channels ....................... .......... .......... .......... .......... .......... .....15
Selecting the signal source ............................. .......... .......... .......... .......... .......... .....15
Appendix ................................................... .......... .......... .......... .......... .......... .....15
Cleaning and care ...................................... .......... .......... .......... .......... .......... .....15
Trouble shooting ....................................... .......... .......... .......... .......... .......... .....16
Specifications .......................................... .......... .......... .......... .......... .......... .....17
This is an IEC safety class II (reinforced insulation) product and does not need grounding for safety.
SAFETY CLASS
Please read all the safety and operating instructions carefully before you begin.
WELCOME TO THE BRIGHT AND VIVID WORLD OF COLOR TV
Dear customer,
Thank you for purchasing this color TV . We wish you many years of viewing pleasure.
The goal of this manual is to guide you through setting up and operating your TV as quickly as possible.
CONTENTS

CAUTION
CAUTION: TO REDUCE THE RISK OF ELEC-
TRIC SHOCK, DO NOT REMOVE
COVER(OR BACK).NO USER-
SERVICEABLE PARTS INSIDE.
REFER SERVICING TO QUALIFIED
SERVICE PERSONNEL.
The lightning flashwith arrowhead symbol,within an
equilateral triangle isintended to alertthe user tothe
presence of uninsulateddangerous voltage withinthe
product s enclosure thatmay be ofsufficient magnitude
to constitute arisk of electricshock.
'
The exclamation pointwithin an equilateraltriangle is
intended to alertthe user tothe presence ofimportant
operating and maintenance(servicing) instructions in
the literature accompanyingthe TV.
CAUTION: Changes or modifications not expressly approved by the party responsible for
with the FCC Rules could void the users authority to operate this equipment.
compliance
WARNING: TO PREVENT OR SHOCK HAZARD,DO NOT EXPOSETHIS APPLIANCETO RAIN OR MOISTURE.
-1-
Important safety instructions
1. READ THESEINSTRUCTIONS
All the safetyand operating instructionsshould be readbefore the product is operated.
2. KEEP THESE INSTRUCTIONS
The safety andoperating instructions shouldbe retained forfuture reference.
3. HEEDALL WARNINGS
All warnings onthe product andin the operatinginstructions should beadhered to.
4. FOLLOWALL INSTRUCTIONS
All operating anduse instructions shouldbe followed.
5. DO NOTUSE THIS APPARATUS NEAR WATER
Do not usethe product nearwater. Forexample, near abathtub, washbowl, kitchensink, or laundrytub, in awet
basement, or neara swimming pool,and the like.
6. CLEAN ONLY WITHDRY CLOTH
Unplug the TV from thewall outlet beforecleaning. Do notuse liquid cleanersor aerosol cleaners.Use a damp
cloth for cleaning.
7. DO NOTBLOCK ANYVENTILATION OPENINGS
Slots and openingsin the cabinetback or bottomare provided forventilation, to ensurereliable operation ofthe
TV and toprotect it fromoverheating. These openings must notbe blocked orcovered. The openings should never
be blocked byplacing the producton a bed,sofa, rug, orother similar surface.This product should never beplaced
near or overa radiator orheat resource. This product shouldnot be placedin a built-ininstallation such asa bookcase
or rack unlessproper ventilation isprovided or themanufacture's instructions have been adhere to.
8. DO NOTINSTALL NEAR ANYHEAT SOURCES
This product shouldbe situated awayfrom heat sourcessuch as radiators, stoves, or otherproducts (including amplifiers)
that produce heat.
9. DO NOTDEFEAT THE SAFETY PURPOSE OF THEPOLARIZED OR GROUNDING-TYPEPLUG
A polarizedplug has twoblades with onewider than theother.A grounding-type plug hastwo blades anda third grounding
prong. The wide blade orthe third prongare provided for your safety. If theprovided plug doesnot fit intoyour outlet, consult
an electrician forreplacement of theobsolete outlet.
10. PROTECT THEPOWER CORD FROMBEING WALKEDON OR PINCHEDPARTICULARLY AT PLUGS, CONVENIENCE
RECEPTACLES, AND THE POINT WHERE THEYEXIT FROM THEAPPARATUS.
11. ONLY USEATTACHMENTS/ACCESSORIES SPECIFIED BYTHE MANUFACTURE.

S3126A
-2-
Important safety instructions
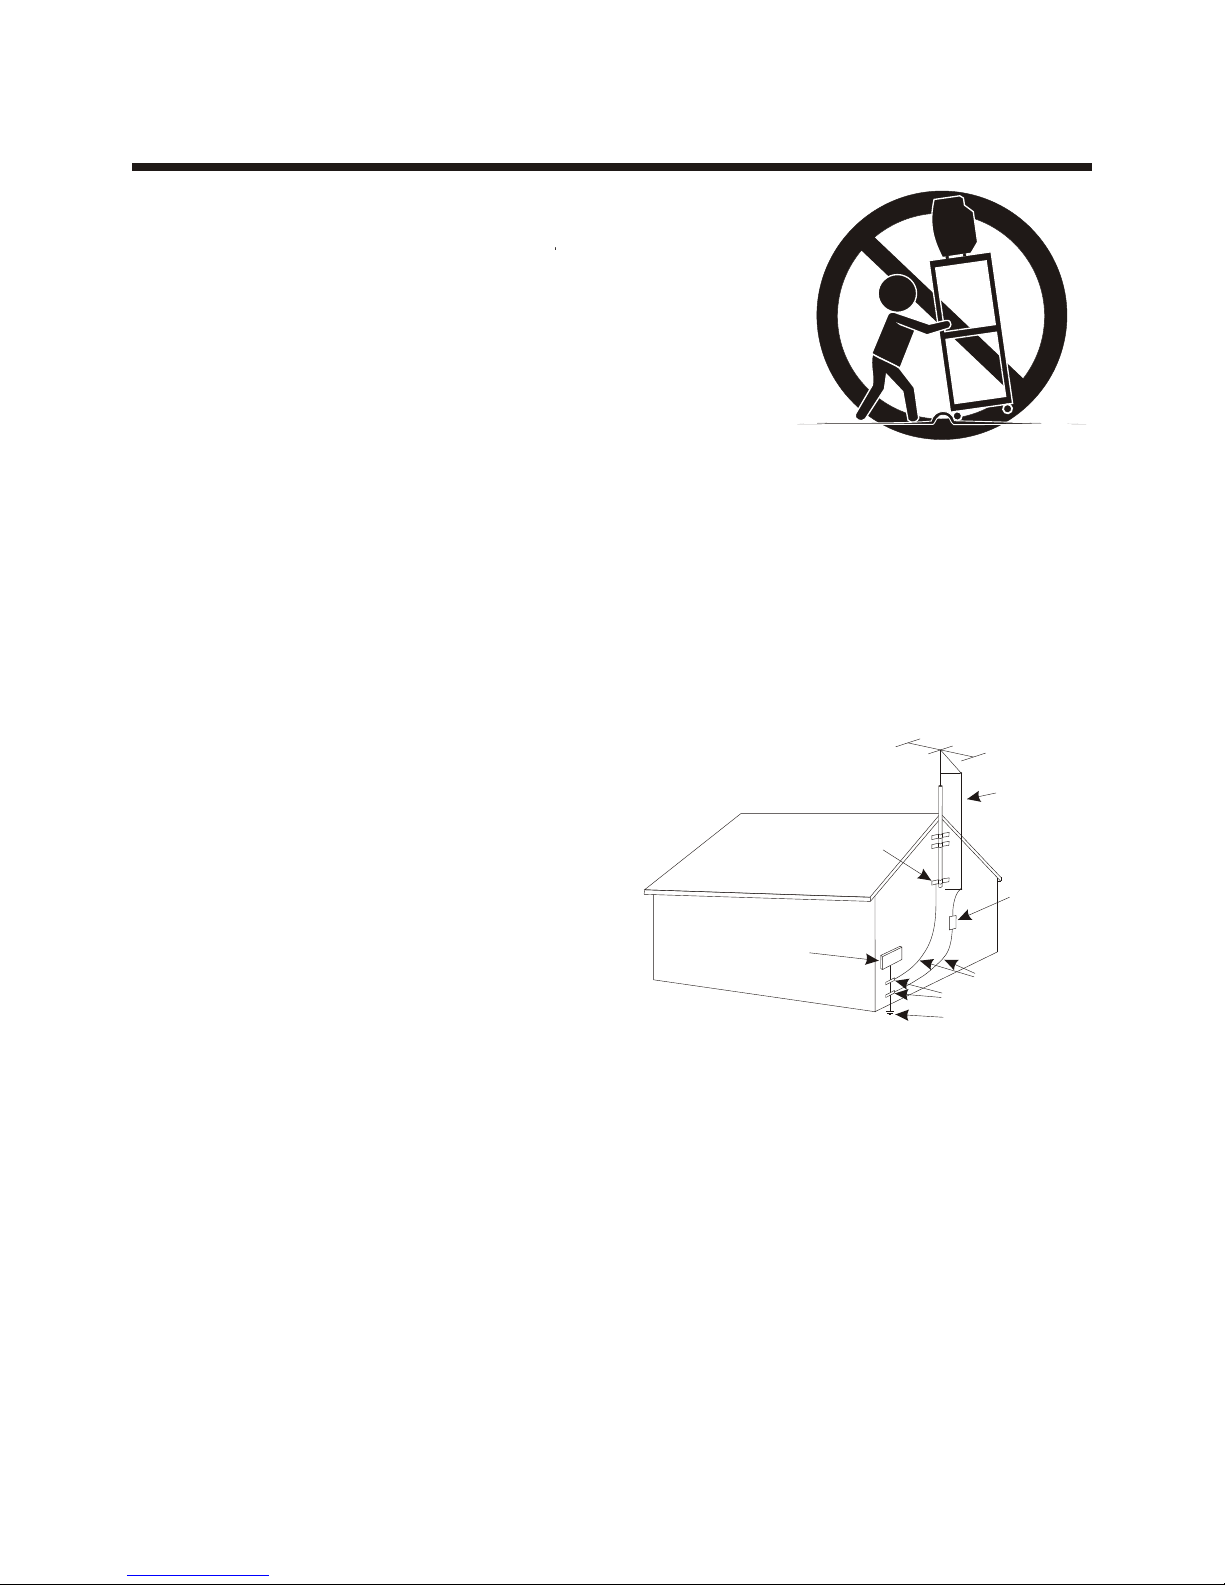
12. USE ONLY WITHCART,STAND, TRIPOD, BRACKET, OR TABLE SPECIFIED BY
THE MANUFACTURER,OR SOLD WITHTHE APPARATUS. WHEN ACART IS USED,
USE CAUTION WHENMOVING THE CART/APPARATUS COMBINATION TO AVOID
INJURY FROMTIP-OVER.
Do not placethis TV on an unstablecart, stand, tripod,bracket ,or table.The TVmay
fall, causing seriousinjury to someone,and serious damageto the appliance.An TV
and cart combinationshould be movedwith care. Quickstops, excessive force, and
uneven surfaces maycause the productand cart combinationto overturn.
POWER SOURCE
This TV should be operatedonly from thetype of powersource indicated onthe marking label.If you arenot sure ofthe type
of power supplyto your home,consult your appliancedealer or localpower company .For TVs intended to operatefrom
battery power,or other sources,refer to theoperating instructions.
16. POWER CORDPROTECTION
Power-supply cords shouldbe routed sothat they arenot likely tobe walked onor pinched byitems placed uponor against
them, paying particularattention to cordsat plugs, convenience receptacles, and thepoint where theyexit from theappliance.
17. OUTDOORANTENNA GROUNDING
If an outsideantenna or cablesystem is connected to
the TV, be sure the antenna orcable system isgrounded
to provide someprotection against voltagesurges
and built-up staticcharges. Section 810of the National
Electrical Code,ANSI/NFPANO.70,provides
information with respectto proper grounding
of the mastand supporting structure,grounding
of the lead-inwire to anantenna discharge unit,
size of groundingconductors, location of
antenna discharge unit,connection to grounding
electrodes, and requirementsfor the grounding
electrode.(Fig.A)
18. LIGHTNING
For added protectionfor this TV receiver during
a lightning storm,or when itis left unattended and
unused for longperiods of time,unplug it from the wall outletand disconnect theantenna or cablesystem. This will prevent
damage to theTV due to lightning andpower line surges.
19. POWER LINES
An outsideantenna system shouldnot be located in the vicinityof overhead powerlines, or otherelectric light orpower
circuits, or whereit can fallinto such powerlines or circuits.When installing anoutside atenna system,extreme care should
be taken tokeep from touchingsuch power linesor circuits ascontact with themmight be fatal.
20. OVERLOADING
Do not overloadwall outlets andextension cords as this can resultin a riskof fire orelectric shock.
21. OBJECTAND LIQUID ENTRY
Never push objectsof any kindinto this TV through openingsas they maytouch dangerous voltagepoints or shortout parts
that could resultin fire orelectric shock. Never spill liquid ofany kind intothe TV.
22. SERVICING
Do not attemptto service thisTV yourself as opening orremoving covers mayexpose you todangerous voltage orother
hazards. Refer allservicing to qualifiedservice personnel.
23. REPLACEMENT PARTS
When replacement partsare required, besure the servicetechnician uses replacement parts specified bythe manufacturer
that have thesame characteristics asthe original part.Unauthorized substitutions may result in fire,electric shock, injuryto
persons or otherhazards.
24. SAFETY CHECK
Upon completion ofany service orrepairs to this TV,ask the servicetechnician to performroutine safety checksto determine
that the TV is inproper operating condition.
13. UNPLUG THISAPPARATUS DURING LIGHTNINGSTORMS OR WHEN UNUSED
FOR LONG PERIODSOF TIME.
For added Protectionfor this TV receiver duringa lightning storm, or when itis left
unattended and unusedfor long periodof time, unplugit from thewall outlet and
disconnect the antennaor cable system.This will prevent damage tothe TV due to
lightning and powerline surges.
14. REFERALL SERVICINGTO QUALIFIED SERVICE PERSONNEL. SERVICING IS REQUIRED WHEN THE APPARATUS
HAS BEEN DAMAGEDIN ANYWAY,SUCH ASPOWER-SUPPLYCORD OR PLUGIS DAMAGED, LIQUIDHAS BEEN
SPILLED OR OBJECTSHAVE FALLEN INTO THEAPPARATUS, THEAPPARATUS HAS BEENEXPOSED TO RAIN OR
MOISTURE, DOES NOTOPERATE NORMALLY, OR HASBEEN DROPPED.
15.
ANTENNA LEAD
IN WIRE
ANTENNA
DISCHARGE UNIT
GROUND CLAMPS
POWER SERVICE GROUNDING
ELECTRODE SYSTEM
ELECTRIC
SERVICE
EQUIPMENT
GROUND
CLAMP
EXAMPLE OF ANTENNA GROUNDINGAS PER
NATIONAL ELECTRICAL CODE
FIGURE A
S2898A
GROUNDING WIRES

V-CHIP ZOOM CCD
312
645
978
0
1--
RECALL
CH+
CH-
MENU
VOL- VOL+
P.MODE TV/AV
SLEEP DISPLAY
ES-10702CES-10702C
Brief Operating Instructions
1. Connection
Connect the antenna lead or CATV cable or external equipments ( such as Antenna, Cable TV, VCD, DVD,
VTR, Set top box, etc .) to the corresponding terminals or interface on the TV rear( please refer to the
owner's manual of the equipment to be connected as well ) and confirm that the signal source is available
and works normally.
2. The remote control
Open the battery cover of the remote control and install two AAA size batteries and then close
the battery cover .
-3-
Power on / off
CHANNEL NUMBER : Direct Channel
selection
Recall: Return to previous channel
Display: Display the current
channel number
TV/AV: TV/AV selection
CH+/CH-: Channel selection
Cursor up/down
VOL+/VOL-:Control the volume level
Select or adjust from a
particular menu
P.MODE: Select the picture mode
Mute the sound
MENU: Call up the main menu
SLEEP: Display the sleep timer and
start the function
V-CHIP: Enter the parental
control menu
CCD: C.CAPTION on/off
ZOOM: Zoom in / out
IN
S-VIDEO
VIDEO
AUDIO
MONO
Y
Cb
Cr
Antenna
Component Video Input
Audio Input
Video Input
S-VIDEO Input
IN
S-VIDEO
VIDEO
AUDIO
MONO
Y
Cb
Cr
ANT75

3. Switching on/off
1 ) Connect the TV to power outlet, the power indicator will display red. Press the power switch or
the button on the remote control to turn on the TV.
2 ) Press the power switch or the button on the remote control to turn offthe TV.
4. Signal source selection
Press the TV/AV button to select TVor AV mode.
5. Air/Cable selection
Youcan select the signal receiving method according to the following steps:
1 ) Press the MENU button repeatedly until the PRESET menu appears as
shown on the right.
2 ) Press the CH+ or CH- button to select the item ANTENNA.
3 ) Press the VOL- or VOL+ button to change the item betweenAIR and CATV.
6. Channel search
1 ) Press the MENU button repeatedly until the PRESET menu appears as
shown on the right.
2 ) Press the CH+ or CH- button to select the item AUTO-SEARCH.
3 ) Press the VOL- or VOL+ to start to auto-search programs.
7. Picture adjustment
1 ) Press the MENU button, and the PICTURE menu appears as
shown on the right.
2 ) Press the CH+ or CH- to select the item you want to adjust.
3 ) Press the VOL- or VOL+ to adjust the item.
8. Sound adjustment
1 ) Press the VOL+ or VOL- button to adjust the volume.
9. Timer setting
1 ) Press the MENU button repeatedly until the CLOCK menu appears as
shown on the right.
2 ) Press the CH+ or CH- to select the item you want to set.
3 ) Press VOL- to set hour and press VOL+ to set minute.
POSITION 17
PRESET
SKIP
ANTENNA
AUTO-SEARCH
OFF
AIR
Select Adjust
POSITION 17
PRESET
SKIP
ANTENNA
AUTO-SEARCH
OFF
AIR
Select Adjust
COLOR
80
PICTURE
CONTRAST
SHARP
TINT
CORING
50
OFF
00
50
BRIGHT 75
BLACK STRETCH ON
Select Adjust
TIME
CLOCK
ON-TIME
OFF-TIME
ALARM
BESPOKE-TIME
POSITION
:
:
:
:
:
Select Adjust
Note2: For more detailed information, please refer to the manual.owner's
Note1: All keys mentioned above are on the remote control unless indicated otherwise.
-4-

-5-
Learning about your new TV
Youcan operate your TV by using the buttons on the front panel or the remote control. The terminals on
the back panel provide all the connections you will need to connect other equipment to your TV.
Caution:
The TV power plug has one prong wider than the other and will fit only one way into a standard
electrical outlet ( 120VAC,60Hz ). If the plug does not fit into the outlet, try turning it around. If the
plug still does not fit, the outlet is probably non-standard and must be replaced by a qualified
electrician.
Do not tamper with the plug or try to force it into a non-standard outlet.
Selecting a location for the TV
1 ) Place the TV on the floor or on a sturdy platform in a location where light does not directly hit the screen.
2 ) Place the TV far enough from the walls to allow proper ventilation. Inadequate ventilation may cause
overheating, which may damage the TV.
Note: The above figures are for reference only, please refer to the actual units to determine their appearance.
If you haven't connected electronic equipment before, or you have been frustrated in the past, you may wish
to read this section. (Cables are not supplied)
Caution: Do not plug the TV in until you have finished connecting all of your equipment.
Connecting your TV
Front Controls
Power Indicator
Infrared Sensor
Power Switch
Front Panel
Volume Down
TV/AV Selection
Channel Up
Channel Down
Volume Up
MENU
Back Connections
AC Cord and Plug
IN
S-VIDEO
VIDEO
AUDIO
MONO
Y
Cb
Cr
Antenna
Component Video Input
Audio Input
Video Input
S-VIDEO Input
IN
S-VIDEO
VIDEO
AUDIO
MONO
Y
Cb
Cr
ANT75
AV/TV MENU CH
VOL
AV/TV MENU CH
VOL
VIDEO
AUDIO/L
AUDIO/R
LateralAV
Video Input
Audio Input (Right)
Audio Input (Left)

To enjoy the programs coming from your audiovisual equipment such as VCR, DVD, Satellite receiver, Camcorder,
Audio amplifier etc, the signal must be received by the set via the AV input terminals at rear. Connect the devices as
the shown below.
Note: When connecting YUV (Y Cb Cr) jacks, Audio Left and Right cables should be connected to AUDIO
INPUT terminals.
Connecting the audiovisual equipment
Connecting your TV
To enjoy the signal transmitted by your local TV station, you need an indoor or outdoor antenna ( not supplied ).
Perfect picture quality requires a good signal and generally means that an outdoor antenna must be implemented.
The exact type and location of the antenna will depend on your particular area. Consult your local dealer or service
personnel for best advice. If you are a subscriber of your local CATV net, the outdoor or indoor antenna is not needed.
Connect the equipments as the following figure.
-6-
Connecting the antenna
Antenna Socket
Rear View
IN
S-VIDEO
VIDEO
AUDIO
MONO
Y
Cb
Cr
ANT75
OUTPUT
VIDEO LEFT(MONO) RIGHT
To the input terminals
PLAY VIDEO TAPE, DVD etc.
TV
OUTPUT
Y
Cb
Cr
VCR/DVD
VCR/DVD
Loosen the screw Insert the feeder in Tighten the screw
Plug(not supplied)
Adaptor (not supplied)
The signal comes from:
An outdoor antenna
An indoor antenna
CATV net
Twin-Lead Feeder(300W)
Coaxial Cable (75W)
IN
S-VIDEO
VIDEO
AUDIO
MONO
Y
Cb
Cr

IN
S-VIDEO
VIDEO
AUDIO
MONO
Y
Cb
Cr
ANT75
-7-
Connecting a cable converter box
This television has an extended tuning range and can tune most cable channels without using a cable
company supplied converter box. Some cable companies offerpremium pay channels in which signal is
scrambled. Descrambling these signals for normal viewing requires the use of a descrambler device which
is generally provided by the cable company.
For subscribers to Basic Cable TV Service
For basic cable service not requiring a Converter/Descrambler box, connect the CATV 75 ohm Coaxial
Cable directly to the Antenna Jack on the back of the television.
For subscribers to Scrambled Cable TV Service
If you subscribe to a cable service which requires the use of a Converter/Descrambler box, connect the
incoming cable to the Converter/Descrambler box and connect the output of the box to the Antenna Jack
on the back of the television. Follow the connections shown below. Set the television to the output of the
Converter/Descrambler box(usually channel 3 or 4)and use the Converter/Descrambler box to select
channels.
For Subscribers to Unscrambled Basic Cable with Scrambled Premium Channels
If you subscribe to a cable service in which basic cable channels are unscrambled and premium channels
require the use of a Converter/Descrambled box, you may wish to use a two-set signal splitter ( sometimes
called two set coupler ) and an A/B Switch box from the cable installer or an electronics supply store.
Follow the connections shown below. With the switch in the B position, you can directly tune any
nonscrambled channels on your TV. With the switch in the Aposition, tune your TV to the output of the
Converter/Descrambler box(usually channel 3 or 4) and use the box to tune scrambled channels.
Note: When you use a converter box with your TV, there may be features that you cannot
program using the remote control.
Connecting your TV
Converter/Descrambler
Splitter A/B Switch

Preparing the remote control for use
Installing the remote control batteries
1. Open the battery cover on the back of the remote control.
2. Install two AAA size (1.5V) batteries. Match the +and -signs on the batteries to the signs on the battery
compartment.
-8-
3. Close the battery cover on to the remote control.
Note:
1. Dispose of your batteries in a designated disposal area. Do not throw your batteries into fire.
2. Do not mix battery types or combine used batteries with new ones.
3. Remove dead batteries immediately to prevent battery acid from leaking into the battery compartment.
4. If you do not intend to use the remote control for a long time, remove the batteries.
5. The effective range of remote control is suggested in the figure.
+
+

Using the TV features
-9-
Watching a TV program
1 ) Connect to power outlet. The power indicator will display red. Press the power switch or the
button on the remote control t .
2 ) Select the on-screen display language (See Using the OPTION menu on page 9).
3 ) Auto-search the programs (See Using the PRESET menu on page 10).
4 ) Press CH+ or the channel number buttons on the remote control to s
.
5 ) Adjust the picture quality for a natural looking image (See Adjusting the picture on page 11).
6 ) Press VOL- to a .
7 ) Press the power switch or the button on the remote control to turn off the TV.
the TV
o turn on the TV
or CH- elect the channel you wish to view.
(See Changing channels on page 10)
or VOL+ djust the volume
Using the OPTION menu
1 ) Press the MENU button repeatedly until OPTION menu as
shown on the right.
2 ) Press the CH+ to select the item you want to adjust.
appears
or CH-
Tinted, Bright Black Matrix Picture Tube
181 Channels Selection-All VHF/UHF channels plus up to 125.
PLL Frequency Synthesized Tuning-The latest PLL frequencysynthesized electronic tuning system
provides free and easy channel selection, and lets you tune directly to any channel using the channel
number buttons on the remote control.
On-Screen Function Display
Full-Function Remote Control
Sleep Timer
Closed Caption Decoder-Youmay view specially labelled (cc) TV program, movies, new, prerecorded
tapes, etc. with either a dialogue caption or text display added to the program.
Auto Shut Off Function-If thereis no signal input from the antenna terminal and no operation for 15
minutes, the TV willturn itself off .
V-CHIP-Enables parents to prevent their children from watching inappropriate programs on TV.
Understanding the TV features
Language
Press CH- or CH+ to change the on-screen display language.
LANGUAGE ENGLISH
OPTION
C.CAPTION
CC ON MUTE
OFF
OFF/ON
Select Adjust

-10-
Using the TV features
Using the PRESET menu
1 ) Press the MENU button repeatedly until the PRESET menu appears as
shown on the right.
2 ) Press the CH+ button to select the item you want to adjust.
or CH-
The item allows the TV to automatically detect all active channels and store them in its memory.
Press CH+ or CH- to start it. You can also press the MENU button to stop the auto search if you want.
Note: The PRESET menu will not appear when the TV set is in AV mode.
AUTO-SEARCH
Press to select the channel that you wish. You can also use the channel number
buttons to change the channel.
CH+ or CH-
POSITION
The item allows you to skip a channel.
If some channel is set to ON, the channel will be skipped when
you select a channel by pressing CH+ or CH-.
Press VOL- or VOL+ to select ON or OFF.
SKIP
The item allows you to select the signal receiving method.
change the item between AIR and CATV.
If you use an antenna, choose AIR.
If you use cable, choose CATV.
Press VOL- or VOL+ to
ANTENNA
POSITION 17
PRESET
SKIP
ANTENNA
AUTO-SEARCH
OFF
AIR
Select Adjust
Changing channels
To change the channel, you can
1) Press on the remote control or on the TV.
2) Press the channel number buttons.
You can change to a specific channel by pressing the channel number buttons. For example, to select channel 123,
press the 1-- button first , then press the 2 button and the 3button.
CH+ or CH- qCH p

Using the TV features
-11-
Note: The items in this menu are explained in details as following.
Adjusting the picture
Adjusting the picture quality
1 ) Press the MENU button, then the PICTURE menu appears as shown on the right.
2 ) Press the to select the item you want to adjust.
3 ) Press the VOL- to adjust the level.
CH+ or CH-
or VOL+
Selecting the picture mode
You can select the picture mode by pressing the P.MODE button on the remote control repeatedly.
The picture mode will alternate in five modes as shown as below.
Adjusting the sound
Item Pressing
BRIGHT
CONTRAST
SHARP
COLOR
TINT Purplish
Softer
Paler
Darker
Higher
VOL-
Sharper
Deeper
Lighter
Lower
VOL+
Greenish
Personal
PERSONAL LIGHTVIVIDSOFT
STANDARD
COLOR
80
PICTURE
CONTRAST
SHARP
TINT
CORING
50
OFF
00
50
BRIGHT 75
BLACK STRETCH ON
Select Adjust
Volume
Press VOL- to decrease or increase the volume.or VOL+
Muting the sound
Press to temporarily turn off the sound. While the
sound is off, the screen will display as shown on the right.
To restore the sound, press again.
on the remote control Mute
25

-12-
Using the CLOCK menu
The item allows you to set the time on the TV.
Press VOL- to set hour. The clock counts up one hour for each press of the button.
Press VOL+ to set minute. The clock counts up one minute for each press of button.
local
the
The item allows the TV automatically to turn to a preset channel when preset time comes.
Set this item just like the TIME setting.
The item allows the TV automatically to switch to standby mode when the preset time comes.
Set this item just like the TIME setting.
1 ) Press the MENU button repeatedly until the CLOCK menu appears as
shown on the right.
2 ) Press the CH+ to select the item you want to adjust.
or CH-
Using the TV features
Note:
1 ) The time you set in this menu is for reference only.
2 ) Youmust set the item TIME first, otherwise you can
not select the other items in this menu.
TIME
ON-TIME
OFF-TIME
The item is for reminding you when preset time comes. A clock will display
on the screen. It will disappear when you press any button.
Set this item just like the TIME setting.
ALARM
TIME
CLOCK
ON-TIME
OFF-TIME
ALARM
BESPOKE-TIME
POSITION
:
:
:
:
:
Select Adjust
The item allows the TV automatically to the channel preset in the POSITION when the preset time comes.
Set this item just like the TIME setting.
to turn
BESPOKE-TIME
The item allows preset time in ON-TIME or BESPOKE-TIME comes.the TV automatically turns to the channel when the
Press VOL- or VOL+ to preset a channel.
POSITION

Using the V-CHIP feature
Using the TV features
-13-
Using the closed caption feature
Youhave two options with the closed caption feature: captions or text. A caption is a printed version of
the dialogue, narration and/or sound effects of a TV program. Text is information not related to the
program that appears on half of the TVscreen.
To use the closed caption feature:
1) Press the MENU button on the remote control repeatedly until the
OPTION menu appears as shown on the right.
2) Press CH+ to select the item C.CAPTION or CC ON MUTE.
3) Press VOL-
or CH-
or VOL+ to change the C.CAPTION item among
CC1/CC2/CC3/CC4/TT1/TT2/TT3/TT4 and OFF.
4) Press VOL- or VOL+ to change the CC ON MUTE item between ON and OFF.
LANGUAGE ENGLISH
OPTION
C.CAPTION
CC ON MUTE
OFF
OFF/ON
Select Adjust
To block programs by rating
1 ) Press the V-CHIP button , the V-CHIP menu will appear as
shown on the right.
2 ) Enter the password 0000.
3 ) Press the CH+ or CH- to select the item BLOCK.
4 ) Press the CH+ or CH- to enable or disable the V-Chip and program
blocking by rating.
Note: If the item BLOCK is set to be ON, the V-Chip and program blocking will be enabled.
If the item BLOCK is set to be OFF, the V-Chip and program blocking will be disabled.
To set the TV or MPAARating
1 ) Press the CH+ or CH- to select the item TV RATING or MPAARATING.
2 ) Press the CH+ or CH- to move the cursor up and down and press the VOL- or VOL+ to move the cursor
left and right to select the ratings you want to block.
3 ) Press the MENU to block or unblock the rating. Blocked TV ratings are signified by a red [U], unblocked
TV ratings are signified by a green [B]. Blocked MPAAratings are will turn into red, and the unblocked
MPAAratings are cyan. As you block ratings, all ratings higher than the ones you select are blocked, as
well. For example, if you choose to block the MPAA rating R, the higher ratings, NC-17 and X, are
automatically blocked too.
4 ) When you have done selecting the ratings to be blocked, press the V-CHIP button to return to
normal viewing.
MPAA-RATING
Rating
G
PG
PG-13
NC-17
X
R
FV LSVD
Rating
TV-RATING
TV-Y
TV-Y7
TV-G
TV-14
TV-MA
TV-PG
U
U
U
U
U
U
U
U
U
U
U
U
U
U
U
U
U
U
U
U
U
U
U
U
U
Movie
PASSWORD
V-CHIP MENU
BLOCK
TV RATING
OFF
Select Adjust
MPAA RATING

The Motion Picture Association of America (MPAA) uses a rating system to qualify motion picture content. Television
broadcasters employ a rating system to qualify the content of televison programs as well. The MPAA and TV ratings
work with the V-CHIP feature and allow you to block out programming above the rating limits you determine.
About MPAA Ratings
Age Defined as
TV-Y
TV-Y7
TV-G
TV-PG
TV-14
TV-MA
All children
Directed to older children
General audience
Parental Guidance suggested
Parents Strongly cautioned
Mature Audience only
Contents Defined as
FV
D
L
S
V
Fantasy Violence
Suggestive dialogue
Strong language
Sexual situations
Violence
Setting the sleep timer
You can set the TV so it turns off automatically.
To set the sleep timer:
1 ) Press the SLEEP button on the remote control. The screen will display
as shown on the right.
2 ) Press the SLEEP button he clock will count up 15 minutes
for each press of the SLEEP button (15,30,45....).
To confirm the sleep timer setting:
P
To cancel the sleep timer:
Press the SLEEP button repeatedly until the display disappears
repeatedly and t
The timer can be set up to 120 minutes.
ress the SLEEP button and the remaining time will be momentarily displayed.
.
Sleep
Using the TV features
-14-
Rating Defined as
G
PG
PG-13
R
NC-17
X
General audience
Parental Guidance suggested
Parents strongly cautioned
Restricted
No one 17 and under admitted
Adult audience only
About TV Ratings
The TV ratings are divided into two groups: age-based and content-based.

Displaying the current channel number on screen
Press the DISPLAY button on the remote control, and the current channel number will display on the top-right
corner of the screen. Whenever you want to cancel it, press the DISPLAY button again.
Switching between two channels
Press the
the screen will
RECALL button on the remote control to return to the previous channel that you have just viewed.
Press the RECALL button repeatedly, and alternate between the present and previous channels.
Selecting the signal source
Press the TV/AV button to select TV or AV mode.
Using the TV features
-15-
Appendix
Cleaning and care
WARNING: TV sets use high voltage. Do not try to remove the cabinet back. Refer servicing to
qualified service technicians.
To clean the TV screen:
1 ) Unplug the TV to avoid a possible shock hazard.
2 ) Use a clean cellulose sponge or chamois cloth dampened with a solution of mild detergent and warm
water to clean the TV screen and trim. Do not use too much water because water spills into the cabinet
can cause damage to the TV.
3 ) Wipe offany excess moisture with a clean dry cloth.
4 ) Polish the cabinet with a quality furniture polish to maintain the finish and appearance of the cabinet.
Caution: Never use strong solvents such as thinner, benzene, or other chemicals on or near
the cabinet. These chemicals can damage the finish of the cabinet.

Troubleshooting
Before calling a service technician, please check the following table for a possible cause of the problem and
some solutions.
-16-
Problem Solution
TV will not turn on
No picture, no sound
No sound, picture OK
Poor sound, picture OK
Poor picture, sound OK
Poor reception of broadcast channels
Unable to select a certain channel
Multiple images
Poor color or no color
The remote control does not operate
Make sure the power cord is plugged in, then press POWER.
The remote control batteries may be dead. Replace the batteries.
Check the antenna/cable connections.
The sound may be muted. Press VOL+.
The station may have broadcast difficulties. Try another channel.
The station may have broadcast difficulties. Try another channel
Check the antenna connections.
The station may have broadcast difficulties. Try another channel.
Adjust the picture from the menu.
The channel may be skipped with the SKIP feature.
The station may have broadcast difficulties. Try another channel.
Use a highly directional outdoor antenna.
The station may have broadcast difficulties. Try another channel.
Adjust the TINT and COLOR in the menu.
If you change the direction of the TV while it is turned on, the
picture could suffer from color shading. If so, turn off the TV and
allow it to cool down for several hours before turning it on again.
Check to see if the TV/AV mode is properly set.
There may be an obstruction between the remote control and the
remote control sensor.
The remote control batteries may be dead. Replace the batteries.
The station may have broadcast difficulties. Try another channel.
Check the antenna connections.
If you are using a VCR, make sure the TV/AV button is set correctly.
Appendix

-17-
Specifications
Appendix
Picture Tube
Television system
Channel coverage
Power source
Power consumption
Audio power
Speaker type
Video/Audio
terminals
Dimensions
Weight
Supplied accessories
NTSC standard
VHF: 2~13
UHF: 14-69
Cable TV: 2~13,A~W, W+1~W+84,
A-5~A-1, 4A
120VAC, 60Hz
90W
Remote control
C2005US
TYPE 20(508mm diagonal )
2W
2 3-11/20 inches 2
46lbs
Width: 24-3/5inches
Height: 20-7/10inches
Depth: 20-1/10inches
Design and specifications are subject to change without notice.
S-VIDEO INPUT
VIDEO INPUT: RCA connector 1
AUDIO INPUT: RCA connector 2
YCbCr INPUT: RCA connector 3

Hisense Color TV
LIMITED WARRANTY
Hisense Corporation warrants this Product(including any accessories)againstdefects in material or workmanship,
subject to anyconditions set fourthbelow:
1. Limited Warranty
This limited warrantyextends to the original consumer purchaser orany person receiving this TV set as a gift from the
original consumer purchaserand to no other purchaser or transferee.
2. Limited(90)Ninety Day Warranty
Labour for a period of 90 days from the date of purchase, if this Product is determined to be defective. Hisense will
repair or replace the Product, at its option, at no charge, or pay the labor charges to any Hisense authorized service
facility. After the Warranty Period, the consumer must pay for all labor charges.
3. Limited(1)Year Warranty
Hisense will supply, at not charge, new or rebuilt replacements inexchange for defective parts fora period one(1)year
(color picture tube is two(2)years). After 90 days from the date of purchase, labor for removal and installation is available
from Hisense authorized service facilitiesor a Hisense Service Center at your expense.
4. Limited(1)Year Accessories
Parts and labor for all accessories arefor one(1)year.
Toobtain warranty service you musttake the TV ordeliver the TV freightprepaid in either its originalpackaging affording
an equal degree of protection to any authorized Hisense service centre.You are responsible for transportation
charges to and from the Service Center.
The warranty does not cover instruction, installation, set up adjustments or signal reception problems.
The warranty does not cover cosmetic damagedue to acts of Nature, accident, misuse, abuse, negligence,commerical
use, or modification of orto any part of the TV. This warranty does not cover the damage due to improper operation or
maintenance, connection toimproper voltage supply, or attempted repair by someone other than a facility autorizedby
Hisense to service the TV. This warranty does not cover TV's sold AS IS or WITH ALL FAULTS, or consumables. This
warranty is valid only in the United States.
Proof of purchase is theform of a bill orsale or receipted invoice, whichis evidence thatthe unit is within the Warranty
period, must be presented to obtain warranty service.
This warranty is invalid ifthe factory-applied serialnumber has been altered or removed from the TV.
REPAIR OR REPLACEMENTAS PROVIDED UNDER THIS WARRANTYIS THE EXCLUSIVE REMEDYOF THE
CONSUMER. HISENSE SHALL NOT BE LIABLE FOR ANYINCIDENTAL OR CONSEQUENCIAL DAMAGES FOR
BREACH OFANY EXPRESS OR IMPLIED WARRANTY ON THIS PRODUCT EXCEPTTO THE EXTENT PROHIBITED
BY APPLICABLELAW.ANY IMPLIEDWARRANTY OF MECHANTABILITY ORFITNESS FOR A PARTICUYLAR
PURPOSE ON THIS PRODUCT IS LIMITED IN DURATION TO THE DUARATION OF THIS WARRANTY.
Some states do not allow the exclusion or limitationof incidental orconsequential damages orallow limitations onhow
long an implied warranty lasts,so the above limitations orexclusions may notapply to you. In addition, if you enter into
a service contractwith the Hisense Corporation within 90 days of the date of sale, the limitation onhow long an implied
warranty lasts does not apply.This warranty gives you specificlegal rights andyou may haveother rights which may
vary from stateto state.
Hisense has established telephone numbersfro frequently asked questions atyour convenience.
Tolocate the service location ordealer nearest you or for service assistanceor resolution of a service problem orfor
TV information or operation, call:
Hisense TV Service Center
1-888-935.8880
or write to:
Hisense USACorportation
17005 Evergreen Place ,Building A
City of Industry, CA 91745
For an accessory or part not available from your authorized dealer call:
1-888-935.8880
Table of contents
Other Hisense CRT TV manuals