Hitron CODA5 1 Q Series User manual

1
STEP/ ÉTAPE
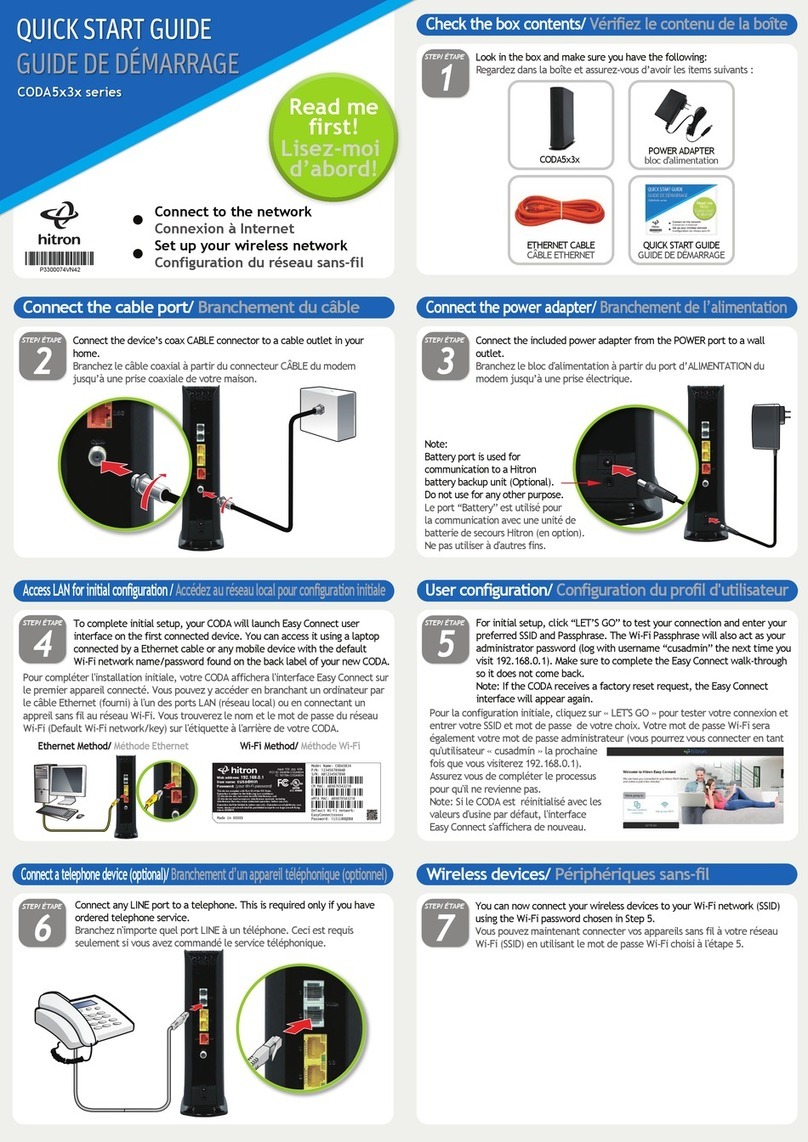
Check the box contents/ Vérifiez le contenu de la boîte
Look in the box and make sure you have the following:
Regardez dans la boîte et assurez-vous d’avoir les items suivants :
User configuration/ Configuration du profil d'utilisateur
7
QUICK START GUIDE
GUIDE DE DÉMARRAGE
ETHERNET CABLE
CÂBLE ETHERNET
QUICK START GUIDE
GUIDE DE DÉMARRAGE
CODA5x1xQ series Read me
first!
Lisez-moi
d’abord!
Connect to the network
Connexion à Internet
Set up your wireless network
Configuration du réseau sans-fil
2
STEP/ ÉTAPE
Connect the cable port/ Branchement du câble
Connect the device’s coax CABLE connector to a cable outlet in your
home.
Branchez le câble coaxial à partir du connecteur CÂBLE du modem
jusqu’à une prise coaxiale de votre maison.
3
STEP/ ÉTAPE
Connect the power adapter/ Branchement de l’alimentation
Connect the included power adapter from the POWER port to a wall
outlet.
Branchez le bloc d'alimentation à partir du port d’ALIMENTATION du
modem jusqu’à une prise électrique.
Note:
Battery port is used for
communication to a Hitron
battery backup unit (Optional).
Do not use for any other purpose.
Le port “Battery” est utilisé pour
la communication avec une unité de
batterie de secours Hitron (en option).
Ne pas utiliser à d'autres fins.
STEP/ ÉTAPE
5
STEP/ ÉTAPE
Connect any LINE port to a telephone. This is required only if you have
ordered telephone service.
Branchez n'importe quel port LINE à un téléphone. Ceci est requis
seulement si vous avez commandé le service téléphonique.
6
STEP/ ÉTAPE
For initial setup, click “LET’S GO” to test your connection and enter your
preferred SSID and Passphrase. The Wi-Fi Passphrase will also act as your
administrator password (log with username “cusadmin” the next time you
visit 192.168.0.1). Make sure to complete the Easy Connect walk-through
so it does not come back.
Note: If the CODA receives a factory reset request, the Easy Connect
interface will appear again.
Pour la configuration initiale, cliquez sur « LET'S GO » pour tester votre connexion et
entrer votre SSID et mot de passe de votre choix. Votre mot de passe Wi-Fi sera
également votre mot de passe administrateur (vous pourrez vous connecter en tant
qu'utilisateur « cusadmin » la prochaine
fois que vous visiterez 192.168.0.1).
Assurez vous de compléter le processus
pour qu'il ne revienne pas.
Note: Si le CODA est réinitialisé avec les
valeurs d'usine par défaut, l'interface
Easy Connect s'affichera de nouveau.
Access LAN for initial configuration / Accédez au réseau local pour configuration initiale
Ethernet Method/ Méthode Ethernet Wi-Fi Method/ Méthode Wi-Fi
4
Pour compléter l'installation initiale, votre CODA affichera l'interface Easy Connect sur
le premier appareil connecté. Vous pouvez y accéder en branchant un ordinateur par
le câble Ethernet (fourni) à l'un des ports LAN (réseau local) ou en connectant un
appreil sans fil au réseau Wi-Fi. Vous trouverez le nom et le mot de passe du réseau
Wi-Fi (Default Wi-Fi network/key) sur l'étiquette à l'arrière de votre CODA.
To complete initial setup, your CODA will launch Easy Connect user
interface on the first connected device. You can access it using a laptop
connected by a Ethernet cable or any mobile device with the default
Wi-Fi network name/password found on the back label of your new CODA.
Wireless devices (optional) / Périphériques sans-fil (optionnel)
You can now connect your wireless devices with the correct SSID and
Passphrase chosen in Step 5.
Vous pouvez maintenant connecter vos appareils sans-fil avec votre SSID
et « Passphrase » choisis à l'étape 5.
OPTIONAL: To connect a wireless device with the Wi-Fi Protected Setup button (WPS),
You need to first access the GUI with the user “cusadmin” and your Wi-Fi Passphrase
as password, enter the Wireless page to enable WPS and set Encrypt Mode to AES then
save the changes. Press the WPS button on the CODA and on the device you wish to
connect. You will have 2 minutes to complete the pairing process.
OPTIONNEL : Pour connecter un appareil sans-fil avec le bouton WPS
(« Wi-Fi Protected Setup »), vous devez d'abord accéder à
l'interface usager avec l'utilisateur « cusadmin » et votre mot
de passe Wi-Fi, entrez dans la page « Sans-Fil » pour activer
WPS et définissez « Encrypt Mode to AES » puis enregistrez les
modifications. Appuyez sur le bouton WPS du CODA et de
l'appareil que vous souhaitez connecter. Vous aurez 2 minutes
pour compléter le processus de jumelage.
STEP/ ÉTAPE
CODA5x1xQ POWER ADAPTER
bloc d'alimentation
2
P3300072VN42
Connect a telephone device (optional)/
Branchement d’un appareil téléphonique (optionnel)
P/N: 1234567890AB
S/N: AB1234567890
CM MAC: AB9876543210
eMTA MAC: AB9876543210
Default Wi-Fi network:
EasyConnectxxxxx
Password: 1iIlL0OQDB8
Made in XXXXX
Model Name: CODA5814Q
FCC ID: 2AHKM-CODA5814Q
IC: 10778A-CODA5814Q
Input: 12V 4A
This device complies with Part 15 of the FCC Rules.
Operaon is subject to the following two condions:
(1) this device may not cause harmful interference, and
(2) this device must accept any interference received, including
interference that may cause undesired operaon.
Indoor use only.
Web address: 192.168.0.1
User name: cusadmin
Password: (your Wi-Fi password)

COPYRIGHT © 2022 HITRON TECHNOLOGIES, INC.
Setup complete/ Installation terminée
IP addresses/ Adresses IP
If your CODA is successfully connected to the network (see LED display) but you cannot access the Internet from a connected device, your device’s IP address may be set up
incorrectly.
Si votre CODA est correctement connecté au réseau (voir la section Affichage DEL), mais que votre appareil n'a pas accès à Internet, il se peut que l'adresse IP de ce dernier ne
soit pas configurée correctement.
In your device’s control panel, ensure that the device is configured to receive an IP address automatically (recommended) or that it has a static IP address in the following range:
192.168.0.2~192.168.0.253. For more information, consult your operating system’s documentation.
Dans le panneau de configuration de votre appareil, assurez-vous que celui-ci soit configuré pour recevoir une adresse IP automatiquement (recommandé) ou qu'il dispose d'une
adresse IP statique dans la plage 192.168.0.2~192.168.0.253. Pour plus de renseignements, consultez la documentation portant sur votre système d'exploitation.
Congratulations! You have successfully set up your CODA. If you have any problems, see the section below for help identifying the problem.
Félicitations! Vous avez configuré votre CODA avec succès. Si vous rencontrez un problème, consultez la section ci-dessous pour vous aider à en déterminer la nature.
Safety warnings/ Consignes de sécurité
LED display/ Affichage DEL
WARNING/ ATTENTION
Risk of electrical shock. Do not expose the device to water or moisture.
The device is a high-performance communications device designed for home and office environments. Do not use the device outdoors.
Keep the device in an environment between 0°C ~ 40°C (32°F ~104°F). To avoid overheating, do NOT place any object on top of the device.
Do not restrict the flow of air around the device. The manufacturer assumes no liabilities for damage caused by any improper use of the device.
DISCLAIMER/ AVERTISSEMENT
The manufacturer assumes no liabilities with respect to the contents of this document. The manufacturer also reserves the right to revise this document or update the
content thereof without any obligation to notify any person of such revisions or amendments. Specifications subject to change without notice.
Le fabricant décline toute responsabilité concernant le contenu de ce document. Le fabricant se réserve le droit de réviser ce document ou mettre à jour le contenu de
celui-ci sans aucune obligation de notifier toute personne de ces révisions ou modifications. Spécifications sujettes à modification sans préavis.
CAUTION/ MISE EN GARDE
The cable distribution system should be grounded (earthed) in a accordance with ANS/NFPA 70, the National Electrical Code (NEC), in particular Section 820.93,
Grounding of Outer Conductive Shield of a Coaxial Cable.
Le système de distribution par câble doit être mis à la terre conformément à ANS/NFPA 70, le Code national de l'électricité (NEC), en particulier l'article 820.93,
Mise à la terre du blindage conducteur externe d'un câble coaxial.
Risque de choc électrique. Ne pas exposer l'appareil à l'eau ou à l'humidité.
L’appareil est un dispositif de communication de haute performance conçu pour les environnements domestiques et de bureau. Ne pas utiliser l'appareil à l'extérieur.
Gardez l'appareil dans un environnement entre 0°C ~ 40°C (32°F ~ 104°F). Pour éviter la surchauffe, ne placez aucun objet sur le dessus de l'appareil.
Ne pas restreindre la circulation d'air autour de l'appareil. Le fabricant décline toute responsabilité de dommages causés par une mauvaise utilisation de l'appareil.
State
État
White (for 2 sec), then Green - Steady
Blanche (pour 2 sec), puis Verte – Stable
Green - Slow Blinking
Verte - Clignotement lent
White/Green - Alternating
Blanche/Verte - En alternance
White - Slow Blinking
Blanche - Clignotement lent
White - Steady
Blanche - Stable
Cyan - Steady
Cyan - Stable
Cyan - Slow Blinking
Cyan - Clignotement lent
Power on
Mise en marche
Booting
Démarrage
Establishing DOCSIS
Connexion DOCSIS en cours
Service Provisioning
Approvisionnement du service
Online &. Active (Normal state)
En ligne et prêt à l'emploi (état normal)
Online & Active but all WiFi disabled
En ligne et prêt à l'emploi mais WiFi désactivé
Software upgrade in progress
Mise à niveau du logiciel en cours
Blue - Blinking
Bleue - Clignotante
Blue - Steady (60 seconds)
Bleue - Stable (60 secondes)
Light blue - Steady
Bleue pâle - Stable
Red - Blinking
Rouge - Clignotante
Red - Slow Blinking
Rouge - Clignotement lent
Red - Steady
Rouge - Stable
WPS Sync
Synchronisation WPS
WPS Paired
Jumelage WPS complété avec succès
A phone is off-hook (if equipped)
Un téléphone est décroché (si équipé)
DOCSIS issue
Problème de connexion DOCSIS
Service provisioning issue
Problème d'approvisionnement du service
Hardware failure
Défaillance de l'appareil
LED Color
Couleur de la DEL
State
État
LED Color
Couleur de la DEL
Other Hitron Transceiver manuals
Popular Transceiver manuals by other brands

Delta Electronics
Delta Electronics SFP Bi-Directional Transceiver Module... Specification sheet

Wilson Electronics
Wilson Electronics Mini-Com HH-156-D6 Operating and service manual

Yaesu
Yaesu FTM-100DR operating manual

Midland
Midland G11 PRO Instruction guide

Icom
Icom IC-M31 instruction manual

Yaesu
Yaesu FT-950 Update