Hive Wasp 100-C User manual
WASP 100-C
USER MANUAL
™
™

page 1
WELCOME!
And thank you for your purchase of the
Wasp 100-C™. The Wasp 100-C™ is an
Omni-Color LED luminaire from Hive
Lighting designed for use in permanent,
semi-permanet and mobile lighting
applications. Combining energy efficient
LEDs with our Perfect S.H.O.T. controls
we hope you find the Wasp 100-C™ is
the perfect instrument for any lighting
application. We hope this manual serves
as a helpful companion to your new
light and answers all the questions you
may have, but please do not hesitate to
take advantage of our website and tech
support services.
Sincerely,
Hive Lighting

page 2
Quickstart Guide
GETTING A PERFECTLY LIT SHOT IN JUST 3 STEPS
1) Plug In and Power On
(Select Local Control)
2) Pick your S.H.O.T.
(Saturation, Hue, Output,
color Temperature)
3) Shoot!

page 3
Table of Contentvs
User Manual for the Wasp 100-C™ 1
Welcome! 1
Quick Start 2
Dimensions 5
Safety Information 7
Safety Warnings & Precautions 7
Safety Guidelines 7
FCC Information 9
Caring for your Wasp 100-C™ 9
Tips & Troubleshooting 10
Product Overview 11
Components & Included Accessories 11
Control Panel Features 12
Getting Started 13
Mounting The Light 13
Tilting (Vertical Adjustment) 13
Panning (Horizontal Adjustment) 14
Switching Lenses 14
Attaching the Barndoors 15
Removing the Reflector 15
Power 17
AC/DC Adapter (Included) 17
Battery (Sold separately) 17
Firmware Updates 18
Perfect S.H.O.T. Controls 18
Local Control 19
DMX Mode Instructions 20

page 4
App Control (Via Bluetooth) 22
Asset of Menu Tables 23
Policies 25
Product Modification Warning 25
Limited Warranty 25
Returning an Item Under Warranty for Repair 26
Refund Policy 28
Freight Policy 30

page 5
218mm
8.60”
140mm
5.5”
32mm
1.25”
117mm
4.6”
202mm
7.95”
140mm
5.50”
100mm
3.92” 140mm
5.51”
6mm
.24”
8mm
.31”
103mm
4.05”
191mm
7.50”
199mm
7.85”
135mm
5.30”
25mm
1.00”
201mm
7.90”

page 6
Specifications
• Lens type: HDP
• Optical System:
Omni-Color LED
• Lens Diameter: 5”
• Weight: 5lbs
• Mounting: 16 mm
receiver (“Baby” 5/8
inch receiver)
• Power Supply
Range: 12-34V DC
• Power Consumption:
85W
• DC Power
Connection:
4-pin XLR
• White Light: 1650K –
8000K Continuously
Variable Correlated
Color Temperature
• Colored Light: Full
360 degree color
wheel Hue and
Saturation control
• Color Temperature
Tolerance: +/- 100K
• Dimming: 0 – 100%
• Control Options:
5-Pin DMX In and
Out, In-Unit, app via
bluetooth
• Data Input: USB
• Housing Color: Black
• Ambient Temperature
Operation: -35C to
40C
• Estimated LED
Lifetime: 50,000
page 7
Safety Information
SAFETY WARNINGS & PRECAUTIONS
• WARNING: Risk of Electric Shock! The Wasp
100-C™ is a lighting product powered by sufficient
electricity to cause harm to the human body. Do
not install or operate fixture while standing in
water or underwater. Failure to observe this safety
information or to ignore common sense may cause
serious injury or even death.
• CAUTION: High beam intensity! Do not look
directly into the light beam for an extended period.
No UV or IR is emitted at any time from this fixture.
• CAUTION: Devices and accessories must
always be properly secured against fall when
mounted above floor level. Always observe
common and local safety regulations.
GENERAL SAFETY GUIDELINES
• Defective components to the unit, attached
cables or electronic devices connected to it must
not be used. If you suspect there is damage to the
product’s internal components, do not open the
housing. Doing so will void all warranties.

page 8
• Do not operate the light if you see that any cables
or devices that light is connected to has been
damaged.
• Product complies with DMX512 standards only.
Light is not compliant with RDM standards and
may not be operated with aid of an AC dimming
system.
• Do not sit or submerge product in water.
• ONLY use DC Power source within acceptable
voltage range of 12-34V DC - check that power
source complies before handling. It is strongly
recommended that the user powers light with
either the provided AC/DC adapter or a Hive-
approved battery adapter.
• Do not position or mount the product
near open flames.
• Unobstructed airflow is required for
effective cooling. Allow minimum clearance
of one inch clearance around air vents for
proper ventilation.

page 9
FCC INFORMATION
This equipment has been tested and found to comply with
the limits for a Class A digital device, pursuant to Part
15 of the FCC rules. These limits are designed to provide
reasonable protection against harmful interference
when the equipment is operated in a commercial
environment. This equipment generates, uses, and can
radiate radio frequency energy and, if not installed and
used in accordance with the instruction manual, may
cause harmful interference to radio communications.
Caring for your Wasp 100-C™
MAINTENANCE
Help prevent damage and prolong the life of your equipment
by following following these suggestions:
• With the unit unplugged, lightly clean the outer
metal housing with a soft, clean towel and
compressed air.
• Clean the control panel with cotton swabs wetted
with isopropyl alcohol.
• Clean the reflector and lenses with a dry chamois
or compressed air. Avoid touching any of these
components with your fingers directly.
• (DAMAGE ASSET) Do not operate product when
operating environment is in excess of 120℉.
• (DAMAGE ASSET) Do not misuse the power
connector to hold, move or suspend the fixture.

page 10
• Disconnect all cables prior to transport.
• Store light in a cool dry place (between 5 - 20°C) .
TROUBLESHOOTING
It is rare but possible for the reflector to become unfixed,
either during transport or during storage. If this happens,
simply re-secure it by twisting it clockwise until the
reflector plate engages the pins locking it into place.
It is generally acceptable to operate the light on external
shoots but when operating the light in damp or wet
conditions be sure to monitor the light to ensure that no
water is accumulating inside of the housing.
When using a battery pack, remember that the light uses
80W when at full output. This requires a battery with a
minimum power rating of 90Wh, although we recommend
batteries rated for 100 Wh or higher and with a minimum
10 amp hour fuse. Exact run time is based on the individual
battery’s storage capacity.
If you need to adjust one of many Wasp 100-C™ units via the
app and have forgotten what it is named in the app’s scan
results, try reducing the Bluetooth Discovery Distance to
1 meter (avail in the app’s main settings) and rescan with
your phone next to the specific light in question.

page 11
Product Overview
COMPONENTS AND INCLUDED ACCESSORIES
Components of Wasp 100-C™ and Included Accessories
1. Housing - This metal casing is the shell that
protects the more sensitive internal components of
the light and should not be opened for any reason.
NOTE: Opening the housing risks voiding all
warranties.
2. Control Panel - Contains the digital display,
controls and ports for the light.
3. Reflector - This comes attached to the light, and it
can be removed from the housing to accommodate
other light modifying accessories by gently twisting
it counter-clockwise.
4. Yoke - Used when attaching some accessories and
for mounting the light.
5. Lenses - The Wasp 100-C™ comes with 3
interchangeable HDP Lenses (medium, wide,
super wide) and lens bag.
6. AC/DC Adapter and Power Cable (Not Pictured)
- ONLY use DC Power source within acceptable
voltage range of 12-34V DC. Using any DC voltage
outside this range will void the product warranty.
7. Barndoors - Accessory used for light-shaping.

page 12
NOTE: The Wasp 100-C™ is compatible with a broad range of Hive-
branded and third party accessories. For more information, please
visit Hive’s website at http://hivelighting.com/hive-products/
accessories.
CONTROL PANEL FEATURES
8. On/Off Switch - Controls Power. The power light
above the display illuminates when power is on.
9. DMX Mode On/Off Switch - Controls DMX mode
when unit is attached to DMX board. (See pg [ ] for
more instructions.) The DMX indicator light above
the display illuminates when Wasp 100-C™ is in
DMX mode.
10. Left “Selector” Knob - Selects the S.H.O.T.
property.
11. Right “Adjustment” Knob - Selects S.H.O.T.
property’s desired value. When in DMX mode, this
knob is used to adjust the light’s starting address.
12. DMX IN Socket - Connect Wasp 100-C™ to your
DMX board via a 5-pin XLR cable.
13. DMX OUT Socket - Connect Wasp 100-C™ to
another light via a 5-pin XLR cable when using
one DMX board to control multiple units. The
Wasp 100-C™ follows DMX512 standards, allowing
multiple lights to be “daisy chained” together.
14. Power Socket - Connect Wasp-100C to valid power
source via the 4-pin XLR power cable that comes
included with adapter (For XLR pin wiring pin 1 -
DCV In and pin 4 + DCV In).

page 13
15. Display - Provides digital readout for values of all
controllable light properties.
16. USB Port - Used to connect light to computer when
firmware updates are made available by Hive.
Getting Started
MOUNTING THE LIGHT
The Wasp 100-C™ may be operated when securely mounted
to a separate apparatus, such as a stand (purchased
separately).
1. Carefully position the light above stand.
2. Place the top of the stand into the mount, located
on the base of the yoke.
3. Continue to hold the light securely with one hand,
and use the other to twist the mount’s locking knob
clockwise until tight.
TILTING (VERTICAL ADJUSTMENT)
1. Loosen the tilt lock on the yoke until light can move
freely.
2. Adjust the light upward or downward at any angle
between 0° and 180° (Vertical).
3. Secure the tilt lock once desired angle is reached.

page 14
PANNING (HORIZONTAL ADJUSTMENT)
1. Loosen the mount lock on the yoke.
2. Freely adjust the light left to right up to a full 360°
horizontal rotation.
3. Secure the mount lock once desired angle is
reached.
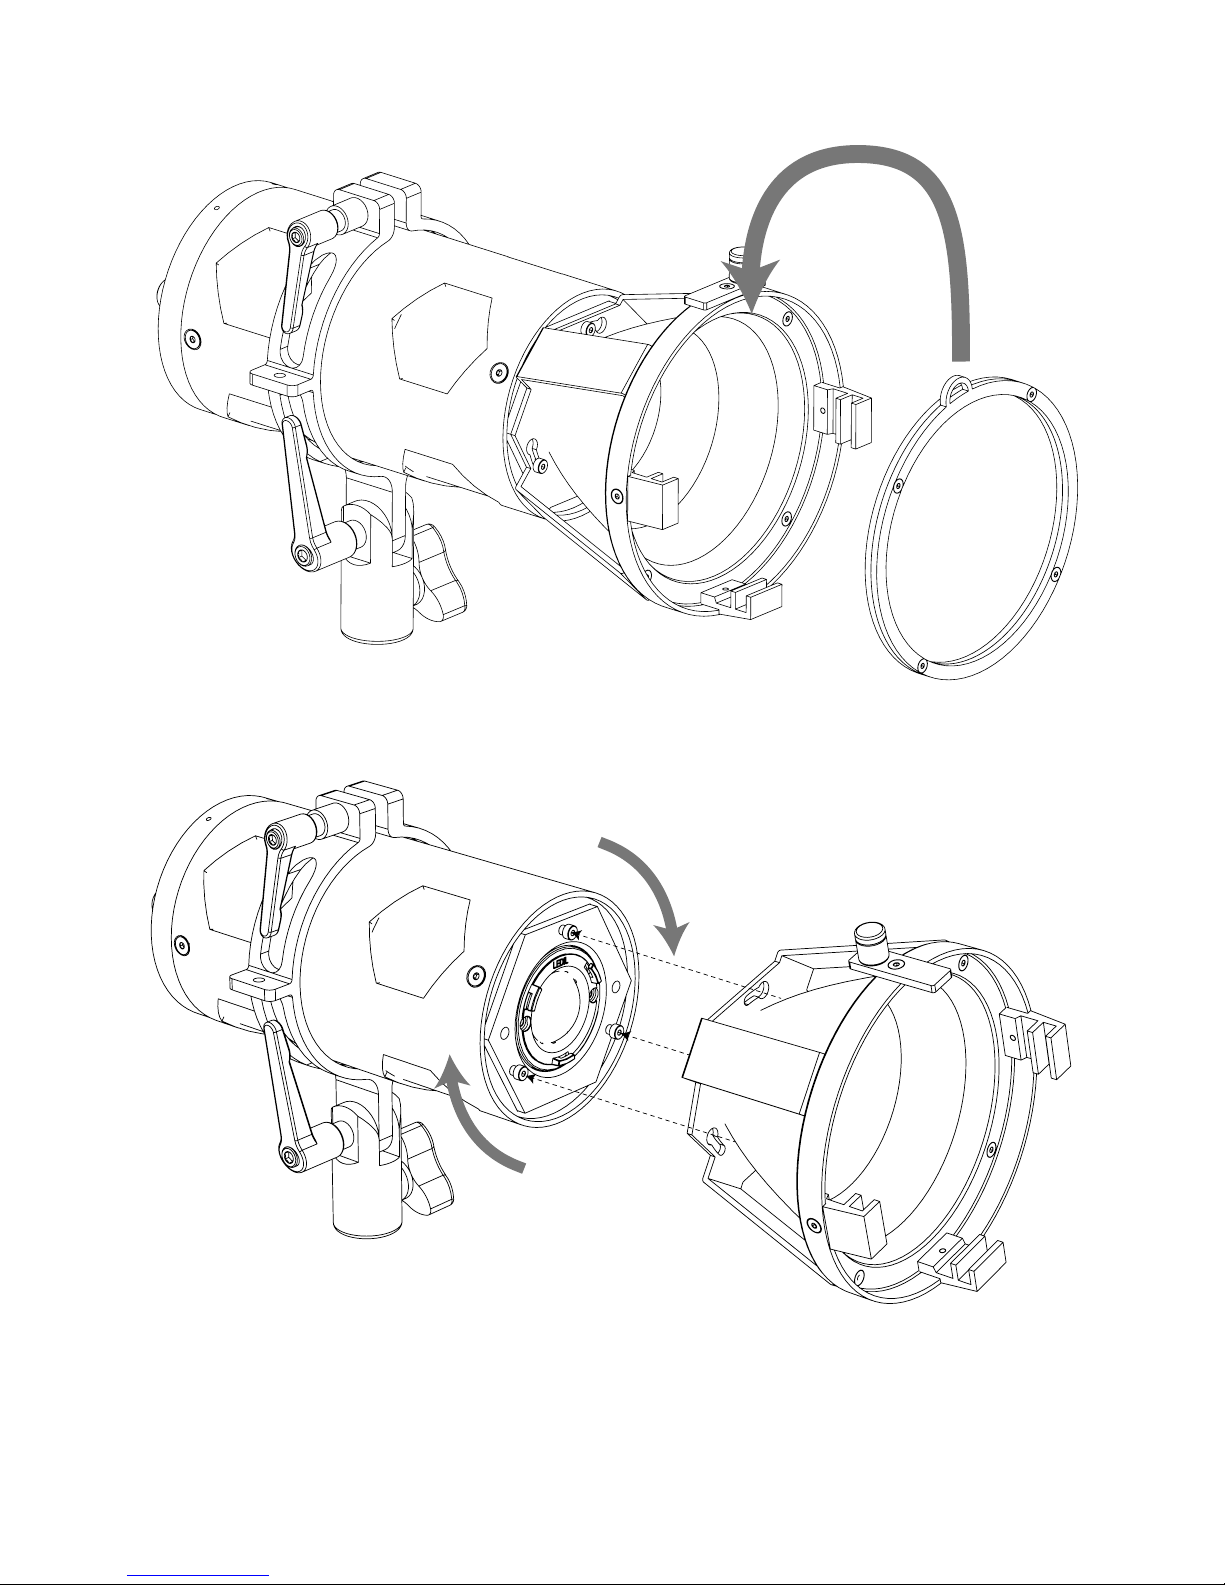
SWITCHING LENSES
Your Wasp 100-C™ comes with 3 interchangeable HDP
Lenses: Medium, Wide and Super Wide. To affix these
to the device, follow these steps:
1. Rotate the top clip until it is parallel to the reflector
face
2. Slide the desired lens into the reflector cage’s inner
lens stage, or slot (pictured below).
3. Rotate the top clip back into its locked position.
4. Rotate lenses with elliptical beams in order to
position light projection in desired location.

page 15
ATTACHING THE BARNDOORS
The barndoors can allow for greater control in shaping the
light. To attach:
1. Rotate the top clip until it is parallel to the reflector
face
2. Slide the barndoors into the reflector cage’s outer
lens stage, or slot (pictured above).
3. Rotate the top clip back into its locked position.
4. Adjust one or more of the leaves (i.e. “doors”) of the
barndoors to cut or shape the beam of light emitted
by the Wasp 100-C™.
REMOVING THE REFLECTOR
The reflector and the cage that it sits in can be removed
from the housing in order to accommodate a different
accessory, such as an alternative reflector or softbox.
1. Press firmly on reflector cage and twist
counterclockwise to release reflector plate from
locking pins.
2. Rotate counterclockwise and pull loosely until free.
3. To reattach, center the reflector’s keyed grooves
over the housing pins, insert, and rotate clockwise.
page 16

page 17
Power
(DAMAGE ASSET) ONLY use 24VDC Power source within
acceptable voltage range of 12-34V DC.
There are two options for powering the light:
AC/DC ADAPTER (INCLUDED):
1. Connect the provided AC/DC adapter to the light
via the the 4-pin XLR cable (XLR pin wiring pin
1 - DCV In and pin 4 + DCV In), which is inserted
into the corresponding power socket on the light’s
control panel.
2. Connect the adapter’s power cable into the wall or
to a generator.
3. Turn the Wasp-100C on by flipping the power
switch to the “on” position (up), located on the
control panel, causing the power indicator light to
illuminate.
BATTERY (SOLD SEPARATELY):
1. Attach the battery’s Dtap to 4 pin XLR adapter
cable to the battery, with the other end connecting
to the light via the power socket in the control
panel.
2. Turn the light on by flipping the power switch
to the “on” position (up), located on the control
panel. This will cause the power indicator light to
illuminate.

page 18
NOTE: Remember that the light uses 80W per second when at
full output. This requires a battery with a minimum power rating
of 90Wh, although we recommend batteries rated for 100 Wh or
higher and with a minimum 10 amp hour fuse. Exact run time is
based on the individual battery’s storage capacity.
Firmware Updates
The Wasp 100-C™ is designed to receive periodic firmware
updates, which will be made available via Hive. Once
notified, connect your unit to your computer via a USB
cable using the USB port in order to complete the firmware
installation.
Perfect S.H.O.T. Controls
The light emitted by the Wasp 100-C™ can be configured
via Hive’s Perfect S.H.O.T. system, which controls these
four properties:
• Saturation (denoted by “S” on the display)
• Hue (denoted by “H” on the display)
• Output or Dimming (denoted by “D” on the display)
• Color Temperature (denoted by “K” for degrees in
Kelvin when in local mode, or by “C” when in DMX
mode.)

page 19
There are three ways to use the Perfect S.H.O.T system:
1. Locally, using the light’s own digital control panel.
Local control is useful for those who don’t have
access to a DMX board, or who are working on
simpler projects.
2. Via a DMX board (purchased separately). When in
this mode, the Perfect S.H.O.T. system is controlled
via this external device, with a fifth property - the
board’s starting address - controlled on the light
itself.
3. Via the Hive iOS App, which allows your iphone or
ipad to control the app via a bluetooth connection.
LOCAL CONTROL
1. Engage Local Mode: Flip the DMX On/Off Switch
to the down position, causing the DMX light to turn
off. You are now
in LOCAL MODE,
and the digital
display will look
like this:
IMPORTANT: In local
mode, color temperature
is indicated by the letter
“K” because the color
temperature range of
1650 - 8000 is in
degrees Kelvin.
Table of contents


