Hogtunes G4 SG KIT-RM User manual


1
Thank you for choosing the Hogtunes G4 SG KIT-RM kit for 2014+ Rushmore
Platform Street Glides. Since positive word of mouth is the best way to grow
our business, we want your new system to work as well as it was designed to.
If you have any questions or concerns, we are here to help.
To help protect your bike’s electrical system and battery, the amp has a built
in feature where it will turn itself off if it sees less than 10.5 volts, whether
the bike is running or not. If you’re listening to your stereo while not riding,
this feature can help protect your battery so the bike can still start. If you’re
riding and the amp shuts off, this could be showing a potential issue with your
charging system. If this feature is activated and the amp shuts off, it will turn
the amp back on again if the voltage exceeds the 10.5 volt threshold.
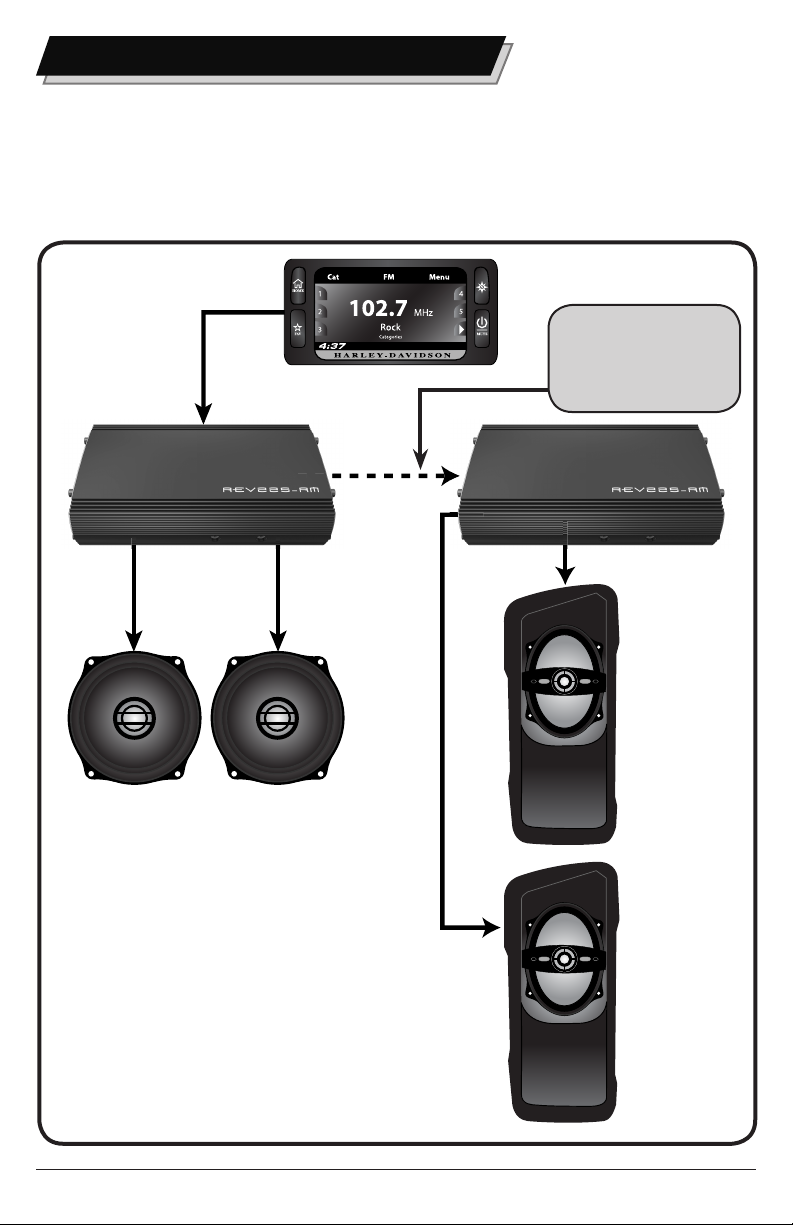
REV 225-RM is rated for 112.5 watts per channel @ 2 ohms.
Although this amplifier makes its highest power with 2 ohm speakers, if
Hogtunes 5.75 ohm speakers or 4 ohm car speakers are used there will still
be a noticeable improvement in volume and sound quality.
The installation will be done in 3 steps.
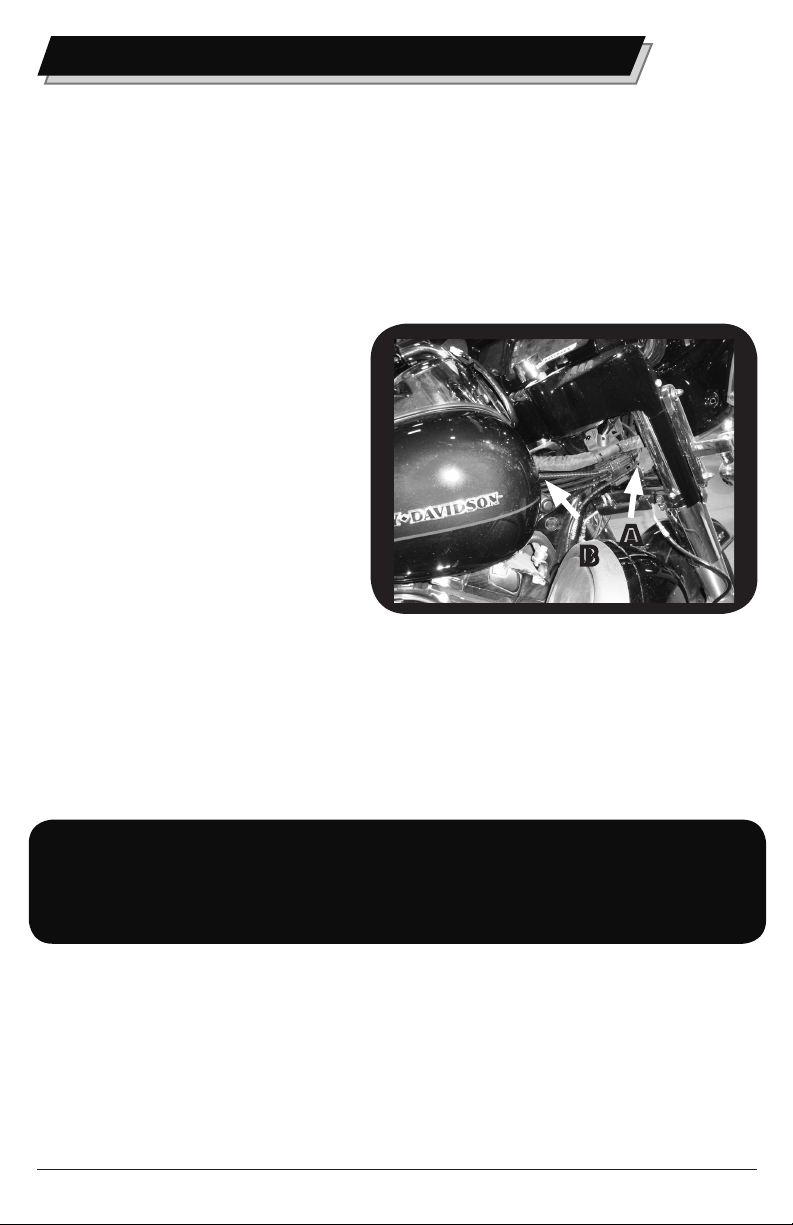
Step 1: Changing out the front SpeakerS
Step 2: inStallation of the amplifier
Step 3: routing the power harneSS
Hogtunes Contact Information
Telephone (USA) 608-554-7631 • (Canada) 705-719-6361
The REV 225-RM amplifier is a Class D design. It should be
understood that ALL Class D amplifiers, REGARDLESS OF BRAND, cause
a reduction in FM reception. The REV 225-RM features a proprietary
circuit design called R.E.M.I.T. (Reduced Electro Magnetic Interference
Technology) that Hogtunes believes gives the BEST FM reception
available for any Class D Amplifier designed for a motorcycle.
If you add a 2nd or 3rd model amplifier to your system, reduction
of FM reception is increased and is considered normal.
Hogtunes understands that some riders prefer the cosmetics
of in-fairing antennas, however it should be noted that
NOTHING WORKS AS WELL AS THE FACTORY ANTENNA.
If FM is an important part of your riding experience, we strongly
advise against the use of any in fairing type antenna!

2
462F-RM FRONT SPEAKER
INSTALLATION INSTRUCTIONS
Step #1: Remove the seat and both wires (+ and -) from the battery. Remove the
outer fairing/headlamp assembly and set aside. Refer to a service
manual if you need help with this. NOTE: Placing a towel on the front
fender can help prevent scratches or “dings” from dropped tools or
fasteners, etc. Expletives will also be kept to a minimum!
Step #2: Speaker Cabinet Removal: On the brake side speaker cabinet,
carefully remove the cable going into the power port/cigarette lighter
assembly. If your bike has the CB module (mounted “sideways” on the
clutch side cabinet) undo the antenna cable and main harness. The
CB Module will stay attached to the clutch side cabinet when removed.
Undo the speaker wire plugs going into each cabinet (pink & pink with
black stripe wires).
The speaker cabinets are vital to the fairings structure.
DO NOT operate the bike without the speaker cabinets installed!
NOTE: We STRONGLY suggest completing the speaker swap on one side and
then moving to other side! Figure 1.1 and 1.2 (below) have arrows that point
to the factory fasteners that will be removed to allow the cabinets to come
out of the bike. Although the Brake Side is shown below, fastener locations
are common for both brake and clutch side cabinets.
Figure 1.1
Side view of brake side cabinet
Figure 1.2
Back view of brake side cabinet

3
Step #3: Installing the New Speaker: With the cabinet removed from the
bike, undo the four screws that hold the factory speaker to the cabinet.
Carefully take off each speaker wire by disconnecting one at a time.
Take a Hogtunes speaker and attach the factory speaker wires, noting
they will only go on one way. You will see a small locator “peg” on the
speaker cabinet. There is a provision on the underside of the 462F-RM
that allows the speaker to sit over this, so there is no reason to cut the
peg off. Using the factory screws, attach the new speaker to the
cabinet. Please make sure the speaker is flush to the cabinet when
installed. Bass response will be greatly reduced if the speaker is not
flush to the cabinet! The new speaker can be used behind the factory
cloth covered grill, but the speaker will play louder with the supplied
metal mesh grills installed. If you use the metal mesh grills, remove the
3 screws that secure the factory grill to the inner fairing. Looking at the
metal mesh grill, you will see that one of its mounting tabs has a
“keyhole” in it. The metal mesh grill will install into the inner fairing
using the screws that held the factory grill in, but the mounting tab with
the keyhole MUST be oriented so it is closest to the radio. With the grills
in place, and the speaker properly attached to the speaker cabinet, the
cabinet can be re-installed to the bike. It’s always a good idea to put the
factory fasteners back in to specified torque.

4
REV 225-RM AMPLIFIER
INSTALLATION INSTRUCTIONS
Step #1: Over top of the radio, pull up to release each wire harness from the
black plate via the factory “Christmas tree” fasteners. If your bike has
factory GPS, the small square antenna will need to be relocated just
behind the voltmeter as shown in Fig 1.1 below. Remove the four factory
T-20 “Torx” screws that go through the top of the black plate and into
the top of the radio.
Step #2:
Step #3: The amplifier comes on a black mounting plate and needs to be
separated from that plate. Sit the amplifier plate over top of your radio
and re install the factory screws to secure the amplifiers mounting plate
to your bike noting the plate can only go on one way. Locate the supplied
input harness and plug into the “audio input” socket on the side of the
amp. Locate the “front output” harness with brown/ black and blue/
black wires and plug it into the 4 pin BLACK plug on the pig-tail coming
out of the amp. You will now put the amp back in place. For reference, if
you are standing in front of your bike looking down at the plate, the amp
will go to the extreme left so the power harness is closest to you. When
sticking the amp in place, position the 4 pin black plug on the pig-tail so
its sitting on top of the amp. This will allow the amp to sit as close to your
gauges as possible and allow the outer fairing to go back on. There is a
“tab” on the front and side of the amplifiers mounting plate which allows
you to re-attach the wire harness using the factory Christmas tree fastener.
Figure 1.1 - The white circle shows the new
location for GPS Antenna if the bike came
factory equipped with this feature.

5
Step #4: On the back of each speaker cabinet, you will see pink wires that go to a
plug. Separate these plugs on each side of the bike noting they may still
be undone from when the speakers were installed. From the amp, take
the 2 pin plug with the blue/black wires and install it into the plug going
into the brake side speaker cabinet. Take the 2 pin plug with the brown/
black wires and install it into the plug going into the clutch side speaker
cabinet.
Step #5: From the amp’s input connector, take the 2 pin plug with the green/
black wires and install it into the mating plug on the brake side of the
bike. Also from amp’s input connector, take the 2 pin plug with the
yellow/black wires and install it into the mating plug on the clutch side
of the bike.
Fig 1.2. Single REV 225-RM amplier correctly
positioned on mounting plate. The empty area to
the right is perfect if you want to add a second REV
225-RM later on to power speakers in saddle bag
lids or fairing lowers.

6
ROUTING THE POWER HARNESS
Locate the main power harness and plug it into the matching “pig-tail” on the side
of the amp. If installing 2x REV 225-RM, run the second power harness at the same
time as this step. The balance of the main wire harness will pass under the inner
fairing where the main wire harness passes through on the brake side of the bike.
Loosen the tank console and run wires up and over the gas tank, but under the
tank console. There is a provision on the front of the tank console for wires to pass.
Secure the amplifier’s harness to the bike’s factory harness using zip ties. When
correctly installed, the power and ground wires are the right length to connect on
to the battery.
Stock harness and amplifier’s
harnesses passing from fairing
to just in front of tank (Arrow A).
Cable tying the Harnesses to the
main bike harness just in front of
the tank (Arrow B) allows the amp
harnesses to go up towards the tanks
chrome console easier and makes for
a Cleaner Install.
Note: although not necessary, you can run the harness along the backbone of the
bikes frame if you choose to remove and re-install the bikes fuel tank.
Attach the red wire to the positive (+) battery terminal and the black wire to the
negative (-) battery terminal. The factory battery wires are also re-installed at this
point. Turn the ignition of the bike to the “on” position and play the stereo at low
volume to verify the amplifier is working fine.
IMPORTANT: With all wires secured, turn the front wheel to
each extreme side making sure that any wires cannot bind or
impede the steering of the motorcycle. Failure to do so can cause
an accident resulting in serious injury or death!
Now is a good time to “clean up” and secure any wiring inside your fairing using
supplied zip ties. For best possible FM reception, DO NOT attach any of
the amplifiers wiring to any factory antenna wires. Doing so will
hurt your radios ability to receive FM signals!
Please go to “final system adjustments” near the back of this manual
A
BBA

7
easy system upgrade 1
Adding a second amp is easy and will give you the incredible power of
2 x REV 225-RM. The first amp will power the front speakers as it does now,
while the second amp can power speakers in Hogtunes saddlebag lids, lower
fairings, or rear speaker “pods” on Tour Paks.
Use supplied blue
plug to send signal
from expansion port
of rst amp to input of
second amp

8
easy system upgrade 2
Adding a second and third amp is easy and will give the CRAZY power of
3 x REV 225-RM. The first amp would power the fairing speakers, while the
second and third amps would power speakers in Hogtunes saddlebag lids, lower
fairings, or rear speaker ”pods” on Tour Paks. Note: The 3rd amp mounts on the
side of the clutch side speaker cabinet and requires Hogtunes FLH Side plate-RM
for mounting (Drag Specialties Part #4405-0521) If a CB Module is present, it
must be removed to make room for the third amp.
Use supplied blue plugs
to send signal from
expansion port of rst
amp to second amp, and
do the same from second
amp to third amp

9
Final system adjustments
From time to time, the “Motor Company” will release software updates on
their website which can be downloaded, and install on your bike. For best
performance of the audio system, please make the downloads are up to date!
Earlier versions of the software could cause any brand of aftermarket amplifier
to distort prematurely so this is an important point!
How the system sounds when the bike is running is going to differ from how
it sounds when the bike is not running. This is a function of the radios built in
software. You may find yourself adjusting the bass and or treble controls if you’re
listening to the bike without the motor running.
A Couple Of Tips To Have Your System Sound Great
1) Many people will store music on a hand held type player and use that as the
music source for the bikes audio. PLEASE NOTE: If you “borrow” your music
files from certain sites, they typically sound poor. Using a good quality file will
only make your system sound better!
2) Many people will take advantage of the convenience of ‘streaming” their
music to the radio using Bluetooth®. It should be noted that we found
plugging in your music device using the radios USB cord sounds better and
plays louder than using Bluetooth.
3) Streaming your music in from internet based radio is not always consistent,
especially outside of populated areas. When streaming while riding, the
quality of the audio is greatly effected by the speed of the cell signal you’re
in at any given time.

10
Harley-Davidson, Electra Glide, Road Glide, Street Glide, Ultra Classic, Tri Glide, CVO, Screamin
Eagle and Tour-Pak® are Trademarks, and/or Registered Trademarks of Harley-Davidson, Inc.,
Milwaukee, Wisconsin, USA, and if Used or Implied are for Reference Only. There is No Afliation
Between Harley-Davidson, Inc., and Hogtunes Inc.
Warranty inFormation
IMPORTANT: In the event of a warranty claim, please ll out the
form in the Warranty section of our website, or contact us by
email or by phone. Valid claims will have an Return Authorization
Number (RA#) generated which MUST appear on the outside of
the box when it arrives to our oce.
Goods Arriving Without an RA# Will Be Refused!
Please Record Your Amplifier’s Serial # Here_________________________
Hogtunes speakers are warranted for a period of 20 years. The REV 225-RM
Amplifier is warranted for 3 years from original purchase date. Proof of purchase
is required for all warranty claims. The warranty applies to the original retail
customer and is not transferable. Please contact Hogtunes for all warranty claims.
Products found to be defective during the warranty period will be repaired or
replaced (with a product deemed to be equivalent) at Hogtunes sole discretion.
Hogtunes complete warranty policy is available on our website at:
www.hogtunes.com/warranty.html
What Is Not Covered:
1) Any expense related to the removal or re-installation of Hogtunes products.
2) Repairs to these products performed by anyone other than Hogtunes.
3) Subsequent damage to any other components.
4) Any product purchased from a non-authorized Hogtunes dealer.
5) Damage to Hogtunes products due to an accident or collision.
6) Hogtunes Amplifiers with broken or removed “warranty void” stickers.
7) Damage due to water from custom installations.
8) Damage from incorrect installation, improper use, abuse or modifications.
9) Damage to inbound product due to improper packing.
Hogtunes Inc. is owned by Powersports Audio Inc.

Hogtunes products will play much louder than the
Original Equipment, which can be a distraction to
the rider and/or passenger. Please use caution
when adjusting or playing your stereo
at high volume, especially in trac.
You are a valued customer so please:
Ride Alert
Arrive Alive!
www.hogtunes.com
G4 SG KIT-RM Manual
Table of contents