Montarbo MP4 User manual
MP4
KEYBOARDS COMBO

MP4
keyboards combo
ITALIANO 3 - 8
ENGLISH 9 - 14
DEUTSCH 15 - 20
FRANÇAIS 21 - 26
ESPAÑOL 27 - 32
APPENDIX 33 - 39
April 2008

keyboards combo
MP4
ITALIANO
3
__________________________________________
__________________________________________
__________________________________________
__________________________________________
__________________________________________
__________________________________________
__________________________________________
__________________________________________
__________________________________________
__________________________________________
INDICE
Introduzione 4
Descrizione 4
Importante !!! 5
Pannello controlli e connessioni 6 - 7
Appendice: 33 - 39
Dati tecnici 34
Schema a blocchi 34
Esempi di collegamento 35 - 36
Applicazioni 37 - 38
Parti di ricambio 39
ITALIANO
CONTENUTO DELL’IMBALLO
Amplificatore per tastiere MP4
Cavo di alimentazione
Manuale istruzioni
Certificato di garanzia
Dichiarazione di conformità CE
Il lampo con la freccia inserito in un triangolo equilatero avvisa l'utilizzatore della presenza
di tensione pericolosa, senza isolamento, all'interno dell'apparecchio che potrebbe essere
sufficientemente alta da generare il rischio di scossa elettrica.
Il punto esclamativo inserito in un triangolo equilatero avvisa l'utilizzatore della presenza di
importanti istruzioni per l'utilizzo e per la manutenzione.
IMPORTANTE ! Norme di sicurezza
ATTENZIONE
Nell'interesse della propria e della altrui sicurezza, e per non invalidare
la garanzia, si raccomanda una attenta lettura di questa sezione prima di
utilizzare il prodotto.
-Questo apparecchio è stato progettato e costruito per venire utilizzato come sistema
di altoparlanti con amplificatore nel contesto tipico di un sistema di amplificazione
sonora e/o di un sistema di registrazione sonora. L'utilizzo per scopi diversi da questi
non è contemplato dal costruttore, ed avviene pertanto sotto la diretta responsabilità
dell'utilizzatore/installatore.
- Questo apparecchio è conforme alla Classe di isolamento 1 (è necessario il
collegamento alla terra di protezione).
PER EVITARE IL RISCHIO DI INCENDIO E/O DI FOLGORAZIONE:
•Non esporre il prodotto alla pioggia, non utilizzarlo in presenza di elevata umidità
o vicino all'acqua. Non lasciare penetrare all'interno dell'apparecchio alcun liquido,
né alcun oggetto solido. In caso ciò avvenga, scollegare immediatamente
l'apparecchio dalla rete elettrica e rivolgersi ad un servizio di assistenza qualificato
prima di adoperarlo nuovamente. Non appoggiare candele accese od altre sorgenti
di fiamma nuda sopra l'apparecchio.
•Prima di collegare l'apparecchio alla rete elettrica assicurarsi che la tensione
corrisponda a quella indicata sull'apparecchio stesso.
•Collegare questo apparecchio esclusivamente ad una presa di corrente dotata
di contatto di terra, rispondente alle norme di sicurezza vigenti, tramite il cavo di
alimentazione in dotazione. Nel caso in cui il cavo necessiti di sostituzione, utilizzare
esclusivamente un cavo di identiche caratteristiche.
•L'apparecchio è collegato alla rete anche quando l'interruttore di rete è in posizione
'0' (spento) e la spia luminosa è spenta. All'interno sono presenti potenziali elettrici
pericolosi. Prima di qualunque intervento di manutenzione, scollegare il cavo di
alimentazione dalla presa di rete.
•Non appoggiare alcun oggetto sul cavo di alimentazione. Non posarlo dove possa
costituire intralcio e causare inciampo. Non schiacciarlo e non calpestarlo.
•Installare questo apparecchio prevedendo ampio spazio circostante per un'abbon-
dante circolazione d'aria, necessaria al raffreddamento. Non ostruire le aperture o
le prese d'aria presenti sull'apparecchio. Lasciare spazio sufficiente per accedere alla
presa di alimentazione elettrica e al connettore di rete sul pannello posteriore.
•In caso di sostituzione del fusibile esterno, utilizzare esclusivamente un fusibile di
caratteristiche identiche, come riportato sull'apparecchio.
•Prima di effettuare qualsiasi operazione di collegamento, assicurarsi che l'interruttore
di accensione dell'apparecchio sia in posizione '0'.
•Prima di effettuare qualsiasi spostamento del prodotto già installato o in funzione,
rimuovere tutti i cavi di collegamento.
•Per scollegare l'apparecchio dalla rete elettrica, non tirare mai lungo il cavo, ma
afferrarlo sempre per il connettore.
ATTENZIONE!
Questo apparecchio non contiene parti interne destinate all'intervento
diretto da parte dell'utilizzatore. Per evitare il rischio di incendio e/o
folgorazione, non smontarlo e non rimuovere il pannello posteriore.
Per qualsiasi intervento di manutenzione o riparazione, rivolgetevi alla
Elettronica Montarbo srl e/o a personale altamente qualificato
specificamente segnalato da questa.
-Nel predisporre l'apparecchio all'utilizzo, assicurarsi che la forma e la portata
della superficie di appoggio siano idonee a sostenerlo.
Per questo apparecchio non è previsto alcun metodo di sollevamento o sospensione.
-Per evitare urti, calci, inciampi, riservate come luogo per l'istallazione del prodotto
un'area protetta inaccessibile a personale non qualificato. Qualora l'apparecchio
venga utilizzato in presenza di bambini e animali, si rende necessaria una strettissima
sorveglianza.
-Questo prodotto è in grado di generare pressioni acustiche molto elevate, pericolose
per la salute del sistema uditivo. Evitarne quindi l'utilizzo ad elevati livelli acustici se il
pubblico si trova eccessivamente vicino al prodotto (almeno ad 1 m di distanza).
Non esporre i bambini a forti sorgenti sonore.

MP4
keyboards combo
Dietro la semplice definizione di "amplificatore per tastiere"
vi è in realtà un potente e versatile PA system, con una
quantità di caratteristiche professionali ed uno standard
qualitativo non comune ai prodotti di questa categoria.
Grazie al mini-mixer incorporato (4 canali) è ideale per
l’amplificazione di piccoli gruppi, tastiere, fisarmonica,
per il pianobar, come monitor da palco.
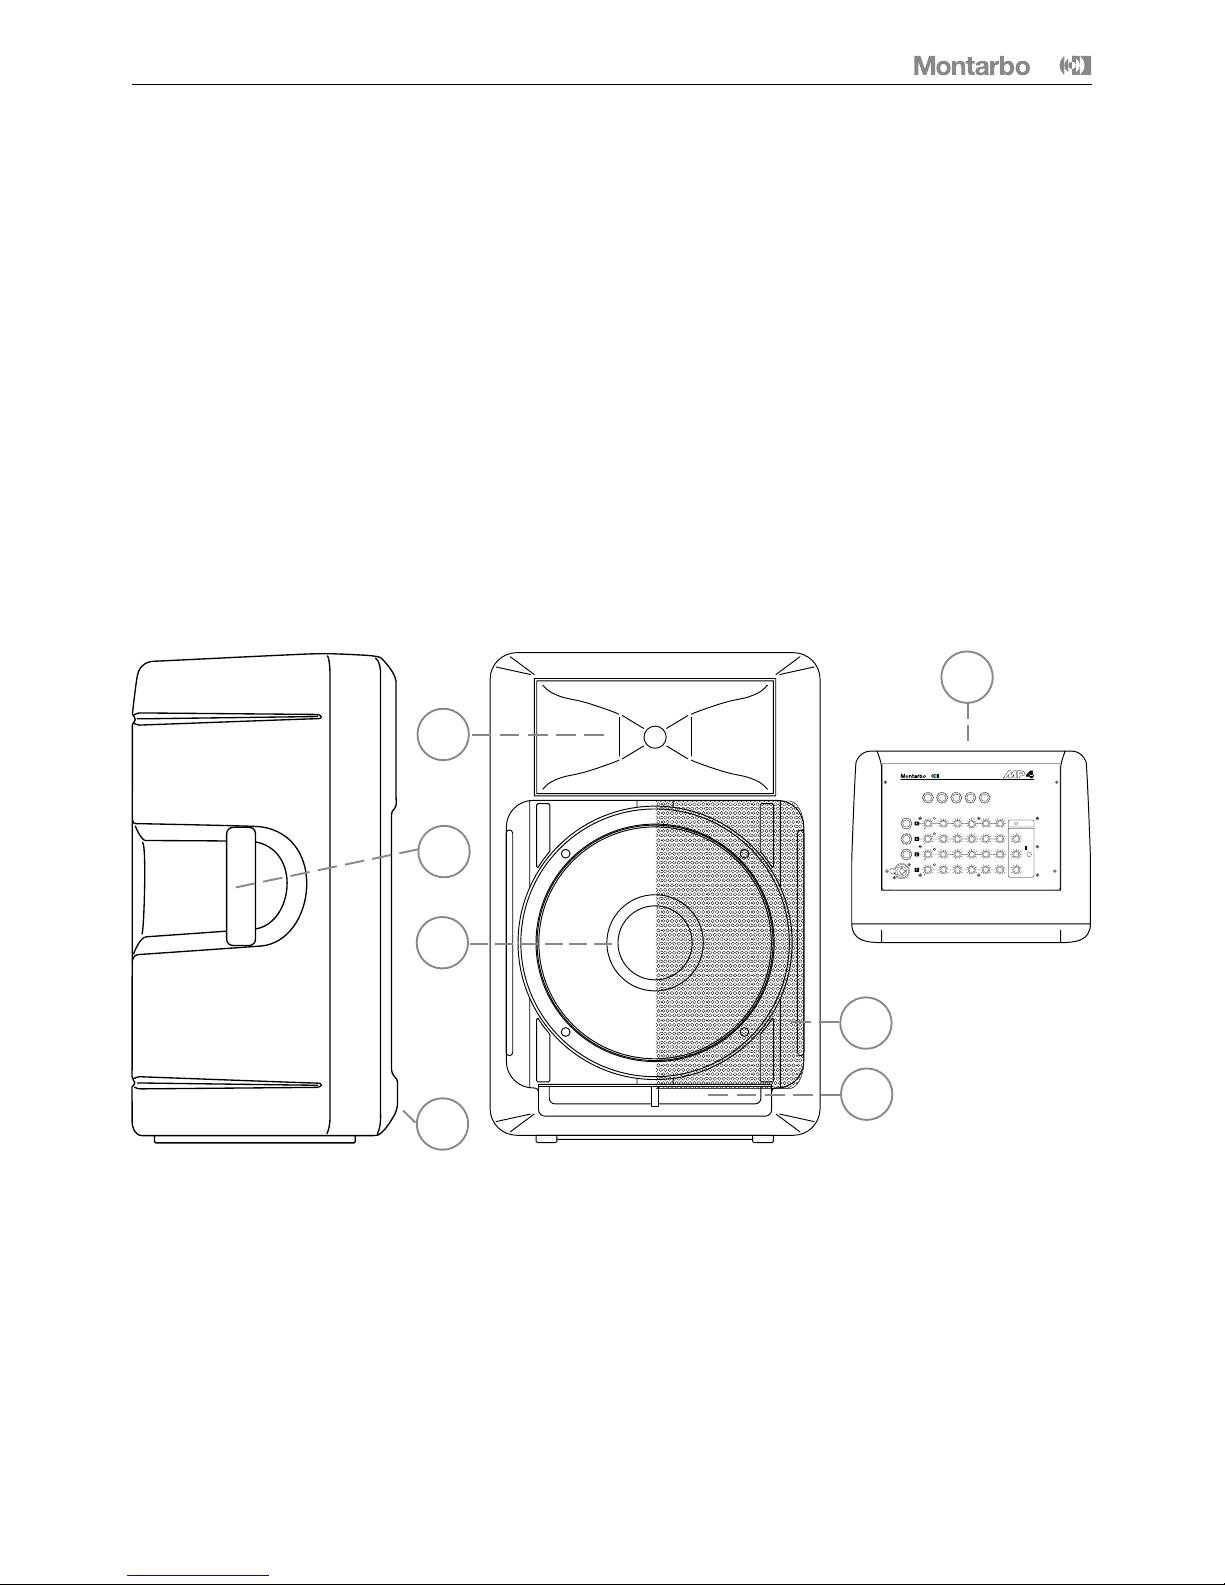
Descrizione
ACostruzione in polietilene ad alta densità, stampo rotazionale.
Nota: eventuali piccole imperfezioni nella finitura e nella colorazione della superficie esterna sono
da considerarsi come normali variazioni dovute al particolare processo di stampaggio rotazionale e
non compromettono in alcun modo il funzionamento e la durata del prodotto nel tempo
BDriver dinamico a compressione da 1" caricato a tromba
(90°H x 60°V).
CWoofer ad alta efficienza da 12".
DCondotti di accordo.
EGriglia di protezione in acciaio.
FPratiche maniglie per il trasporto.
GMixer a 4 canali.
F
D
C
B
E
4
ITALIANO
mic/line
mic/line
mic/line
mic/line
rev.
chorus
AUX OUT VOL.
EFF. VOL.
POWER
MASTER
EFF.
SELECT
10
0
10
0
10
0
MID EFF.
EFF.
VOL.
MID EFF. VOL.
MID EFF. VOL.
MID BASS VOL.HIGH
BASSHIGH
BASSHIGH
BASSHIGH
10
010
010
0
10
010
010
0
10
010
010
0
10
010
010
0
10
0
10
0
10
0
10
0
10
0
10
0
10
0
10
0
GAIN
GAIN
GAIN peak
peak
peak
peak
GAIN
10
10
10
10
4
3
2
1
RETURN
MAIN IN
SEND
PRE OUT
EFFECT
F. SWITCH
AUX OUT
0dB
PHONES
100W MOSFET AMPLIFIER
VISTA SOPRA
Introduzione
Il cabinet realizzato con stampaggio rotazionale in poletilene
HD, riciclabile, robusto ed elegante, incorpora:
■componenti di alta qualità realizzati su nostre
specifiche:
- woofer ad alta efficienza da 12"
- driver dinamico a compressione da 1" caricato a tromba.
■mixer a 4 canali con processore digitale di effetti
incorporato (Reverb / Chorus).
■amplificatore a MosFet in classe AB, controllato
a processore attivo.
Potenza di uscita: 100 W continui, 150 W di picco.
A
G
keyboards combo
MP4
ITALIANO
5
Importante !
Cura e manutenzione del prodotto
•Posizionate la cassa lontano da fonti di calore (lampade,
fari, sorgenti luminose di alta potenza, caloriferi o qualsiasi
altro oggetto che produca calore).
• Non porre sulla cassa sorgenti di fiamme nude, quali cande-
le accese.
•Evitate di esporre la cassa alla radiazione solare diretta,
ad eccessive vibrazioni e ad urti violenti.
•Evitate l'uso ed il deposito dell'apparecchio in ambienti polverosi
o umidi: eviterete così cattivi funzionamenti e deterioramento
anticipato delle prestazioni.
•Evitate l'uso dell'apparecchio vicino a fonti di interferenze
elettromagnetiche (monitor video, cavi elettrici di alta potenza).
Ciò potrebbe compromettere la qualità audio.
• Nel caso in cui il sistema venga utilizzato all’aperto fare attenzione
a proteggerlo dalla pioggia.
•Proteggete l'apparecchio dal rovesciamento accidentale di liquidi
o sostanze di qualsiasi tipo. In particolare nelle condizioni di utilizzo
tipiche, prestate la massima attenzione alla collocazione
dell'apparecchio onde evitare che il pubblico, i musicisti, i tecnici
o chicchessia possa poggiarvi sopra bicchieri, tazze, contenitori di
cibo o di bevande, posacenere o sigarette accese.
•Non rimuovere la griglia di protezione dalle casse.
•Per rimuovere la polvere usate un pennello o un soffio d'aria,
non usate mai detergenti, solventi o alcool.
•Abbiate cura dei cavi di collegamento, avvolgeteli evitando nodi
e torsioni.
•Non forzate i connettori ed i comandi.
•Accertatevi che l'interruttore di rete sia in posizione '0' (spento)
prima di effettuare qualsiasi collegamento.
• All’interno dell’apparecchio possono essere presenti potenziali
elettrici pericolosi anche quando l’interruttore di rete è in posizione
'0' (spento) e la spia luminosa è spenta.
Prima di qualunque intervento di manutenzione, scollegare il cavo
di alimentazione dalla presa di rete.
Collegamento alla rete
• Accertarsi che l'interruttore di rete sia in posizione "0".
•Accertarsi che la tensione di alimentazione corrisponda a quella
indicata sul pannello.
•Collegare il cavo di alimentazione ad una presa di corrente
dotata di contatto di terra di sicura efficienza. Utilizzare solamente
il cavo di alimentazione fornito con l’apparecchio o un altro dotato
di contatto di terra e riportante i marchi di sicurezza applicabili nel
paese di impiego.
• Lasciare spazio sufficiente per accedere alla presa di alimentazione
elettrica e al connettore di rete sul pannello posteriore.
All’interno dell’apparecchio possono essere presenti potenziali
elettrici pericolosi anche quando l’interruttore di rete è in posizione
'0' (spento) e la spia luminosa è spenta.
Prima di qualunque intervento di manutenzione, scollegare il cavo
di alimentazione dalla presa di rete.
Collegamento all'ingresso e all'uscita
Utilizzare sempre e solo cavi SCHERMATI (cavi di segnale)
di adeguata sezione ed elevata qualità per i collegamenti di effetti
esterni, microfoni e strumenti.
Assicurarsi sempre che i volumi dei canali o il volume master siano
al minimo (senso antiorario) prima di accendere l'apparecchio e
prima di inserire o disinserire microfoni o strumenti.
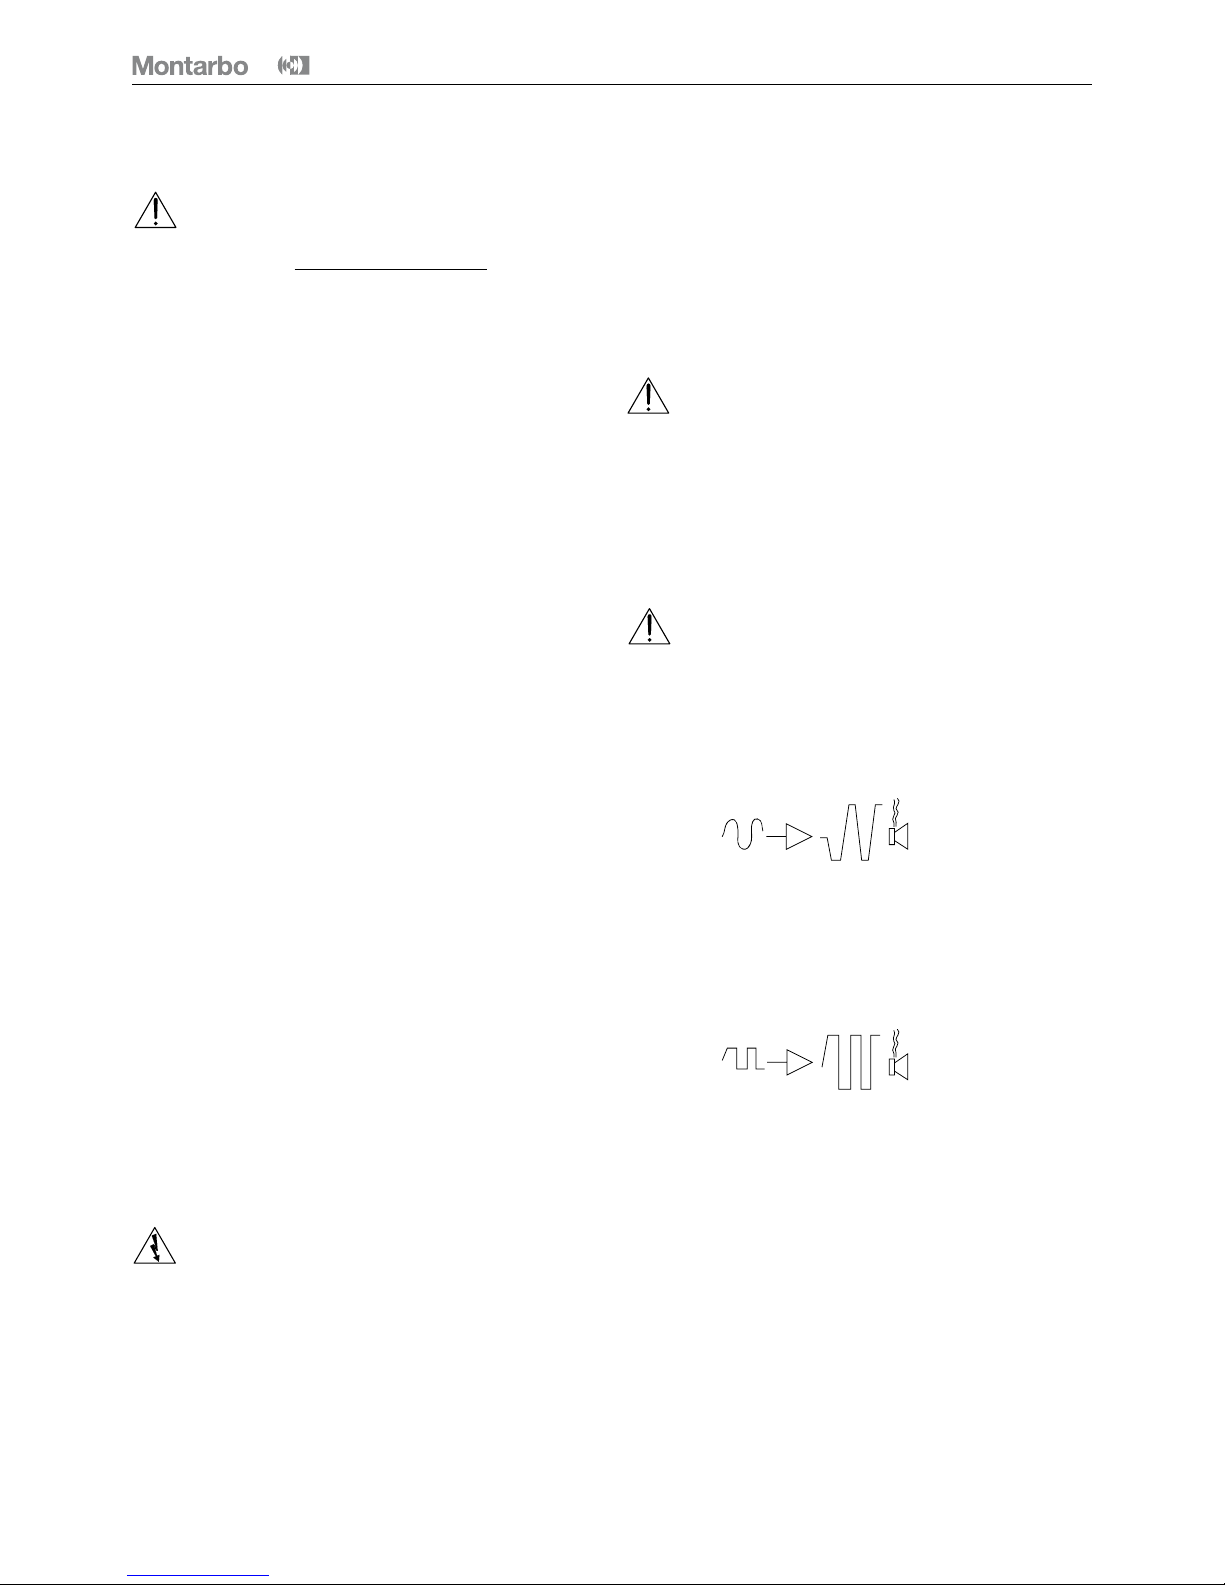
Sensibilità e clipping. Come evitare il clipping.
Ogni sistema amplificatore-altoparlante è caratterizzato da una
sensibilità di ingresso. La sensibilità è definita come il valore del se-
gnale di ingresso all'amplificatore che produce la massima potenza
in uscita. Aumentando il segnale oltre tale valore, infatti, non si
ottiene una maggiore potenza di uscita, ma soltanto un fenomeno
di distorsione detto 'clipping' (saturazione).
In questa situazione l'altoparlante lavora in modo improprio.
Si hanno delle sovraescursioni e una dissipazione anomala
nella bobina mobile, che si surriscalda e può rompersi. I processori
attivi possono evitare solo parzialmente il clipping, abbassando il
guadagno dell'amplificatore. È possibile, in casi estremi, oltrepassare
anche questo tipo di protezione. Ciò che il processore non può mo-
dificare è un'onda che arrivi già distorta in ingresso all'amplificatore.
Gli effetti di un segnale di questo tipo sono gli stessi descritti sopra.
Come evitare il clipping
Il metodo più semplice sta nel controllare i livelli della catena del
segnale. Partendo dal canale del mixer bisogna impostare i controlli
(gain ed equalizzatori) in modo tale che la spia 'peak' non si
accenda mai (o solo occasionalmente). Se si oltrepassano tali livelli
occorre diminuire il gain del canale.

MP4
keyboards combo
6
ITALIANO
9
8
7
6
5
3
1
14
13
15
11
10
24
12
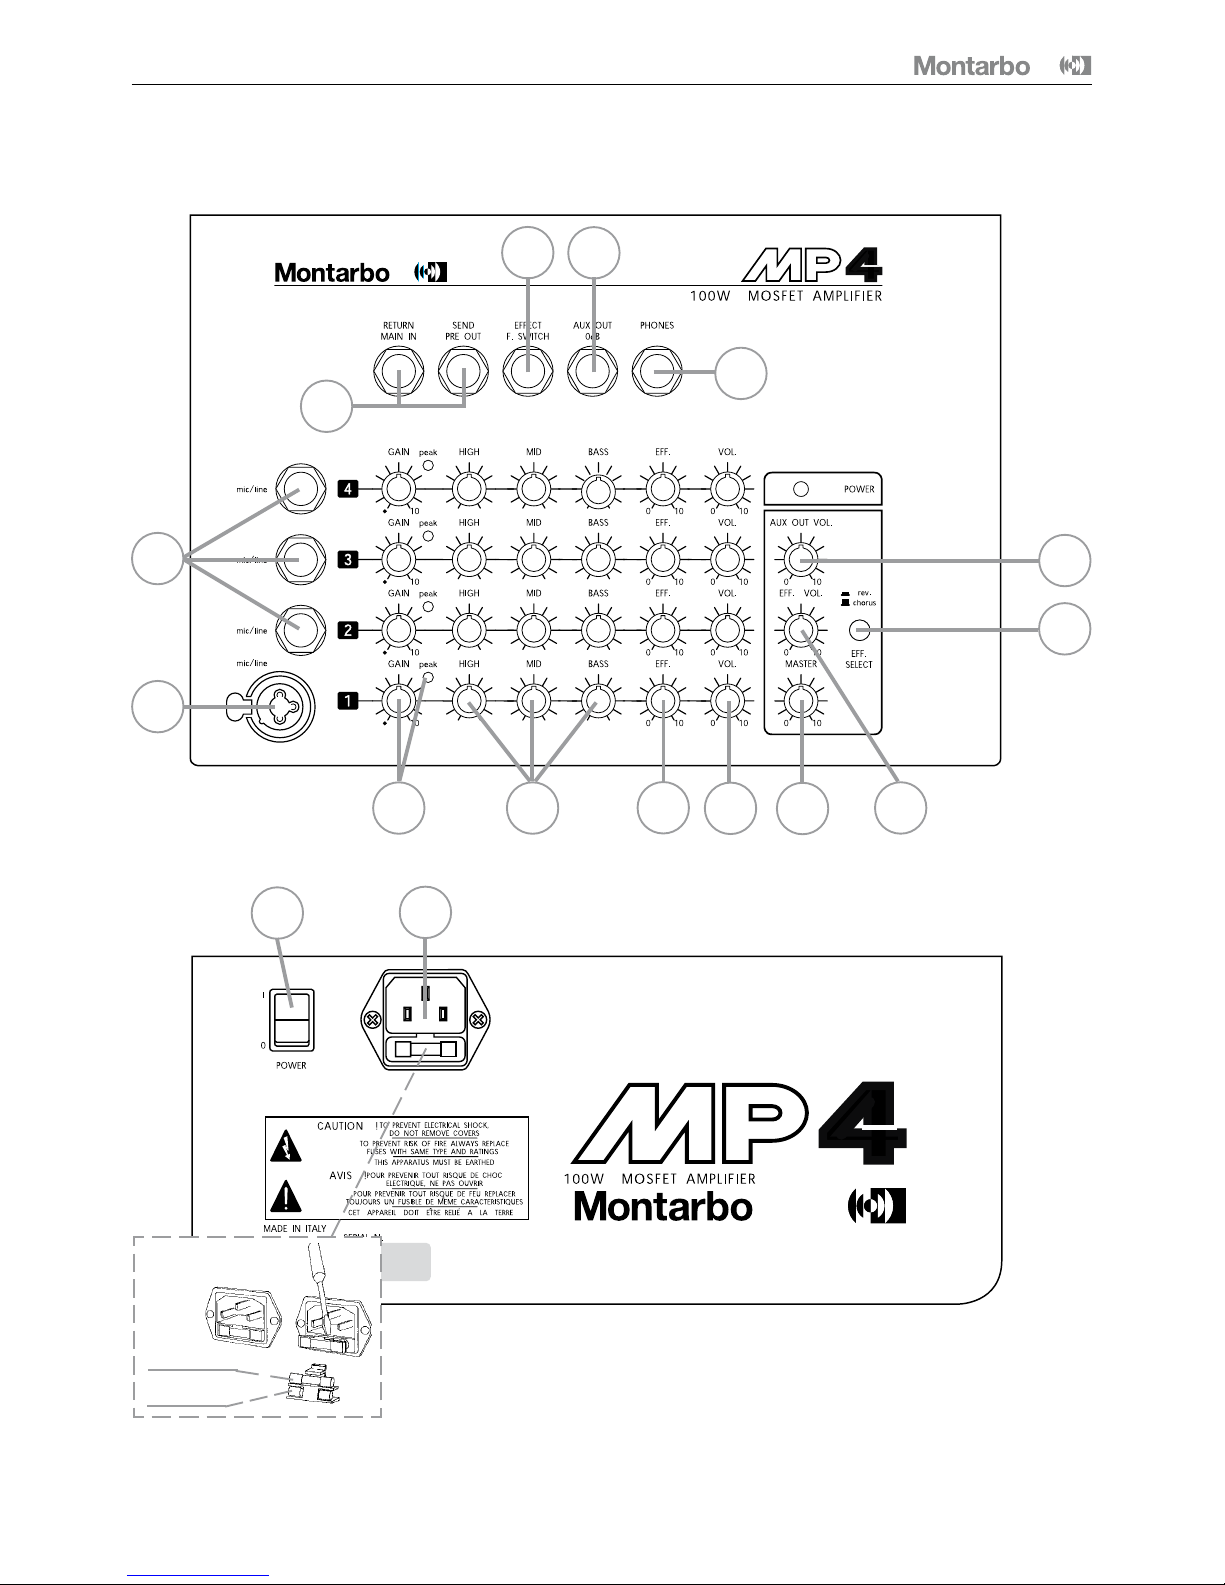
Pannello controlli e connessioni
16
Fusibili di riserva
Fusibili di servizio
sostituzione fusibile

keyboards combo
MP4
7
ITALIANO
Ognuno dei 4 canali dispone di:
1 ➤GAIN: controlla il guadagno dello stadio di ingresso,
permettendo il collegamento di sorgenti sia microfoniche che di
linea aventi segnali di uscita estremamente variabili.
Come regola generale, al fine di contenere al minimo il rumore,
consigliamo di regolare il GAIN al massimo livello possibile, evitando
però che l'indicatore di picco (PEAK) si illumini.
2 ➤HIGH / MID / BASS: equalizzazione a 3 bande.
Controlli di tono che consentono di ottenere la timbrica desiderata.
• HIGH: regola la quantità di accentuazione o attenuazione delle
frequenze alte. Girando la manopola in senso orario si ottiene una
accentuazione dei toni alti, in senso antiorario una attenuazione,
al centro il controllo è escluso.
• MID: regola la quantità di accentuazione o attenuazione delle
frequenze medie. Girando la manopola in senso orario si ottiene
una accentuazione dei toni medi, in senso antiorario una
attenuazione, al centro il controllo è escluso.
• BASS: regola la quantità di accentuazione o attenuazione delle
frequenze basse. Girando la manopola in senso orario si ottiene
una accentuazione dei toni bassi, in senso antiorario una
attenuazione, al centro il controllo è escluso.
3 ➤EFF: volume mandata effetto (dipende dai controlli di tono
e volume del canale). Permette di regolare la quantità dell'effetto
interno da aggiungere al segnale di ingresso di quel canale.
N.B: Sui canali dove non si vuole avere l'effetto interno girare questa manopola
in senso completamente antiorario.
4 ➤VOLUME del canale: permette di regolare il livello del canale
nella miscelazione di uscita.
●connessioni:
5 ➤MIC/LINE - canale 1: ingresso mic (bilanciato) /linea con
connettore Neutrik Combo
®
che accetta sia Jack che XLR (per il
collegamento di microfoni dinamici).
6 ➤MIC/LINE - canali 2-3-4: ingressi mic/linea sbilanciati, su
prese Jack, per il collegamento di strumenti e microfoni dinamici.
Sezione master:
7 ➤Volume generale (MASTER): regola la potenza di uscita totale
dell’amplificatore.
8 ➤EFF SELECT: Pulsante per la selezione dell'effetto incorporato
(Riverbero o Chorus).
Con il pulsante sollevato si ottiene l'effetto 'CHORUS'. Un effetto
che fornisce un suono caldo e ricco, ideale per dare corpo alla voce,
per ravvivare un accompagnamento di chitarra e per le tastiere.
Con il pulsante premuto si ottiene l'effetto 'RIVERBERO'. Ideale per
la voce e per impieghi generali.
9 ➤EFF. VOL.: Volume di uscita del effetto incorporato.
10 ➤AUX OUT VOL: Controllo livello uscita ausiliaria.
È indipendente dalla regolazione del volume master.
●connessioni:
11 ➤Prese SEND (PRE-OUT ) e RETURN (MAIN-IN): permettono
il collegamento di effetti esterni (ad esempio equalizzatore, eco,
flanger, phaser ecc…) utilizzando connettori jack mono.
• sulla presa SEND (PRE-OUT ) è presente il segnale di uscita del
preamplificatore, dipendente dalla regolazione del controllo di
volume MASTER. Inserendo una spina Jack, l’amplificatore di
potenza interno resta collegato al preamplificatore.
Ciò permette di prelevare il segnale (per esempio per collegarsi
all'ingresso di un mixer o di un amplificatore esterno) continuando
ad utilizzare normalmente l’apparecchio.
• la presa RETURN (MAIN-IN) è collegata all’ingresso
dell’amplificatore di potenza interno. Inserendo una spina jack
viene interrotto il collegamento interno tra preamplificatore ed
amplificatore di potenza. L’uscita del preamplificatore continua
ad essere presente sulla presa SEND.
❚Nel caso di utilizzo di un effetto esterno la presa SEND va
collegata all'ingresso e la presa RETURN all'uscita dell'effetto
SEND ➔ Ingresso dell'effetto
Uscite dell'effetto ➔ RETURN
Nota: Il collegamento di un effetto esterno a queste prese non
esclude il funzionamento dell'effetto incorporato.
Se non si volesse utilizzare quest’ultimo, è necessario azzerare il
controllo di volume dell'effetto (9). L'effetto esterno è applicato
a tutti i canali.
Vedere pagina 35.
12 ➤EFFECT F.SWITCH: presa jack per footswitch.
Consente di attivare o disattivare l'effetto interno mediante un
interruttore a pedale.
13 ➤AUX OUT: Uscita ausiliaria. Il segnale presente sull'uscita
ausiliaria è la miscelazione dei singoli canali; esattamente la stessa
che arriva al master con l'unica differenza che l'uscita 'aux'
(non amplificata) dispone di un controllo di volume indipendente
dalla regolazione del volume master ed è perciò possibile effettuare
due regolazioni di livello completamente autonome fra loro.
L'uscita aux può pertanto essere utilizzata per inviare il segnale
ad un'altro impianto di amplificazione (finali di potenza, casse
autoamplificate...) o ad un mixer.
Vedere pagine 35 - 36.
14 ➤PHONES: presa jack per cuffia stereo.
Pannello posteriore
15 ➤Presa di rete (con fusibile incorporato) per cavo di alimentazio-
ne. Utilizzare solamente il cavo di alimentazione fornito con
l’apparecchio o un altro dotato di contatto di terra e riportante i
marchi di sicurezza applicabili nel paese di impiego.
Nell'installazione, accertarsi che sia possibile accedere facilmente a
questo connettore e alla presa di alimentazione elettrica.
16 ➤Interruttore di rete.
Pannello controlli e connessioni
Neutrik Combo® è un marchio Neutrik

MP4
keyboards combo
Direttiva RAEE
Attenzione !
Il prodotto è contrassegnato da questo simbolo che
segnala di non smaltire le apparecchiature elettriche
ed elettroniche tramite la normale procedura di
smaltimento dei rifiuti domestici.
Per questi prodotti è previsto un sistema di raccolta
differenziato in conformità alla legislazione che
richiede il trattamento, il recupero e il riciclaggio
adeguato dei suddetti prodotti.
Per maggiori informazioni si prega di contattare
l’autorità locale competente.
La barra nera sotto il simbolo indica che il prodotto è
stato immesso sul mercato dopo il 13 Agosto 2005.
INFORMAZIONI PER UN CORRETTO SMALTIMENTO
Per gli utenti privati
Nell’Unione europea
Attenzione: Per smaltire il presente dispositivo, non utilizzare il normale
bidone della spazzatura! Le apparecchiature elettriche ed elettroniche usate
devono essere gestite a parte e in conformità alla legislazione che richiede
il trattamento, il recupero e il riciclaggio adeguato dei suddetti prodotti.
In seguito alle disposizioni attuate dagli Stati membri, i privati residenti
nella UE possono conferire gratuitamente le apparecchiature elettriche
ed elettroniche usate a centri di raccolta designati*.
In alcuni paesi (*), anche il rivenditore locale può ritirare gratuitamente
il vecchio prodotto se l’utente acquista un altro nuovo di tipologia simile.
* Per maggiori informazioni si prega di contattare l’autorità locale compe-
tente.
In paesi che non fanno parte dell’UE: contattare le autorità locali e
informarsi sul metodo di smaltimento corretto.
In Svizzera: Le apparecchiature elettriche o elettroniche usate possono
essere restituite gratuitamente al rivenditore, anche se non si acquista un
prodotto nuovo.
Altri centri di raccolta sono elencati sulle homepage di www.swico.ch
o di www.sens.ch.
Per gli utenti professionali
Nell’Unione europea
Attenzione: Se il prodotto è impiegato a scopi professionali, procedere come
segue per eliminarlo: contattare il proprio rivenditore Montarbo che fornirà
informazioni circa il ritiro del prodotto. Potrebbero essere addebitate le
spese di ritiro e riciclaggio. Prodotti piccoli (e quantitativi ridotti) potranno
essere ritirati anche dai centri di raccolta locali.
In Spagna: contattare il sistema di raccolta ufficiale o l’ente locale preposto
al ritiro dei prodotti usati.
In paesi che non fanno parte dell’UE: contattare le autorità locali e
informarsi sul metodo di smaltimento corretto.
8
ITALIANO

keyboards combo
MP4
9
ENGLISH
ENGLISH
PACKAGE CONTENTS
Keyboards combo MP4
Power supply cable
Owner’s manual
Warranty certificate
CE declaration of conformity
The lighting flash with arrowhead symbol within an equilateral triangle, is intended to alert
the user to the presence of uninsulated 'dangerous voltage' within the product's enclosure,
that may be of sufficient magnitude to constitute a risk of electric shock to humans.
The exclamation point within an equilateral triangle, is intended to alert the user to the
presence of important operating and maintenance (servicing) instructions.
IMPORTANT ! SAFETY INSTRUCTIONS
WARNING
In order to protect your own and others' safety and to avoid invalidation
of the warranty of this product, please read this section carefully
before operating this product.
- This product has been designed and manufactured for being operated as active
speaker system in the applications tipical of a sound reinforcement system or of a
sound recording system. Operation for purposes and applications other than these
has not been covered by the manufacturer in the design of the product, and is
therefore to be undertaken at end user's and/or installer's sole risk and responsability.
- This unit conforms to Class 1 insulation, and for safe use it is required that the
protective earth contact is connected to a grounded (earthed) outlet.
TO AVOID THE RISK OF FIRE AND/OR ELECTRIC SHOCK:
•Never expose this product to rain or moisture, never use it in proximity of water
or on a wet surface. Never let any liquid, as well as any object, enter the product.
In case, immediately disconnect it from the mains supply and refer to servicing before
operating it again. Never place burning candles or other sources of open flame on
top of the device.
•Before connecting this product to the mains supply, always make sure that the
voltage on the mains outlet corresponds to that stated on the product.
•This product must be connected only to a grounded mains outlet complying to
the safety regulations in force via the supplied power cable. In case the power cable
needs to be substituted, use exclusively a cable of the same type and characteristics.
•This device is connected to the power line even when the mains switch is in the
O (off) position and the power indicator is off. As long as it is plugged in there are
dangerous electrical potentials inside the device, so, before undertaking any sort of
maintenance work etc., always make sure it has been unplugged from the mains
socket.
•Never place any object on the power cable. Never lay the power cable on a
walkway where one could trip over it. Never press or pinch it.
•Never install the product without providing adequate airflow to cool it.
Never obstruct the air intake openings on it. Leave enough room to get to the
mains power socket and the mains connector on the back panel.
•In case the external fuse needs replacement, substitute it only with one of the
same type and rating, as stated on the product.
•Always make sure the Power switch is in its '0' (= off) position before doing any
operation on the connections of the product.
•Before attempting to move the product after it has been installed, remove all
the connections.
•To disconnect the power cable of this product from the mains supply never pull
the cable directly. Hold the body of the plug firmly and pull it gently from the mains
supply outlet.
CAUTION!
This product does not contain user serviceable parts.
To prevent fire and/or electrical shock, never disassemble it or
remove the rear panel. For maintenance and servicing always
refer to the official Montarbo Distributor in your Country or
to qualified personnel specifically authorised by the Distributor.
- Before placing the product on a surface of any kind, make sure that its shape and
load rating safely match the product size and weight.
Never attempt to hang the product. It is not designed for lifting or hanging.
-To avoid shocks, kicks, or whatever action, always reserve a protected area with
no access to unqualified personnel as installation site of the product.
In case the product is used near children and animals closest supervision is necessary.
-This product can generate very high acoustic pressures which are dangerous for the
hearing system. Always avoid operation at loud levels if anyone is excessively near to
the product (at least 1 m of distance).
Never expose children to high sound sources.
__________________________________________
__________________________________________
__________________________________________
__________________________________________
__________________________________________
__________________________________________
__________________________________________
__________________________________________
__________________________________________
__________________________________________
INDEX
Introduction 10
Description 10
Important !!! 11
Control and connection panel 12 - 13
Appendix: 33 - 39
Technical Specifications 34
Block diagram 34
Connection examples 35 - 36
Applications 37 - 38
Spare parts 39

MP4
keyboards combo
ENGLISH
10
Description
ARotationally moulded, High Density Polyethylene.
Note: any slight imperfections in the finish and coloration of the external surface are to be regarded
as normal variations due to the special rotational molding process employed.
Obviously, they in no way compromise the performance or operating life of the product.
BDynamic compression 1" driver loaded by a 90°H x 60°V horn.
C12" high efficiency woofer.
DTuning ports.
EPerforated steel grid.
F2 transport handles.
G4-channel mixer.
Introduction
Behind the simple definition of "keyboards combo" is a
versatile PA system, in a compact enclosure, with a number
of professional features and a level of quality rarely found in
products of this category.
Thanks to the built-in mixer (4 channels) it is envaluable in
reinforcing small bands, keyboards, accordions, one-man-band
or simply as stage monitor.
TOP VIEW
The rugged and stylish enclosure, made from rotationally
moulded, recyclable HD polyethylene is equipped with:
■custom designed, high quality components
- 12" high efficiency woofer
- 1" compression dynamic driver loaded by a 90° x 60° horn.
■4-channel mixer with built-in digital effects processor
(Reverb/Chorus).
■dedicated class AB MosFet power amplifier controlled by
an active processor.
Output power: 100 W continuous, 150 W peak.
F
D
C
B
E
mic/line
mic/line
mic/line
mic/line
rev.
chorus
AUX OUT VOL.
EFF. VOL.
POWER
MASTER
EFF.
SELECT
10
0
10
0
10
0
MID EFF.
EFF.
VOL.
MID EFF. VOL.
MID EFF. VOL.
MID BASS VOL.HIGH
BASSHIGH
BASSHIGH
BASSHIGH
10
010
010
0
10
010
010
0
10
010
010
0
10
010
010
0
10
0
10
0
10
0
10
0
10
0
10
0
10
0
10
0
GAIN
GAIN
GAIN peak
peak
peak
peak
GAIN
10
10
10
10
4
3
2
1
RETURN
MAIN IN
SEND
PRE OUT
EFFECT
F. SWITCH
AUX OUT
0dB
PHONES
100W MOSFET AMPLIFIER
A
G
keyboards combo
MP4
11
ENGLISH
Important !
Product care and maintenance
• Never place burning candles or other sources of open flame
on top of the device.
• Never expose the enclosure to heat sources (lamps, lights,
high power light sources, radiators or other products that
produce heat.
• Never expose the enclosure to direct sunlight, excessive
vibrations or mechanical shocks.
• Avoid operating and storing the enclosure in damp or dusty
places: this may lead to malfunctions and premature degrading of
specifications.
• Avoid using the enclosure close to strong sources of
electromagnetic interferences (e.g. video monitors, high power
electrical cabling). This may lead to degradation of audio quality.
• When setting up the system up outdoors, be sure to protect it
against rain.
• Care should be taken so that objects do not fall and liquid is not
spilled onto the enclosure. In public event don't let people,
musicians, technicians or anyone put glasses, cups, ashtrays or
cigarettes on the enclosure.
• Always leave the protective grid mounted on the enclosure.
• Use a soft brush or a jet of air to clean the enclosure. Do not use
alcohol, solvents or detergents.
• Take care of your connector cables. Make sure that they are not
damaged, knotted or twisted.
• Do not force connectors and controls.
• Make sure the mains power switch is off ('0') before starting any
connection.
• As long as it is plugged in there can be dangerous electrical
potentials inside the device, so, before undertaking any sort of
maintenance work etc., always make sure it has been unplugged
from the mains socket.
Mains power connection
• Make sure the mains power switch is off ('0').
• Check that mains voltage corresponds to the voltage indicated
on the panel, under the mains socket.
• Use only the factory supplied mains cable or, if a different plug
style is needed, a suitable cable with a ground connection and
marked with the safety approvals valid in the country of use.
• Leave enough room to get to the mains power socket and the
mains connector on the back panel. As long as it is plugged in there
can be dangerous electrical potentials inside the device, even when
the mains switch is in the '0' (off) position and the power indicator
is off so, before undertaking any sort of maintenance work etc.,
always make sure it has been unplugged from the mains socket
Connection to the INPUT and to the OUTPUT
• Always use high quality SHIELDED cables (signal cables) for
connecting external effects, microphones and instruments.
• Always make sure that the channel volumes or the master
volume control are to their lowest settings (counterclockwise)
before plugging or unplugging microphones and instruments.
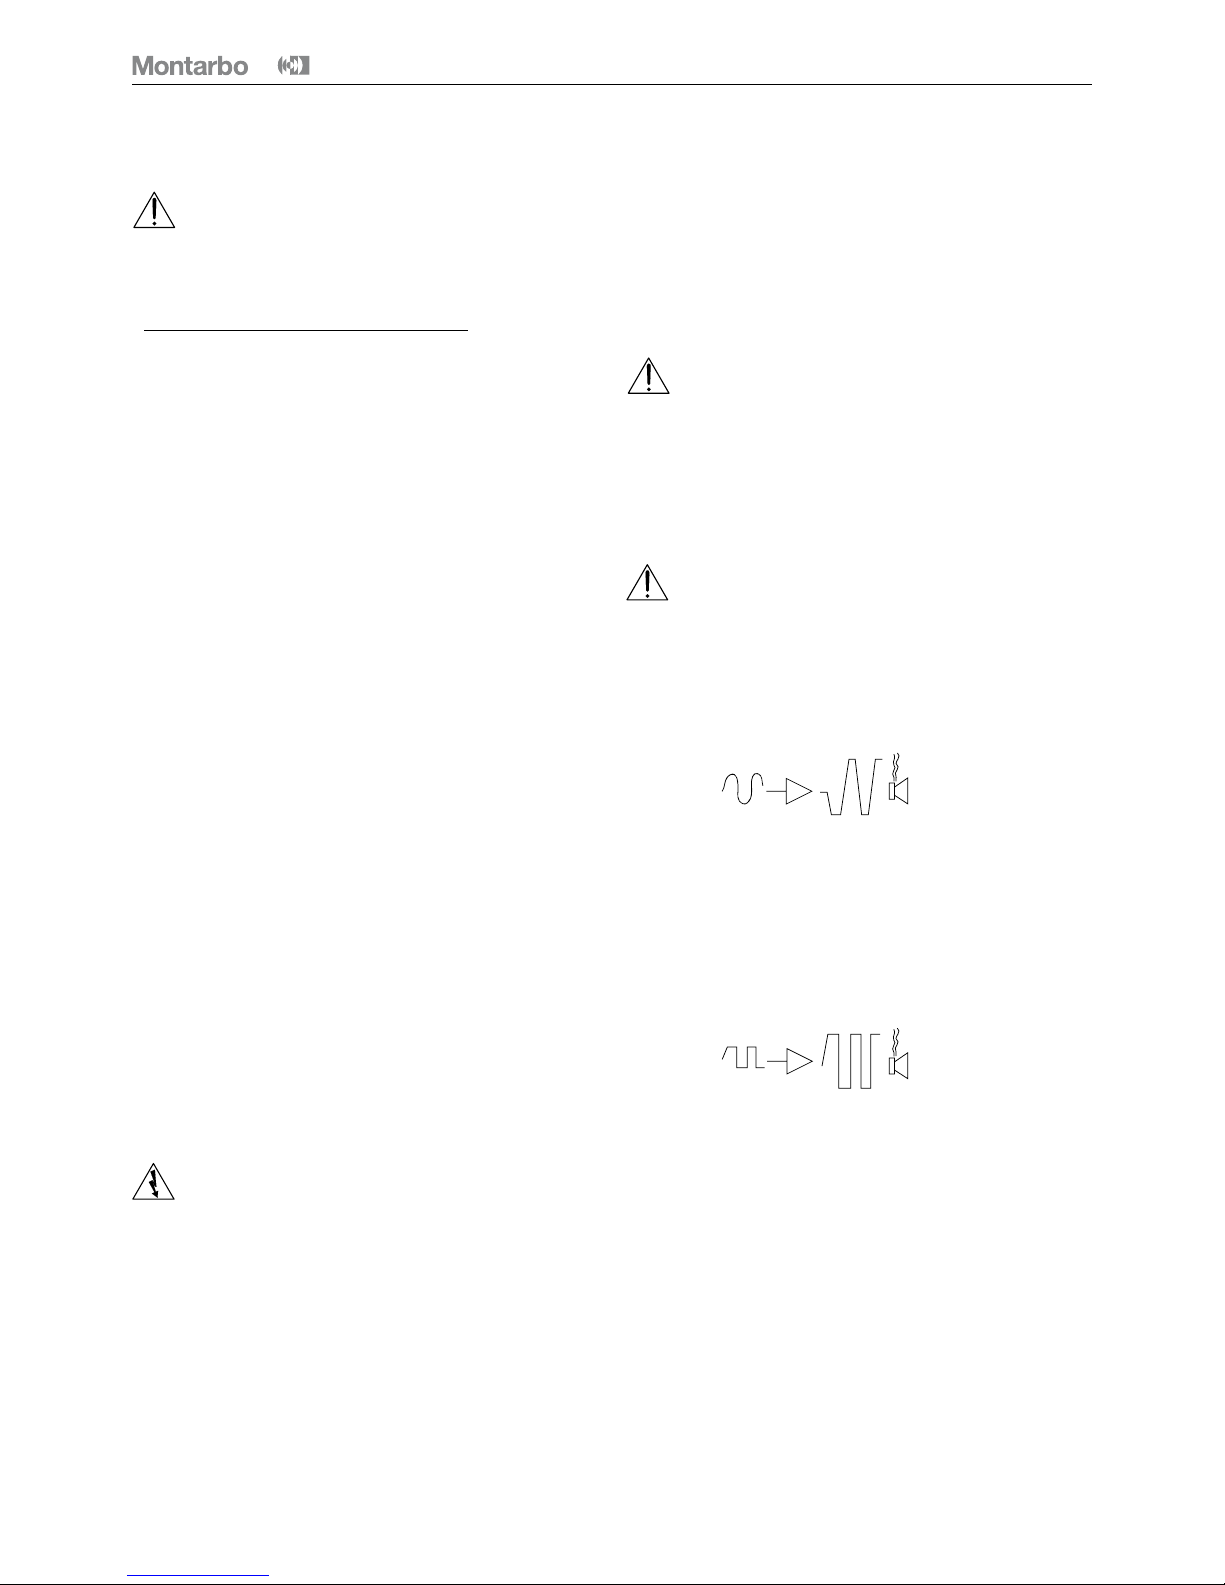
Input sensitivity and clipping. How to avoid clipping
Every amplified speaker system is characterized by a value of input
sensitivity. The sensitivity is defined as the value of the amplifier's
input signal that will result in maximum power output. An increase
in input signal over that threshold will result, not in increased power,
but in a distortion phenomenon called 'clipping' (output stage
saturation).
In this condition, the speaker will operate improperly.
The diaphragm will exceed it's excursion limits, and the voice coil
will overheat beyond it's thermal limits, resulting in overheating
and premature failure.
The active processors will help in avoiding clipping, by reducing the
amplifier gain and thus the input sensitivity, but this type of protec-
tions may be overridden in very extreme conditions.
What the active processor cannot modify is a signal that is distorted
before getting to the active speaker's input.
The effects of this type of signal are the same as described above.
How to avoid clipping
The simplest way to avoid clipping is to check each level in the
signal's chain. Start from each input channel of the mixer and adjust
the gain control and the equalizer's controls so that the 'peak'
indicator is always off, or blinks only occasionally.
If these levels are exceeded, reduce the channel's input gain.

MP4
keyboards combo
ENGLISH
12
Control and connection panel
Spare fuse
Service fuse
fuse replacement
9
8
7
6
5
3
1
14
13
15
11
10
24
12
16

keyboards combo
MP4
Control and connection panel
13
ENGLISH
Each channel is fitted with:
1 ➤GAIN: adjust the gain (sensitivity) of the line and mic inputs,
allowing connections of signal sources (both line and mic level)
having a wide range of signal level. As a practical rule, the GAIN
control must be set to the maximum allowable level that will not
activate the peak level indicator.
2 ➤HIGH / MID / BASS: 3-band equalizer, allow you to achieve the
desired tonal blend.
• HIGH: adjusts the amount of boost or cut in the high frequency
range. Turning the control clockwise increases the amount of high
frequencies, counter-clockwise decreases it, in the middle position
there will be no alteration.
• MID: adjusts the amount of boost or cut in the mid frequencies
range. Turning the control clockwise increases the amount of high
frequencies, counter-clockwise decreases it, in the middle position
there will be no alteration.
• BASS: adjusts the amount of boost or cut in the low frequency
range. Turning the control clockwise increases the amount of low
frequencies, counter-clockwise decreases it, in the middle position
there will be no alteration.
3 ➤EFF: effect send volume (post fader and post tone controls).
It adjusts the quantity of the built-in effect that is sent to the
channel signal.
Note: on the channels where you don't want to have the internal effect turn
this knob fully anticlockwise.
4 ➤Channel VOLUME control: adjusts the channel's level in the
output mix.
●connections:
5 ➤MIC/LINE - channel 1: mic(balanced)/line input with Neutrik
Combo
®
receptacle (allowing use of either XLR and Jack connector),
for connection of dynamic microphones.
6 ➤MIC/LINE - channels 2-3-4: unbalanced mic / line inputs with
jack connectors, for dynamic microphones and instruments.
Master section:
7 ➤MASTER volume control: adjusts the total power output
of the amplifier.
8 ➤EFF SELECT: pushbutton for the selection of the built-in effect
(Reverb or Chorus).
With the pushbutton up you will obtain a 'CHORUS' effect.
It produces a warm and rich sound and it is ideal to enliven a guitar
or keyboards accompainment and to 'fatten' a voice.
With the pushbutton pushed you will obtain a 'REVERB' effect.
it is ideal for the voice and for general purposes.
9 ➤EFF. VOL.: built-in effect volume control.
10 ➤AUX OUT VOL: auxiliary output level control. It is independent
from the master volume setting.
●connections:
11 ➤SEND (PRE-OUT ) and RETURN (MAIN-IN) sockets: they allow
external effects devices (such as equalizers, echo units, flangers,
phasers etc..) to be connected to the unit. Use mono jack plugs.
• the SEND (PRE-OUT) socket is connected to the preamplifier output
signal (dependent of the master volume control). When a jack is
plugged into this socket, the power amplifier is not disconnected
from the preamplifier, enabling thus to take the signal out while
using the amplifier normally.
• the RETURN (MAIN-IN) socket is connected to the internal
power amplifier input. When a jack is plugged into this socket, the
internal connection between preamplifier and power amplifier is
interrupted. The preamplifier output signal is still available at the
SEND (PRE-OUT) socket.
❚When using an external device connect the SEND socket to the
input of the external effect unit and the output of the external
effect unit to the RETURN socket.
SEND ➔ Effect input
Effect output ➔ RETURN
Note: when an external effect device is connected to these sockets,
the internal effect unit is not disconnected.
Should the internal effect not be desired, turn the EFF. VOL control
(9) to the '0' setting. The external effect affects all channels.
See page 35.
12 ➤EFFECT F.SWITCH: a standard footswitch connected to this
jack socket will allow to switch the internal effect 'on' and 'off'
remotely.
13 ➤AUX OUT: Auxiliary output. The signal appearing at the AUX
output is the mix of the output levels of the single channels;
the signal sent to the AUX output is exactly the same sent to the
master with the only difference that the AUX output (not amplified)
has its own volume control (AUX OUT VOL) which is independent
from the position of the master volume control; this allows to make
two fully independent level adjustments. The aux output can be
used for sending the signal to a second sound system (power amp,
self-powered speakers) or to a mixer.
See pages 35 - 36.
14 ➤PHONES: jack socket for stereo headphones.
Rear panel
15 ➤Mains power cord socket (with built-in fuse). Use only the
factory supplied mains cable or a suitable cable with a ground
connection and marked with the safety approvals valid in the
country of use. When installing make sure that it is easy to get to
this connector and to the mains plug.
16 ➤Mains POWER on/off switch.
The trademark Neutrik Combo®is property of Neutrik

MP4
keyboards combo
Attention !
The crossed out wheeled bin symbol that can be
found on this product means that the product is
covered by the Waste from Electrical and Electronic
Equipment Directive. The symbol is intended to
indicate that waste from electrical and electronic
equipment must be subject to a selective collection.
For more details on available collection facilities
please contact your local government office or the
retailer where you purchased this product.
The solid bar underneath indicates that the product
has been put on the market after 13th August 2005.
INFORMATION ON PROPER DISPOSAL
Information on Disposal for Users (private households)
In the European Union
Attention: If you want to dispose of this equipment, please do not use the
ordinary dust bin! Used electrical and electronic equipment should not be
disposed of via the normal household waste stream but must be treated
separately and in accordance with legislation that requires proper treatment,
recovery and recycling of used electrical and electronic equipment.
Following the implementation by member states, private households within
the EU states may return their used electrical and electronic equipment to
designated collection facilities free of charge*.
In some countries* your local retailer may also take back your old product
free of charge if you purchase a similar new one.
* Please contact your local authority for further details.
In other Countries outside the EU: If you wish to dispose of this product,
please contact your local authorities and ask for the correct method of
disposal.
In Switzerland: Used electrical or electronic equipment can be returned
free of charge to the dealer, even if you don’t purchase a new product.
Further collection facilities are listed on the homepage of www.swico.ch
or www.sens.ch.
Information on Disposal for Professional Users
In the European Union
If the product is used for business purposes and you want to discard it:
please contact your Montarbo dealer who will inform you about the
take-back of the product. You might be charged for the costs arising from
take-back and recycling. Small products (and small amounts) might be taken
back by your local collection facilities.
In Spain: Please contact the established collection system or your local
authority for takeback of your used products.
In other Countries outside the EU: please contact your local authorities
and ask for the correct method of disposal.
Waste from Electrical and Electronic Equipment
ENGLISH
14
keyboards combo
MP4
15
DEUTSCH
PACKUNGSINHALT
Keyboards-Verstärker MP4
Netzkabel
Bedienungsanleitung
Garantiebescheinigung
EG-Konformitätserklärung
Das Blitzsymbol mit Pfeilspitze innerhalb eines gleichschenkligen Dreiecks warnt den
Benutzer vor dem Vorhandensein nicht isolierter gefährlicher Netzspannungen im
Inneren des Geräts, die so stark sein können, dass für Menschen die Gefahr eines
Stromschlags besteht.
Das Ausrufezeichen innerhalb eines gleichschenkligen Dreiecks macht den Benutzer
auf das Vorhandensein wichtiger Betriebs- und Wartungsanleitungen aufmerksam.
WICHTIG ! Sicherheitsvorschriften
ACHTUNG
Im Interesse Ihrer eigenen Sicherheit und der Sicherheit anderer
und um die Garantie nicht zu gefährden, sollte der vorliegende
Abschnitt vor Gebrauch des Produkts aufmerksam gelesen werden.
-Dieses Gerät wurde für den Gebrauch als Aktivlautsprechersystem im Rahmen
typischer Anwendungen von Verstärkungssystemen und/oder Tonaufnahmesystemen
entwickelt und hergestellt. Der Gebrauch zu anderen als den genannten Zwecken ist
vom Hersteller nicht vorgesehen und erfolgt somit unter direkter Verantwortung des
Benutzers/Installateurs.
- Dieses Gerät entspricht der Isolierungsklasse 1 (Schutzerdung ist unbedingt
erforderlich).
Zur Vermeidung der Gefahr von Bränden oder elektrischen Schlägen:
•Dieses Produkt nicht Regen oder Feuchtigkeit aussetzen und nicht in der Nähe von
Wasser betreiben. Verhindern, dass in das Gerät Flüssigkeiten oder Gegenstände
eindringen. Sollte dies dennoch geschehen, unverzüglich das Gerät vom Stromnetz
abnehmen und vor der erneuten Inbetriebnahme durch einen qualifizierten Service-
techniker überprüfen lassen. Stellen Sie keine offenen Flammen, beispielsweise
angezündete Kerzen, auf das Gerät.
•Vor dem Anschluss an das Stromnetz sicherstellen, dass die Netzspannung mit der
auf dem Gerät angegebenen Nennspannung übereinstimmt.
•Das Gerät ausschließlich mit dem mitgelieferten Netzkabel an eine Steckdose mit
Schutzkontakt anschließen, die den geltenden Sicherheitsvorschriften entspricht.
Muss das Netzkabel ersetzt werden, ausschließlich ein Netzkabel mit identischen
Eigenschaften verwenden.
•Selbst wenn der Netzschalter sich in der Stellung '0' (aus) befindet, ist das Gerät
nicht vollständig vom Netz getrennt und kann gefährliche elektrische Potentiale
aussenden. Vor jedem Wartungseingriff ist das Gerät vom Stromnetz zu trennen
(Netzkabel ausstecken)
•Zum Ausstecken des Netzkabels aus der Steckdose keinesfalls am Netzkabel ziehen,
sondern das Kabel stets direkt am Stecker anfassen.
•Keine Gegenstände auf dem Netzkabel abstellen. Das Netzkabel so verlegen, dass
es kein Hindernis darstellt und keine Stolpergefahr besteht. Das Netzkabel nicht
quetschen und nicht darauf treten.
•Bei der Installation genug freien Raum um das Gerät lassen, um eine ausreichende
Luftzirkulation für die Kühlung zu gewährleisten. Die Lüftungs- und Ansaugöffnungen
nicht verdecken. Genug freien Raum lassen um die Steckdose und den Netzstecker
auf der Rückeite zu erreichen.
•Muss die externe Sicherung ausgetauscht werden, ausschließlich eine Sicherung
mit identischen Eigenschaften gemäß den Angaben auf dem Gerät verwenden.
•Vor dem Anschluss des Geräts sicherstellen, dass sich der Ein/Aus-Schalter in
Schaltstellung '0' befindet.
•Vor dem Transport des bereits installierten oder bereits in Betrieb befindlichen
Geräts zunächst alle Anschlusskabel abnehmen.
ACHTUNG!
Dieses Gerät enthält keine Teile, bei denen ein direkter Eingriff seitens des
Benutzers vorgesehen ist. Das Gerät keinesfalls auseinanderbauen oder
die Rückwand abnehmen, um die Gefahr von Bränden und elektrischen
Schlägen zu vermeiden. Für Wartungs- und Reparatureingriffe aller Art
wenden Sie sich stets an das Unternehmen Elettronica Montarbo srl und/
oder qualifizierte Fachtechniker, die vom Unternehmen genannt werden.
-Beim Aufstellen des Geräts sicherstellen, daß Art und Tragfähigkeit der
Standfläche für das Gerät geeignet sind. Niemals versuchen das Gerät aufzuhängen.
Das Gerät wurde nicht für Hub- und/oder Hängeinstallation konzipiert.
-Zur Vermeidung von Stößen, Tritten und sonstigen gewaltsamen Einwirkungen das
Gerät nur an einem geschützten und Unbefugten nicht zugänglichen Ort aufstellen.
Wenn das Gerät in Gegenwart von Kindern oder Haustieren betrieben wird, ist eine
strikte Überwachung erforderlich.
-Dieses Gerät kann sehr hohe Schalldruckwerte erzeugen, die zu Gehörschäden
führen können. Daher sind hohe Lautstärkepegel zu vermeiden, wenn sich das
Publikum in großer Nähe zum Gerät befindet. Sicherstellen, dass ein Abstand von
mindestens 1m zwischen Gerät und Publikum gewährleistet ist.
Niemals Kinder starken Schallemissionen aussetzen !
DEUTSCH
__________________________________________
__________________________________________
__________________________________________
__________________________________________
__________________________________________
__________________________________________
__________________________________________
__________________________________________
__________________________________________
__________________________________________
INHALTSVERZEICHNIS
Vorstellung 16
Beschreibung 16
Wichtig !!! 17
Bedien- und Anschlußfeld 18 - 19
Appendix: 33 - 39
Technische Daten 34
Blockdiagramm 34
Anschlußbeispiele 35 - 36
Anwendungsbeispiele 37 - 38
Ersatzteile 39
MP4
keyboards combo
16
DEUTSCH
Beschreibung
Vorstellung
Hinter der Bezeichnung 'Keyboards-Verstärker' versteckt sich
ein leistungsstakes und vielseitiges PA-System, das sich durch
Profi-Features und beste Qualität auszeichnet.
Durch den eingebauten Mini-Mixer (4 Kanäle) ist es ideal als
Verstärkeranlage für Tasteninstrumente, Akkordeons, kleine
Gruppen, kleine Lokale, Piano Bar oder als Monitor für
Tasteninstrumente auf der Bühne.
AAus einem Stück im Drehformverfahren hergestellte
Lautsprecherbox aus wiederverwertbarem hochverdichtetem
Polyäthylen.
Anmerkung: durch die besondere Bearbeitung im Drehverfahren kann die Oberfläche des Gehäuses
manchmal kleine Unvollkommenheiten in Farbe und Finish aufweisen, die jedoch den guten Betrieb
und die Lebensdauer des Geräts in keiner Weise beeinflußen
B1" Kompressiondriver mit Horn (90°H x 60°V).
C12" Hochleistungstieftöner.
DReflexöffnungen.
ESchutzgitter aus Stahl.
F2 Tragegriffe.
G4-Kanal-Mixer.
VON OBEN GESEHEN
Die Box aus hochdichtem Polyäthylen verfügt über:
■ Nach Montarbo-Angaben speziell gefertigte Komponenten:
- 12" Hochleistungstieftöner
- 1" dynamischer Kompressiondriver mit Horn
■4-Kanal-Mischpult mit digitalem Effektprozessor
(Reverb / Chorus).
■Prozessorgesteuerte MosFet-Endstufe (Klasse AB)
Ausgangsleistung: 100 W Dauerleistung, 150 W Spitzleistung.
F
A
D
C
B
G
E
mic/line
mic/line
mic/line
mic/line
rev.
chorus
AUX OUT VOL.
EFF. VOL.
POWER
MASTER
EFF.
SELECT
10
0
10
0
10
0
MID EFF.
EFF.
VOL.
MID EFF. VOL.
MID EFF. VOL.
MID BASS VOL.HIGH
BASSHIGH
BASSHIGH
BASSHIGH
10
010
010
0
10
010
010
0
10
010
010
0
10
010
010
0
10
0
10
0
10
0
10
0
10
0
10
0
10
0
10
0
GAIN
GAIN
GAIN peak
peak
peak
peak
GAIN
10
10
10
10
4
3
2
1
RETURN
MAIN IN
SEND
PRE OUT
EFFECT
F. SWITCH
AUX OUT
0dB
PHONES
100W MOSFET AMPLIFIER

keyboards combo
MP4
17
DEUTSCH
Wichtig !
Pflege und Wartung des Geräts:
• Die Lautsprecherbox ist weit von Wärmequellen (Lampen,
Scheinwerfern, Hochleistungs-Lichtquellen, Heizkörpern oder
jedem anderen Gerät, das Wärme produziert) aufzustellen.
• Stellen Sie keine offenen Flammen, beispielsweise angezündete
Kerzen, auf das Gerät.
• Vermeiden Sie starke Vibrationen und Stöße.
• Die Lautsprecherbox darf nicht in feuchter oder staubiger Umgebung
betrieben oder gelagert werden. Sie darf niemals Regen ausgesetzt
werden. Somit vermeiden Sie Störungen und eine vorzeitige
Verschlechterung der Leistungen oder gar elektrische Stromschläge
bzw. Brand.
• Achten Sie beim Einsatz im Freien darauf, dass Ihr System vor Regen
geschützt aufgestellt wird.
• Vermeiden Sie den Betrieb des Systems in der Nähe von
elektromagnetischen Störquellen (wie Video-Monitore, Starkstromkabel
etc.).
• Keine Gegenstände auf die Lautsprecherbox fallen lassen.
Keine Flüssigkeiten auf die Lautsprecherbox stellen.
Achten Sie besonders darauf, dass keine Gläser, Tassen, Aschenbecher
und Zigaretten auf die Lautsprecherbox gelegt werden.
• Zum Reinigen sollten Sie eine weiche Bürste oder Druckluft
verwenden. Benutzen Sie keine Lösungsmittel oder scharfe Spülmittel.
• Schutzgitter nie entfernen.
• Vergewissern Sie sich stets, dass die Kabel funktionstüchtig sind und
vermeiden Sie deren Verknoten und Knicken.
• Vermeiden Sie das Anstoßen an die Bedienungselemente.
• Vor dem Anschluss sicherstellen, dass sich der Netzschalter des
Systems in Schaltstellung '0' (aus) befindet.
• Selbst wenn der Netzschalter sich in der Stellung '0' (aus) befindet,
ist das Gerät nicht vollständig vom Netz getrennt und kann gefährliche
elektrische Potentiale aussenden. Vor jedem Wartungseingriff ist das
Gerät vom Stromnetz zu trennen (Netzkabel ausstecken).
Netzanschluß
• Überprüfen, ob die Netzspannung mit der auf dem Bedienfeld
angegebenen Spannung übereinstimmt.
• Das Netzkabel mit einer Steckdose verbinden, deren Erdung sicher
gewährleistet ist. Nur jenes Kabel verwenden, das zusammen mit
dem Gerät geliefert wurde, ansonsten muß ein Kabel mit Erdungsleiter
verwendet werden, das die im jeweiligen Einsatzland geltenden
Sicherheitskennzeichnungen aufweist.
• Genug freien Raum hinter der Box lassen um die Steckdose und den
Netzstecker auf der Rückseite zu erreichen.
Selbst wenn der Netzschalter sich in der Stellung '0' (aus) befindet, ist
das Gerät nicht vollständig vom Netz getrennt und kann gefährliche
elektrische Potentiale aussenden. Vor jedem Wartungseingriff ist das
Gerät vom Stromnetz zu trennen (Netzkabel ausstecken).
Anschluß an den EIN- und AUSGANG:
• Immer nur ABGESCHIRMTE Kabel (Signal-Kabel) mit ausreichen-
dem Querschnitt und von guter Qualität benutzen.
• Vor dem Einschalten des Geräts, sowie vor dem Anschluss
von Mikrofone oder Instrumente, sicherstellen, dass die Lautstärke-
Fader auf die einzelne Kanäle auf die niedrigste Stellung sind.
Empfindlichkeit und Clipping (Übersteuerung)
Jedes Aktiv-System ist durch einen Eingangsempfindlichkeitwert
gekennzeichnet. Die Empfindlichkeit ist definiert als den E
ingangssignalwert des Verstärkers, der die maximale Ausgangsleistung
erzeugt. Eine Steigerung des Eingangssignals über diesen Wert,
führt zu keiner höheren Ausgagsleistung sondern zu einem
Verzerrungsphänomen, das sogenanntes Clipping (Übersteuerung).
Unter dieser Bedingung wird der Lautsprecher falsch arbeiten.
Die Membran wird stark überschwingen und die Spule wird überhitzten
und kaputt gehen. Die integrierte Aktiv-Prozessoren können das
Clipping nur teilweise verhindern, durch Verminderung des Gains
(und daher der Eingangsempfindlichkeit) des Verstärkers.
In extreme Fälle wird jedoch auch dieser Typ von Schutz überschritten.
Was der Prozessor nicht ändern kann ist eine verzerrte Welle am
Eingang des im Lautsprechersystems eingebauten Verstärkers.
Die Wirkungen eines solchen Signals sind dieselbe wie die oben
beschrieben.
Tipps zur Vermeidung von Clipping
Die einfachste Weise um das Clipping zu verhindern ist alle Pegel der
Signalkette zu kontrollieren. Auf allen Kanälen des Mischpults, jeweils
nur ein Kanal, Gain und Klangregelungen so einstellen, daß die Peak-
LED nieoder nur gelegentlich aufleuchtet. Werden solche Pegelgrenzen
überschritten, soll man den Gain des Kanals zurückdrehen.
MP4
keyboards combo
9
8
7
6
5
3
1
14
13
15
11
10
24
12
16
Betrieb- und Anschlußfeld
DEUTSCH
18
Betriebssicherung
Ersatzsicherung
sicherungsaustausch

keyboards combo
MP4
19
DEUTSCH
Jedes Kanal verfügt über:
1 ➤GAIN: Stellt die Empfindlichkeit des Mikrophon- oder
Line-Eingangs ein. Es ermöglicht daher, Signalquellen mit völlig
unterschiedlichen Pegeln anzuschließen. In der Praxis sollte dieses
Potentiometer soweit aufgedreht werden, daß die PEAK-LED auch
bei den lautesten Stellen so eben nicht aufleuchtet. So bekommt
man den höchstmöglichen Rauschabstand.
2 ➤HIGH / MID / BASS: drei getrennte TON-Regler zur Einstellung
der Klangfarbe.
• HIGH: Bestimmt den Anteil der Höhen.
Durch Rechtsdrehen erfolgt eine Anhebung, durch Linksdrehen
eine Absenkung. In der Mittelstellung erfolgt keine Änderung.
• MID: Bestimmt den Anteil der Mitten.
Durch Rechtsdrehen erfolgt eine Anhebung, durch Linksdrehen
eine Absenkung. In der Mittelstellung erfolgt keine Änderung.
• BASS: Bestimmt den Anteil der Bässe.
Durch Rechtsdrehen erfolgt eine Anhebung, durch Linksdrehen
eine Absenkung. In der Mittelstellung erfolgt keine Änderung.
3 ➤EFF: Effekt-Send-Regler (er liegt hinter den Klangreglern
und dem Kanal-Lautstärke-Regler). Bestimmt den Anteil des
eingebauten Effekt.
Anmerkung: Wollen Sie kein Effekt, dann drehen Sie diesen Regler zu.
4 ➤VOL: Lautstärke-Regler.
●Anschlüße:
5 ➤MIC/LINE - Kanal 1: Mic (symmetrisch) /Line-Eingang
auf Neutrik Combo
®
Buchse, (XLR + Klinken) für dynamische
Mikrophone.
6 ➤MIC/LINE - Kanälen 2-3-4: unsymmetrische Mic/Line Klinken-
Eingänge für Instrumente, sowie für dymamische Mikrophone.
Summeteil:
7 ➤Der MASTER-Lautstärke-Regler bestimmt die Ausgangs-Leistung
des Verstärkers.
8 ➤EFF SELECT: Mittels dieser Drucktaste wählt man Chorus oder
Reverb.
Ist die Taste hoch, hat man einen 'CHORUS'-Effekt, der dem Signal
einen warmen druckvollen Sound gibt. Dieser Effekt ist ideal
um eine Gitarren-Begleitung zu beleben oder eine Stimme satter
Klingen zu lassen.
Ist die Taste gedruckt hat man den 'REVERB'-Effekt, der für Stimme
sowohl auch für allgemeine Anwendungen geeignet ist.
9 ➤EFF. VOL.: Lautstärke-Regler des eingebauten Effekts.
10 ➤AUX OUT VOL: Lautstärke-Regler des Aux-Ausgangs.
Stellt den Signalpegel ein, der an die Aux-Buchse liegt und ist
unabhängig von der Master-Lautstärke-Regelung.
●Anschlüße:
11 ➤SEND (PRE-OUT) und RETURN (MAIN-IN) Buchsen: sie
ermöglichen den Anschluß von externen Effekt-Geräte (wie
Equalizer, Echo, Flanger usw) mittels Mono-Klinkenstecker.
• An der SEND (PRE-OUT) Buchse liegt das Ausgangs-Signal des
Vorverstärkers nach der Lautstärke-Regelung.
Durch Einstecken des Klinkensteckers bleibt die Endstufe am
Vorverstärker. Die Buchse hat somit die Funktion einer SEND-Buchse.
• Die RETURN (MAIN-IN) Buchse liegt zwischen Summe und
Endstufe. Durch Einstecken eines Klinkensteckers wird die interne
Verbindung zwischen Vorverstärker und Endstufe unterbrochen.
Der Ausgang des Vorverstärkers (Pre-out) bleibt jedoch weiterhin
benutzbar.
❚Schließen Sie die SEND-Buchse an den Eingang des externen
Effekt-Geräts und den Ausgang desselben an die RETURN-Buchse an.
SEND ➔ Effekt-EINGANG
Effekt-AUSGANG ➔ RETURN
Anschlüße: Durch ein externes Effekt-Gerät wird der eingebaute
Effekt nicht abgeschaltet. Wird er nicht gewünscht, ist der
Effekt-Lautstärke-Regler 'EFF. VOL' (9) auf 0 zu stellen.
Der Extern-Effekt ist auf alle Kanäle tätig.
Siehe Seite 35.
12 ➤EFFECT F.SWITCH: Die Effekt-Fußschalter-Buchse ermöglicht
den Anschluß einer Fernbedienung.
13 ➤AUX OUT: Aux-Ausgang (Line-Ausgang). Das Signal an
dieser Buchse ist die Summe der einzelnen Kanälen.
Es ist dasselbe wie an den Master, aber ganz unabhängig von der
Master Lautstärkeregelung, weil der Aux-Ausgang über eigenen
Lautstärkeregler verfügt.
Der Aux-Ausgang ermöglicht daher ein zusätzliches Sound System
(Endstufen, Aktiv-Boxen usw) oder ein Mischpult anzusteuern.
Siehe Seite 35 - 36.
14 ➤PHONES: Klinkenbuchse für Stereo-Kopfhörer.
Rückseite
15 ➤Netzsteckdose mit eingebauter Sicherung.
Nur jenes Netzkabel verwenden, das zusammen mit dem Gerät
geliefert wurde, ansonsten muß ein Kabel mit Erdungsleiter
verwendet werden, das die im jeweiligen Einsatzland geltenden
Sicherheitskennzeichnungen aufweist. Bei der Installation darauf
achten, dass sowohl der Netzverbinder als auch die Steckdose leicht
erreichbar sind.
16 ➤Der Netzschalter (POWER) dient zum Einschalten des Geräts
und leuchtet auf.
Bedien- und Anschlußfeld
Neutrik Combo® ist ein Warenzeichen der Firma Neutrik.

MP4
keyboards combo
Achtung !
Ihr Produkt trägt dieses Symbol.
Die durch gekreuzte Mülltonne weist darauf
hin, dass dieses Gerät einem getrennten
Rücknahme-
system zugeführt werden soll.
Informationen zur Entsorgung von Elektro-
und Elektronikgeräte erhalten Sie bei der
Stadtverwaltung, beim Entsorgungsamt oder
in dem Geschäft, wo Sie das Produkt erworben
haben.
Entsorgungsinformationen für Benutzer aus Privathaushalten
In der Europäischen Union
Achtung: dieses Gerät darf nicht in den normalen Hausmüll geworfen
werden!
Gemäß einer neuen EU-Richtlinie, die die ordnungsgemäße Rücknahme,
Behandlung und Verwertung von gebrauchten Elektro- und Elektronikge-
räten vorschreibt, müssen elektrische und elektronische Altgeräte getrennt
vom Hausmüll über dafür staatlich vorgesehenen Stellen entsorgt werden.
Nach der Einführung der Richtlinie in den EU-Mitgliedstaaten können
Privathaushalte ihre gebrauchten Elektro- und Elektronikgeräte nun
kostenlos an ausgewiesenen Rücknahmestellen abgeben*.
In einigen Ländern* können Sie Altgeräte u.U. auch kostenlos bei Ihrem
Fachhändler abgeben, wenn Sie ein vergleichbares neues Gerät kaufen.
*Weitere Einzelheiten erhalten Sie von Ihrer Gemeindeverwaltung.
In anderen Ländern außerhalb der EU
Bitte erkundigen Sie sich bei Ihrer Gemeindeverwaltung nach dem
ordnungsgemäßen Verfahren zur Entsorgung dieses Geräts.
In der Schweiz: Gebrauchte Elektro- und Elektronikgeräte können
kostenlos beim Händler abgegeben werden, auch wenn Sie kein neues
Produkt kaufen. Weitere Auskünfte finden Sie auf der Homepage von
www.swico.ch oder www.sens.ch.
Entsorgungsinformationen für professionelle Nutzer
In der Europäischen Union
Wenn Sie dieses Produkt für gewerbliche Zwecke genutzt haben und nun
entsorgen möchten: bitte wenden Sie sich an Ihren Montarbo Fachhändler,
der Sie über die Rücknahme des Produkts informieren kann.
Möglicherweise müssen Sie die Kosten für die Rücknahme und Verwertung
tragen. Kleine Produkte können möglicherweise bei Ihrer örtlichen Rücknah-
mestelle abgegeben werden.
In Spanien: Bitte wenden Sie sich an das vorhandene Rücknahmesystem
oder Ihre Gemeindeverwaltung, wenn Sie Fragen zur Rücknahme Ihrer
Altgeräte haben.
In anderen Ländern außerhalb der EU:
Bitte erkundigen Sie sich bei Ihrer Gemeindeverwaltung nach dem
ordnungsgemäßen Verfahren zur Entsorgung dieses Geräts.
Europäische Richtlinie für Elektro- und Elektronikalt-/schrottgeräte
DEUTSCH
20
Table of contents
Languages:
Other Montarbo Stereo System manuals


