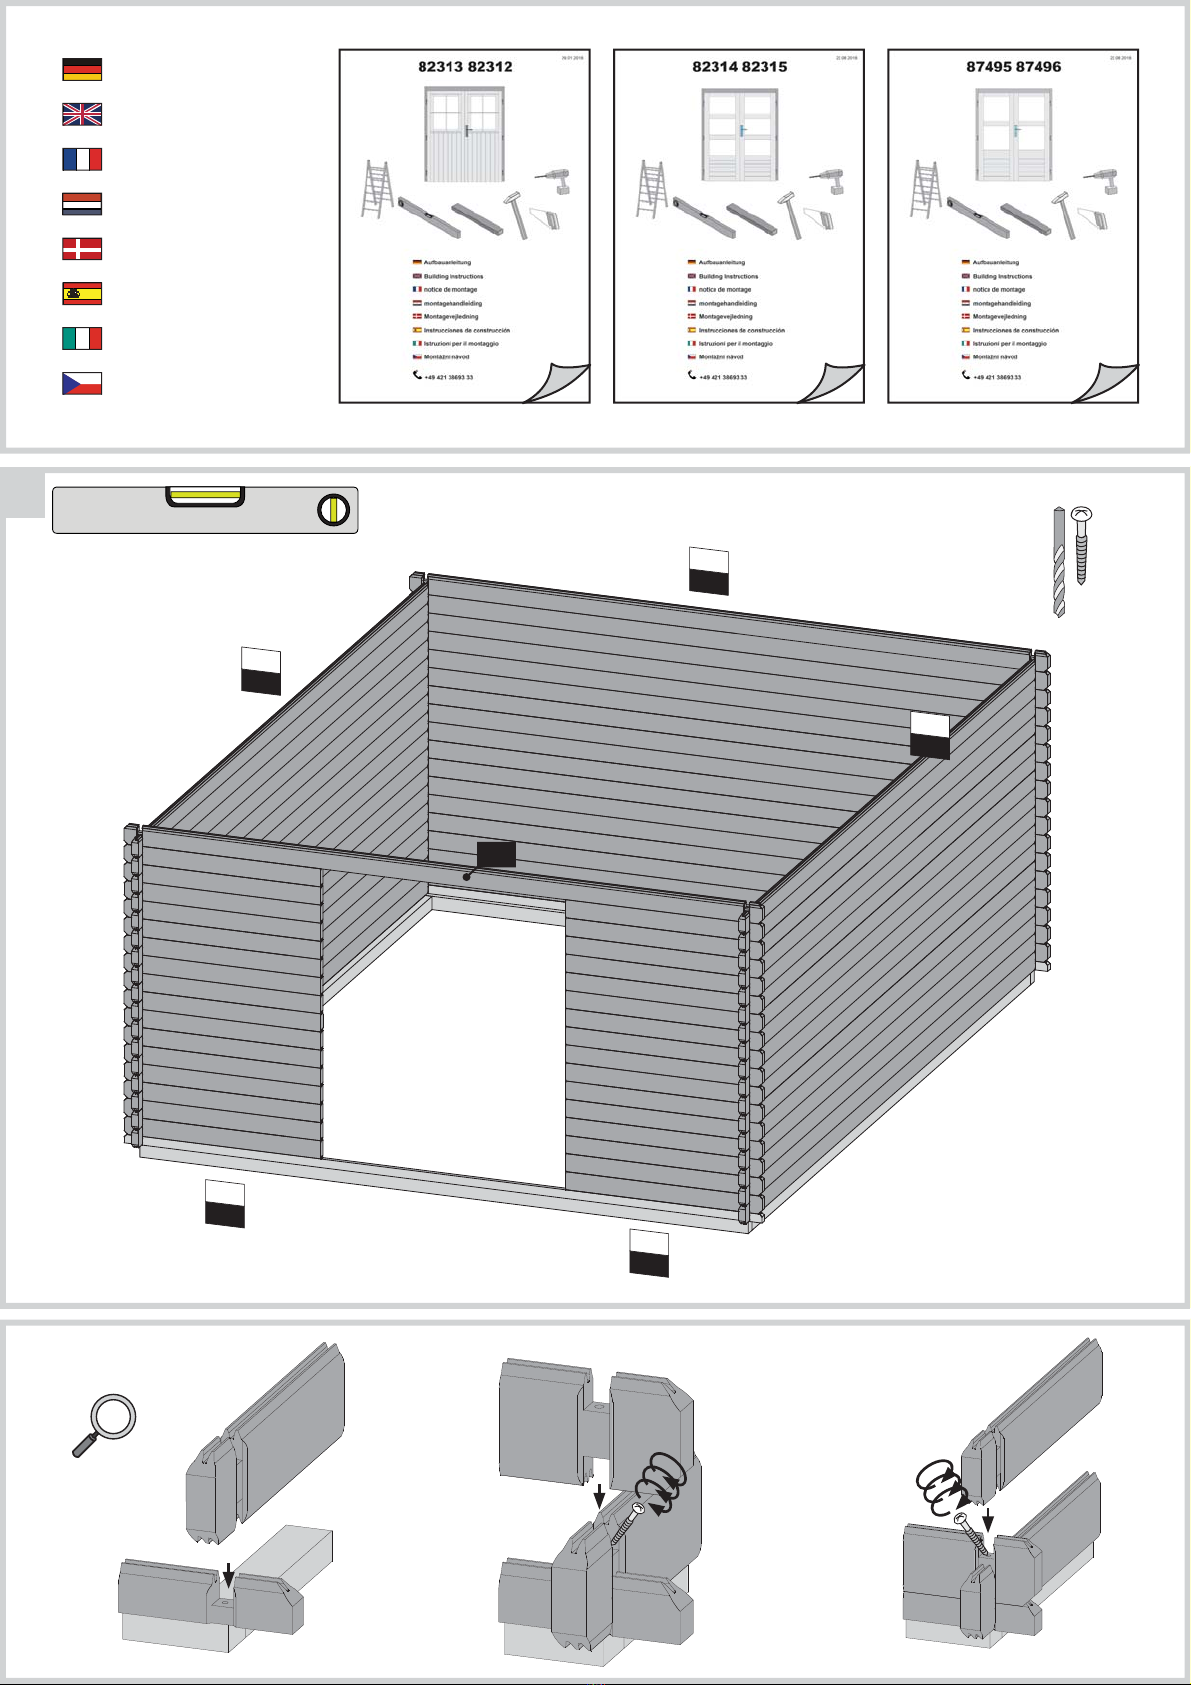
Verschraubung Ausschnitte
Vissage découpes
Cut-outs for screw connections
Vastschroeven uitsparingen
Atornilladura recorte
Fissaggio tavole
Verschraubung Ausschnitte
Vissage découpes
Cut-outs for screw connections
Vastschroeven uitsparingen
Atornilladura recorte
Fissaggio tavole
Verschraubung Ausschnitte
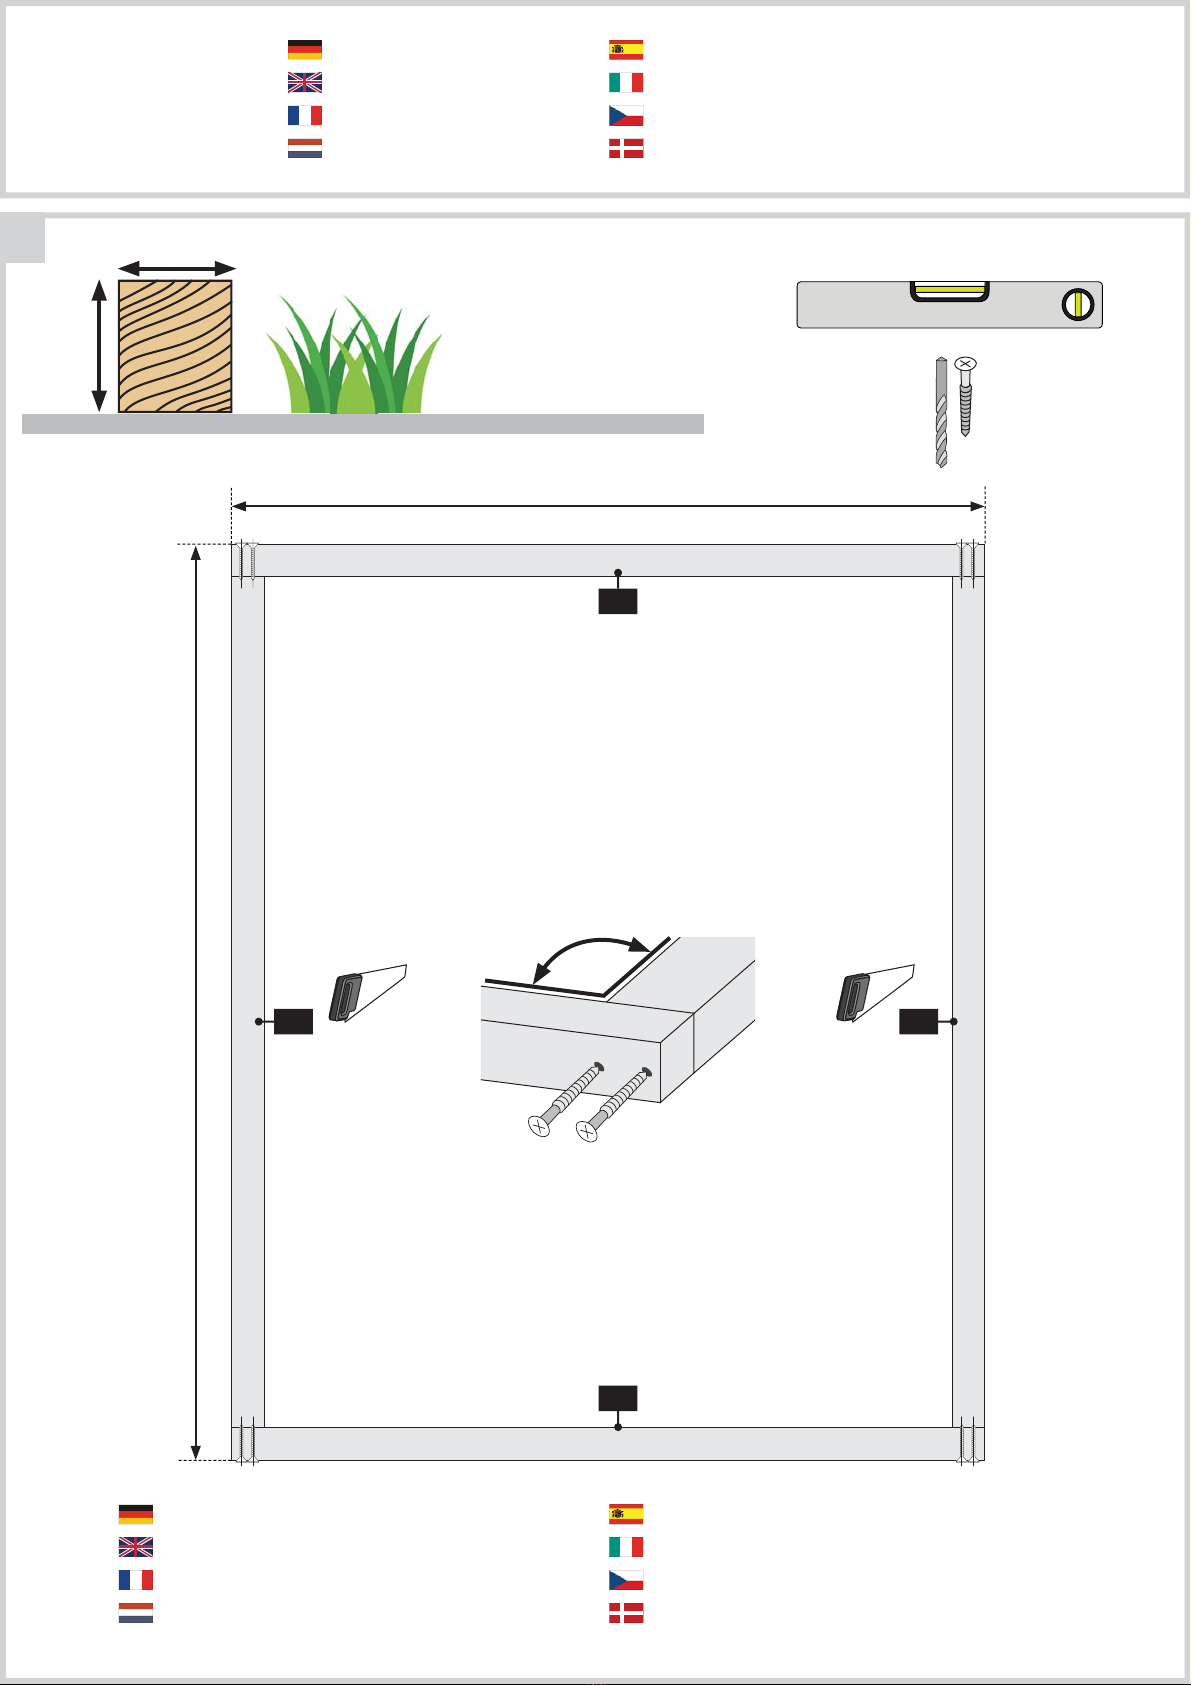
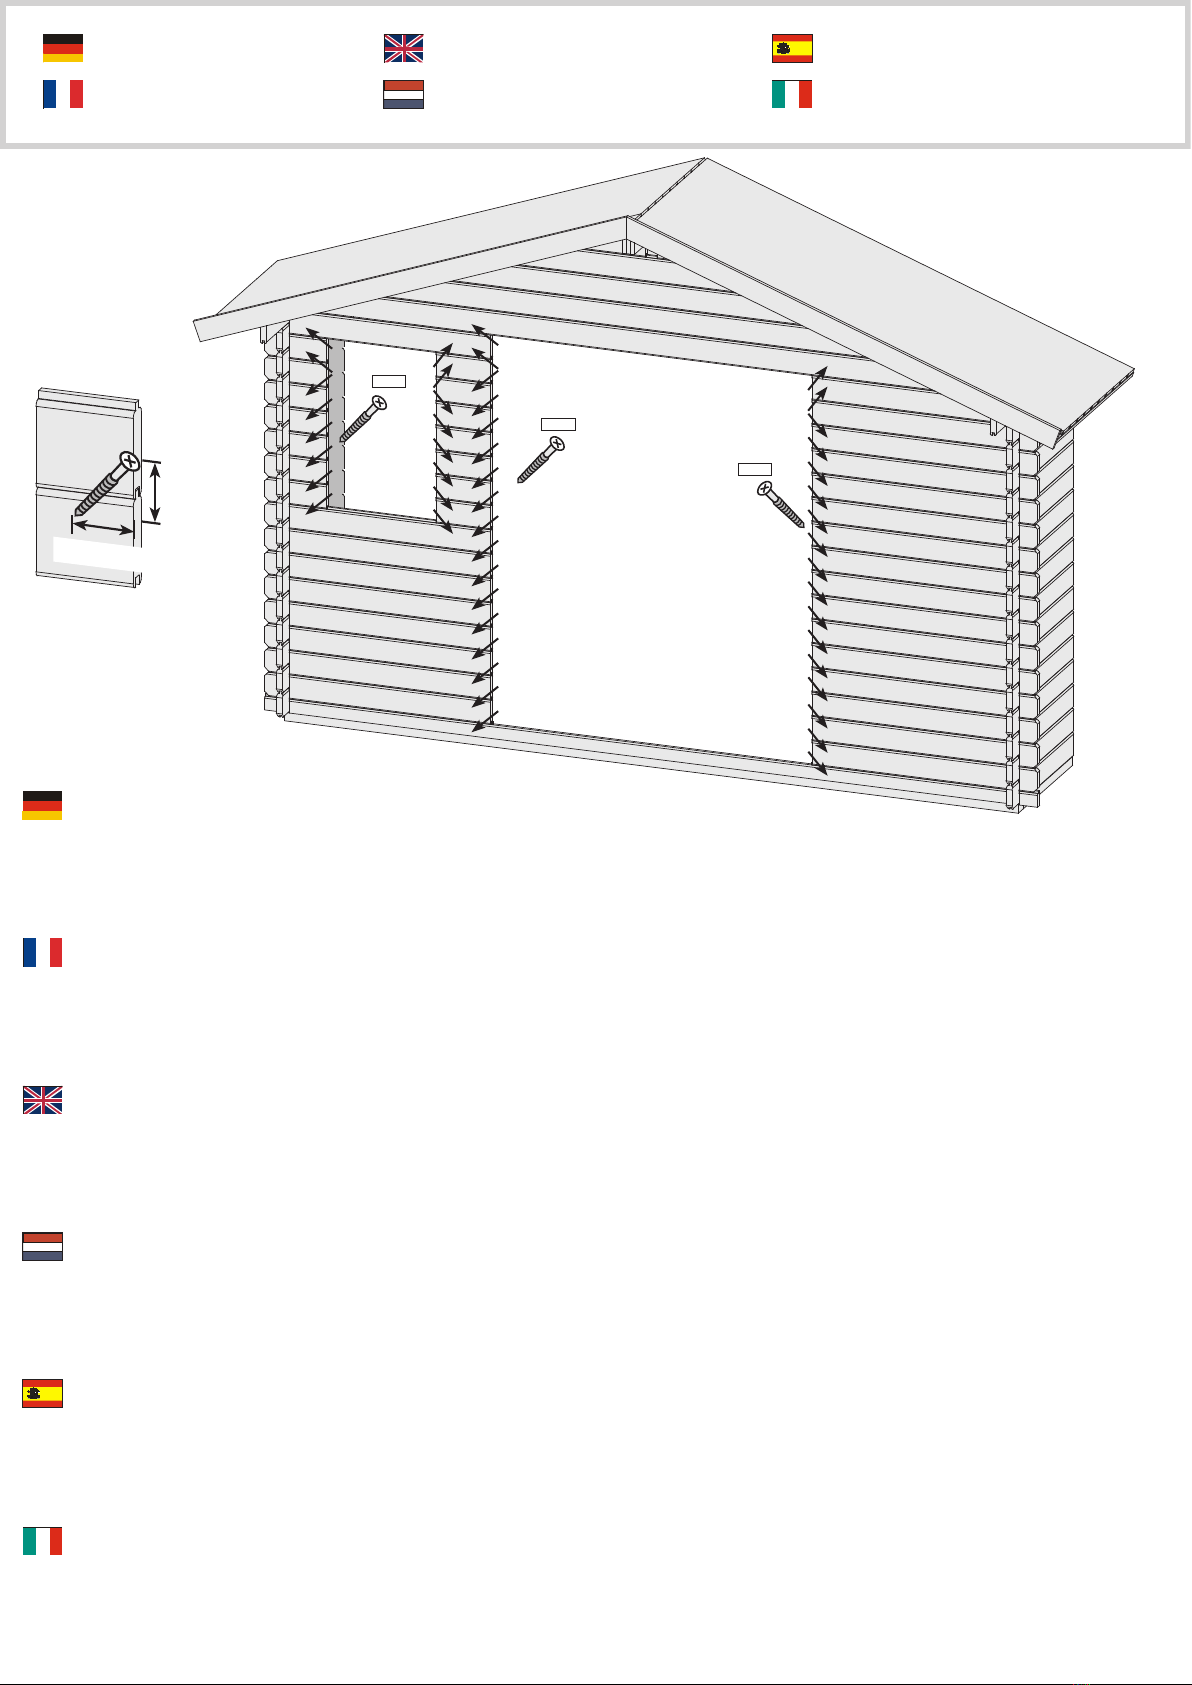
Holz hat ein natürliches Quell und Schwindverhalten. Dadurch „wächst“ und „schrumpft“ Ihr Haus im Laufe eines Jahres. Kürzere Holzbohlen (Front) passen sich
schneller als längere Bohlen den aktuellen klimatischen Bedingungen an. Dadurch kann es zu Spaltenbildungen kommen. Um diese Spaltenbildung zu verringern aber
gleichzeitig das natürliche Quell- und Schwindverhalten des Holzes zu gewährleisten müssen Sie an Fenster und Türausschnitten die jeweils zwei direkt übereinandersit-
zenden Bohlen miteinander verbinden. Verwenden Sie dafür Spax 4 x 60. Bohren Sie die Bohlen bei einer Verschraubung immer vor. Hinweis: Schräge Bohrungen ohne
Abrutschen: Die ersten 3 bis 5mm den Bohrer senkrecht zur Holzoberäche ansetzen und erst dann im gewünschten Winkel bohren.
Vissage découpes
Le bois a un comportement naturel de gonement et de rétractation. C’est ainsi que votre pavillon «se gone» et «se rétracte» au cours d’une année. Les madriers de bois
plus courts (façade) s’adaptent plus rapidement aux conditions climatiques que les madriers plus longs. Ceci peut entraîner des fentes. Pour réduire cette formation de
fentes tout en garantissant que le bois puisse se comporter de manière naturelle, vous devez raccorder au niveau des fenêtres et des découpes de porte les deux madriers
respectivement situés l’un sous l’autre. A cet effet, utilisez des Spax 4 x 60. Lors de vissages, veuillez toujours percer un trou préalable dans les madriers. Remarque: pour
percer des trous inclinés sans déraper, veuillez tenirr la perceuse de manière perpendiculaire lors des premiers 3-5 mm, puis percer ensuite dans l’angle souhaité.
Cut-outs for screw connections
Wood is subject to a natural process of swelling and contraction. For this reason, over the course of the year your house “grows” and “shrinks”. Shorter wooden boards
(front) adapt faster than long boards to the momentary climatic conditions. This can result in cracking. In order to reduce this cracking and at the same time allow for
the natural growth and shrinkage behaviour of the wood, at the window and door recesses you must join each two boards positioned directly over each other. For this
purpose, use 4 x 60 Spax joints. Always pre-drill the boards for screw can drill obliquely into the wood without slipping connections. Note: You away by setting on the
drill vertically for the rst 3-5 mm and only then drilling obliquely.
Vastschroeven uitsparingen
Hout zet uit en krimpt van nature. Daardoor zal ook uw huisje in de loop van een jaar „uitzetten“ en „krimpen“. Kortere houten delen (front) passen zich sneller danlangere
delen aan de verschillende klimatologische omstandigheden aan. Daardoor kunnen er zich spleten vormen. Om de vorming van deze spleten te verminderen, maar tegeli-
jkertijd het natuurlijke uitzet- en krimpgedrag van het hout te waarborgen, moet u bij raam- en deuruitsparingen telkens de twee direct boven elkaar bevindende delen met
elkaar verbinden. Gebruik daarvoor spax-schroeven 4 x 60. Boor de delen bij het vastschroeven altijd voor. Opmerking: schuin boren in hout zonder weg te glijden gaat
het beste door de eerste 3-5 mm de boor haaks op de oppervlakte van het hout te houden en pas daarna onder de gewenste hoek te boren.
Atornilladura recorte
La madera tiene un comportamiento natural de hinchamento y encogimiento. Debido al mismo, su casa „crece“ y se „encoge“ a lo largo del año. Los tablones de madera
cortos (parte delantera) se adaptan más rápido que los largos a las condiciones climatológicas. Para reducir esta formación de ranuras pero, al mismo tiempo, garantizar
el proceso natural de hinchamiento y encogimiento de la madera, tiene que unir en la ventana y los recortes de la puerta entre sí los dos tableros que están justo uno sobre
otro. Utilice para ello Spax 4 x 60. Perfore siempre previamente los tablones antes de efectuar el atornillamiento. Advertencia: Para efectuar perforaciones inclinadas en
la madera sin resbalar hacer los primeros 3-5 mm con la broca vertical respecto a la supercie y después inclinar en el ángulo deseado.
Fissaggio tavole
È naturale che il legno lavori dilatandosi e restringendosi. Per questo la vostra casa „cresce“ e „si contrae“ nel corso dell’anno. Le assi più brevi (quelle frontali) si adattano
alle situazioni climatiche più velocemente di quelle più lunghe. Per questo si può avere la formazione di crepe. Per minimizzare il rischio dela formazione di crepe ma allo
stesso tempo per permettere le contrazioni e dilatazioi del legno, sulle aperture della nestra e della porta collegare le due assi direttamente in contatto tra loro. Utilizzare
a tal ne viti a croce da 4 x 60. Preforare sempre le assi prima di avvitarle. Avviso: Per fare dei fori obliqui nel legno senza che la punta scivoli si può dapprima fare un
foro perpendicolare per 3-5 mm e poi iniziare a forare con l’angolo desiderato.
4×60
4×60
4×60
20mm
20mm