© Outdoor Life Group Nederland B.V. v050313 www.outdoorlifeproducts.com
-3-
1
2 Tagplanke Takbräde Szalunek Tetődeszka Assi del tetto
3 Tag/gulvplint Tak/golvlist
Listwa dachowa/przypodłogowa
Szegőléc Plinto del tetto / plinto del pavimento
4 Gavlliste Gavelist Deska czołowa okapu Homlokdeszka Cornicione della facciata
4/1 Tagafdækningsliste Takavslutningslist Deska poszycia ściany Kátránypapír leszorító léc Listello per la copertura del tetto
4/2 Rombe Tvivlare/Romb/Firmamärke Deska kalenicowa Embléma Colmo a losanga
4/3 Tagskægsliste Takfotsbräda Płyta okapowa Kátránypapír leszorító léc Gronda
5 Overligger Takås Płatew Gerenda Terzera
6 Gavlpunkt Gavel Szczyt ściany Tűzfal Facciata
7 Dør Dörr Drzwi Ajtó Porta
7/1 Indbygningslægte dør Spjälor dörr Listwa profilowa drzwi Ajtó borítóléc Stipiti di montaggio porta
7/2 Afdækningsliste dør Täcklist dörr Listwa zakrywająca drzwi Ajtó takaróléc Modanatura porta
7/3 Dørlister Dörr-spröjs Szczeblina drzwi Ajtó osztóléc Travi della porta
8 Vindue Fönster Okno Ablak Finestra
8/1 Indbygningslægte vindue Spjälor fönster Listwa profilowa okna Ablak borítóléc Stipiti di montaggio finestra
8/2 Afdækningsliste vindue Täcklist fönster Listwa zakrywająca okna Ablak takaróléc Modanatura finestra
8/3 Vindueslister Fönster-spröjs Szczeblina okna Ablak osztóléc Travi della finestra
9 Vægbjælke Väggbalk Belka ścienna Faldeszka Travi della parete
9/1 Vægbjælke med fer Halv väggbalk spont Półbelki ściennej z piórem Fél faldeszka Semi-tronco
9/2 Vægbjælke med udskæring Väggbalk med ursparing Półbelki ściennej z wycięciem Ajtós faldeszka Trave della parete con vano
Vaegbjaelke Halv väggbalk 1/2 deski wpust Fél faldeszka nútos Semi-tronco
10
+€
Gulvplanke Golvbräden Deska podłogowa Padlódeszka Assi del pavimento
11
+€
Gulvbjælke Golvbalk Belka stropowa Impregnált stafni Travi del pavimento
12
+€
Terrasse Terrass Taras Terasz Terrazza
12/1
+€
Terrassedele Terrassbrädor Elementy tarasu Teraszdeszka Componenti della terrazza
13
+€
Blomsterkasse Blomlåda Skrzynka na kwiaty Virágláda Fioriera
14
+€
Skodder Fönsterluckor Okiennice Spaletta Imposte
15
+€
Dræningsprofil Dräneringsprofil Profil odwadniający Vízelvezetőkeret Profilo di drenaggio
16 Monteringsmateriale Fastsättningsmaterial Elementy mocujące Csavarcsomag Materiale di fissaggio
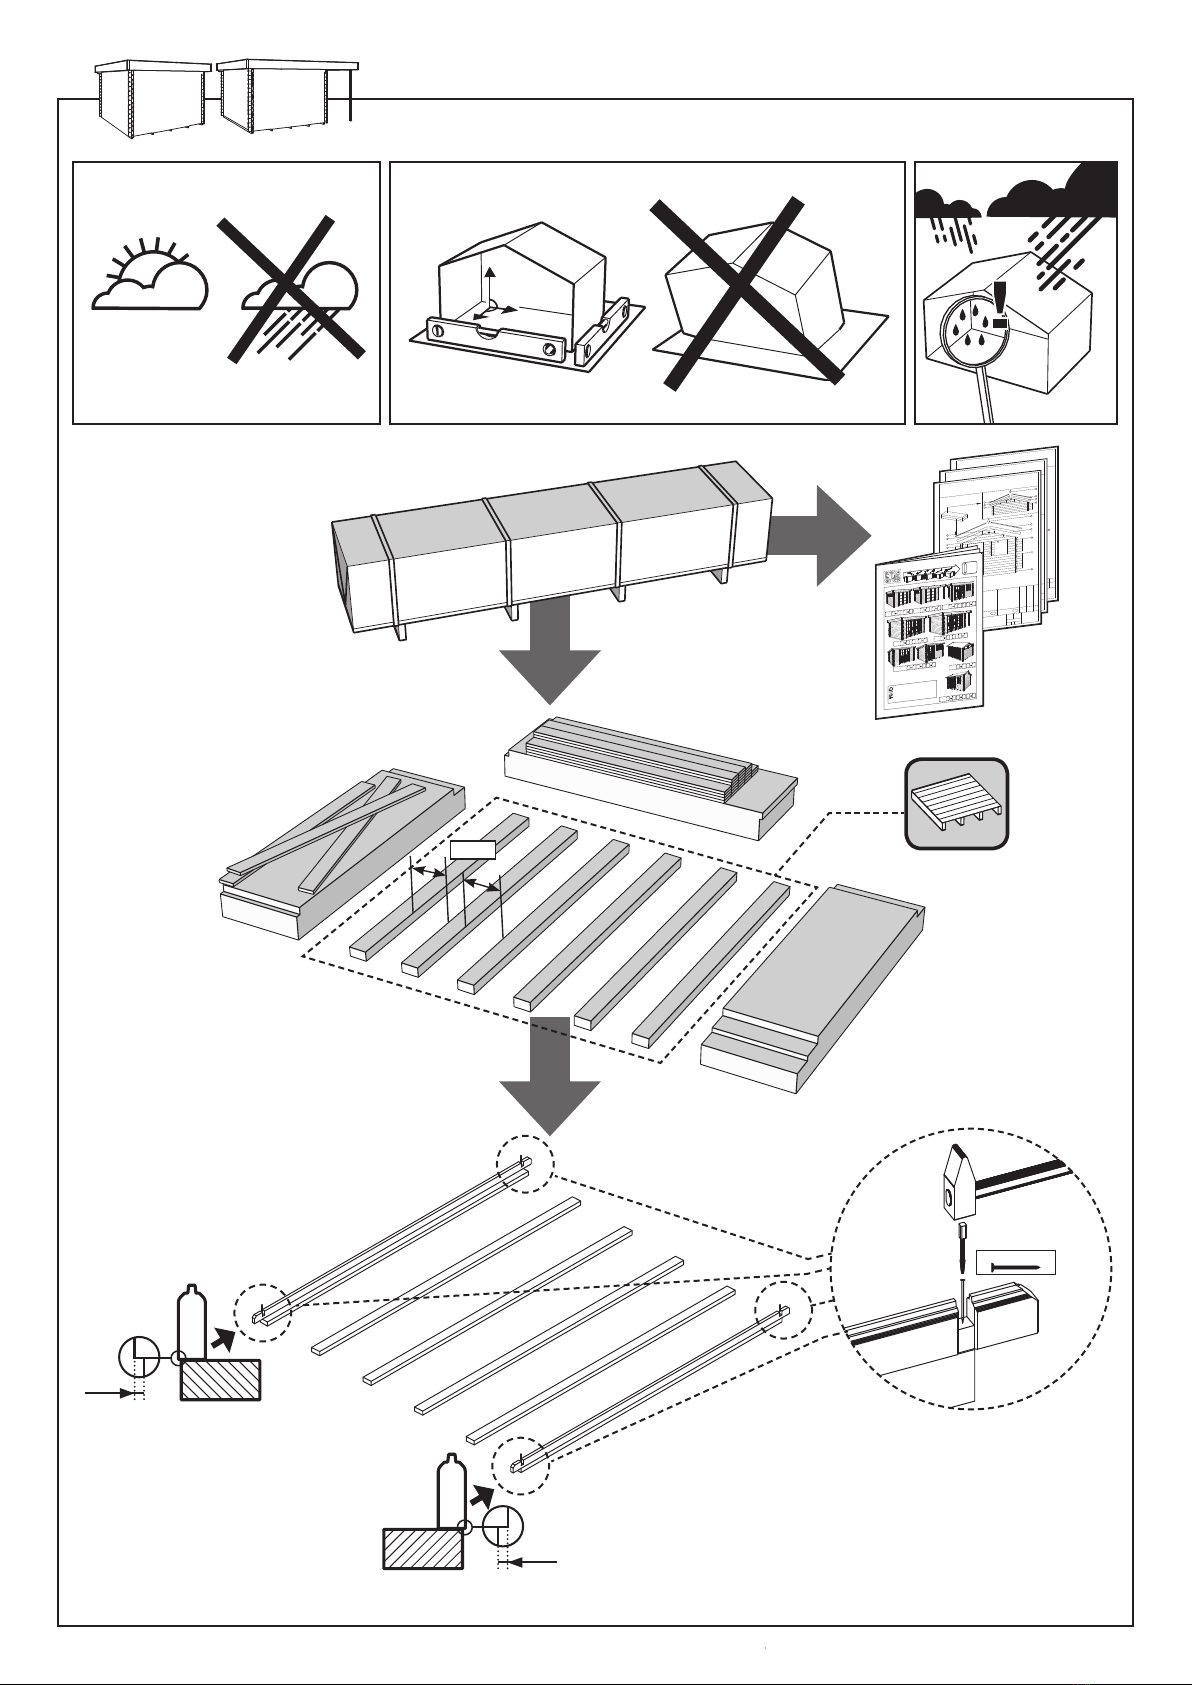
17 Bygningsinstruktion Byggnadsbeskrivning Instrukcja budowy Építési útmutató Istruzioni di montaggio
18 Fascie Fascia Powięź Párkány Fascia
19 Slidlag Slitskikt Warstwa Kopó rétegből Strato di usura
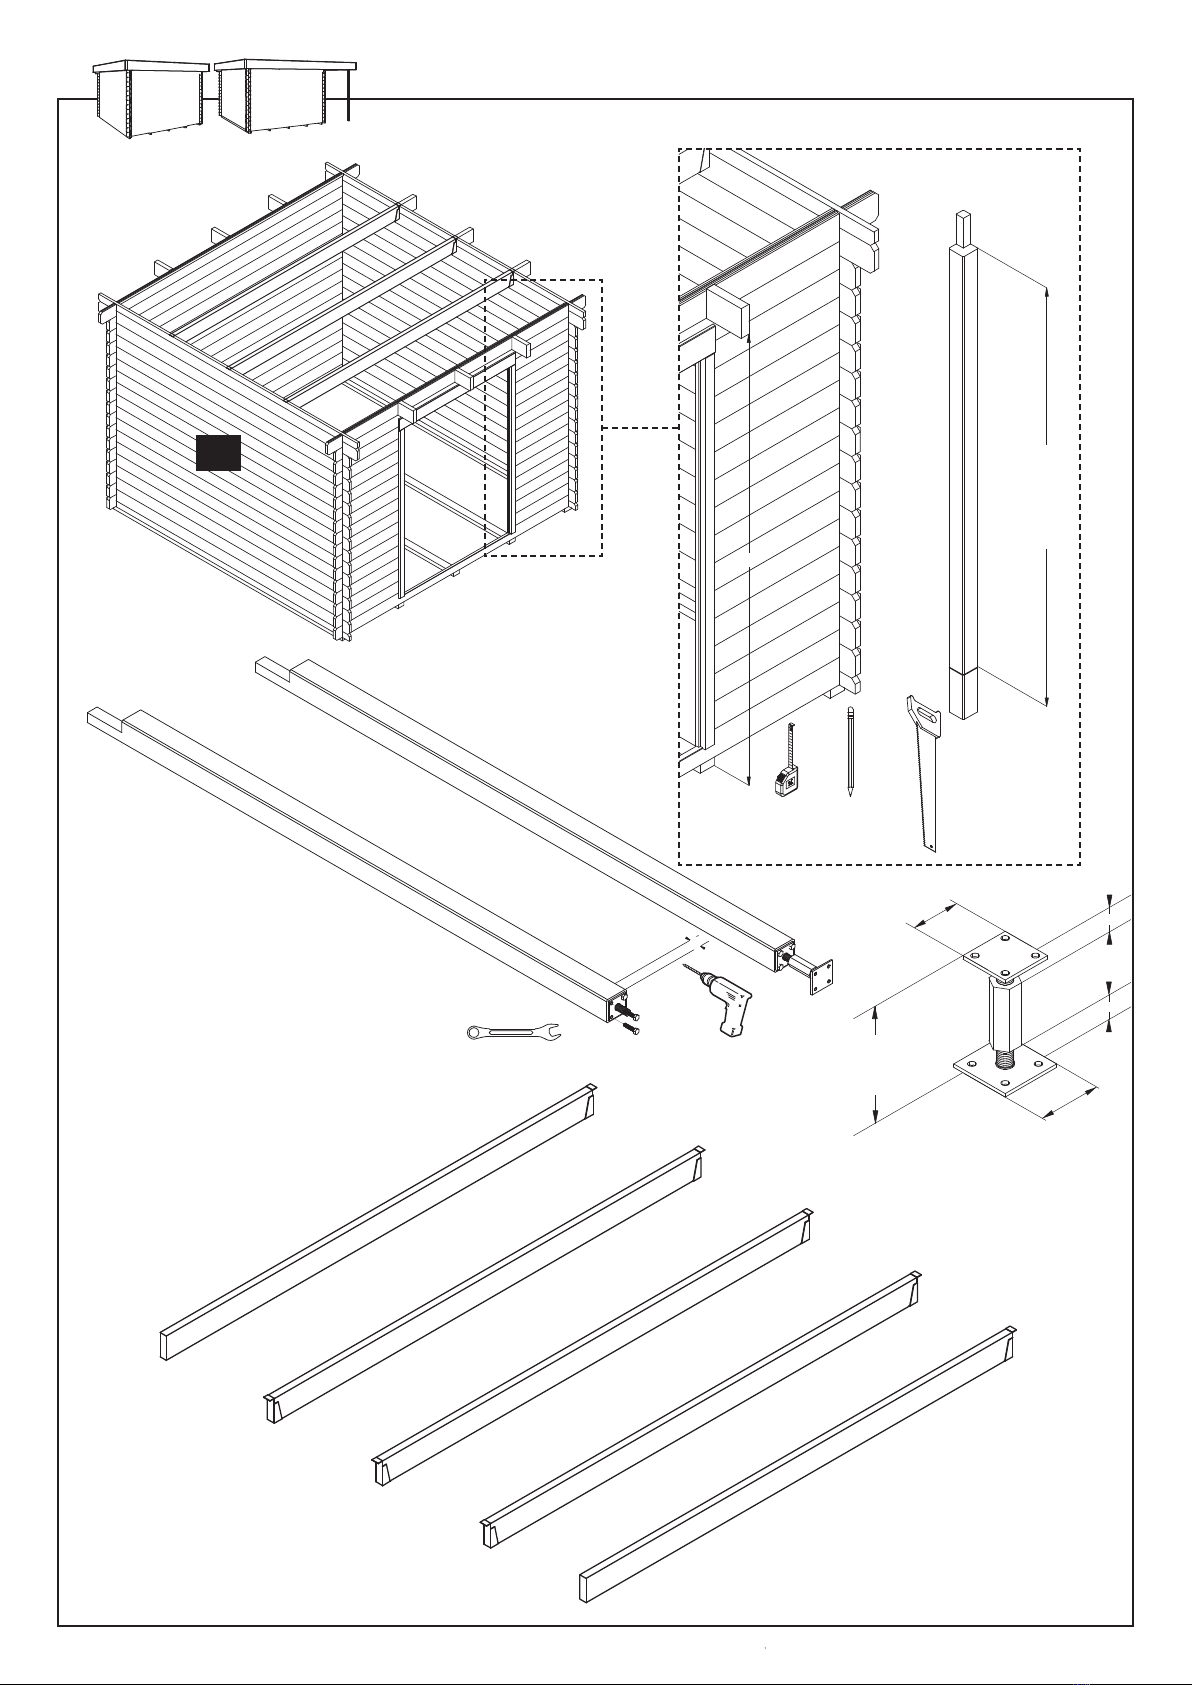
20 Støtte Pole Stödja Pol Wspieranie biegun Alátámasztó rúd Asta di sostegno
21
Tilslutning Nedløbsrør skorsten odpływ Vízelvezetőtorok transito del tetto
22
tremme før forbindsele Skärp bräda listwa łacząca poprzeczna összekötőléc listello per collegare
23
Pladen af metal nagelplattan blacha łacząca csomólemez piastra del chiodo
24
Stykke træ før afstand trabit för Avstånd atrapa belki stropowej gerendavég tacco del terzera
25
jern før overligger järnvara framför bindbjälke wieszak belki struganej gerendatartó papucs ferro per terzera
26
Nedløbsrør Avloppsrör rura spustowa rynny ereszcsatorna lefolyócsőtubo di scarico
27
Nedløbsrør krumning Avloppskurva 45 gr. kolano 45 gr lefolyóvég 45fok tubo con rotazione
28
justerbare pøle lugg bas justerbar kotwa, słup do betonu állítható oszloptartó registrabile
IHPLSDK
1 Dakbedekking Dacheindeckung roofing toiture para techos
2 Dakhout Dachbrett Roof boards Planche de toit Maderas de tejado
3 Dakplint/vloerplint Dach/Fussbodenleiste Roof/Floorplinth Plinthe de toit/de sol Zócalo de techo/suelo
4 Gevellijst Giebelleiste Fascia board Planche de finition Listón de remate de la fachada
4/1 Dakafdeklijst Dachabschlussleiste Weather board Parement supérieur toit Listón del tejado
4/2 Twijfelaar Firmenzeichen Rhomb Faîtage Rombo
4/3 Dakvoetlijst Trauffenbrett Eaves board Lame de finition Listón lateral del techo
5 Gording Dachpfette Girder Volige Viga maestra
6 Gevelpunt Giebelpunkt Gabel Pignon Hastial
7 Deur Tür Door Porte Puerta
7/1 Inbouwlat deur Einbaulatten Tür Frameslates door Latte encastrable porte Remates de puerta
7/2 Afdeklat deur Abdeckleiste Tür Door moulding Parement porte Listones de recubrimiento de puerta
7/3 Deurroeden Türsprossen Door-glazing bar Croisillon porte Vástagos decorativos de puerta
8 Raam Fenster Window Fenêtre Ventana
8/1 Inbouwlat raam Einbaulatten Fenster Frameslates window Latte encastrable fenêtre Remates de ventana
8/2 Afdeklat raam Abdeckleiste Fenster Window moulding Latte de finition fenêtre Listones de recubrimiento de ventana
8/3 Raamroeden Fenstersprossen Window-glazing bar Moulûres de fenêtre Vástagos decorativos de ventana
9 Wandbalk Wandbalken Log Madrier de la paroi Tabla de pared
9/1 Halve wandbalk messing Wandbalken mit Feder Half-log Demi madrier Tabla de pared con lengüeta
9/2 Wandbalk met uitsparing Wandbalken mit Aussparung Log with door-cut-out Madrier avec échancrure Tabla de pared con entalladura
9/3 Halve wandbalk groef Halbbohle mit nut Half-log groove Demi-madrier Tabla de pared con muesca
10
+€
Vloerhout Fussbodenbrett Floor boards Plancher Tabla del suelo
11
+€
Vloerbalk Fussbodenbalken Floor joist Solive Viga del suelo
12
+€
Terras Terrasse Terrace Terrasse Terraza
12/1
+€
Terrasdelen Terrassenbrett Terrace-floor boards Eléments de terrasse Piezas de terraza
13
+€
Bloembak Blumenkasten Flowerbox Jardinière Maceta
14
+€
Luiken Fensterläden Shutters Volets Postigos
15
+€
Afwateringsprofiel Abflussprofil Drainage profile Profil d’écoulement Perfil de drenaje
16 Bevestigingsmateriaal Befestigungsmaterial Mounting parts Matériel de fixation Material de fijación
17 Opbouwbeschrijving Aufbauanleitung Building instruction Description montage Descripción de montaje
18 Boeiboord Faszie Fascia Fascia Fascia
19 Afdeklat Abdecklatte Cover batten Latte de finition Capa de desgaste
20 Steunpaal Stützpfahl Support joist Pilier de soutien Mástil de apoyo
21
Dakdoorvoer
Verbindung Fallrohr
Connection to drain-pipe
raccord pour descente
transito de la azotea
22
Koppellat
Verbindungsleiste
strip for connection
une latte pour accoupler
listón para conectar
23
Spijkerplaat
Eisenplatte
Metal sheet
une plaque métallique
placa del clavo
24
Gordingklos
Abstandhalter
chock
Bûche de volige
taco por el travesaño
25
Gordingschoen
Balkenschuhe
iron for purlin
fer pour le volige
hierro por el travesaño
26
Regenpijp
Fallrohr
drain-pipe
Tuyau découlement
alcantarilla
27
Afvoerbocht 45gr
Fallrohrbogen 45 Gr.
drain-pipe with curve 45
raccord pour descente
avec courbe
drenaje con recodo de 45 Gr.
28
Stelbare paalvoet
Verstellung für Pfosten
adjustable foot of the post
base de poteau réglable
pie de la pila regulable
EFGBDNL
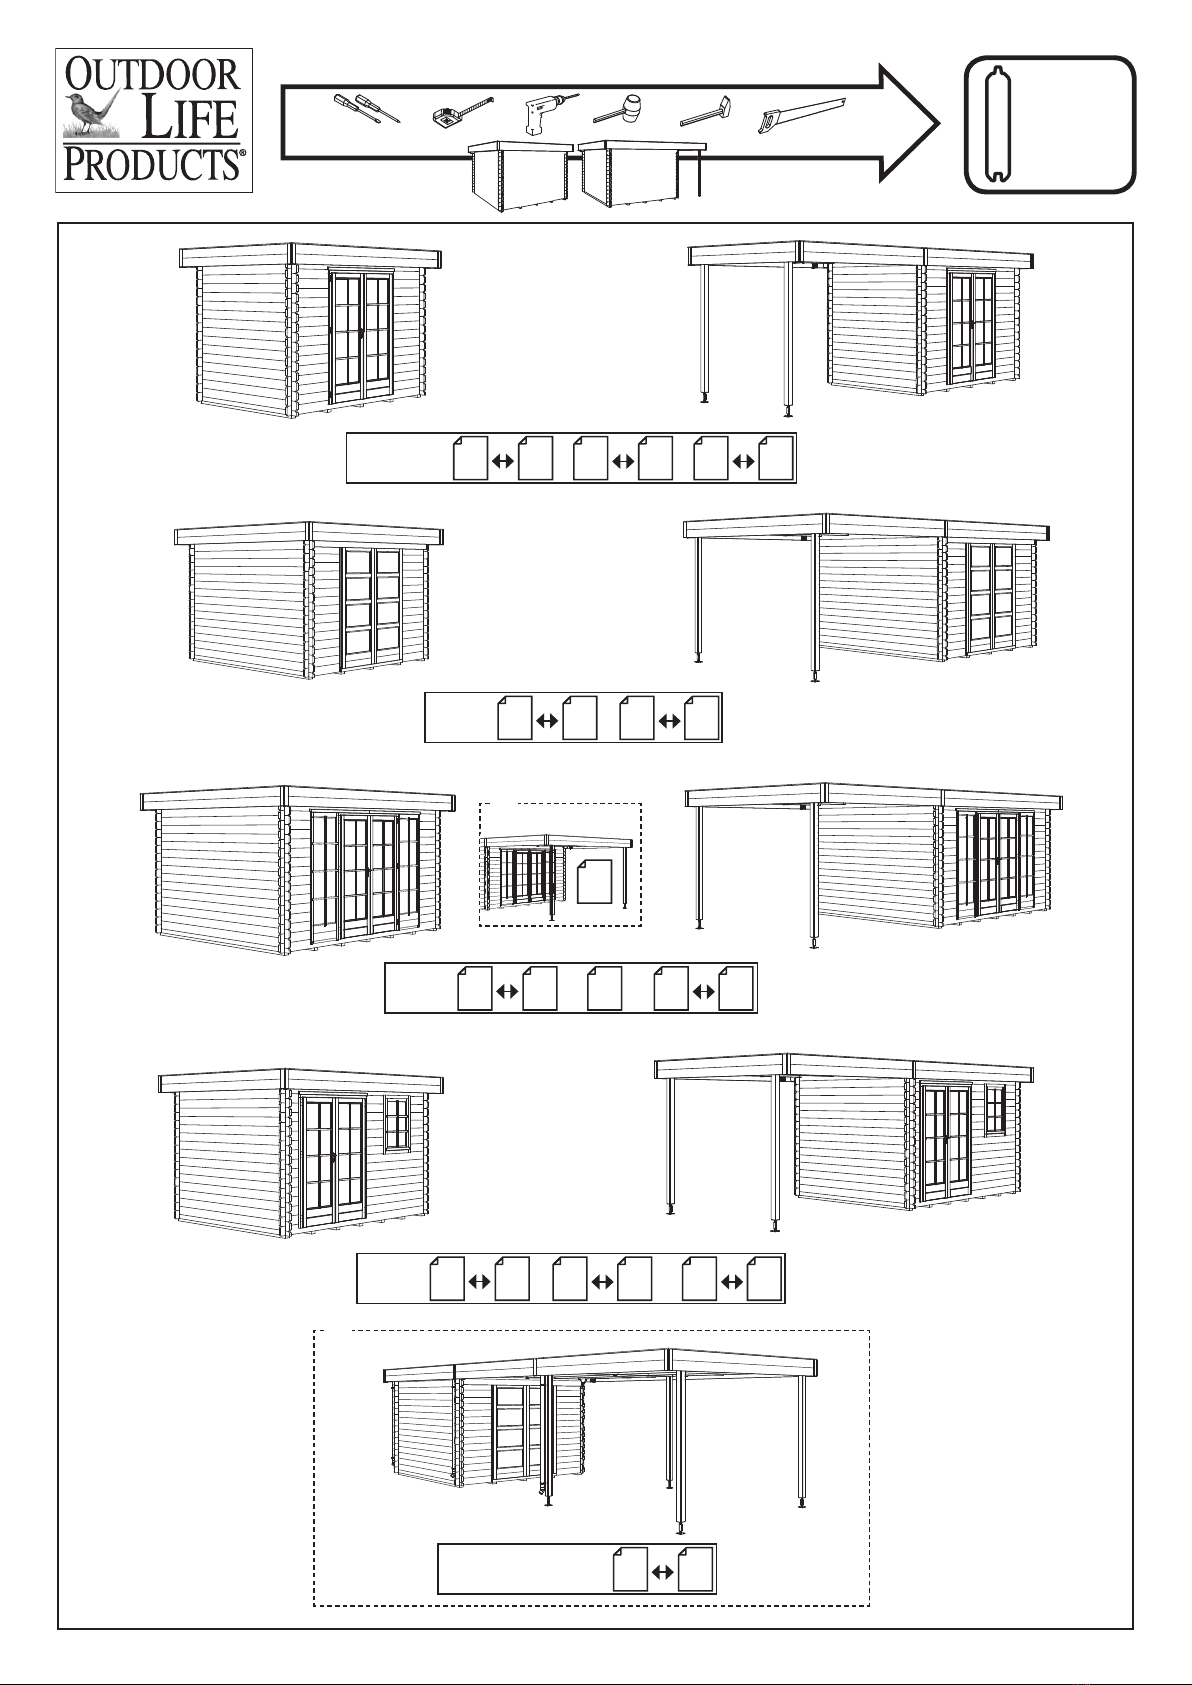
FP EP
OP PP
XP
FP EP
OP PP
XP+PDA