INSTALLATIONGUIDE:
For24” to27” :Use upto 3”of rightside, pullout extenderpanel
For28” to34” :Use one3” extenderpanel onthe leftside. Adjustthe
pullout extenderon theright sidefor atight fit(from .5”to 7”).
For35” to37” :Use two3” extenderpanels onthe leftside. Adjustthe
pullout extenderon theright sidefor atight fit(from .5”to 7”).
Largerthan 37”: Additonalextender panelswill required.
OPERATINGINSTRUCTIONS:
•Make surerotary switchesare inthe OFFposition.
•Plug into120V ACelectric outlet.
•Set theindividual fanmotors oneither INTAKE,EXHAUST orAIR
EXCHANGEusing thecontrol lever.
•To startthe unit,turn therotary switchesto desiredspeed (HI,MED,
LO).Note: Ifunit willnot start,please checkthat ComfortControl
Thermostatis setto HI/largestdot.
•When operatingboth fanson EXHAUST,set theComfort Control
Thermostatall theway tohigh byturning thedial CLOCKWISE(to the
right)toward thelargest dot.
THERMOSTATINSTRUCTIONS:
Yourwindow fanis equippedwith aComfort ControlThermostat thatauto-
maticallyturns thefan ONand OFFdepend-
ingon thepreset comfortlevel. Thisis ideal
foroperation atnight whenthe temperature
drops.It islabeled ComfortControl.
•While theWindow Fanis on,turn the
ComfortControl Thermostatdial counter-
clockwisetowards thesmaller dotsuntil
thefan stops(Away fromCooler). Thisis
theselected comfortlevel.
•If thefan isstopped andyou wantto turnit backon, turnthe Comfort
ControlThermostat dialclockwise untilthe fanstarts, towardsthe larg-
erdots (TowardsCooler).
SETDIAL TODESIRED SHUT-OFFPOINT. Turningdial (asnoted above)
helpsyou locatethe prevailingtemperature onthe dial.
IMPORTANT:If youdesire continuousrunning ofthe fan,the Comfort
ControlThermostat dialshould beturned allthe wayto theright tothe
largestdot.
•WARNING: BE SURE FAN IS SECURELY INSTALLED IN YOUR
WINDOW AT ALL TIMES. DO NOT LEAN OR PUSH ON FAN
WHILE IT IS IN THE WINDOW.
CLEANING/MAINTENANCEINSTRUCTIONS:
Followtheseinstructionstocorrectly and safelycareforyourHome Essentials
windowfan.Pleaseremember:
•Alwaysunplugthefan before cleaningordisassembling
•Donotallowwater to driponorintothe fan motorhousing
•Do notuseanyof the followingasacleaner:gasoline,
thinner,benzine
Fan blade and Front Grill Cleaning:
Step1: Using aPhilips headscrewdriver, removethe screwsthat holdthe
frontand reargrills together.
Step2: Clean theblades andgrills witha softcloth moistenedwith amild
soapsolution.
Step3 :Securelyfasten the front and rear grill back together.
FANSTORAGE:
Forallwindowfans,and fans thatcomealreadyassembled.
•Itisimportantto keep itinasafe, dry location
•Werecommendusingthe original (orappropriatelysized)box
•Pleaseremembertoprotect the fanfromdustor moisture
SERVICEINSTRUCTIONS:
1. DoNOT attemptto repairor adjustany electricalor mechanical
functionson thisunit. Doingso willvoid thewarranty.
2.If youhave anyquestions regardingthis unit’soperation orbelieve any
repairis necessary,please callour 1-800number tospeak witha
ConsumerService Representative.
3.If youneed toexchange theunit, pleasereturn itin itsoriginal carton,
witha salesreceipt, to thestore whereyou purchasedit. Ifyou are
returningthe unitmore than30 daysafter thedate ofpurchase, please
seethe enclosedwarranty.
4.If youhave anyother questionsor comments,see ourcorrespondence
below:
Please call 1-800-546-5637
Consumer Returns
P.O. Box 769
Milford, MA 01757-0769
COMFORT CONTROL
PLEASE READ AND SAVE
THESE IMPORTANT
SAFETY INSTRUCTIONS
Whenusingelectricalappliances,basic safety precautionsshouldalwaysbe
followedtoreducetherisk of fire,electricshock,and injury to persons,
includingthefollowing:
1. Readallinstructionsbeforeusing the appliance.
2. Toavoidfireorshock hazard, plugtheappliancedirectly into a 120V
ACelectricaloutlet.
3. Keepthecordoutof heavy trafficareas. DONOTlet the cord hangover
theedgeofatable or counter. Toavoidfirehazard, NEVER put thecord
underrugs,nearheatregisters, radiator, stoves,orheaters.
4. Toprotectagainstelectricalhazards, DO NOTimmerseinwater or other
liquids. Donotusenearwater.
5. Closesupervisionisnecessarywhen any applianceisusedby or near
children,orbydisabledpeople.
6. Alwaysunplugthefanbefore moving it,puttingonor taking off parts,
cleaning,orwheneverthefan is notinuse. Besure to pull bytheplug
andnotthecord.
7. Avoidcontactwithmovingparts. DO NOT operatewithoutfangrills
properlyinplace.
8. DONOToperateanyappliance with adamagedcordor plug, if motor
fanfailstorotate,after the appliancemalfunctions,orif it has been
droppedordamagedinany manner. Return appliancetomanufacturer
forexamination,electricalormechanical adjustment, orrepair.
9. DONOToperateinthe presence ofexplosiveand/orflammable
fumes.
10.Use applianceonlyforintended household useasdescribedin
thismanual.Anyotheruse not recommendedbythemanufacturer may
causefire,electricshock,or injury topersons.Theuse of attachments
notrecommendedorsoldby Home Essentials maycausehazards.
11. DONOTuseoutdoors.
12. Alwaysuseonadry, level surface.
13. Keepunitawayfromheated surfaces andopenflames.
14. WARNING:Toreducetherisk of fireorelectricshock,DO NOT usethis
fanwithanysolid-statespeed control device.
15. DONOTattempttorepair or adjustanyelectricalormechanical func-
tionsonthisunit. Doingso will voidyourwarranty.Theinside of the
unitcontainsnouserserviceable parts. All servicingshouldbeper-
formedbyqualifiedpersonnelonly.
PLEASE READ AND SAVE
THESE IMPORTANT
SAFETY INSTRUCTIONS
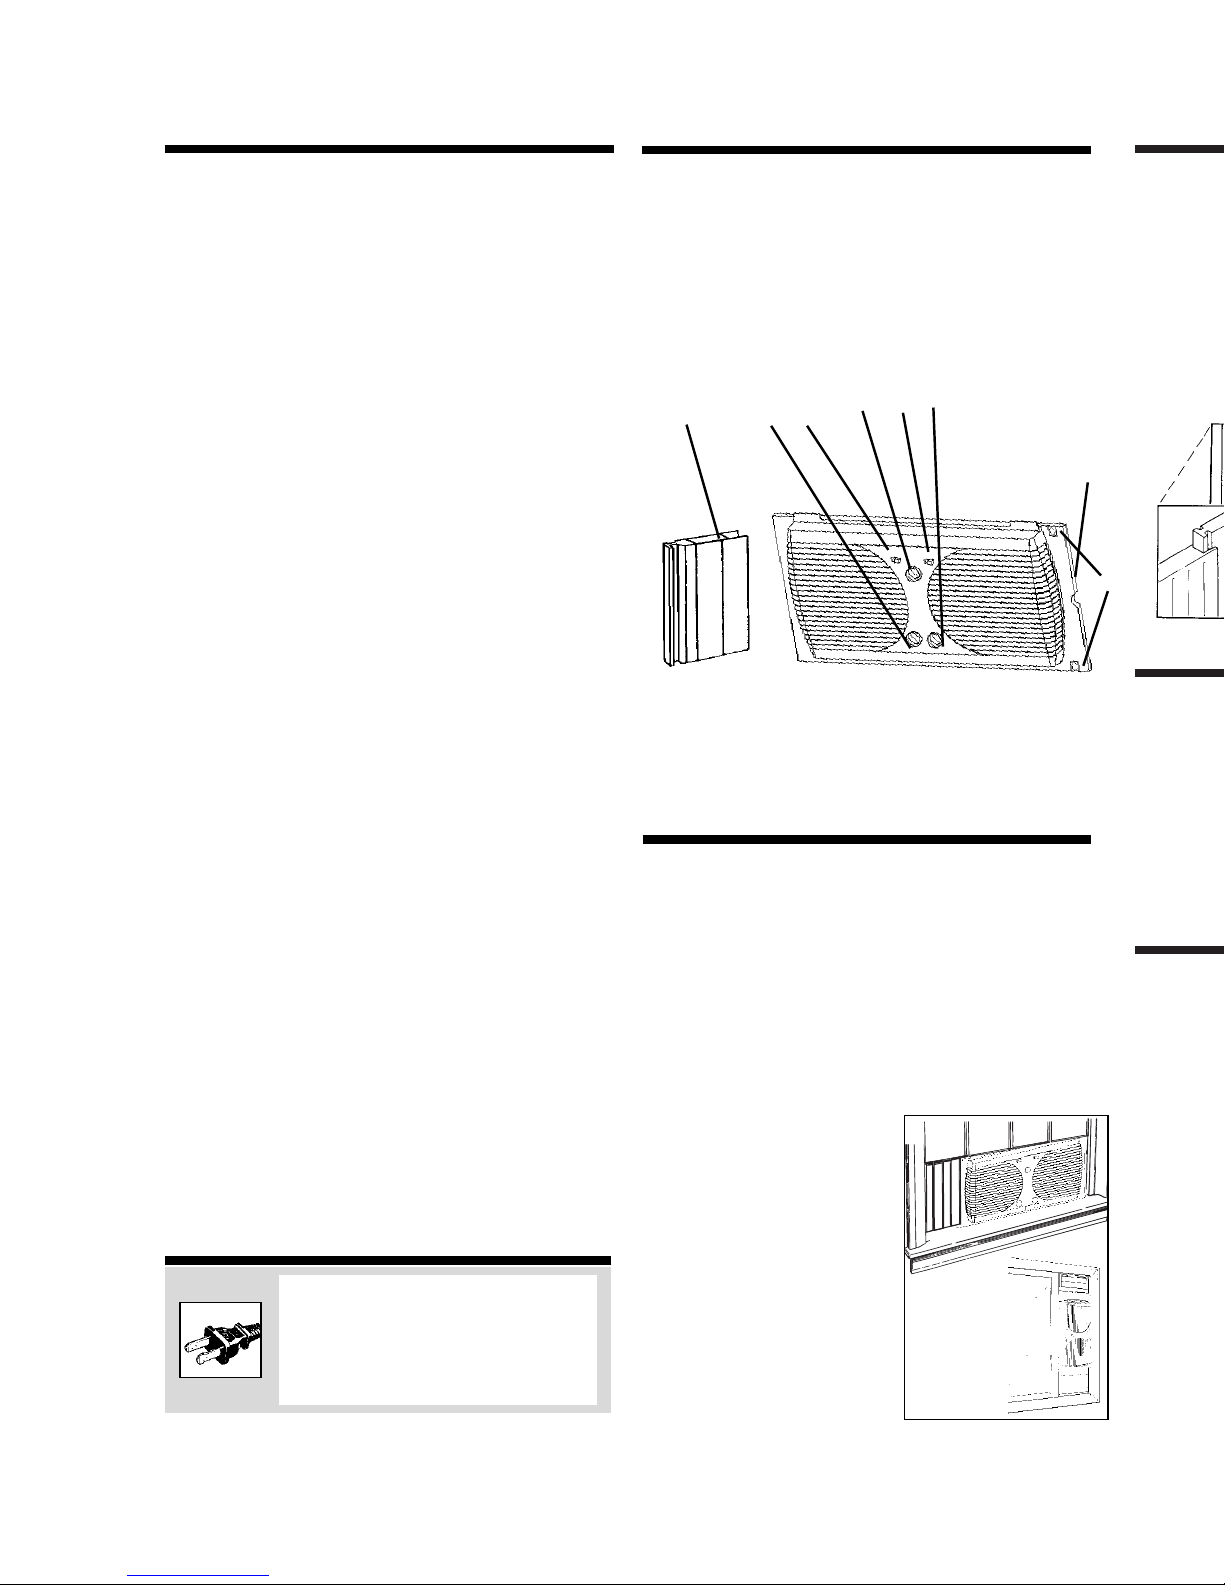
PRE-INSTALLATIONINSTRUCTIONS:
Carefullyunpack allcontents ofcarton.
•The windowfan comesfully assembledand isready forimmediate
installation.
•Before installation,familiarize yourselfwith thebuilt-in 7”extenderon
theright sideof thefan, andthe twoadditional 3”extenders which
attachto theleft sideof thefan housing(see figure1) Theextra
extendersare packedin styrofoamat eachend ofthe box.
WERECOMMENDED KEEPING YOURWINDOW SCREENIN PLACE
INSTALLATIONINSTRUCTIONS:
Thiswindowfanhasbeen designed tofitdouble-hung,slider, and casement
windows. Forsafety,werecommendyou leave yourwindowscreenin
place.
For double hung and slider windows:
Note:For sliderwindows, setthe fanvertically inyour windowopening,
withthe leftside onthe bottom.
1. Setthe faninto yourwindow opening.
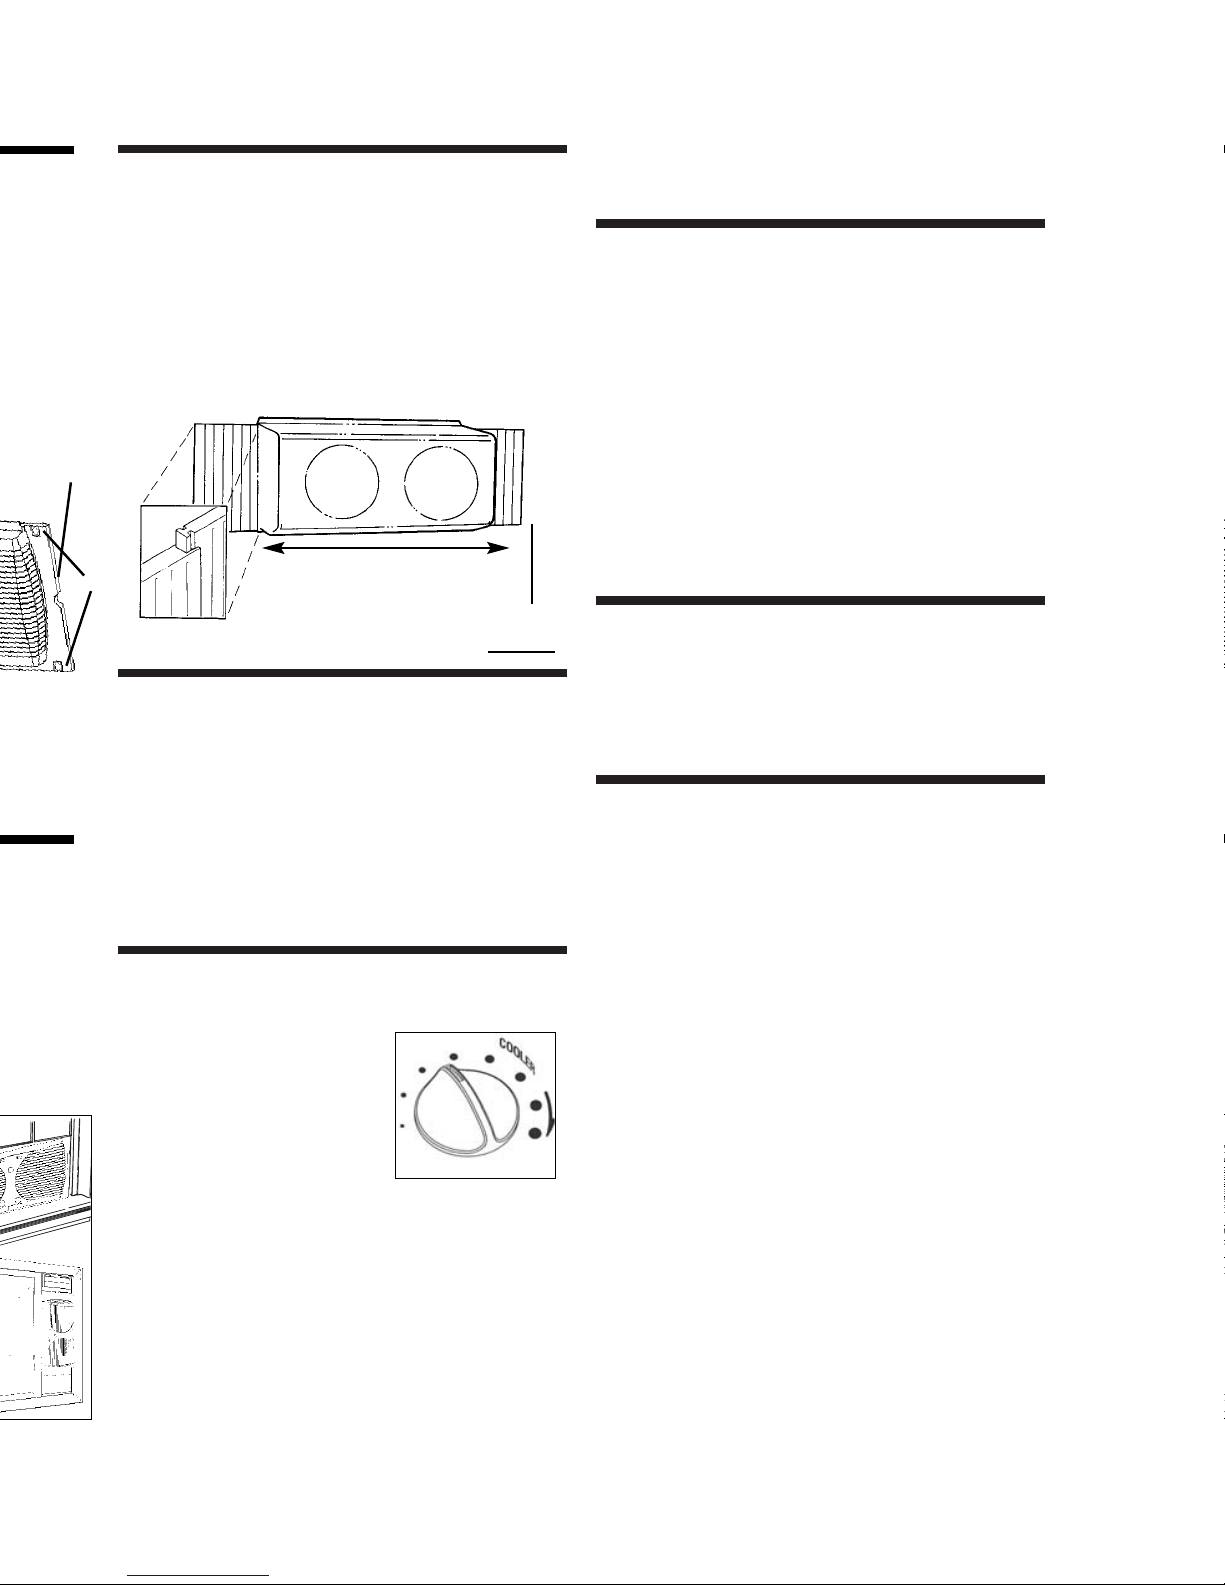
2. Ifthe fandoes notfit snuglyto thetop andbottom ofthe windowcas-
ing,attach theincluded extenderpanel(s) andpull outthe built-in
extenderscreen untilthe fansits safe-
lyin yourwindow (SeeFigure 2).
3. Tokeep thefan inplace, carefully
closethe windowso thatthe bottom
edgeof thewindow restson theflat
areaon thetop ofthe fan.
For casement windows:
Fora safefit youwill needa specially
designedmounting bracket. This,and the
neededhardware, canbe providedto you
freeof charge. Installationinstructions are
includedwith thebracket. Please callthe
ConsumerService numberlocated atthe
endof thismanual.
THIS PRODUCT IS EQUIPPED WITH A POLARIZED AC
(Alternating Current) PLUG (a plug having one blade
wider than the other). This plug will fit into the power
outlet only one way. If the plug does not fit fully into
the outlet, reverse the plug. If it still does not fit, con-
tact qualified personnel to install the proper outlet.
DO NOT DEFEAT THE SAFETY PURPOSE OF THIS
POLARIZED PLUG IN ANY WAY
ABCDEF
G
H
Figure1
A. Slide-onExtender
B. LeftFan SpeedControl
C. LeftFanIntake- Exhaust/Air Exchange
D. ComfortControl Thermostat
E. RightFanIntake-Exhaust/ Air Exchange
F. RightFan SpeedControl
G. Built-inExtender(notshown)
H. ExtenderLocks
PULLSOUT UPTO 7.0”
LEFT
ExtraExtender Panels RIGHT
Built-In,Pull OutExtender
UNIT’SLENGTH
24”
FRONT VIEW
Two 3.0” extenders, (Included in your box packed at both ends)
FIGURE2