Home8Care IPC2202 User manual

Mini Talking Camera User Guide
V1.0 2017
1
Mini Talking Camera
(Mini Cube HD Camera)
IPC2202
User Manual
home8care.com
1-844-800-6482 | support@home8care.com

Mini Talking Camera User Guide
V1.0 2017
1
Table of Contents
1.1 System Requirement ...............................................................................................3
Chapter 2. Hardware Overview.....................................................................4
Chapter 3. Mini Cube HD Camera Setup......................................................5
3.1 Before powering on the camera...............................................................................5
3.2 Powering on the camera..........................................................................................5
3.3 Camera Mode Selection ..........................................................................................6
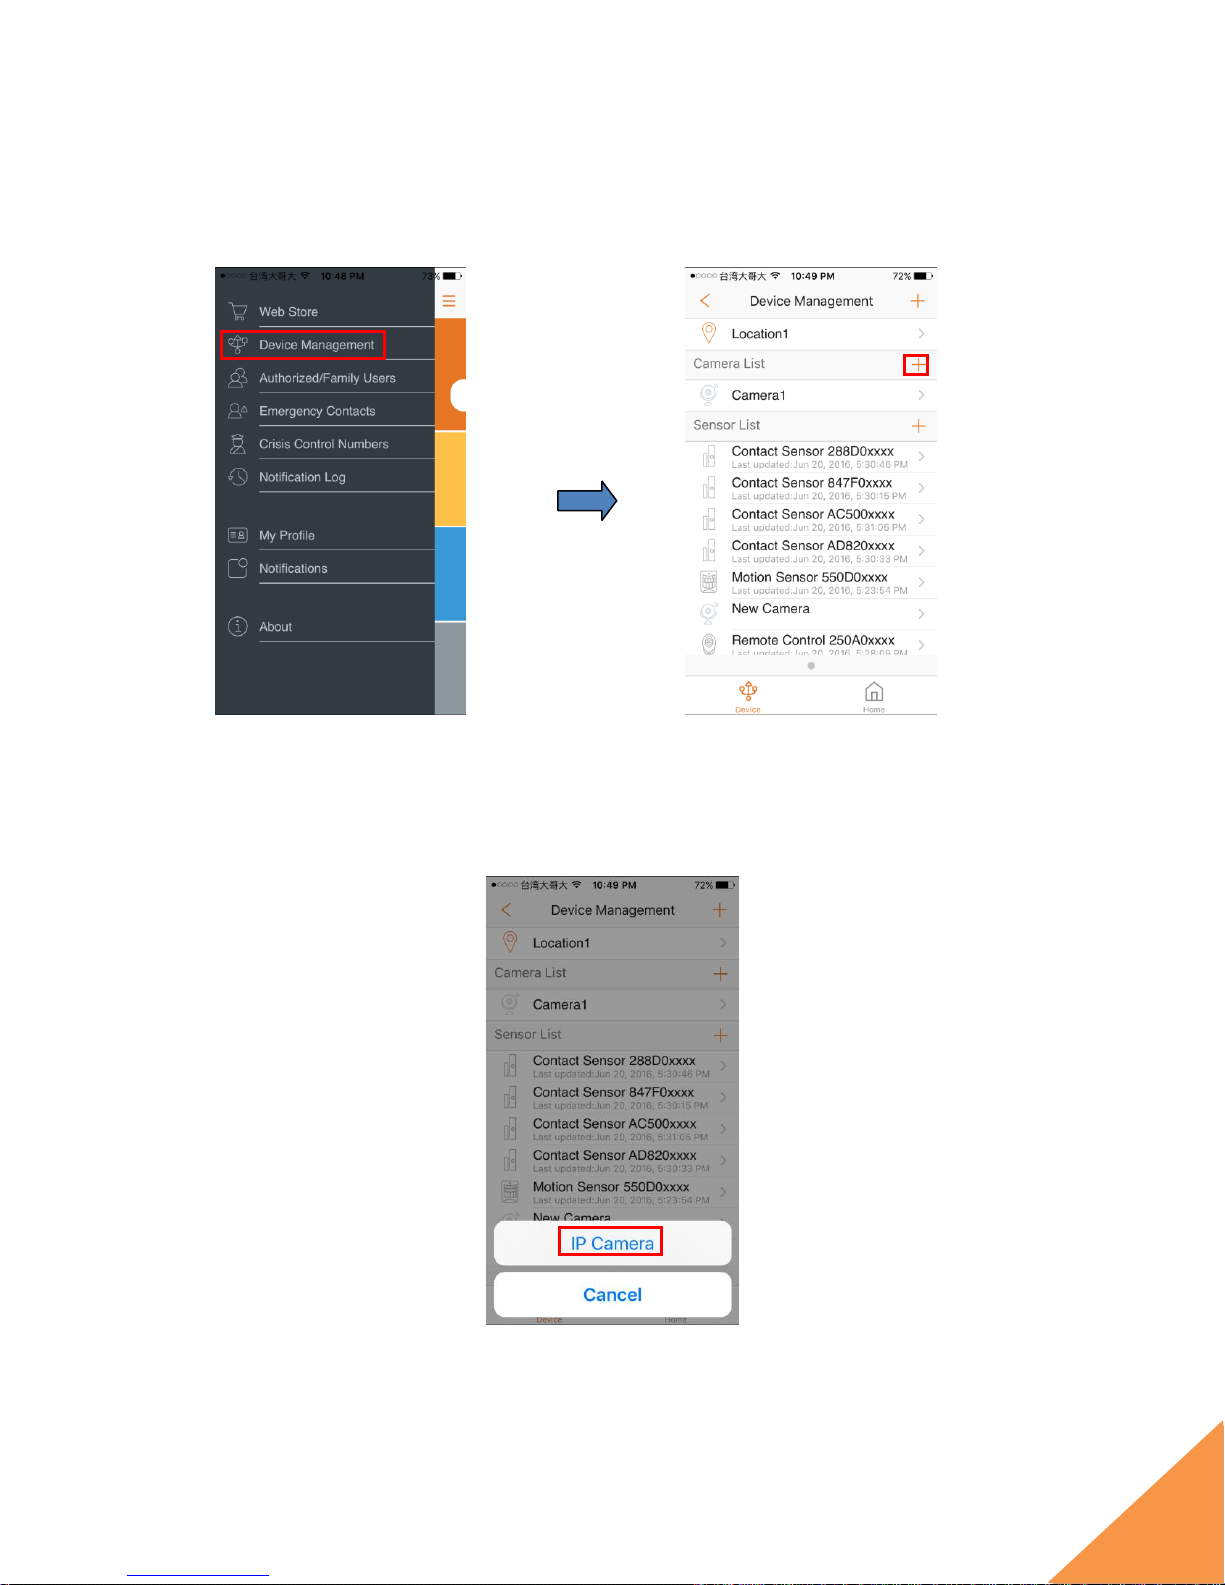
3.4 Adding the Camera to the System...........................................................................7
3.4.1 Adding Camera to System with Security Shuttle......................................................................... 8
3.4.2 Adding Camera to System with Virtual Security Shuttle............................................................12
3.4.3 Adding Camera to System with an existing Virtual Security Shuttle......................................... 18
3.5 Positioning the camera ..........................................................................................24
Chapter 4. Mini Cube HD Camera Settings................................................25
4.1 Display Name.........................................................................................................26
4.2 Motion Detection....................................................................................................26
4.3 Sound Detection ....................................................................................................27
4.4 Live Video Resolution ............................................................................................27
4.5 Wi-Fi ......................................................................................................................28
4.6 Local Storage.........................................................................................................28
4.7 Turn On/Off camera...............................................................................................29
4.8 Turn On/Off Continuous Recording........................................................................29
4.9 Restart/Remove IP Camera...................................................................................30
4.10 Record Audio .........................................................................................................31
Chapter 5. Starting to Use the Mini Cube HD Camera..............................32
5.1 System/Sensor setting...........................................................................................32
5.1.1 Arm / Disarm / Stay mode Selection.......................................................................................... 32
5.1.2 Sensor setting............................................................................................................................34
5.1.3 Event Notification and Recording..............................................................................................34
5.2 Viewing the Live Video Feed..................................................................................35

Mini Talking Camera User Guide
V1.0 2017
2
5.3 Viewing the Video Recording.................................................................................39
5.3.1 Viewing Recorded Events ......................................................................................................... 39
Chapter 6. Resetting the Mini Cube HD camera........................................45
Appendix –Glossary of Terms...................................................................47

Mini Talking Camera User Guide
V1.0 2017
3
Chapter 1. Introduction
The Mini Cube HD camera is a high-definition (HD) camera that is used to connect with other devices via your Wi-Fi
network to automatically record triggered events during the day or night. Users can switch between motion-activated
or continuous recording mode, where still and live video is captured. The Mini Cube Camera is also equipped with
speakers and a built-in microphone for two-way audio recording. The camera’s ball-and-socket mount makes it easy to
swivel the camera in a range of directions, allowing you to keep a close eye on your kids or pets, or even cover key entry
points into your home or office.
Key Features and Specifications
Video resolution : 1280x720
Automatic night vision
Expandable flash storage
Built-in microphone and speaker for two-way audio
Operating temperature : 32°F to 104°F (0°C to 40°C)
1.1 System Requirement
This section explains the system requirements when using the camera.
Network
When camera is
connected to
Security Shuttle*
Router with
- 10/100Mbps RJ45 LAN port
- DHCP service
When camera is
connected directly to
Wi-Fi Router
Wi-Fi Router supports
- IEEE 802.11n, 802.11g, 802.11b
- WEP/WPA2-PSK Wireless Security
Mobile Device
An Apple iPhone, iPad, or Android mobile device with:
- iOS (version 8.1 above)
- Android (version 4.1 above)
*See Appendix –Glossary of Terms.

Mini Talking Camera User Guide
V1.0 2017
4
Chapter 2. Hardware Overview
This section provides an overview of the Mini Cube HD camera and its accessories.

Mini Talking Camera User Guide
V1.0 2017
5
Chapter 3. Mini Cube HD Camera Setup
3.1 Before powering on the camera
If you wish to save video clips locally or turn on the continuous recording function, a MicroSD card needs to
be inserted into the camera. For details on how to check the current storage size of the MicroSD card, see
Section 4.6 –Local Storage.
Note: Before you insert the MicroSD card into the camera, make sure it has been formatted to FAT 32. Do not
insert the MicroSD card into the camera when it is powered on, as this may damage the MicroSD card.
3.2 Powering on the camera
To power on the camera, complete the following steps.
1. Remove the protective film from the camera lens.
2. Plug the micro USB connector of the USB cable to the camera; then, connect the other end of the cable to
the USB power adapter.
3. Plug the USB power adapter into the power outlet to provide power to the camera.
4. The powering-on process first involves the LED indicator showing a flashing purple light. After a few
seconds, the LED indicator will begin to show a solid purple light; then it will show a solid blue light, and you
will hear “Internet mode”, which is the default setting. The other mode that you can chose is “Local mode”.

Mini Talking Camera User Guide
V1.0 2017
6
3.3 Camera Mode Selection
After the camera is powered on, the default setting will be “Internet mode”. The other mode that you can
choose is “Local mode”. To switch between the two modes, short press the button on top of the camera. The
switching process takes approximately 25 seconds, and you will hear “Internet mode” or “Local mode”.

Mini Talking Camera User Guide
V1.0 2017
7
In “Internet mode”, the LED indicator will show a solid blue light.
In “Local mode”, the LED indicator will show a solid purple light.
3.4 Adding the Camera to the System
Before you begin using the camera, it will need to be added to the system first. This can be done with or
without the security shuttle. For details, see the three subsections below.
Important: If you are unable to add the camera to the system or the app shows a message telling you to
reset the camera, see Chapter 6 - Resetting the Mini Cube HD camera for details.

Mini Talking Camera User Guide
V1.0 2017
8
3.4.1 Adding Camera to System with Security Shuttle
To activate the camera with the security shuttle, complete the following steps.
Note:
Make sure the Security Shuttle is powered on and connected to your router.
Make sure the camera is in “Internet mode”.
1. Tap the menu icon to show the sidebar menu.

Mini Talking Camera User Guide
V1.0 2017
9
2. Tap “Device Management”. If you have more than one security shuttle, you may need to swipe left more
than once to find the one you want the camera to connect to. After selecting the security shuttle, tap the
plus icon “+” located to the right of “Camera List”.
3. Select “IP Camera”.

Mini Talking Camera User Guide
V1.0 2017
10
4. Follow the on-screen instructions. When finished, press “Next”.
5. After scanning the QR code located on the bottom of the camera, the “camera adding” process will begin.
The process will take approximately 1 to 2 minutes.

Mini Talking Camera User Guide
V1.0 2017
11
6. When the activation is completed, the camera will be added to the device management page. In the
illustration shown below, the name of the Security Shuttle is “Location 1” and the name of the camera is
“New Camera”.
7. The LED indicator on the camera will show a solid blue light.

Mini Talking Camera User Guide
V1.0 2017
12
3.4.2 Adding Camera to System with Virtual Security Shuttle
To add the camera to the system when there is no security shuttle, complete the following steps. The process
will involve the creation of a new virtual security shuttle.
To add the camera to an existing virtual security shuttle, see Section 3.4.3 - Adding Camera to System with an
existing Virtual Security Shuttle.
Note:
Make sure your Wi-Fi router is turned on.
Make sure the camera is in “Local mode”.
Make sure the Wi-Fi of your smartphone is turned on.
1. Tap the menu icon to show the sidebar menu; then, tap “Device Management”.

Mini Talking Camera User Guide
V1.0 2017
13
2. Swipe left across the screen and select “IP Camera”. At times, you may need to swipe more than once.
3. Follow the on-screen instructions. When finished, press “Next”.

Mini Talking Camera User Guide
V1.0 2017
14
4. The steps for iOS and Android devices will be different here.
For iOS devices:
After scanning the QR code located on the bottom of the camera, tap “Close”; then, tap “Settings” to access
the Wi-Fi settings page to let your smart device connect to the IP camera network. Select the SSID marked as
“milife”, followed by “_xxxxxx”; then, follow the subsequent on-screen instructions.
Note: The 6 digit “_xxxxxx” is the product serial number located on the bottom of the camera.

Mini Talking Camera User Guide
V1.0 2017
15
After connecting to the camera network, launch the app again. Select your Wi-Fi network and enter the
password if necessary. When finished, tap “Join”.
For Android devices:
After scanning the QR code located on the bottom of the camera, the Wi-Fi settings page will appear to let
your smart device connect to the IP camera network. Select the SSID marked as “milife”, followed by
“_xxxxxx”.
Note: The 6 digit “_xxxxxx” is the product serial number located on the bottom of the camera.

Mini Talking Camera User Guide
V1.0 2017
16
After connecting to the camera network, tap “Previous”. Select your Wi-Fi network and enter the password.
When finished, tap “Join”.
5. Follow the on-screen instructions.

Mini Talking Camera User Guide
V1.0 2017
17
6. After the activation is completed, you will see the message “System is ready” on the screen. By clicking
“OK”, you will hear “Internet mode”, and a virtual Security Shuttle and the camera will be added to the
device management page. In the illustration shown below, the name of the virtual Security Shuttle is
“Location 2”, and the name of the camera is “Camera1”.
Note: As the name virtual Security Shuttle implies, there isn’t actually a new Security Shuttle. It is merely a
virtual creation by the system to bridge the camera to the system.
The icon represents a virtual Security Shuttle.
The icon represents an actual Security Shuttle.
7. The LED indicator on the camera will show a solid blue light.

Mini Talking Camera User Guide
V1.0 2017
18
3.4.3 Adding Camera to System with an existing Virtual Security Shuttle
If you wish to add the camera to an existing virtual security shuttle, complete the following steps.
Note:
Make sure your Wi-Fi router is turned on.
Make sure the camera is in “Local mode”.
Make sure the Wi-Fi of your smartphone is turned on.
1. Tap the menu icon to show the sidebar menu; then, tap “Device Management”.

Mini Talking Camera User Guide
V1.0 2017
19
2. If you have more than one security shuttle, swipe left across the screen until you find the virtual security
shuttle you want the camera to connect to; then, tap the plus icon “+” located to the right of “Camera List”
and select “IP Camera”.
For iOS devices:
For Android devices:
Table of contents