Homegear A001-07KR/C Series User manual

PORTABLE AIR CONDITIONER
A001-07KR/C, A001-08KR/C, A001-09KR/C, A001-10KR/C SERIES

2
IMPORTANT SAFEGUARDS
Please read following safeguards carefully before using the unit and retain for
future reference
·This unit is for domestic use only
·This unit should only be used indoors and placed in a dry environment.
·Do not install in the laundry
·Do not use this unit if there is any damage to the power cord, plug or unit itself.
Consult a professional electrician before using again.
·Position the unit away from direct heat sources and power supplies. Avoid direct
sunlight.
·Turn off the unit before removing the plug from the socket
·When the air conditioner is not in use or when cleaning, make sure the unit is turned
off and the plug removed from the socket.
·Make sure that the voltage marked on the unit agrees with your mains voltage
·Do not let children touch or play with the air Conditioner
·Do not leave the air conditioner running when there is no one about.
·Do not tug on the power cord when pulling out plug or moving the unit.
·Do not place the unit near or on water.
·Do not put hard objects between the fan blades.
·Do not attempt to repair the unit or power cord yourself. Always consult a professional
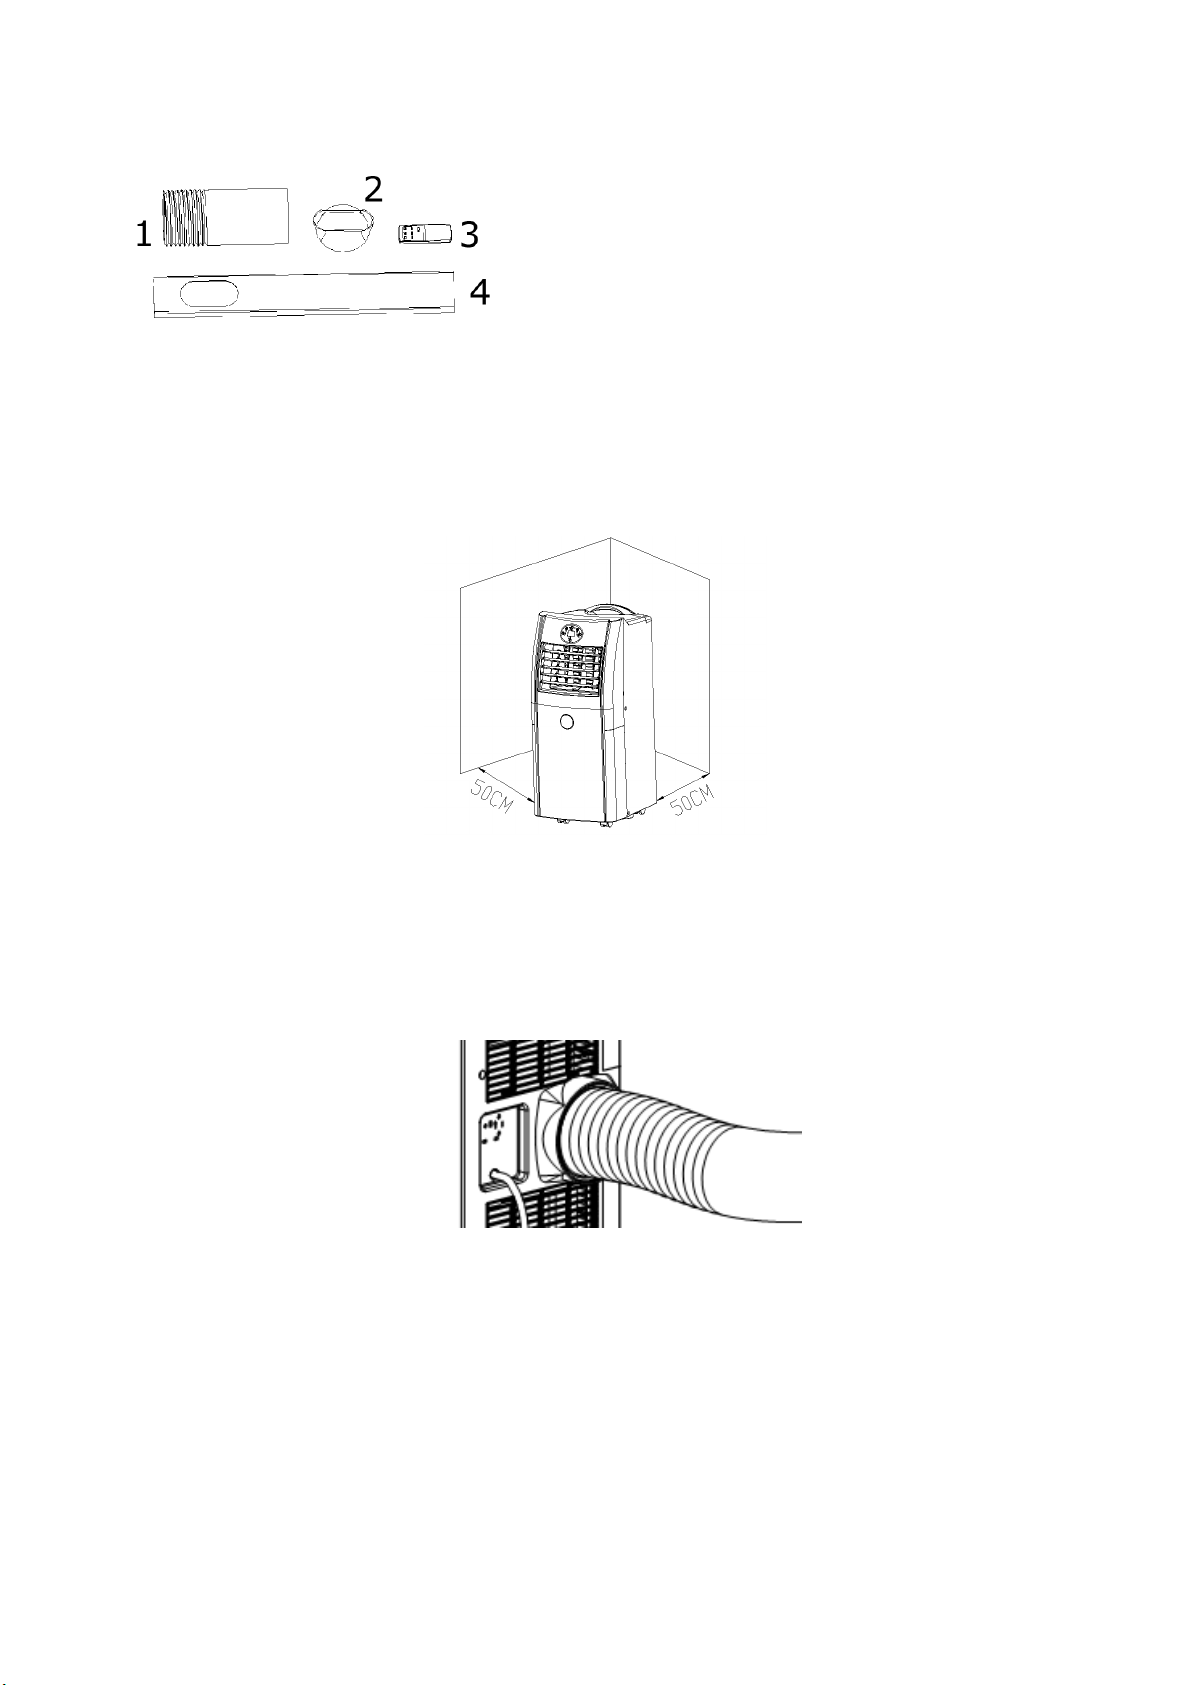
·Allow at least 50cms of air space on all sides of the unit for good air ventilation and
place on a flat surface
·Make sure that the unit’s air inlets and outlets are not blocked at all times
·Make sure the unit is placed where the power socket can be easily reached.
·Never insert fingers or any other objects in the air outlet grill
·Keep the unit upright so that compressor can work and to avoid water leakage
·Do not run the unit near to gasoline or any other flammable liquids.

3
·Do not use sharp instruments, rubbing alcohol, flammable fluids, or abrasive cleaners,
as these products can damage the surface of the air conditioner
·Do not use with an adaptor
·Do not use with an extension cord
·The unit must be earthed
·Plug into an earthed socket outlet
·Although this unit is portable, it should only be rolled on smooth surfaces. Avoid
carpet and other objects
Parts
Front
1. Handle
2. Control Panel
3. Air-outlet
4. Fan blade
5. Castor
Back
6. Filter frame upper
7. Exhaust Connector
8. Power Cord Location
9. Filter frame lower
10. Rubber plug
11. Plug cap
12.Power Cord
6
7
8
9
10
11
12
1
2
3
4
5

4
Accessories
1. Exhaust Pipe 2. Adapter 3. Remote control 4. Window Bracket
Placement
·Place the unit on a smooth level floor, and make sure there is a distance of at least
50cms from all objects (fig.1)
(fig.1)
Installation
·Attach the adapter onto exhaust pipe.
Attach the exhaust pipe into exhaust connector by turning anti clockwise (fig.2)
Adjust the window bracket as per the width or height of the window, and attach the
exhaust pipe to it.
When installing the exhaust pipe, make sure it is as flat as possible (see fig 4). Avoid
excessive bending as this could lead to the unit not function correctly (see figure 3).

5
(fig.3) (fig.4)
Warning
The fully extended length of the exhaust pipe is 1500mm. It is recommended you use it
at its shortest length
Do not replace or lengthen the exhaust pipe. Doing so may result in the unit not working
properly or not working at all.

6
Control Panel
1 Power button
2 Mode button
4 Down button
5 Up button
6 Timer button
7 Fan button
8 Receiver for remote control
9 “Water Full”indicator
11 High fan speed indicator
12 Low fan speed indicator
13 Timer mode indicator
14 Display window
15 Sleep mode indicator
16 Cooling mode indicator
17 Dehumidify mode indicator
18 Fan mode indicator
19 Power indicator
POWER: Press this key to turn the unit on/off. After unit turns on, the default mode is
the cooling mode at 22℃with low fan speed.
MODE: After turning on the unit, use this key to select cooling, dehumidifying or fan
mode.
FAN: Press this key to select fan speed (high and low).
DOWN: When in the cooling mode, press this key to lower the temperature from
16~31℃.
UP: Press this key to raise the temperature.
SLEEP: This can only be used in the cooling mode. Once the sleep mode is activated,
the preset temperature will increase by 1℃in the first hour and then increase by 1℃in
the second hour. The unit will then operate at this temperature. The fan speed in this
mode is low

7
The sleep mode will not work when the unit is in the dehumidifying or fan mode. When
the water unit is full or in standby mode the sleeping mode will be cancelled
TIMER: Press to enter into the timer setting mode. Use the up/down buttons to set up
the on/off time from 1 to 24 hours. The timer mode indicator will light up to show the
unit is in this mode
Operating
Cooling mode
Press MODE to select cooling mode, cooling mode indictor turns on.
Press UP or DOWN to adjust temperature (from 16℃to 31℃).
Press FAN to select high or low fan speed.
Fan mode
Press MODE to select fan mode, fan mode indicator turns on.
Press FAN to select high speed or low speed.
Dehumidifying mode
Close all the doors and windows, in order to obtain the best dehumidifying effect
Press MODE to select dehumidifying mode, the dehumidifying mode indicator
turns .on. The fan speed is low in this mode and cannot be adjusted
Water Drainage
When there is excessive water condensation inside the unit, the “WF” indictor will
flash, the unit stop running and a buzzer sound. The unit will not work until the water
has been drained.
To drain the unit
Unplug the unit from the power source
Place a shallow dish under the drain plug
Remove the drain plug
Once the water has drained, replace the plug and turn the unit back on.

8
Remote Control
1. Power 2. Timer 3. Down 4. Mode
5. Up 6. Fan 7. Sleep
Maintenance
Before doing any maintenance, make sure the unit is switched off and the power plug
pulled out of the wall socket
Cleaning
Wipe the outside of the unit with a damp cloth and dry with a soft cloth. Do not use any
harsh chemicals or abrasives.
Filter
Clean the filters every two weeks, if filters are blocked by dust, the efficiency will be
reduced
Clean the filters in warm soapy water and allow to dry completely before placing back
into the unit
Note: Do not run the unit without filters.

9
Seasonal Cleaning
If the unit will not be used for a long time, please do the following:
·Pull out drainage plug to let out any water
·Let the unit run under fan mode for 2 hours to dry out the unit
·Turn off the unit and pull out plug .
·Clean and dry filters, then reinstall them .
·Pull out exhaust pipe for safekeeping .
·Store the unit in a safe dry place.
Trouble Shooting
Trouble
Cause
Solution
Unit not working
Power off
Power on
Water-full indicator on
Drain water out
Unit
auto-restarts
frequently
Direct sunlight
Draw the curtains
Door and windows are open, too
many heat sources in the room.
Close the door and windows, move out
heat sources.
Filters are too dirty.
Clean or replace filters
Air-inlet or air out-let is blocked
Remove blockage
Too noisy
Air conditioner is not on a flat
surface
Place it on a flat surface
Compressor not
working
Compressor time-delay
protection is on.
Wait for 3 minutes for the unit to cool
down and then re-start
This manual suits for next models
3
Table of contents
Popular Air Conditioner manuals by other brands

American Standard
American Standard 4A6V8024A1000B Service facts

Mitsubishi Electric
Mitsubishi Electric PUHZ-RP50VHA4 Service manual

Mitsubishi Heavy Industries
Mitsubishi Heavy Industries DXK05ZTLA-WF user manual

Carrier
Carrier 42HVM109303 Service manual

Mitsubishi Electric
Mitsubishi Electric Mr.Slim PUZ-SM100VKA Service manual

Snap-On
Snap-On POLARTEK EEAC330B manual