Page 1 Page 2
Please review these instructions before beginning the installation. Check that the correct components (shown at right) were provided
with your order. Do not discard the packaging until the product is assembled and functioning.
• Caution
• Do not look directly into the LED lights when lamp is operating.
• Do not direct light at other persons.
• Use only the supplied AC power adaptor.
• Do not hang, clip or tape any object to the lamp.
• Do not put this unit near any heat source or under direct sunlight.
Lily Set-up and operation
Set-up
1. Position the task light so that no obstructions prevent arm or lamp movement.
2. Insert the power supply jack into the lamp base.
3. Insert the power supply plug into an independent power outlet.
—Do not share an outlet with high power equipment such as printers, copy machines, scanners or computer work stations. This may
cause the light to flicker.
Operation
Lily-LED
1. Press and release the switch to turn the lamp on.
2. Press the switch the second time the light output will be reduced for 30%.
3. Press the switch one more time and the Lamp will turn o.
LILY LED Light has automatic energy saving mode and the lamp will turn o after 6hours of continuous work.
To turn the lamp on just press the switch one time
Lily-LED – or – Lily-LEDX
power supply
Lily-LEDX
Lily-LED
ON-OFF and
dimming switch
USB port
rotate
rotate
ON-OFF switch
Specifications
• light: 8W LED Nichia type
• CRI: >80
• life: 70,000 hours
• power adaptor: direct plug in with type A
plug input 100V-240V; output 24V
• power cord: quick connect power supply jack 6F-1.8m
• USB output (Lily-LEDX only): DC5V/1A
bottom
of base
power supply jack
power supply jack
Lily Set-up and operation
Lily-LEDX
1. Lily-LEDX features a continuous dimming option with memory. Press and release the switch to turn the lamp ON. Then press and hold
the switch to gradually increase to full brightness. Release the switch when the desired level of brightness is reached.
2. Press and release the switch to turn the lamp OFF. When turned back ON, the lamp will illuminate at the previous intensity level.
3. To decrease the intensity level, first increase it to full brightness. Then press and hold the switch to dim it to the desired level. To
increase the level again, the lamp first must be at its lowest intensity.
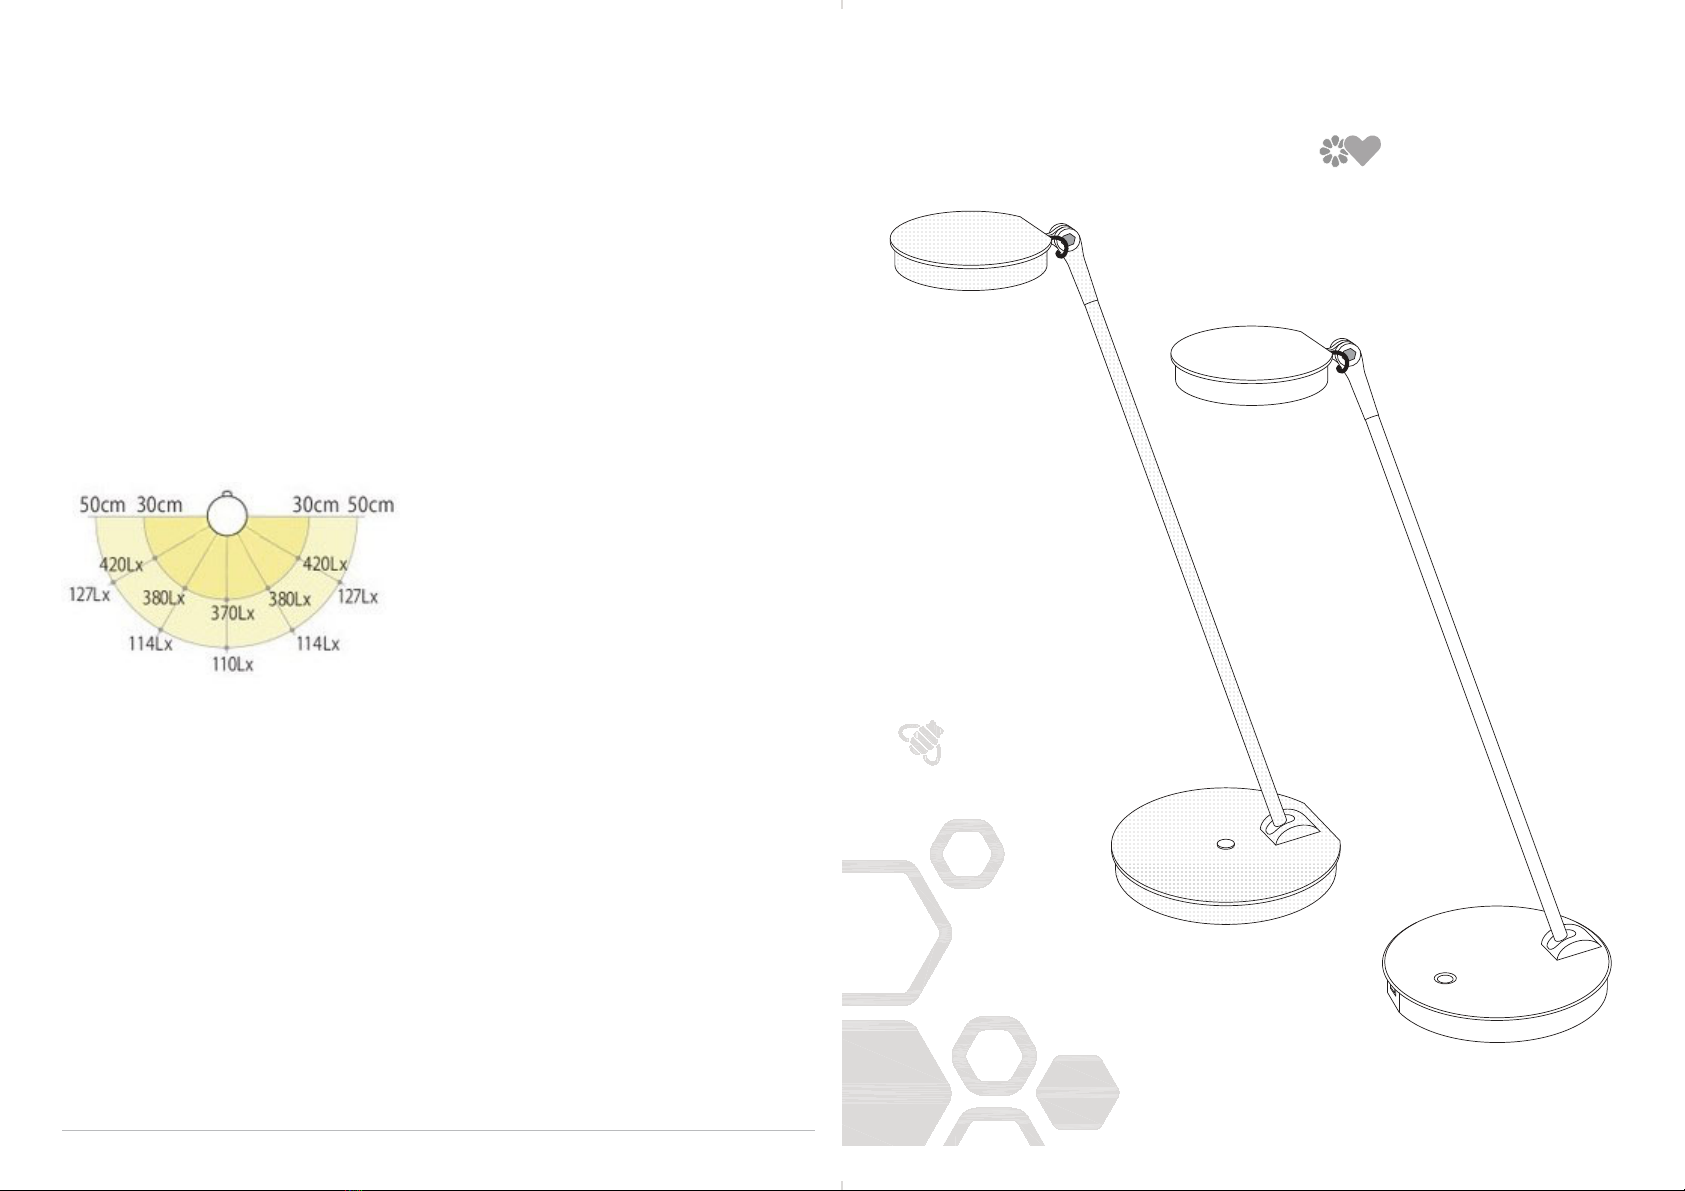
4. Aim the light by rotating the arm at the base and the lamp at the top of the arm.
Lily-LEDX has a USB port that can be used for charging smart phones, tablets and other personal electronics.
LILY LED Light has automatic energy saving mode and the lamp will turn o after 6hours of continuous work.
To turn the lamp on just press the switch one time
1. Position the task light so that no obstructions prevent arm or lamp movement.
Specifications
• Light: 8W LED Nichia type
• CRI: 90
• LED Module Lifespan: 90,000 hours
• Power adaptor: direct plug in with type A
plug input 100V-240V; output 24V: Power
adapter 24W
Set-up
2. Insert the power supply jack into the lamp base.
3. Insert the power supply plug into an independent power outlet.
-Do not share an outlet with high-power equipment such as printers, copy machines, scanners or computer
work stations. This may cause the light to flicker.
Operation
1. Press and release the switch to turn the lamp on.
2. Press the switch the second time the light output will be reduced by 30%.
3. Press the switch one more time and the lamp will turn off.
IRIS LED L Light has automatic energy-saving mode, and the lamp will turn off after 12 hours of continuous work.
To turn the lamp on, press the switch one time.
1. IRIS LED LX features a continuous dimming option with memory. Press and release the switch to turn the lamp ON.
Press and hold the switch to gradually increase to full brightness. Release the button when the desired brightness is reached.
2. Press and release the switch to turn the lamp OFF. When turned back ON, the light will illuminate at the previous intensity.
3. To decrease the intensity level, first increase it to full brightness. Then press and hold the switch to dim it to the desired level.
The lamp must first be at its lowest intensity to increase the level again.
4. Aim the light by rotating the arm at the base and the lamp at the top of the arm.
IRIS LED LX has a USB port to charge smartphones, tablets, and other personal electronics.
IRIS LED LX Light has automatic energy-saving mode, and the lamp will turn off after 12 hours of continuous work.
To turn the lamp on, just press the switch one time.
• Power cord: quick-connect power supply
jack 6F-1.8m
• USB output (IRIS LED LX only): DC5V/2.4A
• Spring Balanced Arm Movement
• Multidirectional Shade
• ETL Certified
IRIS LED L
IRIS LED L
IRIS LED LX USB
IRIS LED LX USB
Felt pad- protection
for Desk top finishes
USB
IRIS LED L IRIS LED LX USB
IRIS LED Task Lighting uses highly efficient LED lighting technology that supports Health & Wellbeing.
Products with LED technology use less energy and last longer than traditional types of lighting.
Quick-connect power cord
shade rotation
Page 1 Page 2
Please review these instructions before beginning the installation. Check that the correct components (shown at right) were provided
with your order. Do not discard the packaging until the product is assembled and functioning.
• Caution
• Do not look directly into the LED lights when lamp is operating.
• Do not direct light at other persons.
• Use only the supplied AC power adaptor.
• Do not hang, clip or tape any object to the lamp.
• Do not put this unit near any heat source or under direct sunlight.
Lily Set-up and operation
Set-up
1. Position the task light so that no obstructions prevent arm or lamp movement.
2. Insert the power supply jack into the lamp base.
3. Insert the power supply plug into an independent power outlet.
—Do not share an outlet with high power equipment such as printers, copy machines, scanners or computer work stations. This may
cause the light to flicker.
Operation
Lily-LED
1. Press and release the switch to turn the lamp on.
2. Press the switch the second time the light output will be reduced for 30%.
3. Press the switch one more time and the Lamp will turn o.
LILY LED Light has automatic energy saving mode and the lamp will turn o after 6hours of continuous work.
To turn the lamp on just press the switch one time
Lily-LED – or – Lily-LEDX
power supply
Lily-LEDX
Lily-LED
ON-OFF and
dimming switch
USB port
rotate
rotate
ON-OFF switch
Specifications
• light: 8W LED Nichia type
• CRI: >80
• life: 70,000 hours
• power adaptor: direct plug in with type A
plug input 100V-240V; output 24V
• power cord: quick connect power supply jack 6F-1.8m
• USB output (Lily-LEDX only): DC5V/1A
bottom
of base
power supply jack
power supply jack
Lily Set-up and operation
Lily-LEDX
1. Lily-LEDX features a continuous dimming option with memory. Press and release the switch to turn the lamp ON. Then press and hold
the switch to gradually increase to full brightness. Release the switch when the desired level of brightness is reached.
2. Press and release the switch to turn the lamp OFF. When turned back ON, the lamp will illuminate at the previous intensity level.
3. To decrease the intensity level, first increase it to full brightness. Then press and hold the switch to dim it to the desired level. To
increase the level again, the lamp first must be at its lowest intensity.
4. Aim the light by rotating the arm at the base and the lamp at the top of the arm.
Lily-LEDX has a USB port that can be used for charging smart phones, tablets and other personal electronics.
LILY LED Light has automatic energy saving mode and the lamp will turn o after 6hours of continuous work.
To turn the lamp on just press the switch one time
Quick-connect power cord
IRIS LED Task Light has an automatic Energy
saving mode that will turn off the Lamp after
12 hours of continuous work.To turn the lamp
on, press the switch one time.
Power adaptor
Quick-connect power cord
USB Charging Port
- or -
Sustainable design
Set-up instructions and operation Specifications
2 3
Caution
• Do not look directly into the LED lights when lamp is operating.
• Do not direct light at other persons.
• Use only the supplied power adaptor.
• Do not hang, clip or tape any object to the lamp.
• Do not put this unit near any heat source, humid place or under direct sunlight.
• For indoor use only.
Please review these instructions before beginning the installation. Check that the correct components (shown below)
were provided with your order. Do not discard the packaging until the product is assembled and functioning.
Page 1 Page 2
Please review these instructions before beginning the installation. Check that the correct components (shown at right) were provided
with your order. Do not discard the packaging until the product is assembled and functioning.
• Caution
• Do not look directly into the LED lights when lamp is operating.
• Do not direct light at other persons.
• Use only the supplied AC power adaptor.
• Do not hang, clip or tape any object to the lamp.
• Do not put this unit near any heat source or under direct sunlight.
Lily Set-up and operation
Set-up
1. Position the task light so that no obstructions prevent arm or lamp movement.
2. Insert the power supply jack into the lamp base.
3. Insert the power supply plug into an independent power outlet.
—Do not share an outlet with high power equipment such as printers, copy machines, scanners or computer work stations. This may
cause the light to flicker.
Operation
Lily-LED
1. Press and release the switch to turn the lamp on.
2. Press the switch the second time the light output will be reduced for 30%.
3. Press the switch one more time and the Lamp will turn o.
LILY LED Light has automatic energy saving mode and the lamp will turn o after 6hours of continuous work.
To turn the lamp on just press the switch one time
Lily-LED – or – Lily-LEDX
power supply
Lily-LEDX
Lily-LED
ON-OFF and
dimming switch
USB port
rotate
rotate
ON-OFF switch
Specifications
• light: 8W LED Nichia type
• CRI: >80
• life: 70,000 hours
• power adaptor: direct plug in with type A
plug input 100V-240V; output 24V
• power cord: quick connect power supply jack 6F-1.8m
• USB output (Lily-LEDX only): DC5V/1A
bottom
of base
power supply jack
power supply jack
Lily Set-up and operation
Lily-LEDX
1. Lily-LEDX features a continuous dimming option with memory. Press and release the switch to turn the lamp ON. Then press and hold
the switch to gradually increase to full brightness. Release the switch when the desired level of brightness is reached.
2. Press and release the switch to turn the lamp OFF. When turned back ON, the lamp will illuminate at the previous intensity level.
3. To decrease the intensity level, first increase it to full brightness. Then press and hold the switch to dim it to the desired level. To
increase the level again, the lamp first must be at its lowest intensity.
4. Aim the light by rotating the arm at the base and the lamp at the top of the arm.
Lily-LEDX has a USB port that can be used for charging smart phones, tablets and other personal electronics.
LILY LED Light has automatic energy saving mode and the lamp will turn o after 6hours of continuous work.
To turn the lamp on just press the switch one time