HomeSecure HS-IP-03 User manual


HomeSecure HS-IP-03 manual: 22-01-2015
2
Copyright © 2015 HomeSecure
Table of Contents
1
Introduction
5
1.1
Functions
5
2
Getting Started
6
2.1
The Package Contains
6
2.2
Overview of the Camera
7
2.3
Installation of hardware
7
3
Access to the Camera
8
3.1
Search Tool
8
3.2
Browser User Interface
9
3.3
Browser User Interface Overview
11
4
Camera Settings
12
4.1
System Settings
13
4.1.1
Device Status
13
4.1.2
Device Name
14
4.1.3
System Time
14
4.1.4
User Account
15
4.1.5
System Logs
16
4.2
Network
17
4.2.1
IP (Internet Protocol)
18
4.2.2
Port
19
4.2.3
WiFi
19
4.2.4
P2P
20
4.2.5
DDNS
21

HomeSecure HS-IP-03 manual: 22-01-2015
3
Copyright © 2015 HomeSecure
4.3
Alarm
22
4.3.1
Motion Detection
23
4.3.2
Alarm Settings
24
4.3.3
Email
25
4.3.4
FPT
26
4.4
Capture & Recording
26
4.4.1
Timed Recording
27
4.4.2
Timed Capture
27
4.4.3
Storage Device
27
4.5
Video & Audio
28
4.5.1
Video parameters
28
4.5.2
On screen display
29
4.5.3
Audio
30
4.6
Others
30
4.6.1
Pan/Tilt
30
4.6.2
System Configuration
31
5
App
32
5.1
App Setup
32
5.1.1
Install the App
32
5.1.2
Add Camera
32
5.1.3
Input Camera Information
33
5.1.4
Camera List
33
5.1.5
Live View
34
5.2
App Settings
35
5.2.1
Camera Settings
35
5.2.2
Advanced Settings
36

HomeSecure HS-IP-03 manual: 22-01-2015
4
Copyright © 2015 HomeSecure
6
Frequently Asked Questions
41

HomeSecure HS-IP-03 manual: 22-01-2015
5
Copyright © 2015 HomeSecure
Introduction
Congratulations on your new HomeSecure HD IP Camera. The camera will enable you to easily see what
is going on in your home from anywhere in the world as long as you have access to the internet.
This manual will give you all the information and instructions that you will need to familiarize yourself
with the camera’s functions, installation procedure and operation.
To avoid installation errors it is important that you read the manual thoroughly before starting to install
the IP camera. You must follow the installation procedure as specified in the manual to ensure that IP
camera functions optimally.
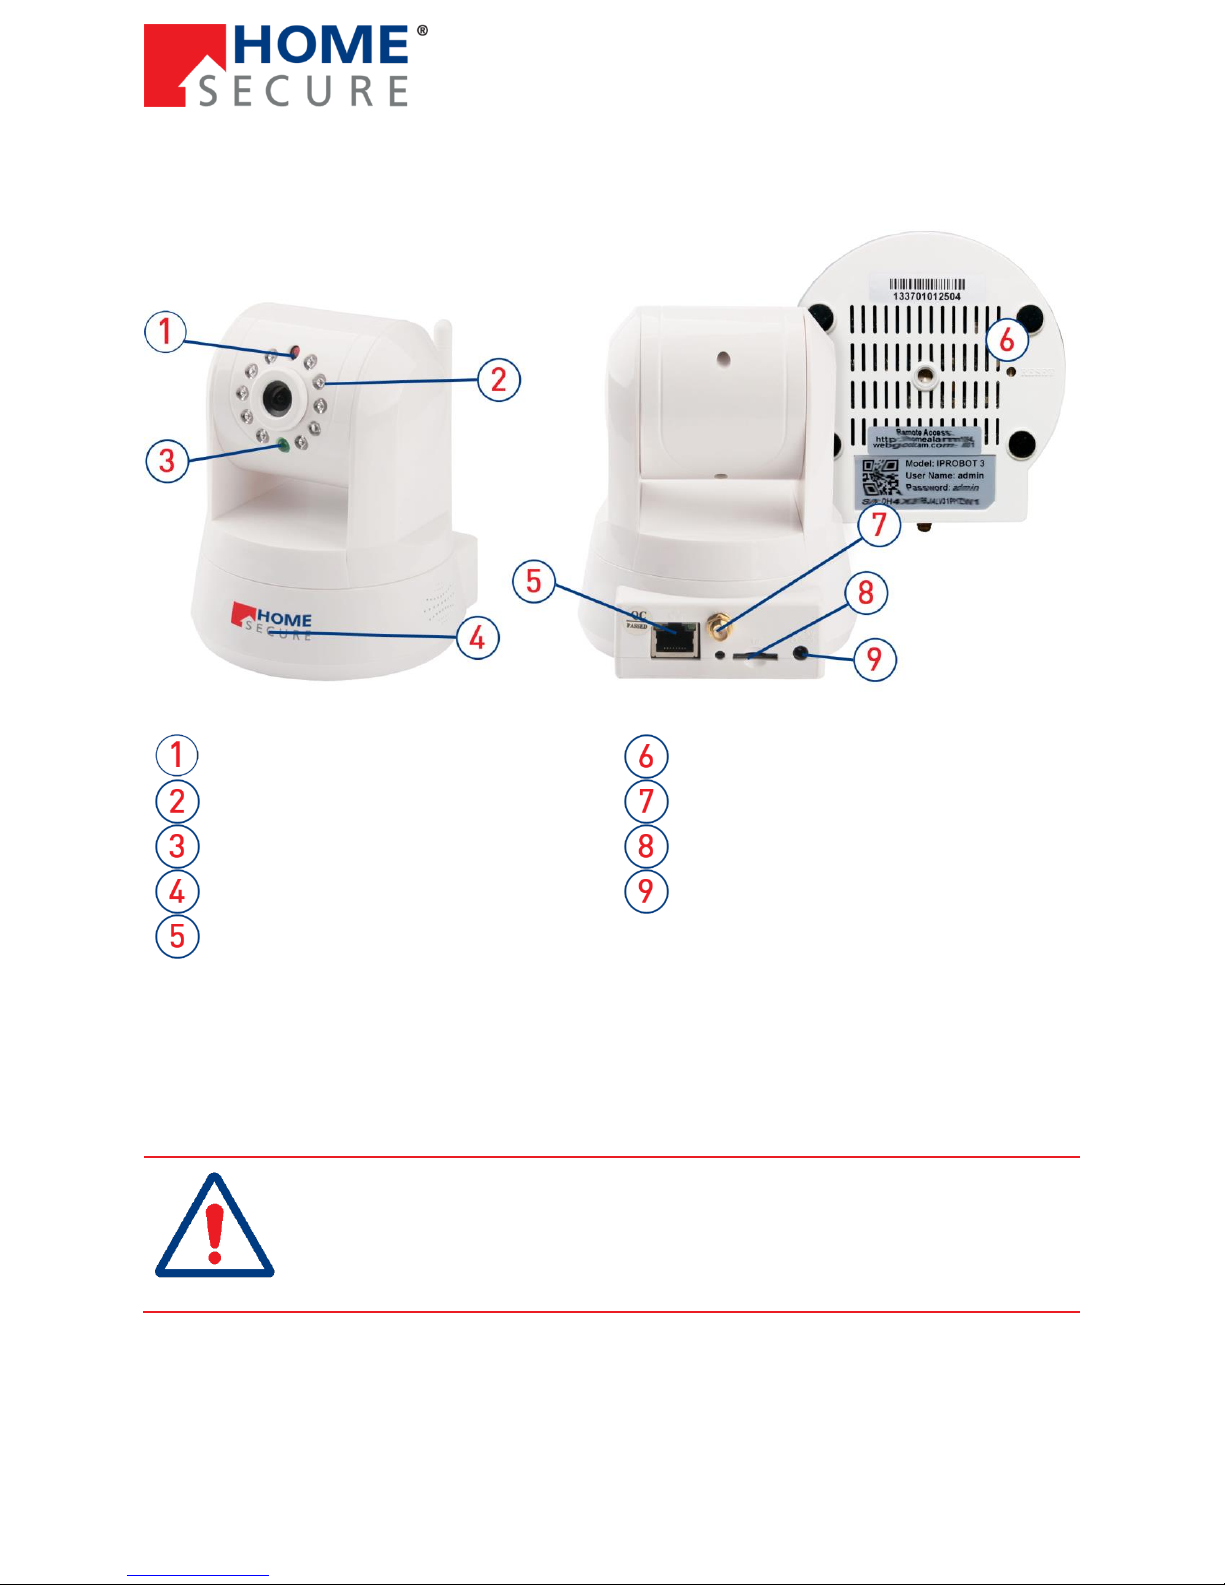
1.1 Functions
Below is a list of the most important functions of the HomeSecure HD IP Cam with descriptions. Please
make yourself familiar with all possible customizations described in the manual to achieve the best
setup for you.
HD 720P Resolution –This razor sharp resolution makes sure that you can always see what is
going on in the picture.
H.264 Video Compression –More fluid streaming and smaller file sizes.
Infrared Night Function –Turns on and off automatically in dark and light environments.
IR Cut-Off Filter –Colour correction and improved lighting.
P2P –Peer to peer communication, plug and play.
WiFi –Wireless internet connection. No internet cable necessary.
Accessible on Mobile Devices –Supports remote viewing on mobile devices. iPhone and
Android are supported.
2-way Communication –Speak and listen through the camera.
Pan/Tilt/Zoom Remote Controlling –Move the camera as you please. Up to 345 degrees
horizontal pan and 120 degrees vertical tilt.
Motion detector –Automatically detects moving objects and triggers alarm. The camera sends
email to the user and uploads pictures and video recordings to FTP server (and saves on TF card
if one is inserted).

HomeSecure HS-IP-03 manual: 22-01-2015
6
Copyright © 2015 HomeSecure
Getting Started
2.1 The Package Contains
Refer to the overview of what should be included in the package. If anything was missing when you
received the package, please contact your retailer as soon as possible to ensure your full use of the
product.
HomeSecure HD IP Camera
12V Power Supply
Mount
Network Cable
Installation CD
Wifi antenna

HomeSecure HS-IP-03 manual: 22-01-2015
7
Copyright © 2015 HomeSecure
2.2 Overview of the Camera
Please familiarize yourself with the hardware setup of the camera before you start installing.
Sensor
Reset button
IR LED’s
Antenna
Power indicator
TF card slot
Built-in microphone
Power input
Ethernet Port
2.3 Installation of Hardware
Attach the wifi antenna by screwing it on and attach the power supply. Then connect the IP camera to
your router with the network cable (NOTE: You will connect the camera to the wireless network later
in the process in [4.2.3 Wifi] please keep the cable connected until that procedure is done).
When the camera powers up, the power indicator will light green and the camera
calibrates position by panning and tilting all the way around.
Do not install the camera in its final position until you have finished the complete
setup.

HomeSecure HS-IP-03 manual: 22-01-2015
8
Copyright © 2015 HomeSecure
Access to the Camera
This section will describe how you install the camera software on your computer (PC or Mac), find your
camera and open the user interface in the browser.
3.1 Search Tool
In order to find the camera in your network, you need a search tool. Install the program called Search
Tool For PC (IP Camera V3) for Windows or run Search Tool for Mac (IP Camera V3) for Mac to install
the HomeSecure search tool on your PC or Mac. You can find the search tool on the enclosed CD.
Open the program and you will see the following screen:
If your camera is connected correctly, it
will be shown on the list here.
Remove this tick to manually change IP
address on the camera. If the box is
ticked, the camera will be assigned an IP
address automatically.
If your camera is not shown, try clicking
[Search] to make a manual search.
Your computer’s network information.
Click [Open] to open the user interface in
the browser.
Your IP camera’s network information.
Choose language (before you open the
interface).
After making all your desired changes,
type in your username and password
followed by [Apply].
Tick here to change the network settings
on the camera. The window will expand
as shown on the right.

HomeSecure HS-IP-03 manual: 22-01-2015
9
Copyright © 2015 HomeSecure
3.2 Browser User Inerface
After you click [Open] in the search tool as described on the last page, your default browser will open
the IP address of your IP camera.
Type in user name and password and click
[OK]. The default user name and password
are ”admin” and ”admin”.
As a safety precaution, you will be asked to change your password (6-12 char.). It must include at
least two of the following: Capital letters, small letters, numbers or simple signs.
You will then be redirected to the screen below. Click the link to download the required plugin.

HomeSecure HS-IP-03 manual: 22-01-2015
10
Copyright © 2015 HomeSecure
It might be necessary for you to authorize the program to run.
Install the program.
Go back to the browser and update the window. Now you will have access to the camera as
shown here.

HomeSecure HS-IP-03 manual: 22-01-2015
11
Copyright © 2015 HomeSecure
3.3 Browser User Interface Overview
Click this tab to see live video.
Choose one of the 8
positions. Press [Set] to
save the current position,
or press [Go] if you have
already set a position
here to jump to that
position.
Click [System Settings] to change settings.
Adjust frequency for better video quality.
Adjust brightness,
contrast, etc.
Choose stream (and thereby resolution).
Use the 8 arrows to move the camera and take
snapshots with the button in the middle.
Set Orientation to [Invert]
if the camera is upside
down.
Vertically or
horizontally. Press the
square to center the
camera.
(Route1-4 cannot be
used)
Receive sound from the camera.
Send sound to the camera.
Record video to your computer. You can change the
path in the settings menu.

HomeSecure HS-IP-03 manual: 22-01-2015
12
Copyright © 2015 HomeSecure
Camera Settings
When you have access to the camera in the browser, you can start customizing the settings on the
camera. It is important that you read this section thoroughly, so you have an idea of which settings to
change.
Press the [System Settings] tab to go to the settings menu:
The following pages will describe these 6 sections:
System settings
Settings for capture and recording
Network settings
Video and audio settings
Alarm settings
Others

HomeSecure HS-IP-03 manual: 22-01-2015
13
Copyright © 2015 HomeSecure
4.1 System Settings
Click [System] in the left side menu. This section covers general settings such as name, time, date etc.
4.1.1 Device Status
Explanation on next page.

HomeSecure HS-IP-03 manual: 22-01-2015
14
Copyright © 2015 HomeSecure
Model number of the IP camera
Software version number.
UID (unit ID) of the IP camera
IP-camera SD-card status.
IP-camera name
MAC-address.
Hardware version number.
Refresh status.
4.1.2 Device Name
Type in the name you
wish.
Click [Save] to save the
new name.
Click [Refresh] to update
info.
4.1.3 System Time
Current device time.
Choose sync mode:
Ntp: Update from server
Computer (recommend)
Manual
If ntp is chosen under
[Mode], you can choose
your timeserver here.
Choose how often to
synchronize time.
Choose your time zone.
Disable/enable daylights
saving time.
Choose whether to
automatically update
time (recommended).
Click [Save] to save
changes.
Click [Refresh] to update
info.

HomeSecure HS-IP-03 manual: 22-01-2015
15
Copyright © 2015 HomeSecure
4.1.4 User Account
User names of existing users.
User types of existing users.
Operation (change password).
Add new user. Choose user type, input
user name and password.
Overview over user types. Admin can
see live video and change settings.
Operator can only see live video.
Click [Refresh] to update info.
The system will automatically prompt you to change admin password on first login.

HomeSecure HS-IP-03 manual: 22-01-2015
16
Copyright © 2015 HomeSecure
4.1.5 System Logs
See an overview of all recent events on the IP camera. Operations and alarm events.
Date interval for overview. Input the date
interval you wish.
Choose type. Alarm, Operation or All.
Click [Search] to search on the chosen
parameter.
Click [Clear] to delete the chosen
parameters.
Log overview. All events are shown with
date, time, type and details.
Navigate the search result.
Click [Refresh] to update info.

HomeSecure HS-IP-03 manual: 22-01-2015
17
Copyright © 2015 HomeSecure
4.2 Network
This section describes all settings that have to do with network and connecting to the network, including
setup of Wifi so you don’t need to use the network cable.

HomeSecure HS-IP-03 manual: 22-01-2015
18
Copyright © 2015 HomeSecure
4.2.1 IP (Internet Protocol Settings)
The basic network settings of the IP camera. DHCP and DNS are both set to Enable as standard. We
recommend that you keep this setting unless you are familiar with setting up network settings.
Enable/disable automatic allocation of IP
address. If enabled, the IP address cannot be
changed manually.
Local IP address of the IP camera.
Used to access the camera locally.
The IP address must be unique.
IP Camera Subnet Mask
IP address of the standard gateway
(router), used on the local network.
DNS (Domain Name Service). Set to Enable to
obtain automatically.
Input preferred DNS server.
Input alternate DNS server.
Click [Save] to save changes.
Click [Refresh] to update info.
If you are planning to connect your IP camera to the wireless network, you should
setup wifi first and then return to this page to finish network setup.
When the camera is connected to the wireless network, it will be allocated new IP
and MAC addresses.

HomeSecure HS-IP-03 manual: 22-01-2015
19
Copyright © 2015 HomeSecure
4.2.2 Port
Port for web access via browser.
Port for access via RTSP
Port for access via Onvif protocol.
Click [Save] to save changes.
Click [Refresh] to update info.
4.2.3 Wifi
Configuration of wireless internet connection. Explanation on the next page.

HomeSecure HS-IP-03 manual: 22-01-2015
20
Copyright © 2015 HomeSecure
Enable/disable Wifi connection.
Choose your wireless network (SSID) on
the list.
Pop up is shown when you choose
network.
Input network key for the network.
Click [Save] to save the changes or [Test]
to test the connection first.
Click [Refresh] to update info.
The IP camera is allocated new MAC and IP addresses when you switch to wifi.
4.2.4 P2P
Enable/disable P2P function. The P2P function makes it possible for you to connect directly to the
camera from the smartphone app for Android and iPhone.
Enable/disable P2P.
UID (Unit ID), is used in the app to
connect directly to the camera.
Click [Refresh] to update info.
P2P requires UPnP to be activated on your router. Please refer to your router’s
manual.
Be aware that UPnP opens up the port for all devices with UPnP enabled to access
the internet and thereby might create a potential security risk.
Ask an experienced IT specialist if you have no experience with port
forwarding/NAT on your router.
Table of contents