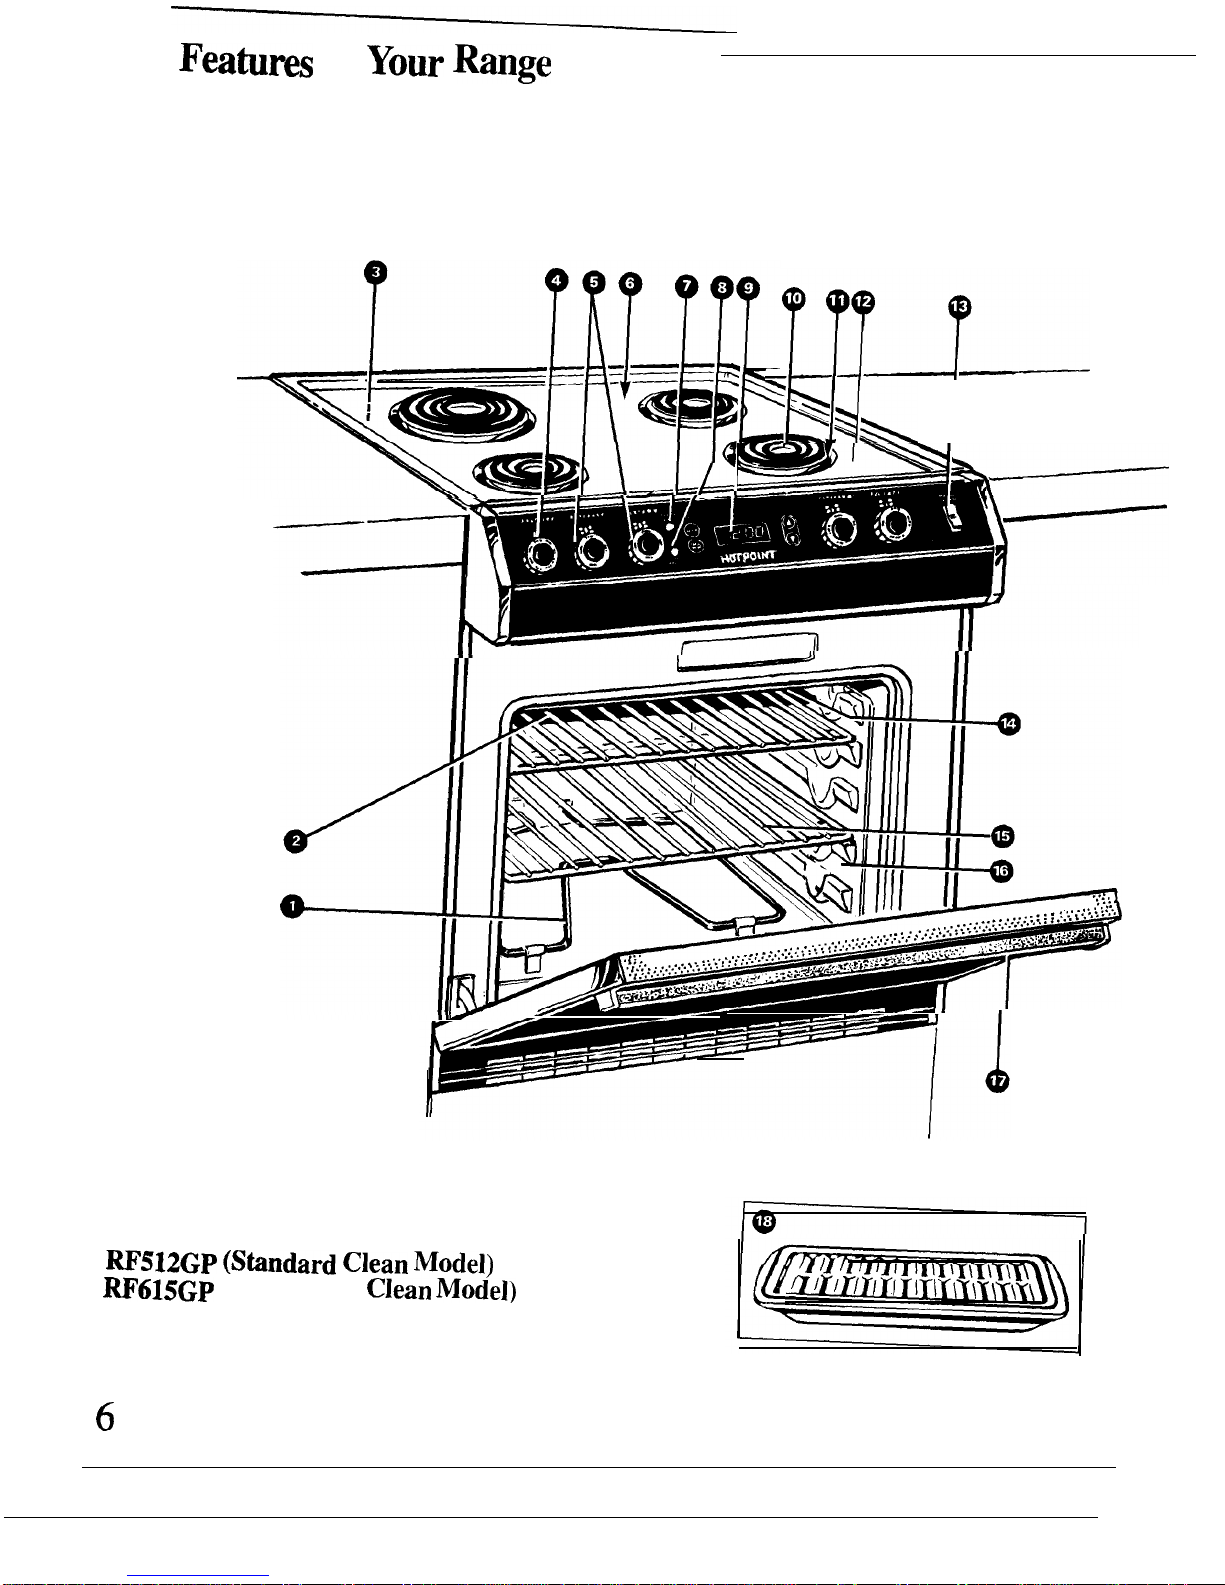
Hotpoint RF512GP Specification sheet

o
0
0
How to
get
the best from
Aluminum Foil
18
Appliance Registration
2
Canning Tips
9
Care and Cleaning 20-23
Clock/Timer
12
Consumer Services
27
Energy-Saving Tips
5
Features
6,7
Model and Serial Numbers
2
Oven
13
Baking/Baking Guide
14, 15
Broiling/Broiling Guide 18, 19
Continuous Cleaning Care 20
Control Settings
13
Door Removal
21
Light; Bulb Replacement 21
Roasting/Roasting Guide
16,
17
Thermostat Adjustment
22
Problem Solver
24
Safety Instructions
3,4
Surface Cooking 8-11
Control Settings
8
Cookware Tips
10, 11
Warranty
Back Cover
GE Answer Center
(
”
)
800.626.2000
Use
and
Care
of models
W512GP
m615GP

Help us help you...
Before using your range,
read this book carefully.
It is intended to help you operate
and maintain your new range
properly.
Keep it handy for answers to your
questions.
If you don’t understand something
or need more help, write (include
your phone number):
Consumer Affairs
Hotpoint
Appliance Park
Louisville, KY 40225
Write down the model
and serial numbers.
You’ll find them on a label
underneath the
cooktop.
These numbers are also on the
Consumer Product Ownership
Registration Card that came with
your range. Before sending in this
card, please write these numbers
here:
‘M;del
Number
Serial Number
Use these numbers in any
correspondence or service calls
concerning your range.
If you received
a damaged range...
Immediately contact the dealer (or
builder) that
sold
you the range.
Save time and money.
Before you request
service...
Check the Problem Solver in the
back of this book. It
Iists
causes of
minor operating problems that you
can correct yourself.
If you need service...
To obtain service, see the
Consumer Services page in the
back of this book.
We’
re
proud of our service
and
want you to be pleased. If for some
reason you are not happy with the
service you receive, here are three
steps to follow for further help.
FIRST, contact the people who
serviced your appliance. Explain
why you are not pleased. In most
cases, this
will
solve the problem.
NEXT, if you are still not pleased,
write
all
the details—including
your phone number-to:
Manager, Consumer Relations
Hotpoint
Appliance Park
Louisville, KY 40225
FINALLY,
if
your problem is still
not resolved, write:
Major Appliance Consumer
Action Panel
20 North
Wacker
Drive
Chicago, IL
60606
2

IMPORTANT SAFETY INSTRUCTIONS
Read all instructions before using this appliance.
,ihen using electrical appliances,
basic safety precautions should
be followed, including the
following:
●
Use this appliance only for its
intended use
as described in this
manual.
●
Be sure your appliance is
properly installed and
grounded
by a qualified
technician in accordance with the
provided installation instructions.
c
Don’t attempt to repair or
replace any part of your range
unless
it is specifically
recommended in this book.
All
other servicing should be referred
to
a
qualified technician.
●
Before performing any
service,DISCONNECTTHE
RANGE POWER SUPPLY
AT THE HOUSEHOLD
-
~ISTRIBUTION
PANEL
BY
.EMOVING THE FUSE OR
SWITCHING OFF THE
CIRCUIT BREAKER.
●
Do not leave children
alone—
children should not be left alone
or unattended in an area where an
tippliance
is in use. They should
never be allowed to sit or stand
on any part of the appliance,
●
Don’t allow anyone to climb,
stand or hang on the door,
drawer or range top. They
could
damage the range.
●
CAUTION: ITEMS OF
INTEREST TO CHILDREN
SHOULD NOT BE STORED
IN CABINETS ABOVE A
RANGE OR ON THE
BACKSPLASH OF A
RANGE—CHILDREN
CLIMBING ON THE RANGE
TO REACH ITEMS COULD
BE SERIOUSLY INJURED.
●
Never wear loose-fitting or
hanging garments while using
the appliance.
Flammable
material could be ignited if
brought in contact with hot
heating elements and may cause
severe burns.
●
Use only dry pot
holders—
moist or damp pot holders on hot
surfaces may result in burns from
steam. Do not let pot holders
touch hot heating elements. Do
not use a towel or other
bulky cloth.
●
For your safety, never use
your appliance for warming or
heating the room.
Q
Do not store or use
combustible materials,
gasoline
or other flammable vapors and
liquids in the vicinity of this or
any other appliance.
●
Keep hood and grease filters
clean
to maintain good venting
and to avoid grease fires.
Q
Do not let cooking grease or
other flammable materials
accumulate in or near the range.
●
Do not use water on grease
fires. Never pick up a flaming
pan.
Smother
flaming
pan on
surface unit by covering pan
completely with well-fitting lid,
cookie
sheet or
flat
tray. Flaming
grease
outside
a
pan can be put
out by covering with baking soda
or, if available, a multi-purpose
dry chemical or foam-type
fire extinguisher.
●
Do not touch heating elements
or interior surface of oven.
These surfaces may be hot
enough to burn even though they
are dark in color. During and
after use, do not touch, or let
clothing or other flammable
materials contact surface units,
areas nearby surface units or any
interior area of the oven; allow
sufficient time for cooling, first,
Potentially hot surfaces include
the
cooktop,
areas facing the
cooktop,
oven vent opening,
surfaces near the opening,
crevices around the oven door,
and metal trim parts above the
door. Remember: The inside
surface
of
the oven may be hot
when the door is opened.
●
When cooking pork,
follow
the directions exactly and always
cook the meat to an internal
temperature of at least
170°F.
This assures that, in the remote
possibility that trichina may be
present in the meat, it will be
killed and the meat will be safe
to eat.
(c(>ntinue(l
tt(xt
[Jage)
3
I

IMPORTANT SAFETY INSTRUCTIONS
(continued)
Oven
@
Stand away from range when
opening oven door.
Hot
air or
steam which escapes can cause
burns to hands, face
antior
eyes.
●
Don’t heat unopened food
containers in the oven. Pressure
could build up and the
container could burst, causing
an injury.
●
Keep oven vent duct
unobstructed.
●
Keep oven free from grease
buildup.
●
Place oven shelf in desired
position while oven is cool.
If
shelves must be handled when
hot, do not let pot holder contact
heating units in the oven.
●
Pulling out shelf to the shelf
stop is a convenience in lifting
heavy foods. It is also a
precaution against burns from
touching hot surfaces of the
door or oven walls.
●
When using cooking or
roasting bags in oven,
follow
the manufacturer’s directions.
●
Do not use your oven to dry
newspapers.
If overheated, they
can catch fire.
●
Do not use aluminum foil to
line oven bottom
or surface
units, except as suggested in
manual. Improper installation of
these
liners
may result in electric
shock or fire.
Surface Cooking Units
●
Use proper pan
size—This
appliance is equipped with one or
more surface units of different
size. Select cookware having flat
bottoms large enough to cover
the surface unit heating element.
The use of undersized cookware
will expose a portion of the
heating element to direct contact
and may result in ignition of
clothing. Proper relationship of
cookware to burner will also
improve efficiency.
●
Never leave surface units
unattended at HI heat settings.
Boilover
causes smoking and
greasy
spillovers
that may catch
on fire.
●
Be sure drip pans and vent
ducts are not covered and are
in place.
Their absence during
cooking could damage range
parts and wiring.
●
Don’t use aluminum foil to
line drip pans
or anywhere in
the oven except as described in
this book. Misuse could result in
a shock, fire hazard or damage to
the range.
●
Only certain types of glass,
glass/ceramic, earthenware or
other glazed containers are
suitable for
cooktop
service;
others may break because of the
sudden change in temperature,
See section on Surface Cooking
for suggestions.
●
To minimize the possibility of
burns,
ignition of flammable
materials, and spillage, the
handle of a container should be
turned toward the center of the
range without extending over
nearby surface units.
●
Always turn surface unit to
OFF before removing
cookware.
●
Keep an eye on foods being
fried at HI or MEDIUM HI
heat settings.
●
To avoid the possibility of a
burn or electric shock, always
be certain that the controls for
all surface units are at OFF
position and all coils are cool
before attempting to lift or
remove the unit.
●
Don’t immerse or soak
removable surface units. Don’t
put them in a dishwasher.
●
When flaming foods are
under the hood, turn the fan
off. The fan, if operating, may
spread the flame.
●
Foods for frying should be as
dry as possible.
Frost on frozen
foods or moisture on fresh foods
can cause hot fat to bubble up
and over sides of pan.
.
Use little fat for effective
shallow or deep-fat frying.
Filling the pan too full of fat
ca
cause
spillovers
when food is
added.
●
If a combination of oils or fats
will be used in frying,
stir
together before heating, or as fats
melt slowly.
●
Always heat fat slowly,
and
watch as it heats.
●
Use deep fat thermometer
whenever possible
to prevent
overheating fat beyond the
smoking point.
SAW
THESE
~STRUCTIONS
4

Ener~-Sating
Tips
Surface Cooking
●
Use cookware of
medium-weight
aluminum, with tight-fitting
covers, and
flat
bottoms which
completely cover the heated
portion of the surface unit.
●
Cook fresh vegetables with a
minimum amount of water
in a
covered pan.
● Watch foods when bringing them
quickly to cooking temperatures at
high heat. When food reaches
cooking temperature, reduce heat
immediately to lowest setting that
will keep it cooking.
● Use residual heat with surface
cooking whenever possible. For
example, when cooking eggs in
their shell, bring water and eggs to
boil, then turn control knob to OFF
position and cover cookware with
lid
to
complete the cooking.
Oven Cooking
● Preheat oven only when
necessary. Most foods will cook
satisfactorily without preheating.
you find preheating is necessary,
watch the indicator light, and put
food in oven promptly after the
light goes out.
● Always turn oven OFF before
removing food.
● During baking, avoid frequent
door
op~nings.-Keep
door
~pen
as
short a time as possible if it is
opened.
● Cook complete oven meals
instead of just one food item.
Potatoes, other vegetables, and
some desserts
will
cook together
with a main-dish casserole, meat
loaf,
chicken or roast. Choose
foods that cook at the same
temperature and in approximately
the same amount of time.
c
Use residual heat in the oven
whenever possible to finish
cooking casseroles, oven meals,
etc. Also add
rolls
or precooked
desserts to a warm oven, using
residual heat to warm them.
If
5

Feati~s
of
Your
Range
~512GP
(Shndard
Clean
Mode])
~61SGP
(Continuous
Clean
Model)

Feature Index
1 Bake Unit
(May be lifted gently
for
wiping oven floor.)
2 Oven Interior Light
Explained
on page
23
21
3 Model and Serial Numbers
(under
cooktop)
2
4 Oven Control I 13,14
5 Surface Unit Controls
8
6 Oven Vent Duct
4
(Located under right rear surface unit.)
7 Surface Unit “ON” Indicator Light
8
8
Oven Cycling
Light
13
9
Clock
and Minute Timer
I
12
10 Plug-In Surface Unit
(May
be removed when
cleaning
under unit.) 22,23
1
I
Chrome-Plated
Drip
Pans
I
22,23
12
Lift-Up
Cooktop
21
13 Oven Light Switch
13
14
Broil Unit 18,23
15 Oven Shelves
I
13
16 Oven Shelf Supports
I
13
17 Removable Oven Door
I
21
18 Broiler Pan and Rack
18
7
—
—

Sutiace
CooHzng
See Surface Cooking Guide.
Surface Cooking with
Infinite Heat Controls
At
both
OFF and HI positions,
there is a slight niche so control
“clicks” at those positions; “click”
on HI marks the highest setting;
the lowest setting is LO. In a quiet
kitchen, you may hear slight
“clicking” sounds during cooking,
indicating heat settings selected are
being maintained.
Switching heats to higher settings
always shows a quicker change
than switching to lower settings.
How to Set the Controls
I
I
\
Step 1: Grasp control knob and
push in.
Step 2: Turn either clockwise or
counterclockwise to desired heat
setting.
Control must be pushed into set
only from OFF position. When
control is in any position other
than OFF, it may be rotated
without pushing in.
Be sure you turn control knob to
OFF when you finish cooking. An
indicator light will glow when ANY
heat on
any
surface unit is on.
Cooking Guide for
Using Heat Settings
HI—Quick start for cooking; bring
water to
boil.
MEDIUM HI—Fast fry, pan broil;
maintain fast boil on large amount
Of
food.
MED—Saute and brown; maintain
slow
boil
on large amount of food.
MEDIUM LO—Steam rice,
cereal; maintain serving
temperature of most foods.
LO—Cook after starting at HI;
cook with little water in covered
pan.
NOTE:
1. At HI and MEDIUM HI
settings, never leave food
unattended.
Boilovers
cause
smoking; greasy
spillovers
may
catch fire.
2. At MEDIUM LO and LO
settings,
melt
chocolate and butter
on small surface unit.
8

Questions & Answers
(>.
May
1
can foods and
reserves on my surface units?
A. Yes, but only use cookware
designed
for
canning purposes.
Check
the manufacturer’s
instructions
and
recipes
for
preserving
foods.
Be sure canner is
flat-bottomed and fits over the
center of the surface unit. Since
canning generates
large
amounts of
steam, be careful to avoid burns
from
steam or heat. Canning should
only
be
done on surface units.
Q. Can 1 cover my drip pans
with foil?
A. No.
Clean
as
recommended in
Cleaning Guide.
Q. Can I use special cooking
equipment, like an oriental wok,
on any surface units?
A. Cookware without flat surfaces
is not recommended. The
life
of
the surface unit can be shortened
and the cooktop can be damaged
from the high heat needed for this
type of cooking.
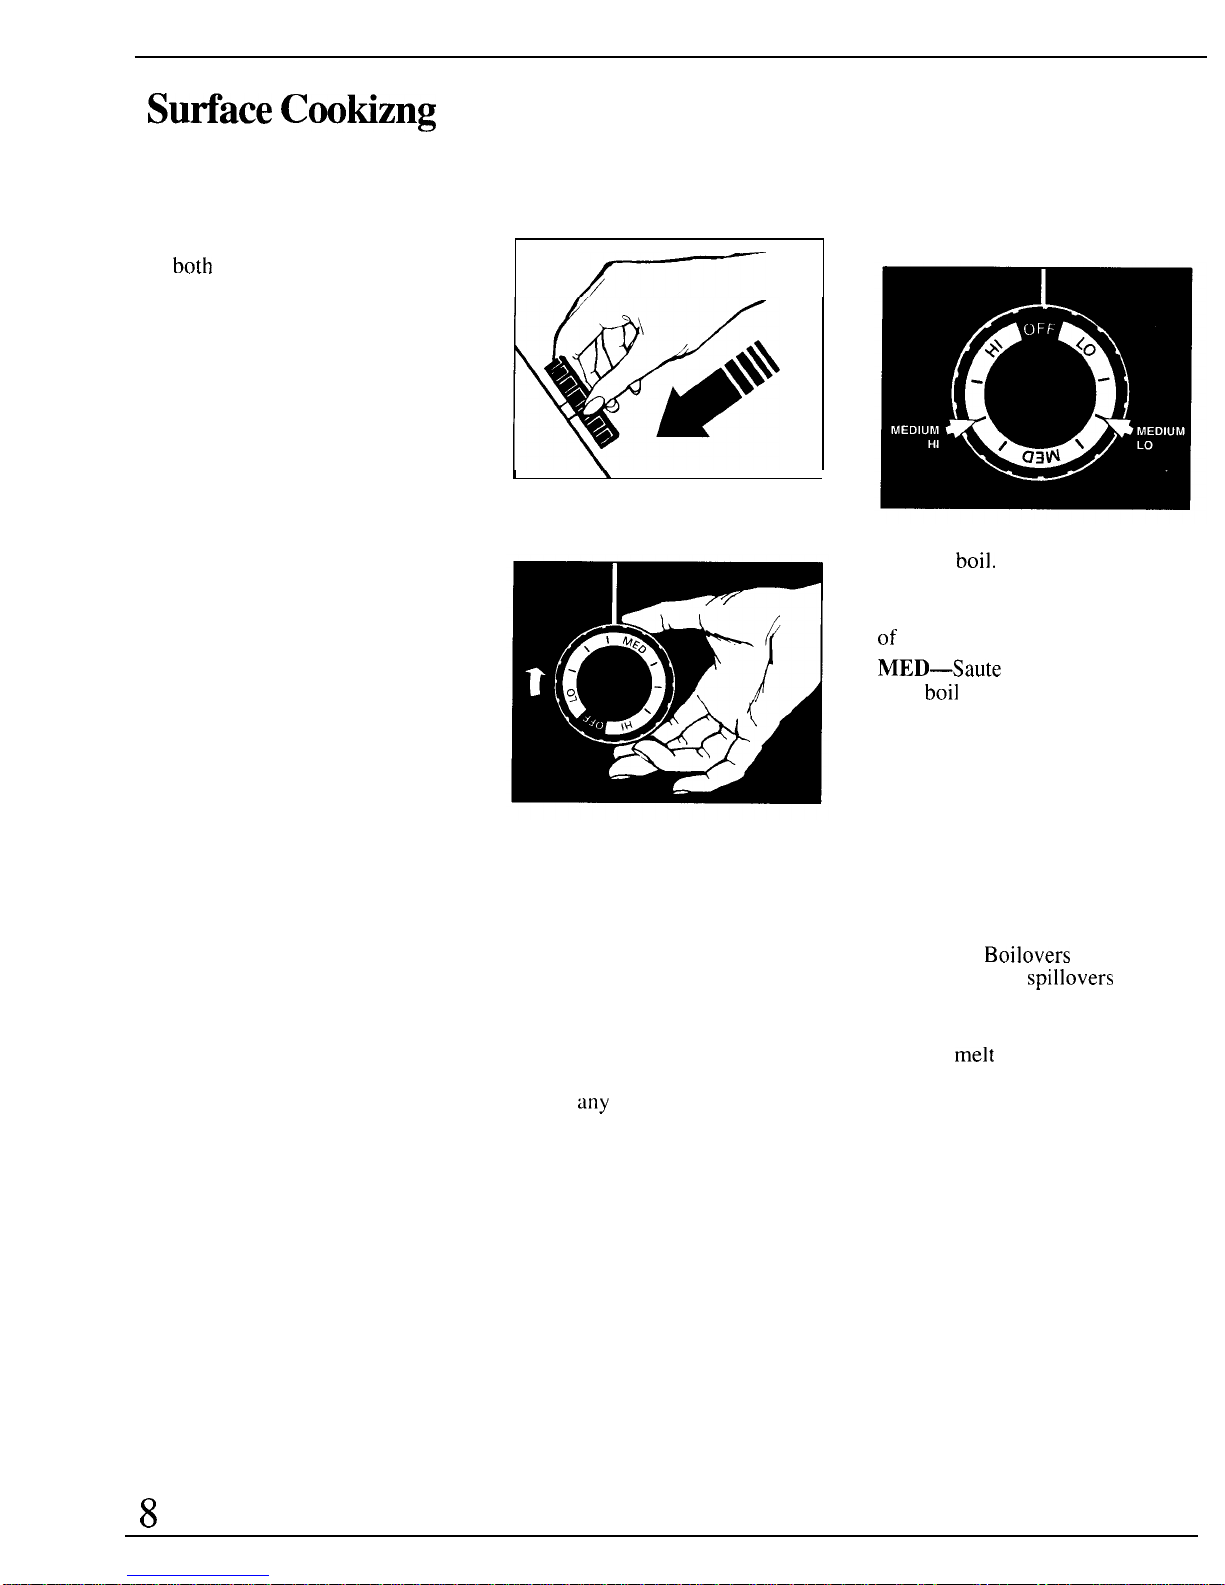
Q. Why am I not getting the heat
I
need from my surface units
even though I have the knobs on
the right setting?
A. After turning surface units off
and making sure they are cool,
check to make sure that the plug-in
units are securely fastened into the
Q. Why does my cookware tilt
when I place it on the surface unit?
A. Because the surface unit is not
flat. Make sure that the “feet” on
the surface unit are sitting tightly
in the cooktop indentation and the
reflector ring is flat on the
range surface.
Q. Why is the porcelain finish on
my cookware coming
o~
A. If you set the surface unit
higher than required for the
cookware material, and leave it,
the finish may smoke, crack, pop
or burn, depending on the type of
cookware. Also, cooking small
amounts of dry food or cooking at
surface connection.
high heat for
long
periods
may-
damage the cookware’s finish.
Home Canning Tips
Canning should be done on
surface units only.
Pots that extend beyond one inch
of cooking element’s trim ring are
not recommended for most surface
cooking. However, when canning
with water-bath or pressure canner,
large-diameter pots may be used.
This is because boiling water
temperatures (even under pressure)
are not harmful to cooktop surfaces
surrounding the surface units.
HOWEVER, DO NOT USE
LARGE-DIAMETER CANNERS
OR OTHER LARGE-DIAMETER
POTS FOR FRYING OR
BOILING FOODS OTHER
THAN WATER. Most syrup or
sauce mixtures-and all types of
trying—cook at temperatures
much higher than boiling water.
Such temperatures could
eventually harm cooktop surfaces
surrounding the surface units.
Observe Following Points
in Canning
1. Be sure the canner fits over the
center of the surface unit. If your
range or its location does not allow
the canner to be centered on the
surface unit, use small-diameter
pots for good canning results.
2. Flat-bottomed canners must be
used. Do not use canners with
flanged or rippled bottoms (often
found in enamelware) because they
don’t make enough contact with
the surface unit and take too long
to boil water.
RIGHT WRONG
3. When canning, use recipes and
procedures from reputable sources.
Reliable recipes and procedures
are available from the
manufacturer of your canner;
manufacturers of glass jars for
canning, such as
Ball
and Kerr;
and the United States Department
of Agriculture Extension Service.
4. Remember that canning is a
process that generates large
amounts of steam. To avoid burns
from steam or heat, be careful
when canning.
NOTE: If your house has low
voltage, canning may take longer
than expected, even though
directions have been carefully
followed. The process time
will
be
shortened by:
(1) using a pressure canner, and
(2)
starting
with HOT
tau
water for
fastest he~ing of large
q~antities
of water.
9

Sutiace
Cooting Guide
Control Settings Cookware Tips
HI—Highest setting.
MEDIUM HI—Setting halfway
between HI and MED.
MED—Medium
setting.
MEDIUM LO—Setting halfway
between MED and LO.
LO—Lowest setting.
1. Use medium- or heavy-weight
cookware. Aluminum cookware
conducts heat faster than other
metals. Cast iron and coated cast
iron cookware are slow to absorb
heat, but generally cook evenly at
low to medium heat settings. Steel
pans may cook unevenly if not
combined with other metals.
Directions
and
Settings
to Start Cooking Directions and Settings to
Complete Cooking
Food Cookware Comments
Cereal
Cornmeal,
grits,
oatmeal
Covered
Saucepan
HI.
In covered
pan
bring
water to
boi
1
before
adding
cereal.
MEDIUM
LO
or LO,
tben
add
cereal, Finish timing according
[()
package
directions.
Cereals bubble and expand as
they cook; use large enough
saucepan to prevent
boilover.
Uncovered
Saucepan
Cocoa
HI.
it-~”
together
wa(cr
or
milk
and
cocoa” ingredients.
Bring jus( to a boil.
HI. At
first
perk,
swi(ch
heat to MEDIUM
LO.
MED.
to cook
1
or
2 minutes
to
comple(eiy
blend ingredients.
ME1)ILJM
L()
to maintain gentle
but
s(cody
perk.
Milk boils over rapidly.
Watch as boiling point
approaches.
Percolate 8 to
10
minutes for
8 cups, less for fewer cups.
Coffee Percolator
Eggs
Cooked in shell
Covered
Saucepan HI. Cover eggs
with
cool”
water. Cover pan. cook”
until steaming.
MEDIUM
HI,
McI(
hLl[lCl”,
add eggs and cover ski
Ilc(.
MEDIUM
LO. Cook only
3
to 4
minutes
f’or
sof’t
cooked;
15 minutes
for
hard cooked.
[’ontinue
cooking” at MEDIUM
HI until
whiles
are just set,
about
.3
to 5 more minutes.
MEDIUM LO. then
add
eggs.
When
bottoms” of eggs have
just
set.
carefully turn over to
cook other side.
M1;DIUM
LO.
Carefully add
eggs.
C()()k
uncovered about 5
minutes at MEDIUM
HI,
MED.
Add
egg
mixture.
C()()k.
stirring to desired
doneness.
M13DIUM
LO. Stir occasionally
ancl
check
f’or
sticking.
Fried sunny-side-up Covered
Skillet If you do not cover skillet,
baste eggs with
fat
to cook
tops evenly.
Fried over easy
Uncovered
Skillet
HI. Melt butter
Poached Covered
Skillet
HI.
[n
covered
p:in
bring
water to a boil, Remove cooked eggs with
slotted spoon or pancake
turner,
Eggs continue to set slightly
after cooking. For omelet do
not stir last few minutes.
When set, fold in
half.
Fresh fruit: Use
1/4
to
1/2
cup water per pound of fruit.
Dried fruit: Use water as
package directs. Time
depends on whether fruit has
been presoaked. If not, allow
more cookinz time,
Scrambled or omelets Uncovered
Skillet
H].
Heat
butter until light
golden in color.
Fruits
Covered
Saucepan
HI,
In covered pan bring
fruit
zind
w:iter
(()
boil.
Meats
Braised: Pot roasts of
beef, lamb or veal;
pork steaks and
chops
Covered
Skillet
H].
Melt fat,
then
LLdd
mca[
Switch to
ME3D1UM
HI
I()
brown
meal.
Add
wa(cr
or
other liquid.
MF;I)IUM
LO. Simmer until fork
tcnLfcl”.
Meat can be seasoned and
floured before it is browned,
if desired. Liquid variations
for
flavor could be wine, fruit
or tomato juice or meat broth.
Timing: Steaks 1 to 2 inches:
I to 2 hours. Beef Stew: 2 to
3 hours. Pot Roast:
2’/~
to
4 hours.
Pan frying is best for thin
steaks and chops. If rare is
desired, pre-heat skillet
before adding meat.
Pan-fried: Tender
chops; thin steaks up
to 3/4-inch; minute
steaks; hamburgers;
franks and sausage;
thin fish fillets
Uncovered
Skillet
HI,
Prehea(
skillc(.
[hen
gre:lse
Iigh(ly. MIiDILJM
HI or MED. Brown
ancf
cook”
to desired doneness,
turnitlg
over
~s
needed,
10

Wrong
2. To
conserve
the most
cooking
trim
rinzs
ran~in~
from blue to
mm
?nergy,
pans
should
be flat on
tie
.)[tom,
have straight sides and
[ight
fitting lids.
Match
the size
of the saucepan to the size of the
surftice
unit. A pan that extends
more
than one inch beyond the
edge Of the trim ring will trap heat
causing discoloration
on
chrome
dark
gr~y.
u
“
Concave Bottom
Rounded Bottom
Right
3. Deep Fat Frying. Do not overfill
cookware with fat that may
spill
over when adding food. Frosty
foods bubble vigorously. Watch
foods frying at high temperatures.
Keep range and hood clean from
accumulated grease.
)
f
Wrong
\
-
~
OVER 1“
Right
A
NOT OVER
1“
Directions and Settings
to Start Cooking Directions and Settings to
Complete Cooking
E.ood
Cookware
Comments
.Meats
I;licd
Chicken
Covered
Skillet
HI. Melt
fat.
Switch to MED
HI to brown chicken. MEDIUM
LO.
Cover skillet
and
cook until tender,
Uncover last few minutes.
For
crisp,
dry
chicken,
cover only after switching
to MEDIUM LO
for
10
minutes. Uncover
and
cook,
turning occasionally for
10
to 20 minutes.
Pdtl-f-ied
bacon
Uncovered
Skillet
HI. In
cold
skillet,
~rrange
bucon
slices. Cook just until
starting to sizzle,
HI. Melt fat, Switch to MED
to brown slowly.
MEDIUM HI. Cook, turning
over
as
needed. A more attention-free method
is to start and cook at MED.
silLl(CCd:
i,CSS
tCllLtCl”
(hin
steaks
(ChLICk,
l’OLllld,
Ctc.
):
I
ivcr;
[hick
or
whole
fish.
Sinlmcred
or stewed
meat;
chicken;
corned beef;
smoked
pork;
stewing beef:
loll~LIC;
C(C.
Covered
Skillet
MEDIUM LO. Cover and cook
until tender.
Meat may be breaded or
marinated in sauce before
frying.
Covered
Dulch
Oven,
Kettle
or
Large
Saucepan
Small
Uncovered
Saucepan.
Skillet or
Griddle
HI. Cover meat with water
and cover pan or kettle.
Cook until steaming.
MEDIUM
LO.
Cook until
fork
tender. (Water should boil
slowly. )
For
very large amounts,
medium heat
may
be needed,
Add salt or other seasoning
before
cooking if meat has
not been smoked or
otherwise cured.
Nlelting
chocolate,
‘)utter,
marshmallow:
LO. Allow 1 () to 15 minutes
to melt through. Stir to smooth, Use small surface
unit,
When melting marshmallows,
add milk or water.
MEDIUM HI. Heat skillet
8
to
10 minutes. Grease lightly.
Pancakes or
IJrench
toast Cook 2 to
3
minutes per side. Thick batter takes slightly
longer time. Turn over
pancakes when bubbles
rise to surface,
Pasta
N()()dlcs
or
spaghetti
Lal”ge
Covered
Kettle or Pot
HI,
In covered
kettte,
bring
salted water to a boil, uncover
and add pasta
stowly
so
boiting
does not stop,
MEDIUM Ht. Cook uncovered
untit tender. For
targe
amounts,
HI may be needed to keep water
at rotting boit throughout entire
cookin&
time.
MEDIUM HI for foods cooking
t O minutes or
tess.
MED for
foods over 10 minutes.
MEDIUM
LO.
To
finish
cooking,
Use
targe
enough kettle to
prevent
boilover.
Pasta
doubtes
in size when cooked.
Pressure Cooking
H1.
Heat untit first
ji>e
is heard. Cooker
shoutd
jiggte 2 to
3
times per minute.
Pressure
Cooker or
Canner
Puddings, Sauces,
Candies,
P.rostings
H].
Bring just to boit.
Uncovered
Saucepan
Stir frequently
to
prevent
sticking.
Vegetables
t:rcsh Covered
Sallccpan
HI,
Measure t/2 to t inch
water in saucepan. Add salt
and prepared
vegetabte.
In covered saucepan bring
to boit.
HI. Measure water and
satt
as above. Add
frozen
block
of
vegetabte.
In covered
saucepan bring to boit.
HI.
tn
skillet. melt fat.
MED. Cook t pound
t O to
30
or more minutes,
depending on tenderness
of
vegetabte.
Uncovered pan requires more
water and
tonger
time.
Fl”ozell
Covered
Suuccpan
MEDIUM LO. Cook according
to time
on
package. Break up or stir as needed
white cooking.
stiLltCCd:
onions;
:1’ccn
pcppcl’s;
mllslll-(x)llls;
Cclely;
etc.
Rice
and
(;rits
Uncovered
Skittet
MED. Add vegetabte
Cook untit desired
tenderness is reached.
Turn over or stir
vegetabte
as
necessary for even browning,
HI. Bring satted water to a boil. Rice and
grits
tripte
in
vohrme
after cooking. Time at LO.
Rice: I cup rice and 2 cups
water
for
25 minutes.
Grits:
I
cup grits and 4 cups
water for 40 minutes.
Covered
Sauceptin
LO. Cover and cook
according to time.
11

Automatic Clock and Timer
The automatic clock and timer on
To set the Timer
your range are helpful devices that
serve the following purposes.
Press the TIMER ON/OFF pad.
The
words “SET TIMER”
appear
To set the Clock
in the display. Then press the””
INCREASE or DECREASE pad
Press the CLOCK pad. The words until the desired time (hours and
“SET TIME” appear in the display.
minutes) is displayed. The colon
Then press the INCREASE or flashes when the timer starts
DECREASE pad until the correct
counting down.
time is displayed. After a slight
pause, time is set.
To cancel the Timer
Press the TIMER ON/OFF pad
until “0:00” appears in the display.
At the end of the timer operation,
the timer beeps 3 times followed by
1
beep every 10 seconds until
cancelled. You can display the time
of
day by pushing the CLOCK pad.
To return to the time counting
down push TIMER ON/OFF.
Questions and Answers
Q.
How
can I use the Timer to
make the surface cooking easier?
A. The Timer will
help
you time
total cooking, which includes
time to boil food and change
temperatures. Do not judge
cooking time by visible steam
only.
Food will cook in covered
containers even though you can’t
see any steam.
Q. Can I use the Timer during
oven cooking?
A. The Timer can be used during
any cooking function.
12

Using Your Oven
Before Using Your Oven
1. Look
at
the control. Be sure you
understand how
to
set it properly.
2.
Check
oven interior. Look
at
the
shelves.
Take
a
practice run at
removing
and
replacing them
properly
to
give sure, sturdy
support.
3.
Read
over information and tips
that
fo]]OW.”
4.
Keep
this book handy so you
con
refer to it, especially during
the
first
weeks of using your range.
Oven Temperature Control
The OVEN CONTROL knob is
located on the control panel on the
front
of the range.
Simply turn the knob to the desired
cooking temperatures, which are
marked in
25°F.
increments on the
dial. OVEN CONTROL maintains
the temperature you set, from
WARM ( 1500 F.) to BROIL
(5500F.).
The Oven Cycling Light glows
until the oven reaches your
selected temperature, then goes off
und
on with the oven unit(s) during
cooking.
Oven Shelves
The shelves are
designed
with
stoP-
locks so when
placed
correctly
o;
the shelf supports, they will stop
before coming completely out of
the oven
and
will not tilt when you
are removing food
from
them or
placing food on them.
When placing cookware on a
shelf,
pull
the shelf out to the “stop”
position. Place the cookware on
the shelf, then slide the shelf back
into the oven. This will eliminate
reaching into the hot oven.
t
Shelf Positions
Each oven has four shelf
supports—
A (bottom), B, C and D (top).
Shelf positions for cooking are
suggested on Baking and Roasting
pages.
I
\l
1
1
Oven Light
The light comes on automatically
when the oven door is opened. Use
the switch on the control panel to
turn the light on and off when the
door is closed.
To remove the shelves from the
oven, pull them toward you, tilt
front end upward and pull them out.
To replace, place shelf on shelf
support with stop-locks (curved
extension of
shelf)
facing up and
toward rear of oven. Tilt up front
and push shelf
toward
back of
oven until it goes past “stop” on
oven wall. Then lower front of
shelf
and push it all the way back.
13

Bating
When cooking a food
for
the first
time in your new oven, use time
given on recipes as a guide. Oven
thermostats, over a period of years,
may “drift” from the factory
setting and differences in timing
between an old and new oven of 5
to 10 minutes are not unusual and
you may be inclined to think that
the new oven is not performing
correctly. However, your new oven
has been set correctly at the factory
and is more apt to be accurate than
the oven it replaced.
How to Set Your
Range for Baking
Step 1: Place food in oven, being
certain to leave about
1
inch of
space between pans and walls of
oven for good circulation of heat.
Close oven door. During baking,
avoid frequent door openings to
prevent undesirable results.
Step
2: Turn OVEN SET knob to
BAKE and OVEN TEMP knob to
temperature on recipe or on the
Baking Guide in this book.
Step 3: Check food for doneness at
minimum time on recipe. Cook
longer if necessary. Switch off heat
and remove foods.
Shelf Positions
Most baking is done on the second
shelf
position (B) from the bottom.
When baking three or four items,
use two shelves positioned on the
second and fourth sets of supports
(B &D) from bottom of oven.
Bake
angel
food cakes on first shelf
position (A) from bottom of oven.
Baking Tips
●
Follow
a tested recipe and
measure the ingredients carefully,
If you are using a package mix,
follow label directions.
● Do not open the oven door during
a baking operation—heat will be
lost and the baking time might
need to be extended. This could
cause poor baking results. If you
must open the door, open it
partially-only 3 or 4 inches—and
close it as quickly as possible.
● Do not disturb the heat
circulation in the oven with the use
of aluminum foil. If foil is used,
place a small sheet of it, about 10
by 12 inches at the most, on a
lower shelf several inches below
the food. Do not place foil on the
oven bottom.
Common Baking Problems
and Possible Solutions
PIES
Burning around edges
● Edges of crust too thin.
● Incorrect baking temperature.
Bottom crust soggy and unbaked
● Allow crust
andor
filling to cool
sufficiently before filling pie shell.
● Filling may be too thin or juicy.
● Filling allowed to stand in pie
shell before baking. (Fill pie shells
and bake immediately.)
c
Ingredients and proper measuring
affect the quality of the crust. Use
a tested recipe and good technique.
Make sure there are no tiny holes
or tears in a bottom crust.
“Patching” a pie crust could cause
soaking.
Pie filling runs over
● Top and bottom crust not well
sealed together.
● Edges of pie crust not built up
high enough.
● Too much filling.
● Check size of pie plate.
Pastry is tough; crust not flaky
● Too much handling.
● Fat too soft or cut in too fine.
Roll dough lightly and handle as
little as possible.
CAKES
Cake rises higher on one side
● Batter spread unevenly i n pan.
● Oven shelves not level.
● Using warped
pans.
Cakes cracking on top
● Oven temperature too high.
● Batter too thick, follow recipe or
exact package directions.
● Check for proper shelf position.
●
Check pan size called for in recipe.
● Improper mixing of cake.
Cake
falls
● Too much shortening, sugar
or liquid.
● Check leavening agent, baking
powder or baking soda to assure
freshness. Make a habit to note
expiration dates of packaged
ingredients.
● Cake not baked long enough or
baked at incorrect temperature.
● If adding oil to a cake mix, make
certain the oil is the type and
amount specified.
Crust is hard
● Check temperature.
● Check shelf position.
Cake has soggy layer or streaks
at bottom
● Undermining ingredients.
● Shortening too soft for proper
creaming.
●
Too much 1
iquid.
COOKIES & BISCUITS
Doughy center; heavy crust
on surface
● Check temperature.
● Check shelf position.
● Follow baking instructions
carefully as given in reliable recipe
or on convenience food package.
● Flat cookie sheets will give more
even baking results. Don’t
overcrowd foods on a baking sheet.
● Convenience foods used beyond
their expiration date.
Browning more noticeable on
one side
“
Oven door not closed properly,
check gasket seal.
● Check shelf position.
14

Bating
Guide
1. Aluminum pans conduct heat heat, which may result in dry, crisp
preheating gives best appearance
quickly. For most conventional
crusts. Reduce oven heat
25°F.
if
and crispness. Although preheating
baking, light, shiny finishes
lighter crusts are desired. Rapid
is not necessary with meats, it is
generally give best results because browning of some foods can be
prefemed
for baked
goods.
~hey
help prevent
overbrowning. achieved-by preheating cast-iron 4. To prevent uneven heating and to
For best browning results, we
cookware.
recommend dull bottom surfaces save energy, open the oven door as
for cake pans and pie plates,
3. Preheating the oven is not always little as possible in checking food.
necessarv,
es~eciallv for foods that
2. Dark or non-shiny finishes
and
-. . .
cook longer than 30 to 40 minutes.
glass cookware generally absorb
For foods with short cooking times,
Shelf
Positior
Oven
Temperature
400°-4750
Time,
Minutes
15-20
20-30
20-40
45-55
20-30
45-60
45-60
45-60
10-25
20-30
Cookware
Comments
Bread
Biscui[s
( l/2-in. thick)
Shiny
Cookie Sheet
B, C
B
B
B
B
B
:
B
B
Canned, refrigerated biscuits take 2 to
4 minutes less time.
Shiny Metal Pan with
sztin-finish bottom
Cast-iron or
Glass Pan
Shiny
Metal Pan with
satin-finish bottom
Shiny Metal Muffin Pans
Deep Glass or Cast-iron Cups
350°-4000
Corn
breaci
or
muffins
Gingerbread
400°-4500
350°
Preheat cast-iron pan for crisp crust.
Muffins
Popovers 400°-4250
375°
Decrease about 5 minutes for muffin
mix, or bake at
450”F.
for 25 minutes,
then at
350°F.
for 10 to 15 minutes.
Quick
loaf
bread
Yeast
bread
(2
loaves) Metal or Glass Loaf Pans
Metal or Glass Loaf Pans
350°-3750
375°-4250
Dark metal or glass give deepest
browning.
Plain rolls
Sweet rolls
Cakes
‘without
shortening)
Angel
food”
Jelly roll
Sponge
Cakes
~undt
cakes
Cupc~kes
Fruit
cukes
Shiny Oblong or Muffin Pans
375°-4250
350°-3750
Aluminum Tube Pan
Metal Jelly Roll Pan
Metal or Ceramic Pan
325°-3750
375°-4000
325°-3500
30-55
IO-15
45-60
Two-piece pan is convenient.
Line pan with waxed paper.
A
B
B
Metal or Ceramic Pan
Shiny Metal Muffin Pans
Metal
or Glass Loaf or Tube Pan
325°-3500
350°-3750
275°-3000
A, B
A;B
B
B
B
45-65
20-25
2-4
hrs.
20-35
25-30
40-60
25-35
10-20
6-12
7-12
Paper liners produce moister crusts.
Use
300°F.
and Shelf B for small
or
individual cakes.
If baking four layers, use
Shelves B and D.
L:Iycr
Shiny Metal Pan with
satin-finish bottom
Shiny Metal Pan with
satin-finish bottom
Metal or Glass Loaf Pans
350°-3750
Layer,
chocolate
350°-3750
I.oaf
Cookies
Brownies
Drop
Refrigcra[or
Rolled or
sliced
E’ruits,
other Desserts
Baked
apples
Cus[tird
350°
Metal or Glass Pans
Cookie Sheet
Cookie Sheet
Cookie Sheet
B, C
B, C
B, C
B. C
325°-3500
350°-4000
400°-4250
375°-4000
Bar cookies from mix use same time.
Use Shelf C and increase temp.
25°F.
to
50°F.
for more browning.
Glass or Metal Pans
Glass Custard Cups or Casserole
(set in pan of hot water)
Glass Custard Cups or Casserole
B, C
B
B
350°-4000
300°-3500
325°
30-60
30-60
50-90
Reduce temp. to
300°F.
for large
custard.
Cook bread or rice pudding with
custard base 80 to 90 minutes.
Puddings, rice
and
cLtstJrd
Pies
Frozen
Meritrguc
Foil Pan on Cookie Sheet
Spread to crust edges B!C
B
B
B
400°-4250
325°-3S00
45-70
15-25
45-60
40-60
12-16
For large pies use
400°F.
and more time.
To quickly brown meringue,
use
400°F.
for 9 to
11
minutes.
Custard fillings require lower
temperature, longer time.
one
CI”LIS(
Two crust
Pastry
shell
Miscellaneous
daked
potatoes
Scidlopcd
dishes
SOLlff”]CS
Glass
or
Satin-finish Metal Pan
Glass or Satin-finish Metal Pan
400°-4250
400°-4250
4s0°
Set on Oven Shelf
Glass or Metal Pan
Glass Pan
32 S
0
-400
0
325°-3750
300°-3s00
60-90
30-60
30-75
Increase time for larger amount or
size.
15

Roasting
Roasting is cooking by
dry
heat.
Tender meat or poultry can be
roas(ed
LIncovcred
in your oven.
Roasting
[enlperatures,
which
sI1ouI{I
hc
low
and
steady, keep
spat[cl”i[lg
to
a minimum. When
roasting,
i[
is
not
necessary to
sear,
baste.
cover
or add
water
(()
yolll”
Incilt.
Roaslillg
is
easy:
just
follow
these
steps:
Step 1:
(’heck
weight of
meat,
and
place
it,
fa[-side-up.
on roasting
rack in a shallow pan. (Broiler
pan
with
rack
is a good
pan
for
this. )
L,ine
broiler pan with aluminum
toil
when using
pan
for
marinating,
cooking
with fruits, cooking
heavily-cured
meals,
or
for
basting
fOOd
dul-ing
cooking.
Av(>id
spi][illg
these materials 0[1
oven
1
incr
or door.
Step 2:
Place
in
oven
on shelf in
A or
B
position. No preheating
is ncccssary.
Step 3: Turn OVEN SET knob to
BAKE. Turn OVEN TEMP knob
to
325°t7.
Small poultry
may
be
cooked
at
350°F.
for
best
browning. (You
may
hear
a
slight
c1
icking
sound. indicating the oven
is working properly. )
Questions and Answers
Q. Is it necessary to check
f’or
doneness with a meat
thermometer?
A. Checking the finished
inlernal
temperature
at
the completion of
cooking time is recommended.
Temperatures are shown in
Roasting Guide. For roasts over
8
pounds, cooked
at
300°F.
with
reduced time, check with
thermometer at half-hoar intervals
after half the time has passed.
Q. Why is my roast crumbling
Step 4: Most meats continue to
cook slightly while standing after
being removed
from
the oven.
Standing time recommended
for
roasts is 1() to
20
minutes. This
allows
roasts to firm up and makes
them easier to carve. Internal when I try to carve it?
temperature
will
rise about 5°
to
10°F.;
to compensate for
temperature increase, if desired,
remove the roast from the oven
when roast’s internal temperature
is 5° to
10°F.
less than temperature
shown in the Roasting Guide.
Remember that food will continue
to cook in the hot oven and
therefore should be removed when
the desired internal temperature
has been reached.
For Frozen Roasts
● Frozen roasts of beef, pork,
lamb, etc.,
can
be started without
thawing, but
allow
10 to 25
minutes additional time per pound
(10 minutes additional time per
pound for roasts under 5 pounds,
more time for larger roasts).
● Thaw most frozen poultry before
roasting to ensure even doneness.
Some commercial frozen poultry
can be cooked successfully without
thawing. Follow directions given
on package label.
A. Roasts are easier to slice
if
allowed to cool
10
to 20 minutes
after removing from oven.
Be
sure
to cut across the grain of the
meat.
Q. Do I need to preheat my
oven each time I cook a roast
or poultry?
A.
[t
is rarely necessary to preheat
your oven; only for very small
roasts, which cook a short
Iengtll
of time.
Q. When buying a roast, are
there any special tips that would
help me cook it more evenly?
A. Yes. Buy a roast
as
even in
thickness as possible, or buy
rolled roasts.
Q. Can I seal the sides
of.
my
foil
“tent”
when roasting a turkey?
A. Sealing the foil will steam the
meat. Leaving it unsealed allows
the air to circulate and brown
the meat.

Roasting Guide
1. Position oven shelf at B for
small-size roasts (3 to 7 pounds)
and at A for larger roasts.
2. Place meat fat-side-up, or poultry
breast-side-up, on broiler pan or
other shallow pan with trivet. Do
not cover. Do not stuff poultry until
.Iust
before roasting. Use meat
~hermometer
for
~ore
accurate
doneness. (Do not place
thermometer in stuffing.)
Meat
Tender
cuts; rib, high quality
sirloin tip, rump or top round*
Lamb leg or bone-in shoulder*
Veal shoulder,
leg
or loin*
Pork loin, rib or shoulder*
Ham, precooked
Ham, raw
*For boneless rolled roasts over 6
inches thick, add 5 to 10 minutes per
pound to times
given above.
Poultry
Chicken or Duck
Chicken pieces
Turkey
3. Remove fat and drippings as
necessary. Baste as desired.
4. Standing time recommended for
roasts is 10 to 20 minutes. This
allows roasts to firm up and
m~es
them easier to carve. Internal
temperature will rise about 5° to
10°F.:
to compensate for
5. Frozen roasts can be
conventionally roasted by adding
10
to 25 minutes additional time
per pound to times given in guide
for refrigerated roasts. (10 minutes
additional time per pound for
roasts under 5 pounds, more time
for larger roasts,) Defrost poultry
temperature
i~crease,
if desired,
before roasting.
remove the roast from oven when
the roast’s internal temperature is
5° to
10°F.
less than temperature
shown in the Roasting
Guide.
Oven
Temperature
325°
325°
325°
325°
325°
325°
325”
350°
325°
Doneness
Rare:
Medium:
Well Done:
Rare:
Medium:
Well Done:
Well Done:
Well
Done:
To Warm:
Well Done:
Well
Done:
Well
Done:
Well Done:
in Minutes per Pound-
3
to
5
Ibs.
6 to 8
Ibs.
24-33 18-22
35-39 22-29
40-45 30-35
21-25
20-23
25-30 24-28
30-35 28-33
35-45
30-40
35-45 30-40
17-20 minutes
per pound (any weight)
Under 10 lbs,
10 to 15 Ibs.
20-30
17-20
3 to 5 lbs.
Over 5 Ibs.
35-40 30-35
35-40
10 to 15 lbs.
Over 15 lbs.
18-25 15-20
Internal
Temperature
“F,
140°-1500
150°-1600
170°-1850
140°-1500
150°-1600
1700-1 85°
170°-1800
170°-1800
115°-1250
170°
185°-1900
185°-1900
In
thigh:
185°-1900
17

Broiling
Broiling is cooking food by intense
radiant heat from the upper unit in
the oven. Most fish and tender cuts
of meat can be broiled. Follow
these steps to keep spattering and
smoking to a minimum.
Step 1:
[f
meat has fat or gristle
near edge, cut vertical slashes
through both about 2“ apart. If
desired, fat may be trimmed,
leaving layer about 1/8” thick.
Step
2: Place meat on broiler rack
in broiler pan which comes with
range.
Always
use rack so fat drips
into broiler pan; otherwise juices
may become hot enough to
catch fire.
Step
3: Position shelf on
recommended shelf position as
suggested in Broiling Guide on
opposite page. Most broiling is
done on C position.
Step 4: Leave door open to broil
stop position (except when broiling
chicken). The door stays open by
itself, yet the proper temperature is
maintained in the oven.
Step 5: Turn OVEN SET knob to
BROIL. Turn OVEN TEMP knob
to BROIL. Preheating unit is not
necessary. (See notes in Broiling
Guide.)
Step 6: Turn food only once
during cooking. Time foods for
first side per Broiling Guide.
Turn food, then use times given for
second side as a guide to preferred
doneness. (Where two thicknesses
and times are given together, use
first times given for thinnest food.)
Step 7: Turn OVEN SET and
TEMP knobs to OFF. Serve food
immediately, and leave pan outside
oven to
co{]
during
me~l
for
easiest cleaning.
Use of Aluminum Foil
/
Questions & Answers
Q. Why should I leave the
door
closed when broiling chicken’?
A. Chicken is the only
food
recommended for closed-door
broiling. This is because chicken is
relatively thicker than other foods
you broil. Closing the door holds
more heat in oven which allows
chicken to cook evenly throughout.
Q. When broiling, is it necessary
to always use a rack in the
pan’?
A. Yes. Using the rack suspends
the meat over the pan. As the
meat
cooks, the juices
fall
into the pan,
thus keeping meat drier.
Juices
arc
protected by the rack
and
stay
cooler, thus preventing excessive
spatter and smoking.
Q. Should I salt the meat
before
broiling?
A. No. Salt draws out the juices
and allows them to evaporate.
Always salt after cooking. Turn
meat with tongs; piercing meat
with a fork also allows juices to
escape. When broil
ing
poultry or
You can use aluminum foil to line
your broiler
pan
and broiler rack.
However, ye-u must mold the foil
tightly to the rack and cut slits in it
fish,-brush
each side
~fien
iust
like the rack.
with butter.
.Without the slits, the foil
will
Q. Why are my meats not
prevent fat and meat juices from turning out as brown as
draining
to the broiler
pan.
The
they should?
juices
c~uld
become
h~t
enough to A. In some areas, the power
catch on fire. If you do not cut the (voltage) to the range may be low.
slits, you are frying, not broiling.
In these cases, preheat the broil
unit for 10 minutes before placing
broiler pan with
food
in oven.
Check to see if you
are
using the
recommended shelf position. Broil
for longest period of time indicated
in the Broiling Guide. Turn food
only once during broiling.
Q. Do I need to grease my
broiler rack to prevent meat
from sticking?
A. No. The broiler rack is designed
to reflect broiler
heat,
thus keeping
the surface cool enough to prevent
meat sticking to the surface.
However, spraying the broiler
rack
lightly with a vegetable cooking
spray before cooking will make
cleanup easier.
18

Broiling Guide
1. Always use broiler pan and rack
,~at
comes with your oven. It is
designed to minimize smoking and
spattering by trapping juices in the
shielded lower part of the pan.
the
meat, Use tongs to turn meat
over to prevent piercing meat and
losing juices,
6. Broiler does not need to be
preheated. However, for very thin
foods, or to increase browning,
preheat if desired.
4. If desired, marinate meats or
chicken before broiling. Or brush
with barbecue sauce last 5 to 10
minutes only.
7. Frozen steaks can be
conventionally broiled by
positioning the oven shelf at next
lowest shelf position and increasing
cooking time given in this guide
1
X
times per side.
2. Oven door should be open to
the broil stop position for all food
except chicken.
5. When arranging food on pan, do
not let fatty edges hang over sides,
which could soil oven with fat
dripping,
3. For steaks and chops, slash fat
evenly around outside edges of meat.
To slash, cut crosswise through
outer fat surface just to the edge of
Quantity antior
Thickness
1/2 lb. (about 8
thin slices)
Shelf
Position
c
First Side
Time, Minutes
4%
Second Side
Time, Minutes
4%
Food
Comments
Arrange
in single layer.
Bacon
Ground Beef
Well
Done
1
lb. (4 patties)
l/2 to 3/4 in. thick
c
10
7
Space evenly
Up to 8 patties take about same time.
Beef Steaks I
in,
thick
(1
to
1
X
Ibs.)
Rare
Medium
Well Done
Rare
Medium
Well Done
c
c
c
c
c
c
6
8
12
10
15
25
5
6
11
7-8
14-16
20-25
10-15
Steaks less than
I
in. thick cook
through before browning.
Pan
frying is
recommended. Slash fat.
I
X
in. thick
(2
to
2X
Ibs.)
Chicken
1
whole
(2 to
2X
Ibs.),
split lengthwise
’35
Reduce time about 5 to 10 min. per side”
for cut-up chicken. Brush each side with
melted butter. Broil with skin-side-down
first and broil with door closed.
A
Bakery Products
Bretid
(Toast) or
Toaster Pastries
English Muffins
2
to
4 slices
I pkg. (2)
2 (split)
c
I
%-2
c
3-4
1/2
Space evenly. Place English muffins
cut-
side-up and brush with butter, if desired.
Lobster tails
2-4
(6 to 8 oz. each)
B
13-16
Do not
turn over.
Cut
through back of shell, spread
open.
Brush with melted butter before broiling
and after half of broiling time.
Fish
l-lb. fillets l/4 to
l/2 in. thick
c
5
5
Handle and turn very carefully.
Bnrsh
with
lemon butter before and during cooking, if
desired. Preheat broiler to increase browning.
B8 8
Increase time 5 to 10 min.
per side
for
1
X
in. thick or home-cured ham.
Hamslices
(precooked)
I
in, thick
Pork chops
Well
Done 2 ( l/2 in. )
2 (1 in. thick),
about
1
lb.
c
10
10
Slash fat.
B13
13
Lamb chops
Medium
Well Done
Medium
Well Done
Wieners
and
similar precooked
sausages, bratwurst
2 (
I
in. thick)
about 10 to 12 oz.
2 (1
Y?
in. thick),
about I lb.
c
c
c
B
10
12
14
17
9
10
12
12-14
Slash fat.
I -lb. pkg. ( 10)
c
6
I-2
If desired, split sausages in half
lengthwise; cut into 5- to 6-in. pieces.
19

Care and Cleating
(See Cleaning
(Juide.)
Special Care of
Continuous-Cleaning
Oven Interior
(on
models so equipped)
The Continuous-Cleaning oven
cleans itself while cooking. The
inside of the oven-top, sides
and
back—is finished with a
.\/~[~(;(ll
c’~~[lril?,q
which
cannot
be cleaned in
the usual manner with soap.
detergents,
steel
woo]
p~ds,
commerc
itil
oven
cleaners,
coarse
abrasive pads or coarse brushes.
Use of such
clcancrs
and/or
the
use
of oven sprays will cause
permanent damage.
The special coating is a porous
ceramic material which is dark in
color
and feels s]
ightly
roligh
to
the touch.
If
tnagnified.
the surface
would
appear
us
peaks, valleys and
sub-surface “tunnels.” This
rough
finish
tends
to prevent grease
spatters from forming little beads
or droplets which run down
the
side walls of a
hurd-surface
oven
liner leaving unsightly streaks that
require hand cleaning. Instead,
when spatter hits
the
porous finish,
it is dispersed and is partially
absorbed. This spreading
action
increases the exposure of oven soil
to heated air,
and
makes it
somewhat less noticeable.
Soil may not disappear
completely and
tit
some time after
extended usage. stains may appear
which cannot be removed.
The special coating works best
on small amounts of spatter. It
does not work well with
larger
spil
1s,
espec
iul
Iy
sugars,
egg
or
dairy mixtures.
The special coating is not used
on oven shelves. Shelves should
be cleaned
()[{[,vi(l(’
tl~(’
oic’tl
to
avoid
damage
to the special
coating inside the
oven.
To Clean the Continuous-
Cleaning Oven:
1. Let range parts cool before
handling. We recommend rubber
gloves
be worn when cleaning.
2. Remove shelves and cookware.
3. Soil visibility maybe reduced
by operating the oven at
400°F.
Close the door and turn OVEN
CONTROL knob to
400°F.
Time
for at least 4
hours,
Repeated
cycles may be necessary before
improvement in appearance is
apparent.
REMEMBER : DURING THE
OPERATION OF
TFIE
OVEN, THE DOOR,
WINDOW ANO OTHER RANGE
S[JRFAC.ES
WILI
GET HOT ENOUGH TO
CAt
JSE
B(JRNS. Do NOT
TOLJCH.
LET
THIi
RANGE COOL BEFORE REPLACING
THE
SHE1.VES.
4.
[f
a
spillover
or heavy soiling
occurs on the
porous
surface, as
soon as the oven has cooled,
remove as much of the soil as
possible
usin&
a small amount of
water and a stiff-bristle nylon
brush. Use water sparingly and
change it frequently, keeping it as
clean as possible. and be sure to
blot it up with paper towels, cloth
or
sponges.
D~~
Ilot rub or
.vcrub
with paper towels, cloths
or
sponges, since they will leave
unsightly lint
on
the oven finish. If
water leaves a white ring on the
finish as it dries, apply water again
and
blot
it with a
clean
sponge;
starting at the edge of the ring and
working toward the center.
Do not use soap, detergent,
steel wool pads, commercial
oven cleaner, silicone oven
sprays, coarse pads or coarse
brushes on the porous surface.
These products will spot, clog
and mar the porous surface and
reduce its ability to work.
Do not scrape the porous
surface with a knife or
spatula— they could
permanently
datnage
it.
Porcelain Oven Interior
(on models so equipped)
With proper care, the porcelain
enamel finish
on
the inside of the
oven—top, bottom, sides, back and
inside of the door—will stay
new-
looking for years.
Let range cool before cleaning. We
recommend that you wear rubber
gloves when cleaning the range.
Soap and water will normally do
the job. Heavy spattering or
spillovers
may require cleaning
with a mild abrasive cleanser.
Soapy, wet metal pads may also be
used. Do not allow
food
spills
with
a high sugar or acid content (such
as
milk,
tomatoes, sauerkraut,
fruit
juices or pie filling)
to
remain
on
the surface. They may cause a dull
spot even after cleaning.
Household ammonia may make the
cleaning job easier.
place
1/2
cLlp
in a shallow glass or pottery
container in a cold oven overnight.
The ammonia fumes will help
IOOS(
‘“
the burned-on grease and
food.
If necessary, you may use a
commercial oven cleaner.
Follow
package directions.
Cautions about using
spray-on oven cleaners:
● Do not spray on the electrical
controls and switches because it
could cause a short circuit and
result in sparking or fire.
● Do not allow a
film
from the
cleaner to build up on the
temperature sensor—it
could
cause
the oven to heat improperly. (The
sensor is located at the top of the
oven.) Carefully wipe the sensor
clean after each oven cleaning,
being careful not to move the
sensor as a change in its position
could affect how the oven bakes.
● Do not spray any oven cleaner on
the oven door, handles or any
exterior surface of the oven, wood
or painted surfaces. The cleaner
can damage these surfaces.
20
This manual suits for next models
1
Table of contents