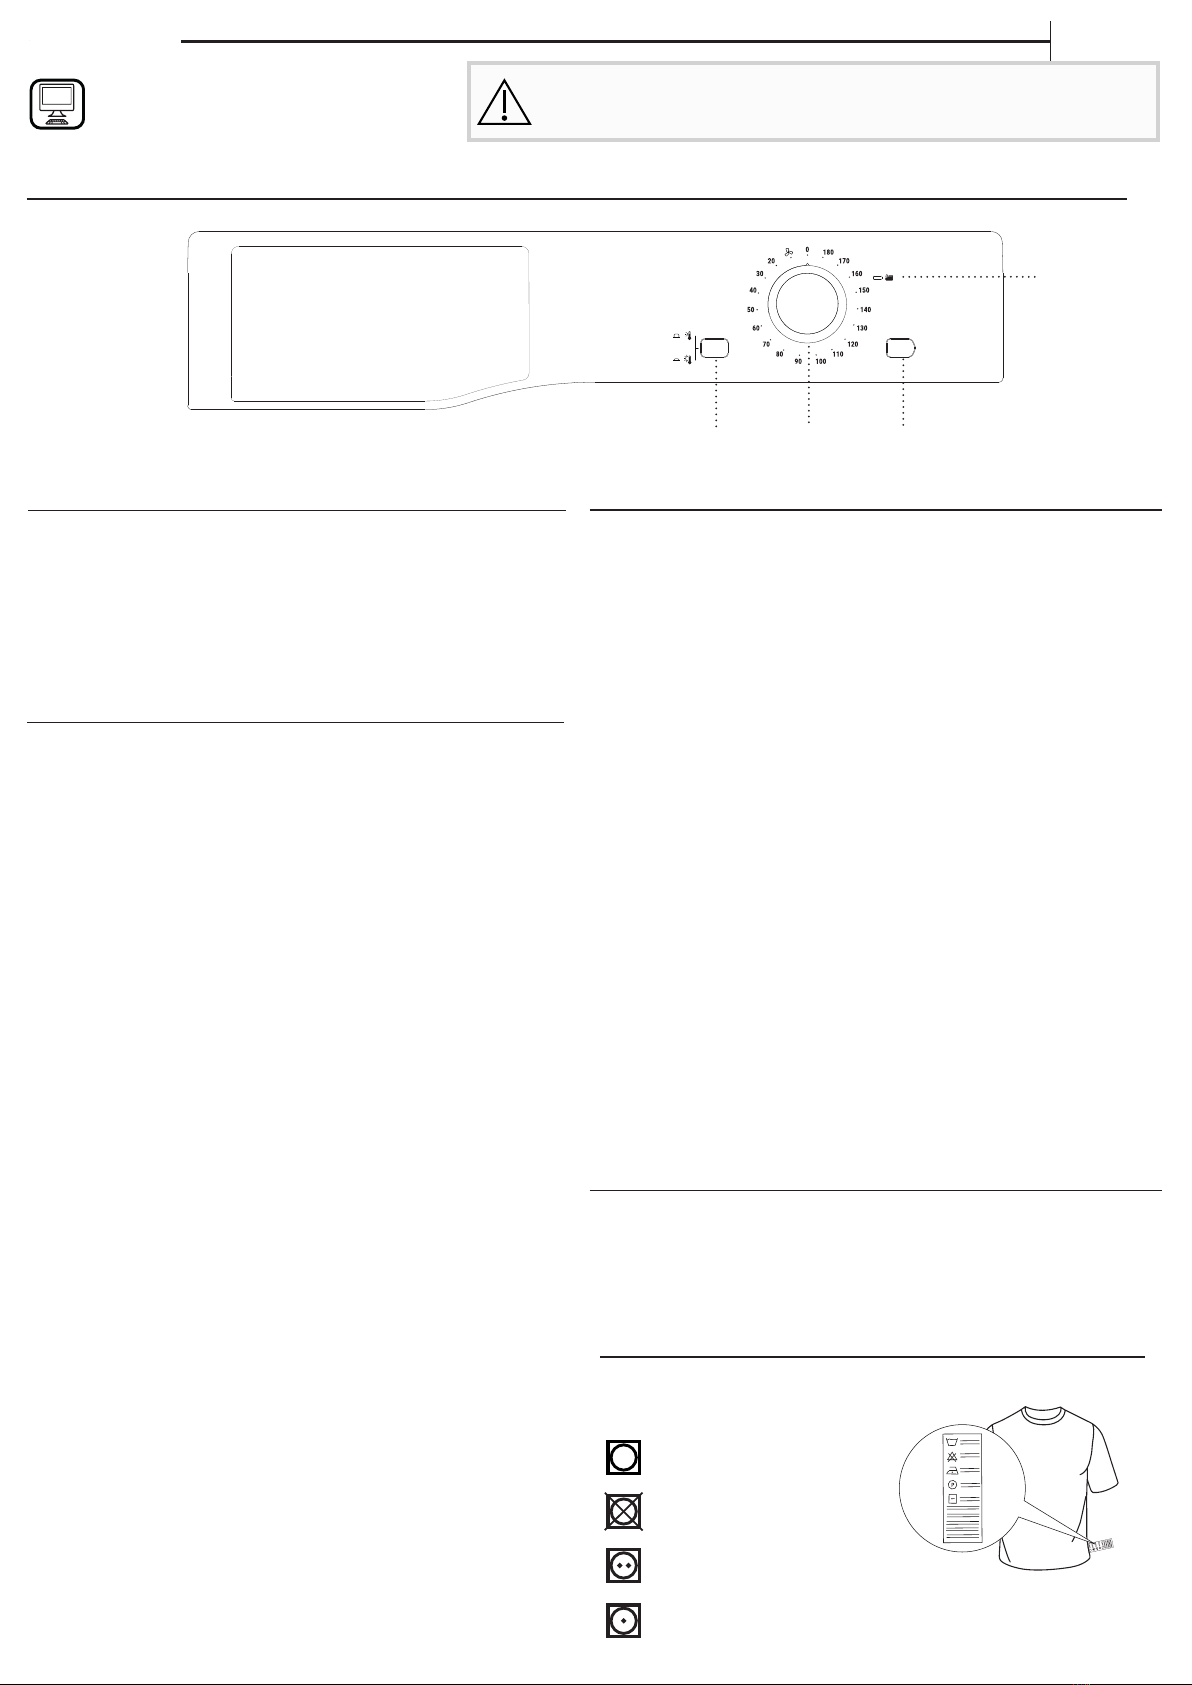
manuals.online logo
Brands
  1. Home
  2. •
  3. Brands
  4. •
  5. Hotpoint
  6. •
  7. Washer
  8. •
  9. Hotpoint 772268 User manual

Hotpoint 772268 User manual

CONTROL PANEL
DAILY USE
Doing this will keep your machine working at its BEST:
- remember to empty your water tank after each drying cycle.
- remember to clean your condenser unit regularly (monthly).
- remember to clean your lter after each drying cycle.
Refer to the Care & Maintenance section.
1. Plug the dryer into the power supply socket.
2. Open the door and load garments; always refer to instructions on
clothing labels and the max loads indicated in the drying time table.
Empty pockets. Make sure garments do not get caught between the
door and/or the door lter.
3. Close the door.
4. Turn the “Drying Time" selection knob until the indicator is
pointing towards the most suitable drying time for the type of
fabric in that load.
Note: do not attempt to turn the knob anticlockwise.
5. If necessary, set the temperature using the "High Heat" button.
6. Press the "Start" button to begin drying.
7. A nal COOL TUMBLE phase (i.e. the fabrics are cooled) activates
during the last few minutes of the drying cycle; always allow this
phase to nish.
8. The cycle ends when the selection knob reaches the "0" zero
position and the drum stops.
9. Open the door, remove the laundry.
10. Disconnect the dryer from the power supply.
11. Clean the lter and replace it.
12. Empty the water tank and put it back in its slot.
OPENING THE DOOR DURING THE CYCLE
Laundry can be checked while the drying cycle runs and any
garments already dry can be removed, while drying continues for
the remaining items. After closing the door, press the "Start" button
to resume machine operation.
DESCRIPTION OF CONTROL PANEL
1. "Start" button
Press to begin drying.
2. "Drying Time" selection knob
This is used to set the drying time: turn the knob in a clockwise
direction until the indicator is set to the desired drying time. The
0 position switches o the dryer.
3. "Emptying Water Tank" indicator light
To indicate when the water tank needs emptying.
Lighting up when the container is full, the door is closed and the
"Start" button has been pressed.
After emptying, reposition it correctly and the light will take
around 30 seconds to switch o after restarting the drying cycle
with the "Start" button.
IMPORTANT: If the container becomes full during the cycle, the
dryer will automatically stop and clothes will not be dried. To
avoid this empty the tank after or before starting a cycle.
4. "High Heat" button
To be used to increase the heat on drying cycles.
CARE LABEL
Always check the care labels, especially when placing garments in
the tumble dryer for the rst time. Below are the most commonly
used symbols:
May be tumble dried.
Do not tumble dry.
Tumble dry – high heat.
Tumble dry – low heat.
FIRST TIME USE
Make sure that the water tank is correctly inserted. Make sure
that the drain hose on the back of the dryer is properly
connected, either to the dryer’s water tank or to your domestic
drainage system.
The dryer must be installed in a room with a temperature
ranging between 5°C and 35°C to ensure proper operation.
You can download the Safety Instructions, User Manual, Product Fiche and Energy data by:
• Visiting our website - docs.hotpoint.eu
• Using QR Code
• Alternatively, contact our After-sales Service (See phone number in the warranty booklet). When
contacting our After-sales Service, please state the codes provided on your product’s identication plate.
THANK YOU FOR BUYING A HOTPOINT PRODUCT.
In order to receive a more complete assistance,
please register your product on
www.hotpoint.eu/register
EN
Quick guide
Before using the appliance read the Safety Instructions carefully.
xxxxxxxxxxxx
xxxx
421
3
High Heat
This button selects the drying temperature. When the button
is out low heat is selected and when it is pushed in high heat is
selected.
Drying Times
The drying time depends on the size of the load and on the type
of fabric it contains (see the table below).
A cool tumble cycle runs during the nal 10 minutes of the cycle.
High Heat Cotton is the most ecient setting in terms of
energy consumption (EU 392/2012). To reach maximum eciency,
select the highest temperature option.
Drying Times table
Maximum load sizes: 7 kg Maximum load sizes: 8 kg
DRYING TIMES AND OPTIONS
Drying times are approximate and may vary depending on the
following:
• Amount of water retained after the spin cycle: towels and
delicate items can retain a lot of water (if laundry retains
a large amount of water, use a longer cycle than the one
recommended).
• Fabrics: items of the same fabric, but with dierent texture and
thickness may have dierent drying times.
• Amount of laundry: single items and small loads take less time
to dry.
• Ironing: If you will be ironing laundry, remove while slightly
damp for better results. Items not being ironed can be left
longer.
• Temperature of the room: the lower the temperature of the
room, the longer it will take for the dryer to dry clothing.
• Bulky items: Bulky items require special care. We recommend
removing several times the items during the drying cycle to
shake them out.
Warning:do not over-dry items.
All fabrics contain natural dampness which helps to keep them
soft and uy.
Power consumption
o-mode (Po) - Watts 0.06
left-on mode (Pl) - Watts 0.06
Drying Cycles kg kWh Minutes
High Heat Cotton* 7 4.25 129
High Heat Cotton 3.5 2.31 72
Low Heat Synthetics 3 1.32 75
*This is the reference setting used for the energy
label and is suitable for drying normal wet cotton
laundry.
The lip seal, provided inside the drum, must be
tted to guarantee ecient drying (refer to the
relevant lip seal installation guide).
Power consumption
o-mode (Po) - Watts 0.06
left-on mode (Pl) - Watts 0.06
Drying Cycles kg kWh Minutes
High Heat Cotton* 8 4.75 143
High Heat Cotton 4 2.57 81
Low Heat Synthetics 3 1.32 75
*This is the reference setting used for the energy
label and is suitable for drying normal wet cotton
laundry.
The lip seal, provided inside the drum, must be
tted to guarantee ecient drying (refer to the
relevant lip seal installation guide).
Fabric
Load
1 kg 2 kg 3 kg 4 kg 5 kg 6 kg 7 kg 8 kg
Cotton –
high heat
30 or 40
minutes 40 or 55
minutes 55 or 70
minutes 70 or 80
minutes 80 or 90
minutes 95 or 120
minutes 120 or 140
minutes 140 or 150
minutes
Synthetics –
low heat
40 or 50
minutes 50 or 70
minutes 70 or 90
minutes - - - - -
Delicates –
low heat
40 or 60
minutes 55 or 75
minutes - - - - - -
Refer to the rating label located on the rear of the dryer for maximum load capacity.
Refresh
A short cycle suitable for refreshing bres and garments through
the emission of fresh air. It lasts about 10 minutes.
As this is not a drying cycle, it is not to be used for garments that
are still wet.
It can be used on any load size but is more eective on smaller
loads.
EN
Quick guideQuick guide
CARE AND MAINTENANCE
WARNING: unplug the dryer during the cleaning and
maintenance procedures.
Emptying the water tank after each cycle (see Fig. A).
Pull the container out of the dryer and empty it into a sink or
other suitable drain, then place it back properly. Do not use the
dryer without having inserted the container back in place.
Cleaning the door lter after each cycle (see Fig. B).
Pull the lter out and clean it by removing the lint from the lter
surface under running water or using a vacuum cleaner. For optimal
performance, dry up the lter before inserting it back in place.
Do not use the dryer without having reinserted the lter in place.
Remove the door lter as described below:
1. Open the door and pull upwards.
2. Open the lter and remove lint from all its parts. Replace the
lter correctly making sure it is fully seated.
The lter is an essential part for drying. It is intended to
collect the lint formed during the drying process. If the
lter is clogged, the air ow inside the dryer can become
seriously aected: this will increase the drying time and
energy consumption, and could damage the dryer.
Cleaning the condenser unit (see Fig. C).
Remove the condenser unit regularly (monthly) and clean o
any u deposits from the plates by running cold water along its
rear end.
Removing the condenser:
1. Open the condenser cover, unlock the three catches by
turning them 90° anticlockwise.
2. Pull on the grip to remove the condenser.
3. Clean the surface of the seals.
4. Replace the unit with the arrows pointing upwards, while
making sure that the catches are securely xed.
Cleaning the tumble dryer
• The external metal, plastic and rubber parts can be cleaned
with a damp cloth.
• Clean the front air intake grille regularly (every 6 months)
with a vacuum cleaner to remove any lint, u or dust
deposits. Furthermore, remove any lint deposits from the
front part of the condenser and from the lter area, using a
vacuum cleaner every so often.
• Do not use solvents or abrasives.
TRANSPORT AND HANDLING
Never lift the dryer by holding on to its top side.
1. Unplug the dryer
2. Remove the water from the water tank completely.
3. Make sure that door and water tank are properly closed.
4. If the drain hose is connected to your drainage system, re-
connect it to the back of the dryer (see "Installation" section in
the Safety Instructions).
PRODUCT DESCRIPTION
1. Water tank
2. Air intake
3. Door lter
4. Condenser unit
5. Condenser cover
AB
C
1
3
2
4
5
TROUBLESHOOTING
Before contacting the After-sales Service, refer to the table below. Often the malfunctions are minor and can be solved in few
minutes.
Malfunction Possible cause Solution
The tumble
dryer does not
start.
The plug is not inserted into the socket. Insert the plug into the socket.
The plug is faulty.
Try to plug another appliance in the same socket. Do not use
connecting electrical devices to the socket, such as adapters or
extensions.
A power failure occurred. Wait for the power supply to be restored and switch the fuse on
again if necessary.
The door has not been closed properly. Close the door.
The drying time has not been set correctly. Refer to the "Drying Time and Options" section to nd the most
suitable drying time and options for the type of load.
The "Start" button was not pressed to begin
drying. Press the "Start" button.
The drying
times are very
long.
An appropriate maintenance was not carried
out.
Refer to the "Care & Maintenance" section and perform the
described operations.
An incorrect drying time or option was
selected for the type of load.
Refer to the "Drying Time and Options" section to nd the most
suitable drying times cycle and options for the type of load.
The garments are too wet. Carry out a washing cycle with higher spin speed to remove as
much water as possible.
The dryer may be overloaded. Refer to the "Drying Times" table to check the max load for each
drying times cycle.
The air intake grille is clogged up. Clean and do not occlude the air intake grille, refer to "Care &
Maintenance" section.
The “Empty
Water Tank”
indicator light
is on.
The water tank is full.
The water tank was not emptied before starting the drying cycle.
Always empty it before starting a new drying cycle - do not wait
for the tank full indicator light is on before emptying the water
tank.
The dryer is
noisy during
the rst few
minutes of
operation.
This is normal, especially if the dryer has not
been used for a long time.
If the noise persists during the entire drying cycle, contact the
After-sales Service.
The timer
resets to zero
without the
dryer running.
This is normal. This ensures you select the correct drying time when you next use
the dryer.
05/2021 W11511768
19516185000
You can download the Safety Instructions, User Manual, Product Fiche and Energy data by:
• Visiting our website - docs.hotpoint.eu
• Using QR Code
• Alternatively, contact our After-sales Service (See phone number in the warranty booklet). When
contacting our After-sales Service, please state the codes provided on your product’s identication plate.
THANK YOU FOR BUYING A HOTPOINT PRODUCT.
In order to receive a more complete assistance,
please register your product on
www.hotpoint.eu/register
EN
Quick guide
Before using the appliance read the Safety Instructions carefully.
xxxxxxxxxxxx
xxxx

This manual suits for next models

3

Other Hotpoint Washer manuals

Hotpoint 9577 Instruction Manual

Hotpoint

Hotpoint 9577 Instruction Manual

Hotpoint AQUARIUS WMAQB 741 User manual

Hotpoint

Hotpoint AQUARIUS WMAQB 741 User manual

Hotpoint WMUD 9627 User manual

Hotpoint

Hotpoint WMUD 9627 User manual

Hotpoint WMD 940 P User manual

Hotpoint

Hotpoint WMD 940 P User manual

Hotpoint Futura WMFG 611 User manual

Hotpoint

Hotpoint Futura WMFG 611 User manual

Hotpoint AQGL 129 PM User manual

Hotpoint

Hotpoint AQGL 129 PM User manual

Hotpoint 9537 Instruction Manual

Hotpoint

Hotpoint 9537 Instruction Manual

Hotpoint WMFG 651 User manual

Hotpoint

Hotpoint WMFG 651 User manual

Hotpoint AQUALTIS AQ113D 69 User manual

Hotpoint

Hotpoint AQUALTIS AQ113D 69 User manual

Hotpoint 9536 Instruction Manual

Hotpoint

Hotpoint 9536 Instruction Manual

Hotpoint VBSR3100GWW - 3.2 cu. Ft. Washer Manual

Hotpoint

Hotpoint VBSR3100GWW - 3.2 cu. Ft. Washer Manual

Hotpoint WMFG 8337 User manual

Hotpoint

Hotpoint WMFG 8337 User manual

Hotpoint Aquarius WF560 Instructions for  and use User manual

Hotpoint

Hotpoint Aquarius WF560 Instructions for and use User manual

Hotpoint WMG 622 User manual

Hotpoint

Hotpoint WMG 622 User manual

Hotpoint WLW3750B Installation instructions

Hotpoint

Hotpoint WLW3750B Installation instructions

Hotpoint ECOT7F 1292 User manual

Hotpoint

Hotpoint ECOT7F 1292 User manual

Hotpoint WF 566 P User manual

Hotpoint

Hotpoint WF 566 P User manual

Hotpoint HV5L 125 P User manual

Hotpoint

Hotpoint HV5L 125 P User manual

Hotpoint HSWP1000MWW User manual

Hotpoint

Hotpoint HSWP1000MWW User manual

Hotpoint WM33 Instruction Manual

Hotpoint

Hotpoint WM33 Instruction Manual

Hotpoint FEW14 User manual

Hotpoint

Hotpoint FEW14 User manual

Hotpoint AQUALTIS AQ103D 49 User manual

Hotpoint

Hotpoint AQUALTIS AQ103D 49 User manual

Hotpoint WMT05 Guide

Hotpoint

Hotpoint WMT05 Guide

Hotpoint WMD 947 P User manual

Hotpoint

Hotpoint WMD 947 P User manual

Popular Washer manuals by other brands

Bosch WGA144A0AU Instruction manual and installation instructions

Bosch

Bosch WGA144A0AU Instruction manual and installation instructions

LG FC1407S4W owner's manual

LG

LG FC1407S4W owner's manual

Kaiser WASHING MACHINE user manual

Kaiser

Kaiser WASHING MACHINE user manual

Bosch Washing Machine instruction manual

Bosch

Bosch Washing Machine instruction manual

Beko WI1573 user manual

Beko

Beko WI1573 user manual

AEG LFR84146UC user manual

AEG

AEG LFR84146UC user manual

Beko EV 6102 manual

Beko

Beko EV 6102 manual

Kenmore 8566934C Use & care guide

Kenmore

Kenmore 8566934C Use & care guide

Electrolux EW 1078 F Instruction booklet

Electrolux

Electrolux EW 1078 F Instruction booklet

Indesit WIA 101 Instructions for use

Indesit

Indesit WIA 101 Instructions for use

Samsung WA19R7L6DD Series user manual

Samsung

Samsung WA19R7L6DD Series user manual

LG WSG1208XMN owner's manual

LG

LG WSG1208XMN owner's manual

Electrolux EW7F3946LB user manual

Electrolux

Electrolux EW7F3946LB user manual

ALLIANCE HWF561*E1102 Service

ALLIANCE

ALLIANCE HWF561*E1102 Service

Smeg LBS105-9 manual

Smeg

Smeg LBS105-9 manual

Asko WM75.C-P Instructions for use

Asko

Asko WM75.C-P Instructions for use

Zanussi ZWH 5105 user manual

Zanussi

Zanussi ZWH 5105 user manual

Hisense WDQY8014EVJM Series Quick user manual

Hisense

Hisense WDQY8014EVJM Series Quick user manual

manuals.online logo
manuals.online logoBrands
  • About & Mission
  • Contact us
  • Privacy Policy
  • Terms and Conditions

Copyright 2025 Manuals.Online. All Rights Reserved.