manuals.online logo
Brands
  1. Home
  2. •
  3. Brands
  4. •
  5. Houstoun Gate Locomotive Works
  6. •
  7. Toy
  8. •
  9. Houstoun Gate Locomotive Works Contractors Loco User manual

Houstoun Gate Locomotive Works Contractors Loco User manual

1 of 9
Houstoun Gate Locomotive Works
Contractors Loco Assembly Instructions
It is suggested that you read these instructions through before commencing construction as this
kit is a little more complex than some of our other kits. Although not a difficult build it is vital that
you build this in the sequence outlined here.
A minimum of tools are needed to assemble the kit. Sandpaper and sanding block, some strong
rubber bands or weights to hold parts in place while the glue dries.
This kit requires glue and paint to complete. It can be built entirely with PVA (exterior type) or
aliphatic resin. A favourite glue is Titebond 3 aliphatic. Excess glue can be wiped away with a
damp rag.
MDF is not moisture proof and the model should therefore be painted or varnished before use.
First apply a sealer/primer - MDF sealer, thinned PVA or grey automotive primer will all do the
job. The cut edges may need more than one application of primer to seal them. Cans of
automotive spray paint work well and give a good finish. If brush painting then use acrylic or
enamel paint.
Kit Contents
Main Chassis and 3mm body parts Inner Chassis
Roof, Load Compartment
2 of 9
Parts Description
3 of 9
Carefully separate the parts from their sheets. Wriggling them lightly is normally enough to
break the retaining tab. You can also cut the tabs with a sharp modelling knife. Sand the
retaining tabs away on all parts before beginning assembly.
Glue the parts together in the sequence shown in the pictures below. It is worth trial fitting the
parts of the loco together first to get an idea of how it goes together. If you intend to paint the
inside of the cab then it is a good idea to do so before you add the roof or windows.
Inner Chassis Assembly
Commence building with the Inner Chassis Assembly
Attach the chassis cross-member to the two
chassis sides
Add chassis side assembly into the chassis base
Attach the end plates and motor support lugs
4 of 9
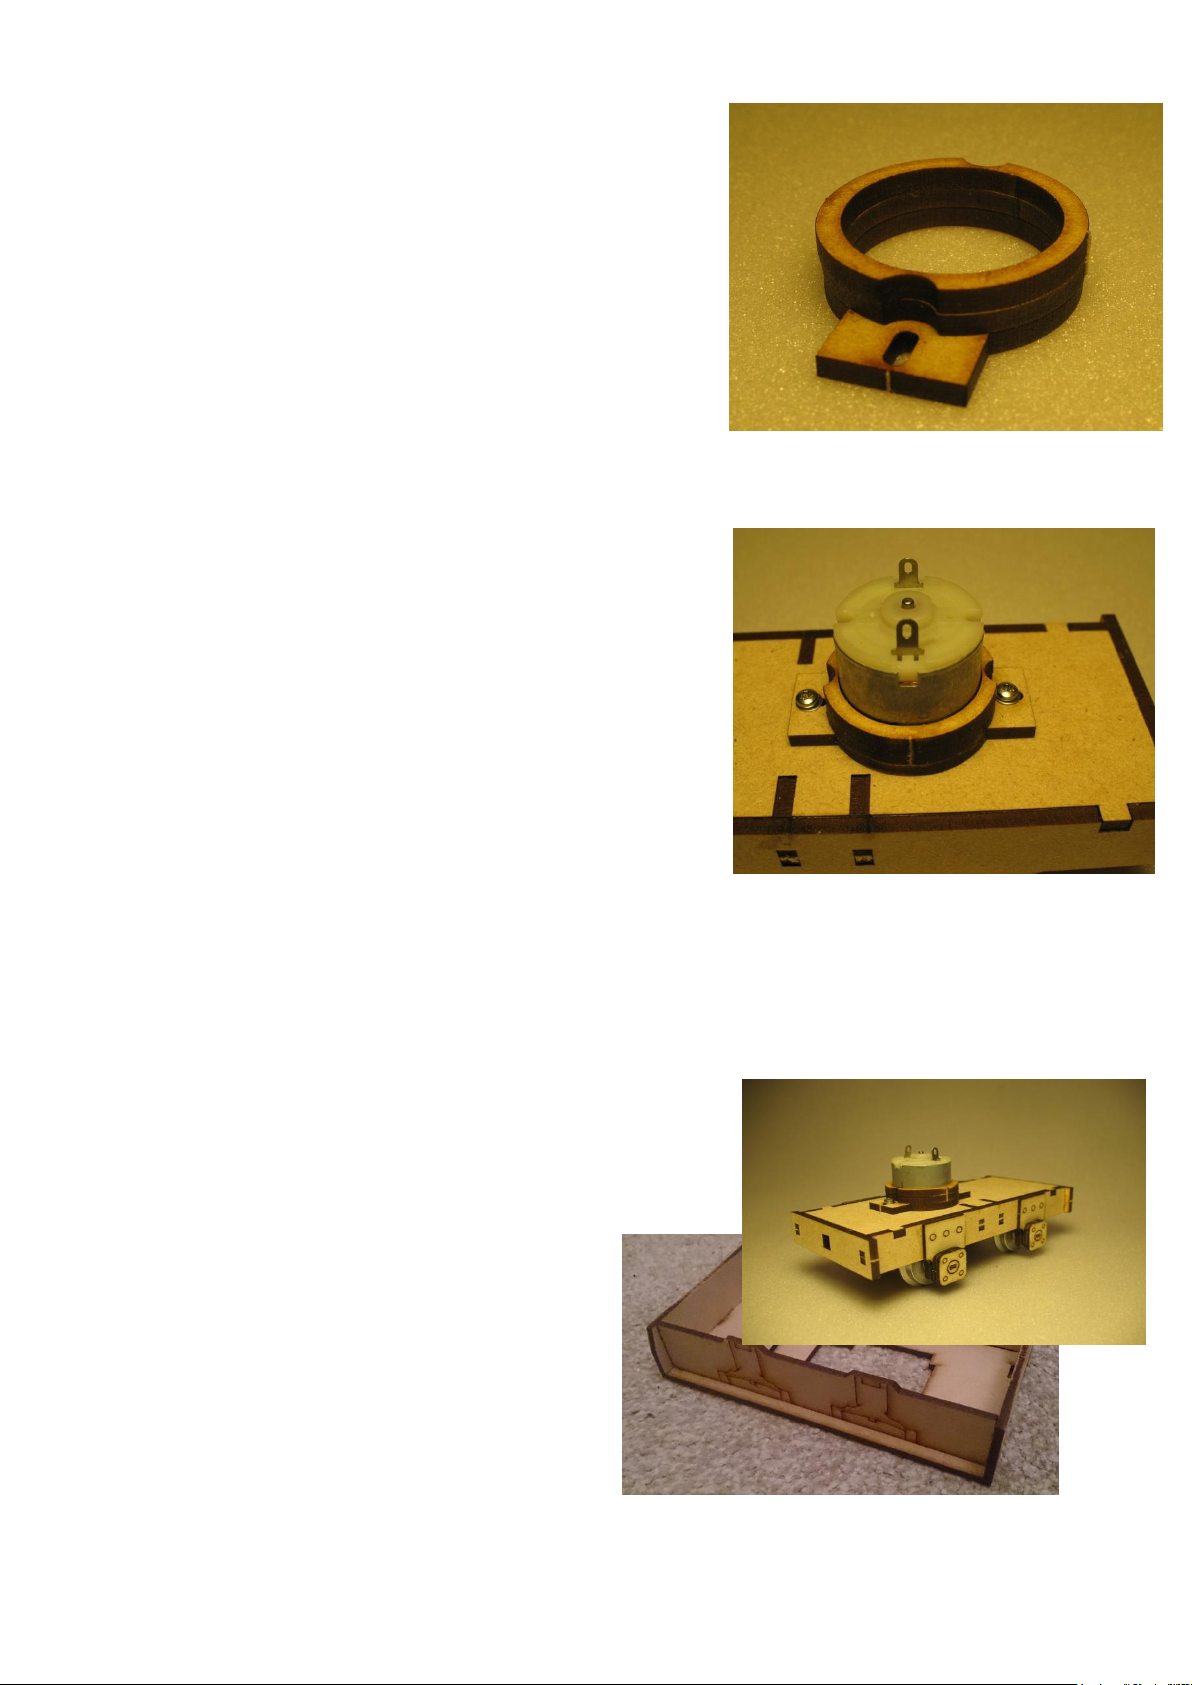
Glue the three motor holder hoops together as shown in
the picture. You can use the motor to assist aligning them
but remove the motor before the glue sets.
Once the glue on the motor holder is dry place the motor in
the holder and insert it into the chassis so that the motor
rests on the motor support lugs.The motor should now be
glued to the holder. Wood glue will have sufficient grab on
the motor to keep it in place. However a couple of drops of
cyano glue will also do the trick.Alternatively you could
use hot-melt glue if you have a glue gun. Take care not to
glue the motor assembly to the chassis.
When all glue is dry it is time to secure and align the motor.
Place a washer onto each self-tap screw and carefully
screw the motor/holder onto the base. Don't tighten the
screws fully yet. Slide the holder around until you have the
perfect mesh between the worm and the spur gear. The
worm must not be tight against the gear but should have a
tiny gap. Now tighten the screws but be careful not to
overdo it as this may damage the base.
To minimise wear ensure that the brass gear is central to
the worm gear on the motor shaft when run in both
directions. Adjust the on the axle if necessary until there is
equal play either side. A spare worm is supplied to
Note: The gears should not be lubricated, oil or grease tends to be pushed off the worm anyway
so only serves to attract dust and dirt and nylon is self-lubricating.
The chassis top-hat bearings do already contain oil but a tiny drop may be applied after
extended running
(wheels bearings and axlebox)
5 of 9
6 of 9
7 of 9
8 of 9
9 of 9
We hope you enjoy your kit, but if you have any problem with construction email our technical
help line at techhelp@hglw.co.uk

Popular Toy manuals by other brands

Kid Dimension Barney Tape Recorder with Stereo Sound instructions

Kid Dimension

Kid Dimension Barney Tape Recorder with Stereo Sound instructions

LRP MONSTER HORNET PRO user guide

LRP

LRP MONSTER HORNET PRO user guide

Jamara 398016 instructions

Jamara

Jamara 398016 instructions

eKids Disney Pixar Cars 3 CR-155 manual

eKids

eKids Disney Pixar Cars 3 CR-155 manual

Startright Toddler-Talk Computer owner's guide

Startright

Startright Toddler-Talk Computer owner's guide

Vollmer 47737 Mounting instruction

Vollmer

Vollmer 47737 Mounting instruction

Horizon Hobby Blade 500 X instruction manual

Horizon Hobby

Horizon Hobby Blade 500 X instruction manual

Ripmax Phase 5 E instruction manual

Ripmax

Ripmax Phase 5 E instruction manual

Faller 232511 manual

Faller

Faller 232511 manual

Hasbro Marvel Spider-Man Web Cyclone Blaster quick start guide

Hasbro

Hasbro Marvel Spider-Man Web Cyclone Blaster quick start guide

Seagull Models Little Bunnt P-47D Assembly manual

Seagull Models

Seagull Models Little Bunnt P-47D Assembly manual

Kogan KAMGDRAWMTA user guide

Kogan

Kogan KAMGDRAWMTA user guide

Peg-Perego Polaris Outlaw IGOR0044 use & care

Peg-Perego

Peg-Perego Polaris Outlaw IGOR0044 use & care

Eduard Seatbelts Luftwaffe WWII fighters STEEL manual

Eduard

Eduard Seatbelts Luftwaffe WWII fighters STEEL manual

Faller 239001/1 manual

Faller

Faller 239001/1 manual

Fisher-Price POWER CHANGE instructions

Fisher-Price

Fisher-Price POWER CHANGE instructions

Little Tikes First OVEN manual

Little Tikes

Little Tikes First OVEN manual

krakpol 211086 Assembly instructions

krakpol

krakpol 211086 Assembly instructions

manuals.online logo
manuals.online logoBrands
  • About & Mission
  • Contact us
  • Privacy Policy
  • Terms and Conditions

Copyright 2025 Manuals.Online. All Rights Reserved.