Hytera VM780 User manual

Body Worn Camera
USER MANUAL

1
Preface
Welcome to the world of Hytera and thank you for purchasing this product. To derive optimum
performance from the product, please carefully read this manual before use.
This manual is applicable to the following product:
VM780 4G Body Worn Camera (MPTT)

2
Icon Conventions
The following icons are available through this manual:
: Indicates references that can further describe the related topics.
: Indicates situations that could cause data loss or equipment damage.
Key Operation
Long press: To keep pressing a key for two seconds.
Press: To press a key and release it immediately.
Press and hold: To press a key and keep holding it down.
Copyright Information
Hytera is the trademark or registered trademark of Hytera Communications Corporation Limited (the
Company) in PRC and/or other countries or areas. The Company retains the ownership of its trademarks
and product names. All other trademarks and/or product names that may be used in this manual are
properties of their respective owners.
The product described in this manual may include the Company's computer programs stored in
memory or other media. Laws in PRC and/or other countries or areas protect the exclusive rights of the
Company with respect to its computer programs. The purchase of this product shall not be deemed to
grant, either directly or by implication, any rights to the purchaser regarding the Company's computer
programs. The Company's computer programs may not be copied, modified, distributed, decompiled, or
reverse-engineered in any manner without the prior written consent of the Company.
Disclaimer
The Company endeavors to achieve the accuracy and completeness of this manual, but no warranty of
accuracy or reliability is given. All the specifications and designs are subject to change without notice
due to continuous technological development. No part of this manual may be copied, modified,
translated, or distributed in any manner without the prior written consent of the Company.
We do not guarantee, for any particular purpose, the accuracy, validity, timeliness, legitimacy or
completeness of the third-party products and contents involved in this manual.
If you have any suggestions or would like to receive more information, please visit our website at:

3
http://www.hytera.com.
EU Regulatory Conformance
As certified by the qualified laboratory, the product is in compliance with the essential requirements and
other relevant provisions of the following directives:
2006/66/EC
2011/65/EU
2012/19/EU
2014/53/EU
Please note that the above information is applicable to EU countries only.

4
1.Packing List
Please unpack carefully and check that all items listed below are received. If any item is missing or
damaged, please contact your dealer.
Item
Qty.
Item
Qty.
Body Worn Camera
1
USB Cable
1
Battery
1
Power Adapter
1
Belt Clip
1
User Manual
1
Pictures listed in this manual are for reference only.
5
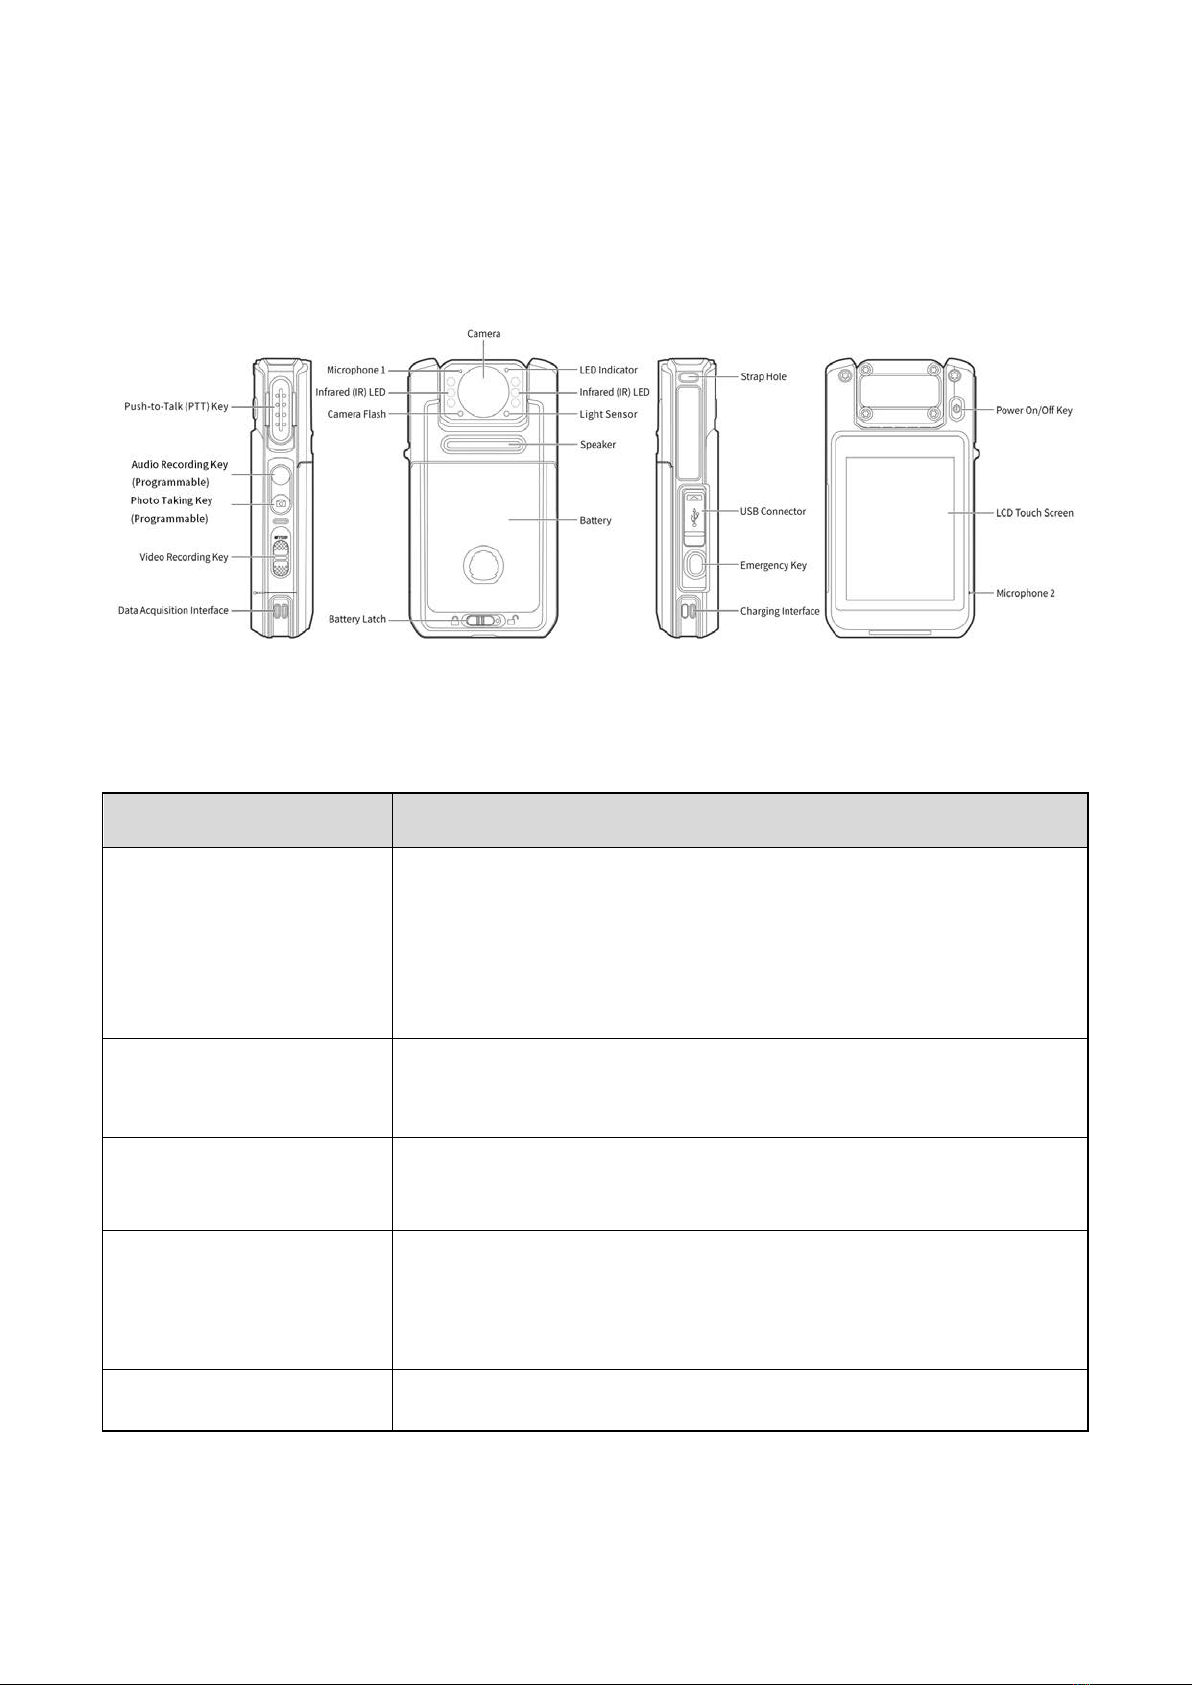
2.Product Overview
2.1 Product Layout
2.2 LED Indicators
Status
Description
Glows red
The product is transmitting voice or emergency alarm.
The product is being charged.
The TF card is full (lasts for three seconds).
The product is being turned off (lasts for two seconds).
Glows green
The product is fully charged.
The product is being turned on
.
Flashes orange rapidly
The remaining capacity of the TF card is less than 2 GB (lasts for
three seconds).
Flashes red slowly
Flashes once every second: The product is recording a video.
Flashes once every five seconds: The battery runs low. Please
recharge or replace the battery in time.
Flashes orange slowly
The product is recording an audio.

6
3.Before Use
3.1 Installing the Nano SIM Card
Open the card slot cover and unlock the SIM card flip cover according to the instructions on it. Place the
Nano SIM card into the slot and lock the flip cover and slot cover, as shown in the following figure.
3.2 Attaching the Battery
Use only the Hytera standard or optional battery. Polarity reverse or use of other batteries may
result in explosion and fire hazards.
Attach the battery according to the steps shown in the following figure. To remove the battery, turn off
the product and reverse the attaching steps.

7
3.3 Attaching the Belt Clip
Attach the belt clip according to the steps shown in the following figure. To remove the belt clip, reverse
the attaching steps.
3.4 Charging the Product
To charge the product, do as follows:


9
4.Basic Operations
4.1 Turning On or Off the Product
Turning On the Product
In power-off mode, long press the On/Off key for three seconds to turn on the product and enter the
preview mode.
Turning Off the Product
In power-on mode, long press the On/Off key for three seconds to turn off the product.
4.2 Connecting to Network
4.2.1 Cellular Data
Before enabling the cellular network, make sure that the SIM card has been registered to the Carrier
Networks. When not used, disable the cellular network to save traffic and extend the standby time.
1. Wipe down from the status bar to open the notification center, and tap .
2. Tap to enable the cellular network; or tap to disable the cellular network.
4.2.2 WLAN
Connect to a WLAN (Wireless Local Area Networks) to visit the Internet or shared files from other network
devices.
To use the WLAN, do one of the following:
Enable WLAN through the shortcut switch.
a) Swipe down from the status bar to display all shortcut switches. Tap to enable WLAN.
b) Select available network from the WLAN list.
c) (Optional) If the network displays with a icon, enter the password and tap Connect.
Enable WLAN through Settings.
a) Tap on the home screen, and tap WLAN to enable WLAN.
b) Select available network from the WLAN list.
Other manuals for VM780
1
Table of contents


