Hyundai H-SA604 User manual

HYUNDAI H-SA604
H-SA604
4 CHANNEL CAR AMPLIFIER 4-КАНАЛЬНЫЙ УСИЛИТЕЛЬ МОЩНОСТИ
Instructionmanual Руководство по эксплуатации

HYUNDAI H-SA604
2
YOUR NEW HIGH FIDELITY 4 CHANNEL AMPLIFIER IS DESIGNED TO DELIVER MAXIMUM ENJOYMENT AND ONE YEAR OF TROUBLE
FREE SERVICE.
Features
• Class ''AB'' Technology MOSFET PWM Power Supply.
• Remote turn-on of the amplifier via car radio
• Continuously Variable 12dB/Octave High Pass & 12dB/Octave Low Pass Crossover.
• Enhanced Bass Boost 0/12dB @50Hz
• Regulator for input sensitivity
• Bridgeable 4/3/2-channel
• Gold Plated RCA & Power, Speaker Terminal.
• Soft Start & Muting.
• Capsulated screw terminals of loudspeaker and power supply
• Overload, Thermal, Short Circuit Protection.
• Power & Protection indicator.
• 2 subwoofer connecting (bridged mode)
Precautions:
• If after reading the direction you feel uncomfortable about installing the amplifier in your car, or not equipped or competent to do so, you
should have the amplifier installed by an authorized installer. It's your car!
• Negative battery terminal must be disconnected before any electrical connections are made.
• Be sure choosing a location that provides substantial ventilation for the amplifier.
• The most preferred locations would be in your car's trunk, under the front seats or on the back wall of a truck.
• The location chosen should provide at least 2" of clearance above the amplifier for adequate ventilation.
• If the amplifier is to be mounted vertically be sure that it is in a place where adequate air will flow along the length of its heat sink fins for
cooling.
• NEVER mount the amplifier up side down, this will cause the heat to rise back into the amplifier causing thermal shutdown or possible
permanent damage.
• NEVER mount the amplifier in a location that is subject to direct sunlight or exposed to moisture.
• Be sure to mount the amplifier to a strong, solid surface which will not give way under the stress of
• a sudden stop or accident.
• Make sure that the mounting screws will not penetrate the gas tank, brake and fuel lines, wiring or other critical parts of your car when
installed.

HYUNDAI H-SA604
3
• NEVER operate the amplifier without the proper power and ground wire. The proper power and ground wire is 4-8 gauge.
• NEVER operate the amplifier without proper fusing. Fuse holder must be located with in 0.5 meters from the battery. This fuse is to protect
the car not the electronics. In case of a short, the fuse will blow instead of the wire burning up. Using other than the recommended fuse ratings
at the battery and at the amplifier may cause damage to the amplifier and will void your warranty.
• Do not run wiring underneath or outside the car since exposure to the elements may cause the insulation to deteriorate rapidly, resulting in
short-circuits and/or intermittent operation. All cables should be run beneath carpets and inside trim pieces.
• To help minimize interference, it is best to run the power cables along the opposite side from the audio cables.
• Whenever wires pass through metal, rubber or plastic grommets must be used to prevent the mental from wearing through the installation and
causing a short.
• Whenever possible, use cable ties, mounting clamps and similar wiring aids (available from an electrical supply or auto parts store) Adding
stress relief loops to wiring is also advisable to prevent straining or breakage.
• It is best to test the system before the amplifier is mounted and interior of car is reassembled.
• If the temperature inside your car reaches extreme levels (such as sitting locked up for several hours in the hot sun or exposed to a very cold
winter's day)the amplifier may go into protection mode and shut off. Leave the unit off until the ambient temperature returns to normal.
• The amplifier operates with any vehicle using a 12 volt negative ground system. If you are not sure of the type of electrical system in your
vehicle, consult your authorized dealer or qualified mechanic.
• NEVER ground the speaker leads and NEVER allow the speaker leads to come in contact with each other. Speaker wire should be 15 gauge
or larger.
• Remote turn on wire must be switched by the radio does not have a remote turn on or antenna output, connect to wire that has a positive 12
volts when the key is turned to the accessory. If the amplifier does not turn off the battery will die.
• Do not listen to high volumes for extended periods of time or hearing damage may occur.
CONTINOUS EXPOSURE TO SOUND PRESSURE LEVELS OVER 100dB
MAY CAUSE PERMANENT HEARING LOSS. HIGH POWERED AUTOSOUND
SYSTEM MAY PRODUCE SOUND PRESSURE LEVELS WELL OVER
130dB. USE COMMON SENSE AND PRACTICE SAFE SOUND.

HYUNDAI H-SA604
4
Installation
MOUNTING:
1. After reading precaution, decide where you are going to install the unit. Also, see the picture below.
2. Once the location has been determined, place the amplifier in position. Using a felt tip pen or pencil mark the four holes to be drilled for mounting.
NEVER use the amplifier as a template for drilling. It is very easy to damage the amplifier surface in manner.
3. Remove amplifier. Drill four 3.5 mm. diameter holes into mounting surface on steel panel. If you want mounting the MDF or wood panel, drill four
3.0mm diameter holes into mounting surface.
4. If possible, test the system operating before final mounting of the amplifier.
5. Mount the amplifier using the supplied 4 self-threading screws.
Installation diagram
Fig. 1

HYUNDAI H-SA604
5
POWER CONNECTIONS
It is important to have good quality power and ground connections. Remember, to complete an electrical circuit, the ground connection is just as important
as the positive power connection. Before any power connections are made, disconnect the ground cable at the battery.
When the power supply lead, memory backup lead or ground lead are extended use a 5mm2or larger automotive grade cable which will withstand friction
and heat to safe grade against fires occurring as a result of short-circuiting.
GND = Connect the proper gauge ground wire to the amplifier "GND" terminal. Locate the position on the chassis of the car to which the amplifier is to be
grounded. The surface must be free from any paint or dirt. This can be accomplished with a small grinding bit, sand paper or wire wheel. NOTE: Do not ground
the amplifier to the “frame” of the car. The frame on most cars and trucks is not grounded to the chassis (body). Use Solder or a clamp ring to connect the ground
wire. Pre-drill the prepped chassis to bolt the ground ring terminal with nut, bolt and lock washers. Insulate metal and connector with paint or silicon to prevent
rust and oxidation. Silicon also works great to prevent nuts and bolts from working loose in a harsh environment of an automobile. Upon completion of the
ground connection, grab wire or connector and confirm that it is a solid connection. To prevent engine noise, it is recommended to ground the head unit and other
audio electronics in the same location.
REM = Connect the remote wire (power antenna output) from the head unit to the remote turn-on wire of the amplifier. If the head unit is not equipped with
a remote/antenna output, locate a wire that is controlled by the accessory position of the key. It is important to have the amplifier turn off with the radio or key. If
the amplifier remains on, the result will most likely be a dead battery.
12V = Connect the proper gauge power wire to the amplifier "B+" terminal. Run wire to wards the fuse holder that is no greater then 0.5 meters from the
battery. Remember, the fuse is to protect the safety of the car in the case of a short. Connect fuse holder to battery, but do not install fuse at this time.
Fig. 2
Note: Place the fuse in the power supply lead as close as possible to the car battery.

HYUNDAI H-SA604
6
SPEAKER CONNECTIONS
This amplifier can operate in two, three or four channel mode. The minimum impedance for bridged operation is 4 or 8 ohms. Tri channel power is
referred to stereo mode. Minimum impedance remains the same for three channel (front / subwoofer) systems as long as proper passive crossovers are used.
Connect right and left speaker wire to corresponding speaker output terminals of the amplifier. Be sure to have the positive wire from the speaker connected to
the positive speaker terminal of the amplifier and the negative wire from the speaker must connect with the negative speaker terminal of the amplifier. Reversing
any of these connections will result in the speaker cones moving out of phase, which causes bass cancellation. See Fig. 3, 4, 5 Speaker Output Connections.
4 channel series speaker connections
Fig. 3
If you want to use a standard 4 CH speaker mode, connect the speakers as illustrated and choose the
CROSSOVER to OFF. The output signals to speaker will be a standard stereo of the front and rear output signals.

HYUNDAI H-SA604
7
4 channel series speaker connections (Bridge mode connection)
Fig. 4
If you want to use a normal 2 CH speaker mode, connect the speakers as illustrated and choose the
CROSSOVER to OFF. The output signals to speaker will be a standard stereo of the right and left output signals.

HYUNDAI H-SA604
8
4 channel series speaker connections (dual mode system)
Fig. 5
If you want to use the amplifier in dual mode, connect the speakers as illustrated and
choose the CROSSOVER to OFF. The output signals to amplifier will be stereo of the front and rear output
signals and the subwoofer will be a combination of both the right and left output signals.

HYUNDAI H-SA604
9
ADJUSTMENTS
1.Set to the "H.P.F" position when the amplifier is used to drive a tweeter/midrange system. The frequencies below the crossover point will be attenuated at
12dB/octave. Permits adjustment of the crossover frequency, by rotating the knob to select any frequency between 30Hz to 5kHz as the crossover point.
2.Set to the "L.P.F" position when the amplifier is used to drive a subwoofer. The frequencies above the crossover point will be attenuated at 12dB /octave.
Permits adjustment of the crossover frequency, by rotating the knob to select any frequency between 30Hz to 250 Hz as the crossover point.
3.Set to the "OFF" position when the amplifier will be used for driving full-range speakers. The full frequency bandwidth (5Hz - 20,000kHz) will be output
to the speakers without high or low frequency attenuation.
4.Level adjustment-The sensitivity adjustment is to allow the amplifier to work with many different brands of head units. It allows input signal to vary
between 300 millivolts to 6 volts from the head unit or other signal processor. Start by setting the sensitivity adjustment to the "MIN" (6 volts).Using a cassette or
compact disc that you are familiar with, turn on head unit to the 3/4 volume setting. Slowly turn up sensitivity adjustment towards the "MAX" (300 millivolts)
using a flat head screw driver. Stop turning on the onset of distortion and turn back just a slight. The 3/4 volume setting is now the "maximum" volume for the
head unit. The goal is to keep the level control to the lowest setting yet still have enough signal to drive the amplifier. This is done to prevent over driving the
amplifier and to keep system noise to a minimum. It is important not over drive speakers (at point of distortion) this will cause permanent damage to the
speakers. Also, if the amplifier itself is over driven, it could be damaged.
5.The "BASS" function can be selected to increase low frequency response output, or decrease frequency response output. The "BASS" function will be
working at only "OFF" or "L.P.F" position. The BASS is adjustable from 0 / 12dB boost at 50Hz.
Fig.6

HYUNDAI H-SA604
10
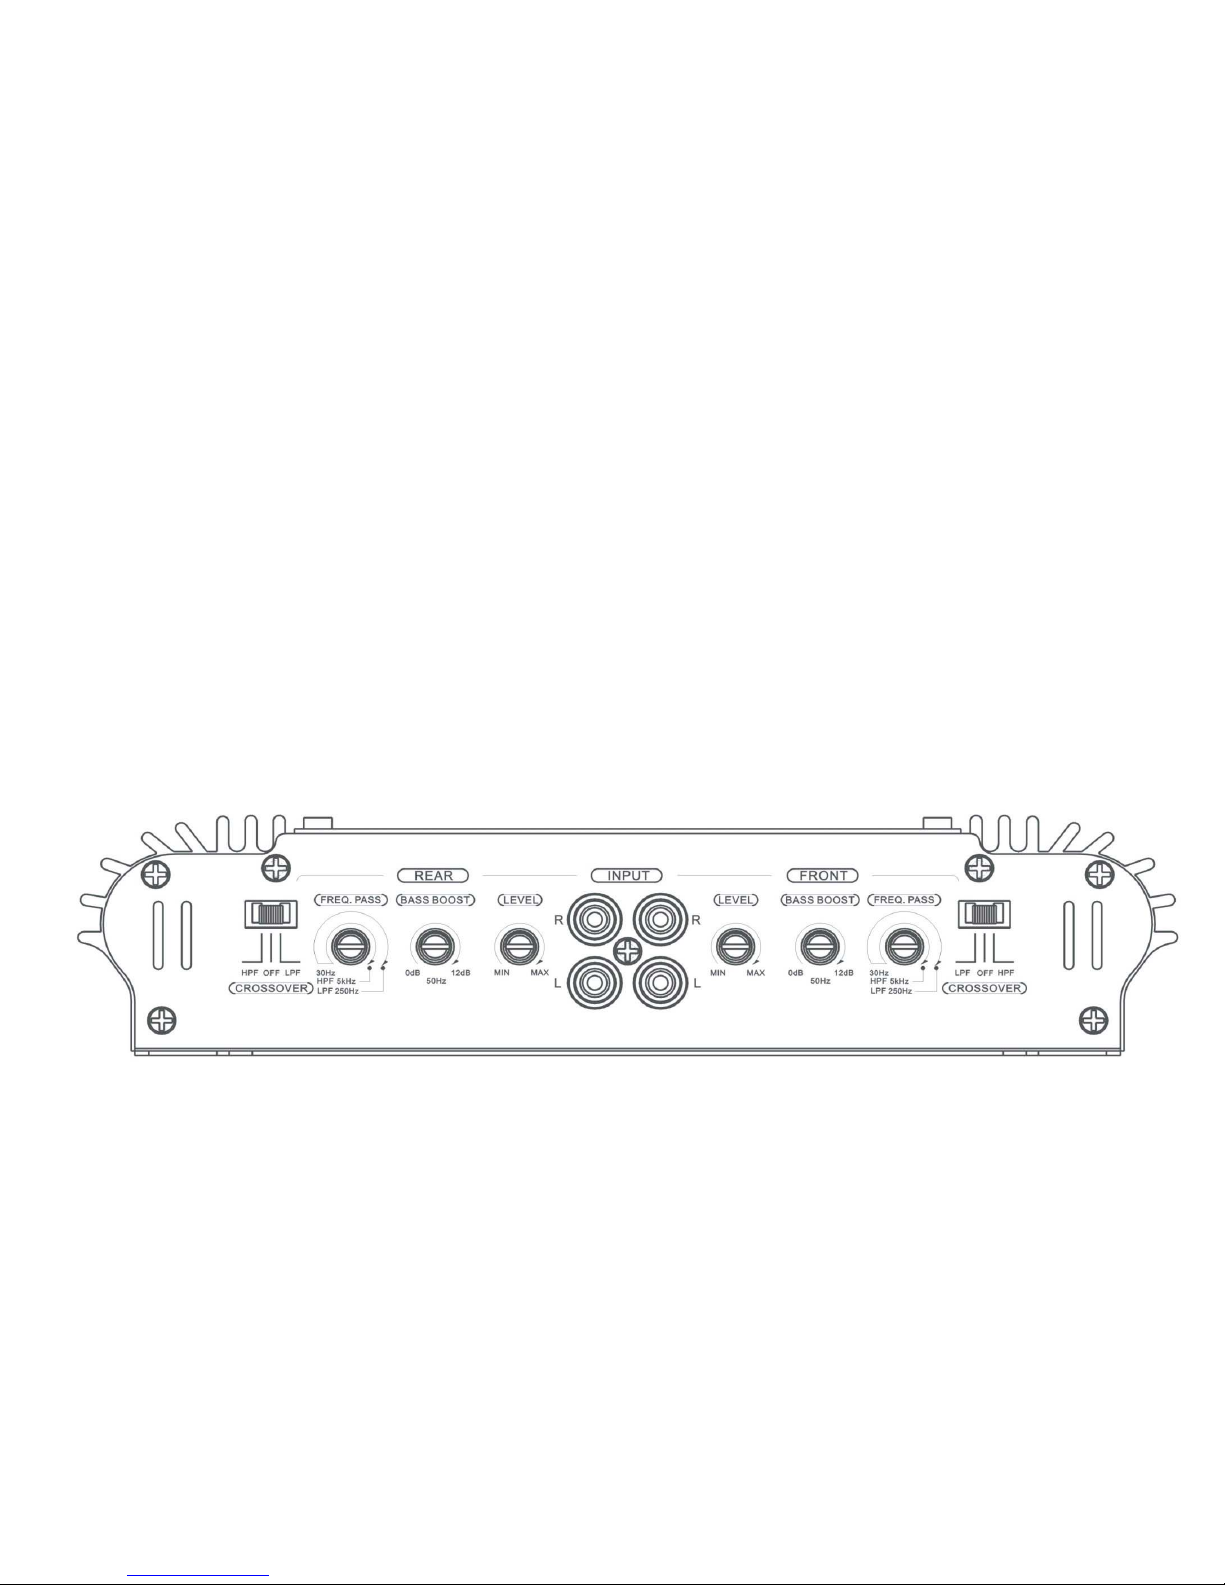
OPERATING ELEMENTS AND IN/OUTPUT CONNECTIONS
1.REAR CROSSOVER there are 3 optional modes for the CROSSOVER: HPF, OFF, LPF.
2.REAR FREQ. PASS when CROSSOVER selection HPF, REAR HPF adjusts the high pass frequency point
from 30Hz to 5kHz, When CROSSOVER selection LPF, REAR LPF frequency adjusts the low pass frequency point
from 30Hz to 250Hz.
3.REAR BASS BOOST rear dual channel 12dB bass gain, controls the amount of 50Hz boost from 0dB~12dB.
4.REAR LEVEL control-Adjusts the input gain of the amplifier to accept different level of signal inputs.
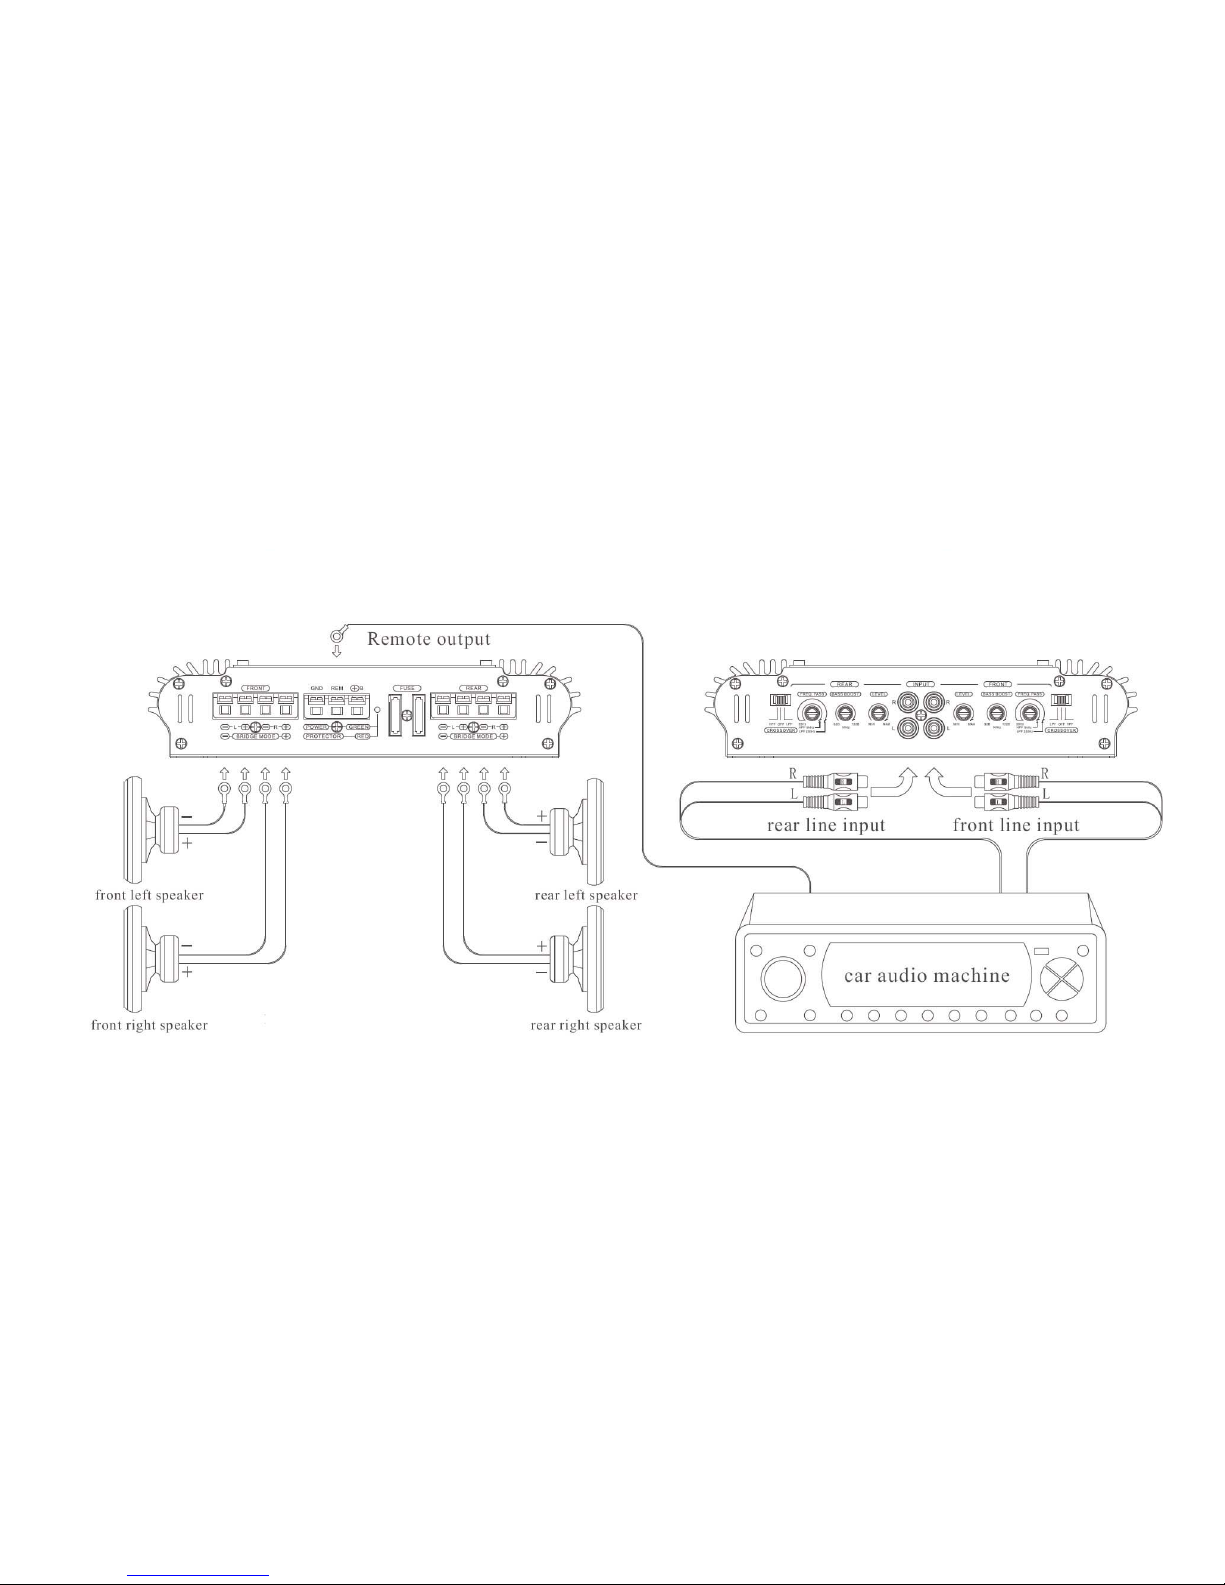
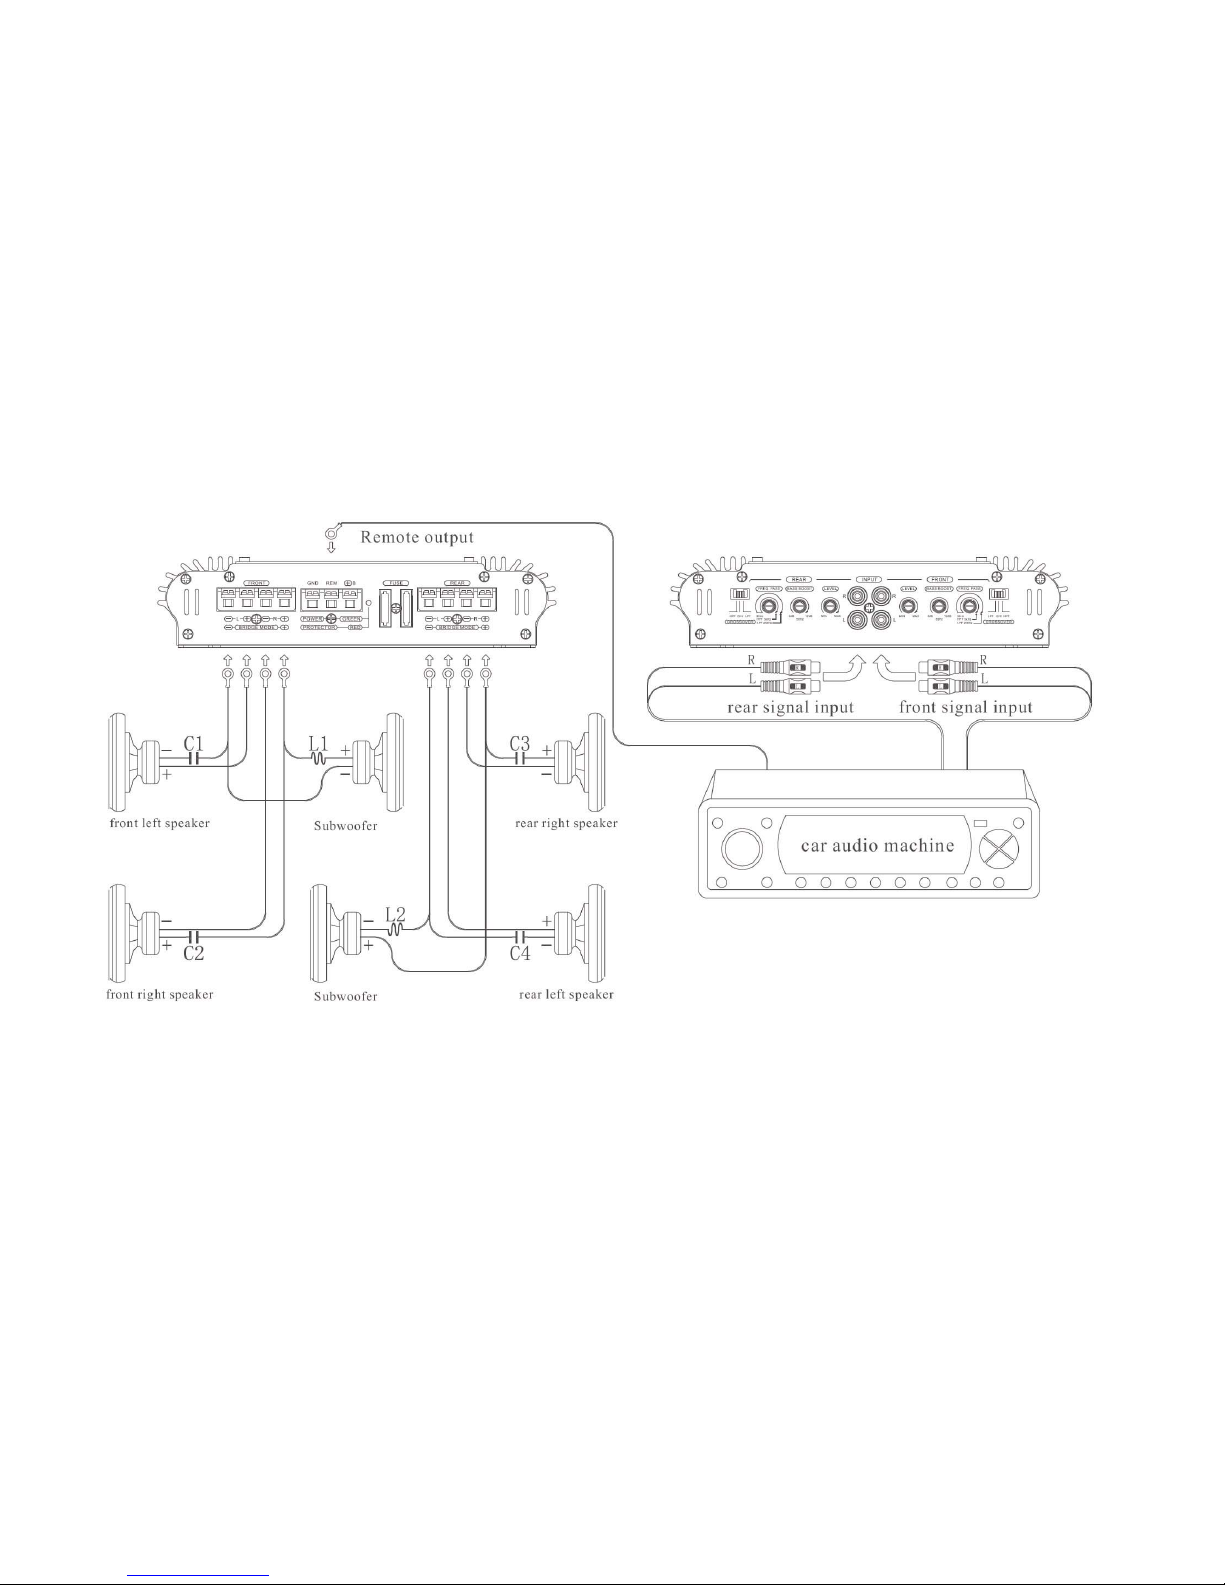
5.REAR INPUT (L) accepts rear left line level RCA inputs from a head unit or other signal processor.
6.REAR INPUT (R) accepts rear right line level RCA inputs from a head unit or other signal processor.
7.FRONT INPUT (R) accepts front right line level RCA inputs from a head unit or other signal processor.
8.FRONT INPUT (L) accepts front left line level RCA inputs from a head unit or other signal processor.
9.FRONT LEVEL control-adjusts the input gain of the amplifier to accept different level of signal inputs.
10.FRONT BASS BOOST controls the amount of 50Hz boost from 0dB~12dB
11.FRONT FREQ. PASS when CROSSOVER selection HPF, FRONT HPF adjusts the high pass frequency
point from 30Hz to 5kHz, When CROSSOVER selection LPF, FRONT LPF frequency adjusts the low pass
frequency point from 30Hz to 250Hz.
12.FRONT CROSSOVER there are 3 optional modes for the X-OVER: HPF, OFF, LPF.
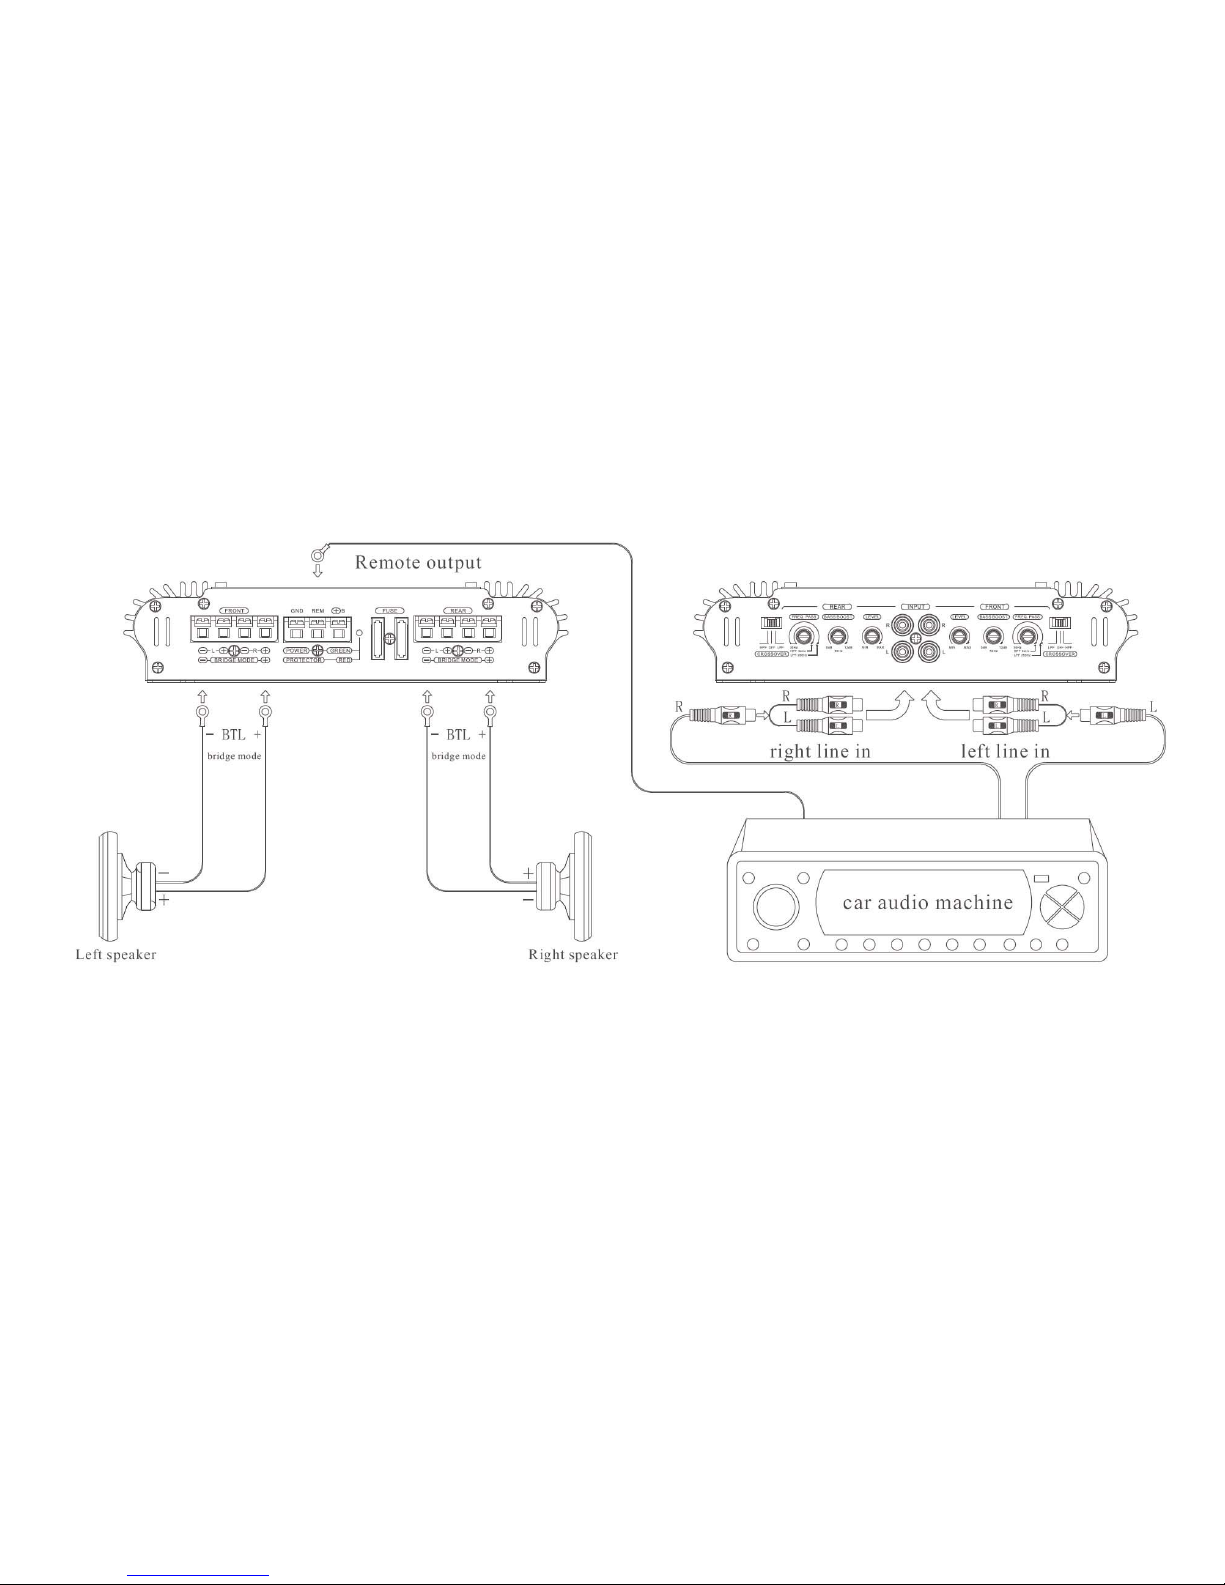
13.FRONT OUTPUT L (-) speaker connections (-), when used as a bridging amplifier,
bridge mode(-).
14.FRONT OUTPUT L (+) speaker connections (+).
15.FRONT OUTPUT R (-) speaker connections (-).
16.FRONT OUTPUT R (+) speaker connections (+), when used as a bridge amplifier,
bridge mode(+).
17.POWER (GND) to a metal point of the car.
18.REMOTE connect the remote input terminal.
19.+B (+12V) connect the +12V power supply of car battery. (Notes on the power
supply)
20.POWER --- (GREEN) illuminates green when the amplifier is on.
PROTECTOR-(RED) LED will turn to red when the amp goes into protection mode.
21.FUSE - (1) protects the amp from damage of dangerous amounts of current.
22.FUSE - (2) protects the amp from damage of dangerous amounts of current.
(Notes on Fuse specifications)
23.REAR OUTPUT L (-) speaker connections (-), when used as a bridging amplifier,
bridge mode(-).
24.REAR OUTPUT L (+) speaker connections (+).
25.REAR OUTPUT R (-) speaker connections (-).
26.REAR OUTPUT R (+) speaker connections (+), when used as a bridging amplifier, bridge mode(+). Fig. 7

HYUNDAI H-SA604
11
Trouble Shooting Guide
• Before you consult this listing, make sure the vehicle’s electrical system is working properly by verifying that other electrical items (e. g. headlights,
Windows, etc.) still function correctly.
SYMPTOM PROBABLE CAUSE SOLUTION
Low or N.C. remote turn-on connections Check remote turn-on voltage at amp and head unit
Blown fuse Replace with new fast-blow fuse
Power wires not connected Check butt splices or solder joints;
Check ground and battery connections
No audio
Blown or non-speakers connected Use VOM or DVM to measure speaker coil impedance; check speaker
wiring connections
Input sensitivity not set properly or damaged
speaker cones
See adjustment procedure and check each step; inspect each speaker
for damage and repair or replace suspected componentDistorted audio
Low turn-on voltage Refer to head unit owner’s manual
Audio level low Mute circuits is on head unit Check electrical system for low voltage;
Check ground connection
Audio lacks Speakers wired with wrong polarity, causing
cancellation of bass frequencies
Check polarity of wires from amplifiers to each speak as defined by
the system design;
Check battery voltage at amplifier during operation
External fuse blowing Incorrect wiring or short circuit Refer to electrical installation and check each installation step
Whining noise on audio
with engine running Amplifier is picking up alternator noise
Install a line noise filter on the head unit’s power wire;
Check alternator routing diodes or voltage regulator for proper
operation. Check all grounds, check battery voltage, check RCA
cables
Ticking noise on audio
with engine running Amplifier is peaking up radiated spark noise Check RCA audio cable; Install an in-line noise filter on the head
unit’s power wire, check spark plug wires

HYUNDAI H-SA604
12
Specification
MODEL H-SA604
AVERAGE OUTPUT POWER 4 Ohms, 10% THD. 60 W х4
LOW PASS FILTER 30 Hz – 250 Hz
HIGH PASS FILTER 30 Hz – 5 kHz
MAXIMUM OUTPUT POWER 500 W
FREQUENCY RESPONSE (-1dB ~ +1dB) 5Hz –22 kHz
SIGNAL TO NOISE RATIO (`A' WTD) >98 dB (IHF, A-weighting)
INPUT SENSITIVITY 300mV – 6V
HARMONIC DISTORTION 0.05% or less 0.05% (at 1kHz , 4 Ohms , 10W)
OPERATION VOLTAGE (NEGATIVE GROUND) DC 12V
SPEAKER IMPEDANCE @ STEREO DRIVEN 4 ~ 8 Ohms
FUSE RATING 30 A
DIMENSIONS (W mm x H mm x D mm)/weight 475 х125 х315; Approx. 3.7kg
NOTE : Specifications & design subject to change without notice for improvements.

HYUNDAI H-SA604
13
ПОЗДРАВЛЯЕМ СПРИОБРЕТЕНИЕМ НАШЕГО 4-КАНАЛЬНОГО УСИЛИТЕЛЯ МОЩНОСТИ! ЕГО СОВЕРШЕННАЯ КОНСТРУКЦИЯ
ПОЗВОЛИТ ВАМ НАСЛАЖДАТЬСЯ ВЫСОКОКАЧЕСТВЕННЫМ ЗВУКОМ СГАРАНТИЕЙ ОДИН ГОД. ПОЖАЛУЙСТА, ПРОЧИТАЙТЕ
ВНИМАТЕЛЬНО ДАННОЕ РУКОВОДСТВО – ВНЁМ ОПИСАНЫ СВОЙСТВА ИПРАВИЛА ЭКСПЛУАТАЦИИ УСИЛИТЕЛЯ.
Возможности
• Мощный блок питания стехнологией MOSFET PWM.
• Управление включением усилителя сголовного устройства.
• Регулируемые фильтры НЧ/ВЧ 12 дБ/октаву.
• Схема усиления НЧ (Bass Boost) 0-12 дБ на 50 Гц.
• Регулируемая входная чувствительность.
• Мостовой режим работы.
• Позолоченные контакты разъёмов RCA, питания иакустической системы.
• Плавное включение иотключения звука.
• Защищённые клеммы для подключения громкоговорителей икабелей питания.
• Защита от перегрузок, перегрева икоротких замыканий.
• Индикатор питания изащиты.
• Возможность подключения двух сабвуферов (мостовой режим).
Требования безопасности
• Если после изучения руководства Вы по каким-либо причинам сомневаетесь, что сможете самостоятельно установить усилитель, обратитесь в
сертифицированную Сервисную Службу - ведь это Ваш автомобиль!
• Перед тем, как производить любые подключения, отсоедините отрицательную клемму аккумулятора.
• Устанавливайте усилитель таким образом, чтобы обеспечить его достаточную вентиляцию. Лучше всего для этого подходят багажник,
пространство под передними сидениями или задняя стенка багажного отделения. Вокруг усилителя должно оставаться свободное пространство
не менее 5 см.
• Если усилитель крепится вертикально, воздушные потоки должны проходить вдоль пластин радиатора охлаждения.
• НИКОГДА не устанавливайте усилитель вперевёрнутом положении во избежание перегрева, врезультате которого устройство может
отключиться или выйти из строя.
• Не подвергайте усилитель воздействию прямого солнечного света или попадания влаги.
• Крепите усилитель кпрочной твёрдой поверхности, способной удержать его при ударах, резких торможениях или авариях.
• При установке усилителя следите за тем, чтобы крепёжные винты не повредили топливный бак, бензопровод, тормозные магистрали,
проводку или другие важные узлы икоммуникации.
• РЕКОМЕНДУЕТСЯ подключать усилитель проводами (силовыми имассы) сечением не менее 8 – 21 мм2.
• НЕ ДОПУСКАЕТСЯ работа усилителя без предохранителей. Блок предохранителей должен быть расположен впределах 0,5 метра от
аккумулятора. Предохранитель не является электронным устройством; он разрывает цепь при коротком замыкании, предотвращая таким

HYUNDAI H-SA604
14
образом возгорание проводов. Установка на аккумулятор иусилитель предохранителей сноминалами, отличными от рекомендованных, может
привести кполомке усилителя, при этом гарантийные обязательства утрачивают силу.
• Во избежание повреждения изоляции проводов, что может привести ксбоям вработе усилителя или короткому замыканию, не монтируйте
проводку вне салона автомобиля; рекомендуется пропускать провода под ковриками или внутренней облицовкой.
• Для снижения помех прокладывайте силовые иаудиокабели как можно дальше друг от друга (например, по разным сторонам салона).
• Для предотвращения повреждения изоляции проводов вместах, где они проходят через отверстия вметаллических элементах, следует
устанавливать проходные изолирующие втулки.
• При прокладке проводов по возможности используйте различный крепёж (зажимы, хомуты идр.), атакже оставляйте припуски, ослабляющие
натяжение.
• Целесообразно проверить работу усилителя перед окончательной его установкой, пока внутренняя облицовка не установлена на место.
• Если температура всалоне слишком высокая или, наоборот, низкая, усилитель может перейти взащитный режим иотключиться. Втаких
случаях не включайте усилитель до тех пор, пока окружающая температура не станет нормальной.
• Усилитель может быть установлен влюбом автомобиле, где есть питание 12 Всотрицательной «массой». Если вы не знаете, какой системой
оснащён Ваш автомобиль, обратитесь всертифицированную Сервисную Службу или кквалифицированному специалисту.
• ЗАПРЕЩАЕТСЯ подключать ккорпусу изамыкать накоротко провода от динамиков. Эти провода должны иметь сечение не меньше 0,8 мм2.
• Усилитель должен отключаться при выключении магнитолы (источника сигнала), если она не оснащена выходом для дистанционного
управления, подключайте дистанционный выключатель кпроводу, на котором после поворота ключа взамке зажигания будет +12 В. Если
усилитель не отключать, возможна быстрая разрядка аккумулятора.
• Избегайте чрезмерно громкого звучания.
ДЛИТЕЛЬНОЕ ВОЗДЕЙСТВИЕ ГРОМКОГО ЗВУКА (ВЫШЕ 100 ДБ) МОЖЕТ
ПРИВЕСТИ КПОТЕРЕ СЛУХА. МОЩНЫЕ АВТОМОБИЛЬНЫЕ АУДИОСИСТЕМЫ
МОГУТ ВЫДАВАТЬ БОЛЕЕ 130 ДБ. БУДЬТЕ ВНИМАТЕЛЬНЫ!

HYUNDAI H-SA604
15
Установка
• Выберите место для установки усилителя, учитывая приведенные выше требования безопасности.
• Приложите усилитель квыбранному месту инаметьте точки для сверления четырёх крепёжных отверстий. Ни вкоем случае не используйте
сам усилитель вкачестве шаблона при сверлении, чтобы не повредить его.
• Уберите усилитель ипросверлите 4 отверстия диаметром 3,5 мм встальной основе и3,0 мм – впластике или деревянной панели.
• Перед окончательной установкой усилителя проверьте работу системы.
• Закрепите усилитель четырьмя саморезами (рис.1).
СХЕМА УСТАНОВКИ
Рис. 1

HYUNDAI H-SA604
16
Подключение питания
• ОБЯЗАТЕЛЬНО отсоединяйте провод массы от аккумулятора перед подключением любых электрических схем.
• Используйте специальные автомобильные провода рекомендуемого сечения. Такие провода устойчивы кизносу инагреву.
• Кразъёму «GND» усилителя присоедините провод массы того же сечения. Определите на кузове автомобиля небольшой участок для
подключения изачистите его до металла спомощью шлифовальной бумаги или проволочной щетки для обеспечения хорошего электрического
контакта.
ПРИМЕЧАНИЕ:не подключайте усилитель краме, поскольку убольшинства автомобилей она изолирована от кузова.
• Припаяйте или зажмите один конец провода ксиловой клемме.
• Прикрепите силовую клемму кзачищенному участку. Силовую клемму желательно защитить от коррозии, окисления имеханических
повреждений краской или силиконовым герметиком.
• Подёргайте провод, чтобы убедиться внадёжности ижёсткости соединения.
• Для снижения помех от двигателя рекомендуется подключить кэтому же контакту иостальные электронные аудиоустройства.
• Соедините проводом небольшого сечения (0,5 – 0,7 мм) разъёмы «REMOTE» усилителя и«remote amplifier» источника сигнала.
• Кразъёму усилителя «В+» подсоедините провод надлежащего сечения ипротяните его кблоку предохранителей, который должен
располагаться не далее 0,5 метра от аккумулятора. Подсоедините блок БЕЗ ВСТАВЛЕННОГО ПРЕДОХРАНИТЕЛЯ каккумулятору.
Предохранитель обеспечивает безопасность автомобиля вслучае короткого замыкания.
Рис. 2.
Примечание:Предохранитель провода питания должен быть расположен как можно ближе каккумулятору автомобиля.
Головное устройство
Подключение
дистанционного
включения усилителя

HYUNDAI H-SA604
17
Подключение динамиков
• Этот усилитель может работать вдвух-, трех- ичетырехканальном режиме. Минимальная нагрузка при работе вмостовом режиме составляет
4 – 8 Ом. Трехканальный режим относится крежиму стерео. Минимальная нагрузка остается неизменной для трехканальных систем
(фронт/сабвуфер) при использовании соответствующих пассивных кроссоверов.
• Строго соблюдая полярность, подключите провода правого илевого динамиков ксоответствующим разъёмам усилителя.
• При неправильной полярности динамики будут работать впротивофазе, что приведёт кснижению отдачи вобласти низких частот (басов) (См.
рис. 3, 4 и5).
Если вы хотите использовать стандартный четырехканальный режим, подсоедините динамики,
как показано на рисунке, ипоставьте переключатель CROSSOVER вположение OFF.
Выходной сигнал усилителя будет являться стандартным стереосигналом правого илевого выходов.
Рис.3.
4-Канальный
р
ежим
(
Станда
р
тный
)

HYUNDAI H-SA604
18
Мостовой
р
ежим
Если вы хотите использовать усилитель вобычном режиме стерео, подсоедините динамики,
как показано на рисунке, ипоставьте переключатель CROSSOVER вположение OFF.
Выходной сигнал усилителя будет являться стандартным стереосигналом правого илевого выходов.
Рис.4.

HYUNDAI H-SA604
19
Д
в
у
х
р
ежимный способ подключения
Если вы хотите использовать усилитель врежиме одновременного усиления сигнала для сабвуфера иакустики, подсоедините динамики, как
показано на рисунке, ипоставьте переключатель CROSSOVER вположение OFF. Выходной сигнал усилителя будет являться стереосигналом
фронтального итылового выходов, авыходной сигнал сабвуфера будет являться комбинацией правого илевого выходных сигналов. При таком
способе подключения необходимо использовать конденсаторы икатушку индуктивности (фильтры), номинальное значение которых необходимо
подобрать взависимости омощности ичастотных характеристик динамических головок.
Рис.5.

HYUNDAI H-SA604
20
Настройки
• Установите переключатель фильтров вположение «Н.Р.F», если усилитель используется для работы только свысоко- исреднечастотными
акустическими системами. Частоты ниже частоты среза будут ослаблены на 12 дБ/октаву. Частоту среза можно изменять впределах 30 Гц – 5
кГц, вращая соответствующий регулятор.
• Установите переключатель фильтров вположение «L.Р.F», если усилитель используется для работы только ссабвуфером. Частоты выше
частоты среза будут ослаблены на 12 дБ/октаву. Частоту среза фильтра НЧ можно изменять впределах 30 Гц – 250 Гц, вращая
соответствующий регулятор.
• Если усилитель работает сширокополосными динамиками, установите «OFF». При этом динамики буду воспроизводить весь диапазон частот
(5 Гц – 20 000 кГц), ивысокие инизкие частоты не будут обрезаться.
• Вусилителе предусмотрена возможность настройки чувствительности, что позволяет использовать его систочниками сигнала различных
уровней. При этом входной сигнал может быть изменён впределах 300 мВ – 6 В. Начните настройку, установив значение «MIN» (6 В). При
воспроизведении кассеты или CD установите громкость магнитолы на 3/4 возможной имедленно поворачивайте отвёрткой регулятор в
сторону увеличения чувствительности (по направлению кзначению «МАХ» (300 мВ)). Когда качество звучания начнёт ухудшаться,
прекратите вращать регулятор иверните его немного назад. Таким образом, 3/4 громкости – рекомендуемый уровень для магнитолы. Это
необходимо для предотвращения перегрузок усилителя идинамиков, которые могут вывести их из строя, атакже для сведения кминимуму
искажений.
• Функция «BASS» позволяет плавно изменять усиление звучания низких частот от 0 до +12 дБ на частоте 50 Гц (только врежимах «L.P.F» или
«OFF»).
Рис.6.
ПЕРЕДНЯЯ ПАНЕЛЬ
Other manuals for H-SA604
1
Table of contents
Languages:
Other Hyundai Car Amplifier manuals
Popular Car Amplifier manuals by other brands

Rockford Fosgate
Rockford Fosgate puch 250m2 Installation & operation

Pioneer
Pioneer GM5100T - 760 Watts Power Amplifier owner's manual

ITC
ITC TQ-40 Operation manual

Sony
Sony XM-502Z - Stereo Power Amplifier operating instructions

Kenwood
Kenwood KAC-746 instruction manual

Lanzar
Lanzar 1000.1D owner's manual